CVS 1000R Electro-Pneumatic Rotary Positioner - CVS Controls
CVS 1000R Electro-Pneumatic Rotary Positioner - CVS Controls
CVS 1000R Electro-Pneumatic Rotary Positioner - CVS Controls

Create successful ePaper yourself
Turn your PDF publications into a flip-book with our unique Google optimized e-Paper software.
ADJUSTMENT<br />
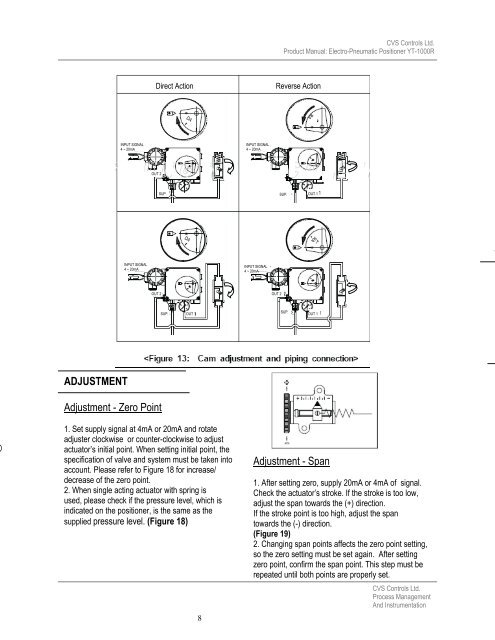
INPUT SIGNAL<br />
4 ~ 20mA<br />
INPUT SIGNAL<br />
4 ~ 20mA<br />
Adjustment - Zero Point<br />
1. Set supply signal at 4mA or 20mA and rotate<br />
adjuster clockwise or counter-clockwise to adjust<br />
actuator’s initial point. When setting initial point, the<br />
specification of valve and system must be taken into<br />
account. Please refer to Figure 18 for increase/<br />
decrease of the zero point.<br />
2. When single acting actuator with spring is<br />
used, please check if the pressure level, which is<br />
indicated on the positioner, is the same as the<br />
supplied pressure level. (Figure 18)<br />
Direct Action Reverse Action<br />
OUT 2<br />
OUT 2<br />
SUP.<br />
DA<br />
DA<br />
SUP. OUT 1<br />
8<br />
INPUT SIGNAL<br />
4 ~ 20mA<br />
INPUT SIGNAL<br />
4 ~ 20mA<br />
OUT 2<br />
<strong>CVS</strong> <strong>Controls</strong> Ltd.<br />
Product Manual: <strong>Electro</strong>-<strong>Pneumatic</strong> <strong>Positioner</strong> YT-<strong>1000R</strong><br />
SUP.<br />
SUP.<br />
RA<br />
OUT 1<br />
RA<br />
OUT 1<br />
Adjustment - Span<br />
1. After setting zero, supply 20mA or 4mA of signal.<br />
Check the actuator’s stroke. If the stroke is too low,<br />
adjust the span towards the (+) direction.<br />
If the stroke point is too high, adjust the span<br />
towards the (-) direction.<br />
(Figure 19)<br />
2. Changing span points affects the zero point setting,<br />
so the zero setting must be set again. After setting<br />
zero point, confirm the span point. This step must be<br />
repeated until both points are properly set.<br />
<strong>CVS</strong> <strong>Controls</strong> Ltd.<br />
Process Management<br />
And Instrumentation