- Page 1 and 2: The Complete Guide to Point-and-Fig
- Page 4 and 5: The Complete Guide to Point-and-Fig
- Page 6 and 7: Contents About the authors 1 Prefac
- Page 8: About the authors Kermit C. Zieg, J
- Page 11 and 12: The Complete Guide to Point-and-Fig
- Page 13 and 14: The Complete Guide to Point-and-Fig
- Page 16 and 17: Introduction Why point-and-figure?
- Page 18 and 19: Chart 0.3 - Candlestick chart of NA
- Page 20 and 21: Chart 0.5 - Point-and-figure chart
- Page 22 and 23: • It generates crystal-clear tren
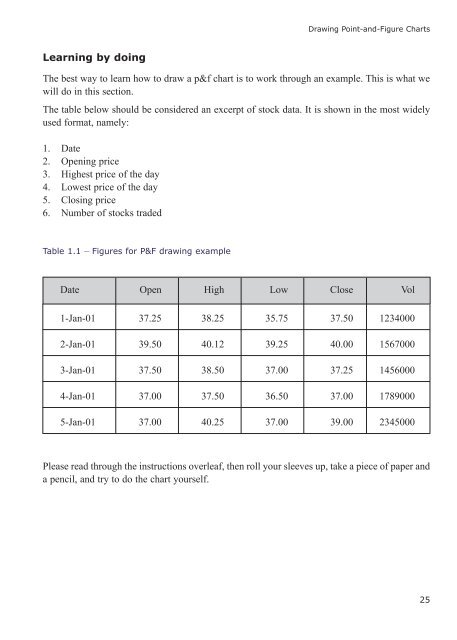
- Page 24 and 25: Examples of point-and-figure in act
- Page 26: Chart 0.8 - Safeway [SFW.L] 420 ...
- Page 29 and 30: The Complete Guide to Point-and-Fig
- Page 31: The Complete Guide to Point-and-Fig
- Page 35 and 36: The Complete Guide to Point-and-Fig
- Page 37 and 38: The Complete Guide to Point-and-Fig
- Page 39 and 40: The Complete Guide to Point-and-Fig
- Page 41 and 42: The Complete Guide to Point-and-Fig
- Page 43 and 44: The Complete Guide to Point-and-Fig
- Page 45 and 46: The Complete Guide to Point-and-Fig
- Page 47 and 48: The Complete Guide to Point-and-Fig
- Page 49 and 50: The Complete Guide to Point-and-Fig
- Page 51 and 52: The Complete Guide to Point-and-Fig
- Page 53 and 54: The Complete Guide to Point-and-Fig
- Page 55 and 56: The Complete Guide to Point-and-Fig
- Page 57 and 58: The Complete Guide to Point-and-Fig
- Page 59 and 60: The Complete Guide to Point-and-Fig
- Page 62 and 63: Chapter 2 Interpreting the charts
- Page 64 and 65: formation is more than an entry poi
- Page 66 and 67: Chart 2.1 - FTSE [.FTSE] FTSE / 3 b
- Page 68 and 69: To reiterate what was said on page
- Page 70 and 71: Complex buy and sell formations Alt
- Page 72 and 73: Table 2.2 - The Davis Study - frequ
- Page 74 and 75: B3 - Breakout of a Triple Top The t
- Page 76 and 77: B-7 - Upside Breakout above a Bulli
- Page 78 and 79: Chart 2.4 - Buy signals on the €
- Page 80 and 81: The sell signals Interpreting the C
- Page 82 and 83:
S-5 - Spread Triple Bottom The fift
- Page 84 and 85:
Examples of sell signals Interpreti
- Page 86 and 87:
Summary of sell signals Figure 2.19
- Page 88 and 89:
take all signals given weak and det
- Page 90 and 91:
Trend lines drawn at 45 degrees Int
- Page 92 and 93:
Bullish support lines Bullish suppo
- Page 94 and 95:
Chart 2.9 - Bullish support of Shir
- Page 96 and 97:
Bullish resistance lines Interpreti
- Page 98 and 99:
Trading strategies As a trading too
- Page 100 and 101:
Chart 2.14 - Pace [PIC.L] goes for
- Page 102 and 103:
Bearish support lines Interpreting
- Page 104 and 105:
Chart 2.18 - ARM [ARM.L] ARM.L / 3
- Page 106 and 107:
The bearish support line defines th
- Page 108 and 109:
Bearish resistance lines A bearish
- Page 110 and 111:
Trading strategies Interpreting the
- Page 112 and 113:
Chart 2.24 - Lowering resistances o
- Page 114 and 115:
Chapter 3 Trading applications •
- Page 116 and 117:
Definition of a base A base is defi
- Page 118 and 119:
Example 3.2 - Horizontal price obje
- Page 120 and 121:
or Vu = Vlow + (Ru x Rm x Vbox) JMA
- Page 122 and 123:
The formula in words as well as sym
- Page 124 and 125:
Trading Applications sophisticated
- Page 126 and 127:
Reactive and proactive trading styl
- Page 128 and 129:
Example 3.6 - Placing a buy-stop or
- Page 130 and 131:
Trailing stops Trading Applications
- Page 132 and 133:
Chart 3.11 - Pole 3, lowering the t
- Page 134 and 135:
Non-trailing profit targets Employi
- Page 136 and 137:
Risk and position size Your availab
- Page 138 and 139:
Trading Applications The most signi
- Page 140 and 141:
Pyramiding made simple and profitab
- Page 142 and 143:
Chart 3.16 - Pyramiding, Cable and
- Page 144 and 145:
Pyramiding increments These are val
- Page 146 and 147:
Trading Applications Swing trading
- Page 148 and 149:
Swing trading in practice From the
- Page 150 and 151:
Commissions Trading Applications Co
- Page 152 and 153:
Chart 3.19 - Swing trading, Man [EM
- Page 154 and 155:
Chart 3.21 - Swing trading Imperial
- Page 156 and 157:
Trading Applications The tests or s
- Page 158 and 159:
- time&sales or such time&sales dat
- Page 160 and 161:
Chart 3.24 - Intraday, 06.01.03-10.
- Page 162 and 163:
Liquidating positions Trading Appli
- Page 164 and 165:
data is copied to a new sheet. To o
- Page 166 and 167:
Chart 3.27 - Oil Index [.HUI] HUI /
- Page 168 and 169:
Table 3.3 - Scaling commodities Com
- Page 170 and 171:
Summary Trading Applications All ma
- Page 172 and 173:
Trading Applications If you trade c
- Page 174 and 175:
it occurs. Prior to the market open
- Page 176 and 177:
Trading Applications If the risk on
- Page 178 and 179:
Trading Applications As shown in th
- Page 180 and 181:
Example 3.11- Getting in and out on
- Page 182:
day. Say you trade an index basket.
- Page 185 and 186:
The Complete Guide to Point-and-Fig
- Page 187 and 188:
The Complete Guide to Point-and-Fig
- Page 189 and 190:
The Complete Guide to Point-and-Fig
- Page 191 and 192:
The Complete Guide to Point-and-Fig
- Page 193 and 194:
The Complete Guide to Point-and-Fig
- Page 195 and 196:
The Complete Guide to Point-and-Fig
- Page 197 and 198:
The Complete Guide to Point-and-Fig
- Page 199 and 200:
The Complete Guide to Point-and-Fig
- Page 201 and 202:
The Complete Guide to Point-and-Fig
- Page 204 and 205:
Chapter 5 Profitability analysis do
- Page 206 and 207:
Introduction to the historical stud
- Page 208 and 209:
The profitability of P&F commodity
- Page 210 and 211:
Second study A second study was the
- Page 212 and 213:
Profitability Analysis Table 5.3 -
- Page 214 and 215:
Profitability of P&F stock trading
- Page 216 and 217:
Results — long and short Profitab
- Page 218 and 219:
Fourth test — selection criteria
- Page 220 and 221:
Table 5.9 - FTSE 100 Signal Frequen
- Page 222 and 223:
Profitability Analysis We have used
- Page 224:
selection techniques were employed,
- Page 227 and 228:
The Complete Guide to Point-and-Fig
- Page 229 and 230:
The Complete Guide to Point-and-Fig
- Page 231 and 232:
The Complete Guide to Point-and-Fig
- Page 233 and 234:
The Complete Guide to Point-and-Fig
- Page 235 and 236:
The Complete Guide to Point-and-Fig
- Page 237 and 238:
The Complete Guide to Point-and-Fig
- Page 239 and 240:
The Complete Guide to Point-and-Fig
- Page 241 and 242:
The Complete Guide to Point-and-Fig
- Page 243 and 244:
The Complete Guide to Point-and-Fig
- Page 245 and 246:
The Complete Guide to Point-and-Fig
- Page 248:
Appendix 1 Quick reference guide to
- Page 251 and 252:
The Complete Guide to Point-and-Fig
- Page 253 and 254:
The Complete Guide to Point-and-Fig
- Page 256 and 257:
Appendix 3 Recommended websites Poi
- Page 258:
Appendix 4 Bibliography The All New
- Page 261:
The Complete Guide to Point-and-Fig