NovDec_2012

Create successful ePaper yourself
Turn your PDF publications into a flip-book with our unique Google optimized e-Paper software.
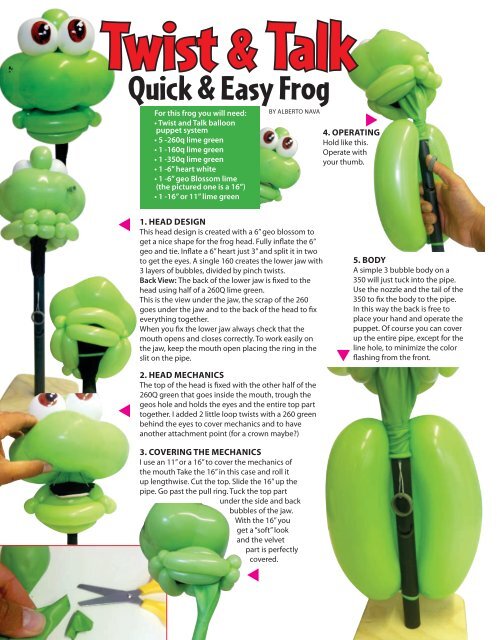
Twist & Talk<br />
Quick & Easy Frog<br />
For this frog you will need:<br />
• Twist and Talk balloon<br />
puppet system<br />
• 5 -260q lime green<br />
• 1 -160q lime green<br />
• 1 -350q lime green<br />
• 1 -6” heart white<br />
• 1 -6” geo Blossom lime<br />
(the pictured one is a 16”)<br />
• 1 -16” or 11” lime green<br />
by ALBeRTO Nava<br />
4. Operating<br />
Hold like this.<br />
Operate with<br />
your thumb.<br />
1. Head design<br />
This head design is created with a 6” geo blossom to<br />
get a nice shape for the frog head. Fully inflate the 6”<br />
geo and tie. Inflate a 6” heart just 3” and split it in two<br />
to get the eyes. A single 160 creates the lower jaw with<br />
3 layers of bubbles, divided by pinch twists.<br />
Back View: The back of the lower jaw is fixed to the<br />
head using half of a 260Q lime green.<br />
This is the view under the jaw, the scrap of the 260<br />
goes under the jaw and to the back of the head to fix<br />
everything together.<br />
When you fix the lower jaw always check that the<br />
mouth opens and closes correctly. To work easily on<br />
the jaw, keep the mouth open placing the ring in the<br />
slit on the pipe.<br />
5. Body<br />
A simple 3 bubble body on a<br />
350 will just tuck into the pipe.<br />
Use the nozzle and the tail of the<br />
350 to fix the body to the pipe.<br />
In this way the back is free to<br />
place your hand and operate the<br />
puppet. Of course you can cover<br />
up the entire pipe, except for the<br />
line hole, to minimize the color<br />
flashing from the front.<br />
2. Head mechanics<br />
The top of the head is fixed with the other half of the<br />
260Q green that goes inside the mouth, trough the<br />
geos hole and holds the eyes and the entire top part<br />
together. I added 2 little loop twists with a 260 green<br />
behind the eyes to cover mechanics and to have<br />
another attachment point (for a crown maybe?)<br />
3. Covering the mechanics<br />
I use an 11” or a 16” to cover the mechanics of<br />
the mouth Take the 16” in this case and roll it<br />
up lengthwise. Cut the top. Slide the 16” up the<br />
pipe. Go past the pull ring. Tuck the top part<br />
under the side and back<br />
bubbles of the jaw.<br />
With the 16” you<br />
get a “soft” look<br />
and the velvet<br />
part is perfectly<br />
covered.<br />
Page 20<br />
The New Calliope