Maintworld 1/2019
Condition Monitoring in the Age of the of the IIoT // Digital line of sight // Harnessing change for a successful business // Energy savings 4.0
Condition Monitoring in the Age of the of the IIoT // Digital line of sight // Harnessing change for a successful business // Energy savings 4.0

Create successful ePaper yourself
Turn your PDF publications into a flip-book with our unique Google optimized e-Paper software.
PARTNER ARTICLE<br />
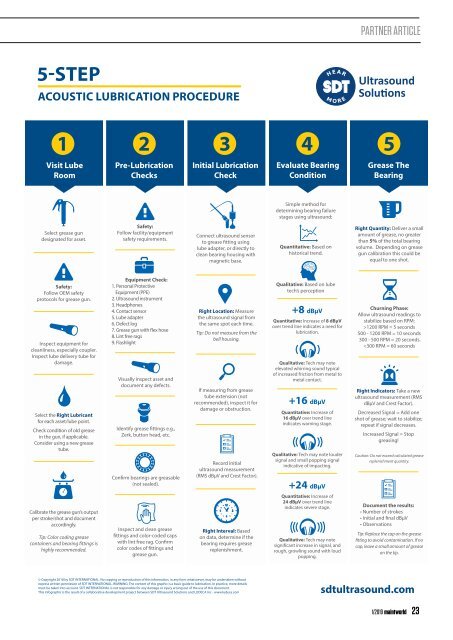
5-STEP<br />
ACOUSTIC LUBRICATION PROCEDURE<br />
1 2 3 4 5<br />
Visit Lube<br />
Room<br />
Pre-Lubrication<br />
Checks<br />
Initial Lubrication<br />
Check<br />
Evaluate Bearing<br />
Condition<br />
Grease The<br />
Bearing<br />
Simple method for<br />
determining bearing failure<br />
stages using ultrasound:<br />
Select grease gun<br />
designated for asset.<br />
Safety:<br />
Follow facility/equipment<br />
safety requirements.<br />
Connect ultrasound sensor<br />
to grease fitting using<br />
lube adapter, or directly to<br />
clean bearing housing with<br />
magnetic base.<br />
Quantitative: Based on<br />
historical trend.<br />
Right Quantity: Deliver a small<br />
amount of grease, no greater<br />
than 5% of the total bearing<br />
volume. Depending on grease<br />
gun calibration this could be<br />
equal to one shot.<br />
Safety:<br />
Follow OEM safety<br />
protocols for grease gun.<br />
Inspect equipment for<br />
cleanliness, especially coupler.<br />
Inspect lube delivery tube for<br />
damage.<br />
Select the Right Lubricant<br />
for each asset/lube point.<br />
Check condition of old grease<br />
in the gun, if applicable.<br />
Consider using a new grease<br />
tube.<br />
Calibrate the grease gun’s output<br />
per stroke/shot and document<br />
accordingly.<br />
Tip: Color coding grease<br />
containers and bearing fittings is<br />
highly recommended.<br />
Equipment Check:<br />
1. Personal Protective<br />
Equipment (PPE)<br />
2. Ultrasound instrument<br />
3. Headphones<br />
4. Contact sensor<br />
5. Lube adapter<br />
6. Defect log<br />
7. Grease gun with flex hose<br />
8. Lint free rags<br />
9. Flashlight<br />
Visually inspect asset and<br />
document any defects.<br />
Identify grease fittings e.g.,<br />
Zerk, button head, etc.<br />
Confirm bearings are greasable<br />
(not sealed).<br />
Inspect and clean grease<br />
fittings and color-coded caps<br />
with lint free rag. Confirm<br />
color codes of fittings and<br />
grease gun.<br />
Right Location: Measure<br />
the ultrasound signal from<br />
the same spot each time.<br />
Tip: Do not measure from the<br />
bell housing.<br />
If measuring from grease<br />
tube extension (not<br />
recommended), inspect it for<br />
damage or obstruction.<br />
Record initial<br />
ultrasound measurement<br />
(RMS dBμV and Crest Factor).<br />
Right Interval: Based<br />
on data, determine if the<br />
bearing requires grease<br />
replenishment.<br />
Qualitative: Based on lube<br />
tech’s perception<br />
+8 dBµV<br />
Quantitative: Increase of 8 dBµV<br />
over trend line indicates a need for<br />
lubrication.<br />
Qualitative: Tech may note<br />
elevated whirring sound typical<br />
of increased friction from metal to<br />
metal contact.<br />
+16 dBµV<br />
Quantitative: Increase of<br />
16 dBµV over trend line<br />
indicates warning stage.<br />
Qualitative: Tech may note louder<br />
signal and small popping signal<br />
indicative of impacting.<br />
+24 dBµV<br />
Quantitative: Increase of<br />
24 dBµV over trend line<br />
indicates severe stage.<br />
Qualitative: Tech may note<br />
significant increase in signal, and<br />
rough, growling sound with loud<br />
popping.<br />
Churning Phase:<br />
Allow ultrasound readings to<br />
stabilize based on RPM:<br />
>1200 RPM = 5 seconds<br />
500 - 1200 RPM = 10 seconds<br />
300 - 500 RPM = 20 seconds.<br />