New Oxford Organ Method
A single piece of repertoire is the primary focus for each chapter, with preparatory exercises providing the necessary technical work building towards the piece. Each lesson covers four main topics, which are systematically developed: practice methods, registration, fingering and pedalling, and historically-informed interpretation. The method is for keyboard players of any age who are establishing first steps at the organ with or without a teacher. It will also serve more experienced organists who want to improve their technique.
A single piece of repertoire is the primary focus for each chapter, with preparatory exercises providing the necessary technical work building towards the piece. Each lesson covers four main topics, which are systematically developed: practice methods, registration, fingering and pedalling, and historically-informed interpretation. The method is for keyboard players of any age who are establishing first steps at the organ with or without a teacher. It will also serve more experienced organists who want to improve their technique.
- No tags were found...

Create successful ePaper yourself
Turn your PDF publications into a flip-book with our unique Google optimized e-Paper software.
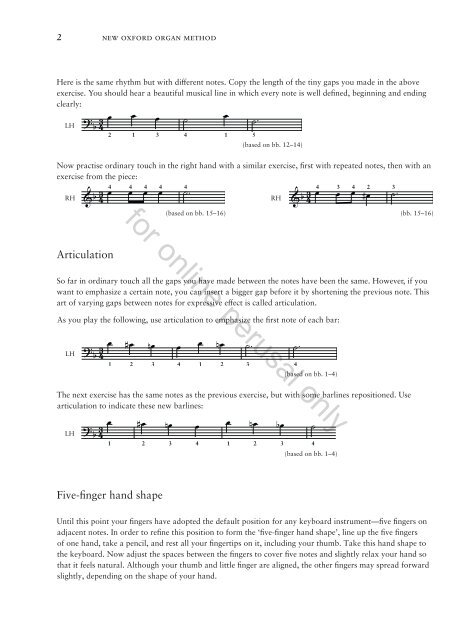
2 new oxford organ method<br />
Here is the same rhythm but with different notes. Copy the length of the tiny gaps you made in the above<br />
exercise. You should hear a beautiful musical line in which every note is well defined, beginning and ending<br />
clearly:<br />
LH<br />
œ œ œ ˙ œ<br />
? 3 b 4<br />
2 1 3 4 1 5<br />
˙<br />
(based on bb. 12–14)<br />
Now practise ordinary touch in the right hand with a similar exercise, first with repeated notes, then with an<br />
exercise from the piece:<br />
RH<br />
œ œ œ œ ˙ 3<br />
RH 4<br />
3<br />
& b 4 4 4 4 4<br />
4<br />
& b<br />
4 3 4 2 3<br />
œ œ œ # œ ˙<br />
for online perusal only<br />
(based on bb. 15–16) (bb. 15–16)<br />
Articulation<br />
So far in ordinary touch all the gaps you have made between the notes have been the same. However, if you<br />
want to emphasize a certain note, you can insert a bigger gap before it by shortening the previous note. This<br />
art of varying gaps between notes for expressive effect is called articulation.<br />
As you play the following, use articulation to emphasize the first note of each bar:<br />
LH<br />
œ<br />
? 3<br />
# œ nœ<br />
œ œ nœ<br />
˙ ˙<br />
b 4<br />
1 2 3 4 1 2 3 4<br />
(based on bb. 1–4)<br />
The next exercise has the same notes as the previous exercise, but with some barlines repositioned. Use<br />
articulation to indicate these new barlines:<br />
LH<br />
œ<br />
? 3<br />
# œ nœ<br />
œ œ nœ<br />
bœ<br />
˙<br />
b 4<br />
1 2 3 4 1 2 3 4<br />
(based on bb. 1–4)<br />
Five-finger hand shape<br />
Until this point your fingers have adopted the default position for any keyboard instrument—five fingers on<br />
adjacent notes. In order to refine this position to form the ‘five-finger hand shape’, line up the five fingers<br />
of one hand, take a pencil, and rest all your fingertips on it, including your thumb. Take this hand shape to<br />
the keyboard. Now adjust the spaces between the fingers to cover five notes and slightly relax your hand so<br />
that it feels natural. Although your thumb and little finger are aligned, the other fingers may spread forward<br />
slightly, depending on the shape of your hand.