Contents - StarHub
Contents - StarHub
Contents - StarHub

Create successful ePaper yourself
Turn your PDF publications into a flip-book with our unique Google optimized e-Paper software.
<strong>Contents</strong><br />
Disclaimer<br />
Please note that all information provided in this User Guide is correct as at date of production.<br />
For more information, please check the latest online updates and terms and conditions at our website at www.starhub.com/voice<br />
Version 3.7<br />
1 About Digital Voice Home 1<br />
2 Technical Information 2<br />
3 Setting Up Your Digital Voice Home Connection 5<br />
a. Digital Voice Home only connection 8<br />
b. Digital Voice Home connection with Router 9<br />
c. Digital Voice Home and MaxOnline Connection 10<br />
using Internal Network Interface Card with Voice-enabled Cable Modem/<br />
Integrated Wireless Voice Modem<br />
d. Digital Voice Home and MaxOnline Connection using 11<br />
USB Voice-enabled Cable Modem / Integrated Wireless Voice Modem<br />
e. Digital Voice Home and MaxOnline Connection using External 12<br />
USB Network Interface Card with Voice-enabled Cable Modem/<br />
Integrated Wireless Voice Modem<br />
4 Troubleshooting for Voice-enabled Cable Modem 13<br />
a. SBV5120i Voice-enabled Cable Modem 13<br />
b. Other Scenarios 15<br />
5 Troubleshooting for Integrated Wireless Voice Modem 16<br />
a. Integrated Wireless Voice Modem 16<br />
b. Other Scenarios 20<br />
6 Setting up your Digital Voice Home connection using 22<br />
Dlink DVG-G5402SP Wireless Integrated Access Device<br />
a. Connecting with your HubStation to MaxOnline broadband 24<br />
b. Connecting with Cable/ADSL broadband modems 25<br />
c. Connecting a cable or ADSL connection with built-in router 26<br />
d. Router Configuration 29<br />
7 Troubleshooting for Dlink DVG-G5402SP 30<br />
Wireless Integrated Access Device<br />
8 Value-Added Services Guide 31<br />
a. Value Bundle 31<br />
b. Exclusive IDD discounts 31<br />
c. Privacy 32<br />
d. Call Control 33<br />
e. Call Barring 35<br />
f. Voicemail 36<br />
9 Appendices 38<br />
a. Port Forwarding Setting for Motorola SBG 1000 Cable Modem Gateway 38<br />
b. Setting up the Firewall for Motorola SBG 1000 Cable Modem Gateway 40<br />
10 Glossary 42<br />
2
About Digital Voice Home<br />
Digital Voice Home is <strong>StarHub</strong>’s fixed voice service to our residential customers, delivered over the same quality<br />
cable network that brings <strong>StarHub</strong> TV and MaxOnline broadband services into their homes.<br />
With Digital Voice Home, you have access to:<br />
• Free local calls to fixed and mobile lines (<strong>StarHub</strong>, SingTel and M1)<br />
• IDD calls (<strong>StarHub</strong>, SingTel, M1 and others*)<br />
• Directory Enquiry and Operator Assistance services (100)<br />
• Faxing<br />
• Local (1800) toll-free services<br />
• Local (1900) premium services<br />
• International Calling Card (Application and Enquiries)<br />
• <strong>StarHub</strong> Customer Service, billing and fault reporting numbers<br />
• Emergency numbers** (995 and 999) and more.<br />
You also have access to our comprehensive range of Value-Added Services such as Call Waiting, Caller<br />
Number Display, etc.<br />
* Digital Voice Home customer has to register with the respective IDD service provider in order to use their IDD service.<br />
** Calls to emergency numbers and 1633 are free-of-charge.<br />
1
Technical Information<br />
Digital Voice Home equipment overview<br />
<strong>StarHub</strong> offers customers various options for the eqiupment you can use to access Digital Voice Home service.<br />
The section below shows an overview of the different types of equipment.<br />
Types of Equipments<br />
Motorola SBV5121i<br />
Voice-enabled Cable Modem (VeCM)<br />
DLink DVG-G5402SP<br />
Wireless router with voice-ports<br />
Wireless Integrated Access Device (IAD)<br />
Dlink DCM-604<br />
S0078-06<br />
S1079-09/N1065-09<br />
Integrated Wireless Voice Modem (IWVM)<br />
N0941-08<br />
Benefits<br />
1. Single device that has cable modem function<br />
and voice ports, thus enabling you to save on<br />
additional hardware costs<br />
2. Simple connection to cable point and PC<br />
1. Integrated router with in-built voice ports to<br />
provide both Ethernet and wireless broadband<br />
access, as well as Digital Voice Home service.<br />
Require separate broadband modems.<br />
2. Can be used on other Service Providers’<br />
broadband network<br />
Integrated Wireless Voice Modem is a single<br />
integrated device that can provide following<br />
functions, simultaneously<br />
a) cable modem to enable MaxOnline Internet Access<br />
b) Wireless router to enable multiple PCs/devices<br />
to simultaneously access the internet<br />
c) voice ports to enable Digital Voice Home service<br />
2
Techinical Information<br />
Hardware Requirements for Voice-enabled Cable Modem<br />
• A coaxial cable to connect the VeCM to the cable point<br />
• An IDA-approved standard or cordless telephone set (Note: Pulse dialling is not supported).<br />
• A standard RJ-11 telephone cable to connect the telephone set to the VeCM.<br />
• A standard 13A power point to power the VeCM.<br />
Besides the VeCM, no other hardware is required. A standard or cordless telephone set can be connected to<br />
the phone jack of the VeCM to make voice calls.<br />
You can buy a VeCM from any <strong>StarHub</strong> Shop. If you are a MaxOnline customer, you will have to replace your<br />
cable modem with a VeCM. The VeCM can be used to access the internet via MaxOnline and make voice<br />
calls simultaneously.<br />
Hardware Requirements for Wireless Integrated Access Device<br />
• 1) Dlink DVG-G5402 wireless IAD (wireless router with voice ports)<br />
The wireless IAD is compatible with almost any Microsoft Windows ® , Macintosh ® , or UNIX ® computers<br />
with a 10Base-T or 10/100Base-T Ethernet adapter<br />
Note: Only wireless IADs purchased from <strong>StarHub</strong> or its authorised resellers can be used for Digital Voice Home. Though<br />
device can work with UNIX computers, <strong>StarHub</strong> is unable to support due to compatibility issues related to UNIX.<br />
• Broadband Internet connection<br />
The broadband Internet access can either be of a cable (<strong>StarHub</strong>s’ MaxOnline broadband access) or<br />
an ADSL connection, with a minimum download speeds of 512Kbps and upload speeds of 128Kbps.<br />
Note: Digital Voice Home will not function with a narrowband connection. (e.g 56Kbps Dial-up access)<br />
• An IDA-approved phone (corded or cordless)<br />
• A standard RJ-11 telephone cable to connect the telephone set to the wireless IAD<br />
• A standard 13A power point to power the wireless IAD.<br />
3
Techinical Information<br />
Hardware Requirements for Integrated Wireless Voice Modem<br />
• Dlink DCM-604 (Integrated Wireless Voice Modem)<br />
• Broadband Internet connection<br />
• An IDA-approved phone (corded or cordless)<br />
• A standard RJ-11 telephone cable to connect the telephone<br />
• A standard 13A power point<br />
The Integrated Wireless Voice Modem is compatible with almost any Microsoft Windows ® , Macintosh ® , or<br />
UNIX ® computers with a 10Base-T or 10/100Base-T Ethernet adapter<br />
Note: Only equipment purchased from <strong>StarHub</strong> or its authorised resellers can be used for Digital Voice Home.<br />
Though device can work with UNIX computers, <strong>StarHub</strong> is unable to support compatibility issues related to UNIX.<br />
Internal Wiring<br />
If the telephone set is placed near the VeCM, no additional wiring is required. Internal wiring will be required<br />
should you wish to locate the telephone set to another room. We recommend using a cordless phone if you<br />
do not wish to do any internal wiring.<br />
If you require additional wiring, please call our Customer Care at 1633 so that they can advise you on the appropriate<br />
type of wiring for the service. We will be happy to arrange for additional cabling for you or you may also wish to engage<br />
your own contractors for the job. Please ensure that only approved cables are used for the cabling.<br />
4
Setting Up Your Digital Voice Home Connection<br />
using Voice-enabled Cable Modem/ Integrated<br />
Wireless Voice Modem<br />
We have included some useful tips on how to set up your Digital Voice Home connection in this guide. You may<br />
wish to refer to them before deciding to call the hotline for technical assistance. Alternatively, you can visit our<br />
website at www.starhub.com/voice for the latest updates.<br />
Using the VeCM<br />
The VeCM allows you to access the Internet through your computer (if you are a MaxOnline user) and make voice<br />
calls through your standard or cordless phone. Please ensure that the VeCM is powered on at all times.<br />
5
Setting Up Your Digital Voice Home Connection<br />
The following diagram shows the types of connection at the rear panel of the VeCM.<br />
While the configuration may vary depending on the model and type of VeCM, the types of connections<br />
are similar.<br />
6
Setting Up Your Digital Voice Home Connection<br />
Using the Integrated Wireless Voice Modem<br />
The IWVM allows you to access the Internet through your computer (if you are a MaxOnline user) and make voice<br />
calls through your standard or cordless phone. Please ensure that the equipment is powered on at all times.<br />
7
Setting Up Your Digital Voice Home Connection<br />
Digital Voice Home Only Connection<br />
8
Setting Up Your Digital Voice Home Connection<br />
Digital Voice Home connection with Router<br />
9
Setting Up Your Digital Voice Home Connection<br />
Digital Voice Home and MaxOnline Connection using Internal Network<br />
Interface Card and Voice-enabled Cable Modem/ Integrated Wireless<br />
Voice Modem<br />
10
Setting Up Your Digital Voice Home Connection<br />
Digital Voice Home and MaxOnline Connection using USB<br />
Voice-enabled Cable Modem/Integrated Wireless Voice Modem.<br />
11
Setting Up Your Digital Voice Home Connection<br />
Digital Voice Home and MaxOnline Connection using External USB<br />
Network Interface Card and Voice-enabled Cable Modem/Integrated<br />
Wireless Voice Modem.<br />
12
Troubleshooting for Voice-enabled Cable Modem<br />
13
Troubleshooting<br />
14
Troubleshooting<br />
Other Scenarios<br />
No dial tone is heard<br />
Please check the following:<br />
• Voice-enabled cable modem (VeCM) is powered on (usually the first LED on the front panel is the Power<br />
indicator. It should display a solid green colour if it is powered up successfully).<br />
• RJ-11 cable is connected securely to the phone jack at the rear of the VeCM. If you have a single<br />
telephone line, it should usually be connected to phone jack number 1, unless you have been advised by<br />
us otherwise.<br />
• RJ-11 cable is connected securely to your standard telephone set or cordless telephone set.<br />
Note : When the VeCM is powered on, you may have to wait for up to 40 seconds before it completes the start-up sequence<br />
and acquires a dial tone. If no dial tone is heard, try turning off then on the power supply to the VeCM. If you still can’t get a<br />
dial tone, please call our Customer Care at 1633.<br />
Different dial tone is heard<br />
Under certain circumstances, you may hear a dial tone that is different from the standard (continuous)<br />
dial tone.<br />
• Intermittent dial tone: This dial tone is generated when you activate certain Value-Added Services.<br />
This special tone serves to remind you that you have activated a Value-Added Service. Your phone is not<br />
engaged, you can still continue to make or receive calls.<br />
• Stutter tone: When you subscribe to our Voicemail service, this dial tone is generated to alert you that<br />
you have a new mail message in your mailbox.<br />
Pressing the telephone hook (to simulate the flash function) does not work<br />
You may try pressing and holding the hook for a while as it may not respond when pressed quickly. If your<br />
telephone set has a flash key, we strongly recommend that you use it for more consistent results.<br />
Value-Added Services (such as Call Waiting) do not work<br />
The most common cause is misinterpretation of the procedures in the Value-Added Services User Guide. Please<br />
call our Customer Care at 1633 if you need help on using our Value-Added Services.<br />
15
Troubleshooting for Integrated Wireless Voice<br />
Modem<br />
Integrated Wireless Voice Modem<br />
FRONT PANEL INDICATOR<br />
WPS LED<br />
WIFI LED<br />
Panel LED Descriptions:<br />
VoIP LED USB LAN Port<br />
LED LED<br />
Power LED<br />
Online LED<br />
Upstream LED<br />
LED NAME COLOUR INDICATE<br />
Power Green Solid indicates the power source<br />
is on<br />
Cable Green Blinking indicates TFTP/DHCP in<br />
progress. Solid indicates IWVM<br />
registered<br />
Tx Green Flashing indicates scanning for<br />
upstream frequency. Solid indicates<br />
upstream channel is acquired<br />
Rx Green Flashing indicates scanning for<br />
downstream frequency. Solid indicates<br />
downstream channel is acquired<br />
LAN1 Green OFF indicates that no wired connection<br />
detected on LAN Port 1. Solid indicates<br />
wired connection detected. Blinking<br />
when there is data transfer.<br />
16
Troubleshooting<br />
Panel LED Descriptions:<br />
LED NAME COLOUR INDICATE<br />
WPS<br />
LAN2 Green OFF indicates that no wired<br />
connection detected on LAN Port 2.<br />
Solid indicates wired connection<br />
detected. Blinking when there is<br />
data transfer.<br />
LAN3 Green OFF indicates that no wired<br />
connection detected on LAN Port 3.<br />
Solid indicates wired connection<br />
detected. Blinking when there is<br />
data transfer.<br />
LAN4 Green OFF indicates that no wired<br />
connection detected on LAN Port 4.<br />
Solid indicates wired connection<br />
detected. Blinking when there is<br />
data transfer.<br />
USB Green Off indicates that no USB connection<br />
detected. Solid indicates that USB<br />
connection detected. Blinking when<br />
there is data transfer.<br />
TEL1 Green Off when the Line 1 is not registered.<br />
Solid indicates Line 1 is registered.<br />
Blinking when in active session.<br />
TEL2 Green Off when the Line 1 is not registered.<br />
Solid indicates Line 1 is registered.<br />
Blinking when in active session.<br />
Wifi Green Off when the WIFI is turned on. Solid<br />
indicates WIFI is functioning. Blinking<br />
when data there is transferring<br />
WPS Blue Off when there is no WPS connection.<br />
On indicates WPS connected. Blinking<br />
when WPS activating<br />
17
Troubleshooting<br />
Panel LED Diagnostics:<br />
LED NAME STATUS POSSIBLE PROBLEM SUGGESTED ACTION<br />
Power OFF The power cord is not Check power cord<br />
properly seated connection<br />
Power outlet is not Check power outlet (use<br />
operating a test pen) or use<br />
another power point<br />
The IWVM is faulty Call our Customer Care<br />
at 1633<br />
Cable Blinking Unsuccessful Registration Call our Customer Care<br />
at 1633<br />
Tx/RX Blinking Loose Connection Check RG-6 cable<br />
connection from TV point<br />
and to IWVM for loose<br />
connection<br />
Upstream and downstream • Bypass splitter if there is<br />
cannot be acquired any<br />
• Replace the RG-6 cable<br />
• Call our Customer Care<br />
at 1633<br />
LAN 1 to OFF No wired connection • Check UTP cable<br />
LAN 4 detected connection<br />
• Check UTP cable<br />
connection from PC<br />
and to IWVM for<br />
loose connection<br />
• Replace the UTP cable<br />
• Check PC network card<br />
to ensure it is function<br />
properly<br />
• Connect to another PC<br />
using the same IWVM's<br />
LAN port<br />
• Call our Customer Care<br />
at 1633<br />
18
Troubleshooting<br />
Panel LED Diagnostics:<br />
LED NAME STATUS POSSIBLE PROBLEM SUGGESTED ACTION<br />
USB OFF No USB connection • Check USB cable<br />
detected connection from PC<br />
and to IWVM for<br />
loose connection<br />
• Check the USB driver<br />
is properly installed on<br />
the PC<br />
• Check to another USB<br />
slot on the PC<br />
• Call our Customer<br />
Care at 1633<br />
TEL1/ OFF • Loose Connection • Check RJ 11 connection<br />
TEL2 from Phone to IWVM for<br />
loose connection<br />
• Not Registered • Call our Customer<br />
Care at 1633<br />
19
Troubleshooting<br />
Other Scenarios<br />
No dial tone is heard<br />
Please check the following:<br />
• Integrated Wireless Voice Modem (IWVM) is powered on (usually the TEL1 LED on the front panel is<br />
the Power indicator. It should display a solid green colour if it is powered up successfully).<br />
• RJ-11 cable is connected securely to the phone jack at the rear of the IWVM. If you have a single<br />
telephone line, it should usually be connected to phone jack number 1, unless you have been advised by<br />
us otherwise.<br />
• RJ-11 cable is connected securely to your standard telephone set or cordless telephone set.<br />
Note : When the IWVM is powered on, you may have to wait for up to 40 seconds before it completes the start-up sequence<br />
and acquires a dial tone. If no dial tone is heard, try turning off then on the power supply to the VeCM. If you still can’t get a dial<br />
tone, please call our Customer Care at 1633.<br />
Different dial tone is heard<br />
Under certain circumstances, you may hear a dial tone that is different from the standard (continuous)<br />
dial tone.<br />
• Intermittent dial tone: This dial tone is generated when you activate certain Value-Added Services.<br />
This special tone serves to remind you that you have activated a Value-Added Service. Your phone is not<br />
engaged, hence you can still continue to make or receive calls.<br />
Pressing the telephone hook (to simulate the flash function) does not work<br />
You may try pressing and holding the hook for a while as it may not respond when pressed quickly. If your<br />
telephone set has a flash key, we strongly recommend that you use it for more consistent results.<br />
Value-Added Services (such as Call Waiting) do not work<br />
The most common cause is misinterpretation of the procedures in the Value-Added Services User Guide. Please<br />
call our Customer Care at 1633 if you need help on using our Value-Added Services.<br />
20
Troubleshooting<br />
Other Scenarios<br />
Router Configuration<br />
To access the web-based configuration utility, open a web browser such as Internet Explorer and enter the IP<br />
address of the DCM-604.<br />
Once you enter, you should see the webpage below:<br />
Type the username (admin) and password (password) in the respective fields.<br />
For more information on the DCM-604 IWVM configuration, please refer to DLink website<br />
http://www.dlink.com.sg/Starhub/downloads/DCM-604_Manual.pdf<br />
21
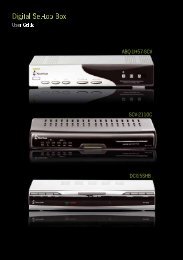
Setting up your Digital Voice Home connection<br />
using Dlink DVG-G5402SP Wireless Integrated<br />
Access Device<br />
The following diagram shows the typical set-up for a <strong>StarHub</strong> TV, MaxOnline and Digital Voice Home user using<br />
the Dlink DVG-G5402SP wireless IAD<br />
1. Line: This is an optional connection. You may connect to this port your other service provider’s telephone<br />
line using the RJ-11 cable to receive incoming calls. However, please note you will not be able to make out-<br />
going calls via the other service provider’s telephone line when connected through the wireless IAD.<br />
2. Phone Port (1 & 2): The default phone port to be connected is Phone Port (1). Connect to your phones<br />
using standard phone cabling (RJ-11).<br />
3. LAN: Connect to your Ethernet enabled computers using Ethernet cabling.<br />
4. WAN: Connect to your broadband modem using an Ethernet cable.<br />
5. Power Receptor: Receptor for the provided power adapter.<br />
6. Ground: A conducting connection with the earth. Connect with the ground so as to make the earth a<br />
part of an electrical circuit using metal wire.<br />
7. Antenna: Connect to a wireless network.<br />
WARNING: DO NOT (1) connect the phone ports to each other (FXS to FXS) or (2) connect any<br />
phone port directly to a PSTN line (FXS to PSTN) or to an internal PBX line (FXS to PBX extension).<br />
Doing so may damage your VoIP Router.<br />
Use Reset Button to restore factory default settings:<br />
1. Power on.<br />
2. Press and hold the reset button for 5 seconds.<br />
3. Release the reset button. Factory settings will be restored.<br />
22
Troubleshooting<br />
Front Panel<br />
Power<br />
Prov./Al<br />
Register<br />
WAN<br />
WLAN<br />
LAN<br />
Phone<br />
Line<br />
Solid indicates a connection to a good power source.<br />
A blinking light indicates DVG-G5402SP is attempting to connect with the Provisioning<br />
server. Once the serviceconnects, the LED will turn off. The LED will light solid red if<br />
the self-test or boot-up fails.<br />
The Register LED will light solid when DVG-G5402SP is connected to a VoIP service<br />
provider. The LED will blink if not connected to a service provider.<br />
When a connection is established the 10 or 100 LED will light up solid. The LED will<br />
blink to indicate activity. If the10 or 100 LED does not light up when a cable is<br />
connected, verify the cable connections and make sure your devices are powered on.<br />
A steady light indicates a wireless connection. A blinking light indicates that<br />
DVG-G5402SP is receiving / transmitting from/to the wireless network.<br />
When a connection is established the 10 or 100 LED will light up solid on the<br />
appropriate port. The LEDs will blink to indicate activity. If the 10 or 100 LED does<br />
not light up when a cable is connected, verify the cable connections and make sure<br />
your devices are powered on.<br />
This LED displays the VoIP status and Hook activity on the phone port that is used to<br />
connect your normal telephone(s). If a phone connected to a phone port is off hook<br />
or in use, this LED will light solid. When a phone is ringing, the indicator will blink.<br />
Light on means the line is in use off-hook<br />
23
Troubleshooting<br />
Connecting your HubStation to MaxOnline broadband<br />
Note : If you are connecting your HubStation free unlimited 1Mbps broadband Internet access, please note that the Digital<br />
Voice Home’s voice quality may be affected when there is heavy Internet access/usage occurring simultaneously by 1 or more<br />
PCs connected to the wireless IAD’s router. For better voice quality, we would recommend that you upgrade to MaxOnline<br />
service with higher bandwidth.<br />
24
Troubleshooting<br />
Connecting with Cable/ADSL broadband modems<br />
Steps for Setting up:<br />
1. Insert one end of the Ethernet cable into the Ethernet (LAN) port on the back panel of the DVG-G5402SP<br />
and the other end of the cable to an Ethernet Adapter or available Ethernet port on your computer.<br />
2. Insert one end of the Ethernet cable into the WAN port on the back of the DVG-G5402SP and the other<br />
into your cable/DSL.<br />
3. Insert a telephone cable (RJ11) into the Phone port 1, and then connect the other end of the telephone<br />
cable to your telephone.<br />
4. Connect the power adapter to the power input at the back panel of the DVG-G5402SP and then plug the<br />
other end of the power adapter to a wall outlet or power strip. On the front of the device, the Power LED<br />
will turn On to indicate proper operation.<br />
Note: Start-up may take longer if the wireless IAD re-configuration takes place or when the Internet is slow/congested.<br />
5. Check the LED display on the front of the wireless IAD to confirm that the connections have been made.<br />
6. Pick up the telephone handset and listen for a dial tone. If you hear a dial tone, you can now call anyone<br />
as you normally would on any telephone. If you do not hear a dial tone, check that all connections as<br />
described in this procedure are correct. 25
Troubleshooting<br />
Connecting a cable or ADSL connection with built-in router.<br />
Steps for Setting up:<br />
1. Ensure that your wireless IAD is unplugged and that the power supply to your modem is turned off.<br />
2. Connect one end of an Ethernet cable (RJ-45) to an open Ethernet LAN port on your modem with built-in<br />
router. Connect the other end of this Ethernet cable to the Internet connector on your wireless IAD.<br />
3. Connect a telephone to your PHONE 1 connector on your wireless IAD using a RJ-11 telephone cable.<br />
4. Plug the AC power adapter to the POWER connector on your wireless IAD and the electrical outlet. This<br />
turns your wireless IAD on.<br />
Note: You should keep the wireless IAD powered on all the time in order to receive incoming calls.<br />
5. Wait for about 1-2 minutes for the wireless IAD to start up.<br />
Note: Start-up may take longer if the wireless IAD re-configuration takes place or when the Internet is slow/congested.<br />
6. Pick up the telephone handset and listen for a dial tone. If you hear a dial tone, you can now call anyone<br />
as you normally would on any telephone. If you do not hear a dial tone, check that all connections as<br />
described in this procedure are correct.<br />
26
Troubleshooting<br />
Note for cable modem users :<br />
The following cable modems with built-in routers are supported by <strong>StarHub</strong>.<br />
• Motorola SBG1000 Cable Modem Gateway<br />
• Linksys Wireless Cable Gateway 200<br />
For other models, please check with Customer Care at 1633 whether they are supported.<br />
Overcoming firewalls in the cable modem with built-in router. There may be firewall options built in the wireless<br />
Integrated cable modem cum router that may block certain network traffic and may interfere with the use of<br />
Digital Voice Home. If you experience problems with your Digital Voice Home service and are connecting through<br />
a firewall, please perform the following steps to enable UDP ports to and from the wireless IAD:<br />
1. Disable Firewall on the wireless Integrated cable modem cum router<br />
No additional settings is needed on wireless IAD and cable modem with built-in router to use Digital Voice Home<br />
2. When Firewall is enabled on the wireless Integrated cable modem cum router, there are 2<br />
options available as follows:<br />
• Configure “Port Forwarding” for the cable modem with built-in router on UDP Port 5060/5061 and<br />
16384-32767<br />
Refer to Appendix 1 for setting of Port Forwarding. Please also ensure that the firewall policy on the cable<br />
modem with built-in router allow the Port specified above. (See Appendix 2: Setting up the firewall for<br />
the SBG1000). For Wireless Cable Gateway 200 cable modem with built-in router, Port Forwarding is not<br />
required on the Wireless Cable Gateway 200 even though the firewall is enabled.<br />
•If you are using the Motorola SBG1000 cable modem cum router, bypass the wireless IAD from the Firewall<br />
policy and place the IP address of the wireless IAD MAC address, in the De-militarised Zone (DMZ) of<br />
the router.<br />
Note: Please refer to Appendix 2 for Firewall settings<br />
27
Troubleshooting<br />
Note for other ADSL service provider users :<br />
Basic PPP0E set-up on wireless IAD for ADSL modem without NAT (Network Address Translation)<br />
To perform basic PPP0E configuration on DVG-G5402SP, please refer to Dlink website<br />
http://www.dlink.com.sg/starhub/downloads/DVG-G5402SP.pdf<br />
Note: For more information related to other information/setup for DVG-G5402SP, please refer to Dlink website<br />
http://www.dlink.com.sg/starhub/downloads/DVG-G5402SP.pdf<br />
If you are unable to connect to the PPP0E server, you may wish to perform the following steps:<br />
1. Check the PPPOE settings: username and password.<br />
2. Check the cabling between Internet port and DSL modem<br />
3. Check the link lights between the router and the modem<br />
4. Try new cabling between the Internet port and DSL modem<br />
If the above fails, please contact Customer Care at 1633 for assistance.<br />
Overcoming firewall for ADSL modem or ADSL router<br />
If you have an ADSL router, there may be firewall options built in that may block certain network traffic and<br />
may interfere with the Digital Voice Home service. If you experience problems with your Digital Voice Home<br />
service, and are connecting through a firewall, please ensure that the following UDP ports are allowed to and<br />
from the wireless IAD<br />
Digital Voice Home wireless IAD Internet ports:<br />
• SIP ports 5060 through 5061 using UDP protocol<br />
• TFTP port 69 using UDP protocol<br />
• DNS port 53 using UDP protocol<br />
• RTP ports 16384 through 32767 using UDP protocol<br />
Since firewalls may be designed differently, please consult the ADSL modem or router user manual for further<br />
information on firewall settings.<br />
For ADSL modem or ADSL router with NAT<br />
The NAT (Network Address Translation) function on your router may block needed communication ports, which<br />
will interfere with the Digital Voice Home. You may need to direct certain ports to be accessible to our network<br />
in order to use Digital Voice Home.<br />
Each router manufacturer has a different process for Port Forwarding (also called Port Opening). In each case,<br />
you must always specify two port ranges to be opened:<br />
• 5060 - 5061 (UDP)<br />
• 16384-32767 (UDP)<br />
These ports should be forwarded to the IP address of your Digital Voice Home. Please refer to your router<br />
manual for Port Forwarding configuration instructions.<br />
28
Troubleshooting<br />
Router Configuration<br />
To access the web-based configuration utility, open a web browser such as Internet Explorer and enter the IP<br />
address of the DVG-G5402SP.<br />
Once you enter, you should see the webpage below:<br />
Type User for the username and leave the password blank. Then clink logon.<br />
For more information on the DVG-G5402SP router configurations, please refer to Dlink website<br />
http://www.dlink.com.sg/starhub/downloads/DVG-G5402SP.pdf<br />
29
Troubleshooting for Dlink DVG-G5402SP<br />
Wireless Integrated Access Device<br />
leD<br />
Power<br />
Prov./Alm.<br />
Register<br />
WAN<br />
WLAN<br />
laN<br />
Phone1,2<br />
Note:<br />
STATUS<br />
Off<br />
On<br />
Blinking<br />
Blinking<br />
Off<br />
Off<br />
Off<br />
Off<br />
POSSIBLE PROBLEMS<br />
The power cord is not properly<br />
seated.<br />
Power outlet is not operating.<br />
The device is faulty.<br />
The start-up test failed or<br />
Boot-up failed.<br />
Trying to obtain IP or failed to<br />
register or provisioning failed.<br />
Registration unsuccessful.<br />
Loose Connection.<br />
Wireless connection is disable.<br />
Wireless Connection is not<br />
operating.<br />
Loose Connection.<br />
Telephone connection is not<br />
properly connected to the<br />
telephone port.<br />
Phone service has not been<br />
setup.<br />
SUGGESTED ACTIONS<br />
Check the power cord connection.<br />
Check power outlet (use a test pen) or<br />
use another power point.<br />
Call our Customer Care at 1633.<br />
Reset the wireless DVG. If the problem<br />
persists, replace the wireless DVG. Call<br />
our Customer Care at 1633.<br />
Wait for a few minutes to light off. If it<br />
is still blinking, call our Customer Care<br />
at 1633.<br />
Call our Customer Care at 1633.<br />
Check RJ-45 cable connection from cable<br />
modem to wireless DVG and make sure<br />
cable modem is powered on.<br />
Check the wireless setting from WebUI.<br />
Call our Customer Care at 1633.<br />
Verify the cable connections and make<br />
sure your devices are powered on.<br />
Check the RJ-11 cable connection from<br />
the phone handset to phone port.<br />
Call our Customer Care at 1633.<br />
Register LED is Off and Prov./Alm is solid red, wireless DVG is being upgraded new firmware. Upgrading process will take one<br />
or two minutes and the wireless DVG will be ready after rebooting.<br />
Register LED is solid green and Prov./Alm is solid red and the status is lasted for more than one minutes, the wireless DVG<br />
is abnormal and please call our Customer Care at 1633.<br />
30
Value-Added Home Services Guide<br />
Digital Voice Home comes with a full range of Value-Added Services to serve your telephony needs. The<br />
following section describes what they are and how to operate them. If you need further assistance, please<br />
call our Customer Care at 1633.<br />
Pleaase note that some of Digital Voice Home’s Value-Added Services may work differently from those of<br />
other service operators.<br />
Value Bundle<br />
Value Bundle consists of the following four popular features:<br />
• Caller Number Display • Call Divert • Call Waiting • Voicemail<br />
To get details on these features, please refer to the individual feature description.<br />
Call IDD 018<br />
There are currently three plans for discounted IDD 018 calls to the following countries - China, Hong Kong<br />
or USA (including Alaska and Hawaii):<br />
(a) Call IDD 018 China<br />
(b) Call IDD 018 Hong Kong<br />
(c) Call IDD 018 USA (Including Alaska & Hawaii)<br />
Once activated for any of the above three plans you have subscribed, you may call the specified country in<br />
the usual manner as follows. No extra step is required.<br />
018 > Country Code > Area Code (if any) > Telephone Number<br />
For each country you have chosen, you will enjoy a certain amount of free IDD 018 minutes. For example, if you frequently<br />
call Hong Kong, sign up for Call IDD 018 Hong Kong and enjoy up to 200 minutes worth of extra talktime.<br />
31
Value-Added Services Guide<br />
Privacy<br />
CALLER NUMBER DISPLAY:<br />
The phone number of an incoming caller is displayed on your phone (which must have caller ID display) or<br />
external caller ID display unit.<br />
Note:<br />
(1) The Caller Number Display is activated by default.<br />
(2) If you wish to turn off Caller Number Display, you may deactivate the service.<br />
CALLER NUMBER NON-DISPLAY:<br />
The person you are calling will not be able to see your phone number when you call them.<br />
To apply for this Value-Added Service, please call our Customer Care at 1633. Once activated, this service<br />
cannot be turned off.<br />
If you wish to unblock the caller ID for the current outgoing call only, you can key *82 before dialing the number<br />
to unblock the caller ID.<br />
Note:<br />
(1) De-activation is on a per-call basis, i.e. the caller ID will be blocked again for the next call.<br />
(2) When you subscribe to this service, you may not be able to gain access to certain services that require a Caller ID to<br />
be presented.<br />
PRIVATE NUMBER LISTING :<br />
Your telephone number will not be listed in the Residential Telephone Directory and our Operator Assistance<br />
service will not disclose your telephone number to any requestor.<br />
To apply for this Value-Added Service, please call our Customer Care at 1633. Once activated, this service cannot<br />
be turned off. To de-activate this service, you will need to call our Customer Care at 1633 to terminate it.<br />
32
Value-Added Services Guide<br />
Call Control<br />
1) CALL DIVERT PLUS:<br />
Your incoming calls can be diverted to another fixed or mobile number of your choice (can be local or<br />
international numbers).<br />
To activate dial: * 72 (the number to divert to) #<br />
To de-activate dial: * 73<br />
If you have subscribed to Voicemail, you can divert your calls to your Voicemail.<br />
To activate dial: * 72 (1302) #<br />
To de-activate dial: * 73<br />
CALL WAITING:<br />
When you are engaged on a call and someone calls you, you will hear an intermittent tone indication.<br />
To activate dial: flash to put the first caller on hold and talk to the second caller.<br />
You can alternate between the 2 callers by pressing flash.<br />
If the first caller terminates the call while you are on the line with the second caller, you need to return to the<br />
first line to end the call by pressing flash, followed by flash again to return to the second caller. If you do not<br />
terminate the first line, the next caller will hear an engaged tone.<br />
To de-activate If you do not wish to be interrupted in the middle of a call, you can temporarily de-activate Call<br />
Waiting by keying * 70<br />
Note:<br />
Once Call Waiting is de-activated, you should hear a short intermittent tone followed by a dial tone after you have pressed * 70.<br />
If you do not hear a dial tone, that means the de-activation of Call Waiting service was unsuccessful.<br />
33
Value-Added Services Guide<br />
CALL TRANSFER PLUS:<br />
Call Transfer Plus combines the functions of both Call Transfer and Three Party Call.<br />
1) CALL TRANSFER:<br />
While on a call with party A, you can transfer the call to party B.<br />
To activate dial: flash (party B’s number). Wait for party B to answer the call before you disconnect<br />
your phone. After that, parties A and B will be connected.<br />
Note:<br />
(1) The number you transfer to must be a local fixed or mobile number (not international number).<br />
2) THREE PARTY CALL:<br />
You can talk to two other persons on different lines at the same time.<br />
To begin the conference dial (party A’s number) and after party A answers the call, call party B by<br />
pressing flash key, after which you will hear a secondary dial tone. Next, dial party B’s number.<br />
After party B answers the call, press flash key to activate a Three party call.<br />
To begin the conference while on a call with party A while on a call with party A, call party B by pressing<br />
flash key. You will hear a secondary dial tone. Dial party B’s number. When party B picks up the call, press<br />
flash key to activate a Three party call.<br />
Note:<br />
(1) The Digital Voice Home user who initiates the conference must remain in the conference.<br />
Otherwise, all calls will be terminated.<br />
(2) International calls are supported.<br />
34
Value-Added Services Guide<br />
Call Barring<br />
INCOMING CALL BARRING:<br />
This service blocks all incoming calls (except operator test calls) so that you will not be interrupted by<br />
incoming calls.<br />
To activate dial: * 78#<br />
To de-activate dial: * 79#<br />
Note:<br />
(1) All calls that are barred will be disposited to the voicemail.<br />
35
Value-Added Services Guide<br />
Voicemail<br />
DIVERSION TO VOICEMAIL<br />
Your calls will be diverted to your Voicemail when :<br />
• Your Digital Voice Home line is engaged<br />
• You do not answer the call<br />
Note: Your calls will not be diverted to your Voicemail if the VeCM is not powered on, unless you have activated Call Divert<br />
previously to direct your calls to Voicemail.<br />
MESSAGE RETRIEVAL<br />
Retrieving Messages Using Digital Voice Home Line:<br />
Message Retrieval dial: 1303 and enter your (Voicemail password)# Press 1 to access the main menu.<br />
Note: Default Voicemail password is 8888. The Voicemail password is different from that of the other Value-Added Services<br />
such as Outgoing Call Barring.<br />
Retrieving Messages Using Other Lines:<br />
Message Retrieval dial: 1303 or (+65) 9850 1303 when calling from overseas and enter your<br />
(Digital Voice Home number)#(Voicemail password)#. Press 1 to access main menu. You can also access your<br />
Voicemail from a <strong>StarHub</strong> Mobile line or another operator’s fixed and mobile line.<br />
Note: Default password is 8888<br />
OTHER VOICEMAIL FUNCTIONS<br />
Leaving messages in voice mailboxes of other Digital Voice Home and <strong>StarHub</strong> Mobile users<br />
Dial 1302 or (+65) 9850 1302 when calling from overseas and enter (the other party’s Digital Voice Home or<br />
mobile number)#. You will hear the default or personalised greeting “You have reached mailbox number xxxx<br />
xxxx. Please leave your message after the tone”. (Or the personalised greeting if there is one). Leave your<br />
message after the tone.<br />
Personalising your Own Greeting Dial 1303 or (+65) 9850 1303 when you are calling from overseas,<br />
and enter (your Voicemail password)#<br />
Press 2 to access your greetings menu<br />
To record your greeting, press 2 followed by 3<br />
To play your greeting, press 2 followed by 1<br />
36
Value-Added Services Guide<br />
CHANGING YOUR VOICEMAIL PASSWORD<br />
Voicemail Password:<br />
Digital Voice Home Voicemail is protected by a password (this password is different from that of your other<br />
Value-Added Services). The default password is 8888. To change your Voicemail password :<br />
- Dial 1303 and log into your mailbox<br />
- Press 8 to access your Personal Options menu<br />
- Press 2 to access your Password Options<br />
- Press 3 to modify your password (4 to 7 digit number)<br />
- Press # to confirm the new password<br />
If you have forgotten your password, please call our Customer Care at 1633 or (+65) 6820 1633 when you<br />
are calling from overseas to reset your password to the default password (8888).<br />
Note: If you are also a <strong>StarHub</strong> Mobile customer, please note that your Digital Voice Home’s voice mailbox is a separate<br />
mailbox from that of your mobile voice mailbox.<br />
If you subscribe to both Call Waiting and Voicemail and your line is engaged, the Call Waiting feature will be activated first. If<br />
you do not initiate the Call Waiting function after about 20 seconds, your call will be transferred to your Voicemail.<br />
37
Appendix 1:<br />
Port Forwarding Setting for Motorola SBG 1000<br />
Cable Modem Gateway<br />
Configure “Port Forwarding” for the Motorola SBG1000 cable modem gateway on Port 5060/5061 and<br />
16384-32767<br />
Note: Please ensure that the firewall policy on the wireless Integrated cable router allows the Ports specified above.<br />
In the menu on the left hand side of your screen, click the Gateway button. This will open a new menu at the<br />
top of your screen. In this new menu, click the Port Forwarding button.<br />
Close to the top of the status area, you should see a config option. Click config.<br />
Use the Template drop down box to select Custom (default). Enter the name of the program you are forwarding<br />
ports for into the Name box.<br />
To forward a range of ports, e.g. UDP ports 5060,5061, 16384 -32767, enter the lowest port number in the<br />
range into the Port Start box. Enter the highest port number in the range into the Port End box.<br />
Enter the IP address to forward these ports to into the LAN IP Address box. This should be the IP address of<br />
the wireless IAD (Linksys SPA2102-R3 wireless Integrated Access Device) you are forwarding ports for. Check<br />
Enable checkbox to enable your configuration.<br />
38
Appendix 1: Port Forwarding Setting for Motorola SBG 1000 cable modem gateway<br />
Click the Add button to add the configuration to the table below.<br />
39
Appendix 2:<br />
Setting up the Firewall for Motorola SBG1000<br />
Cable Modem Gateway<br />
To select a predefined policy for all packets processed by the firewall:<br />
• On the set-up program left panel, click Firewall.<br />
• Click POLICY.<br />
• Click basic to display the options for firewall policy:<br />
To create a custom firewall policy, first select Custom and click Apply on the Firewall > POLICY > basic Page.<br />
Then use this page to configure a custom firewall policy.<br />
40
Appendix 2: Setting up the Firewall for Motorola SBG1000 cable modem gateway<br />
To open up the range of ports for SIP UDP signalling ports, eg. UDP ports 5060,5061, enter name of the<br />
Port ID of this firewall policy.<br />
• Put a check mark into the Enable checkbox to enable your firewall policy.<br />
• Select allowed protocol UDP/TCP from the drop down menu.<br />
• Enter the lowest e.g. 5060 and the highest port number; eg. 5061 in the Port Range.<br />
• Enter zero for the Protocol Number.<br />
• Put a check mark into the Allow Inbound checkbox to allow incoming packets through the firewall.<br />
• Put a check mark into the Allow Outbound checkbox to allow outgoing packets through the firewall.<br />
• Click the Add button to add this configuration to the table below.<br />
To open up the range of ports for SIP UDP Voice ports, e.g. UDP ports 16384 - 32767, enter name of the<br />
Port ID of this firewall policy.<br />
• Put a check mark into the Enable checkbox to enable your firewall policy.<br />
• Select allowed protocol UDP/TCP from the drop down menu.<br />
• Enter the lowest e.g. 16384 and the highest port number; e.g. 32767 in the Port Range.<br />
• Enter zero for the Protocol Number.<br />
• Put a check mark into the Allow Inbound checkbox to allow incoming packets through the firewall.<br />
• Put a check mark into the Allow Outbound checkbox to allow outgoing packets through the firewall.<br />
• Click the Add button to add this configuration to the table below.<br />
41
Glossary<br />
The following are some common terms used in our Digital Voice Home service for your easy reference.<br />
Term Definition<br />
Cable Modem This is a device that allows data access (such as to the Internet) via <strong>StarHub</strong>’s broadband<br />
network. A cable modem typically has two connections, one to the cable wall outlet<br />
and the other to a computer.<br />
Cable Point This is the cable outlet on the wall which connects to <strong>StarHub</strong>’s cable network.<br />
De-militarised Zone It is a part of the network sited between the (public) Internet and an internal network.<br />
A firewall or a router usually protects this zone with network traffic filtering capabilities<br />
whilst enabling external access to information.<br />
Digital Voice Home Digital Voice Home is <strong>StarHub</strong>’s fixed voice service to our residential customers,<br />
delivered over the same quality cable network that brings <strong>StarHub</strong> TV and MaxOnline<br />
broadband services into their homes.<br />
Golden Number Golden Numbers are telephone numbers with special sequences such as “2828” etc.<br />
There is an additional charge for golden numbers.<br />
iaD Short form for “Integrated access device”. It allows a user to make voice calls when<br />
it is connected to any broadband network.<br />
Integrated Wireless Integrated Wireless Voice Modem is a single integrated device that can provide following<br />
Voice Modem functions, simultaneously:<br />
a) cable modem to enable Max Online Internet Access<br />
b) Wireless router to enable multiple PCs/devices to simultaneously access the<br />
internet<br />
c) voice ports to enable Digital Voice Home service<br />
Internal Wiring A user would usually connect a standard or cordless telephone set directly to the phone<br />
jack of the VeCM to make voice calls. Additional internal wiring is required if the user<br />
needs to place the telephone set at another location.<br />
Number Portability This is known as Number Retention which allows a customer to transfer their existing<br />
SingTel residential telephone number over to <strong>StarHub</strong>’s Digital Voice Home Service.<br />
PPPoE PPPoE i.e Point-to-Point Protocol over Ethernet is a network protocol for encapsulating<br />
PPP frames in Ethernet frames. It offers standard PPP features such as authentication,<br />
encryption and compression. This protocol is being used by many DSL/ADSL carriers<br />
for connecting high-speed modems to the service provider.<br />
RJ-11 Short form for Registered Jack-11. This is a two-wire connector widely used to connect<br />
telephone equipment. It looks similar to the RJ-45 connector, but RJ-11 is narrower.<br />
42
Glossary<br />
Term Definition<br />
RJ-45 Short form for Registered Jack-45. This is a eight-wire connector used commonly to<br />
connect computers onto a local area network (LAN), especially Ethernet networks.<br />
Silver Number Like golden numbers, silver numbers are also telephone numbers with special number<br />
sequences but they cost less than golden numbers.<br />
Value-Added Value-Added Services are telephony features like Call Waiting, Call Barring etc. Separate<br />
Services<br />
subscription and activation charges are required.<br />
VeCM Short form for “voice-enabled cable modem”. A VeCM has all the functionalities of a<br />
cable modem but has additional telephony capabilities. It allows a user to have data<br />
access (such as the Internet) as well as the ability to make voice calls simultaneously.<br />
43