
Create successful ePaper yourself
Turn your PDF publications into a flip-book with our unique Google optimized e-Paper software.
<strong>Contents</strong><br />
1 Getting Started<br />
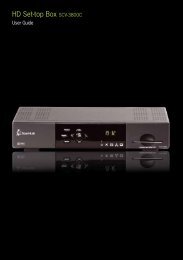
Digital Set-top Box / 1–2<br />
Remote Control / 3<br />
Smart Card / 4<br />
2 Guide To Digital Cable Applications<br />
On-Screen TV Guide / 5<br />
Genre Search / 6<br />
Video Mosaic / 7<br />
Info Bar / 8<br />
Programme Information In Chinese / 9<br />
Programme Alert (Set Reminder) / 9<br />
Favourite Channel Setting / 10<br />
Last Channel Recall / 10<br />
Parental Lock Setting / 11<br />
Auto-Tune Setting / 12<br />
Change PIN / 13<br />
Preference Settings / 14<br />
3 Guide To Interactive Applications<br />
Interactive TV / 15<br />
TV Games / 15<br />
eTV / 16<br />
4 Technical Information<br />
Installation Guide<br />
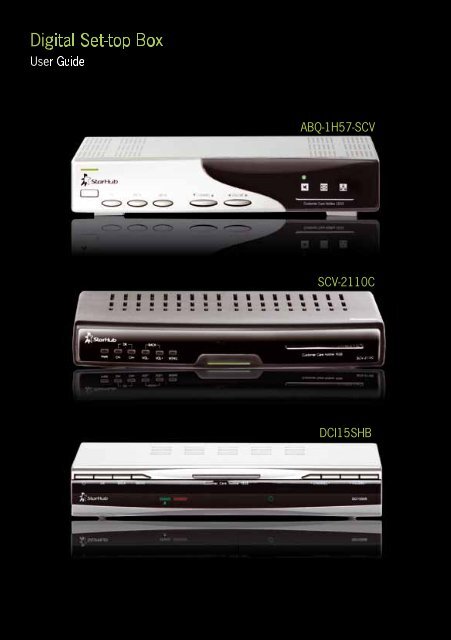
Digital Set-top Box (ABQ-1H57-SCV)<br />
- Option 1: Connection via AV cable (Recommended) / 17<br />
- Option 2: Connection via RF cables – For TV units without AV inputs / 18<br />
- Option 3: Connection via AV cables to VCR/DVD-R / 19<br />
Digital Set-top Box (SCV-2110C)<br />
- Option 1: Connection via AV cable (Recommended) / 20<br />
- Option 2: Connection via RF cables – For TV units without AV inputs / 21<br />
- Option 3: Connection via AV cables to VCR/DVD-R / 22<br />
Digital Set-top Box (DCI15SHB)<br />
- Option 1: Connection via AV cable (Recommended) / 23<br />
- Option 2: Connection via RF cables – For TV units without AV inputs / 24<br />
- Option 3: Connection via AV cables to VCR/DVD-R / 25<br />
Tuning Procedures /26<br />
Recording / 27-28<br />
150711
5 Trouble Shooting<br />
Tips for Improving TV reception / 29<br />
6 Signal Leakage<br />
A Reminder / 30<br />
7 General Information<br />
MACROVISION Product Notice / 30
Getting Started<br />
The digital set-top box provides you with a host of special features including the menu<br />
system, volume control and channel navigation. You can access these features via the control<br />
buttons on the front of the digital set-top box.<br />
Digital Set-top Box (ABQ-1H57-SCV)<br />
POWER On LED Indicator<br />
Green = ON<br />
Red = Standby<br />
Flashing = IR Transmission in progress<br />
OK<br />
POWER ON/OFF<br />
OK<br />
Press both CHANNEL UP / DOWN buttons for confirrmation of selecion<br />
POWER ON/OFF<br />
BACK<br />
Confirmation of selection<br />
BACK<br />
CHANNEL UP/DOWN<br />
MENU<br />
Pressing button alternates between ON and STANDBY modes<br />
Enters and exits MENU system<br />
Moves back one level in MENU system<br />
Front Panel Buttons<br />
Digital Set-top Box (SCV-2110C)<br />
Press both VOLUME UP / DOWN buttons to move back one level in the MENU System<br />
MENU<br />
Enters and exits MENU system<br />
VOLUME UP/DOWN<br />
Volume change or navigates when in MENU system<br />
Channel change or navigates when in MENU system<br />
Pressing button alternates between ON and STANDBY modes<br />
Front Panel Buttons<br />
CHANNEL UP/DOWN<br />
VOLUME UP/DOWN<br />
POWER On LED Indicator<br />
Green = ON<br />
Red = Standby<br />
Flashing = IR Transmission in progress<br />
LED Indicators<br />
MUTE<br />
Volume change or navigates when in MENU system<br />
Channel change or navigates when in MENU system<br />
Red = Muted<br />
MESSAGE<br />
Yellow = Message Waiting<br />
Smart Card Slot<br />
Graphics<br />
ONLINE<br />
Smart Card Slot<br />
Graphics<br />
Green = IP address<br />
assigned by<br />
external<br />
cable modem<br />
1
2<br />
Digital Set-top Box (DCI15SHB)<br />
Front Panel Buttons<br />
Pressing button alternates between ON and STANDBY modes<br />
POWER ON/OFF<br />
IMPORTANT<br />
OK<br />
Confirmation of selection<br />
BACK<br />
Moves back one level in MENU system<br />
MENU<br />
Enters and exits MENU system<br />
POWER On LED Indicator<br />
Green = ON<br />
Red = Standby<br />
Flashing = IR Transmission in progress<br />
CHANNEL UP/DOWN<br />
Channel change or navigates when in MENU system<br />
Smart Card Slot<br />
Graphics<br />
ONLINE<br />
Green = IP address<br />
assigned by<br />
external<br />
cable modem<br />
VOLUME UP/DOWN<br />
Volume change or navigates when in MENU system<br />
• When you switch off your television set, you should always put the digital set-top box on<br />
stand-by mode for regular software updates.<br />
• Always place your digital set-top box on a smooth, flat surface.<br />
• Air should circulate freely under and around the box to prevent overheating. Do not place<br />
anything on top of your digital set-top box.<br />
• Do not place the digital set-top box near wet or moist areas.<br />
• If the display flickers and the digital set-top box does not change channels, unplug it from<br />
the wall cable point and wait at least ten seconds before plugging it back again. Press the<br />
ON/OFF button to reactivate the digital set-top box and try again.<br />
• Do not dismantle the digital set-top box to attempt servicing it on your own. Always refer to<br />
our Customer Care at 1633.<br />
Do not remove or deface the bar code label pasted on the digital set-top box.<br />
Getting Started
Getting Started<br />
Remote Control<br />
The remote control offers you the convenience of accessing the same features available from<br />
the digital set-top box remotely.<br />
Power On/Off<br />
TV Viewing or<br />
Last Channel Recall<br />
Mute On/Off<br />
IMPORTANT<br />
When using the remote control, make sure there are no obstructions between the remote<br />
control and the digital set-top box.<br />
If the channels can be changed with the digital set-top box and not with the remote control,<br />
check if the remote control batteries are weak.<br />
If you cannot change channels using either the digital set-top box or the remote control, do<br />
not attempt your own servicing. Check with our Customer Care at 1633.<br />
* For future use.<br />
Audio Track Selection<br />
Info Bar On/Off<br />
Navigation Buttons -<br />
Up/Down/Left/Right<br />
Confirmation Key<br />
Channel Change - Up/Down<br />
Back one level in Menu system<br />
Access Menu system<br />
Access Favourite Channels list<br />
Access Video Mosaic<br />
Red Green Yellow Blue<br />
Alphanumeric keypad for<br />
programme selection and<br />
selected application usage.<br />
Colour Function Keys<br />
Access TV Guide<br />
Volume Change - Up/Down<br />
Exit Menu system<br />
Access Demand TV<br />
Access TV Games<br />
3
4<br />
Getting Started<br />
Smart Card<br />
Every digital set-top box has a designated Smart Card which can be found in the Smart Card<br />
slot in the front of the digital set-top box.<br />
The Smart Card is used to store data of your unique customer subscription package. It also<br />
allows <strong>StarHub</strong> to provide 'live' updates of programme rights and other application data<br />
directly to your digital set-top box.<br />
This card is the property of<br />
<strong>StarHub</strong> and must be<br />
returned upon request.<br />
Nagravision is a trademark<br />
of Kudelski SA Switzerland<br />
To avoid service disruption, please do not<br />
remove this smart card from the slot.<br />
How To Insert<br />
If you are inserting your Smart Card, please follow the directional<br />
arrow indicated on the Smart Card. If your Smart Card is not<br />
inserted correctly, an error message will appear on your TV screen.<br />
Smart Card Slot<br />
IMPORTANT<br />
Please keep the Smart Card in its slot at all times. Removal of Smart Card can lead to<br />
disruption of programmes or interruption of regular software updates from <strong>StarHub</strong>.<br />
Should you suspect that your Smart Card is faulty, do not attempt to service it yourself. For<br />
assistance, please contact our Customer Care at 1633.
Guide To Digital Cable Applications<br />
On-Screen TV Guide<br />
The On-Screen TV Guide gives you access to comprehensive information on current and<br />
upcoming programmes including schedules, synopses, cast and crew, available audio tracks<br />
and programme genre for the channel of your choice. (Note: Information may not be available for some<br />
programmes).<br />
To access the On-Screen TV Guide, press the GUIDE button on your remote control. You<br />
will see the Channel Listing on your TV screen as shown below.<br />
How To Use<br />
Functions Directions<br />
1. To choose a channel. The channel you are currently watching is highlighted.<br />
Use the UP or DOWN arrow button on your<br />
remote control to scroll through the list of channels<br />
and press the OK button to go to the channel you<br />
wish to watch.<br />
2. To access current and upcoming Press the RIGHT arrow button on your remote<br />
programmes list. control for Programme Listing. The highlight and arrow<br />
buttons will move to the programme list on the right.<br />
3. To access programme schedules On the Programme Listing Page, press the<br />
for today. UP or DOWN arrow button to scroll.<br />
4. To access programme schedules Press the RIGHT arrow button on your remote<br />
for tomorrow. control.<br />
5. To access programmes schedules Press the RIGHT arrow button on your remote<br />
for the day after tomorrow. control.<br />
6. To access programme schedules Press RIGHT arrow button on your remote control.<br />
from 4th to 7th day. Press LEFT arrow button to return to the previous<br />
day.<br />
7. For additional information on Press the GREEN Green<br />
or INFO button .<br />
programmes.<br />
Note: Additional programme information such<br />
as synopses, cast and audio tracks<br />
may not be available for some programmes.<br />
5
6<br />
Guide to Digital Cable Features<br />
Genre Search<br />
To help you find your favourite programmes easily, you can sort the channels in the<br />
On-Screen TV Guide according to their genre.<br />
By default, the channels are arranged according to Channel Number.<br />
Yellow<br />
Use the YELLOW (SORT) button to sort the channels further. You can sort the channels in<br />
the On-Screen TV Guide in the following sequence:<br />
Channel Number<br />
International<br />
Lifestyle<br />
Channel Name<br />
Ethnic<br />
Entertainment<br />
(Alphabetical Order)<br />
Sports<br />
Movies<br />
Favourites List<br />
Kids<br />
News<br />
Education<br />
Chinese<br />
How To Use<br />
Functions Directions<br />
1. To sort the channels in the Press the GUIDE button on your remote control.<br />
On-Screen TV Guide according<br />
to genre.<br />
The channels are arranged according to Channel<br />
Number by default. Press the YELLOW (SORT)<br />
Yellow button once to arrange the channels according<br />
to Channel Name.<br />
Yellow<br />
Press the YELLOW (SORT) button again to<br />
display only the Favourites List.<br />
Yellow<br />
Continue to press the YELLOW (SORT) button to<br />
search through the other genres in the sequence above.
Guide To Digital Cable Applications<br />
Video Mosaic<br />
Video Mosaic allows you easy access to your full selection of channels. To access<br />
Video Mosaic, press the MOSAIC button on the remote control. A multiplex of 16 windows<br />
per page will be displayed. Each window represents one channel.<br />
How To Use<br />
Functions Directions<br />
1. To view all channels available. Press the MOSAIC button .<br />
Move the highlighted box using the LEFT or<br />
RIGHT arrow button on your remote control.<br />
2. To select a channel. Move the highlighted box to the selected channel<br />
and press the OK button on your remote<br />
control for a full-screen view. If you have not<br />
subscribed to the selected channels, you will not be<br />
able to have a full-screen view.<br />
3. To access the On-Screen TV Guide Move the highlighted box to the channel<br />
for a channel. you wish to select and press the GUIDE button .<br />
4. To return to Video Mosaic from Press the MOSAIC button .<br />
the On-Screen TV Guide.<br />
5. To exit Video Mosaic and return to Press the TV or EXIT button.<br />
the last watched channel anytime.<br />
7
8<br />
Guide To Digital Cable Applications<br />
Info Bar<br />
Info Bar gives you details of the programmes you are watching including the channel number,<br />
channel name, programme genre, programme title and programme start and end times.<br />
Details of programmes in the next 24 hours will also be available on the Info Bar.<br />
How To Use<br />
Functions Directions<br />
1. To access the Info Bar for a Press the INFO button on the remote control.<br />
programme you have selected.<br />
2. To access channel information for Use the UP or DOWN arrow button on your<br />
a programme currently showing remote control to scroll through the channel listings.<br />
on another channel.<br />
3. To check the programmes within Press RIGHT arrow button to proceed to the next<br />
24 hours. programme. Press LEFT arrow button to go back<br />
to the previous programme.<br />
Green<br />
4. To access more detailed Press the GREEN or INFO button.<br />
programme information.<br />
5. To access additional programme Press the GREEN Green or INFO button.<br />
information (Info Page).<br />
6. To select your preferred audio track Press the AUDIO button .<br />
for the programme.<br />
Note: Selection is possible only if another<br />
language is available.<br />
7. To toggle between English and Press the YELLOW (LANG) button Yellow .<br />
Chinese programme information.<br />
Note: Chinese programme information is<br />
available for Chinese programmes only.
Guide To Digital Cable Applications<br />
Programme Information In Chinese<br />
This mode allows for programme information to be in Chinese text for Chinese channels and<br />
in English text for all other channels.<br />
If you prefer, you may change the Preferred Language Setting to English to view all<br />
programme information in English only.<br />
How To Use<br />
Functions<br />
1. To change the Preferred<br />
Language.<br />
Programme Alert (Set Reminder)<br />
You can programme your digital set-top box to prompt you with an on-screen message when<br />
your favourite programmes are about to be shown. You can also set the preferred time for<br />
the message to appear, from 1 to 60 minutes before showtime.<br />
How To Use<br />
Functions<br />
1. To Add/Delete Alert<br />
Directions<br />
Press MENU button , select Settings using the UP<br />
or DOWN arrow buttons.<br />
Press RIGHT arrow button to select General and press<br />
OK button to confirm.<br />
Use the LEFT or RIGHT arrow button to select<br />
Bilingual or English as the Preferred Language Setting.<br />
Note: Chinese programme information is available only for Chinese programmes.<br />
Directions<br />
Press the GUIDE button on your remote control.<br />
Press the UP or DOWN arrow button to select the<br />
channel for programme you want to be alerted of.<br />
Press the RIGHT arrow button, followed by the UP<br />
or DOWN arrow button to select the appropriate<br />
programme time-slot.<br />
Press the YELLOW (ALERT) button Yellow to access the Set<br />
Reminder Screen.<br />
Press the GREEN (ADD) button Green to set your preferred<br />
Alert Duration (i.e. how long before the programme starts for<br />
the alert message to pop up on-screen).<br />
By pressing LEFT or RIGHT button, you can<br />
choose from the following options:<br />
1 min 2 min 5 min 15 min<br />
20 min 30 min 40 min 50 min 60 min<br />
Press the OK button to confirm your selection.<br />
To delete an alert, select the entry you want to delete and<br />
press the YELLOW (DELETE) button Yellow.<br />
The selected<br />
Programme Alert will be deleted from the list.<br />
9
10<br />
Guide to Digital Cable Features<br />
Favourite Channel Setting<br />
You can switch within a pre-selected list of preferred channels by pressing the FAVOURITE<br />
button on your remote control. To begin, you must select the channels to be included in<br />
your list of favourite channels.<br />
How To Use<br />
Functions Directions<br />
1. To set a favourite channel. Press the MENU button on your remote control.<br />
Select TV Guide followed by Favourites on the TV screen.<br />
Use the UP or DOWN arrow button to choose the<br />
channels and press the YELLOW (SELECT) button Yellow to<br />
select your favourite channels.<br />
Press the OK button to confirm your selection and<br />
return to the main Menu.<br />
2. To access a favourite Option 1<br />
channel. Press the FAVOURITE button on your remote control<br />
to access your favourite channels. Surf your favourite<br />
channels by pressing the FAVOURITE button .<br />
Option 2<br />
Press the GUIDE button while watching TV and your<br />
favourite channels will be listed in alphabetical order. Select<br />
the channel you want to watch and press the OK button .<br />
3. To remove a favourite Press the MENU button on your remote control.<br />
channel. Select TV Guide followed by Favourites on the TV screen.<br />
Use the YELLOW button Yellow<br />
to remove your previous<br />
selection(s).<br />
Press the OK button to confirm your selection and<br />
return to the main Menu.<br />
Last Channel Recall<br />
For instant access to the channel you were last viewing, press the TV button .
Guide To Digital Cable Applications<br />
Parental Lock Setting<br />
You may choose to lock a number of channels, after which they will only be accessible via a<br />
6-digit (numeric) Personal Identification Number (PIN). This feature allows parents to control<br />
what their children watch.<br />
How To Use<br />
Functions Directions<br />
1. To lock a channel. Press the MENU button on your remote control.<br />
Select TV Guide followed by Parental Lock on the TV screen.<br />
Enter your 6-digit numeric PIN to access the Channel Listing<br />
screen. (The default PIN is 000000). To set a new PIN, see<br />
Change PIN section.<br />
Scroll to the channel using the UP or DOWN arrow button.<br />
In the Channel Listing screen, use the YELLOW LANG button<br />
to select the channels you wish to lock.<br />
Blue<br />
Press the BLUE button to confirm and save your selection.<br />
The channels you have selected will now be accessible only by<br />
entering the correct 6-digit numeric PIN.<br />
2. To unlock a channel. Press the MENU button on your remote control. Select TV<br />
Guide followed by Parental Lock on the TV screen.<br />
Enter your 6-digit numeric PIN to access the Channel Listing screen.<br />
In the Channel Listing screen, use the YELLOW (LANG) button<br />
Yellow to select the channels you wish to unlock.<br />
Blue<br />
Press the BLUE button to confirm and save your selection.<br />
The channels you have selected are now unlocked and accessible<br />
by anyone.<br />
Yellow<br />
11
12<br />
Guide To Digital Cable Applications<br />
Auto-Tune Setting<br />
You may prepare your digital set-top box to switch channels at pre-determined times and<br />
dates for recording purposes.<br />
How To Use<br />
Functions Directions<br />
1. To access Auto-Tune. Press the MENU button on your remote control.<br />
Select TV Guide followed by Auto-Tune on the TV<br />
screen, to access the Auto-Tune event list.<br />
2. To add a new Auto-Tune event. Within the Auto-Tune screen, press the GREEN (ADD)<br />
button Green to add a new event. You will be required<br />
to set the following:<br />
Frequency Start Date<br />
Start Time Channel<br />
3. To set the Frequency. Use the LEFT or RIGHT arrow button to select<br />
from the following options:<br />
Once<br />
Daily<br />
Weekly<br />
4. To fix Start Date. Use the LEFT or RIGHT arrow button on<br />
your remote control to set the date for Auto-Tune to<br />
activate, e.g. Mon 05 Jan.<br />
5. To confirm Start Time. Using the number buttons on your remote control,<br />
enter the time you want the digital set-top box to<br />
switch to the channel of your choice. The time is<br />
displayed in 12-hour format, e.g. 01:30PM or<br />
11:25AM. Use the RIGHT arrow button to select<br />
"AM" or "PM".<br />
6. To select the Channel. Using the LEFT or RIGHT arrow button<br />
on your remote control, select the Channel you want<br />
the digital set-top box to tune to.<br />
When done, press the BLUE button Blue to confirm<br />
and save your options.<br />
7. To view and delete your preset Press the MENU button on your remote control.<br />
event. Select TV Guide followed by Auto-Tune on the TV<br />
screen to access the Auto-Tune event list.<br />
To delete an event on the list, select the event and<br />
Yellow<br />
press the YELLOW button . The selected event<br />
will be deleted from the list.
Guide To Digital Cable Applications<br />
Change PIN<br />
This function allows you to replace the default or old PIN of your digital set-top box with a new<br />
number. The PIN should be kept confidential as it will enable you secured access to selected<br />
services or features.<br />
How To Use<br />
Functions Directions<br />
1. To change/set a new PIN. Press the MENU button on your remote control.<br />
Note: Please be reminded that the PIN<br />
should be kept confidential.<br />
Select Settings followed by Change PIN on the<br />
TV screen.<br />
Enter your current 6-digit numeric PIN. (The default<br />
Blue<br />
PIN is set to 000000). Press the BLUE button to<br />
confirm your PIN and access the next screen.<br />
On the next screen, enter and confirm your new PIN.<br />
Blue<br />
Press the BLUE (OK) button to save the new PIN.<br />
A message will appear on-screen to inform you if the<br />
change has been successful. Press the BLUE button<br />
Blue again to return to the main Menu.<br />
13
14<br />
Guide To Digital Cable Applications<br />
Preference Settings<br />
This function personalises your viewing preferences including Info Bar Duration, Preferred<br />
Language, Preferred Audio, TV Aspect Ratio and Video Format.<br />
How To Use<br />
Functions<br />
1. To change Info Bar Duration.<br />
2. To change Preferred Language.<br />
3. To change Preferred Audio.<br />
4. To change Auto Load Ch Apps.<br />
5. To change the TV Display.<br />
6. Video Format.<br />
Directions<br />
Press MENU button on your remote control.<br />
Select Settings followed by General, then select Info<br />
Bar Duration.<br />
Use the LEFT or RIGHT arrow button to set<br />
the duration you wish the Info Bar to appear on the TV<br />
screen.<br />
Press the OK button to confirm your selection.<br />
Select Settings followed by General. Scroll to<br />
Preferred Language and use the LEFT or<br />
RIGHT arrow button to change the settings.<br />
The default language is Bilingual. This mode<br />
allows for programme information to be in Chinese<br />
text for Chinese channels and English text for all<br />
other channels.<br />
Select Settings followed by General. Scroll to<br />
Preferred Audio and use the LEFT or RIGHT<br />
arrow button to select your Preferred Audio language.<br />
Select Settings followed by General. Scroll to Auto<br />
Load Ch Apps and use the LEFT or RIGHT<br />
arrow button to change the settings.<br />
The default setting is Yes. This mode allows all<br />
applications (EG. HBO On Demand, Ch 602) to<br />
automatically load the portal.<br />
Select Settings followed by General. Scroll to TV<br />
display and use the LEFT or RIGHT arrow<br />
buttons to select your TV display settings (Standard<br />
or Widescreen).<br />
If you are using a widescreen TV set, you can set the<br />
TV display to widescreen to enjoy selected channels<br />
in widescreen format.<br />
Default Pal
Guide To Interactive Servcies<br />
Interactive TV<br />
Interactive TV on channel 899 brings you a whole new level of experience via your existing TV,<br />
into a world of information and interactivity, 24 hours a day, 7 days a week.<br />
The suite of content available for a start includes, “Live” Financial Stock prices, Lottery results,<br />
Weather report, Movies Showtime’s, <strong>StarHub</strong> Promotions, Communities, etc.<br />
For the first time in Singapore, you can now purchase Golden Village movie tickets via<br />
Interactive TV. Select your movie and buy up to 8 days in advance from the comfort of your<br />
couch. What’s more, you will automatically get to enjoy GV Movie Club membership from first<br />
purchase.<br />
With more upcoming free content, there will be no more toggling between mobile and the web<br />
as your television will have it all.<br />
TV Games<br />
Playin’TV is a round-the-clock games channel that offers easy-to-play and exciting interactive<br />
TV games your whole family will love. There are five complimentary TV games and 19 paid<br />
games for your whole family to enjoy.<br />
Select Playin’TV at the GAMELAND portal to access the 19 paid games on the TV screen.<br />
Playing instructions are available within each game.<br />
To access your favourite free TV games, press the Games button on your remote control.<br />
When you see the GAMELAND portal, select FunZone to launch the complimentary TV games<br />
page or select Free Games to enjoy a free game from Playin ‘TV.<br />
15
16<br />
Guide to Interactive Services<br />
eTV (Available only for eTV supported programmes)<br />
eTV provides you more interactivity with your favourite TV programme. You can get more<br />
information on the programme you are watching and even participate in votes and contests<br />
while watching TV.<br />
Green<br />
To access eTV, press the GREEN button on the remote control when the eTV icon appears<br />
on the top of the screen.<br />
How To Use<br />
Functions<br />
Directions<br />
1. To access the different tabs on eTV Use the LEFT , RIGHT , UP or DOWN<br />
arrow buttons to select the different tabs. Select<br />
OK button to confirm.<br />
2. To select the categories within eTV Use the LEFT , RIGHT , UP or DOWN<br />
arrow buttons to select the different tabs. Select<br />
OK button to confirm.<br />
3. To exit eTV and return to the last Press BACK , TV , EXIT or YELLOW<br />
Yellow<br />
watched channel buttons.
Technical Information<br />
Installation Guide - Digital Set-top Box (ABQ-1H57-SCV)<br />
Option 1: Connection via AV cables (Recommended)<br />
<strong>StarHub</strong><br />
CableTV point<br />
1<br />
Connect RF cable<br />
from the cable TV<br />
point to the digital<br />
set-top box Cable In.<br />
Digital set-top box<br />
(Back)<br />
CABLE IN TV OUT<br />
TV<br />
(Back)<br />
RIGHT LEFT<br />
Red White Yellow<br />
STEREO AUDIO<br />
To TV AV In<br />
VIDEO<br />
ETHERNET<br />
4<br />
2<br />
POWER CABLE<br />
Switch your TV to the<br />
AV Channel to watch your<br />
<strong>StarHub</strong> TV programmes.<br />
Connect AV cable from the<br />
digital set-top box AV Out to<br />
TV AV In.<br />
3 Power on the<br />
digital set-top box<br />
and TV unit.<br />
Viewing Procedure<br />
1) Switch your TV to the AV Channel to watch your programmes.<br />
2) Select the desired channel using the remote control of your digital set-top box.<br />
Video<br />
Yellow<br />
HDMI/DVI<br />
AV<br />
L<br />
White<br />
RF IN<br />
R<br />
Red<br />
R<br />
Red<br />
L<br />
White<br />
STEREO AUDIO<br />
Y<br />
Green<br />
Component<br />
Pb<br />
Blue<br />
Video<br />
Yellow<br />
Video<br />
Pr<br />
Red<br />
TV<br />
(Back)<br />
Video<br />
Yellow<br />
RF IN<br />
AV<br />
L<br />
White<br />
R<br />
Red<br />
R<br />
Red<br />
Y<br />
Green<br />
STEREO AUDIO<br />
L<br />
White<br />
Component<br />
Pb<br />
Blue<br />
Video<br />
Yellow<br />
Video<br />
Pr<br />
Red<br />
17
18<br />
Technical Information<br />
Installation Guide - Digital Set-top Box (ABQ-1H57-SCV)<br />
Option 2: Connection via RF cables – For TV units without AV inputs<br />
<strong>StarHub</strong><br />
CableTV point<br />
1<br />
Connect RF cable<br />
from the cable TV<br />
point to the digital<br />
set-top box Cable In.<br />
Digital set-top box<br />
(Back)<br />
CABLE IN TV OUT<br />
TV<br />
(Back)<br />
RIGHT LEFT<br />
STEREO AUDIO<br />
Viewing Procedure<br />
1) Tune TV unit to receive programmes from your digital set-top box.<br />
(Refer to the Tuning Procedures)<br />
2) Select the pre-tuned RF channel.<br />
3) Select the channel using the remote control of your digital set-top box.<br />
Video<br />
Yellow<br />
HDMI/DVI<br />
L<br />
White<br />
Audio<br />
RF IN<br />
Red White Yellow<br />
VIDEO<br />
Component<br />
R<br />
Red<br />
R<br />
Red<br />
L<br />
White<br />
STEREO AUDIO<br />
Y<br />
Green<br />
Pb<br />
Blue<br />
Video<br />
Video<br />
Yellow<br />
Video<br />
Pr<br />
Red<br />
ETHERNET<br />
4<br />
2<br />
Tune TV unit to receive<br />
programmes from your digital<br />
set-top box.<br />
(Refer to Tuning Procedures).<br />
TV (Back)<br />
RF IN<br />
Connect a second RF cable from the<br />
digital set-top box to the TV RF In.<br />
POWER CABLE<br />
3 Power on the<br />
digital set-top box<br />
and TV unit.
Technical Information<br />
Installation Guide - Digital Set-top Box (ABQ-1H57-SCV)<br />
Option 3: Connection via AV cables to VCR/DVD-R<br />
Please refer to the steps in the following diagram to connect your digital set-top box,<br />
VCR/DVD-R and TV unit. This connection will allow three different recording scenarios as<br />
shown in the Recording section.<br />
<strong>StarHub</strong><br />
CableTV point<br />
Digital set-top box<br />
(Back)<br />
CABLE IN TV OUT<br />
1<br />
Connect RF cable<br />
from the cable TV<br />
point to the digital<br />
set-top box Cable In.<br />
VCR/DVD-R<br />
(Back)<br />
RF IN RF OUT<br />
AV 1<br />
AV 2<br />
RIGHT LEFT<br />
Red White Yellow<br />
STEREO AUDIO<br />
5<br />
Connect the<br />
RF cable from the<br />
digital set-top box TV Out<br />
to VCR/DVD-R RF In.<br />
RIGHT LEFT<br />
STEREO AUDIO<br />
To TV<br />
AV In<br />
3<br />
VIDEO<br />
VIDEO<br />
Red White Yellow<br />
2<br />
To TV AV In<br />
TV<br />
(Back)<br />
Connect AV cable from<br />
digital set-top box AV Out<br />
to TV AV In.<br />
ETHERNET<br />
POWER CABLE<br />
6 Connect RF cable from VCR/DVD-R RF Out to TV RF In.<br />
IMPORTANT<br />
Only 1 set of AV cables and 1 set of RF cables are included during installation.<br />
VCR/DVD-R must be tuned to all free-to-air frequencies for the recording function to work. For VCR/DVD-R tuning<br />
procedures, refer to the VCR/DVD-R manual.<br />
TV must be tuned to all free-to-air frequencies so that you can watch free-to-air channels on your TV while recording a<br />
<strong>StarHub</strong> TV channel on your VCR/DVD-R.<br />
Video<br />
Yellow<br />
HDMI/DVI<br />
AV<br />
L<br />
White<br />
POWER CABLE<br />
Connect AV cable from<br />
digital set-top box AV Out<br />
to VCR/DVD-R AV In.<br />
RF IN<br />
R<br />
Red<br />
R<br />
Red<br />
L<br />
White<br />
STEREO AUDIO<br />
Y<br />
Green<br />
Component<br />
Pb<br />
Blue<br />
Video<br />
Yellow<br />
Video<br />
Pr<br />
Red<br />
TV<br />
(Back)<br />
Video<br />
Yellow<br />
RF IN<br />
RF IN<br />
AV<br />
L<br />
White<br />
R<br />
Red<br />
R<br />
Red<br />
Y<br />
Green<br />
STEREO AUDIO<br />
L<br />
White<br />
Component<br />
Pb<br />
Blue<br />
To TV<br />
RF In<br />
4<br />
Connect AV cable from<br />
VCR/DVD-R AV Out to<br />
another TV AV In.<br />
Video<br />
Yellow<br />
Video<br />
Pr<br />
Red<br />
19
20<br />
Technical Information<br />
Installation Guide - Digital Set-top Box (SCV-2110C)<br />
Option 1: Connection via AV cables (Recommended)<br />
Digital set-top box (Back)<br />
POWER<br />
CABLE<br />
ETHERNET Video<br />
Audio<br />
3 Power on the<br />
digital set-top box<br />
and TV unit.<br />
Viewing Procedure<br />
Do Not Open<br />
VCR R L<br />
TV R<br />
Do Not Open<br />
L<br />
TV OUT CABLE IN<br />
1) Switch your TV to the AV Channel to watch your programmes.<br />
Video<br />
TV<br />
(Back)<br />
2 Connect AV cable from digital<br />
set-top box AV Out to TV AV In.<br />
1 Connect RF cable<br />
from the cable TV<br />
point to the digital<br />
set-top box Cable In.<br />
2) Select the desired channel using the remote control of your digital set-top box.<br />
Video<br />
Yellow<br />
Audio<br />
HDMI/DVI<br />
AV<br />
L<br />
White<br />
RF IN<br />
R<br />
Red<br />
R<br />
Red<br />
L<br />
White<br />
STEREO AUDIO<br />
Y<br />
Green<br />
Component<br />
Pb<br />
Blue<br />
Video<br />
Yellow<br />
Video<br />
Pr<br />
Red<br />
To TV AV In<br />
TV<br />
(Back)<br />
Video<br />
Yellow<br />
RF IN<br />
AV<br />
L<br />
White<br />
R<br />
Red<br />
R<br />
Red<br />
Y<br />
Green<br />
STEREO AUDIO<br />
L<br />
White<br />
Component<br />
Pb<br />
Blue<br />
Video<br />
Yellow<br />
Video<br />
Pr<br />
Red<br />
<strong>StarHub</strong><br />
CableTV point
Technical Information<br />
Installation Guide - Digital Set-top Box (SCV-2110C)<br />
Option 2: Connection via RF cables – For TV units without AV inputs<br />
Digital set-top box (Back)<br />
POWER<br />
CABLE<br />
ETHERNET Video<br />
Audio<br />
3 Power on the<br />
digital set-top box<br />
and TV unit.<br />
Viewing Procedure<br />
Do Not Open<br />
VCR R L<br />
1) Tune TV unit to receive programmes from your digital set-top box.<br />
(Refer to the Tuning Procedures)<br />
2) Select the pre-tuned RF channel.<br />
TV<br />
(Back)<br />
TV R<br />
Do Not Open<br />
L<br />
Video<br />
TV OUT CABLE IN<br />
3) Select the channel using the remote control of your digital set-top box.<br />
Video<br />
Yellow<br />
Audio<br />
HDMI/DVI<br />
L<br />
White<br />
Audio<br />
RF IN<br />
Component<br />
R<br />
Red<br />
R<br />
Red<br />
L<br />
White<br />
STEREO AUDIO<br />
Y<br />
Green<br />
Pb<br />
Blue<br />
Video<br />
Video<br />
Yellow<br />
Video<br />
Pr<br />
Red<br />
4<br />
2<br />
Tune TV unit to receive<br />
programmes from your digital<br />
set-top box.<br />
(Refer to Tuning Procedures).<br />
TV (Back)<br />
RF IN<br />
Connect a second RF cable from the<br />
digital set-top box to the TV RF In.<br />
<strong>StarHub</strong><br />
CableTV point<br />
1 Connect RF cable<br />
from the cable TV<br />
point to the digital<br />
set-top box Cable In.<br />
21
22<br />
Technical Information<br />
Installation Guide - Digital Set-top Box (SCV-2110C)<br />
Option 3: Connection via AV Cables to VCR/DVD-R<br />
Please refer to the steps in the following diagram to connect your digital set-top box,<br />
VCR/DVD-R and TV unit. This connection will allow three different recording scenarios as<br />
shown in the Recording section.<br />
2<br />
Connect AV cable from digital<br />
set-top box AV Out to TV AV In.<br />
Model: SCV-3110C (Back)<br />
Do Not Open<br />
VCR R L<br />
POWER<br />
CABLE<br />
ETHERNET Video<br />
Audio<br />
3 Power on the<br />
digital set-top box<br />
and TV unit.<br />
VCR/DVD-R<br />
(Back)<br />
RF IN RF OUT<br />
RIGHT LEFT<br />
Red White Yellow<br />
STEREO AUDIO<br />
VIDEO<br />
To TV AV In<br />
TV<br />
(Back)<br />
IMPORTANT<br />
Only 1 set of AV cables and 1 set of RF cables are included during installation.<br />
VCR/DVD-R must be tuned to all free-to-air frequencies for the recording function to work. For VCR/DVD-R tuning<br />
procedures, refer to the VCR/DVD-R manual.<br />
TV must be tuned to all free-to-air frequencies so that you can watch free-to-air channels on your TV while recording a<br />
<strong>StarHub</strong> TV channel on your VCR/DVD-R.<br />
Video<br />
Yellow<br />
HDMI/DVI<br />
AV<br />
L<br />
White<br />
RF IN<br />
R<br />
Red<br />
R<br />
Red<br />
L<br />
White<br />
STEREO AUDIO<br />
Y<br />
Green<br />
TV R<br />
Do Not Open<br />
L<br />
Video<br />
Component<br />
Pb<br />
Blue<br />
Video<br />
Yellow<br />
Video<br />
Pr<br />
Red<br />
5<br />
Connect the RF cable from the<br />
digital set-top box TV Out to<br />
VCR/DVD-R RF In.<br />
POWER CABLE<br />
Audio<br />
To TV AV In<br />
TV<br />
(Back)<br />
Video<br />
Yellow<br />
RF IN<br />
AV<br />
L<br />
White<br />
TV OUT CABLE IN<br />
6 Connect RF cable from VCR/DVD-R RF Out to TV RF In.<br />
R<br />
Red<br />
RF IN<br />
R<br />
Red<br />
Y<br />
Green<br />
STEREO AUDIO<br />
L<br />
White<br />
Component<br />
Pb<br />
Blue<br />
Video<br />
Yellow<br />
Video<br />
Pr<br />
Red<br />
To TV<br />
RF In<br />
<strong>StarHub</strong><br />
CableTV point<br />
1 Connect RF cable<br />
from the cable TV<br />
point to the digital<br />
set-top box Cable In.<br />
4<br />
Connect AV cable from<br />
VCR/DVD-R AV Out to<br />
another TV AV In.
Technical Information<br />
Installation Guide - Digital Set-top Box (DCI15SHB)<br />
Option 1: Connection via AV cables (Recommended)<br />
<strong>StarHub</strong><br />
CableTV point<br />
1<br />
Connect RF cable<br />
from the cable TV<br />
point to the digital<br />
set-top box Cable In.<br />
TV OUT CABLE IN<br />
Digital set-top box (Back)<br />
Viewing Procedure<br />
ETHERNET<br />
TV<br />
Yellow<br />
VIDEO<br />
TV<br />
(Back)<br />
White<br />
LEFT<br />
1) Switch your TV to the AV Channel to watch your programmes.<br />
2) Select the desired channel using the remote control of your digital set-top box.<br />
Video<br />
Yellow<br />
HDMI/DVI<br />
AV<br />
L<br />
White<br />
RF IN<br />
Red<br />
RIGHT<br />
R<br />
Red<br />
R<br />
Red<br />
L<br />
White<br />
STEREO AUDIO<br />
Y<br />
Green<br />
Component<br />
Pb<br />
Blue<br />
Video<br />
Yellow<br />
Video<br />
Pr<br />
Red<br />
To TV AV In<br />
VCR<br />
Yellow<br />
VIDEO<br />
White<br />
LEFT<br />
4<br />
2<br />
Switch your TV to the<br />
AV Channel to watch your<br />
<strong>StarHub</strong> TV programmes.<br />
TV<br />
(Back)<br />
Video<br />
Yellow<br />
RF IN<br />
Connect AV cable from the<br />
digital set-top box AV Out to<br />
TV AV In.<br />
Red<br />
RIGHT<br />
AV<br />
L<br />
White<br />
R<br />
Red<br />
Yellow<br />
VIDEO<br />
Black<br />
SPDIF<br />
R<br />
Red<br />
Y<br />
Green<br />
POWER<br />
CABLE<br />
STEREO AUDIO<br />
L<br />
White<br />
Component<br />
Pb<br />
Blue<br />
Video<br />
Yellow<br />
Video<br />
Pr<br />
Red<br />
3 Power on the<br />
digital set-top box<br />
and TV unit.<br />
23
24<br />
Technical Information<br />
Installation Guide - Digital Set-top Box (DCI15SHB)<br />
Option 2: Connection via RF cables – For TV units without AV inputs<br />
<strong>StarHub</strong><br />
CableTV point<br />
L<br />
R<br />
Y<br />
1<br />
Video<br />
Yellow<br />
White<br />
Audio<br />
Red<br />
Green<br />
Pb<br />
Pr<br />
Blue<br />
Red<br />
Video<br />
Connect RF cable<br />
from the cable TV<br />
point to the digital<br />
RF IN<br />
set-top box Cable In. To TV AV In<br />
TV OUT CABLE IN<br />
Digital set-top box (Back)<br />
Viewing Procedure<br />
ETHERNET<br />
Yellow<br />
VIDEO<br />
1) Tune TV unit to receive programmes from your digital set-top box.<br />
(Refer to the Tuning Procedures)<br />
2) Select the pre-tuned RF channel.<br />
TV<br />
TV<br />
(Back)<br />
3) Select the channel using the remote control of your digital set-top box.<br />
White<br />
LEFT<br />
HDMI/DVI<br />
Red<br />
RIGHT<br />
R<br />
Red<br />
Component<br />
L<br />
White<br />
STEREO AUDIO<br />
Video<br />
Yellow<br />
Video<br />
VCR<br />
Yellow<br />
VIDEO<br />
4<br />
White<br />
LEFT<br />
Tune TV unit to receive<br />
programmes from your digital<br />
set-top box.<br />
(Refer to Tuning Procedures).<br />
TV (Back)<br />
RF IN<br />
Red<br />
RIGHT<br />
2 Connect a second RF<br />
cable from the digital<br />
set-top box to the TV<br />
RF In.<br />
Yellow<br />
VIDEO<br />
Black<br />
SPDIF<br />
POWER<br />
CABLE<br />
3 Power on the<br />
digital set-top box<br />
and TV unit.
Technical Information<br />
Installation Guide - Digital Set-top Box (DCI15SHB)<br />
Option 3: Connection via AV cables to VCR/DVD-R<br />
Please refer to the steps in the following diagram to connect your digital set-top box,<br />
VCR/DVD-R and TV unit. This connection will allow three different recording scenarios as<br />
shown in the Recording section.<br />
<strong>StarHub</strong><br />
CableTV point 1<br />
Connect RF cable<br />
from the cable TV<br />
point to the<br />
digital set-top box<br />
Cable In.<br />
TV OUT CABLE IN<br />
ETHERNET<br />
TV<br />
Digital set-top box (Back)<br />
VCR/DVD-R (Back)<br />
RF IN RF OUT<br />
Yellow<br />
VIDEO<br />
To TV<br />
AV In<br />
5<br />
Connect the RF cable from<br />
the digital set-top box TV Out<br />
to VCR/DVD-R RF In.<br />
RIGHT LEFT<br />
White<br />
LEFT<br />
Red<br />
RIGHT<br />
Red White Yellow<br />
STEREO AUDIO<br />
6<br />
2<br />
VIDEO<br />
To TV AV In<br />
TV<br />
(Back)<br />
VCR<br />
Yellow<br />
VIDEO<br />
IMPORTANT<br />
Only 1 set of AV cables and 1 set of RF cables are included during installation.<br />
VCR/DVD-R must be tuned to all free-to-air frequencies for the recording function to work. For VCR/DVD-R tuning<br />
procedures, refer to the VCR/DVD-R manual.<br />
TV must be tuned to all free-to-air frequencies so that you can watch free-to-air channels on your TV while recording a<br />
<strong>StarHub</strong> TV channel on your VCR/DVD-R.<br />
White<br />
LEFT<br />
Video<br />
Yellow<br />
HDMI/DVI<br />
AV<br />
L<br />
White<br />
RF IN<br />
R<br />
Red<br />
R<br />
Red<br />
L<br />
White<br />
STEREO AUDIO<br />
Y<br />
Green<br />
Red<br />
RIGHT<br />
Component<br />
Pb<br />
Blue<br />
Video<br />
Yellow<br />
Video<br />
Pr<br />
Red<br />
Connect AV cable from digital<br />
set-top box AV Out to TV AV In.<br />
POWER CABLE<br />
3<br />
Yellow<br />
VIDEO<br />
Black<br />
SPDIF<br />
TV<br />
(Back)<br />
Video<br />
Yellow<br />
POWER<br />
CABLE<br />
RF IN<br />
AV<br />
L<br />
White<br />
Connect AV cable<br />
from digital set-top box<br />
AV Out to VCR/DVD-R AV In.<br />
Connect RF cable from VCR/DVD-R RF Out to TV RF In.<br />
R<br />
Red<br />
R<br />
Red<br />
Y<br />
Green<br />
STEREO AUDIO<br />
To TV<br />
RF In<br />
4<br />
Connect AV cable from<br />
VCR/DVD-R AV Out to<br />
another TV AV In.<br />
L<br />
White<br />
Component<br />
Pb<br />
Blue<br />
Video<br />
Yellow<br />
Video<br />
Pr<br />
Red<br />
25
26<br />
Technical Information<br />
Tuning Procedures<br />
To receive the channels for option 2, the TV unit must be tuned to UHF Channel 67<br />
(838Mhz to 846Mhz). You can use either the TV remote control or the button on the<br />
front panel of the TV unit for tuning.<br />
Tuning Procedures-Auto<br />
1. Turn on your digital set-top box. Wait one minute for initialisation to complete before<br />
you press the MOSAIC button on the remote control of the digital set-top box.<br />
2. Press the AUTO SEARCH button on the front panel of the TV or select<br />
[MENU>TUNE>AUTO] from the TV remote control.<br />
3. The TV unit will automatically search and lock all available TV channels assigning each<br />
channels with a CHANNEL NUMBER (#).<br />
4. Pay attention to the CHANNEL NUMBER (#) that is assigned to the <strong>StarHub</strong> TV<br />
channel.<br />
5. Once the Auto Search is complete, press the CHANNEL NUMBER (#) that has been<br />
assigned to receive the <strong>StarHub</strong> TV channel.<br />
Tuning Procedures-Manual<br />
1. Turn on your digital set-top box. Wait one minute for initialisation to complete before<br />
you press the MOSAIC button on the remote control of the digital set-top box.<br />
2. Select an unused CHANNEL on the TV unit.<br />
3. Press the TUNING button on the TV remote control or at the front panel of the TV unit,<br />
commonly labeled as [PRESET], [INSTALL], [SET], [P/C] or [MENU>TUNE>MANUAL]. If<br />
the TV unit does not have any of these buttons, please refer to the TV manual.<br />
4. Start tuning by pressing or selecting the VOLUME +/- button or the CHANNEL<br />
UP/DOWN button on the TV remote control until the <strong>StarHub</strong> TV channel appears on<br />
the screen.<br />
5. Next, press the STORE or MEM button on the TV remote control to store the tuning.<br />
6. Press the MENU or PRESET button to end or exit the tuning procedure.
Technical Information<br />
Recording<br />
Scenario A : Record and view the current <strong>StarHub</strong> TV channel<br />
1. To view<br />
<strong>StarHub</strong> TV channel.<br />
TV: Select the correct<br />
channel i.e. AV1/2 or<br />
AUX etc.<br />
2. Select the desired<br />
<strong>StarHub</strong> TV channel<br />
using the remote<br />
control of the digital<br />
set-top box.<br />
3. To record<br />
<strong>StarHub</strong> TV channel.<br />
VCR/DVD-R : Select the<br />
AV In from the VCR/DVD-R<br />
i.e. AV1/2 or AUX etc.<br />
Press the "Record" button.<br />
Scenario B : Record free-to-air channel and view <strong>StarHub</strong> TV channel<br />
1. To view <strong>StarHub</strong> TV channel.<br />
Please follow steps 1 and 2 of Scenario A.<br />
2. To record free-to-air<br />
channel.<br />
VCR/DVD-R: Select the<br />
pre-tuned free-to-air<br />
channel that you want<br />
to record (eg. Channel<br />
no. 1,2,etc.) and press<br />
the "Record" button.<br />
Digital set-top box<br />
(Back)<br />
CABLE IN TV OUT<br />
AV 1<br />
AV 2<br />
<strong>StarHub</strong><br />
CableTV point<br />
Digital set-top box<br />
(Back)<br />
RIGHT LEFT<br />
Red White Yellow<br />
STEREO AUDIO<br />
TV<br />
(Back)<br />
RIGHT LEFT<br />
Red White Yellow<br />
STEREO AUDIO<br />
VIDEO<br />
Digital set-top box<br />
(Back)<br />
CABLE IN TV OUT<br />
HDMI/DVI<br />
R<br />
L<br />
Video<br />
Red<br />
White<br />
Yellow<br />
STEREO AUDIO<br />
Video<br />
Component<br />
Video<br />
L<br />
R<br />
Y<br />
Pb<br />
Pr<br />
Yellow<br />
White<br />
Red<br />
Green<br />
Blue<br />
Red<br />
Audio<br />
Video<br />
RF IN<br />
To TV AV In<br />
VIDEO<br />
ETHERNET<br />
VCR/DVD-R (Back)<br />
RIGHT LEFT<br />
Red White Yellow<br />
STEREO AUDIO<br />
TV<br />
(Back)<br />
Video<br />
Yellow<br />
POWER CABLE<br />
VCR/DVD-R (Back)<br />
RF IN<br />
RF IN<br />
L<br />
White<br />
Audio<br />
VIDEO<br />
R<br />
L<br />
Video<br />
Red<br />
White<br />
Yellow<br />
STEREO AUDIO<br />
Video<br />
Component<br />
R<br />
Red<br />
Y<br />
Green<br />
Pb<br />
Blue<br />
Video<br />
RF OUT<br />
Pr<br />
Red<br />
27
28<br />
Scenario C : Record <strong>StarHub</strong> TV channel and view free-to-air channel<br />
1. To view free-to-air<br />
channel.<br />
TV: Select the pre-tuned<br />
free-to-air channel.<br />
(Refer to Installation<br />
Guide section for<br />
tuning procedures).<br />
2. To record <strong>StarHub</strong><br />
TV channel.<br />
Channel Settings: Select<br />
the desired <strong>StarHub</strong> TV<br />
channel using the<br />
remote control of the<br />
digital set-top box.<br />
VCR/DVD-R: Select the<br />
correct channel i.e. AV<br />
1/2 or AUX etc. Press<br />
the "Record" button.<br />
1. VCR: Load video tape<br />
into VCR and press<br />
"Play".<br />
DVD-R: Load CD-ROM<br />
into DVD-R and press<br />
"Play".<br />
2. Play-back to new tape.<br />
VCR/DVD-R: Select the<br />
correct channel i.e. AV<br />
1/2 or AUX etc.<br />
<strong>StarHub</strong><br />
CableTV point<br />
CABLE IN TV OUT<br />
AV 1<br />
AV 2<br />
Digital set-top box<br />
(Back)<br />
VCR/DVD-R (Back)<br />
RIGHT LEFT<br />
Digital set-top box<br />
(Back)<br />
RIGHT LEFT<br />
Red White Yellow<br />
STEREO AUDIO<br />
STEREO AUDIO<br />
Red White Yellow<br />
VIDEO<br />
VIDEO<br />
To TV AV In<br />
VCR/DVD-R (Back)<br />
RF IN<br />
VCR/DVD-R (Back)<br />
RIGHT LEFT<br />
TV (Back)<br />
AV In<br />
RF OUT<br />
Red White Yellow<br />
STEREO AUDIO<br />
Scenario D : To view tape from VCR/DVD-R<br />
VCR<br />
DVD-R<br />
AV In<br />
VIDEO<br />
RIGHT LEFT<br />
Technical Information<br />
Option 4: Recording<br />
Red White Yellow<br />
STEREO AUDIO<br />
TV (Back)<br />
VIDEO<br />
RF IN
Trouble Shooting<br />
Tips For Improving TV Reception<br />
If you experience any disturbance in your TV reception, the problem may be due to a minor<br />
oversight. Here's an important checklist that may help you locate the source of the problem<br />
quickly:<br />
Always ensure that all devices (TV, digital set-top box, VCR and DVD-R) are plugged into<br />
your power outlet and the power is turned on.<br />
Ensure that all cable connections are intact and tight.<br />
Inspect all cords for wear and tear.<br />
Check that the selected channel on your TV unit is tuned to UHF Channel 67<br />
(838Mhz to 846Mhz).<br />
In addition, you can also try the following steps:<br />
Problem Trouble Shooting<br />
Picture Adjust horizontal control of TV unit.<br />
leaning/flipping<br />
Picture too Adjust brightness control of TV unit.<br />
bright or dark<br />
Blank screen, Check if TV brightness and contrast controls are adjusted.<br />
sound ok<br />
Picture rolling Adjust vertical hold of TV unit.<br />
No sound, Adjust TV or digital set-top box volume control.<br />
picture ok Check if either are in MUTE mode.<br />
Washed-out picture Adjust TV contrast control.<br />
No picture Turn OFF and turn ON the main power to the digital set-top box.<br />
Check all connections.<br />
Check other channels.<br />
Pixelised picture Check other electrical appliance in operation.<br />
Check for loose connection.<br />
Check other channels.<br />
Remote control Check for obstacles in the line of sight between the remote<br />
not working control and the digital set-top box.<br />
Check the batteries of the remote control for the digital set-top box.<br />
If you encounter any difficulties which you cannot resolve, we will be pleased to be of assistance.<br />
Just call our Customer Care at 1633.<br />
29
30<br />
Signal Leakage<br />
A Reminder<br />
It is very important that you do not tamper with the cable wiring in your home once <strong>StarHub</strong>'s<br />
signals are connected to your TV points. This is because you could cause signal leakage.<br />
Signal leakage is the unwanted radiation of cable signals into the atmosphere from a<br />
component in the cable network which is faulty or improperly installed. As some of the cable<br />
signals carried in our cable network are on the same frequencies as those used in the air for<br />
other communication services like those used by the police, military and other essential<br />
services, leakage will be disruptive and is a very serious problem. If you intend to renovate<br />
and have your home upgraded to cable ready status, or need to relocate or rewire your TV<br />
points, please approach a COPIF approved cable contractor who is trained to do this work. If<br />
you need help regarding signal leakage or the cabling in your home, call <strong>StarHub</strong>'s Public<br />
Hotline at 6873 2828.<br />
IMPORTANT<br />
Causing signal leakage is a very serious offence as it disrupts the communication services of<br />
legitimate users. Infocomm Development Authority of Singapore (IDA) manages and polices<br />
the airwaves. When the need arises, <strong>StarHub</strong> may have to enter your home to test for signal<br />
leakage. The penalties for creating communication interference are severe, so be sure to<br />
contact a qualified cable contractor.<br />
General Information<br />
MACROVISION Product Notice<br />
This product incorporates copyright protection technology that is protected by U.S. patents<br />
and other intellectual property rights. Use of this copyright protection technology must be<br />
authorized by Macrovision, and is intended for home and other limited viewing uses only<br />
unless authorized by Macrovision. Reverse engineering or disassembly is prohibited.