Dental Asia November/December 2022
For more than two decades, Dental Asia is the premium journal in linking dental innovators and manufacturers to its rightful audience. We devote ourselves in showcasing the latest dental technology and share evidence-based clinical philosophies to serve as an educational platform to dental professionals. Our combined portfolio of print and digital media also allows us to reach a wider market and secure our position as the leading dental media in the Asia Pacific region while facilitating global interactions among our readers.
For more than two decades, Dental Asia is the premium journal in linking dental innovators and manufacturers to its rightful audience. We devote ourselves in showcasing the latest dental technology and share evidence-based clinical philosophies to serve as an educational platform to dental professionals. Our combined portfolio of print and digital media also allows us to reach a wider market and secure our position as the leading dental media in the Asia Pacific region while facilitating global interactions among our readers.

Create successful ePaper yourself
Turn your PDF publications into a flip-book with our unique Google optimized e-Paper software.
BEHIND THE SCENES<br />
prepare ourselves accordingly and I would<br />
recommend the following actions:<br />
1. Always use tools that are suitable for<br />
zirconia finishing in the green state. I use<br />
the Amann Girrbach Green State Finishing<br />
Kit, it contains all the tools I need.<br />
2. The speed specifications of the tools<br />
should always be observed.<br />
3. Zirconia in the green state is very<br />
sensitive, never use too high pressure<br />
and/or blunt tools.<br />
4. Always keep in mind that the zirconia<br />
shrinks by almost 20%. Due to that fact,<br />
the surface characterisation should be<br />
a bit deeper, but never make notches in<br />
areas under tensile stress.<br />
5. Use gloves and a mask and work cleanly,<br />
milling dust must be completely removed<br />
before sintering.<br />
We should always should bear in mind that<br />
although we infiltrate the zirconia with<br />
liquids for shading, we still apply stains,<br />
glazes and veneering ceramics later. Of<br />
course, we want to keep the microstructure<br />
even if these ceramic materials are applied.<br />
We should also take this into account in<br />
this phase, too. The microstructure we<br />
create in the green state is later decisively<br />
involved in the aesthetics and the natural<br />
appearance of the restoration.<br />
INFILTRATION<br />
This stage has the least influence on the<br />
final result, but it is the trickiest step. We<br />
must improve the chroma and the effects<br />
of the restoration without a real and<br />
immediate visualisation of the colours we<br />
use. The final colour becomes visible for<br />
the first time after the sintering process.<br />
To achieve aesthetic results, we must<br />
understand the principle of the white and<br />
porous zirconia foundation. I therefore<br />
recommend to people who do not have a<br />
lot of experience with the application of<br />
colouring liquids to always start with tests<br />
on blank leftovers or practice restorations,<br />
to take photos of the last results and to<br />
record everything you do.<br />
If the principle is once understood, the<br />
mental visualisation and implementation<br />
works quite easy. For this process step, I<br />
recommend the following preparation:<br />
1. Prepare all the colours to be used and<br />
follow the instructions for the materials.<br />
2. Clean the zirconia surface with<br />
compressed air, milling dust needs to be<br />
fully removed.<br />
3. Carefully start infiltration with small<br />
brushstrokes and small amounts of liquid.<br />
The zirconia in this stage has a high<br />
absorption behaviour (Fig. 12).<br />
4. Apply the chroma (dentin liquid) to the<br />
intended areas, i.e., approximal, cervical<br />
and occlusal. Due to the use of preshaded<br />
zirconia, the colour only needs to<br />
be reinforced in those areas.<br />
5. Apply the effects e.g., in the incisal area.<br />
SURFACE PREPARATION AND COLOUR<br />
CUSTOMISATION<br />
Figures 13-16 show the results after<br />
sintering. Despite all the work, the excellent<br />
quality of this material is evident. It is<br />
only possible with a material like Zolid<br />
HT+ Preshades to have such results after<br />
sintering and to perceive the excellent<br />
optical behaviour of zirconia. If the<br />
restoration meets all requirements after<br />
sintering, we can concentrate on the most<br />
important aspect, the aesthetics.<br />
In that case, I used the staining system<br />
Ivocolor from Ivoclar Vivadent. This has<br />
two reasons. The first is the wide range of<br />
possible firing cycles, I am able to choose a<br />
temperature between 700-890ºC without<br />
harming its properties. The second reason<br />
is its optical behaviour. This kit has three<br />
unique colours on the market: Ivocolor E22,<br />
Magenta Ivocolor E21 and Neutral Gray<br />
Ivocolor E17. It also has three basic shades<br />
SD0, SD1 and SD2, that form the base of<br />
the chroma that we will need for this type<br />
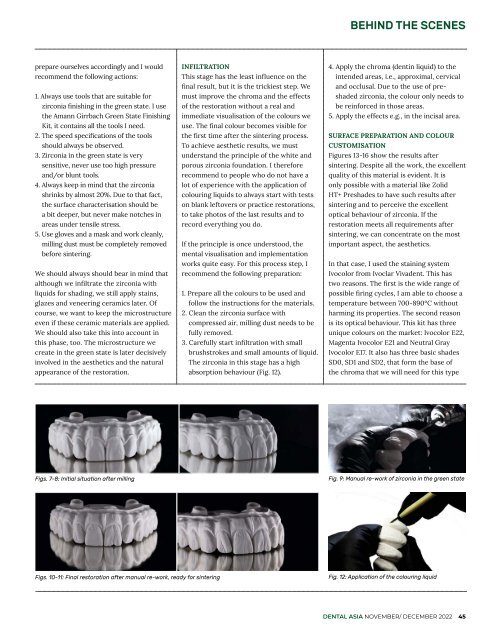
Figs. 7-8: Initial situation after milling<br />
Fig. 9: Manual re-work of zirconia in the green state<br />
Figs. 10-11: Final restoration after manual re-work, ready for sintering<br />
Fig. 12: Application of the colouring liquid<br />
DENTAL ASIA NOVEMBER/ DECEMBER <strong>2022</strong> 45