Intecom E / PointSpan 6880 - Avaya Support
Intecom E / PointSpan 6880 - Avaya Support
Intecom E / PointSpan 6880 - Avaya Support

Create successful ePaper yourself
Turn your PDF publications into a flip-book with our unique Google optimized e-Paper software.
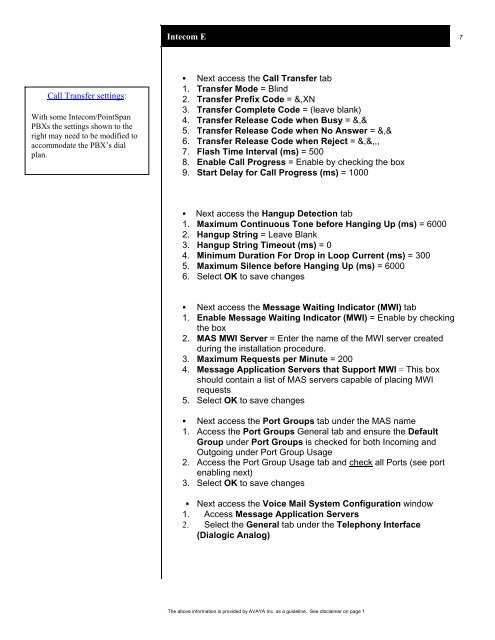
Call Transfer settings:<br />
With some <strong>Intecom</strong>/<strong>PointSpan</strong><br />
PBXs the settings shown to the<br />
right may need to be modified to<br />
accommodate the PBX’s dial<br />
plan.<br />
<strong>Intecom</strong> E 7<br />
� Next access the Call Transfer tab<br />
1. Transfer Mode = Blind<br />
2. Transfer Prefix Code = &,XN<br />
3. Transfer Complete Code = (leave blank)<br />
4. Transfer Release Code when Busy = &,&<br />
5. Transfer Release Code when No Answer = &,&<br />
6. Transfer Release Code when Reject = &,&,,,<br />
7. Flash Time Interval (ms) = 500<br />
8. Enable Call Progress = Enable by checking the box<br />
9. Start Delay for Call Progress (ms) = 1000<br />
� Next access the Hangup Detection tab<br />
1. Maximum Continuous Tone before Hanging Up (ms) = 6000<br />
2. Hangup String = Leave Blank<br />
3. Hangup String Timeout (ms) = 0<br />
4. Minimum Duration For Drop in Loop Current (ms) = 300<br />
5. Maximum Silence before Hanging Up (ms) = 6000<br />
6. Select OK to save changes<br />
� Next access the Message Waiting Indicator (MWI) tab<br />
1. Enable Message Waiting Indicator (MWI) = Enable by checking<br />
the box<br />
2. MAS MWI Server = Enter the name of the MWI server created<br />
during the installation procedure.<br />
3. Maximum Requests per Minute = 200<br />
4. Message Application Servers that <strong>Support</strong> MWI = This box<br />
should contain a list of MAS servers capable of placing MWI<br />
requests<br />
5. Select OK to save changes<br />
� Next access the Port Groups tab under the MAS name<br />
1. Access the Port Groups General tab and ensure the Default<br />
Group under Port Groups is checked for both Incoming and<br />
Outgoing under Port Group Usage<br />
2. Access the Port Group Usage tab and check all Ports (see port<br />
enabling next)<br />
3. Select OK to save changes<br />
� Next access the Voice Mail System Configuration window<br />
1. Access Message Application Servers<br />
2. Select the General tab under the Telephony Interface<br />
(Dialogic Analog)<br />
The above information is provided by AVAYA Inc. as a guideline. See disclaimer on page 1