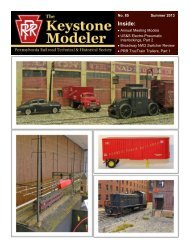
Winter 2010 - Pennsylvania Railroad Technical and Historical Society
Winter 2010 - Pennsylvania Railroad Technical and Historical Society
Winter 2010 - Pennsylvania Railroad Technical and Historical Society

You also want an ePaper? Increase the reach of your titles
YUMPU automatically turns print PDFs into web optimized ePapers that Google loves.
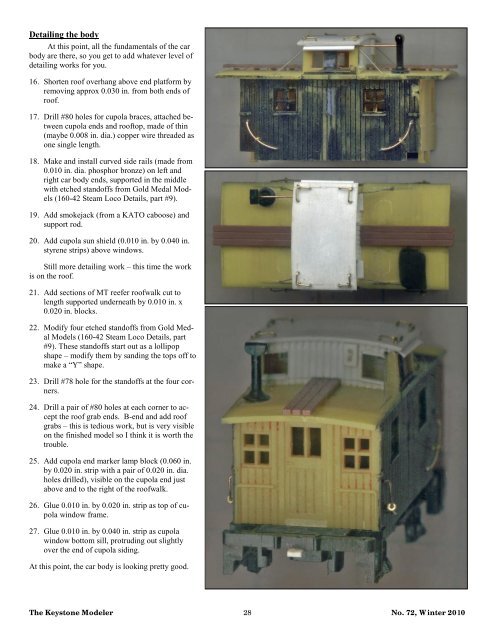
Detailing the body<br />
At this point, all the fundamentals of the car<br />
body are there, so you get to add whatever level of<br />
detailing works for you.<br />
16. Shorten roof overhang above end platform by<br />
removing approx 0.030 in. from both ends of<br />
roof.<br />
17. Drill #80 holes for cupola braces, attached between<br />
cupola ends <strong>and</strong> rooftop, made of thin<br />
(maybe 0.008 in. dia.) copper wire threaded as<br />
one single length.<br />
18. Make <strong>and</strong> install curved side rails (made from<br />
0.010 in. dia. phosphor bronze) on left <strong>and</strong><br />
right car body ends, supported in the middle<br />
with etched st<strong>and</strong>offs from Gold Medal Models<br />
(160-42 Steam Loco Details, part #9).<br />
19. Add smokejack (from a KATO caboose) <strong>and</strong><br />
support rod.<br />
20. Add cupola sun shield (0.010 in. by 0.040 in.<br />
styrene strips) above windows.<br />
Still more detailing work – this time the work<br />
is on the roof.<br />
21. Add sections of MT reefer roofwalk cut to<br />
length supported underneath by 0.010 in. x<br />
0.020 in. blocks.<br />
22. Modify four etched st<strong>and</strong>offs from Gold Medal<br />
Models (160-42 Steam Loco Details, part<br />
#9). These st<strong>and</strong>offs start out as a lollipop<br />
shape – modify them by s<strong>and</strong>ing the tops off to<br />
make a “Y” shape.<br />
23. Drill #78 hole for the st<strong>and</strong>offs at the four corners.<br />
24. Drill a pair of #80 holes at each corner to accept<br />
the roof grab ends. B-end <strong>and</strong> add roof<br />
grabs – this is tedious work, but is very visible<br />
on the finished model so I think it is worth the<br />
trouble.<br />
25. Add cupola end marker lamp block (0.060 in.<br />
by 0.020 in. strip with a pair of 0.020 in. dia.<br />
holes drilled), visible on the cupola end just<br />
above <strong>and</strong> to the right of the roofwalk.<br />
26. Glue 0.010 in. by 0.020 in. strip as top of cupola<br />
window frame.<br />
27. Glue 0.010 in. by 0.040 in. strip as cupola<br />
window bottom sill, protruding out slightly<br />
over the end of cupola siding.<br />
At this point, the car body is looking pretty good.<br />
The Keystone Modeler 28 No. 72, <strong>Winter</strong> <strong>2010</strong>