Safety And Maintenance - NAVIGON.com
Safety And Maintenance - NAVIGON.com
Safety And Maintenance - NAVIGON.com

You also want an ePaper? Increase the reach of your titles
YUMPU automatically turns print PDFs into web optimized ePapers that Google loves.
Contents:<br />
<strong>Safety</strong> and <strong>Maintenance</strong> .....................................................1<br />
<strong>Safety</strong> Instructions.............................................................. 1<br />
Data Security................................................................... 2<br />
Repair............................................................................. 2<br />
Operating Environment ..................................................... 2<br />
Ambient temperature........................................................ 3<br />
Electromagnetic Compatibility ............................................ 3<br />
Connection ...................................................................... 4<br />
Battery Operation ............................................................. 5<br />
<strong>Maintenance</strong>....................................................................... 5<br />
Care of the Display ........................................................... 6<br />
Transport ........................................................................ 7<br />
Notes on these Operating Instructions................................... 8<br />
Quality ............................................................................ 8<br />
Service............................................................................ 9<br />
Supplied Items ................................................................... 9<br />
Getting Started.................................................................11<br />
Views .............................................................................. 12<br />
Front Components .......................................................... 12<br />
Back Components........................................................... 13<br />
Bottom Components ....................................................... 14<br />
Left Components ............................................................ 14<br />
Right <strong>com</strong>ponents........................................................... 15<br />
Initial Set-up.................................................................... 16<br />
Switching on the navigation system .................................. 16<br />
Working with Memory Cards............................................... 19<br />
Inserting Memory Cards .................................................. 19<br />
Removing Memory Cards................................................. 19<br />
Accessing Memory Cards ................................................. 20<br />
Data exchange via card reader......................................... 20<br />
Resetting the navigation system ......................................... 21<br />
Soft Reset ..................................................................... 21<br />
Hard Reset .................................................................... 21
Navigation........................................................................23<br />
ii<br />
<strong>Safety</strong> Instructions for Navigation ....................................... 23<br />
Tips for Navigation ......................................................... 23<br />
Notes for Use in a Vehicle................................................ 24<br />
Additional Notes for Use on a Bicycle or a Motorcycle .............. 24<br />
GPS (Global Positioning System)......................................... 25<br />
Mounting the Navigation Set in a Car .................................. 26<br />
Installation of the Holder of the navigation system ................. 26<br />
Connecting the navigation system in the car ...................... 28<br />
Mounting the Navigation Set on a Bicycle............................. 29<br />
Memory Card Quick Installation .......................................... 31<br />
Starting Navigation......................................................... 32<br />
Software Installation on your PC ......................................... 33<br />
Contents of the navigation CDs ........................................ 33<br />
Installing Microsoft ® ActiveSync ® ..................................... 34<br />
FAQ ..................................................................................35<br />
Customer Service .............................................................36<br />
First-Aid in the Event of Malfunction .................................... 36<br />
General guidance ........................................................... 36<br />
Check Connections and Cables ......................................... 36<br />
Faults and Possible Causes .............................................. 37<br />
Additional Support ............................................................ 38<br />
Warranty ......................................................................... 39<br />
Liability limitations.......................................................... 40<br />
Copying this manual ....................................................... 40<br />
Index ...............................................................................42
SAFETY AND MAINTENANCE<br />
SAFETY INSTRUCTIONS<br />
Please read this section carefully and follow all the instructions<br />
given. This will help ensure reliable operation and extend the service<br />
life for your appliance.<br />
Keep the packaging and the user instructions for future reference<br />
or inquiries at a later date. If you pass the article on to another<br />
person, you must pass on these instructions.<br />
Never open up the housing of the appliance or the power<br />
adapter. These contain no user-serviceable parts. If the housing<br />
is opened there is a danger to life from electric shock.<br />
Do not place any objects on the appliance and do not exert<br />
any pressure on the display. Otherwise there is a danger that<br />
the screen will break.<br />
To avoid damage, do not touch the screen with sharp objects.<br />
Use only the stylus provided.<br />
There is a risk of injury if the display breaks. If this should<br />
occur, use protective gloves to pack the broken parts and<br />
contact customer support to arrange for disposal. Then wash<br />
your hands with soap, since there is a possibility that chemicals<br />
may have escaped.<br />
Never allow children to play with electrical equipment unsupervised.<br />
Children may not always correctly recognize possible<br />
danger.<br />
SAFETY AND MAINTENANCE<br />
1
Remove the power adapter from the outlet, switch the appliance<br />
off immediately, or do not actually switch it on, and contact<br />
Customer Service...<br />
... if the power adapter or the attached plug be<strong>com</strong>e<br />
scorched or damaged.<br />
2<br />
... if the housing of the appliance or the Power Pack be<strong>com</strong>es<br />
damaged or fluids leak into it. Components must be checked<br />
by Customer Service in order to avoid damage!<br />
DATA SECURITY<br />
Every time you update your data make backup copies on an<br />
external storage medium. The supplier does not assume liability<br />
for data loss or damage to data storage units, and no<br />
claims can be accepted for damages resulting from the loss of<br />
data or for consequential damages.<br />
REPAIR<br />
Please contact our Service Center if you encounter technical<br />
problems with your appliance.<br />
In the event repair be<strong>com</strong>es necessary, please use only our<br />
authorized Service Partners. You will find the address on<br />
the back of your guarantee card.<br />
OPERATING ENVIRONMENT<br />
Keep your navigation System and all connected devices<br />
away from moisture and avoid dust, heat and direct sunlight,<br />
especially in the car.<br />
Make sure you protect your appliance from getting wet,<br />
e.g. from rain and hail, at all times. Please pay attention<br />
that moisture can even build up in a protective pouch because<br />
of condensation.<br />
Avoid heavy vibrations and shaking, such as can arise,<br />
for example, in the case of transverse field intrusions.<br />
Avoid the device from releasing itself from its holder, for<br />
example when braking. Install the device as vertically as<br />
possible.<br />
Failure to follow these instructions may lead to damage to your appliance.<br />
The guarantee will be excluded in such cases.<br />
ENGLISH
AMBIENT TEMPERATURE<br />
The appliance is most reliably operated at an ambient temperature<br />
of between 41°F and 104°F (5°C and 40°C) and at a<br />
relative humidity of between 10% and 90% (noncondensing).<br />
In the powered down state the appliance can be stored at<br />
between 32°F and 140°F (0°C and 60°C).<br />
Store the appliance in a safe location to avoid high temperatures<br />
(e.g. when parking or from direct sunlight).<br />
ELECTROMAGNETIC COMPATIBILITY<br />
When connecting additional or other <strong>com</strong>ponents the “Electromagnetic<br />
Compatibility Directive” (EMC) must be adhered<br />
to. Please also note that only screened cable (maximum 10ft)<br />
should be used with this appliance.<br />
For optimal performance, maintain a distance of at least 10 ft.<br />
from sources of high-frequency and magnetic interference<br />
(televisions, loudspeaker systems, mobile telephones and so<br />
on. This will help avoid malfunctions and loss of data.<br />
SAFETY AND MAINTENANCE<br />
3
CONNECTION<br />
When connecting your appliance be sure to correctly observe the<br />
following instructions:<br />
POWER SUPPLY<br />
The outlet must be in the vicinity of the appliance and must<br />
be easily accessible.<br />
4<br />
Only use the mains adapter on grounded sockets at<br />
100 – 240 V~ AC, 50/60 Hz. If you are unsure about the<br />
power supply to the place of use, ask the relevant energy<br />
supplier.<br />
Use only the power adapter provided with your appliance.<br />
For additional safety, we re<strong>com</strong>mend the use of a surge protector<br />
in order to protect your appliance from damage from<br />
spikes or lighting strikes on the power network.<br />
POWER THROUGH CAR ADAPTER<br />
The car adapter should only be connected to the lighter<br />
socket of a car (car battery = DC 12V , no trucks!). If you<br />
are in any doubt about the power source in your car, contact<br />
your car manufacturer.<br />
CABLING<br />
Arrange cables so that no-one can tread on them or trip<br />
over them.<br />
Do not place any items on the cable.<br />
ENGLISH
BATTERY OPERATION<br />
Your appliance is operated with a removable battery. In order to prolong<br />
the life and efficiency of your battery and to ensure safe operation,<br />
follow the instructions below:<br />
Caution! Danger of explosion if rechargeable batteries are<br />
not changed properly. Only replace with the same type of<br />
battery or a similar type re<strong>com</strong>mended by the manufacturer.<br />
Never open the rechargeable battery. Do not throw<br />
the rechargeable battery into fire. Dispose of the used<br />
batteries following the manufacturer's instructions.<br />
Batteries cannot withstand heat. Avoid the appliance and the<br />
integrated battery be<strong>com</strong>ing overheated. Failure to <strong>com</strong>ply<br />
with this instruction may lead to damage to and even explosion<br />
of the battery.<br />
Use only the original power pack to charge the battery or the<br />
car adapter from the optional navigation kit.<br />
The batteries are special category waste. When disposing<br />
of the appliance ensure that this is done correctly.<br />
Contact Customer Service for more details.<br />
MAINTENANCE<br />
� Warning: There are no user-serviceable or cleanable<br />
parts inside the housing of the appliance.<br />
You can prolong the life of the appliance by taking the following<br />
simple steps:<br />
Always remove the power plug and all connecting cables<br />
before cleaning.<br />
Clean the appliance only with a damp, lint-free cloth.<br />
Do not use solvents, caustic or gaseous cleaners .<br />
The device and its packaging are recyclable.<br />
SAFETY AND MAINTENANCE<br />
5
CARE OF THE DISPLAY<br />
6<br />
Avoid scratching the display surface as this is easily damaged.<br />
It is strongly re<strong>com</strong>mended to use a display protection<br />
mylar to avoid scratches. Please ask your nearest dealer for<br />
this accessorie.<br />
The foil on the display at delivery is purely for protection<br />
during transportation!<br />
Ensure that no traces of water remain on the screen. Water<br />
can cause irreversible discoloration.<br />
Use only a soft, lint-free cloth to clean the screen.<br />
Do not expose the screen to either strong sunlight or ultraviolet<br />
radiation.<br />
ENGLISH
TRANSPORT<br />
If you wish to transport the appliance follow the instructions below:<br />
Following transport of the appliance wait until the unit has<br />
acclimatized before using it.<br />
In the case of wide fluctuations in temperature or humidity<br />
condensation or moisture may form inside the appliance<br />
and this can cause an electrical short-circuit.<br />
In order to protect the appliance from dirt, knocks and<br />
scratching, use either the protective case.<br />
Before traveling ensure that you are aware of the power and<br />
<strong>com</strong>munications provision at your destination. Before traveling<br />
obtain any power or <strong>com</strong>munications adapters (modem,<br />
LAN, etc.) that may be needed.<br />
When shipping your appliance use only the original packaging<br />
and advise the carrier accordingly.<br />
When passing through the hand luggage control at airports, it<br />
is re<strong>com</strong>mended that you pass the appliance and all magnetic<br />
storage media (external hard drives) through the X-ray system<br />
(the machine on which you place your bags). Avoid the<br />
magnetic detector (the structure through which you yourself<br />
pass) or the magnetic wand (the hand device that the security<br />
staff use), since this may corrupt your data.<br />
SAFETY AND MAINTENANCE<br />
7
NOTES ON THESE OPERATING INSTRUCTIONS<br />
We have structured these Operating Instructions for the installation<br />
so that you will be able to look up the necessary subjectrelated<br />
information by means of the Contents List at any time.<br />
8<br />
� Note: You will find <strong>com</strong>prehensive Operating Instructions<br />
for navigation on the relevant CDs and at<br />
the online help of the device.<br />
Read the section "Frequently Asked Questions" to obtain answers<br />
to questions that are often addressed to our customer service.<br />
The purpose of this manual is to help you with installing your<br />
appliance using instruction, that are easy to understand.<br />
QUALITY<br />
In selecting the <strong>com</strong>ponents we have aimed for a high level of<br />
functionality, simple handling, safety and reliability. A wellbalanced<br />
hardware and software design allows us to offer you a<br />
technologically advanced navigation system that will give great<br />
satisfaction in both work and leisure use.<br />
ENGLISH
SERVICE<br />
Our individual customer care is there to support you when you<br />
have questions or problems. Please get in touch – we look forward<br />
to helping you. This manual contains a special section on Customer<br />
Service starting on page 36.<br />
SUPPLIED ITEMS<br />
Please check the integrity and <strong>com</strong>pleteness of the supplied items<br />
and, in the case this is not <strong>com</strong>plete, forward us any possible<br />
claims within 14 days from the purchase date. The purchase package<br />
includes:<br />
Navigation system<br />
ActiveSync ® -cable<br />
AC adaptor (Phihong PSC PSC05R-050),<br />
adaptor plug (for the country in question)<br />
Support CD<br />
Instruction manual and warranty card<br />
Bicycle fixture *<br />
Car holder with flexible neck*<br />
Power cable for 12V cigarette lighter*<br />
CD with navigation software (see page 25)<br />
Protective case*<br />
Pre-installed memory card MMC/SD*<br />
* optional<br />
SAFETY AND MAINTENANCE<br />
9
10<br />
ENGLISH
GETTING STARTED<br />
This chapter introduces you to the external <strong>com</strong>ponents of your<br />
navigation system and guides you through the process of setting<br />
up your navigation system for use.<br />
Subsequently, it will be explained how the software for administrating<br />
your navigation assistants is installed.<br />
GETTING STARTED<br />
11
VIEWS<br />
FRONT COMPONENTS<br />
Ref Component Description<br />
� Battery<br />
Charge Indicator<br />
12<br />
The loading display will shine orange during<br />
the charging process. It will shine green<br />
when the accumulator is <strong>com</strong>pletely<br />
charged.<br />
� Touch Screen Displays the output of your appliance. Tap<br />
the screen with the stylus to select menu<br />
<strong>com</strong>mands or enter information.<br />
� Hardware<br />
buttons<br />
� Navigationpad<br />
� Loudspeaker<br />
On/Off Button<br />
Button Settings<br />
Button Back<br />
Button Options / Destination<br />
Button to zoom out<br />
Button to zoom in<br />
Moves up, down, left or right by pushing the<br />
corresponding area of the pad.<br />
Press the centre button to confirm your selection.<br />
Plays back music, language statements and<br />
warnings.<br />
ENGLISH
BACK COMPONENTS<br />
Ref Component Description<br />
� Stylus Take the pen out of its <strong>com</strong>partment in order<br />
to use it, and replace it after use. The<br />
pointer pen is required for operating the<br />
touch screen.<br />
� Battery<br />
button<br />
�<br />
Separates the device from the battery<br />
<strong>com</strong>pletely (also Hard Reset).<br />
GPS antenna Receives the signals of the GPS satellite.<br />
� External<br />
aerial connection<br />
Connection for an optional second aerial.<br />
GETTING STARTED<br />
13
BOTTOM COMPONENTS<br />
Ref Component Description<br />
� AC adaptor<br />
port<br />
� Mini-USB-<br />
Connector<br />
LEFT COMPONENTS<br />
Ref Component Description<br />
14<br />
Connection to external power supply.<br />
Connection for connecting to a PC by<br />
means of the ActiveSync ® Cable (for data<br />
matching).<br />
� SD/MMC Slot Accepts an optional SD (Secure Digital) or<br />
MMC (MultiMediaCard) card for removable<br />
storage.<br />
� Reset Button Restarts your appliance. (Soft-Reset), see<br />
page 21<br />
ENGLISH
RIGHT COMPONENTS<br />
Ref Component Description<br />
� Volume control<br />
� Headphone<br />
Adjusts the volume of your device. Turn<br />
the wheel upwards to increase the volume<br />
and downwards to reduce it.<br />
Connects to a pair of stereo headphones<br />
(3,5 mm).<br />
GETTING STARTED<br />
15
INITIAL SET-UP<br />
The following guides you step by step through the initial set up of<br />
the navigation system.<br />
Firstly, remove the foil for protecting the device during transportation<br />
from the display.<br />
STEP 1: SWITCHING ON THE NAVIGATION SYSTEM<br />
Switch the main switch on the back of the device to ON.<br />
16<br />
� Attention: Always leave the main switch in the ON Position,<br />
unless you want to carry out a new reinstallation. All data will<br />
be lost and the initial installation will have to be carried out<br />
again if the switch is set to OFF.<br />
The Navigation System will start the initial installation automatically.<br />
The brand logo will appear and your device will display the<br />
application screen after a few seconds.<br />
You set the date and the time by means of the Settings switch<br />
and the date/time control button. Set the applicable time zone, if<br />
available.<br />
� Attention: It can be necessary for the device to have to be<br />
charged for some time, before the initial setting up can run<br />
through, according to the charging status of the accumulator<br />
installed.<br />
ENGLISH
CHARGING BATTERY OF THE NAVIGATION SYSTEM<br />
You have different possibilities to charge the battery of your navigation<br />
system:<br />
� With the help of the network adapter<br />
� By means of the car adapter<br />
� The charging status display lights orange until the navitation<br />
system is charged. Do not interrupt the charging<br />
process before the battery is fully charged. This may take<br />
a few hours. The navigation system is fully charged if the<br />
charging display lights green.<br />
� Note: You can use the navigation system during the<br />
charging process, but the power supply must not be interrupted<br />
during initial set-up.<br />
� Leave the mains adapter connected to the navigation system<br />
for around 24 hours, so that the backup battery also<br />
charges-up fully.<br />
� You can leave the main adapter connected, and this is<br />
very handy for continuous operation. However, the mains<br />
adapter also requires power even when it is not charging<br />
up the battery of the navigation system.<br />
GETTING STARTED<br />
17
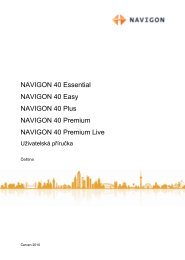
18<br />
Battery<br />
charge<br />
indicator<br />
ENGLISH<br />
Adaptor plug<br />
(similar picture)<br />
Push the adapter connector into the guide on the back of the network<br />
adapter. Push the Network Adapter (�) into a power point<br />
that is easily accessible.<br />
Push the cable of the Network Adapter (�) into the network<br />
adapter connection of the navigation system.
WORKING WITH MEMORY CARDS<br />
Your navigation system supports MMC and SD memory cards.<br />
INSERTING MEMORY CARDS<br />
1. Carefully take the memory card out of its packing (if included).<br />
Take care not to touch or dirty the contacts.<br />
2. Push the memory card carefully into the card bay as<br />
shown. The side of the memory card wearing the label<br />
must point upwards. The memory card should slightly lock<br />
in place.<br />
REMOVING MEMORY CARDS<br />
Do not remove the memory card while it is accessed. This<br />
could result in loss of data.<br />
1. To remove the card press lightly onto the upper edge until<br />
it ejects.<br />
2. Pull the card out without touching the contacts.<br />
3. Store the memory card in the packing or in another safe<br />
location.<br />
Memory cards are very fragile. Take care not to dirty the<br />
contacts and not to force the card.<br />
GETTING STARTED<br />
19
ACCESSING MEMORY CARDS<br />
20<br />
The appliance only supports memory cards in the FAT16/32 file<br />
format. If you insert a card prepared with a different format<br />
(e.g. in cameras, MP3 players), your navigation system may not<br />
recognize it and will ask you to format it again.<br />
Warning: Formatting the memory card irretrievably wipes out<br />
all data.<br />
Likewise you cannot just copy files onto the memory card. In<br />
some cases they must be converted by the Microsoft ®<br />
ActiveSync ® program.<br />
DATA EXCHANGE VIA CARD READER<br />
You can transfer or synchronise data via ActiveSync ® . This is also<br />
the correct method, in particular, if files are to be transferred that<br />
must be converted into a navigation system-readable format.<br />
However, if you wish to copy large quantities of data (MP3 files,<br />
navigation maps) to the memory card, these can also be stored<br />
directly to the memory card.<br />
Many <strong>com</strong>puters already have memory card devices. Insert the<br />
card in this and copy the data directly to the card.<br />
Because of the direct access significantly faster transfer will be<br />
achieved.<br />
ENGLISH
RESETTING THE NAVIGATION SYSTEM<br />
There are two options for resetting the navigation system.<br />
SOFT RESET<br />
This option restarts the navigation system, without reinstallation<br />
being necessary. A soft-reset is often used in order to reorganize<br />
the memory. In doing so all programs that are running are interrupted<br />
and the working memory is reinitialized.<br />
Choose this option if your navigation system is not responding or<br />
working properly.<br />
Perform the soft-reset as follows:<br />
Screw off the end cap of the pointer and carefully press the point<br />
of the end cap into the Reset opening on the left side of your device.<br />
HARD RESET<br />
Warning: A hard-reset deletes all data on your appliance and<br />
causes a new initial installation.<br />
It is not necessary to install the software on your synchronisation<br />
<strong>com</strong>puter again, however.<br />
Perform the hard-reset as follows:<br />
Push the On/Off switch on the back of the device to the OFF position<br />
initially and back to ON after 2 seconds.<br />
GETTING STARTED<br />
21
22<br />
ENGLISH
NAVIGATION<br />
SAFETY INSTRUCTIONS FOR NAVIGATION<br />
The bundled product CD contains a <strong>com</strong>prehensive instruction<br />
manual.<br />
TIPS FOR NAVIGATION<br />
Do not manipulate the navigation system while driving<br />
to protect yourself and others from accidents!<br />
In the event that you do not understand the voice instruction<br />
or if you are in any doubt about what to do at the next<br />
intersection, then the map or arrow display will provide you<br />
with a quick orientation. Only look at the display when you<br />
are in a safe driving situation!<br />
Attention: The road layout and driving rules take precedence<br />
over the instructions of the navigation system. Only<br />
follow the instructions when circumstances and driving rules<br />
permit it! The navigation system will guide you to your destination<br />
even when you have to deviate from your planned<br />
route.<br />
The direction statements of the navigation system given do<br />
not release the driver of the vehicle from his or her duty of<br />
care or personal responsibility.<br />
Plan routes before you leave. If you want to plan a new<br />
route whilst on the road stop driving.<br />
In order to receive the GPS signal correctly, metal objects<br />
may not hinder reception. Attach the navigation system<br />
onto the inside of the windscreen or near the windscreen<br />
with the sucker. Try out different positions in your vehicle<br />
in order to find the best reception.<br />
NAVIGATION<br />
23
NOTES FOR USE IN A VEHICLE<br />
24<br />
Take care that the holder does not present any risk to<br />
safety, even in the case of an accident, when installing it.<br />
Take care that the cable does not impede any safety <strong>com</strong>ponents.<br />
The display of your navigation system may show “light reflexions”.<br />
Please take care of not being “blinded” during<br />
operation.<br />
Take care that the cable does not impede any safety <strong>com</strong>ponents.<br />
Do not mount the <strong>com</strong>ponents within the operating range<br />
of any airbags.<br />
Check the secure adherence of the suction cup at regular<br />
intervals.<br />
The power plug will consume power, even if no device is<br />
connected. Remove it when not in use to avoid draining the<br />
battery.<br />
Check all safety equipment in your car after installation.<br />
ADDITIONAL NOTES FOR USE ON A BICYCLE OR A MOTORCYCLE<br />
Pay attention during installation that the ability to steer is<br />
not impaired.<br />
Do not cover any instruments during installation.<br />
ENGLISH
GPS (GLOBAL POSITIONING SYSTEM)<br />
GPS is a satellite-backed system for determining your position.<br />
With the help of 24 satellites revolving around the earth, it is possible<br />
to determine your position on earth with the accuracy of a<br />
few meters. The satellite signals are received by the antenna of<br />
the built-in GPS receiver, which must have a "line of sight" to at<br />
least 4 of these.<br />
Note: By limited line of sight (e.g. in tunnels, between<br />
houses, in woods or also in vehicles with metal-coated windows)<br />
it is not possible to determine the position. The satellite<br />
reception however automatically picks up again as soon as the<br />
obstacle has been passed and there line of sight is reestablished<br />
again.<br />
The GPS receiver consumes additional power. This is especially of<br />
concern, when running on batteries. To conserve power do not<br />
turn on the GPS receiver unnecessarily.<br />
However, you can also switch the device off by means of the<br />
On/Off switch in the case of a shorter interruption to your journey.<br />
Pressing the same switch again will activate a restart. The<br />
GPS receiver will also be reactivated at the same time, if navigation<br />
software is still active. Here, it can take a short time for the<br />
position to be updated again, according to the reception situation.<br />
Note: Please note, that your appliance is preset to not shut<br />
down automatically after a few minutes without activity. You<br />
can change this preset in the Settings mode.<br />
If the GPS receiver has not been active for some hours, it<br />
must orientate itself again. This process may take a while.<br />
NAVIGATION<br />
25
MOUNTING THE NAVIGATION SET IN A CAR<br />
26<br />
Attention! Only fix the holder for the navigation system to<br />
the windscreen, if it does not impede the view. Should this not<br />
be possible, then mount the holder with the enclosed suction<br />
plate in any way that will allow peril-free and safe operation.<br />
INSTALLATION OF THE HOLDER OF THE NAVIGATION SYSTEM<br />
Hint: If you want to fix the holder to the wind screen, then<br />
you can skip steps 1 and 2.<br />
1. Remove the protective foil from the sticky side of the suction<br />
plate.<br />
2. Fix the suction plate to a suitable location on the dashboard. Take<br />
care, that the surface of the dashboard is clean and press the suction<br />
plate strongly onto the surface.<br />
To obtain a strong and secure hold the suction plate should<br />
not be used for 24 hours.<br />
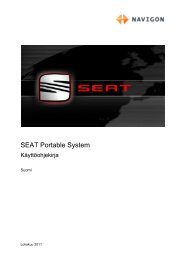
Car holder<br />
ENGLISH<br />
Flexible neck<br />
Suction plate<br />
Suction head<br />
(similar picture)<br />
3. Mount the car holder to the flexible neck. Note the labels on<br />
the flexible neck. The arrow labled close must point in the direction<br />
of the fixture. The connection closes with a noticeable<br />
clicking sound.
4. Place the holder with the suction head onto the suction plate<br />
(or directly onto the wind screen) and press the lever on the<br />
suction head downwards. The suction head will stick itself<br />
firmly to the suction plate.<br />
5. Place the navigation system into the car holder by placing it<br />
initially in the lower noses and then pressing it down gently<br />
until the holder clicks in.<br />
Holder<br />
NAVIGATION<br />
27
CONNECTING THE NAVIGATION SYSTEM IN THE CAR<br />
28<br />
ENGLISH<br />
(similar picture)<br />
1. Plug the jack of the connection cable into the corresponding<br />
receptor at the bottom of your navigation system (p. 14).<br />
2. Insert the power adapter (�) now into the cigarette lighter<br />
socket and ensure, that it will not lose contact while driving.<br />
This could cause a malfunction.<br />
Hint: Remove the power adapter from the cigarette lighter<br />
socket when ending a trip or when parking the car for a extended<br />
period of time. Otherwise the car battery could be<br />
drained.
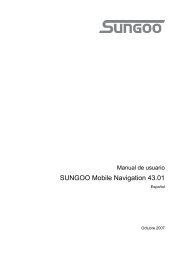
MOUNTING THE NAVIGATION SET ON A BICYCLE<br />
�<br />
�<br />
�<br />
�<br />
1. Place the Clip (�) and the Retaining Plate (�) together and fix<br />
them to your bicycle handlebars by pulling them across the handlebars<br />
from below and pushing one of the rubber rings (�) supplied<br />
between the clip and the handlebars. The flat site of the<br />
support points in your direction.As the material is elastic, you<br />
can carefully bend open the support, lay it around the handlebar<br />
and push it together again.<br />
2. Place the holder for the navigation system (�) on the Retaining<br />
Plate (�) as illustrated above. Push the holder for the navigation<br />
system downwards until it clicks in audibly. Please pay attention<br />
that the holder must only be used in one direction.<br />
3. Fix the <strong>com</strong>plete holding device with the supplied screw (�)<br />
and tighten it slightly by hand.<br />
4. Now insert the navigation system into the holder. You must<br />
pay attention to a firm seating of the clip holder.<br />
�<br />
5. Set the inclination angle by screwing the bicycle holder in according<br />
to your requirements. Now turn the screws finger-tight.<br />
NAVIGATION<br />
�<br />
29
30<br />
Note: After assembly, protect your navigation system from<br />
dust and dirt using the storage pocket. The storage pocket<br />
does not protect against rain or moisture. Take care that the<br />
navigation system does not exposed to moisture. This may<br />
damage the electronic parts.<br />
ENGLISH<br />
Holder
MEMORY CARD QUICK INSTALLATION<br />
This option is only available to you if your navigation system is<br />
equipped with a prepared memory card. In this case, you will already<br />
be able to use the Navigation function of your device after a<br />
short time, without carrying out the pre-installation on a PC.<br />
The initial setting up must be carried out as described on<br />
page 16 in any case.<br />
The following installation limits the Navigation to the area<br />
which is pre-installed on your memory card.<br />
You must carry out these steps to put the navigation into operation in<br />
your car:<br />
1. Read and adhere to the safety instructions on p. 2 and following<br />
and p. 23 and following.<br />
2. Install the remaining <strong>com</strong>ponents of the navigation system.<br />
3. Press the On/Off button to start your navigation system. If<br />
the instructions of Step 1 (p. 16) have not yet been executed,<br />
then do it now. The battery should be charged. The accumulator<br />
will be charged by means of the car power supply if<br />
necessary.<br />
Insert the pre-installed memory card in the navigation system.<br />
The installation of the navigation software will start automatically.<br />
Follow the instructions on the screen.<br />
NOTES<br />
The memory card must always be inserted into the device during<br />
the use of the navigation system. A Soft Reset will have to be<br />
carried out to restart the navigation system, if the memory card<br />
is removed during its use, even for a short time.<br />
The software installation will have to be carried out again following<br />
a Hard Reset.<br />
Carry out a Hard Reset initially, if you want to reinstall the navigation<br />
software.<br />
Set the date and time by means of the Settings button and the<br />
date/time control button, if this has not yet taken place. Set the<br />
applicable time zone, if available.<br />
NAVIGATION<br />
31
STARTING NAVIGATION<br />
32<br />
1. Switch on your navigation system.<br />
2. The Navigation software will start automatically or after clicking<br />
on the Navigation control button, according to the version.<br />
3. Press on the button for entering the destination and enter<br />
the address of your navigation destination. Then start the<br />
navigation by clicking on Navigate. You will receive the<br />
route information on the screen, augmented by language<br />
statements, after a short time, if the satellite reception is<br />
adequate.<br />
Please take information about the further operation of the Navigation<br />
software from the <strong>com</strong>prehensive User Handbook on the<br />
Navigation CD.<br />
In addition, brief help is available to you on your navigation system.<br />
You will reach it by means of the Options/Destination Entry<br />
button and by selecting the Help function.<br />
Note: The GPS-receiver will require some minutes for initialization<br />
when deployed for the first time. Even when GPS<br />
signal reception is indicated the navigation could be imprecise.<br />
In all future instances it will take about 30-60 seconds until a<br />
correct GPS-signal is available, sufficient “sight” of the satellite is<br />
a prerequisite.<br />
ENGLISH
SOFTWARE INSTALLATION ON YOUR PC<br />
In order to be able to deploy self-defined cards on your navigation<br />
system you must install the corresponding navigation software on<br />
your PC:<br />
1. Before installing the navigation software ensure that Active-<br />
Sync ® is installed and your navigation system is connected<br />
with your PC via the ActiveSync ® -cable.<br />
2. Place the CD 1 with the navigation software in your CD<br />
drive. The installation will start automatically.<br />
3. Follow the program instructions.<br />
CONTENTS OF THE NAVIGATION CDS<br />
It is possible for several CDs to be contained in the scope of the<br />
delivery according to the version. Content of the CDs:<br />
CD 1 contains the PC application, digitalized card material and the<br />
data material for restoring the content of the memory card fast.<br />
Additional material on the card will be located on the optional CD 2.<br />
The PC application will be installed on the <strong>com</strong>puter and used to<br />
set up your own card details. Apart from this, it will support the<br />
recreation of data on the memory card.<br />
NAVIGATION<br />
33
INSTALLING MICROSOFT ® ACTIVESYNC ®<br />
In order to transfer your data between your PC and your navigation<br />
system you need the Microsoft ® ActiveSync ® program.<br />
The cost of the navigation system includes a license for this program<br />
which can be found on the Support CD.<br />
34<br />
Attention: Important files can be overwritten or changed<br />
during the installation of software. You should create a hard<br />
disk backup, in order to be able to have access to the original<br />
files in the case of possible problems following the installation.<br />
You must have administrator rights to install the software under<br />
Windows ® 2000 or XP.<br />
Attention: You should not connect the navigation system to<br />
your <strong>com</strong>puter yet.<br />
1. Insert the Support CD ein and wait until the program<br />
starts automatically.<br />
Note: The Auto Run function is probably deactivated if it<br />
does not function. The Setup program on the CD must be<br />
started, to start installation manually.<br />
2. Choose the language, click then Install ActiveSync ® and<br />
follows the instructions on the screen.<br />
3. Connect the navigation system to your <strong>com</strong>puter with the<br />
assistance of the ActiveSync ® Cable, while the connection<br />
options are checked. To do this, push the USB connector<br />
into a free USB port on your <strong>com</strong>puter.<br />
The hardware installation assistant recognizes now a new appliance<br />
and installs a suitable driver which can take some<br />
minutes. Repeat the die connection search if it fails the first time.<br />
4. Follow the instructions on the screen. The program will now<br />
set up a partnership between your PC and the device.<br />
ENGLISH
FAQ<br />
Where can I find more informationen on the navigation<br />
system?<br />
Detailed operating instructions for navigation can be<br />
found on the corresponding CDs, which ac<strong>com</strong>pnay your<br />
navigation system.<br />
Also use the additional Help functions that are available<br />
with a single touch of a button (usually F1 on the PC), or<br />
by selecting the Help option, as additional assistance.<br />
These aids will be provided to you while you are using the<br />
<strong>com</strong>puter or the device.<br />
What do I need the ac<strong>com</strong>panied CDs for?<br />
The Support-CD contains:<br />
- the ActiveSync ® program for balancing data between<br />
the navigation system and the PC.<br />
- additional programs (optional).<br />
- This User manual in digital form.<br />
Contents of the navigation-CD(s):<br />
It is possible for several CDs to be contained in the scope<br />
of the delivery according to the version. Content of the<br />
CDs:<br />
CD 1 contains the PC application, digitalized card material<br />
and the data material for restoring the content of the<br />
memory card fast.<br />
Additional material on the card will be located on the optional<br />
CD 2.<br />
The PC application will be installed on the <strong>com</strong>puter and<br />
used to set up your own card details. Apart from this, it<br />
will support the recreation of data on the memory card.<br />
The navigation system is no longer responding. What should I do?<br />
Carry out a soft-reset (see page 21).<br />
How can I adjust the lighting?<br />
Under Settings � Lightning.<br />
FAQ<br />
35
CUSTOMER SERVICE<br />
FIRST-AID IN THE EVENT OF MALFUNCTION<br />
Error functions can sometimes have trivial causes; however, they<br />
can also sometimes be <strong>com</strong>plex in nature and require costly<br />
analysis.<br />
GENERAL GUIDANCE<br />
36<br />
The regular running of the Windows® programs “Defrag” and<br />
“Scandisk” on the PC can remove sources of error and raise<br />
system performance.<br />
CHECK CONNECTIONS AND CABLES<br />
Start with a careful visual check of all cable links. If the LCD’s are<br />
not working, make sure that the power is reaching the <strong>com</strong>puter<br />
and all peripherals.<br />
Switch off the <strong>com</strong>puter and check all cable links. If the <strong>com</strong>puter<br />
is connected to peripherals, check also the plug connections<br />
of all cables. Do not arbitrarily swap the cables between<br />
various units, even if they appear to be precisely the same.<br />
The pin assignments of the cables are likely to be different.<br />
Once you have ascertained that the power supply is not at<br />
fault and all connections are intact, switch on the <strong>com</strong>puter again.<br />
ENGLISH
FAULTS AND POSSIBLE CAUSES<br />
The navigation system no longer reacts or is behaving atypically.<br />
Press the reset button (see page 14, �).<br />
The navigation system is recognized only as a guest by ActiveSync ® .<br />
See informationen on page 34.<br />
I am receiving error messages from a maintenance program after<br />
installing ActiveSync ® .<br />
The program places the WCESCOMM.LOG file in a temporary<br />
directory defined by the system, which cannot be deleted.<br />
A respective error message will appear, if another<br />
program attempts to do so.<br />
The GPS receiver cannot be initialized or found.<br />
If a GPS signal continues not to be reported on the screen, in spite of<br />
the correct installation of the system, this can be caused by the following<br />
factors:<br />
The GPS receiver is configured to a different connection<br />
than the COM2 port of the device.<br />
Solution:<br />
Überprüfen Sie die GPS-Einstellungen und korrigieren Sie diese ggf.<br />
Also use the GPS test function offered to do this.<br />
Sufficient satellite reception is not possible.<br />
Solution:<br />
Change the position of your navigation system and ensure that<br />
unrestricted “sight” of the aerial is not impaired.<br />
No language statements can be heard.<br />
Check the volume setting.<br />
CUSTOMER SERVICE<br />
37
ADDITIONAL SUPPORT<br />
If the suggestions in the above section have not solved your problem,<br />
please contact our customer service hotline. However, before<br />
you contact your Technology Center, please have the following information<br />
available:<br />
However, before you contact your Technology Center, please have<br />
the following information available:<br />
- How is your <strong>com</strong>puter configured?<br />
- What additional peripherals do you use?<br />
- What messages, if any, appear on your screen?<br />
- What software were you using when the error occurred?<br />
- What steps have you already undertaken to solve the problem?<br />
- Have you upgraded or removed drivers or hardware?<br />
- Can you manually repeat the problem?<br />
- If you have been given a customer number previously, please<br />
give this number to the technician.<br />
38<br />
ENGLISH
WARRANTY<br />
The receipt serves as proof of first purchase and should be kept in<br />
a safe place. Your legal rights are not limited by these warranty conditions.<br />
It is required should you need to make use of the guarantee.<br />
We guarantee that this equipment is in perfect working order.<br />
Upon production of the receipt, the remaining period of guarantee<br />
shall pass on from the original parts to the respective replacement<br />
parts. If you hand in this equipment to make use of the guarantee,<br />
you must remove all programs, data and removable storage<br />
media. Products which are sent without accessories will be replaced<br />
without accessories. The warranty obligation does not apply<br />
in the case of the problem being caused by an accident, a catastrophe,<br />
vandalism, misuse, incorrect use, ignoring the safety<br />
and maintenance regulations, changes by software, viruses or<br />
another piece of equipment or accessories or by other modifications<br />
not approved by ourselves. This limited guarantee declaration<br />
replaces all other guarantees of express or implied nature.<br />
This includes the guarantee of saleability or the suitability for a<br />
certain purpose but is not limited to this. In some countries the<br />
exclusion of implied guarantees is not permissible upon principle.<br />
In this case the validity of all express and implied guarantees is<br />
limited to the guarantee period. Once this period has expired, all<br />
guarantees be<strong>com</strong>e invalid. In some countries limiting the period<br />
of validity for implied guarantees is not permitted, so that the<br />
above limitation does not <strong>com</strong>e into force. If you have any questions<br />
with regard to these guarantee conditions, please contact us.<br />
CUSTOMER SERVICE<br />
39
LIABILITY LIMITATIONS<br />
The contents of this manual are subject to unannounced changes<br />
caused by technical progress. Manufacturer and sales shall not be<br />
responsible for any damages which have been caused as a result<br />
of omissions or errors in the information provided in this manual.<br />
Under no circumstances shall we be liable for any of the following:<br />
1. Claims made against you by third parties based on loss or damage.<br />
2. Loss or damage to your blanks, recordings or data.<br />
3. Economic follow-on damage (including lost profit or savings) or associated<br />
damage even in the case that we have been informed of the possibilities<br />
of this type of damage.<br />
In some countries the exclusion or limitation of ac<strong>com</strong>panying or followon<br />
damage is not legally accepted so that the above limitations do not<br />
<strong>com</strong>e into force.<br />
COPYING THIS MANUAL<br />
This document contains legally protected information. All rights<br />
reserved. Copying in mechanical, electronic and any other form<br />
without the written approval of the manufacturer is prohibited.<br />
Copyright © 2004, All rights reserved. Microsoft ® , MS-DOS ® , and Windows are registered<br />
trademarks of Microsoft Corporation in the U.S. and other countries. Pentium ® is a registered<br />
trademark of Intel Corporation. The names of actual <strong>com</strong>panies and products mentioned<br />
herein may be the trademarks of their respective owners. Information in this document is<br />
subject to change without notice<br />
40<br />
ENGLISH
INDEX<br />
41
INDEX<br />
A<br />
AC adaptor port ................... 14<br />
Accessing Memory Cards....... 20<br />
Ambient temperature.............. 3<br />
Auto run ............................. 34<br />
B<br />
Back Components ................ 13<br />
Battery Charge Indicator....... 12<br />
Bottom Components ............. 14<br />
Buttons<br />
Battery button .................. 13<br />
Hardware ......................... 12<br />
Reset button..................... 14<br />
C<br />
Card reader ......................... 20<br />
Care of the Display................. 6<br />
Charging battery .................. 17<br />
Connecting the navigation<br />
system in the car .............. 28<br />
Contents ................................ i<br />
Contents of the<br />
navigation CDs ................. 33<br />
Copyright ............................ 43<br />
Customer Service................. 39<br />
D<br />
Data exchange..................... 20<br />
Datensicherung...................... 2<br />
Defragmentation .................. 39<br />
E<br />
Electromagnetic Compatibility.. 3<br />
EMC ..................................... 3<br />
External aerial connection ..... 13<br />
F<br />
FAQ.................................... 38<br />
Faults and Possible Causes .... 40<br />
42<br />
ENGLISH<br />
First-Aid ..............................39<br />
G<br />
Getting Started.....................11<br />
GPS ....................................25<br />
GPS antenna ........................13<br />
H<br />
Hard Reset...........................21<br />
Headphone ..........................15<br />
Hotline ................................41<br />
I<br />
Initial Set-up........................16<br />
Installation of the Holder .......26<br />
Installing Microsoft ®<br />
ActiveSync ® ......................34<br />
Introduction .......................... 8<br />
L<br />
Left Components ..................14<br />
Loudspeaker ........................12<br />
M<br />
Malfunction ..........................39<br />
Memory Card Quick<br />
Installation .......................31<br />
Mini-USB-Connector ..............14<br />
Mounting the Navigation<br />
Set in a Car ......................26<br />
Mounting the Navigation<br />
Set on a Bicycle.................29<br />
N<br />
Navigation ...........................23<br />
<strong>Safety</strong> instructions .............23<br />
Tips .................................23<br />
Navigationpad ......................12
Q<br />
Quality.................................. 8<br />
R<br />
Reinigungsmittel .................... 5<br />
Reparatur.............................. 2<br />
Reset.................................. 14<br />
Reset Button ....................... 14<br />
Resetting the navigation<br />
system ............................ 21<br />
S<br />
<strong>Safety</strong> and <strong>Maintenance</strong> .......... 1<br />
<strong>Safety</strong> Instructions<br />
Connection ......................... 4<br />
Scandisk ............................. 39<br />
SD/MMC Slot ....................... 14<br />
Service ................................. 9<br />
Soft Reset ........................... 21<br />
Software Installation on<br />
your PC............................ 33<br />
INDEX<br />
Starting Navigation ...............32<br />
Stylus..................................13<br />
Supplied Items ...................... 9<br />
Switching on the navigation<br />
system .............................16<br />
System performance .............39<br />
T<br />
Touch screen........... See Screen<br />
Transport.............................. 7<br />
V<br />
Views ..................................12<br />
Back <strong>com</strong>ponents ..............13<br />
Bottom <strong>com</strong>ponents ...........14<br />
Front <strong>com</strong>ponents..............12<br />
Left <strong>com</strong>ponents................14<br />
Volume control .....................15<br />
W<br />
Warranty .............................42<br />
Working with Memory Cards...19<br />
43