hdd & dvd / video cassette recorder rdxv60kb owner's ... - UK - Toshiba
hdd & dvd / video cassette recorder rdxv60kb owner's ... - UK - Toshiba
hdd & dvd / video cassette recorder rdxv60kb owner's ... - UK - Toshiba

Create successful ePaper yourself
Turn your PDF publications into a flip-book with our unique Google optimized e-Paper software.
E3TK6BD_EN.book Page 57 Wednesday, February 17, 2010 10:18 AM<br />
3 Select a desired audio soundtrack or audio<br />
channel using [K \ L], then press [ENTER\OK].<br />
With a DVD-<strong>video</strong>, VR mode DVD-RW, or DivX ® files:<br />
Audio soundtrack will switch.<br />
Example:<br />
English Spanish French<br />
If the title contains both main and sub audio, you can<br />
further select L (main), R (sub), L/R (mixed of main and<br />
sub).<br />
With an audio CD or <strong>video</strong> CD:<br />
The Audio channel will switch.<br />
Example:<br />
L/R L R<br />
Note<br />
For some discs, it is only possible to change the soundtrack<br />
from the disc menu. Press [TOP MENU] or [DISC MENU] to<br />
display the disc menu.<br />
When outputting the audio signal from the DIGITAL AUDIO<br />
OUT (COAXIAL) or when connected to the Dolby Digital<br />
Stream compatible TV with an HDMI cable, you cannot<br />
switch to the main audio (L) or sub audio (R) when playing<br />
back a title in HDD or VR mode DVD-RW with “Dolby Digital”<br />
set to “Stream”. If you want to switch the audio, set “Stream”<br />
to “PCM”. (See page 69.)<br />
Switching Virtual Surround System<br />
HDD DVD-V DVD-RW<br />
DVD-R DVD+RW DVD+R CD<br />
You can enjoy stereophonic virtual space through your<br />
existing 2 channel stereo system.<br />
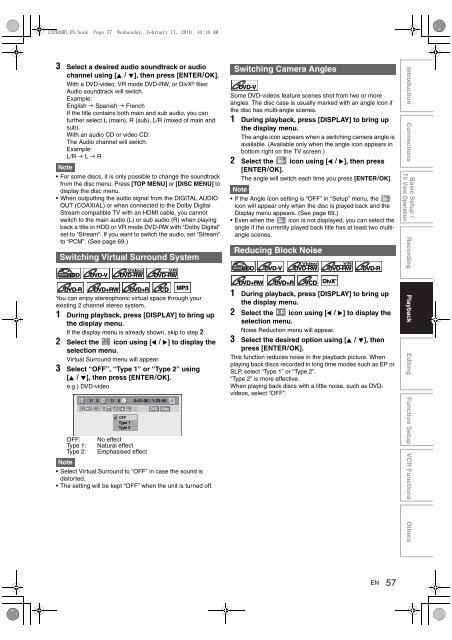
1 During playback, press [DISPLAY] to bring up<br />
the display menu.<br />
If the display menu is already shown, skip to step 2.<br />
2 Select the icon using [0 \ 1] to display the<br />
selection menu.<br />
Virtual Surround menu will appear.<br />
3 Select “OFF”, “Type 1” or “Type 2” using<br />
[K \ L], then press [ENTER\OK].<br />
e.g.) DVD-<strong>video</strong><br />
MP3<br />
OFF: No effect<br />
Type 1: Natural effect<br />
Type 2: Emphasised effect<br />
Note<br />
T 1/ 5 C 1/ 5<br />
OFF<br />
Type 1<br />
Type 2<br />
Video<br />
VR<br />
DVD-RW<br />
0:01:00 / 1:23:45<br />
DVD Video<br />
Select Virtual Surround to “OFF” in case the sound is<br />
distorted.<br />
The setting will be kept “OFF” when the unit is turned off.<br />
Switching Camera Angles<br />
DVD-V<br />
Some DVD-<strong>video</strong>s feature scenes shot from two or more<br />
angles. The disc case is usually marked with an angle icon if<br />
the disc has multi-angle scenes.<br />
1 During playback, press [DISPLAY] to bring up<br />
the display menu.<br />
The angle icon appears when a switching camera angle is<br />
available. (Available only when the angle icon appears in<br />
bottom right on the TV screen.)<br />
2 Select the icon using [0 \ 1], then press<br />
[ENTER\OK].<br />
The angle will switch each time you press [ENTER\OK].<br />
Note<br />
If the Angle Icon setting is “OFF” in “Setup” menu, the<br />
icon will appear only when the disc is played back and the<br />
Display menu appears. (See page 69.)<br />
Even when the icon is not displayed, you can select the<br />
angle if the currently played back title has at least two multiangle<br />
scenes.<br />
Reducing Block Noise<br />
Video<br />
HDD DVD-V DVD-RW<br />
VR<br />
DVD-RW<br />
DivX ®<br />
DVD-R<br />
DVD+RW DVD+R VCD<br />
1 During playback, press [DISPLAY] to bring up<br />
the display menu.<br />
2 Select the icon using [0 \ 1] to display the<br />
selection menu.<br />
Noise Reduction menu will appear.<br />
3 Select the desired option using [K \ L], then<br />
press [ENTER\OK].<br />
This function reduces noise in the playback picture. When<br />
playing back discs recorded in long time modes such as EP or<br />
SLP, select “Type 1” or “Type 2”.<br />
“Type 2” is more effective.<br />
When playing back discs with a little noise, such as DVD<strong>video</strong>s,<br />
select “OFF”.<br />
DivX DivX®<br />
EN<br />
57<br />
Introduction Connections<br />
Basic Setup /<br />
Recording Playback Editing Function Setup VCR Functions Others<br />
TV View Operation