Weber Carburator Manual.pdf - Power by BMW E21
Weber Carburator Manual.pdf - Power by BMW E21
Weber Carburator Manual.pdf - Power by BMW E21
You also want an ePaper? Increase the reach of your titles
YUMPU automatically turns print PDFs into web optimized ePapers that Google loves.
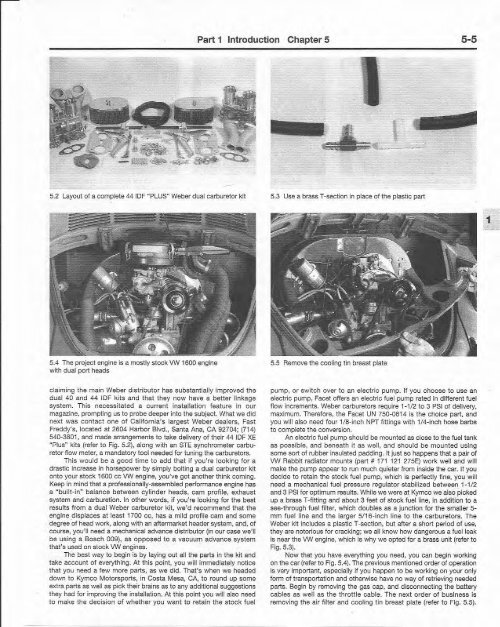
5.2 layout of a com plete 44 IOF "PLUS" <strong>Weber</strong> duaJ carburetor kit<br />
5.4 The project engine is a mostly stock VoN 1600 engine<br />
with dual port heads<br />
claiming th e main <strong>Weber</strong> distributo r has sub stant ially improved th e<br />
dual 40 and 44 IOF kit s and th at th ey now have a bette r linkage<br />
system . This necessitated a current inst allation feat ure in our<br />
magazine, prompt ing us to probe deeper into the subject. What we did<br />
next was co ntact one of Californi a's largest <strong>Weber</strong> deale rs, Fast<br />
Freddy's, located at 2604 Harbor Bivd., Santa Ana, CA 92704; (714)<br />
540-3801, and made arrangements to take delivery of t heir 44 IOF XE<br />
"Plus" kits (refer to Fig. 5.2), along with an STE synchromeler carburetor<br />
flow meter, a mandatory tool needed fo r tun ing the carburetors.<br />
This would be a goo d tim e to add th at if you're looking fo r a<br />
drastic increase in horsepower <strong>by</strong> simply bolting a dual carbureto r kit<br />
onto your stock 1600 cc VoN engine, you've got another think coming.<br />
Keep in mind that a profess ionally-assembled performance engine has<br />
a "built-In" balance betw een cy linder heads, cam profile, exhaust<br />
system and carbu retion. In othe r words , if you're looki ng for the best<br />
results fro m a dual <strong>Weber</strong> carburetor kit, w e'd reco mmend that t he<br />
engine d isplaces at least 1700 co, has a mild profile cam and some<br />
degree of head work , along with an aftermarke t header system, and, of<br />
course, you'l l need a mechanical advance distributor On our case we 'll<br />
be usin g a Bosch OOg), as opposed t o a vacuum ad vance system<br />
that' s used on stock \fIN engines.<br />
The best way to begin is <strong>by</strong> laying out all the parts in the kit and<br />
take account of everything. At this point, you will immediately notice<br />
that you need a few more parts , as we did. That' s when we headed<br />
do wn to Kymco Motorsport s, in Costa Mesa, CA, to round up some<br />
extra parts as well as pick their brains as to any additional suggestions<br />
they had for improving the installation. At this point you will also need<br />
to make the decision of whether you want to retain the stock fu el<br />
Part 1 Introduction Chapter 5 5-5<br />
5.3 Use a brass T-sect ion in place of the plastic part<br />
5.5 Remove the coo ling tin breast plate<br />
pump, or switc h over to an elect ric pum p. If you choose to use an<br />
elect ric pump. Facet offers an electric fuel pump rated in different fuel<br />
flow increments. <strong>Weber</strong> carburetors require 1-1/2 to 3 PSI of delivery,<br />
maximum. Therefore, the Facet UN 750-06 14 is the choice part, and<br />
you will also need four 1/8-inch NPT fitt ings with 114-inch hose barbs<br />
to complete the conversion.<br />
An electric fuel pump should be mounted as close to the fuel tank<br />
as possible, and beneath if as well, and should be mount ed using<br />
some sort of rubber insulated padding. It just so happens that a pair of<br />
\fIN Rabbit radiator mounts (part # 171 121 275E) work well and will<br />
make the pump appear to run much quieter from inside the car. If you<br />
decide to retain the stock fuel pum p, which is perfect ly fine, you wiil<br />
need a mechanical fuel pressu re regulator stabilized betwee n 1-1/2<br />
and 3 PSI for optimum results. While we were at Kymco we also picked<br />
up a brass T-fitting and about S feet of stock fuel line, in addition to a<br />
see-through fuel filter, which doubles as a junction for the smaller 5mm<br />
f uel line and the larger 5/ 16-inch line to the carburetors. The<br />
<strong>Weber</strong> kit includes a plastic T-section, but after a short period of use,<br />
they are notorious for cracking; we all know how dangerous a fuel leak<br />
is near the VoN engine, which is why we opted fo r a brass unit (refer to<br />
Fig.5.3).<br />
Now that you have everything you need, you can begin working<br />
on the car (refer to Fig. 5.4). The previous mentioned order of operation<br />
is very important, especially if you happen to be working on your only<br />
form of transportation and otherwise have no way of retrieving needed<br />
parts. Begin <strong>by</strong> removing the gas cap , and disconnecting the battery<br />
cab les as well as the t hrott le cab le. The next order of business is<br />
removi ng the air filter and cooling t in breast plate (refer to Fig. 5.5).<br />
1<br />
"-=


