Create successful ePaper yourself
Turn your PDF publications into a flip-book with our unique Google optimized e-Paper software.
English<br />
<strong>Quick</strong> <strong>Start</strong> <strong>Guide</strong><br />
Follow these steps to install the LabelWriter printer and print your first label.<br />
1. Unpacking your LabelWriter Printer<br />
NOTE Do not plug the printer into your computer until asked to do so during the<br />
software installation.<br />
1 Unpack your printer and save the packing materials.<br />
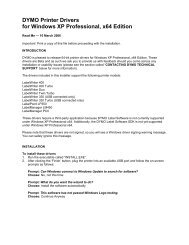
2 Make sure you have all the items shown in Figure 1. (Labels included in the<br />
package may vary.)<br />
CD-ROM<br />
USB cable<br />
Roll of<br />
address labels<br />
LabelWriter printer<br />
Roll of<br />
DYMO Stamps labels<br />
Figure 1<br />
Tested to comply<br />
with FCC standards<br />
Europe P/N: 924883<br />
INPUT:100-240V-50/60Hz Max0.64A<br />
OUTPUT:24V --- 0-1.0A<br />
UL<br />
C UL<br />
Switching Adapter<br />
FOR HOME OR<br />
OFFICE USE<br />
LISTED<br />
15WM<br />
I.T.E. POWER SUPPLY<br />
Model No.:TESA2-2401000<br />
U.S. P/N: 90819<br />
N10926<br />
E198850<br />
SHOCK HAZARD<br />
RISK OF ELECTRIC SHOCK<br />
DRY LOCATION USE ONLY .<br />
NON-SERVICEABLE ARTS P INSIDE.<br />
FOR USE WITH ITE ONLY .<br />
END AST FOR KONT ORSMASKINER.<br />
MADE IN CHINA<br />
CAUTION<br />
LabelWriter<br />
<strong>Quick</strong> <strong>Start</strong><br />
<strong>Quick</strong> <strong>Start</strong> <strong>Guide</strong><br />
Power adapter<br />
Power cable