Deep Sky Imager™: The Basics - Meade
Deep Sky Imager™: The Basics - Meade
Deep Sky Imager™: The Basics - Meade
- TAGS
- deep
- basics
- meade
- www.meade.com

Create successful ePaper yourself
Turn your PDF publications into a flip-book with our unique Google optimized e-Paper software.
<strong>Deep</strong> <strong>Sky</strong> Imager :<br />
<strong>The</strong> <strong>Basics</strong><br />
Color<br />
Black and White Pro II<br />
Pro II<br />
Pro III
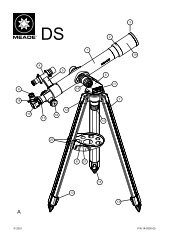
Parts Listing<br />
When first opening the packing box, note carefully the following parts:<br />
• <strong>Deep</strong> <strong>Sky</strong> Imager camera<br />
• Parfocal ring<br />
• USB cable<br />
• DB-9 to RJ-11 adapter<br />
• LX200 ® serial cable<br />
• Autostar ® #497 serial cable<br />
• CD ROM, including the Operating Instruction in .pdf format<br />
Recommended Minimum System:<br />
PC running Windows ® 2000 with 500 MB RAM and 100 MB free disk space.<br />
To get the best view and resolution for the images in this manual, zoom in to 200% using the viewing controls<br />
in the Acrobat ® Reader control bar.<br />
2
Install the Autostar Suite Software<br />
<strong>The</strong> following procedure is also found on the printed Quick Start Guide supplied with this product.<br />
Before you can operate the <strong>Deep</strong> <strong>Sky</strong> Imager camera, you must install the Autostar Suite software.<br />
1. Do not plug the USB cable into your PC at this time. You will be asked to do so later in this installation.<br />
2. Turn on your PC. Allow Windows to load.<br />
3. Place the CD ROM into your PC's CD drive.<br />
4. <strong>The</strong> Main Menu screen displays. Click “Install Autostar Suite.”<br />
5. You are prompted to choose a directory in which to install the driver. You may accept the default directory or<br />
create your own directory path. Click “Next” when done.<br />
6. <strong>The</strong> “Select Components” window displays. This window allows you to choose whether or not to install the<br />
Guide Star Catalog.<br />
Note: This is an optional catalog that may be used by the Planetarium program and contains all of the<br />
locations of the Hubble Space Telescope (HST) Guide stars. This file is very large and takes up a large<br />
amount of memory. Only download if you have enough memory or wish to use this amount of memory of<br />
your hard drive. Memory totals for the file and your hard drive are displayed in this window.<br />
If you wish to install the catalog, check the GSC check box.<br />
If you do not wish to install the catalog, uncheck the GSC check box.<br />
<strong>The</strong>n click “Next.”<br />
7. <strong>The</strong> “Start Installation” window displays. <strong>The</strong> program is now ready to install the Autostar Suite. Click “Next”<br />
to begin installation.<br />
8. <strong>The</strong> “Microsoft Text to Speech Engine” window displays. Click “Yes” to agree to the terms and to continue<br />
with the installation.<br />
9. <strong>The</strong> “Microsoft .Net Framework installation” window displays. You must click “Yes” for the <strong>Deep</strong> <strong>Sky</strong> Imager<br />
to operate. If it's already installed, click “Cancel” when the maintenance mode screen is displayed.<br />
10. Once .Net Framework installs, the .Net Framework agreement displays. Click “OK” to continue.<br />
11. A window displays that allows you to install Adobe ® Acrobat Reader if you do not already have it installed on<br />
your PC. Click “Yes” or “No.”<br />
12. <strong>The</strong> “InstallShield ® Wizard for the <strong>Meade</strong> <strong>Deep</strong> <strong>Sky</strong> Imager” displays. Click “Next.”<br />
13. A window displays prompting you to do a complete or custom install of InstallShield Wizard. Click on the<br />
“Complete” button and then click “Install” to begin installation.<br />
14. InstallShield Wizard completes installation. Click “Finish.”<br />
15. A window displays that tells you that Autostar Suite has been installed. Click “Finish.”<br />
3
Connect <strong>The</strong> <strong>Deep</strong> <strong>Sky</strong> Imager Camera to Your PC<br />
To connect the <strong>Deep</strong> <strong>Sky</strong> Imager Camera to your PC, you need to install the <strong>Deep</strong> <strong>Sky</strong> Imager device driver<br />
and connect the USB cable:<br />
1. Connect one end of the USB Cable to the <strong>Deep</strong> <strong>Sky</strong> Imager camera.<br />
2. Connect the other end of the USB Cable to your PC or to a USB hub.<br />
3. “Found camera” displays at the bottom right of your PC screen.<br />
4. <strong>The</strong> “Hardware Wizard” window displays. <strong>The</strong> “Install Software” selection is checked as the default choice.<br />
Click “Next.” <strong>The</strong> Wizard searches for the driver.<br />
5. (XP versions only) “Windows Logo Test” window displays. Clicking “Continue Anyway” will install a driver<br />
that should operate with most PC configurations.<br />
6. <strong>The</strong> driver is installed. Click “Finish.”<br />
<strong>The</strong> camera driver is now installed and your PC will now be able to recognize the <strong>Deep</strong> <strong>Sky</strong> Imager whenever<br />
you connect it to the PC.<br />
Check out page 56 to learn some helpful tips for your camera.<br />
Windows Vista ® users:<br />
1. When dialog (“New Hardware”) “Windows needs to install driver...,” select “locate and install driver software.<br />
2. Wait for Windows to 'give up' the search—this may take a long time.<br />
3. When “Windows couldn't find driver software,” select “Browse my computer driver software.” Select “Browse.”<br />
4. Navigate to the driver directory: C\program files\meade\autostar suite\envisage\driver\2k-xp<br />
5. When “Windows can't verify the publisher of this driver software” displays, select “Install this driver software<br />
anyway.”<br />
6. When “Found new hardware - <strong>Meade</strong> DSI” displays, select “Close.”<br />
Plug into any PC port and the drive loads. <strong>The</strong> software drivers never need to be installed again.<br />
4
Start the Suite Software<br />
If the Autostar Suite icon doesn’t appear on your desktop, you can start the Autostar Suite program by going to<br />
Start All Program/<strong>Meade</strong>/Autostar Suite. <strong>The</strong> Planetarium program will display.<br />
You can open other programs of the Suite by going to the Image menu and selecting the desired<br />
program, or You can run Envisage from Start/All programs/<strong>Meade</strong>/Envisage.<br />
You can open the Operating Instruction manuals or the <strong>Meade</strong> General Catalog by selecting them from the Main<br />
Menu screen of the CD ROM.<br />
<strong>The</strong> manuals can also be found (without a disk in the drive) in Start/All Programs/<strong>Meade</strong>/Manuals.<br />
Click the word “<strong>Meade</strong>” in the Main Menu or in the General catalog to go www.meade.com.<br />
5
Connect the <strong>Deep</strong> <strong>Sky</strong> Imager Camera to Your Telescope<br />
To connect the <strong>Deep</strong> <strong>Sky</strong> Imager camera to an ETX Telescope:<br />
• While looking at the back of the telescope, orient the <strong>Deep</strong> <strong>Sky</strong> Imager camera into the eyepiece holder so<br />
that the USB cable points to the left of the telescope’s optical tube.<br />
To connect the <strong>Deep</strong> <strong>Sky</strong> Imager camera to an LX-200 ® or LX-90 ® Telescope:<br />
• While looking at the back of the telescope, orient the <strong>Deep</strong> <strong>Sky</strong> Imager camera into the eyepiece holder so<br />
that the USB cable points to the right of the telescope’s optical tube.<br />
To connect the <strong>Deep</strong> <strong>Sky</strong> Imager camera to other telescopes:<br />
• Move the <strong>Deep</strong> <strong>Sky</strong> Imager camera around in the eyepiece holder until the image on the <strong>Deep</strong> <strong>Sky</strong> Imager<br />
display screen (39) is upright.<br />
To connect the <strong>Deep</strong> <strong>Sky</strong> Imager camera as an autoguider:<br />
• Attach the correct serial cable from the telescope’s control panel RS-232 port to the comm port of your PC<br />
(see the Autoguider instruction sheet for more information). Also see “Autoguider and Telescope Controls,”<br />
page 31, for more information.<br />
• Click on the telescope tab (16). Enter the PC’s comm port number or Netscope Server.<br />
• Click the Connect button (27).<br />
6
To open the Envisage Imaging program, go to the Image menu of the Planetarium program and select <strong>Deep</strong> <strong>Sky</strong><br />
Imager Imaging.<br />
<strong>The</strong> Envisage program will display.<br />
Open the Envisage ® Program<br />
7
c<br />
d<br />
2%<br />
1*<br />
1(<br />
2!<br />
2@<br />
1^ 1&<br />
Envisage Controls<br />
i j<br />
1!<br />
2#<br />
1$<br />
h<br />
f 2) 1)<br />
1@ 1%<br />
g<br />
e 1#<br />
3&<br />
2^<br />
3@<br />
3#<br />
2*<br />
2(<br />
3$<br />
3^<br />
2&<br />
3%<br />
24<br />
3*<br />
3)<br />
3!<br />
8
Key to Envisage Controls<br />
1. Gain and Offset sliders<br />
2. Preview and Exposure controls<br />
3. Auto Exp (Exposure) controls<br />
4. Monochrome check box [grayed out for<br />
B&W model]<br />
5. Live Image check box<br />
6. Dark Sub check box<br />
7. Long Exp check box<br />
8. Color button [grayed out for B&W model]<br />
9. Combine and Quality controls<br />
10. Image Process box<br />
11. Object Name box<br />
12. File status boxes<br />
13. Save Process button<br />
14. Start/Stop button<br />
15. Image Acquire status bars<br />
16. Stats, Telescope tabs<br />
17. Help, Live, File Names tabs<br />
18. Histogram display<br />
19. Histogram sliders and controls<br />
20. Countdown display<br />
21. Autocontrast, Shadow Enhance controls<br />
22. Magic Eye Focus<br />
23. CCD Temperature<br />
24. File Name<br />
25. File Open and Settings menu<br />
26. Comm port field<br />
27. Connect/Disconnect button<br />
28. Telescope controls (up, down, right,<br />
left, focus)<br />
29. Autoguide/Guiding or Track/Tracking<br />
button (displays depending on whether<br />
scope can autoguide or track)<br />
30. Tracking box<br />
31. Centroid<br />
32. Will Cal (Calibrate)/No Calibrate button<br />
33. Center and Set Target buttons<br />
34. Corr (Correct) Gain control<br />
35. FL in mm (Focal Length in millimeters)<br />
36. Target Status display<br />
37. Live Image<br />
38. Dark Spot, Full Screen, Zoom<br />
check box<br />
Throughout this manual, any number that is displayed in parentheses refers to key<br />
above. For example, “(3)” refers to the Auto Exp button and “(14)” refers to the<br />
Start/Stop button. Mono (4) and Color (8) buttons are not available for the Black & White<br />
imager and are grayed out. <strong>The</strong> CCD Temperature Readout display (41) is only available with<br />
DSI II and DSI III models.<br />
9
Once you have connected your camera to the computer and opened the Envisage program, you’ll want to start<br />
taking pictures. Follow the steps below to start taking simple pictures with your <strong>Deep</strong> <strong>Sky</strong> Imager camera. We<br />
recommend that the first time you take pictures, you do so during daylight hours. Point your telescope at a<br />
stationary landmark, such as a building, telephone pole or so forth—trees and other objects that move slightly<br />
are not the best objects to use during your first<br />
image tests.<br />
1. Click on the “Auto Exp” button (3).<br />
See “Auto Exp Button,” page 19, for<br />
more information.<br />
2. Click on the combo box controls in the “Image<br />
Process” field (10) to display a list of object types.<br />
Scroll down the list and select “Terrestrial.” See<br />
“Image Process,” page 21, for more information.<br />
3. Type a name for the object in the “Object<br />
Name” box (11). This will be used as the image<br />
file name. See “Object Name,” page 22, for<br />
more information.<br />
4. Click “Save Process” button (13). Select “JPEG”<br />
and “Normal Operation.” See “Save Process,”<br />
page 22, for more information.<br />
5. Click on the “Live” tab (17). See “Live Image<br />
Check Box,” page 19, for more information.<br />
Start Taking Pictures 1<br />
10
more...<br />
6. An image should be already displayed on the screen (39). Use the focuser on<br />
your telescope to focus the object. See “Magic Eye Focus,” page 25 for more<br />
information about focusing. If you are having a lot of problems focusing your<br />
image, see “<strong>The</strong> Parfocal Ring,” pages 17-18.<br />
7. Click “Start (14).”<br />
<strong>The</strong> camera begins taking pictures and will<br />
continue to do so until you click on “Stop.”<br />
Watch the Status box (24). When “Images”<br />
reaches 50, click the “Stop” button (14).<br />
Start Taking Pictures 2<br />
Go to the next page to find out what the program is doing once you press “Start.”<br />
11
What Happens When You Press Start 1<br />
• <strong>The</strong> live image is displayed on the program’s display screen if the Live box is checked and the Live tab is<br />
selected (these are the default settings).<br />
• When you press Start, the <strong>Deep</strong> <strong>Sky</strong> Imager camera begins taking images and continues to take images<br />
until you press stop. <strong>The</strong> Envisage program uses the first 10 images it takes as a baseline to compare with<br />
the images it takes subsequently. In other words, the program is always comparing images. Note: <strong>The</strong> user<br />
can change the amount of images that the program uses as a baseline. See “Evaluation Count,” page 21,<br />
for more information.<br />
• <strong>The</strong> program takes images with the best contrast and quality and assembles the best of these images (that<br />
is, the program “stacks the best images”) into one image; this image is referred to as the composite image<br />
in this manual.<br />
• After you press the Start button, the composite image is displayed as a new tab above the display screen.<br />
When you press Stop and select this tab, the final version of the composite image is displayed.<br />
• After about 10 images are taken, the Envisage program applies a sharpening filter to the composite image.<br />
You can choose which sharpening filter you wish to use from the most to the least sharp, or none. You can<br />
change the filter setting while the camera is taking pictures. See “Kernel Filter,” page 21, for<br />
more information.<br />
• Further image enhancement or filtering may be performed in other image editing software, such as the<br />
supplied Image Processing software or Adobe ® Photoshop. Make sure you select an image type that can be<br />
opened (such as JPEG or BMP) by the Image Editing software.<br />
more...<br />
12
What Happens When You Press Start 2<br />
• <strong>The</strong> Envisage program is continually resaving the composite image. If the Save Every Composite Image box<br />
is selected, in the Save Option dialog the program will save every image that added to the composite image<br />
(see page 22 for more information). If your PC crashes or loses power, the images that have been taken up<br />
to the time of the crash or power loss will automatically be saved—the user does not need to save them<br />
manually.<br />
• <strong>The</strong> Envisage program continues to composite the image until you press the Stop button. Typically, about 50<br />
images are needed to get a high quality composite image. After 50 images, the quality of the image<br />
increases only in small amounts; about 90% of the quality level will have been accumulated with about 50<br />
images.<br />
• When you press Start again, the Envisage program begins to accumulate a new composite image and<br />
renames the image in a new tab. For example, if you named the first image “Building,” the next images will<br />
be named “Building 0002,” then “Building 0003” and so forth, so that it doesn’t overwrite the previously<br />
saved images.<br />
• If a name/number was previously saved as a file name, the program will choose the next available number.<br />
For example, if “Building 0007” was previously saved, the next file will be named “Building 0008.”<br />
• Note that controls that are not currently available are grayed out.<br />
Check out page 56 to learn some helpful tips for your camera.<br />
13
How to take a picture of a terrestrial<br />
object, the Moon or a planet<br />
1. Insert camera into the telescope as previously described.<br />
2. Click on the Live tab (17).<br />
3. Click Auto Exp (3). <strong>The</strong> program will find a good exposure automatically. Set the image balance according to<br />
your taste using the Contrast (21) and Color Balance (8) [color models only] controls.<br />
4. Use Shadow Enhance if necessary. This control is excellent for the moons of Jupiter, craters of the Moon,<br />
some deep sky objects such as nebulae.<br />
5. Go to the Image Process box (10) and select the process from the pop up menu you wish to image (e.g.,<br />
moon, planet, etc.).<br />
6. Click the Save Process button and a dialog box displays. Select file type. Typically you will select “jpeg.” If<br />
you wish to perform image processing in another program such as Photoshop, select “tif.”<br />
7. Draw a box around the planet or a bright feature of the object you wish to image. Or if the object is bright,<br />
choose a dark area, and check the Dark Spot box (40).<br />
8. Enter a name in the Object Name status.<br />
9. Click Start (14). <strong>The</strong> program will now begin to take images.<br />
14
An example of taking a picture<br />
of a deep sky object<br />
1. Insert camera into the telescope as previously described.<br />
2. Click on the Live tab (17).<br />
3. Set the Live Exp spin button to 1.0 second.<br />
4. Click Mono box (not available for Black and White models; continue on to the next step). You should<br />
see bright stars on the Live screen.<br />
5. Before taking the first shot of the evening, leave the camera sit for 5 to 10 minutes to allow the temperature<br />
of the camera to stabilize.<br />
6. In the Image Process dialog box, select “Take Darks.” Use the default values. Click the Start button.<br />
7. A warning displays prompting you to cover the telescope. Cover the end of your telescope so that no light<br />
can get in. Click OK when it is covered.<br />
8. <strong>The</strong> imager begins taking dark frames (see “Dark Frames” page 34, for more information). <strong>The</strong> Dark Frames<br />
are saved in the directory: C:<strong>Meade</strong> Images/Dark. <strong>The</strong> program will display how long the Dark Frame<br />
exposures will take. Important Note: Do not take dark frames while the camera is cooling off.<br />
9. When the Dark Frame exposures are completed, a dialog displays prompting you to uncover the telescope.<br />
Click OK. <strong>The</strong> Dark Subtract box (6) should be checked now; if not, do so now.<br />
10. Stars should be visible on the live tab screen.<br />
11. Select a star to image by drawing a box around it. If the telescope is connected you can use the telescope<br />
control (Arrow keys) to help choose a star. See “ Autoguiding and Telescope Controls,” page 31, for<br />
more information.<br />
12. Adjust the focus by looking at the magic eye focus box, which is a 3D plot of the intensity of the selected<br />
star. Make the sides as sharp as possible. See page 25 for information on setting the magic eye focus.<br />
13. Check the Long Exp box (7). Set exposure to 15 seconds. This will allow you to take a preview of a single<br />
image to view an example of how the camera is imaging.<br />
14. Click Preview (2). <strong>The</strong> countdown timer counts down from 15 to zero seconds.<br />
15. You can now tweak the image. Uncheck mono box [not available for Black and White models; continue<br />
to step #17]. more...<br />
15
16. Click Color to bring up the color control dialog. <strong>The</strong>n click “Auto WB.” Color image controls display [not<br />
available for Black and White models].<br />
17. Adjust Autocontrast (21) and Shadow Enhance (21).<br />
17. In the Image Process menu (10), choose “<strong>Deep</strong> <strong>Sky</strong>.” Use the default values.<br />
18. Once you have a reasonable color or black and white image, type in a name in the Object Name box (11)<br />
Tip: If your object’s name contains a number, such as M31, add a dash after the number. <strong>The</strong><br />
program Automatically saves each image with a number and the dash will allow your image names<br />
to be displayed as M31-0001, M31-0002, M31-0003, etc.<br />
19. Click Start (the button is then displayed as “Stop”). <strong>The</strong> imager begins taking pictures.<br />
20. <strong>The</strong> imager now takes 15 second images. Be patient. Take a number of pictures until your image looks good<br />
and click Stop to abort. You will now have an image that you can post on the web or submit to one of the<br />
<strong>Deep</strong> <strong>Sky</strong> Imager user groups.<br />
Experiment with Contrast, Shadow Enhance, Histogram sliders and Dark Subtract, and you will begin to take<br />
images like an expert.<br />
Dark Frame Subtraction takes out a lot of “hot” pixels from the image. Play with this control to see what effect it<br />
has on your image.<br />
Preview image without color balance or<br />
contrast (color model only).<br />
Preview image with color balance and<br />
contrast (color model only).<br />
Final image after 50 combined images<br />
(color model only).<br />
16
<strong>The</strong> Parfocal Ring 1<br />
It is extremely useful to have the <strong>Deep</strong> <strong>Sky</strong> Imager camera and a telescope eyepiece be parfocal—it will save<br />
you time when you need to refocus.<br />
Parfocal means setting two or more eyepieces to the same focus. (In this case, one eyepiece is a camera.) In<br />
other words, if you focus one eyepiece in your telescope, then you remove it and replace it with a parfocal<br />
eyepiece, the parfocal eyepiece will require little, if any, refocusing.<br />
<strong>The</strong> following procedure will show you how to make your <strong>Deep</strong> <strong>Sky</strong> Imager camera parfocal with a low-power<br />
wide-field 25mm or 26mm eyepiece (do not perform this procedure with a high-power eyepiece). Use the<br />
supplied parfocal ring and perform the procedure during the daytime.<br />
more...<br />
17
<strong>The</strong> Parfocal Ring 2<br />
1. Open the Envisage program.<br />
2. Insert the <strong>Deep</strong> <strong>Sky</strong> Imager camera into the telescope eyepiece holder. Do not tighten the eyepiece holder<br />
thumbscrew. Make sure the <strong>Deep</strong> <strong>Sky</strong> Imager camera slides down as far as it will go into the<br />
eyepiece holder.<br />
3. Point the telescope at a terrestrial object that has a lot of contrast with the surrounding area and if possible,<br />
has a distinctive edge (like a building, for example).<br />
4. If you have previously moved the histogram sliders, move the top slider to the 0 position (move all the way<br />
to the left) and move the bottom slider to the 256 position (move all the way to the right).<br />
5. Click on the Auto Exp (3) button.<br />
6. An image which may be or may not be focused appears on the<br />
display screen.<br />
7. Use the telescope’s focuser to get a rough focus of the object. Be patient.<br />
You may have to rotate the focuser back and forth until you can achieve<br />
focus of the image.<br />
8. When the image is roughly in focus, remove the camera from<br />
the<br />
eyepiece.<br />
9. Place the supplied parfocal ring over the bottom chrome tubing of the<br />
eyepiece. Do not tighten the ring.<br />
10. Place the eyepiece and tubing into the eyepiece holder. Do not tighten<br />
any of the thumbscrews yet. See photo at right.<br />
11. Do not use the telescope focuser in this step. Lift the eyepiece (but not the parfocal ring) until the object is<br />
focused.<br />
12. When the object is focused, tighten the parfocal ring. <strong>The</strong> eyepiece is now parfocal with the <strong>Deep</strong> <strong>Sky</strong><br />
Imager camera. Do not remove or change the position of the parfocal ring or you will need to repeat<br />
the procedure.<br />
Now, instead of focusing the camera with the telescope focuser (which is somewhat difficult and time<br />
consuming), insert in the eye piece/parfocal assembly and focus the eyepiece as you normally would. <strong>The</strong>n<br />
remove the eyepiece and replace the camera. You’ll find that the camera is focused and may need only minor<br />
focuser adjustment.<br />
18
Automatic Adjustment Controls 1<br />
Gain and Offset sliders (1): Similar to a TV set’s contrast and brightness controls. <strong>The</strong>se controls are<br />
automatically set after you pick an Object (10) type and click on the Auto Exp button (3). Most users will seldom,<br />
if ever, need to set these controls manually.<br />
Auto Exp. button (3): Automatically sets the Gain and Offset controls(1) for the camera. Before taking pictures,<br />
choose an Object (10) type and click on the Auto Exp button. This will adjust the camera to give you the typical<br />
contrast and brightness you need to take pictures for the type of object you have selected. You can further<br />
adjust the picture by adjusting the Histogram sliders (19), Filters (Kernel Filters, page 21, for more information)<br />
and focusing the telescope (see “Magic Eye Focus,” page 25, for more information).<br />
Mono check box (4) [grayed out and not available for the Black and White model]: Check this box to take a<br />
black and white picture.<br />
Live Image check box (17): Click to display live camera image in the Image Display (39).<br />
Dark Subtract check box (6): See “Dark Frames,” page 27, for more information.<br />
Color Dialog Cntl (Color Balance) (8) [grayed out and not available for the Black and White model]: Allows<br />
you to control your images’ color. It is recommended that you click “Auto WB” and then make further<br />
adjustments using the other controls. Auto automatically sets a color balance, balancing the red and blue values<br />
in relation to the green. Note: Once Auto is pressed, the values selected by Auto WB remain do not<br />
change, unless changed by the user—they are not continually updated by the program. When you begin<br />
a new image, it is recommended that you reset the values in the Color dialog.<br />
19
Color sliders [not available for the Black and White model]. Experiment with these sliders to change to<br />
change the image color.<br />
Sharp [not available for the Black and White model or DSI III] provides a sharper image, but the colors are<br />
less saturated.<br />
Soft [not available for the Black and White model or DSI III] provides more saturated colors.<br />
Daylight [not available for the Black and White model] provides a brighter image. Note that this may also be<br />
used for deep sky images. Experiment with this setting using the Preview Control (7).<br />
Reset [not available for the Black and White model] sets of the color sliders to midrange. This might be<br />
helpful if you wish to perform color correction in another image processing program, such as Adobe Photoshop.<br />
Long Exposure check box. Check this box to set a long exposure. If your telescope is only crudely aligned, set a<br />
value of no more than 15 seconds (this is a good starting value for any telescope to use) in the spin box to the<br />
left of this check box.<br />
How to take a long exposure:<br />
Turn off mono and click “Preview.”<br />
A countdown displays and the live check is turned off.<br />
An image displays.<br />
Automatic Adjustment Controls 2<br />
You can now use the color balance [not available for the Black and White model], focus, contrast, shadow<br />
enhance and auto contrast to adjust and manipulate the image.<br />
Once you have the preview sets the way you want your image, click on Start (14) and an image will be<br />
composited using your Long Exposure settings.<br />
Live check box. Check this box to set your live settings and focus. Check the Mono box [not available for the<br />
Black and White model] and set the spin box to the left of this check box to 1 sec. You will now have an<br />
image that you can easily focus using the Magic Eye focus controls (see Magic Eye Focus, page 25).<br />
20
Image Processing Controls 1<br />
Setting Menu (25): Click on the Setting Tab to display the Setting<br />
fields. <strong>The</strong>se are field that may be filled in by the user, if so desired.<br />
It also contains the directory paths for the Images and Dark frames<br />
directories.<br />
Combine (9): Selects a minimum quality level that is acceptable<br />
when images are added together to produce the<br />
composite image. Typically 50% is selected. You may wish to set it<br />
lower (e.g., 30%) if you have an image that has a lot of turbulence<br />
or other noise, but should try adjusting other controls first, such as<br />
the Histogram sliders (19). Also try refocusing the telescope.<br />
Image Process (10): Displays a list of objects to view, such as Planets, the Moon, terrestrial, etc. Adjusts some<br />
of the image processing settings to preset levels that will assist you in better quality images for the selected<br />
object. Also “Take Dark” is on this list; see “Dark Frames,” page 34, for more information.<br />
Kernel Filter: <strong>The</strong> chosen sharpening filter is applied to the composite image as it is saved and is displayed in<br />
the live Display Image after about 10 images are accumulated. 3 levels of sharp filters, 1 edge only filter and<br />
“None” (no filter) are available. <strong>The</strong> settings for this filter appear when terrestrial or Moon is selected from the<br />
Image Process (10) list.<br />
Click on the Min Quality % spin box (9) to change the minimum quality level.<br />
Evaluation Count (9) allows you change number of images accumulated and<br />
evaluated to determine a quality baseline when the Start button is pressed.<br />
Normally, 10 images are evaluated (this is the default number). Click in the spin<br />
box to change the number of images used.<br />
21
Image Processing Controls 2<br />
Object Name (11): Type in a name for the object. Each time the Envisage program<br />
begins to accumulate a new composite image, it renumbers the image in a new tab,<br />
using your original name. For example, if you named the first image “Building,” the<br />
next images will be named “Building 2,” then “Building 3” and so forth, so that it<br />
doesn’t overwrite the previously saved images. If a name/number was previously saved as a file name, the<br />
program will choose the next available number. For example, if “Building 7” was previously saved, the next file<br />
will be named “Building 8” and will not overwrite the file “Building 7.”<br />
Save Process (13): Click on this button to select the type of file format in<br />
which to save your picture. Beginners are recommended to save their<br />
pictures in “Jpeg” format. However, if you wish to perform further image<br />
processing, select “BMP” or “Fits.” <strong>The</strong> last two formats, “Fits” and<br />
“Fits3P” are uncompressed formats, are for use by advanced users. “Tif”<br />
files usually take up the most memory, but may be a useful format if you<br />
plan to use Adobe Photoshop. See “Time-Lapse Settings,” page 27.<br />
Save Options (13): Normally images are added together make up a<br />
composite image or if they have too low of a quality level, they may be<br />
discarded. However, you may choose to save every composite image the camera creates by selecting Save<br />
Every Composite Image in the Save Options box.<br />
<strong>The</strong>se images are not displayed as separate images; only the last saved composite image is displayed. <strong>The</strong>se<br />
files are stored in the directory you have chosen using the Image Directory field or the default directory chosen<br />
by the program during installation. If you wish to view any of these files, Click on the File Open button (25), and<br />
then choose the file from the directory.<br />
If you set the Min Quality % box to zero (0), every picture will be saved.<br />
<strong>The</strong> number of images the camera takes is displayed in the Status Displays (12) and the name on the File<br />
Name tabs (17) change with each new composite picture.<br />
Start/Stop button (14): Press to start or stop the camera taking pictures. See “What Happens When You Press<br />
Start,” page12, for more information.<br />
22
Image Processing Controls 3<br />
Image Acquire Status bars (15): Display while the <strong>Deep</strong> <strong>Sky</strong> Imager camera is taking<br />
pictures. Also a box displays the images format (e.g., jpeg), type of operation, time-lapse<br />
sequence or other pertinent information..<br />
Image Directory field and Browse button: Click on the Settings menu<br />
(25) to display a dialog box. In this box, click on the Browse button<br />
to locate a directory or type in a directory path in the field. Or you<br />
may just type in the directory name in the field. If you type in a new<br />
directory, the directory will be created when the first image is saved.<br />
Dark Frames Directory field and Browse button: You may select the<br />
directory in which to save your Dark Frames. Click on the Browse<br />
button to locate a directory or type in a directory path in the field. Or<br />
you may just type in the directory name in the field. If you type in a<br />
new directory, the directory will be created when the first image<br />
is saved.<br />
Settings dialog allows you to enter user information (name, location, Autostar model, etc). This information is<br />
saved in the header.<br />
Tracking Status Bar. Provides tracking information.<br />
Dark Spot check box. Click to center the on a dark area instead of a light area when using a centroid box.<br />
A quality measurement displays, which shows the difference between the central pixel and the threshold.<br />
Time-Lapse. Contains some common presets and allows you to choose your own time-lapse settings as well.<br />
See page 27 for more information.<br />
23
File Settings Tab<br />
File Open menu (25): Allows you to open a file you have previously created. Click on this button and your<br />
directory list displays. Choose the desired file and it opens as a tab above the Image Display window. See<br />
diagram below.<br />
Scroll Arrows<br />
Notice that there are scroll arrows (37, see diagram above) at the end of the tab row. Click on these arrows to<br />
display more composite image file tabs.<br />
Close(38): Allows you to close a composite image file. First click on the tab you wish to close, then click on<br />
the File->Close menu or press the Delete Key to close the file. You cannot close the live image tab.<br />
Close button<br />
24
Magic Eye Focus<br />
<strong>The</strong> Magic Eye Focus (22) displays a 3-D surface plot of the intensity of the image<br />
centered on the crosshairs of the tracking box (see page 28). As you adjust the focus,<br />
the peak of the plot will grow or shrink and the edges will grow steeper or less steep.<br />
Best focus is achieved at maximum peak and steepness.<br />
25
Connecting your Telescope and<br />
Telescope Controls<br />
To connect to your telescope, see the printed instruction sheet that was<br />
including with Autostar Suite.<br />
Once the telescope is connected, you may use the following controls (28):<br />
Use the Arrow keys to move the telescope.<br />
Click on an Arrow to move in that direction at Guide Speed. Hold and drag on an<br />
Arrow in the direction you wish to move to increase the speed. Hold and drag an<br />
arrow in the opposite direction to decrease speed. Release to stop.<br />
If your telescope has motorized focus, use the focus button to focus on the<br />
object (only one focus speed is available).<br />
26
Time-Lapse Settings<br />
Envisage software allows you to take time-lapse images of an object.<br />
This means you can set the software to take an image, wait and then<br />
take another image after a period of time goes by, and continue the<br />
process for however long you desire. This is ideal for taking images of<br />
clouds moving through the sky or creating an animation that shows the<br />
rotation of Jupiter (see “Making a Movie of the Rotation of Jupiter,” page<br />
36, for more a procedure on that topic).<br />
When you begin a time-lapse sequence, you can perform other tasks or<br />
go inside and catch up on your sleep. Envisage does all the work for you automatically.<br />
<strong>The</strong> setting for Time-Lapse sequencing are found in the Save Process dialog box. Choose “Save a Time-Lapse”<br />
Sequence” to use this feature.<br />
You will need to set three parameters for a time-lapse sequence:<br />
Frame Time: How long the image takes to acquire an image (be sure you know how your telescope can image<br />
an object—some telescopes can track for long periods, other will get a fuzzy image after perhaps 5 minutes—<br />
set your frame time accordingly).<br />
Wait Time: <strong>The</strong> amount of time the imager waits before taking the next picture; this is the amount of time it<br />
remains idle between images. It can be set to zero.<br />
Total Time: How long do you want the entire sequence to run.<br />
27
<strong>Deep</strong> <strong>Sky</strong> Imager Camera Program<br />
Advanced Concepts<br />
28
Tracking Boxes and Centroids<br />
Drawing a tracking box allows you to track (that is, to follow) a bright spot that is surrounded by a dark area.<br />
This is very much like your telescope’s tracking feature.<br />
A centroid is the spot where the crosshairs meet. You can use the centroids to help you center an object in a<br />
box. <strong>The</strong> centroid is used for shifting an image before it is combined in a composite image, and also is used for<br />
autoguiding.<br />
To create a tracking box, just use the cursor to draw a box around an object. For your first tests of this feature,<br />
try to choose an object that is bright and has a dark area surrounding it. You can experiment with this as you get<br />
familiar with the function.<br />
If you’re tracking a crater on the moon, draw the box about the center or a bright spot in a crater.<br />
29
Histogram Display and Controls<br />
<strong>The</strong> Histogram controls allow you more control of the brightness, contrast and midrange<br />
tones of your <strong>Deep</strong> <strong>Sky</strong> Imager camera.<br />
Experiment with these controls. Select an easily focused terrestrial image and adjust the<br />
Histogram sliders. You will notice the Live image growing brighter or darker, and even<br />
notice mid-tones becoming more visible. You will have to adjust these sliders differently<br />
for each object and can adjust the sliders “on the fly” as you are creating a<br />
composite image.<br />
You can also use these control when you select Preview. When you return to the live<br />
image, it will apply the setting you choose while in the preview mode.<br />
Note: <strong>The</strong> effect of the sliders is saved in all file types.<br />
Autocontrast: Automatically sets the sliders for the best contrast. You can change the<br />
settings from 1 through 5 to set more contrast. Each number provides a higher level of<br />
contrast than the last; 5 is good for very dim objects.<br />
Shadow Enhance: Helps bring out details in the shadows (gamma).<br />
30
Autoguider and Telescope Controls 1<br />
For users familiar with the product, the <strong>Deep</strong> <strong>Sky</strong> Imager camera functions in a manner similar to the <strong>Meade</strong><br />
Pictor 201XT CCD Autoguider.<br />
An autoguider helps keep an object centered so that a 35mm camera can take long exposures of an image.<br />
Note that you do not have to set the <strong>Deep</strong> <strong>Sky</strong> Imager camera for a long exposure using Exposure<br />
controls (2). Autoguiding is used typically with telescope mounted in the equatorial mode, although it<br />
can also be used with LX200GPS Telescope mounted in the alt/az mode.<br />
To use the <strong>Deep</strong> <strong>Sky</strong> Imager camera as an autoguider, perform the following procedure. You will need an<br />
off-axis guider (see the <strong>Meade</strong> General Catalog for more information) and the supplied serial cable that is<br />
appropriate for your model telescope. You will also need to know the focal length of your telescope.<br />
1. Attach the off-axis guider and your 35mm camera to your<br />
telescope as described in that product’s instruction manual. Insert<br />
and tighten the <strong>Deep</strong> <strong>Sky</strong> Imager into the eyepiece holder.<br />
2. Click on the Telescope tab.<br />
3. Attach one end of the serial cable to one of your PC’s comm ports and the<br />
other end to the telescope’s RS-232 port.<br />
4. Type in the comm port number into comm port box.<br />
5. Click the Connect button (it will then display “Disconnect”). <strong>The</strong> buttons<br />
below the Connect button become active and status data is displayed, such<br />
as which version of Autostar is connected, whether your telescope can<br />
Autoguide or just track, and so forth. If the telescope is capable of<br />
autoguiding, “Can AutoGuide” will display.<br />
6. Check to make sure your cable is properly attached, that you have the correct port<br />
number selected and so forth. If the telescope connection is verified, you will receive a “passed” message.<br />
more....<br />
31
Autoguider and Telescope Controls 2<br />
7. In the “FL IN MM” field (focal length in millimeters), type in the focal length, in millimeters, of your<br />
guide scope.<br />
8. Locate a star using your telescope’s alignment and Go To procedures. Focus and prepare the imager<br />
as described earlier in this manual. You may now use the arrow keys (28) to center the object you have<br />
chosen. Click on an arrow to move in that direction at Guide Speed. Hold and drag on an arrow in the<br />
direction you wish to move to increase the speed. Hold and drag an arrow in the opposite direction to<br />
decrease speed. Release to stop.<br />
9. If your telescope has motorized focus, use the focus button to focus on the object (only one focus speed is<br />
available).<br />
10. Draw a tracking box around the star.<br />
11. Click the Track Here button (the button then displays “Tracking”). Will Cal displays on the Calibrate button.<br />
12. When you click on the Track Here button (you do not need to press the Will Cal button), the program begins<br />
to calibrate. It then begins to autoguide your telescope and displays X and Y error coordinates in the Status<br />
Display box (24). When the program is done calibrating, it will start tracking and a yellow circle will appear<br />
on your target object.<br />
13. Click the Tracking button (the button then displays “Track Here” again) to stop tracking.<br />
If you don’t move your telescope or rotate the guider assembly, you do not need to recalibrate. However, if you<br />
wish to recalibrate, click on the No Cal button to force it to calibrate (which will then display “Will Cal”).<br />
<strong>The</strong> Track Last button will start tracking from where it was (the last tracking position) before it was stopped.<br />
32
Other Features<br />
Autoguider and Telescope Controls 3<br />
Center Target: Click Center Target to move the yellow circle to the center of the screen. <strong>The</strong> telescope models<br />
will follow (some telescopes will move more slowly than others).<br />
Set Target: Click Set Target and click on a position on the screen. <strong>The</strong> target will move to the this position.<br />
Corr (Correction) Gain: Sets how aggressive the correction operates. Default setting is 0.5. .01 is the lowest and<br />
1.0 is the highest setting.<br />
If your telescope takes too long to reach to the yellow circle, increase the gain.<br />
If you telescope keeps overshooting the yellow circle, moving back and forth, decrease the gain.<br />
If the telescope never reaches the yellow circle, recalibrate: Click the Tracking and No-Cal buttons. <strong>The</strong>n click<br />
the Track button again.<br />
33
Some Words about Dark Frames<br />
In oil painting, it is important to prepare the surface of the canvas to receive the paint. <strong>The</strong> unfinished surface of<br />
the canvas is not conducive to the fine brushstrokes required for fine art. <strong>The</strong> surface may have fabric strings or<br />
grainy bumps that will distort the finished picture. Canvas preparation is accomplished by applying oil gesso<br />
with broad regular strokes in one direction. After drying for several days the artist sands the surface until<br />
smooth and repeats the gessoing process as needed to achieve a smooth surface. Only then is the canvas<br />
ready for the artist to begin.<br />
A similar process is needed for the <strong>Deep</strong> <strong>Sky</strong> Imager which can be thought of as a canvas for a fine painting,<br />
only in this case the canvas is the silicon surface of the imager. This silicon surface is uneven in a different way.<br />
If the <strong>Deep</strong> <strong>Sky</strong> Image sensor is covered to block all light for a period of time and the resulting image examined,<br />
you would expect it to be uniformly black, but it is not! This image, which is called a “dark frame”, is speckled<br />
with a pattern of dots of varying intensities. <strong>The</strong> brightest dots are called “hot pixels” and all of these are created<br />
by electrons leaking into the pixels due to heat or other means and not from exposure to light. This pattern is<br />
very predictable and changes only in intensity with time. If this “dark noise pattern” is not removed from the<br />
exposure it will add distortion to the picture.<br />
Fortunately, because “dark noise” is predictable, it can be subtracted from an exposure leaving a clear image.<br />
AutoStar Suite software performs these “dark noise” subtractions automatically for <strong>Meade</strong> imagers because they<br />
transfer complete and uncompressed images to the computer.<br />
Images from webcams can't apply “dark noise” subtraction. Why? Because they compress their data and are<br />
unable to create a “dark frame” for correcting the image.<br />
34
Dark Frames is a useful feature for if you’re taking exposures longer than 1 second.<br />
Longer exposures and temperature can create noise in your <strong>Deep</strong> <strong>Sky</strong> Imager camera called dark current<br />
artifacts. <strong>The</strong> Dark Frames feature allows you to subtract out some of this noise from your pictures.<br />
Delete Existing Dark Frames. Deletes and overwrites previously imaged dark frames. This is box is left<br />
unchecked as a default.<br />
Total Time. Displays how long it will take to create all the dark frames using the Dark Frame settings chosen by<br />
the user<br />
Perform the Dark Frames features at night. If the temperature changes<br />
significantly during your observing session, you should repeat this procedure.<br />
To perform the dark Frames procedure:<br />
1. Select “Take Dark” in the Image Process combo box (10). <strong>The</strong> Dark Frame Exposure controls display.<br />
2. Select a range of exposure time. For example, if the length of your exposures will be between 2 and 5<br />
seconds, set the First Exp (Exposure) box for 2 seconds and the Last Exp box for 5 seconds. <strong>The</strong> Envisage<br />
program will then take a series of dark frames image files between 2 seconds and 5 seconds in length at<br />
approximately 1 f/stop intervals. Later, when you set your camera exposure time (see Step 6 below), the<br />
Envisage program will automatically select the Dark Frame file with the closest exposure length, temperature<br />
and proper binning, and apply it to the image you are taking. In effect, it subtracts out the dark<br />
current<br />
artifacts.<br />
more....<br />
Dark Frames 1<br />
35
Dark Frames 2<br />
3. Select a value for the Avg Exp box. This is the number of<br />
exposures that are averaged together to create each composite<br />
Dark Frame exposure. Typically, set this value to 10.<br />
4. Click on the Setting menu (25). <strong>The</strong> Dark Frames directory field<br />
displays. <strong>The</strong> Dark Frames will be saved to this directory. You<br />
may change the directory if you wish.<br />
5. Click the Start button (14). A message displays that tells you to<br />
cover up your telescope or <strong>Deep</strong> <strong>Sky</strong> Imager camera. Replacing<br />
the lens cap on your telescope is sufficient.<br />
<strong>The</strong> program erases all the old Dark Frames files in the directory<br />
if “Del existing darks” is checked. It then takes and saves the new Dark Frames series. When all the Frames<br />
are taken, “Done” displays in the Status Display (24). Notice the Histogram display; it will reflect the Dark<br />
Frames that are being imaged.<br />
6. Select an exposure in the Exposure Controls (2). <strong>The</strong> Dark Frames feature is used with longer exposures,<br />
so your exposure time should typically be longer than 1 second.<br />
7. Check the Dark Sub check box (6). <strong>The</strong> Dark Frames feature is automated, so Dark Frames will<br />
automatically be applied to any pictures you now take.<br />
8. Remove the lens cap from your telescope or uncover your <strong>Deep</strong> <strong>Sky</strong> Imager camera. Begin taking<br />
pictures as previously described in “Start Taking Pictures.” (See page 12 for more information.) <strong>The</strong> Dark<br />
Frames feature is automated, so Dark Frames will automatically be applied to any pictures you now take.<br />
Note that if you are taking longer exposures, better results will be achieved with black and white (mono)<br />
images: Check the Mono check box (4) [not available for the Black and White model].<br />
36
Make a Movie of the Rotation of Jupiter<br />
You should become familiar with autoguiding/auto tracking and calibration procedures as described in<br />
“Autoguider and Telescope Controls,” page 31.<br />
1. Click on the Save Process button to open the dialog box.<br />
2. Set the file type. Choose “jpeg” if just wish to create a movie, or select “tif” if you wish to process the frames<br />
in another image editing software program, such as Photoshop.<br />
3. In the Save Option, select “Save as a Time-Lapse Sequence.”<br />
4. Select “Jupiter Time Lapse” in the Time-Lapse presets. This preset is set up to watch the Red Spot travel<br />
across the face of Jupiter. <strong>The</strong> sequence takes about 4 hours and takes 24 images.<br />
5. Follow the procedures for Autoguiding or auto tracking as described in “Autoguider and Telescope Controls,”<br />
page 31. Draw box around Jupiter so that the telescope will track Jupiter.<br />
6. Click OK.<br />
7. Select “Planet” in the Image Process dialog.<br />
8. Click Auto Exp (3), so that the exposure will be corrected. You can tweak the color [color models only],<br />
contrast, shadow enhancement and so forth. as described earlier in this manual.<br />
9. Type in “Jupiter” in the Object name box.<br />
10. Click Start to begin the time-lapse sequence.<br />
37
Color Filters and the Black and White Imager<br />
<strong>The</strong> Black and White <strong>Deep</strong> <strong>Sky</strong> Imager model is shipped with a slide that will hold optional CCD RGB color<br />
filters, allowing you to tint, or tint and combine your black and white images. <strong>Meade</strong> offers one such filter set, the<br />
<strong>Meade</strong> CCD RGB Filter set, which includes a red, green, blue and IR filter.<br />
Tip: When you are using a color filter, write down the filter name along with the object name in the object name<br />
box (11). This will make it easier to retrieve when you wish to process your image. If you so desire, you may<br />
also write down the name of the filter you are using in the Settings menu box in the filter field. Make sure you<br />
change the filter color name in this field when you switch filters.<br />
Tip: Make sure that you use a software application, such as the IP program included with Autostar Suite or<br />
Photoshop, which allows you to precisely register and combine your tinted images.<br />
<strong>The</strong> Black and White Imager is shipped with the imager, slide and nosepiece separate.<br />
To install the filters onto the slide:<br />
1: Thread one or more color filters onto the slide so that they clear the bottom edge of the slide. If a filter hangs<br />
below the bottom edge, it will obstruct the movement of the slide. Thread the filters tightly into place.<br />
Note: It maybe necessary to focus each filter separately as you image.<br />
Color filter slide, top view<br />
38
Color Filters and the Black and White Imager 2<br />
2. Thread the nosepiece into place and firmly tighten.<br />
Attach nosepiece. Push the slide into housing<br />
3. Gently push the slide into slide housing on the camera. Notice that you can feel each filter “click” in place as<br />
you move the slide across the camera. This will make it easier to tell if the filter is in place in the dark.<br />
Note the order that you installed the filters as it may be difficult to determine color in the dark. And be aware<br />
that either end of the slide can be placed into either end of the housing.<br />
You may now choose a filter for imaging.<br />
39
Drizzle Tutorial #1<br />
This tutorial demonstrates the basic operation of Drizzle and how you get started. <strong>The</strong> following tutorial assumes<br />
that you have the imager on the telescope pointed at a <strong>Deep</strong> <strong>Sky</strong> object properly focused and that dark frames<br />
have been taken up to the longest desired exposure time.<br />
Recommended settings<br />
File Type -> FITS3P<br />
Save Options -> Save All Uncombined Images<br />
<strong>The</strong> above settings are highly recommended. FITS3P will save the full dynamic range of the imager and “Save<br />
All...” will allow you to run the images back through drizzle offline allowing you to try different settings. <strong>The</strong>se<br />
setting are found by pressing the Save Proc... button on the imager tab.<br />
1. Select “Drizzle” from the “Image Process” dropdown menu.<br />
2. Enter a name in the Object Name box.<br />
3. Set Min Quality and Evaluation Count as desired.<br />
Press the Settings button. See the Drizzle Resolutions section of this document for a description of these<br />
settings. <strong>The</strong>se settings are not critical if you used the recommended settings above because you will<br />
be able run the images back through drizzle off line.<br />
4. Start autotracking<br />
Follow the directions in the manual on page 31 and set up your <strong>Meade</strong> Telescope for autotracking/Guiding.<br />
Be sure the Imager pull down in the Telescope tab is set to the imager you are using for drizzle. <strong>The</strong><br />
imagers are identified by name.<br />
More...<br />
Drizzle Tutorials<br />
40
5. Select 2 stars<br />
<strong>The</strong> first star selected will be the shift star this is the position that will be shifted for subsequent images.<br />
This is also the star that will be used for telescope tracking. <strong>The</strong> second star is to determine the rotation<br />
angle from the first star. It is important to pick stars that are close to the center. Keep the selection within<br />
the middle third of the image, this way the telescope control will have maximum shift space. <strong>The</strong> telescope<br />
control will not shift the selected stars out of the image. When you run the images off line you can select<br />
different stars. If your telescope is polar mounted and well aligned you can use a single star, this will give<br />
you the maximum field of view possible.<br />
6. Press Start<br />
Envisage will create a new tab and put<br />
the drizzled image there. Be patient,<br />
depending on your Drizzle settings and<br />
the speed of your computer it may take<br />
2030 seconds after the count down for<br />
the first image to appear. <strong>The</strong> image<br />
may be bigger than your screen, in this<br />
case scroll bars will appear on the right<br />
and bottom.<br />
7. Telescope Tracking<br />
If you select the live image you will see<br />
your selected stars and a yellow circle<br />
with a cross. This is the target position.<br />
If your star was on the yellow cross<br />
when Start was pressed then the<br />
yellow cross will be in the upper right<br />
corner.<br />
More....<br />
Drizzle Tutorials 2<br />
41
Once the star reaches the first target position the yellow cross will move to the lower right corner. <strong>The</strong><br />
target position will move to the next position each time the selected star reaches it. <strong>The</strong> next position is the<br />
lower left corner and the last position is the upper left corner. Once the star reaches the last position<br />
imaging will stop. But the telescope will continue to track on the last position. During imaging you can<br />
change the target position by pressing the “Set Target” button and then clicking on the desired target<br />
position on the live image.<br />
8. Final Stretch<br />
Once the image is complete you can touch up the histogram stretch and shadow enhance settings and then<br />
save the final result by selecting File->Save from the menu.<br />
Drizzle Tutorial #2<br />
This tutorial demonstrates how to use Drizzle after you have already captured images and are working off-line.<br />
Offline Processing<br />
A new feature is the ability to run your captured images back through the Drizzle process. Bring up the<br />
program without the imager plugged in (to lighten the load of the processing power of your computer). You will<br />
then see the “Image Files” tab on the top.<br />
1. Add images<br />
Drizzle Tutorials 3<br />
Press the Add button in the Image Files tab on the top. <strong>The</strong> familiar Open dialog will appear. Navigate to<br />
the directory where the images are. Select the first image of the sequence and then scroll to the last image.<br />
Hold the shift key down and click on the last image. All the file names from the first to the last should be<br />
selected. Now press Open. After a few seconds the files should appear in the “file name” list box.<br />
42
2. Select images<br />
Select the first image in the list and after a few seconds it should appear in the live display. You can use the<br />
arrow keys and go up an down the list and the image will appear. Inspect each image and click on the<br />
Remove button to take the bad images out of the list. This will not delete the image from your hard drive.<br />
3. File Type: [what ever you want your final image type to be]<br />
This setting is up to you. <strong>The</strong> FITS file types will save the full dynamic range but the others formats may be<br />
more user friendly.<br />
4. Save Options: Normal<br />
This is the only setting that is valid, the other settings are ignored.<br />
5. Select “Drizzle” from the “Image Process” dropdown menu.<br />
6. Enter a name in the Object Name box.<br />
7. Set Min Quality and Evaluation Count to 0 and 1 respectively.<br />
Select these settings so that every image will be used in the final composite image. This is acceptable<br />
because you have eliminated all the bad images in a prior step.<br />
8. Press the Settings button.<br />
See the Drizzle Resolutions section and the sections following it for a description of these settings. <strong>The</strong>se<br />
settings can be experimented with each time you re-run the process.<br />
9. Select 2 stars.<br />
More...<br />
Drizzle Tutorials 4<br />
43
Click on the first file and then select the tracking stars. <strong>The</strong>y don’t have to be the same ones selected when<br />
the images were taken. After the selection you can use the arrow down key to check the tracking of<br />
the 2 stars.<br />
10. Press Start<br />
Drizzle Tutorials 5<br />
Envisage will create a new tab and put the drizzled image there. Be patient, depending on your Drizzle<br />
settings and the speed of your computer it may take 20 to 30 seconds for the first image to appear. <strong>The</strong><br />
image may be bigger than your screen: If so, scroll bars will appear on the right and bottom. <strong>The</strong><br />
current file name is displayed in the status box below the drizzle settings. <strong>The</strong> system will stop when all the<br />
files have been processed.<br />
44
11. Final Stretch.<br />
Once the image is complete, you can touch up the histogram stretch, shadow enhance settings and then<br />
save the final result by selecting File->Save from the menu. <strong>The</strong> file will always be saved to your default<br />
image directory. If you want to save in a different format then press the Save Proc... button and set the file<br />
type then select File->Save from the menu.<br />
12. Stretch any file.<br />
Drizzle Tutorials 6<br />
By selecting File->Open you can load any image file and perform a histogram stretch and shadow<br />
enhance(gamma) and then save the file in the currently selected file type by selecting File->Save. <strong>The</strong> file<br />
is always saved in the default image directory which is C:\<strong>Meade</strong> Images by default.<br />
45
Description of Drizzle<br />
Developed by NASA for the Hubble Space Telescope, Drizzle has features that dramatically increase the<br />
resolution and field of view of the <strong>Deep</strong> <strong>Sky</strong> Imager Pro's CCD chip. When the object being imaged would<br />
normally need a bigger chip camera, the astrophotographer can enable the Drizzle feature, which produces an<br />
effective 4.9 mega pixel camera from the <strong>Deep</strong> <strong>Sky</strong> Imager Pro's 640x480 CCD chip with <strong>Meade</strong> AutoStar<br />
controlled telescopes.<br />
It may seem that we are exaggerating, so here are the numbers: If a user selects Drizzle and inputs the value<br />
of 2 in the Drizzle 'Extended View' setting (effectively making a 2x2 mosaic), and a value of 2 in the ‘Drizzle<br />
Resolution’ (which takes multiple undersampled dithered shots of the object and reconstructs the image at<br />
higher resolution), they will end up with a picture that is 2560 pixels by 1920 pixels or 4,915,200 pixels. <strong>The</strong><br />
uncompressed RAM file (in FITS format) will be approximately 10 megabytes. Drizzle is not simply enlarging the<br />
image as in interpolation. We move the telescope which in turn moves the image across the CCD sensor to<br />
perform seamless precision mosaics.<br />
On the next page is a screen shot of <strong>Deep</strong> <strong>Sky</strong> Imager Pro’s image capture software called “AutoStar Envisage”<br />
with the Drizzle Settings dialog box opened:<br />
46
Description of Drizzle 2<br />
In the Drizzle Settings dialog box you have three options, “Drizzle Resolution,” “Extended View,” and “Pixel<br />
Fraction.” Here is what happens as you change each setting:<br />
47
Drizzle Resolution<br />
Description of Drizzle 3<br />
By increasing the Drizzle Resolution number (maximum value 2), the image resolution is higher creating bigger<br />
image scale. It looks like the image is simply enlarged, but in fact by taking multiple undersampled dithered<br />
shots of the object it reconstructs the image at higher resolution. Notice the Drizzle Size increase from<br />
640x480 to 1248x936, and the final image size being 1248x936. To accomplish this increase in resolution, we<br />
move the AutoStar controlled telescope a small amount and take an image, again and again reading out<br />
fractions of each pixel and then reconstructing the image.<br />
48
Extended View<br />
Description of Drizzle 4<br />
Extended view increases the value to a maximum of 2 (effectively making a 2x2 mosaic). We move the<br />
telescope in small precision movements, pause to take an image, and then repeat the action to make a<br />
seamless mosaic. This increases the true field of view of the image. Notice the outer frame has increased the<br />
effective field coverage and the file size has changed from 640, 480 to 1280, 960.<br />
49
Pixel Fractions<br />
Description of Drizzle 5<br />
By adjusting the Pixel Fraction size to a value smaller than 1 (minimum setting is .20), the size of the pixel<br />
fraction that is downloaded from each pixel is set as the exposure is made. Using a smaller pixel fraction will<br />
increase the image resolution. While the final image size does not change with finer settings, the final image will<br />
be sharper. See the diagram with the smaller blue pixel fraction within each single pixel outlined in red in the<br />
following illustration:<br />
50
Description of Drizzle 6<br />
51
Field De-Rotation<br />
Description of Drizzle 7<br />
Instead of just tracking and stacking images by following the movements of one star, the Envisage Software<br />
with Drizzle will track and stack images locked on two stars, and can correct for image rotation that occurs if the<br />
telescope is tracking in the Altazimuth configuration, or in a roughly polar aligned telescope. Using this feature,<br />
you can do a quick alignment of your <strong>Meade</strong> telescope in Altaz, turn on the Envisage, select Drizzle, and draw a<br />
box around each of two stars in the field. <strong>The</strong> resulting image will not show rotational star trails.<br />
52
Multiple Cameras: <strong>The</strong> latest software release now supports guiding and imaging with multiple cameras: You<br />
can connect up to 5 and use any combination of DSI, DSI Pro, DSI II, DSI Pro II or LPI. But you must use a<br />
USB 2.0 interface and, if necessary, a powered hub. Make sure you have enough power in your ports to run all<br />
your cameras.<br />
Drizzle: <strong>The</strong> Drizzle function has been sped up for all models.<br />
Color Algorithm has been improved on color imagers.<br />
Zoom: If you check the zoom percentage box, you can zoom into the center of the image. If you draw a<br />
selection a box around a part of the image, you will zoom into that part of the image. Select a zoom percentage<br />
from 100% to 500%.<br />
<strong>The</strong> zoom check box and zoom percentage box are displayed on the tab directly above each live image screen.<br />
Change Stretch on Completed Images. When an image is completed you can now alter the histogram stretch<br />
values and save them in the final image. Just pull down the file->save menu and the image will be saved in the<br />
current file time. You can also change the file type in Save Proc... and then save again in the new type.<br />
Image Files imager type. You can now rerun images through Drizzle or shift and combine by using the Image<br />
Files tab. Use the Add button and browse to the files you want to use and select them in the order you want.<br />
<strong>The</strong>n click on the first file in the list and it will appear in the corresponding Image File tab like a live image from<br />
a camera. Draw a box around one or two stars if you want de-rotation and press the start button. <strong>The</strong> image will<br />
start building and automatically stop when all the file images have been processed. It is recommended that the<br />
file type FITS3P be used for the image files because you can process with the full 16 bits from the DSI.<br />
More...<br />
New Features in this Release<br />
53
Additional Features<br />
Imager Naming. <strong>The</strong> new software will prompt you to name your <strong>Deep</strong> <strong>Sky</strong> Imager the first time you run<br />
Envisage with the imager plugged in. Keep the name short and descriptive. This name will stay with that imager<br />
even on a different computer. <strong>The</strong> name is used to identify the imager when using multiple imagers. It is also<br />
used for dark frames. If you have more than one imager it is important to give a unique name to each imager.<br />
You can change the name in the “Cntrl” dialog when using the Pro or the Color dialog when using the original<br />
<strong>Deep</strong> <strong>Sky</strong> Imager.<br />
Imager Tabs. <strong>The</strong>re is now an imager tab for each imager connected to the computer. <strong>The</strong> tab name is the<br />
same as the imager name and when it is selected the corresponding live tab with the same name will be<br />
selected automatically. When a live tab is selected then the corresponding imager tab will be selected also.<br />
<strong>The</strong>re is an extra imager tab called “Image Files” this is a virtual imager that can be loaded with files and then<br />
those images can be sent through the Drizzle process as though they came from the imager. This way you can<br />
rerun the Drizzle process with new settings for different results.<br />
54
DSI II Features<br />
<strong>The</strong> following features are only available with DSI II models. Otherwise, the DSI II color model functions the<br />
same as the DSI, and the DSI Pro II functions the same as the DSI Pro.<br />
Resolution: 748 x 577 pixels. <strong>The</strong> DSI II models have almost twice the resolutions as the other models.<br />
CCD Temperature (41): Reads the temperature at the camera when you take dark frames. <strong>The</strong>se are saved in<br />
the dark frames directory. <strong>The</strong> saved file name will include the length of the exposure and the temperature.<br />
When you click on dark frame subtract, a dark frame from this directory will be selected that is within the 5° of<br />
the current temperature and within 1.5 to 3 seconds of your exposure length. If you do not have a dark frame<br />
that matches these requirements, you will be requested to take a dark frame at the current temperature and<br />
selected exposure rate.<br />
<strong>The</strong> temperature sensor accuracy is ± 2°. Temperature readings are made in half-degree increments.<br />
DSI III Features<br />
<strong>The</strong> following features are only available with DSI III models.<br />
Resolution: 1360 x 1029<br />
CCD Temp: Same as DS II (see above)<br />
Color version is RGB Bayer Pattern for better color reproduction.<br />
Progressive Scan readout for better lunar and planetary images.<br />
2/3 inch sensor for a much wider field of view.<br />
2x2 binning.<br />
55
Finally, Some Important Tips<br />
<strong>The</strong> following are some tips we have discovered that are very useful. Perform these procedures in the daytime,<br />
unless otherwise mentioned.<br />
• Make sure you connect to the correct ports on your computer. Use a USB 2.0 interface.<br />
• After you install the software, see if the camera is working. You should see lighting shifts on the live screen<br />
as you move it about. <strong>The</strong> camera does not have to be focused or inserted into the telescope to try this out.<br />
• Focus your telescope with an 25mm eyepiece in place before inserting the camera into the telescope. Once<br />
you focus, you can make the camera parfocal as described on page 17, or can just try to focus the camera<br />
with the focuser. But focus using the eyepiece first.<br />
• <strong>The</strong> field of view of a 25mm eyepiece is about 3 time the field of view of the camera.<br />
• <strong>The</strong> driver has to be installed twice. This is normal for Windows. You will hear the installation tones<br />
twice. Do not try to delete one of the drivers.<br />
• You will need to take dark frames (do this at night) to image with any of the the <strong>Deep</strong> <strong>Sky</strong> Imagers. If you<br />
have never taken dark frames before, or do not know what dark frames are, read up on dark frames, pages<br />
34 to 36.<br />
56
This document and the <strong>Meade</strong> Autostar IP Software described herein, are copyrighted and are protected from reproduction, proliferation, and disclosure under<br />
the Copyright laws of the United States of America. <strong>The</strong> Software contained herein is licensed to you under the terms of a License Agreement incorporated in<br />
the Software. PLEASE READ IT BEFORE USING. By using the Software, you are accepting and agreeing to such terms. If you do not accept the terms,<br />
return the Software unused to the place of purchase for a full refund.<br />
Information in this document is subject to change without notice and does not represent a commitment on the part of <strong>Meade</strong> Instruments Corp. <strong>The</strong> software<br />
and/or databases described in this document are furnished under a license agreement. <strong>The</strong> software and/or databases may be used or copied only in<br />
accordance with the terms of the agreement. It is against the law to copy the software on any medium except as specifically allowed in the license agreement.<br />
<strong>The</strong> purchaser may make one copy of the software for backup purposes. No part of this manual and/or databases may be reproduced or transmitted in any form<br />
or by any means; electronic or mechanical, including photocopying, recording, or information storage and retrieval systems, for any purpose other that the<br />
purchaser’s personal use, without the express written permission of <strong>Meade</strong> Instruments Corp.<br />
Copyright © 2007 by <strong>Meade</strong> Instruments Corp. All rights reserved. Printed in the United States of America.<br />
Microsoft is a registered trademark and Windows and Vista are a trademarks of Microsoft Corporation.<br />
Acrobat Reader and Photoshop are trademarks of the Adobe Corporation.<br />
LIMITED WARRANTY<br />
LIMITED WARRANTY. <strong>Meade</strong> Instruments warrants that (a) the SOFTWARE will perform substantially in accordance with the accompanying written materials<br />
for a period of ninety (90) days from the date of receipt, and (b) any hardware accompanying the SOFTWARE will be free from defects in materials and<br />
workmanship under normal use and service for a period of one (1) year from the date of receipt. Any implied warranties on the SOFTWARE and hardware are<br />
limited to ninety (90) days and one (1) year respectively. Some states/countries do not allow limitations on duration of an implied warranty, so the above<br />
limitation may not apply to you.<br />
CUSTOMER REMEDIES. <strong>Meade</strong> Instruments entire liability and your exclusive remedy shall be, at <strong>Meade</strong>’s option, either (a) repair or (b) replacement of the<br />
SOFTWARE or hardware that does not meet <strong>Meade</strong>’s Limited Warranty. You must return the defective item to <strong>Meade</strong> Instruments, at your expense, with a copy<br />
of your receipt. This Limited Warranty is void if failure of the SOFTWARE or hardware has resulted from accident, abuse, or misapplication. Any replacement<br />
SOFTWARE or hardware will be warranted for the remainder of the original warranty period or thirty (30) days, whichever is longer. Outside of the United<br />
States, these remedies are not available without proof of purchase from an authorized non-U.S. source.<br />
NO OTHER WARRANTIES. <strong>Meade</strong> Instruments and its suppliers disclaim all other warranties, either expressed or implied, including, but not limited to, implied<br />
warranties of merchantability and fitness for a particular purpose, with regard to the SOFTWARE, the accompanying written materials, and any accompanying<br />
hardware. This limited warranty gives you specific legal rights. You may have other rights which vary from state/country to state/country.<br />
NO LIABILITY FOR CONSEQUENTIAL DAMAGES. In no event shall <strong>Meade</strong> Instruments, or its suppliers, be liable for any damages whatsoever (including<br />
without limitation, damages for loss of business profits, business interruption, loss of business information, or any other pecuniary loss) arising out of the use of,<br />
or inability to use, the <strong>Meade</strong> product, even if <strong>Meade</strong> Instruments has been advised of the possibility of such damages. Because some states/countries do not<br />
allow the exclusion or limitation of liability for consequential or incidental damages, the above limitation may not apply to you.<br />
U.S. GOVERNMENT RESTRICTED RIGHTS<br />
<strong>The</strong> SOFTWARE and documentation are provided with RESTRICTED RIGHTS. Use, duplication, or disclosure by the Government is subject to restriction as set<br />
forth in subparagraph (c)(1)(ii) of <strong>The</strong> Rights in Technical Data and Computer Software clause at DFARS 252.227-7013 or subparagraphs (c)(1) and (2) of the<br />
Commercial Computer Software—Restricted Rights at 48 CFR 52.227-19, as applicable. Manufacturer is <strong>Meade</strong> Instruments Corporation, 6001 Oak Canyon,<br />
Irvine, California 92618.<br />
57
(800) 626-3233 www.meade.com<br />
9/07