Kitchen Range - Wickes
Kitchen Range - Wickes
Kitchen Range - Wickes

Create successful ePaper yourself
Turn your PDF publications into a flip-book with our unique Google optimized e-Paper software.
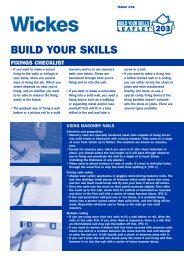
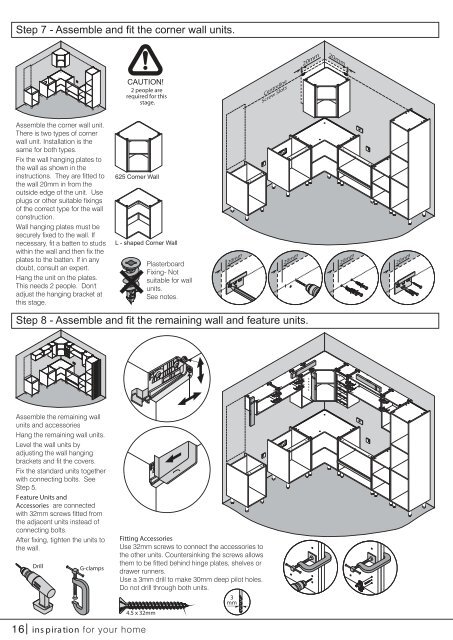
Step 7 - Assemble and fit the corner wall units.<br />
Assemble the corner wall unit.<br />
There is two types of corner<br />
wall unit. Installation is the<br />
same for both types.<br />
Fix the wall hanging plates to<br />
the wall as shown in the<br />
instructions. They are fitted to<br />
the wall 20mm in from the<br />
outside edge of the unit. Use<br />
plugs or other suitable fixings<br />
of the correct type for the wall<br />
construction.<br />
Wall hanging plates must be<br />
securely fixed to the wall. If<br />
necessary, fit a batten to studs<br />
within the wall and then fix the<br />
plates to the batten. If in any<br />
doubt, consult an expert.<br />
Hang the unit on the plates.<br />
This needs 2 people. Don't<br />
adjust the hanging bracket at<br />
this stage.<br />
Assemble the remaining wall<br />
units and accessories<br />
Hang the remaining wall units.<br />
Level the wall units by<br />
adjusting the wall hanging<br />
brackets and fit the covers.<br />
Fix the standard units together<br />
with connecting bolts. See<br />
Step 5.<br />
Feature Units and<br />
Accessories are connected<br />
with 32mm screws fitted from<br />
the adjacent units instead of<br />
connecting bolts.<br />
After fixing, tighten the units to<br />
the wall.<br />
Drill<br />
G-clamps<br />
CAUTION!<br />
2 people are<br />
required for this<br />
stage.<br />
625 Corner Wall<br />
L - shaped Corner Wall<br />
16 inspiration for your home<br />
20mm<br />
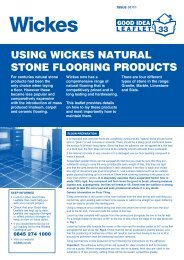
Fitting Accessories<br />
Use 32mm screws to connect the accessories to<br />
the other units. Countersinking the screws allows<br />
them to be fitted behind hinge plates, shelves or<br />
drawer runners.<br />
Use a 3mm drill to make 30mm deep pilot holes.<br />
Do not drill through both units.<br />
3<br />
mm<br />
4.5 x 32mm<br />
Plasterboard<br />
Fixing- Not<br />
suitable for wall<br />
units.<br />
See notes.<br />
Centreline<br />
Screw Slots<br />
20mm<br />
Step 8 - Assemble and fit the remaining wall and feature units.<br />
20mm<br />
20mm<br />
20mm<br />
20mm
![To-Order Kitchens [PDF] - Wickes](https://img.yumpu.com/30243922/1/184x260/to-order-kitchens-pdf-wickes.jpg?quality=85)