Kitchen Range - Wickes
Kitchen Range - Wickes
Kitchen Range - Wickes

You also want an ePaper? Increase the reach of your titles
YUMPU automatically turns print PDFs into web optimized ePapers that Google loves.
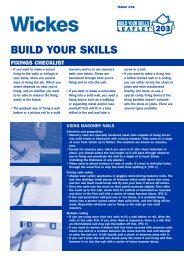
Step 11 - Flooring and Plinth<br />
270mm<br />
Lay flooring. The flooring<br />
usually stops at the legs but<br />
will need to continue under<br />
units with decorative legs.<br />
Fit the plinth. The plinth may<br />
need to be trimmed to allow<br />
for irregularities in the floor.<br />
A return plinth is made from a<br />
section of Continuous Plinth.<br />
It will need to be notched to fit<br />
around the legs. It is fitted<br />
behind the plinth along the<br />
front. Any cut edges should<br />
be covered with the supplied<br />
edging tape using contact<br />
adhesive.<br />
On the return, fit the plinth<br />
clips the other way up to avoid<br />
clashing with the plinth clip on<br />
the front.<br />
263mm<br />
286mm<br />
263mm<br />
270mm<br />
Assemble and fit the drawer<br />
boxes.<br />
Fit the shelves.<br />
Hang the doors. Refer to<br />
pages 20 and 21 for more<br />
information. Refer to<br />
information included with the<br />
appliance for information on<br />
fitting integrated appliance<br />
doors.<br />
Fit the Softclose buffers.<br />
Smaller doors need only 1<br />
Softclose buffer with a cover<br />
cap for the other hinge.<br />
Larger doors use 2 Softclose<br />
buffers. Refer to the assembly<br />
instructions.<br />
Fit the drawer fronts.<br />
Drill the doors and drawer<br />
fronts for the handles. Refer<br />
to page 21 for more<br />
information.<br />
Floor<br />
Covering<br />
Return Plinth<br />
Trim to suit<br />
the wall<br />
18 inspiration for your home<br />
140mm<br />
Plinth<br />
Floor<br />
60<br />
525mm<br />
Step 12 - Fit the Doors and Drawers.<br />
(if required)<br />
= =<br />
324<br />
54<br />
384<br />
263mm<br />
286mm<br />
263mm<br />
270mm<br />
24<br />
= =<br />
Continuous<br />
Plinth<br />
Edging Tape
![To-Order Kitchens [PDF] - Wickes](https://img.yumpu.com/30243922/1/184x260/to-order-kitchens-pdf-wickes.jpg?quality=85)