RS-232 Port on AVT GigE Cameras - Allied Vision Technologies
RS-232 Port on AVT GigE Cameras - Allied Vision Technologies
RS-232 Port on AVT GigE Cameras - Allied Vision Technologies

Create successful ePaper yourself
Turn your PDF publications into a flip-book with our unique Google optimized e-Paper software.
ALLIED VISION TECHNOLOGIES CANADA Inc.<br />
101 – 3750 North Fraser Way | Burnaby, B.C. | Canada<br />
www.alliedvisi<strong>on</strong>tec.com<br />
Applicati<strong>on</strong> Note:<br />
<str<strong>on</strong>g>RS</str<strong>on</strong>g>-<str<strong>on</strong>g>232</str<strong>on</strong>g> <str<strong>on</strong>g>Port</str<strong>on</strong>g> <strong>on</strong> <strong>AVT</strong> <strong>GigE</strong> <strong>Cameras</strong><br />
<strong>AVT</strong> <strong>GigE</strong> cameras can send and receive serial commands using its <str<strong>on</strong>g>RS</str<strong>on</strong>g><str<strong>on</strong>g>232</str<strong>on</strong>g> port. Tx and Rx data lines are<br />
available via the Hirose c<strong>on</strong>necti<strong>on</strong> <strong>on</strong> the back of the cameras. Enabling and c<strong>on</strong>trolling serial<br />
communicati<strong>on</strong> is performed by writing to serial IO registers <strong>on</strong> the camera through the PvAPI <strong>GigE</strong> SDK (see<br />
<strong>GigE</strong>SDK/examples/siotest source code), or through the serial dialog window in the <strong>AVT</strong> SampleViewer.<br />
Requirements<br />
- <strong>AVT</strong> <strong>GigE</strong> Camera with an open ended Hirose c<strong>on</strong>nector allowing access to <str<strong>on</strong>g>RS</str<strong>on</strong>g>-<str<strong>on</strong>g>232</str<strong>on</strong>g> pins.<br />
- A 9 pin DSUB c<strong>on</strong>nector for c<strong>on</strong>necti<strong>on</strong> to host computer.<br />
- A computer with a working serial port, or USB to Serial cable.<br />
- A terminal applicati<strong>on</strong> which allows serial communicati<strong>on</strong> (HyperTerminal, etc).<br />
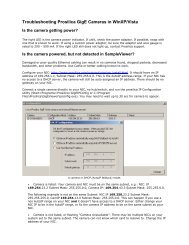
Hirose to DSUB Wiring<br />
Locati<strong>on</strong> of <str<strong>on</strong>g>RS</str<strong>on</strong>g>-<str<strong>on</strong>g>232</str<strong>on</strong>g> RxD, <str<strong>on</strong>g>RS</str<strong>on</strong>g>-<str<strong>on</strong>g>232</str<strong>on</strong>g> TxD, and GND pins varies between models. Naming of correct GND pin is not<br />
c<strong>on</strong>sistent between models. Wire as follows:<br />
- GC: RxD – Pin 9. TxD – Pin 8. GND = Signal Ground – Pin 10.<br />
- GB: RxD – Pin 11. TxD – Pin 10. GND = GND Power - Pin 9.<br />
- GE: RxD – Pin 4. TxD – Pin 5. GND = Isolated Ground - Pin 10/11/12.<br />
- GX: RxD – Pin 8. TxD – Pin 9. GND = Power Ground – Pin 1.<br />
- GT, Manta: RxD – Pin 8. TxD – Pin 9. GND = External Ground – Pin 1.<br />
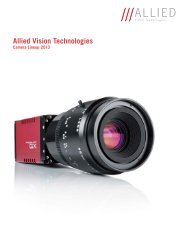
See Camera User Manual for reference. See diagram below for 9 Pin DSUB wiring.
POWER GROUND<br />
12V_POWER<br />
2<br />
GC <str<strong>on</strong>g>RS</str<strong>on</strong>g>-<str<strong>on</strong>g>232</str<strong>on</strong>g> CIRCUIT<br />
POWER GROUND<br />
12V POWER<br />
<str<strong>on</strong>g>RS</str<strong>on</strong>g>-<str<strong>on</strong>g>232</str<strong>on</strong>g> TXD<br />
<str<strong>on</strong>g>RS</str<strong>on</strong>g>-<str<strong>on</strong>g>232</str<strong>on</strong>g> RXD<br />
SIGNAL GND<br />
<str<strong>on</strong>g>RS</str<strong>on</strong>g>-<str<strong>on</strong>g>232</str<strong>on</strong>g> TXD<br />
<str<strong>on</strong>g>RS</str<strong>on</strong>g>-<str<strong>on</strong>g>232</str<strong>on</strong>g> RXD<br />
SIGNAL GND<br />
<str<strong>on</strong>g>RS</str<strong>on</strong>g>-<str<strong>on</strong>g>232</str<strong>on</strong>g> Wiring Diagram. Hirose plug is GC series wiring ONLY.<br />
1<br />
2<br />
3<br />
4<br />
5<br />
6<br />
7<br />
8<br />
9<br />
10<br />
11<br />
12<br />
7<br />
8<br />
CABLE SIDE<br />
6<br />
9<br />
12<br />
CABLE SIDE<br />
1<br />
6<br />
2<br />
7<br />
3<br />
8<br />
4<br />
9<br />
5<br />
10<br />
5<br />
11<br />
1<br />
4<br />
2<br />
3<br />
HIROSE HR10A-10P-12S<br />
9 PIN DSUB SOCKET<br />
C<strong>on</strong>nect <strong>AVT</strong> <strong>GigE</strong> camera to the host PC, ensuring it is recognized by the <strong>GigE</strong> network and that the <str<strong>on</strong>g>RS</str<strong>on</strong>g><str<strong>on</strong>g>232</str<strong>on</strong>g><br />
lines are c<strong>on</strong>nected to your computer serial port.<br />
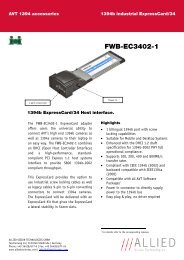
Terminal Setup<br />
Open your terminal applicati<strong>on</strong>, settings:<br />
- Baud Rate: 9600 (MANTA and GT: 115200)<br />
- Data Bits: 8<br />
- Stop Bits: 1<br />
- Parity: N<strong>on</strong>e<br />
- Flow c<strong>on</strong>trol: N<strong>on</strong>e<br />
- COM: Whichever is used by host (typically COM1)
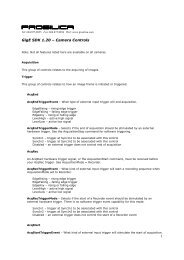
SampleViewer Test<br />
3<br />
Terminal Settings. Note: Manta and GT series uses Baud 115200.<br />
Open the <strong>AVT</strong> SampleViewer, and click <strong>on</strong> the “IIOI” ic<strong>on</strong>. Set Baud rate, parity, character length, stop bits<br />
to same as terminal settings. Click “C<strong>on</strong>nect”.<br />
Type in the SampleViewer <str<strong>on</strong>g>RS</str<strong>on</strong>g>-<str<strong>on</strong>g>232</str<strong>on</strong>g> dialog window and click send. The text will appear in terminal applicati<strong>on</strong>.<br />
This verifies camera TXD communicati<strong>on</strong>.<br />
Type in the terminal applicati<strong>on</strong> and hit enter. The text will appear in SampleViewer. This verifies camera<br />
RXD communicati<strong>on</strong>.
Siotest Example Code Test<br />
4<br />
Testing <str<strong>on</strong>g>RS</str<strong>on</strong>g>-<str<strong>on</strong>g>232</str<strong>on</strong>g> in SampleViewer.<br />
Compile the siotest example code, and run the resulting exe in a windows command prompt.<br />
You will see a test pattern of integers appear in the terminal window. This verifies camera TXD<br />
communicati<strong>on</strong>.<br />
Type in the terminal window, you will see your typed input appear in the windows command prompt. This<br />
verifies camera RXD communicati<strong>on</strong>.
Camera Register Map<br />
The following camera registers are used for <str<strong>on</strong>g>RS</str<strong>on</strong>g>-<str<strong>on</strong>g>232</str<strong>on</strong>g> communicati<strong>on</strong>. See the siotest example code for more<br />
<strong>on</strong> reading/writing to camera registers.<br />
5
We invite comments or suggesti<strong>on</strong>s <strong>on</strong> this document at any time.<br />
Please write to: support@alliedvisi<strong>on</strong>tec.com<br />
Disclaimer<br />
Due to c<strong>on</strong>tinual product development, technical specificati<strong>on</strong>s may be subject to change without notice.<br />
All trademarks are acknowledged as property of their respective owners. We are c<strong>on</strong>vinced that this<br />
informati<strong>on</strong> is correct. We acknowledge that it may not be fully comprehensive. Nevertheless we cannot be<br />
held resp<strong>on</strong>sible for any damage in equipment or subsequent loss of data or whatsoever in c<strong>on</strong>sequence of<br />
following the applicati<strong>on</strong> note. Copyright © 2010<br />
This document was prepared by the staff of <strong>Allied</strong> Visi<strong>on</strong> <strong>Technologies</strong> Canada ("<strong>AVT</strong>") and is the property of<br />
<strong>AVT</strong>, which also owns the copyright therein. All rights c<strong>on</strong>ferred by the law of copyright and by virtue of<br />
internati<strong>on</strong>al copyright c<strong>on</strong>venti<strong>on</strong>s are reserved to <strong>AVT</strong>. This document must not be copied, or reproduced<br />
in any material form, either wholly or in part, and its c<strong>on</strong>tents and any method or technique available there<br />
from must not be disclosed to any other pers<strong>on</strong> whatsoever without the prior written c<strong>on</strong>sent of <strong>AVT</strong>.<br />
8