2001 DVS Fireplace - Woodman's Parts Plus
2001 DVS Fireplace - Woodman's Parts Plus
2001 DVS Fireplace - Woodman's Parts Plus

You also want an ePaper? Increase the reach of your titles
YUMPU automatically turns print PDFs into web optimized ePapers that Google loves.
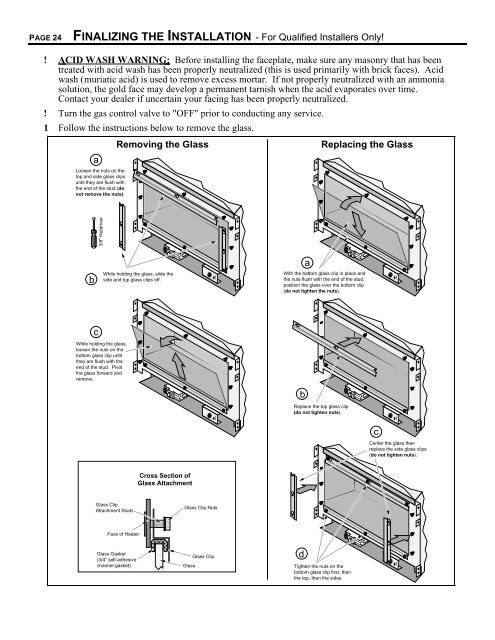
PAGE 24 FINALIZING THE INSTALLATION - For Qualified Installers Only!<br />
! ACID WASH WARNING : Before installing the faceplate, make sure any masonry that has been<br />
treated with acid wash has been properly neutralized (this is used primarily with brick faces). Acid<br />
wash (muriatic acid) is used to remove excess mortar. If not properly neutralized with an ammonia<br />
solution, the gold face may develop a permanent tarnish when the acid evaporates over time.<br />
Contact your dealer if uncertain your facing has been properly neutralized.<br />
! Turn the gas control valve to "OFF" prior to conducting any service.<br />
1 Follow the instructions below to remove the glass.<br />
Loosen the nuts on the<br />
top and side glass clips<br />
until they are flush with<br />
the end of the stud (do<br />
not remove the nuts).<br />
b<br />
a<br />
c<br />
3/8" Nutdriver<br />
While holding the glass,<br />
loosen the nuts on the<br />
bottom glass clip until<br />
they are flush with the<br />
end of the stud. Pivot<br />
the glass forward and<br />
remove.<br />
Glass Clip<br />
Attachment Studs<br />
Removing the Glass<br />
While holding the glass, slide the<br />
side and top glass clips off.<br />
Face of Heater<br />
Glass Gasket<br />
(3/4" self-adhesive<br />
channel gasket)<br />
��������<br />
��������<br />
��������<br />
��������<br />
��������<br />
��������<br />
��������<br />
��������<br />
��������<br />
���������<br />
���������<br />
���������<br />
���������<br />
���������<br />
���������<br />
���������<br />
���������<br />
Cross Section of<br />
Glass Attachment<br />
���<br />
���<br />
��� �<br />
��� �<br />
�<br />
Glass Clip Nuts<br />
Glass<br />
Glass Clip<br />
Replacing the Glass<br />
����������<br />
����������<br />
����������<br />
����������<br />
����������<br />
����������<br />
����������<br />
����������<br />
With the bottom glass clip in place and<br />
the nuts flush with the end of the stud,<br />
position the glass over the bottom clip<br />
(do not tighten the nuts).<br />
b<br />
���������<br />
���������<br />
���������<br />
���������<br />
���������<br />
���������<br />
���������<br />
���������<br />
���������<br />
Replace the top glass clip<br />
(do not tighten nuts).<br />
d<br />
a<br />
���������<br />
���������<br />
���������<br />
���������<br />
���������<br />
���������<br />
���������<br />
���������<br />
���������<br />
Tighten the nuts on the<br />
bottom glass clip first, then<br />
the top, then the sides.<br />
c<br />
Center the glass then<br />
replace the side glass clips<br />
(do not tighten nuts).