Using JRockit Mission Control in the Eclipse IDE - Oracle
Using JRockit Mission Control in the Eclipse IDE - Oracle
Using JRockit Mission Control in the Eclipse IDE - Oracle
Create successful ePaper yourself
Turn your PDF publications into a flip-book with our unique Google optimized e-Paper software.
Introduction<br />
Table 1-1 Chang<strong>in</strong>g Perspectives<br />
If... Do this...<br />
You’ve never opened<br />
<strong>the</strong> perspective<br />
You’ve opened <strong>the</strong><br />
perspective before<br />
To reopen <strong>the</strong> <strong>Mission</strong> <strong>Control</strong> Perspective<br />
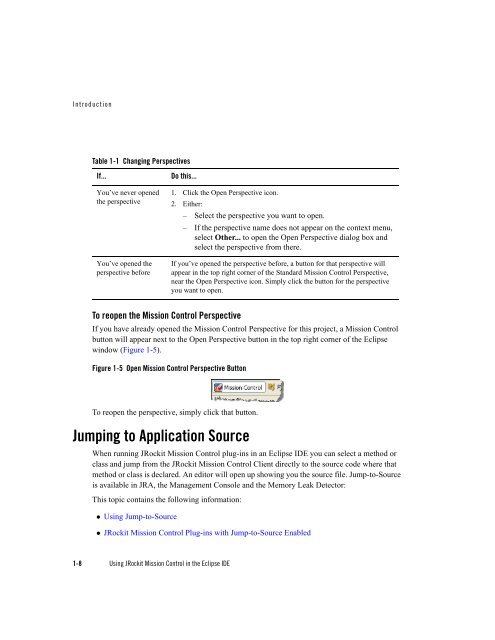
If you have already opened <strong>the</strong> <strong>Mission</strong> <strong>Control</strong> Perspective for this project, a <strong>Mission</strong> <strong>Control</strong><br />
button will appear next to <strong>the</strong> Open Perspective button <strong>in</strong> <strong>the</strong> top right corner of <strong>the</strong> <strong>Eclipse</strong><br />
w<strong>in</strong>dow (Figure 1-5).<br />
Figure 1-5 Open <strong>Mission</strong> <strong>Control</strong> Perspective Button<br />
To reopen <strong>the</strong> perspective, simply click that button.<br />
Jump<strong>in</strong>g to Application Source<br />
When runn<strong>in</strong>g <strong>JRockit</strong> <strong>Mission</strong> <strong>Control</strong> plug-<strong>in</strong>s <strong>in</strong> an <strong>Eclipse</strong> <strong>IDE</strong> you can select a method or<br />
class and jump from <strong>the</strong> <strong>JRockit</strong> <strong>Mission</strong> <strong>Control</strong> Client directly to <strong>the</strong> source code where that<br />
method or class is declared. An editor will open up show<strong>in</strong>g you <strong>the</strong> source file. Jump-to-Source<br />
is available <strong>in</strong> JRA, <strong>the</strong> Management Console and <strong>the</strong> Memory Leak Detector:<br />
This topic conta<strong>in</strong>s <strong>the</strong> follow<strong>in</strong>g <strong>in</strong>formation:<br />
� <strong>Us<strong>in</strong>g</strong> Jump-to-Source<br />
� <strong>JRockit</strong> <strong>Mission</strong> <strong>Control</strong> Plug-<strong>in</strong>s with Jump-to-Source Enabled<br />
1-8 <strong>Us<strong>in</strong>g</strong> <strong>JRockit</strong> <strong>Mission</strong> <strong>Control</strong> <strong>in</strong> <strong>the</strong> <strong>Eclipse</strong> <strong>IDE</strong><br />
1. Click <strong>the</strong> Open Perspective icon.<br />
2. Ei<strong>the</strong>r:<br />
– Select <strong>the</strong> perspective you want to open.<br />
– If <strong>the</strong> perspective name does not appear on <strong>the</strong> context menu,<br />
select O<strong>the</strong>r... to open <strong>the</strong> Open Perspective dialog box and<br />
select <strong>the</strong> perspective from <strong>the</strong>re.<br />
If you’ve opened <strong>the</strong> perspective before, a button for that perspective will<br />
appear <strong>in</strong> <strong>the</strong> top right corner of <strong>the</strong> Standard <strong>Mission</strong> <strong>Control</strong> Perspective,<br />
near <strong>the</strong> Open Perspective icon. Simply click <strong>the</strong> button for <strong>the</strong> perspective<br />
you want to open.


