Enrutamiento - Juniper Networks
Enrutamiento - Juniper Networks
Enrutamiento - Juniper Networks

You also want an ePaper? Increase the reach of your titles
YUMPU automatically turns print PDFs into web optimized ePapers that Google loves.
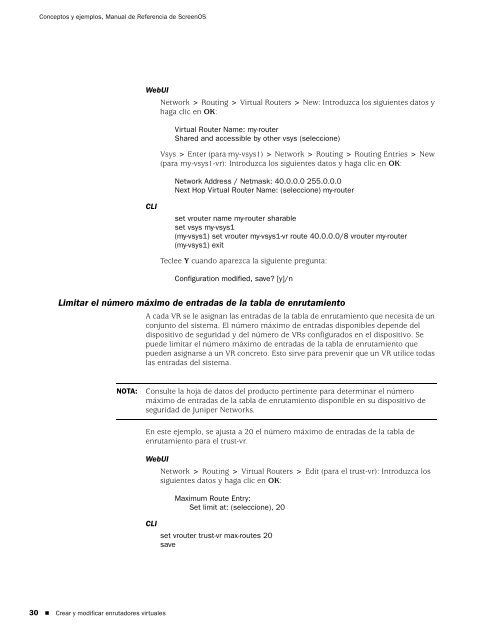
Conceptos y ejemplos, Manual de Referencia de ScreenOS<br />
30 Crear y modificar enrutadores virtuales<br />
WebUI<br />
Network > Routing > Virtual Routers > New: Introduzca los siguientes datos y<br />
haga clic en OK:<br />
CLI<br />
Virtual Router Name: my-router<br />
Shared and accessible by other vsys (seleccione)<br />
Vsys > Enter (para my-vsys1) > Network > Routing > Routing Entries > New<br />
(para my-vsys1-vr): Introduzca los siguientes datos y haga clic en OK:<br />
Network Address / Netmask: 40.0.0.0 255.0.0.0<br />
Next Hop Virtual Router Name: (seleccione) my-router<br />
set vrouter name my-router sharable<br />
set vsys my-vsys1<br />
(my-vsys1) set vrouter my-vsys1-vr route 40.0.0.0/8 vrouter my-router<br />
(my-vsys1) exit<br />
Teclee Y cuando aparezca la siguiente pregunta:<br />
Configuration modified, save? [y]/n<br />
Limitar el número máximo de entradas de la tabla de enrutamiento<br />
A cada VR se le asignan las entradas de la tabla de enrutamiento que necesita de un<br />
conjunto del sistema. El número máximo de entradas disponibles depende del<br />
dispositivo de seguridad y del número de VRs configurados en el dispositivo. Se<br />
puede limitar el número máximo de entradas de la tabla de enrutamiento que<br />
pueden asignarse a un VR concreto. Esto sirve para prevenir que un VR utilice todas<br />
las entradas del sistema.<br />
NOTA: Consulte la hoja de datos del producto pertinente para determinar el número<br />
máximo de entradas de la tabla de enrutamiento disponible en su dispositivo de<br />
seguridad de <strong>Juniper</strong> <strong>Networks</strong>.<br />
En este ejemplo, se ajusta a 20 el número máximo de entradas de la tabla de<br />
enrutamiento para el trust-vr.<br />
WebUI<br />
Network > Routing > Virtual Routers > Edit (para el trust-vr): Introduzca los<br />
siguientes datos y haga clic en OK:<br />
Maximum Route Entry:<br />
Set limit at: (seleccione), 20<br />
CLI<br />
set vrouter trust-vr max-routes 20<br />
save