Designing and Implementing a Junos Node Unifier Network
Designing and Implementing a Junos Node Unifier Network
Designing and Implementing a Junos Node Unifier Network

Create successful ePaper yourself
Turn your PDF publications into a flip-book with our unique Google optimized e-Paper software.
<strong>Junos</strong> ® OS<br />
<strong>Designing</strong> <strong>and</strong> <strong>Implementing</strong> a <strong>Junos</strong> <strong>Node</strong> <strong>Unifier</strong><br />
<strong>Network</strong><br />
Release<br />
1.2<br />
Published: 2013-06-07<br />
Copyright © 2013, Juniper <strong>Network</strong>s, Inc.
Juniper <strong>Network</strong>s, Inc.<br />
1194 North Mathilda Avenue<br />
Sunnyvale, California 94089<br />
USA<br />
408-745-2000<br />
www.juniper.net<br />
This product includes the Envoy SNMP Engine, developed by Epilogue Technology, an Integrated Systems Company. Copyright © 1986-1997,<br />
Epilogue Technology Corporation. All rights reserved. This program <strong>and</strong> its documentation were developed at private expense, <strong>and</strong> no part<br />
of them is in the public domain.<br />
This product includes memory allocation software developed by Mark Moraes, copyright © 1988, 1989, 1993, University of Toronto.<br />
This product includes FreeBSD software developed by the University of California, Berkeley, <strong>and</strong> its contributors. All of the documentation<br />
<strong>and</strong> software included in the 4.4BSD <strong>and</strong> 4.4BSD-Lite Releases is copyrighted by the Regents of the University of California. Copyright ©<br />
1979, 1980, 1983, 1986, 1988, 1989, 1991, 1992, 1993, 1994. The Regents of the University of California. All rights reserved.<br />
GateD software copyright © 1995, the Regents of the University. All rights reserved. Gate Daemon was originated <strong>and</strong> developed through<br />
release 3.0 by Cornell University <strong>and</strong> its collaborators. Gated is based on Kirton’s EGP, UC Berkeley’s routing daemon (routed), <strong>and</strong> DCN’s<br />
HELLO routing protocol. Development of Gated has been supported in part by the National Science Foundation. Portions of the GateD<br />
software copyright © 1988, Regents of the University of California. All rights reserved. Portions of the GateD software copyright © 1991, D.<br />
L. S. Associates.<br />
This product includes software developed by Maker Communications, Inc., copyright © 1996, 1997, Maker Communications, Inc.<br />
Juniper <strong>Network</strong>s, <strong>Junos</strong>, Steel-Belted Radius, NetScreen, <strong>and</strong> ScreenOS are registered trademarks of Juniper <strong>Network</strong>s, Inc. in the United<br />
States <strong>and</strong> other countries. The Juniper <strong>Network</strong>s Logo, the <strong>Junos</strong> logo, <strong>and</strong> <strong>Junos</strong>E are trademarks of Juniper <strong>Network</strong>s, Inc. All other<br />
trademarks, service marks, registered trademarks, or registered service marks are the property of their respective owners.<br />
Juniper <strong>Network</strong>s assumes no responsibility for any inaccuracies in this document. Juniper <strong>Network</strong>s reserves the right to change, modify,<br />
transfer, or otherwise revise this publication without notice.<br />
Products made or sold by Juniper <strong>Network</strong>s or components thereof might be covered by one or more of the following patents that are<br />
owned by or licensed to Juniper <strong>Network</strong>s: U.S. Patent Nos. 5,473,599, 5,905,725, 5,909,440, 6,192,051, 6,333,650, 6,359,479, 6,406,312,<br />
6,429,706, 6,459,579, 6,493,347, 6,538,518, 6,538,899, 6,552,918, 6,567,902, 6,578,186, <strong>and</strong> 6,590,785.<br />
<strong>Junos</strong> ® OS <strong>Designing</strong> <strong>and</strong> <strong>Implementing</strong> <strong>Junos</strong> <strong>Node</strong> <strong>Unifier</strong><br />
Release 1.2<br />
Copyright © 2013, Juniper <strong>Network</strong>s, Inc.<br />
All rights reserved.<br />
Revision History<br />
January 2013—R1 <strong>Junos</strong> <strong>Node</strong> <strong>Unifier</strong> 1.2<br />
The information in this document is current as of the date on the title page.<br />
END USER LICENSE AGREEMENT<br />
The Juniper <strong>Network</strong>s product that is the subject of this technical documentation consists of (or is intended for use with) Juniper <strong>Network</strong>s<br />
software. Use of such software is subject to the terms <strong>and</strong> conditions of the End User License Agreement (“EULA”) posted at<br />
http://www.juniper.net/support/eula.html. By downloading, installing or using such software, you agree to the terms <strong>and</strong> conditions of<br />
that EULA.<br />
ii<br />
Copyright © 2013, Juniper <strong>Network</strong>s, Inc.
Table of Contents<br />
Part 1 Introduction to <strong>Junos</strong> <strong>Node</strong> <strong>Unifier</strong><br />
Chapter 1 Introduction to <strong>Junos</strong> <strong>Node</strong> <strong>Unifier</strong> . . . . . . . . . . . . . . . . . . . . . . . . . . . . . . . . . . . 3<br />
Audience for <strong>Junos</strong> <strong>Node</strong> <strong>Unifier</strong> . . . . . . . . . . . . . . . . . . . . . . . . . . . . . . . . . . . . . . . . 3<br />
<strong>Junos</strong> <strong>Node</strong> <strong>Unifier</strong> Overview . . . . . . . . . . . . . . . . . . . . . . . . . . . . . . . . . . . . . . . . . . . 4<br />
Basic Architecture of a JNU <strong>Network</strong> . . . . . . . . . . . . . . . . . . . . . . . . . . . . . . . . . . . . . 5<br />
Terms Used in the JNU Documentation . . . . . . . . . . . . . . . . . . . . . . . . . . . . . . . . . . 5<br />
Chapter 2 Underst<strong>and</strong>ing the JNU Architecture . . . . . . . . . . . . . . . . . . . . . . . . . . . . . . . . . . 7<br />
JNU Management Plane Overview . . . . . . . . . . . . . . . . . . . . . . . . . . . . . . . . . . . . . . 7<br />
JNU Management <strong>Network</strong> . . . . . . . . . . . . . . . . . . . . . . . . . . . . . . . . . . . . . . . . . . . . 8<br />
<strong>Network</strong> Management in the Management Plane . . . . . . . . . . . . . . . . . . . . . . 9<br />
JNU Data Plane Overview . . . . . . . . . . . . . . . . . . . . . . . . . . . . . . . . . . . . . . . . . . . . . 10<br />
Part 2 Planning a JNU Implementation<br />
Chapter 3 Planning Overview . . . . . . . . . . . . . . . . . . . . . . . . . . . . . . . . . . . . . . . . . . . . . . . . . 15<br />
Platform Considerations for the JNU Controller . . . . . . . . . . . . . . . . . . . . . . . . . . . 15<br />
Supported Platforms for JNU Satellite Devices . . . . . . . . . . . . . . . . . . . . . . . . . . . . 15<br />
Part 3 <strong>Implementing</strong> JNU<br />
Chapter 4 Best Practices for Configuring JNU . . . . . . . . . . . . . . . . . . . . . . . . . . . . . . . . . . . 19<br />
Naming Your JNU Controller <strong>and</strong> Satellite Devices . . . . . . . . . . . . . . . . . . . . . . . . . 19<br />
<strong>Junos</strong> OS Releases on the JNU Controller <strong>and</strong> Satellites . . . . . . . . . . . . . . . . . . . . 19<br />
Chapter 5 Getting Started with the JNU Software . . . . . . . . . . . . . . . . . . . . . . . . . . . . . . . 21<br />
Installing the JNU Software on the Controller . . . . . . . . . . . . . . . . . . . . . . . . . . . . . 21<br />
Installing the JNU Software on Satellite Devices . . . . . . . . . . . . . . . . . . . . . . . . . . 22<br />
Initializing JNU Mode on the Controller . . . . . . . . . . . . . . . . . . . . . . . . . . . . . . . . . . 22<br />
Initializing JNU Mode on Satellite Devices . . . . . . . . . . . . . . . . . . . . . . . . . . . . . . . 30<br />
Running the Satellite Initialization Process . . . . . . . . . . . . . . . . . . . . . . . . . . . 30<br />
Sample Initial Configuration for an EX Series Switch . . . . . . . . . . . . . . . . . . . 32<br />
Sample Initial Configuration on an ACX Universal Access Router . . . . . . . . . 34<br />
Sample Initial Configuration on an EX3300 Ethernet Switch . . . . . . . . . . . . . 36<br />
Chapter 6 Configuring <strong>Junos</strong> OS Features with JNU . . . . . . . . . . . . . . . . . . . . . . . . . . . . . 41<br />
Copyright © 2013, Juniper <strong>Network</strong>s, Inc.<br />
Configuring <strong>Junos</strong> Features with JNU Configuration Templates . . . . . . . . . . . . . . . 41<br />
Displaying a List of Configuration Templates . . . . . . . . . . . . . . . . . . . . . . . . . . 41<br />
Displaying the Configuration Parameters in a Template . . . . . . . . . . . . . . . . . 42<br />
Configuring the Template . . . . . . . . . . . . . . . . . . . . . . . . . . . . . . . . . . . . . . . . . 42<br />
Committing the Configuration . . . . . . . . . . . . . . . . . . . . . . . . . . . . . . . . . . . . . 42<br />
Configuring <strong>Junos</strong> Features with JNU Free Form . . . . . . . . . . . . . . . . . . . . . . . . . . . 43<br />
iii
JNU 1.2 Design <strong>and</strong> Implementation Guide<br />
iv<br />
Chapter 7 Committing Configurations . . . . . . . . . . . . . . . . . . . . . . . . . . . . . . . . . . . . . . . . 45<br />
Commit Process for Satellites Already Connected to the Controller . . . . . . . . . . . 45<br />
Commit Process for Satellite Devices That Come Online After the Commit<br />
Process on the Controller . . . . . . . . . . . . . . . . . . . . . . . . . . . . . . . . . . . . . . . . . 46<br />
Returning to a Previously Committed <strong>Junos</strong> OS Configuration . . . . . . . . . . . . . . . 47<br />
Chapter 8 JNU Operational Mode Comm<strong>and</strong>s . . . . . . . . . . . . . . . . . . . . . . . . . . . . . . . . . . 49<br />
Using Operational Mode Comm<strong>and</strong>s with JNU Overview . . . . . . . . . . . . . . . . . . . 49<br />
config-free-form . . . . . . . . . . . . . . . . . . . . . . . . . . . . . . . . . . . . . . . . . . . . . . . . . . . 50<br />
config-template-name . . . . . . . . . . . . . . . . . . . . . . . . . . . . . . . . . . . . . . . . . . . . . . . 51<br />
jnu-add-delete-satellites . . . . . . . . . . . . . . . . . . . . . . . . . . . . . . . . . . . . . . . . . . . . . 52<br />
jnu-commit . . . . . . . . . . . . . . . . . . . . . . . . . . . . . . . . . . . . . . . . . . . . . . . . . . . . . . . . 53<br />
jnu-initialize-controller . . . . . . . . . . . . . . . . . . . . . . . . . . . . . . . . . . . . . . . . . . . . . . . 54<br />
jnu-order-satellites . . . . . . . . . . . . . . . . . . . . . . . . . . . . . . . . . . . . . . . . . . . . . . . . . 60<br />
jnu-remote . . . . . . . . . . . . . . . . . . . . . . . . . . . . . . . . . . . . . . . . . . . . . . . . . . . . . . . . 61<br />
jnu-rollback . . . . . . . . . . . . . . . . . . . . . . . . . . . . . . . . . . . . . . . . . . . . . . . . . . . . . . . 63<br />
jnu-show-satellites . . . . . . . . . . . . . . . . . . . . . . . . . . . . . . . . . . . . . . . . . . . . . . . . . 64<br />
jnu-show-configuration . . . . . . . . . . . . . . . . . . . . . . . . . . . . . . . . . . . . . . . . . . . . . . 66<br />
op . . . . . . . . . . . . . . . . . . . . . . . . . . . . . . . . . . . . . . . . . . . . . . . . . . . . . . . . . . . . . . . 69<br />
Chapter 9 Setting Up a Basic JNU Implementation . . . . . . . . . . . . . . . . . . . . . . . . . . . . . . 71<br />
Example: Setting Up a Basic JNU Implementation . . . . . . . . . . . . . . . . . . . . . . . . . 71<br />
Part 4 Monitoring <strong>and</strong> Troubleshooting in the JNU <strong>Network</strong><br />
Chapter 10 Monitoring in the JNU <strong>Network</strong> . . . . . . . . . . . . . . . . . . . . . . . . . . . . . . . . . . . . . . 85<br />
Centralized Collection of SNMP Statistics <strong>and</strong> Log Messages Overview . . . . . . . 85<br />
SNMP Community Strings . . . . . . . . . . . . . . . . . . . . . . . . . . . . . . . . . . . . . . . . 85<br />
Collecting Log Messages . . . . . . . . . . . . . . . . . . . . . . . . . . . . . . . . . . . . . . . . . 85<br />
SNMP Get Process in the JNU <strong>Network</strong> . . . . . . . . . . . . . . . . . . . . . . . . . . . . . . . . . . 87<br />
SNMP Trap Process in the JNU <strong>Network</strong> . . . . . . . . . . . . . . . . . . . . . . . . . . . . . . . . . 88<br />
System Logging in the JNU <strong>Network</strong> . . . . . . . . . . . . . . . . . . . . . . . . . . . . . . . . . . . . 89<br />
<strong>Network</strong> Time Protocol (NTP) in the JNU <strong>Network</strong> . . . . . . . . . . . . . . . . . . . . . . . . 90<br />
Configuring the JNU Controller as an SNMP Proxy Agent . . . . . . . . . . . . . . . . . . . . 91<br />
Copyright © 2013, Juniper <strong>Network</strong>s, Inc.
PART 1<br />
Introduction to <strong>Junos</strong> <strong>Node</strong> <strong>Unifier</strong><br />
Copyright © 2013, Juniper <strong>Network</strong>s, Inc.<br />
• Introduction to <strong>Junos</strong> <strong>Node</strong> <strong>Unifier</strong> on page 3<br />
• Underst<strong>and</strong>ing the JNU Architecture on page 7<br />
1
JNU 1.2 Design <strong>and</strong> Implementation Guide<br />
2<br />
Copyright © 2013, Juniper <strong>Network</strong>s, Inc.
CHAPTER 1<br />
Introduction to <strong>Junos</strong> <strong>Node</strong> <strong>Unifier</strong><br />
Audience for <strong>Junos</strong> <strong>Node</strong> <strong>Unifier</strong><br />
Related<br />
Documentation<br />
Copyright © 2013, Juniper <strong>Network</strong>s, Inc.<br />
• Audience for <strong>Junos</strong> <strong>Node</strong> <strong>Unifier</strong> on page 3<br />
• <strong>Junos</strong> <strong>Node</strong> <strong>Unifier</strong> Overview on page 4<br />
• Basic Architecture of a JNU <strong>Network</strong> on page 5<br />
• Terms Used in the JNU Documentation on page 5<br />
This guide is intended to assist service providers to design <strong>and</strong> plan an implementation<br />
for <strong>Junos</strong> <strong>Node</strong> <strong>Unifier</strong> (JNU). We intend the guide to be used by the following:<br />
• <strong>Network</strong> architects—Responsible for creating the overall design <strong>and</strong> architecture of<br />
the dual-stack network.<br />
• <strong>Network</strong> planners—Responsible for planning the implementation from a network<br />
perspective, including equipment.<br />
• <strong>Network</strong> operations engineer—Responsible for creating the configuration that<br />
implements the overall design. Also responsible for deploying the implementation <strong>and</strong><br />
actively monitoring the network.<br />
• Sales engineers—Responsible for working with architects, planners, <strong>and</strong> operations<br />
•<br />
engineers to design <strong>and</strong> implement the network solution.<br />
<strong>Junos</strong> <strong>Node</strong> <strong>Unifier</strong> Overview on page 4<br />
• Basic Architecture of a JNU <strong>Network</strong> on page 5<br />
• Terms Used in the JNU Documentation on page 5<br />
• JNU Management Plane Overview on page 7<br />
3
JNU 1.2 Design <strong>and</strong> Implementation Guide<br />
<strong>Junos</strong> <strong>Node</strong> <strong>Unifier</strong> Overview<br />
4<br />
Related<br />
Documentation<br />
<strong>Junos</strong> <strong>Node</strong> <strong>Unifier</strong> (JNU) allows you to configure <strong>and</strong> manage many Juniper <strong>Network</strong>s<br />
platforms running <strong>Junos</strong> OS from one MX Series router. You can use JNU to manage<br />
thous<strong>and</strong>s of 1-Gigabit <strong>and</strong> 10-Gigabit Ethernet ports in a single site or that are distributed<br />
across multiple sites from a single point.<br />
JNU provides single-touch provisioning from one MX Series router acting as a controller.<br />
It provides a single point of:<br />
• Configuration <strong>and</strong> management<br />
• Running operational mode comm<strong>and</strong>s<br />
• SNMP polling <strong>and</strong> SNMP traps<br />
• Collecting logging information<br />
The JNU software answers the following needs:<br />
• Ethernet port fanout or port multiplexer to control thous<strong>and</strong>s of Ethernet ports from<br />
one MX Series router.<br />
• Layer 2 switching on managed devices to meet Data Center needs, such as server port<br />
aggregation.<br />
• Layer 3 MPLS routing on managed devices to provide business access <strong>and</strong> mobile<br />
•<br />
backhaul applications.<br />
Basic Architecture of a JNU <strong>Network</strong> on page 5<br />
• Terms Used in the JNU Documentation on page 5<br />
• JNU Management Plane Overview on page 7<br />
• Example: Setting Up a Basic JNU Implementation on page 71<br />
Copyright © 2013, Juniper <strong>Network</strong>s, Inc.
Basic Architecture of a JNU <strong>Network</strong><br />
Related<br />
Documentation<br />
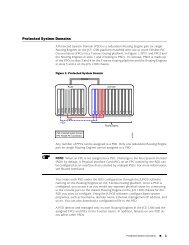
The basic architecture of a JNU implementation is a star configuration with one MX Series<br />
router acting as a hub to the connected satellite devices. The satellite devices are devices<br />
running the <strong>Junos</strong> operating system (<strong>Junos</strong> OS), such as EX Series Ethernet switches,<br />
QFX Series devices, <strong>and</strong> ACX Series Universal Access routers.<br />
Figure 1: Basic JNU Architecture<br />
•<br />
Controller<br />
Satellites<br />
<strong>Junos</strong> <strong>Node</strong> <strong>Unifier</strong> Overview on page 4<br />
• Terms Used in the JNU Documentation on page 5<br />
• JNU Management Plane Overview on page 7<br />
Terms Used in the JNU Documentation<br />
Table 1: JNU Terms<br />
Term<br />
Controller<br />
JNU<br />
Satellite<br />
Copyright © 2013, Juniper <strong>Network</strong>s, Inc.<br />
• Example: Setting Up a Basic JNU Implementation on page 71<br />
Table 1 on page 5 defines terms used in the JNU documentation.<br />
Definition<br />
An MX Series router that is used to manage <strong>and</strong> configure satellite devices.<br />
<strong>Junos</strong> <strong>Node</strong> <strong>Unifier</strong>.<br />
Platforms that are managed by the controller.<br />
Chapter 1: Introduction to <strong>Junos</strong> <strong>Node</strong> <strong>Unifier</strong><br />
g041392<br />
5
JNU 1.2 Design <strong>and</strong> Implementation Guide<br />
6<br />
Related<br />
Documentation<br />
• <strong>Junos</strong> <strong>Node</strong> <strong>Unifier</strong> Overview on page 4<br />
• Basic Architecture of a JNU <strong>Network</strong> on page 5<br />
• JNU Management Plane Overview on page 7<br />
Copyright © 2013, Juniper <strong>Network</strong>s, Inc.
CHAPTER 2<br />
Underst<strong>and</strong>ing the JNU Architecture<br />
JNU Management Plane Overview<br />
Related<br />
Documentation<br />
• JNU Management Plane Overview on page 7<br />
• JNU Management <strong>Network</strong> on page 8<br />
• JNU Data Plane Overview on page 10<br />
The JNU software uses a private management plane on the MX Series controller to<br />
manage satellite devices as follows:<br />
• Provision satellite devices<br />
• Operate satellite devices<br />
• Perform SNMP polling <strong>and</strong> trap collection<br />
• Collect logs<br />
Copyright © 2013, Juniper <strong>Network</strong>s, Inc.<br />
•<br />
JNU Management <strong>Network</strong> on page 8<br />
• JNU Data Plane Overview on page 10<br />
• <strong>Junos</strong> <strong>Node</strong> <strong>Unifier</strong> Overview on page 4<br />
7
JNU 1.2 Design <strong>and</strong> Implementation Guide<br />
JNU Management <strong>Network</strong><br />
8<br />
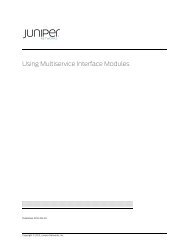
The JNU architecture provides a private management plane for JNU that is separate from<br />
the control plane <strong>and</strong> the data plane. This design provides maximum performance <strong>and</strong><br />
reliability <strong>and</strong> the ability to efficiently scale the JNU network. Figure 2 on page 8 shows<br />
a basic JNU management network. This network is created during the JNU initialization<br />
process.<br />
Figure 2: JNU Management <strong>Network</strong><br />
Controller<br />
NMS, Syslog, NTP<br />
Secure session between controller<br />
<strong>and</strong> satellites (NETCONF SSH)<br />
Private IP subnet<br />
Private VLAN<br />
Satellites<br />
Private Management Plane for<br />
JNU on private routing instance<br />
g041394<br />
Copyright © 2013, Juniper <strong>Network</strong>s, Inc.
The JNU management network is created during the JNU initialization process. The<br />
process creates a private network for in-b<strong>and</strong> management, <strong>and</strong> the configuration is<br />
placed in a configuration group on the controller <strong>and</strong> on each satellite device.<br />
The management network has the following characteristics:<br />
• Ethernet interfaces are used for the connection between the controller <strong>and</strong> the satellites<br />
<strong>and</strong> between the controller <strong>and</strong> network management systems (NMSs). A private<br />
VLAN between the controller <strong>and</strong> the satellite devices is used to separate JNU<br />
management traffic from data plane traffic.<br />
During the initialization process, you specify the physical interfaces, VLAN IDs, <strong>and</strong> IP<br />
addresses to be used in the management network for the downlink connection from<br />
the controller to the satellites, <strong>and</strong> for the uplink connection from the satellites to the<br />
controller.<br />
By default the software places the Ethernet interfaces into an aggregated Ethernet<br />
bundle. If you specify only one physical interface during initialization, you have the<br />
option to not use aggregated Ethernet.<br />
• The following private routing instances are created on the controller during the<br />
initialization process. These routing instances are not visible outside of the JNU <strong>Network</strong>.<br />
• A private VPN routing <strong>and</strong> forwarding (VRF) routing instance to provide address for<br />
Layer 3 VPNs. The VRF routing instance makes it possible to reuse the management<br />
network IP addresses in the data plane.<br />
• A private virtual-switch routing instance is created on the controller for the Layer 2<br />
VPN. The virtual-switch routing instances makes it possible to reuse the VLAN IDs<br />
in the data plane.<br />
An integrated routing <strong>and</strong> bridging (IRB) interface is created that is used to provide<br />
IP addresses to the virtual switch.<br />
• If supported, a routing instance is created on the satellite device that contains the<br />
uplink configuration from the satellite to the controller.<br />
• A secure NETCONF-over-SSH connection is created between the controller <strong>and</strong> the<br />
satellite device.<br />
<strong>Network</strong> Management in the Management Plane<br />
Copyright © 2013, Juniper <strong>Network</strong>s, Inc.<br />
During the controller initialization process, you have the option of setting up SNMP, system<br />
logging, <strong>and</strong> NTP. If you choose to set up these features, the initialization process creates<br />
a network configuration over an Ethernet interface to the NMS servers. The configuration<br />
includes static routes to these servers in the VPN routing <strong>and</strong> forwarding (VRF) routing<br />
instance on the controller.<br />
The initialization process creates a <strong>Network</strong> Address Translation (NAT) configuration<br />
that is used to translate the source address of the traffic sent to the SNMP or syslog<br />
server so that all network management traffic from the satellite devices originates from<br />
a source address on the controller.<br />
Chapter 2: Underst<strong>and</strong>ing the JNU Architecture<br />
You do not need a license to use NAT with the JNU management plane.<br />
9
JNU 1.2 Design <strong>and</strong> Implementation Guide<br />
Related<br />
Documentation<br />
JNU Data Plane Overview<br />
10<br />
•<br />
JNU Management Plane Overview on page 7<br />
• JNU Data Plane Overview on page 10<br />
• Initializing JNU Mode on the Controller on page 22<br />
• Running the Satellite Initialization Process on page 30<br />
• Centralized Collection of SNMP Statistics <strong>and</strong> Log Messages Overview on page 85<br />
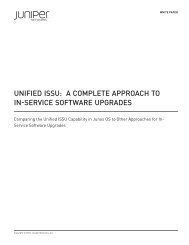
The data plane of the controller <strong>and</strong> satellite devices, which is responsible for forwarding<br />
user data, is separate from the management plane. If your satellite device supports<br />
routing instances, the management configuration is placed in a routing instance, <strong>and</strong> you<br />
can reuse IP addresses that were used for JNU management.<br />
For load balancing <strong>and</strong> fast recovery, you can use link aggregation of both the<br />
management interfaces <strong>and</strong> data plane instances.<br />
Figure 3: JNU Architecture with Data Plane<br />
Controller<br />
NMS, Syslog, NTP<br />
Satellites<br />
Management Plane<br />
User Data Plane traffic designed<br />
to work with different Control Plane<br />
g041395<br />
Copyright © 2013, Juniper <strong>Network</strong>s, Inc.
Related<br />
Documentation<br />
Copyright © 2013, Juniper <strong>Network</strong>s, Inc.<br />
• JNU Management Plane Overview on page 7<br />
• JNU Management <strong>Network</strong> on page 8<br />
Chapter 2: Underst<strong>and</strong>ing the JNU Architecture<br />
11
JNU 1.2 Design <strong>and</strong> Implementation Guide<br />
12<br />
Copyright © 2013, Juniper <strong>Network</strong>s, Inc.
PART 2<br />
Planning a JNU Implementation<br />
Copyright © 2013, Juniper <strong>Network</strong>s, Inc.<br />
• Planning Overview on page 15<br />
13
JNU 1.2 Design <strong>and</strong> Implementation Guide<br />
14<br />
Copyright © 2013, Juniper <strong>Network</strong>s, Inc.
CHAPTER 3<br />
Planning Overview<br />
• Platform Considerations for the JNU Controller on page 15<br />
• Supported Platforms for JNU Satellite Devices on page 15<br />
Platform Considerations for the JNU Controller<br />
Related<br />
Documentation<br />
You can use any MX Series 3D Universal Edge Router as the JNU controller. The MX Series<br />
router uses Modular Port Concentrators (MPCs) to connect to the satellites.<br />
You must use an MX Series router as the controller, <strong>and</strong> you must use MPCs (not DPCs).<br />
We recommend that you allocate more than one interface for interconnect between MX<br />
Series routers <strong>and</strong> satellites. These interfaces will be placed into link aggregation (LAG)<br />
configuration for fast recovery, with traffic spreading across member links.<br />
An MX Series router can manage one satellite on each of its Ethernet ports. For example,<br />
the MX960 router supports up to 176 10-Gigabit Ethernet interfaces. It can therefore<br />
manage up to 176 satellite devices on the 10-Gigabit Ethernet interfaces.<br />
•<br />
Supported Platforms for JNU Satellite Devices on page 15<br />
• <strong>Junos</strong> <strong>Node</strong> <strong>Unifier</strong> Overview on page 4<br />
Supported Platforms for JNU Satellite Devices<br />
Copyright © 2013, Juniper <strong>Network</strong>s, Inc.<br />
JNU 1.2 supports the following satellite devices:<br />
• ACX1000 Universal Access Router<br />
• ACX2000 Universal Access Router<br />
• EX3200 Ethernet Switch<br />
• EX3300 Ethernet Switch<br />
• EX4200 Ethernet Switch<br />
• EX4500 Ethernet Switch<br />
• EX4550 Ethernet Switch<br />
15
JNU 1.2 Design <strong>and</strong> Implementation Guide<br />
16<br />
Related<br />
Documentation<br />
• EX6200 Ethernet Switch<br />
• QFX 3500 devices<br />
• Platform Considerations for the JNU Controller on page 15<br />
• <strong>Junos</strong> <strong>Node</strong> <strong>Unifier</strong> Overview on page 4<br />
Copyright © 2013, Juniper <strong>Network</strong>s, Inc.
PART 3<br />
<strong>Implementing</strong> JNU<br />
Copyright © 2013, Juniper <strong>Network</strong>s, Inc.<br />
• Best Practices for Configuring JNU on page 19<br />
• Getting Started with the JNU Software on page 21<br />
• Configuring <strong>Junos</strong> OS Features with JNU on page 41<br />
• Committing Configurations on page 45<br />
• JNU Operational Mode Comm<strong>and</strong>s on page 49<br />
• Setting Up a Basic JNU Implementation on page 71<br />
17
JNU 1.2 Design <strong>and</strong> Implementation Guide<br />
18<br />
Copyright © 2013, Juniper <strong>Network</strong>s, Inc.
CHAPTER 4<br />
Best Practices for Configuring JNU<br />
• Naming Your JNU Controller <strong>and</strong> Satellite Devices on page 19<br />
• <strong>Junos</strong> OS Releases on the JNU Controller <strong>and</strong> Satellites on page 19<br />
Naming Your JNU Controller <strong>and</strong> Satellite Devices<br />
It is important to plan the naming of controller <strong>and</strong> satellite devices in a JNU group so<br />
that you can easily identify the satellites that belong to the same group. The hostname<br />
of satellites is used in SNMP community strings <strong>and</strong> system log prefixes to identify the<br />
satellite associated with the SNMP message or system log message.<br />
A naming structure like the following is recommended:<br />
• jnu1-ctrl as the controller hostname<br />
• jnu1-sat1, jun1-sat2, jun1-sat3, <strong>and</strong> so on as the satellite hostnames<br />
<strong>Junos</strong> OS Releases on the JNU Controller <strong>and</strong> Satellites<br />
Copyright © 2013, Juniper <strong>Network</strong>s, Inc.<br />
We recommend that you run the same <strong>Junos</strong> OS release on the controller <strong>and</strong> on the<br />
satellite devices.<br />
19
JNU 1.2 Design <strong>and</strong> Implementation Guide<br />
20<br />
Copyright © 2013, Juniper <strong>Network</strong>s, Inc.
CHAPTER 5<br />
Getting Started with the JNU Software<br />
• Installing the JNU Software on the Controller on page 21<br />
• Installing the JNU Software on Satellite Devices on page 22<br />
• Initializing JNU Mode on the Controller on page 22<br />
• Initializing JNU Mode on Satellite Devices on page 30<br />
Installing the JNU Software on the Controller<br />
Related<br />
Documentation<br />
Copyright © 2013, Juniper <strong>Network</strong>s, Inc.<br />
To load the JNU package onto the controller:<br />
• Enter the following comm<strong>and</strong> on the MX Series controller. For example:<br />
•<br />
user@jnu1-ctrlr> request system software add jnu-1.2R1.2-signed.tgz<br />
Installing package '/var/tmp/jnu-1.2R1.2-signed.tgz' ...<br />
Verified jnu-1.2R1.2.tgz signed by PackageProduction_11_4_0 Adding jnu...<br />
Available space: 556676 require: 3220<br />
NOTICE: uncommitted changes have been saved in<br />
/var/db/config/juniper.conf.pre-install<br />
Mounted jnu package on /dev/md10...<br />
Restarting bslockd ...<br />
mgd: commit complete<br />
Saving package file in /var/sw/pkg/jnu-1.2R1.2-signed.tgz ...<br />
Saving state for rollback ...<br />
Initializing JNU Mode on the Controller on page 22<br />
• Installing the JNU Software on Satellite Devices on page 22<br />
21
JNU 1.2 Design <strong>and</strong> Implementation Guide<br />
Installing the JNU Software on Satellite Devices<br />
Related<br />
Documentation<br />
To load the JNU package onto the satellite device:<br />
Initializing JNU Mode on the Controller<br />
22<br />
• Enter the following comm<strong>and</strong> on the satellite device. For example:<br />
•<br />
user@jnu-satellite1> request system software add jnu-1.2R1.2-signed.tgz<br />
Installing package '/var/tmp/jnu-1.2R1.2-signed.tgz' ...<br />
Verified jnu-1.2R1.2.tgz signed by PackageProduction_11_4_0 Adding jnu...<br />
Available space: 556676 require: 3220<br />
NOTICE: uncommitted changes have been saved in<br />
/var/db/config/juniper.conf.pre-install<br />
Mounted jnu package on /dev/md10...<br />
Restarting bslockd ...<br />
mgd: commit complete<br />
Saving package file in /var/sw/pkg/jnu-1.2R1.2-signed.tgz ...<br />
Saving state for rollback ...<br />
Running the Satellite Initialization Process on page 30<br />
• Installing the JNU Software on the Controller on page 21<br />
• Initializing JNU Mode on the Controller on page 22<br />
NOTE: In this guide, all the instances of JNU mode refer to both the JNU<br />
feature-rich <strong>and</strong> port-extender modes, unless explicitly stated otherwise.<br />
Copyright © 2013, Juniper <strong>Network</strong>s, Inc.
Copyright © 2013, Juniper <strong>Network</strong>s, Inc.<br />
After you install the JNU software, you need to initially configure <strong>and</strong> initialize the MX<br />
Series controller. The initialization process creates a JNU management plane configuration<br />
on the controller <strong>and</strong> places it in a configuration group called jnu-controller-mgmt. The<br />
management plane configuration involves interfaces, internal routing-instance,<br />
virtual-switch bridging, SNMP, system logs, NTP, <strong>and</strong> NAT in the main instance of the<br />
configuration.<br />
As part of the initialization process, the JNU configuration is committed on the controller.<br />
When you initialize the controller <strong>and</strong> the satellite devices, you must be logged in to the<br />
controller or satellite as the root user. The initialization process creates a user account<br />
called jnuadmin, which the controller uses to log in to the satellites. After the initialization<br />
process is complete, log in to the controller using the jnuadmin user account.<br />
The first time you initialize the controller, you must enter the full comm<strong>and</strong> op url<br />
/var/db/scripts/op/jnu-initialize-controller.slax. Thereafter, you can reinitialize the<br />
controller using the op jnu-initialize-controller comm<strong>and</strong>.<br />
For a description of the fields used to initialize the controller, see jnu-initialize-controller.<br />
This example configures the controller, adds two satellite devices to the controller<br />
configuration.<br />
To initially configure the controller:<br />
Chapter 5: Getting Started with the JNU Software<br />
23
JNU 1.2 Design <strong>and</strong> Implementation Guide<br />
24<br />
1. Enter the initialize-controller comm<strong>and</strong> <strong>and</strong> follow the prompts.<br />
user@jnu1-ctrlr> op url /var/db/scripts/op/jnu-initialize-controller.slax<br />
Controller initializations:<br />
Please select the JNU mode:<br />
1. Feature-rich mode<br />
The controller <strong>and</strong> satellite features are supported. Configurations<br />
are forwarded to the satellites when the target device is a<br />
satellite managed by this controller.<br />
2. Port Extender mode<br />
Interfaces on the satellites are extended to the satellites.<br />
Features are configured on the extended ports.<br />
JNU mode (1/2)? 2<br />
Please enter hostname [jnu-controller]:<br />
Please enter management IP address: 137.34.1.1<br />
Please enter JNU downlink IP prefix [192.168.0.1/24]:<br />
Please enter JNU VLAN id [4094]:<br />
Do you want to configure any satellites now [n]: y<br />
Please enter the number of satellites [1]: 2<br />
Satellite 1<br />
Please enter the hostname of the satellite: jnu-sat1<br />
Please enter satellite management IP address: 10.0.0.1<br />
Please enter the uplink IP address of the satellite: 192.168.0.2<br />
Please enter downlink interfaces to satellite: ge-0/0/0<br />
Do you want to use aggregated-ethernet for the downlink [y]: y<br />
Please enter downlink aggregate name [ae31]:<br />
Satellite 2<br />
Please enter the hostname of the satellite: jnu-sat2<br />
Please enter satellite management IP address: 10.0.0.2<br />
Please enter the uplink IP address of the satellite: 192.168.0.3<br />
Please enter downlink interfaces for satellite: ge-0/0/1,ge-0/0/2<br />
Do you want to configure SNMP [n]: y<br />
Do you want to enter a read-only community string (y|n)? y<br />
SNMP read-only community string: public<br />
Do you want to enter a read-write community string (y|n)? y<br />
SNMP read-write community string: private<br />
Do you want to enter SNMP trap parameters (y|n)? y<br />
SNMP trap target address: 169.37.0.1<br />
Do you want to enter SNMP trap categories (y|n)? y<br />
Please enter SNMP trap group name: public<br />
Do you want to enable SNMP trap for 'otn-alarms' (y|n)? y<br />
Available alarms:<br />
'oc-lof', 'oc-lom', 'oc-los', 'odu-ais', 'odu-bbe-threshold',<br />
'odu-bdi', 'odu-es-threshold', 'odu-lck', 'odu-oci',<br />
'odu-rx-aps-change', 'odu-sd', 'odu-ses-threshold', 'odu-sf',<br />
'odu-ttim', 'odu-uas-threshold', 'opu-ptm', 'otu-ais',<br />
'otu-bbe-threshold', 'otu-bdi', 'otu-es-threshold',<br />
'otu-fec-deg', 'otu-fec-exe', 'otu-iae', 'otu-sd',<br />
'otu-ses-threshold', 'otu-sf', 'otu-ttim', 'otu-usa-threshold',<br />
'wavelength-lock'<br />
Please enter otn-alarms: oc-lof,oc-lom<br />
Do you want to enable SNMP trap for 'sonet-alarms' (y|n)? y<br />
Available alarms:<br />
'ber-defect', 'ber-fault', 'line-ais', 'line-remote-defect-indication',<br />
'loss-of-cell', 'loss-of-frame', 'loss-of-light', 'loss-of-pointer',<br />
'loss-of-signal', 'path-ais', 'path-mismatch',<br />
'path-remote-defect-indication', 'pll-lock', 'remote-error-indication',<br />
'severely-errored-frame', 'unequipped', 'vt-ais', vt-label-mismatch',<br />
Copyright © 2013, Juniper <strong>Network</strong>s, Inc.
Copyright © 2013, Juniper <strong>Network</strong>s, Inc.<br />
'vt-loss-of-cell', 'vt-loss-of-pointer', 'vt-remote-defect-indication',<br />
'vt-unequipped'<br />
Please enter sonet-alarms: path-ais<br />
Other categories:<br />
'authentication', 'chassis', 'configuration', 'link',<br />
'remote-operations', 'rmon-alarm', 'routing', 'services',<br />
'startup', 'vrrp-events'<br />
Do you want to enter other SNMP trap categories (y|n)? y<br />
Please enter SNMP trap categories: vrrp-events<br />
Do you want to configure Syslog server [n]: y<br />
Syslog host address? 167.37.0.1<br />
port number [123]:<br />
Syslog facility 'all' [n]:<br />
Syslog facilities:<br />
'authorization', 'change-log', 'conflict-log', 'daemon',<br />
'dfc', 'explicit-priority', 'external', 'firewall',<br />
'ftp', 'interactive-comm<strong>and</strong>s', 'kernel', 'log-prefix',<br />
'ntp', 'pfe', 'security', 'user'<br />
Syslog severities:<br />
'alert', 'any', 'criticial', 'emergency', 'error',<br />
'info', 'none', 'notice', 'warning'<br />
Please enter syslog facility name: change-log<br />
Please enter severity: info<br />
Do you want to enter more syslog facilities [n]?<br />
Do you want to configure NTP [n]: y<br />
NTP server address: 188.88.0.1<br />
JNU controller configuration completed<br />
The following is an example of the configuration created on the controller as a result of<br />
running the controller initialization process.<br />
Chapter 5: Getting Started with the JNU Software<br />
groups {<br />
jnu-controller-mgmt {<br />
chassis {<br />
aggregated-devices {<br />
ethernet {<br />
device-count 480;<br />
}<br />
}<br />
/* Slot of the Trio FPC */<br />
fpc 5 {<br />
pic 0 {<br />
inline-services {<br />
b<strong>and</strong>width 1g;<br />
}<br />
}<br />
}<br />
}<br />
system {<br />
ntp {<br />
/* The server is in the main routing-instance, */<br />
/* the server parameters will not be propagated to the satellites */<br />
server 188.88.0.1; /* external server */<br />
}<br />
syslog {<br />
25
JNU 1.2 Design <strong>and</strong> Implementation Guide<br />
26<br />
host 169.37.0.2 {<br />
security info;<br />
change-log info;<br />
/* All the syslog parameters are propagated to satellite */<br />
/* except source-address. The source address used by */<br />
/* the satellites are the mgmt address on satellite */<br />
source-address 137.34.1.1;<br />
}<br />
file messages {<br />
any any;<br />
}<br />
}<br />
services {<br />
ssh;<br />
}<br />
}<br />
snmp {<br />
/* community is configured by user, satellite community string is */<br />
/* : */<br />
community public {<br />
authorization read-only;<br />
}<br />
community private {<br />
authorization read-write;<br />
}<br />
trap-options {<br />
source-address lo0;<br />
}<br />
trap-group public {<br />
/* categories are configured by user, propagate to satellite */<br />
categories {<br />
authentication;<br />
routing;<br />
}<br />
/* targets are configured by user, propagate to satellite */<br />
targets {<br />
169.37.0.1;<br />
}<br />
}<br />
/* Need SNMP proxy configuration */<br />
proxy jnu-sat1 {<br />
device-name 192.168.0.2;<br />
version-v2c {<br />
snmp-community public:jnu-sat1;<br />
}<br />
routing-instance jnu-vrf;<br />
}<br />
proxy jnu-sat2 {<br />
device-name 192.168.0.3;<br />
version-v2c {<br />
snmp-community public:jnu-sat2;<br />
}<br />
routing-instance jnu-vrf;<br />
}<br />
}<br />
interfaces {<br />
Copyright © 2013, Juniper <strong>Network</strong>s, Inc.
Copyright © 2013, Juniper <strong>Network</strong>s, Inc.<br />
Chapter 5: Getting Started with the JNU Software<br />
/* All the interfaces connecting to satellites */<br />
ge-0/0/0 {<br />
gigether-options {<br />
802.3ad ae479;<br />
}<br />
}<br />
si-5/0/0 {<br />
unit 0 {<br />
family inet;<br />
family inet6;<br />
}<br />
unit 1 {<br />
family inet;<br />
service-domain inside;<br />
}<br />
unit 2 {<br />
family inet;<br />
service-domain outside;<br />
}<br />
}<br />
ae479 {<br />
/* Using aggregate-ethernet interface because there can be */<br />
/* multiple physical downlinks */<br />
aggregated-ethernet-options {<br />
lacp {<br />
active;<br />
}<br />
}<br />
vlan-tagging;<br />
encapsulation flexible-ethernet-services;<br />
unit 16385 {<br />
encapsulation vlan-bridge;<br />
vlan-id 4094;<br />
}<br />
}<br />
irb {<br />
unit 16385 {<br />
family inet {<br />
address 192.168.0.1/24;<br />
}<br />
}<br />
}<br />
}<br />
policy-options {<br />
policy-statement reject-all {<br />
then reject;<br />
}<br />
}<br />
routing-instances {<br />
jnu-vrf {<br />
instance-type vrf;<br />
interface irb.16385;<br />
interface si-5/0/0.1;<br />
route-distinguisher 192.168.0.1:0;<br />
vrf-import reject-all;<br />
vrf-export reject-all;<br />
27
JNU 1.2 Design <strong>and</strong> Implementation Guide<br />
28<br />
routing-options {<br />
static {<br />
/* Static route to SNMP trap server via si- interface */<br />
route 169.37.0.1/32 next-hop si-5/0/0.1;<br />
/* Static route to syslog server via si- interface */<br />
route 169.37.0.2/32 next-hop si-5/0/0.1;<br />
}<br />
}<br />
}<br />
jnu-vs {<br />
instance-type virtual-switch;<br />
bridge-domains {<br />
jnu {<br />
vlan-id 4094;<br />
interface ae479.16385;<br />
routing-interface irb.16385;<br />
}<br />
}<br />
}<br />
}<br />
services {<br />
service-set ss-nat {<br />
nat-rules jnu-use-controller;<br />
next-hop-service {<br />
inside-service-interface si-5/0/0.1;<br />
outside-service-interface si-5/0/0.2;<br />
}<br />
}<br />
nat {<br />
/* There needs to be 1 NAT pool (with the same address) per satellite */<br />
pool jnu-sat1 {<br />
/* Use Management IP address */<br />
address 137.34.0.1/32;<br />
}<br />
pool jnu-sat2 {<br />
/* Use Management IP address */<br />
address 137.34.0.1/32;<br />
}<br />
allow-overlapping-nat-pools;<br />
rule jnu-use-controller {<br />
match-direction input;<br />
term jnu-sat1 {<br />
/* Each satellite connection will use 1 term on its own */<br />
from {<br />
source-address {<br />
/* 1st satellite */<br />
10.0.0.1/32;<br />
}<br />
}<br />
then {<br />
translated {<br />
source-pool jnu-sat1;<br />
translation-type {<br />
basic-nat44;<br />
}<br />
}<br />
Copyright © 2013, Juniper <strong>Network</strong>s, Inc.
Related<br />
Documentation<br />
Copyright © 2013, Juniper <strong>Network</strong>s, Inc.<br />
•<br />
}<br />
}<br />
term jnu-sat2 {<br />
/* Each satellite connection will use 1 term on its own */<br />
from {<br />
source-address {<br />
/* 2nd satellite */<br />
10.0.0.2/32;<br />
}<br />
}<br />
then {<br />
translated {<br />
source-pool jnu-sat2;<br />
translation-type {<br />
basic-nat44;<br />
}<br />
}<br />
}<br />
}<br />
}<br />
}<br />
}<br />
}<br />
}<br />
jnu-initialize-controller on page 54<br />
• Installing the JNU Software on the Controller on page 21<br />
• Initializing JNU Mode on Satellite Devices on page 30<br />
Chapter 5: Getting Started with the JNU Software<br />
29
JNU 1.2 Design <strong>and</strong> Implementation Guide<br />
Initializing JNU Mode on Satellite Devices<br />
Running the Satellite Initialization Process<br />
30<br />
• Running the Satellite Initialization Process on page 30<br />
• Sample Initial Configuration for an EX Series Switch on page 32<br />
• Sample Initial Configuration on an ACX Universal Access Router on page 34<br />
• Sample Initial Configuration on an EX3300 Ethernet Switch on page 36<br />
When you initialize the satellite device, the software creates a management configuration<br />
on the device that allows the controller to configure <strong>and</strong> manage the satellite.<br />
When you run the satellite initialization process, the controller connects to the satellite<br />
<strong>and</strong> copies JNU code elements that are based on scripting technology to the satellite.<br />
Before you initialize the satellite device, you must configure a root (superuser) password<br />
by including the root-authentication statement at the [edit system] hierarchy level. When<br />
you initialize the satellite devices, you must be logged in to the satellite as the root user.<br />
The satellite initialization process creates a configuration as follows:<br />
• Creates a user account called jnuadmin, which the controller uses to log in to the<br />
satellites. After the initialization process is complete, log in to the controller using the<br />
jnuadmin user account.<br />
• Loads an SSH public key onto the satellite device <strong>and</strong> sets up a NETCONF-over-SSH<br />
connection for use between the controller <strong>and</strong> the satellite device.<br />
• Creates a configuration group called jnu-satellite-mgmt. The configuration includes<br />
both the configuration resulting from parameters that you specify during the satellite<br />
initialization process <strong>and</strong> the configuration that is propagated from the controller.<br />
Table 2 on page 31 describes the fields in the satellite initialization process.<br />
Copyright © 2013, Juniper <strong>Network</strong>s, Inc.
Table 2: JNU Satellite Initialization Fields<br />
Field<br />
Please select<br />
the JNU<br />
mode<br />
Description<br />
Please enter hostname<br />
JNU mode in which the satellite device in a JNU group must function. Two JNU modes available are:<br />
• 1. Feature-rich mode—This mode is also called non-port-extender mode. In this mode, the interfaces of the<br />
satellites are not exp<strong>and</strong>ed on the controller; they behave as separate physical interfaces. You modify <strong>and</strong><br />
commit configuration changes for satellite devices only on the controller <strong>and</strong> commit the configurations to<br />
the satellites.<br />
• 2. Port Extender mode—In this mode, a JNU group that consists of the controller <strong>and</strong> a number of satellites<br />
is regarded as a single, unified network entity, with the controller owning all the interface resources, including<br />
those residing on the satellites (remote line-cards) as extended ports. A satellite interface functions as the<br />
satellite port that is extended to the controller. In this mode, when an interface that resides on the satellite<br />
is enabled within the JNU group, a service VLAN (S-VLAN) ID or tag is used to transmit the data traffic from<br />
the remote interface of the satellite to the controller.<br />
NOTE: Port-extender mode is supported in JNU Release 1.3 <strong>and</strong> later. It is necessary to select the same<br />
mode—feature-rich or port-extender— on the controller <strong>and</strong> the satellites. The JNU management plane<br />
configurations that are enabled in both the modes are identical. If you choose the mode to be different between<br />
the controller <strong>and</strong> the satellites are different, although the controller might still communicate with the satellites,<br />
the JNU operations do not work correctly.<br />
Enter 1 to enable feature-rich mode. Enter 2 to enable port-extender mode.<br />
Please enter management IP address<br />
Please enter uplink IP prefix<br />
(192.168.0.2-254/24)<br />
Please enter uplink interface name<br />
Do you want to use aggregated-ethernet<br />
for the uplink<br />
Please enter uplink aggregate name<br />
Please enter management VLAN id [4094]<br />
Please enter controller downlink IP address<br />
[192.168.0.1]<br />
Copyright © 2013, Juniper <strong>Network</strong>s, Inc.<br />
Hostname for the satellite.<br />
We recommend planning the names of a JNU group so that it is easy to identify<br />
which satellites <strong>and</strong> controllers belong to a group.<br />
Source address the satellite uses when it sends SNMP or system log messages<br />
to the controller. This address must match the satellite management IP address<br />
that you configured for the satellite during the controller initialization process.<br />
IP address of the satellite used in the JNU management network for uplink<br />
connections to the controller.<br />
ID of the interface used in the JNU management network for the uplink connection<br />
to the controller.<br />
Enter multiple interfaces in a comma-separated list. The JNU software places<br />
multiple interfaces into an aggregated Ethernet bundle.<br />
If you enter only a single uplink interface ID, you have the option of not using<br />
aggregated Ethernet. If your satellite device does not support aggregated Ethernet,<br />
enter n.<br />
If you are using aggregated Ethernet, enter a name for the bundle.<br />
VLAN ID used on the management network.<br />
Chapter 5: Getting Started with the JNU Software<br />
IP address of the controller used on the management network for communication<br />
with the satellite.<br />
31
JNU 1.2 Design <strong>and</strong> Implementation Guide<br />
To initialize a satellite device:<br />
1. Enter the following comm<strong>and</strong> on the satellite device, <strong>and</strong> follow the prompts.<br />
user@jnu-satellite1> op url /var/db/scripts/op/jnu-initialize-satellite.slax<br />
Satellite initializations:<br />
Please select the JNU mode:<br />
1. Feature-rich mode<br />
The controller <strong>and</strong> satellite features are supported. Configurations<br />
are forwarded to the satellites when the target device is a<br />
satellite managed by this controller.<br />
2. Port Extender mode<br />
Interfaces on the satellites are extended to the satellites.<br />
Features are configured on the extended ports.<br />
JNU mode (1/2)? 2<br />
Please enter hostname [jnu-satellite1]: jnu1-sat-ex1<br />
Please enter management IP address: 10.0.0.1<br />
Please enter uplink IP prefix (192.168.0.2-254/24): 192.168.0.2/24<br />
Please enter uplink interface name: ge-0/0/0<br />
Do you want to use aggregated-ethernet for the uplink [n]: y<br />
Please enter uplink aggregate name [ae31] 63<br />
Please enter management VLAN id [4094]:<br />
Please enter controller downlink IP address [192.168.0.1]:<br />
Sample Initial Configuration for an EX Series Switch<br />
32<br />
The following is an example of the configuration that is configured <strong>and</strong> committed on<br />
the satellite device during the initialize process.<br />
groups {<br />
jnu-satellite-mgmt {<br />
chassis {<br />
aggregated-devices {<br />
ethernet-devices {<br />
device-count 63;<br />
}<br />
}<br />
}<br />
system {<br />
syslog {<br />
/ * syslog parameters propagated from controller except source address */<br />
host 169.37.0.1 {<br />
security info;<br />
change-log info;<br />
source-address 10.0.0.1;<br />
}<br />
file messages {<br />
any any;<br />
}<br />
}<br />
ntp {<br />
/ * Using controller mgmt IP address */<br />
server 192.168.0.1;<br />
}<br />
services {<br />
ssh;<br />
Copyright © 2013, Juniper <strong>Network</strong>s, Inc.
Copyright © 2013, Juniper <strong>Network</strong>s, Inc.<br />
Chapter 5: Getting Started with the JNU Software<br />
}<br />
}<br />
snmp {<br />
/ * Other snmp parameters propagated from controller */<br />
community public:jnu-satellite1 {<br />
read-only;<br />
}<br />
/ * Other snmp parameters propagated from controller */<br />
community private:jnu-satellite1 {<br />
read-only;<br />
}<br />
trap-options {<br />
source-address 10.0.0.1;<br />
}<br />
trap-group public:jnu-satellite1 {<br />
version v2;<br />
/ * categories are configured by user, propagate from satellite */<br />
categories {<br />
authentication;<br />
routing;<br />
}<br />
targets {<br />
169.37.0.1;<br />
}<br />
}<br />
}<br />
interfaces {<br />
ge-0/0/0 {<br />
/ * Using aggregate ethernet since there can be more than 1 uplink */<br />
gigether-options {<br />
802.3ad ae63;<br />
}<br />
}<br />
ae63 {<br />
/ * Aggregated ethernet interface uplink connection to controller */<br />
aggregated-ethernet-options {<br />
lacp {<br />
active;<br />
}<br />
}<br />
unit 16385 {<br />
family ethernet-switching {<br />
port-mode trunk;<br />
vlan {<br />
members all;<br />
}<br />
}<br />
}<br />
}<br />
vlan {<br />
unit 4094 {<br />
family inet {<br />
address 192.168.0.2/24;<br />
}<br />
}<br />
}<br />
33
JNU 1.2 Design <strong>and</strong> Implementation Guide<br />
}<br />
vlans {<br />
jnu {<br />
vlan-id 4094;<br />
l3-interface vlan.4094;<br />
}<br />
}<br />
policy-options {<br />
policy-statement jnu-management {<br />
/ * Routes that are to be leaked from jnu-vrf to main instance */<br />
from {<br />
route-filter 169.37.0.1/32 exact;<br />
route-filter 132.0.1.1/32 exact;<br />
protocol static;<br />
}<br />
then accept;<br />
}<br />
policy-statement reject-all {<br />
then reject;<br />
}<br />
}<br />
routing-options {<br />
/ * These configurations to leak routes from jnu-vrf to main instance */<br />
rib-groups jnu {<br />
import-rib [ jnu.inet.0 inet.0 ];<br />
import-policy jnu-management;<br />
}<br />
}<br />
routing-instances {<br />
jnu-vrf {<br />
/ * Routing-instance containing uplink to controller */<br />
instance-type vrf;<br />
interface vlan.4094;<br />
route-distinguisher 192.168.0.2:1;<br />
vrf-import reject-all;<br />
vrf-export reject-all;<br />
routing-options {<br />
routing-options {<br />
static {<br />
rib-group jnu;<br />
route 169.37.0.1/32 next-hop 192.168.0.1;<br />
route 132.0.1.1/32 next-hop 192.168.0.1;<br />
}<br />
}<br />
}<br />
}<br />
}<br />
}<br />
}<br />
Sample Initial Configuration on an ACX Universal Access Router<br />
34<br />
The following is an example of the configuration that is configured <strong>and</strong> committed on<br />
the satellite device during the initialization process.<br />
groups {<br />
Copyright © 2013, Juniper <strong>Network</strong>s, Inc.
Copyright © 2013, Juniper <strong>Network</strong>s, Inc.<br />
Chapter 5: Getting Started with the JNU Software<br />
jnu-satellite-mgmt {<br />
system {<br />
syslog {<br />
/* syslog parameters propagated from controller except source address */<br />
host 169.37.0.1 {<br />
security info;<br />
change-log info;<br />
source-address 10.0.0.1;<br />
}<br />
file messages {<br />
any any;<br />
}<br />
}<br />
ntp {<br />
/* Using controller mgmt IP address */<br />
server 192.168.0.1;<br />
}<br />
services {<br />
ssh;<br />
}<br />
}<br />
snmp {<br />
/* Other snmp parameters propagated from controller */<br />
community public:jnu-satellite1 {<br />
read-only;<br />
}<br />
/* Other snmp parameters propagated from controller */<br />
community private:jnu-satellite1 {<br />
read-only;<br />
}<br />
trap-options {<br />
source-address 10.0.0.1;<br />
}<br />
trap-group public:jnu-satellite1 {<br />
version v2;<br />
/* categories are configured by user, propagate from satellite */<br />
categories {<br />
authentication;<br />
routing;<br />
}<br />
targets {<br />
169.37.0.1;<br />
}<br />
}<br />
}<br />
interfaces {<br />
ge-0/0/0 {<br />
/* Not using AE interface on ACX */<br />
vlan-tagging;<br />
unit 16385 {<br />
vlan-id 4094;<br />
family inet {<br />
address 192.168.0.2/24;<br />
}<br />
}<br />
}<br />
35
JNU 1.2 Design <strong>and</strong> Implementation Guide<br />
}<br />
policy-options {<br />
policy-statement jnu-management {<br />
/* Routes that are to be leaked from jnu-vrf to<br />
main instance */<br />
from {<br />
route-filter 169.37.0.1/32 exact;<br />
route-filter 132.0.1.1/32 exact;<br />
protocol static;<br />
}<br />
then accept;<br />
}<br />
policy-statement reject-all {<br />
then reject;<br />
}<br />
}<br />
routing-options {<br />
/* These configurations to leak routes from<br />
jnu-vrf to main instance */<br />
rib-groups jnu {<br />
import-rib [ jnu.inet.0 inet.0 ];<br />
import-policy jnu-management;<br />
}<br />
}<br />
routing-instances {<br />
jnu-vrf {<br />
/* Routing-instance containing<br />
uplink to controller */<br />
instance-type vrf;<br />
interface ge-0/0/0.16385;<br />
route-distinguisher 192.168.0.2:1;<br />
vrf-import reject-all;<br />
vrf-export reject-all;<br />
routing-options {<br />
routing-options {<br />
static {<br />
rib-group jnu;<br />
route 169.37.0.1/32 next-hop<br />
192.168.0.1;<br />
route 132.0.1.1/32 next-hop<br />
192.168.0.1;<br />
}<br />
}<br />
}<br />
}<br />
}<br />
}<br />
}<br />
Sample Initial Configuration on an EX3300 Ethernet Switch<br />
36<br />
The following is an example of the configuration that is configured <strong>and</strong> committed an<br />
EX3300 Ethernet Switch satellite device during the initialization process. There is no<br />
routing instance configured, because the EX3300 switch does not support routing<br />
instances.<br />
Copyright © 2013, Juniper <strong>Network</strong>s, Inc.
Copyright © 2013, Juniper <strong>Network</strong>s, Inc.<br />
Chapter 5: Getting Started with the JNU Software<br />
groups {<br />
jnu-satellite-mgmt {<br />
chassis {<br />
aggregated-devices {<br />
ethernet {<br />
device-count 32;<br />
}<br />
}<br />
}<br />
system {<br />
host-name jnu-ex3300-1;<br />
login {<br />
/* For JNU scripts to use from controller */<br />
user jnuadmin {<br />
uid 2002;<br />
class super-user;<br />
authentication {<br />
encrypted-password "$1$PlNup5Bb1TDx/"; ## SECRET-DATA<br />
}<br />
}<br />
}<br />
syslog {<br />
/* syslog parameters propagated from controller except source address */<br />
host 169.37.0.1 {<br />
security info;<br />
change-log info;<br />
source-address 10.0.0.2;<br />
}<br />
file messages {<br />
any any;<br />
}<br />
}<br />
ntp {<br />
/* NTP server is MX address */<br />
server 192.168.0.1;<br />
}<br />
services {<br />
ssh;<br />
}<br />
}<br />
snmp {<br />
/* Community string is propagated from controller <strong>and</strong> append with */<br />
/* of ":_hostname-of-satellite_", other parameters are propagated */<br />
/* from controller */<br />
community public:jnu-ex3300-1 {<br />
read-only;<br />
}<br />
/* Community string is propagated from controller <strong>and</strong> append with */<br />
/* of ":_hostname-of-satellite_", other parameters are propagated */<br />
/* from controller */<br />
community private:jnu-ex3300-1 {<br />
read-write;<br />
}<br />
trap-options {<br />
source-address 10.0.0.2;<br />
}<br />
37
JNU 1.2 Design <strong>and</strong> Implementation Guide<br />
38<br />
/* trap-group name is propagated from controller appended with */<br />
/* ":_satellite_host_name_" */<br />
trap-group public:jnu-ex3300-1 {<br />
version v2;<br />
targets {<br />
169.37.0.2;<br />
}<br />
}<br />
}<br />
security {<br />
ssh-known-hosts {<br />
/* Controller downlink IP address */<br />
host 192.168.0.1 {<br />
ecdsa-sha2-nistp256-key AAAAE2VjZHNhLXNoYTItbmlzdHAyNT;<br />
}<br />
}<br />
}<br />
interfaces {<br />
ge-0/0/0 {<br />
/* Using aggregate ethernet since there can be more than 1 uplink */<br />
ether-options {<br />
802.3ad ae31;<br />
}<br />
}<br />
ae31 {<br />
aggregated-ether-options {<br />
lacp {<br />
active;<br />
}<br />
}<br />
unit 0 {<br />
family ethernet-switching {<br />
port-mode trunk;<br />
vlan {<br />
members all;<br />
}<br />
}<br />
}<br />
}<br />
vlan {<br />
unit 4094 {<br />
family inet {<br />
address 192.168.0.3/24;<br />
}<br />
}<br />
}<br />
}<br />
vlans {<br />
jnu {<br />
vlan-id 4094;<br />
l3-interface vlan.4094;<br />
}<br />
}<br />
routing-options {<br />
static {<br />
/* Static route for the Syslog server via controller */<br />
Copyright © 2013, Juniper <strong>Network</strong>s, Inc.
Related<br />
Documentation<br />
Copyright © 2013, Juniper <strong>Network</strong>s, Inc.<br />
route 169.37.0.1/32 next-hop 192.168.0.1;<br />
/* Static route for the SNMP trap server via controller */<br />
route 169.37.0.2/32 next-hop 192.168.0.1;<br />
}<br />
}<br />
event-options {<br />
generate-event {<br />
event-script-timer time-interval 300;<br />
}<br />
policy jnu-controller-connectivity {<br />
events event-script-timer;<br />
then {<br />
event-script monitor-controller-qfx3500.slax {<br />
arguments {<br />
cntrlr-ip 192.168.0.1;<br />
}<br />
}<br />
}<br />
}<br />
event-script {<br />
file monitor-controller-ex3300.slax;<br />
}<br />
}<br />
}<br />
}<br />
• Installing the JNU Software on Satellite Devices on page 22<br />
• jnu-add-delete-satellites on page 52<br />
• Initializing JNU Mode on the Controller on page 22<br />
Chapter 5: Getting Started with the JNU Software<br />
39
JNU 1.2 Design <strong>and</strong> Implementation Guide<br />
40<br />
Copyright © 2013, Juniper <strong>Network</strong>s, Inc.
CHAPTER 6<br />
Configuring <strong>Junos</strong> OS Features with JNU<br />
• Configuring <strong>Junos</strong> Features with JNU Configuration Templates on page 41<br />
• Configuring <strong>Junos</strong> Features with JNU Free Form on page 43<br />
Configuring <strong>Junos</strong> Features with JNU Configuration Templates<br />
The JNU software comes with configuration templates that you can use to configure<br />
<strong>Junos</strong> OS features. Each template contains parameters that correspond to a set of <strong>Junos</strong><br />
OS configuration statements. You configure these parameters with the same values that<br />
you would use for the corresponding set statement in configuration mode of the <strong>Junos</strong><br />
OS CLI. After you have finished configuring the templates, run the op jnu-commit comm<strong>and</strong><br />
to commit the new configuration on the specified satellite devices.<br />
Displaying a List of Configuration Templates<br />
To see a list of templates, enter op config-? In operational mode. For example:<br />
user@jnu1-ctrlr> op config-?<br />
Possible completions:<br />
<br />
config-analyzer<br />
config-cos-classifiers<br />
config-cos-code-point-alias<br />
config-cos-congestion-notification-profile<br />
config-cos-drop-profiles<br />
. . .<br />
Copyright © 2013, Juniper <strong>Network</strong>s, Inc.<br />
config-system-internet-options<br />
config-system-login<br />
config-system-syslog<br />
config-vlan<br />
config-vrrp<br />
config-vstp<br />
41
JNU 1.2 Design <strong>and</strong> Implementation Guide<br />
Displaying the Configuration Parameters in a Template<br />
You can display a list of parameters in a template. If there is a range of accepted values<br />
or a particular value accepted for a parameter, these are included in parenthesis. To<br />
display a list of parameters in a template, enter the name of the template with a ? . For<br />
example:<br />
Configuring the Template<br />
Committing the Configuration<br />
42<br />
Related<br />
Documentation<br />
user@jnu1-ctrlr> op config-cos-drop-profiles ?<br />
Possible completions:<br />
action Action to be performed ('set', 'delete')<br />
apply-groups Groups from which to inherit configuration data<br />
apply-groups-except Don't inherit configuration data from these groups<br />
detail Display detailed output<br />
device Controller/Satellite Name<br />
drop-profile.name R<strong>and</strong>om Early Drop (RED) data point map<br />
fill-level Fill-level value of data point (0 .. 100 percent)<br />
fill-level.drop-probability Probability packet will be dropped<br />
group Configuration group name<br />
interpolate.drop-probability Data points for packet drop probability (0 .. 100<br />
percent)<br />
interpolate.fill-level Data points for queue full percentage (0 .. 100 percent)<br />
| Pipe through a comm<strong>and</strong><br />
To configure a template:<br />
• Include the device comm<strong>and</strong>, which specifies the satellite device on which you want<br />
to commit the configuration. You can configure only one satellite device at a time using<br />
the configuration templates.<br />
• Include the action comm<strong>and</strong>, which specifies whether you are creating a configuration<br />
or deleting a configuration.<br />
• Add parameters <strong>and</strong> values on one line in any order. The software does not validate<br />
values, but it notifies you if you miss a required parameter.<br />
For example, to create a drop policy called best-effort on the jnu1-sat-ex1 satellite device:<br />
user@jnu1-ctrlr> op config-cos-drop-profiles drop-profile.name best-effort<br />
interpolate.fill-level 30 fill-level 50 fill-level.drop-probability 0<br />
interpolate.drop-probability 80 device jnu1-sat-ex1 action set<br />
After you have finished configuring the templates, run the jnu-commit comm<strong>and</strong> to<br />
commit the new configuration on the specified satellite devices.<br />
•<br />
config-template-name on page 51<br />
• Configuring <strong>Junos</strong> Features with JNU Free Form on page 43<br />
• <strong>Junos</strong> <strong>Node</strong> <strong>Unifier</strong> Overview on page 4<br />
Copyright © 2013, Juniper <strong>Network</strong>s, Inc.
Configuring <strong>Junos</strong> Features with JNU Free Form<br />
Related<br />
Documentation<br />
You can use the config-free-form comm<strong>and</strong> to configure <strong>Junos</strong> OS set statements on<br />
satellite devices. You can configure any set statement that is supported on the satellite<br />
device.<br />
Copyright © 2013, Juniper <strong>Network</strong>s, Inc.<br />
To use the config-free-form comm<strong>and</strong> to configure <strong>Junos</strong> OS set statements:<br />
• Include the action comm<strong>and</strong>, which specifies whether you are adding a statement or<br />
deleting a statement.<br />
• Include the device comm<strong>and</strong>, which specifies one or more satellite devices on which<br />
you want to commit the configuration. Enter multiple satellite devices in a<br />
comma-separated list.<br />
• Add statements <strong>and</strong> values on one line in any order. The software does not validate<br />
values, but it notifies you if you miss a required parameter.<br />
For example, to configure an interface:<br />
user@jnu1-ctrlr> op config-free-form action add device jnu1-sat-ex1 comm<strong>and</strong> "set<br />
interfaces ge-1/0/0 unit 0 vlan-id 1044 family inet address 10.10.1.1"<br />
To configure routing options:<br />
user@jnu1-ctrlr> op config-free-form action add device jnu1-sat-ex1 comm<strong>and</strong> "set<br />
routing-options static route 172.16.0.0 next-hop 192.168.167.254 retain no-readvertise"<br />
• config-free-form on page 50<br />
• Configuring <strong>Junos</strong> Features with JNU Configuration Templates on page 41<br />
• <strong>Junos</strong> <strong>Node</strong> <strong>Unifier</strong> Overview on page 4<br />
Chapter 6: Configuring <strong>Junos</strong> OS Features with JNU<br />
43
JNU 1.2 Design <strong>and</strong> Implementation Guide<br />
44<br />
Copyright © 2013, Juniper <strong>Network</strong>s, Inc.
CHAPTER 7<br />
Committing Configurations<br />
• Commit Process for Satellites Already Connected to the Controller on page 45<br />
• Commit Process for Satellite Devices That Come Online After the Commit Process on<br />
the Controller on page 46<br />
• Returning to a Previously Committed <strong>Junos</strong> OS Configuration on page 47<br />
Commit Process for Satellites Already Connected to the Controller<br />
JNU uses commit scripts to automate the commit process on the controller <strong>and</strong> satellite<br />
devices. You commit configurations for the satellite devices from the controller. You<br />
should modify <strong>and</strong> commit configuration changes for satellite devices only on the<br />
controller.<br />
Copyright © 2013, Juniper <strong>Network</strong>s, Inc.<br />
When you commit a configuration on the controller, the flow of the commit process on<br />
the controller is as follows:<br />
1. Enter the following comm<strong>and</strong> on the controller:<br />
user@jnu-ctrlr> op jnu-commit<br />
2. The controller polls each satellite device to verify that the device is reachable.<br />
3. The controller sends the new satellite configuration to each satellite device by using<br />
the NETCONF XML management protocol.<br />
4. The controller runs the remote procedure call (RPC) validate process on each satellite<br />
device to validate the new configuration.<br />
5. If all the satellite devices successfully validate the new configuration, the controller<br />
runs the commit script, which runs the RPC commit process on all satellite devices.<br />
When the process is complete, the controller displays the following message:<br />
jnu1-sat-ex1:<br />
Configuration check succeeds<br />
jnu1-sat-qfx2:<br />
Configuration check succeeds<br />
If the new configuration is not successfully validated on all satellite devices in the JNU<br />
network, the commit process stops <strong>and</strong> the controller displays an error message.<br />
45
JNU 1.2 Design <strong>and</strong> Implementation Guide<br />
Related<br />
Documentation<br />
•<br />
Commit Process for Satellite Devices That Come Online After the Commit Process on<br />
the Controller on page 46<br />
• Returning to a Previously Committed <strong>Junos</strong> OS Configuration on page 47<br />
Commit Process for Satellite Devices That Come Online After the Commit Process on<br />
the Controller<br />
46<br />
Related<br />
Documentation<br />
If a satellite device is not connected to the controller when you perform the commit<br />
process, it receives its configuration from the controller when it comes online.<br />
The commit process for satellite devices that come online after the commit process is<br />
complete is as follows:<br />
1. The satellite device comes online, <strong>and</strong> the satellite <strong>and</strong> the controller discover each<br />
other.<br />
2. A management connection is made between the controller <strong>and</strong> the satellite device<br />
by means of <strong>Junos</strong> OS automation features.<br />
3. If the controller has a new configuration for the satellite device, the controller sends<br />
the new configuration to the satellite device.<br />
4. The satellite device validates the configuration, <strong>and</strong> if the validation succeeds, the<br />
configuration is committed on the satellite.<br />
The configuration on the satellite is now synchronized with the rest of the JNU group.<br />
If the commit process fails or if the controller does not have a new configuration for the<br />
satellite device, the controller removes any services previously committed on the satellite<br />
device because the configuration will not be synchronized the rest of the JNU group. The<br />
controller restores the configuration that the satellite device had in discovery mode.<br />
Because the satellite device has an open management channel to the controller, it will<br />
participate in subsequent configuration commits that the controller sends.<br />
•<br />
jnu-commit on page 53<br />
• Commit Process for Satellites Already Connected to the Controller on page 45<br />
• Returning to a Previously Committed <strong>Junos</strong> OS Configuration on page 47<br />
Copyright © 2013, Juniper <strong>Network</strong>s, Inc.
Returning to a Previously Committed <strong>Junos</strong> OS Configuration<br />
Related<br />
Documentation<br />
To return to a configuration prior to the most recently committed one:<br />
1. (Optional) In configuration mode on the JNU controller, display previous configurations,<br />
including the configuration number, date, <strong>and</strong> time, the name of the user who<br />
committed changes; <strong>and</strong> the method of commit.<br />
.<br />
.<br />
.<br />
Copyright © 2013, Juniper <strong>Network</strong>s, Inc.<br />
user@jnu-ctrlr1# rollback ?<br />
Execute this comm<strong>and</strong><br />
0 2012-10-01 07:55:02 PDT by jnuadmin via cli<br />
1 2012-10-01 07:50:22 PDT by jnuadmin via cli<br />
2 2012-10-01 07:48:00 PDT by jnuadmin via cli<br />
3 2012-10-01 06:57:15 PDT by jnuadmin via junoscript<br />
4 2012-10-01 05:23:55 PDT by jnuadmin via cli<br />
48 2012-09-28 04:23:15 PDT by jnuadmin via cli<br />
49 2012-09-27 06:51:52 PDT by jnuadmin via junoscript<br />
2. Specify the configuration number, 0 through 49, to which you want to return. The<br />
most recently saved configuration is number 0 (which is the default configuration to<br />
which the system returns), <strong>and</strong> the oldest saved configuration is number 49.<br />
user@jnu1-ctrlr> op jnu-rollback 0<br />
In this example, configuration 0 is now the c<strong>and</strong>idate configuration.<br />
3. In operational mode on the JNU controller, commit the new c<strong>and</strong>idate configuration.<br />
user@jnu1-ctrlr> op jnu-commit<br />
• jnu-rollback on page 63<br />
Chapter 7: Committing Configurations<br />
47
JNU 1.2 Design <strong>and</strong> Implementation Guide<br />
48<br />
Copyright © 2013, Juniper <strong>Network</strong>s, Inc.
CHAPTER 8<br />
JNU Operational Mode Comm<strong>and</strong>s<br />
• Using Operational Mode Comm<strong>and</strong>s with JNU Overview on page 49<br />
Using Operational Mode Comm<strong>and</strong>s with JNU Overview<br />
Related<br />
Documentation<br />
Copyright © 2013, Juniper <strong>Network</strong>s, Inc.<br />
Operational mode comm<strong>and</strong>s used with JNU are at the user@host> prompt under the<br />
op comm<strong>and</strong>. You run operational mode comm<strong>and</strong>s on the JNU controller.<br />
There are two types of op comm<strong>and</strong>s for JNU.<br />
• Comm<strong>and</strong>s that begin with jnu- are directly related to operating the JNU or to sending<br />
<strong>Junos</strong> OS operational mode comm<strong>and</strong>s to satellite devices.<br />
• Comm<strong>and</strong>s that begin with config- are related to configuring <strong>Junos</strong> OS features on<br />
•<br />
satellite devices.<br />
• The config-free-form comm<strong>and</strong> allows you to send set comm<strong>and</strong>s to satellite devices.<br />
• All other comm<strong>and</strong>s that begin with config- are configuration templates that you<br />
configure <strong>and</strong> send to satellite devices.<br />
op on page 69<br />
• Configuring <strong>Junos</strong> Features with JNU Configuration Templates on page 41<br />
• Configuring <strong>Junos</strong> Features with JNU Free Form on page 43<br />
49
JNU 1.2 Design <strong>and</strong> Implementation Guide<br />
config-free-form<br />
50<br />
Syntax op<br />
config-free-form<br />
device device-name<br />
action (add | delete)<br />
“set statement-name value”<br />
Release Information Comm<strong>and</strong> introduced in JNU 1.0.<br />
Description Configure <strong>Junos</strong> OS set statements on the satellite device. You can use config-free-form<br />
to configure any set statement that is supported on the satellite device. You can enter<br />
the statements in any order on the same line.<br />
Options device device-name—Satellite device to which you want to add or remove the statement.<br />
Related<br />
Documentation<br />
action (add | delete)—Action to be taken on the set statements. You can add the<br />
statement to the configuration of the satellite device or remove the set statement<br />
from the configuration of the satellite device.<br />
“set statement-name value”—A set statement <strong>and</strong> value that are supported on the satellite<br />
•<br />
device. You must enclose the set statement <strong>and</strong> values in quotation marks. You can<br />
enter multiple set statements on the same line. The JNU software does not validate<br />
the value that you enter for the statement. The value is validated during the commit<br />
process.<br />
Configuring <strong>Junos</strong> Features with JNU Free Form on page 43<br />
Copyright © 2013, Juniper <strong>Network</strong>s, Inc.
config-template-name<br />
Syntax op<br />
config-template-name<br />
device device-name<br />
action (set | delete)<br />
parameter parameter-value<br />
Release Information Comm<strong>and</strong> introduced in JNU 1.0.<br />
Description Configure <strong>Junos</strong> OS features using templates. Each template contains parameters that<br />
correspond to a set of <strong>Junos</strong> OS configuration statements. To see a list of templates,<br />
enter op config-? in operational mode.<br />
Options template-name—Name of the configuration template that you wish to configure.<br />
Related<br />
Documentation<br />
Copyright © 2013, Juniper <strong>Network</strong>s, Inc.<br />
device device-name—Device to which you want to add or remove the statement.<br />
action (set | delete)—Action to be taken on the set statements. You can add the set<br />
statement to the configuration of the satellite device or remove the set statement<br />
from the configuration of the satellite device.<br />
parameter parameter-value—Parameters <strong>and</strong> values that you configure in the template.<br />
•<br />
Parameters correspond to <strong>Junos</strong> OS configuration statements. To display a list of<br />
parameters in a template, enter op config-template-name ?. For example, op<br />
config-interface ?.<br />
Chapter 8: JNU Operational Mode Comm<strong>and</strong>s<br />
Configuring <strong>Junos</strong> Features with JNU Configuration Templates on page 41<br />
51
JNU 1.2 Design <strong>and</strong> Implementation Guide<br />
jnu-add-delete-satellites<br />
52<br />
Syntax op<br />
jnu-add-delete-satellites<br />
action set | delete<br />
ae-id id-value<br />
downlink interface-id<br />
ieee-802.3ad disable<br />
inet ip-address<br />
sat-mgmt-ip ip-address<br />
satellite satellite-name<br />
Release Information Comm<strong>and</strong> introduced in JNU 1.0.<br />
Description Create <strong>and</strong> configure satellite devices in the controller configuration or remove satellite<br />
devices from the configuration.<br />
Options action set | delete—Use set to create <strong>and</strong> configure a satellite device. Use delete to remove<br />
Related<br />
Documentation<br />
a satellite device configuration.<br />
ae-id id-value—ID of the aggregated Ethernet interface in the range 0–479.<br />
downlink interface-id—ID of the interface used for the downlink connection to the satellite<br />
device.<br />
802.3ad disable—Disable the use of an aggregated ethernet interface to bundle the<br />
downlink interfaces to the satellite.<br />
inet ip-address—IP address that the JNU controller uses to communicate with the satellite<br />
device.<br />
sat-mgmt-ip ip-address—IP address that the satellite uses to send syslog <strong>and</strong> SNMP<br />
messages.<br />
satellite satellite-name—Name of the satellite device to be added or deleted.<br />
•<br />
Using Operational Mode Comm<strong>and</strong>s with JNU Overview on page 49<br />
Copyright © 2013, Juniper <strong>Network</strong>s, Inc.
jnu-commit<br />
Syntax op<br />
jnu-commit<br />
Release Information Comm<strong>and</strong> introduced in JNU 1.0.<br />
Description Commit the configuration on the controller <strong>and</strong> on the satellite devices.<br />
Related<br />
Documentation<br />
Copyright © 2013, Juniper <strong>Network</strong>s, Inc.<br />
•<br />
Commit Process for Satellites Already Connected to the Controller on page 45<br />
• Commit Process for Satellite Devices That Come Online After the Commit Process on<br />
the Controller on page 46<br />
Chapter 8: JNU Operational Mode Comm<strong>and</strong>s<br />
• Returning to a Previously Committed <strong>Junos</strong> OS Configuration on page 47<br />
53
JNU 1.2 Design <strong>and</strong> Implementation Guide<br />
jnu-initialize-controller<br />
Syntax op<br />
jnu-initialize-controller<br />
Release Information Comm<strong>and</strong> introduced in JNU 1.0.<br />
Description The first time you initialize JNU on the controller, you must run the op url<br />
Related<br />
Documentation<br />
/var/db/scripts/op/initialize-controller operational mode comm<strong>and</strong>. Thereafter, to change<br />
the JNU configuration on the controller, you can run the op jnu-initialize-controller<br />
comm<strong>and</strong>.<br />
•<br />
Initializing JNU Mode on the Controller on page 22<br />
• Example: Setting Up a Basic JNU Implementation on page 71<br />
Output Fields Table 3 on page 54 describes the fields that you fill in when you run the op<br />
jnu-initialize-controller comm<strong>and</strong>.<br />
Table 3: jnu-initialize-controller Output Fields<br />
54<br />
Field<br />
Please select the JNU mode<br />
Please enter hostname<br />
Description<br />
JNU mode in which the controller device in a JNU group must function. Two JNU<br />
modes available are:<br />
• 1. Feature-rich mode—This mode is also called non-port-extender mode. In this<br />
mode, the interfaces of the satellites are not exp<strong>and</strong>ed on the controller; they<br />
behave as separate physical interfaces. You modify <strong>and</strong> commit configuration<br />
changes for satellite devices only on the controller <strong>and</strong> commit the configurations<br />
to the satellites.<br />
• 2. Port Extender mode—In this mode, a JNU group that consists of the controller<br />
<strong>and</strong> a number of satellites is regarded as a single, unified network entity, with<br />
the controller owning all the interface resources, including those residing on the<br />
satellites (remote line-cards) as extended ports. A satellite interface functions<br />
as the satellite port that is extended to the controller. In this mode, when an<br />
interface that resides on the satellite is enabled within the JNU group, a service<br />
VLAN (S-VLAN) ID or tag is used to transmit the data traffic from the remote<br />
interface of the satellite to the controller.<br />
NOTE: Port-extender mode is supported in JNU Release 1.3 <strong>and</strong> later. It is necessary<br />
to select the same mode—feature-rich or port-extender— on the controller <strong>and</strong><br />
the satellites. The JNU management plane configurations that are enabled in both<br />
the modes are identical. If you choose the mode to be different between the<br />
controller <strong>and</strong> the satellites are different, although the controller might still<br />
communicate with the satellites, the JNU operations do not work correctly.<br />
Enter 1 to enable feature-rich mode. Enter 2 to enable port-extender mode.<br />
Hostname for the controller.<br />
Copyright © 2013, Juniper <strong>Network</strong>s, Inc.
Table 3: jnu-initialize-controller Output Fields (continued)<br />
Field<br />
Please enter management IP address<br />
Please enter JNU downlink prefix<br />
[192.168.0.1/24]<br />
Please enter JNU VLAN id [4094]<br />
Do you want to configure any satellites<br />
now<br />
Please enter the number of satellites<br />
Please enter the hostname of the satellite<br />
Please enter satellite management IP<br />
address<br />
Please enter the uplink IP address of the<br />
satellite<br />
Please enter downlink interfaces to<br />
satellite<br />
Do you want to use aggregated-ethernet<br />
for the downlink [y]<br />
Please enter downlink aggregate name<br />
[ae31] 63<br />
Do you want to configure SNMP [n]<br />
Do you want to enter a read-only<br />
community string (y | n)<br />
Copyright © 2013, Juniper <strong>Network</strong>s, Inc.<br />
Description<br />
Source address used when the controller sends SNMP messages or system logs<br />
to a network management system (NMS).<br />
When the controller receives SNMP messages or system logs from the satellites,<br />
it uses NAT to convert the satellite management address to this address. Therefore,<br />
all network management traffic in the JNU group uses the same source address.<br />
In addition, the controller uses this address as the source address when it sends<br />
its own network management traffic to the NMS.<br />
IP address of the controller used in the JNU management network for downlink<br />
connections to satellite devices.<br />
VLAN ID used on the management network.<br />
Enter y to add satellite devices to the configuration.<br />
Number of satellite devices that you want to add to the configuration.<br />
Name for the satellite.<br />
IP address for the satellite used as the source address for SNMP or system log<br />
messages. This address must match the satellite management IP address that<br />
you configured for the satellite in the satellite initialization process.<br />
IP address of the satellite used in the JNU management network for the uplink<br />
connection to the controller.<br />
ID of Interface used in the JNU management network for the downlink connection<br />
to the satellite.<br />
Enter multiple interfaces in a comma-separated list. The JNU software places<br />
multiple interfaces into an aggregated Ethernet bundle.<br />
If you enter only a single downlink interface ID, you have the option of not using<br />
aggregated Ethernet. If your satellite device does not support aggregated Ethernet,<br />
enter n.<br />
If you are using aggregated Ethernet, enter a name for the bundle.<br />
Enter y to configure SNMP on the controller.<br />
Enter y to configure a read-only community string for the controller, <strong>and</strong> then enter<br />
the community string.<br />
Repeat this process to enter a second community string.<br />
Chapter 8: JNU Operational Mode Comm<strong>and</strong>s<br />
55
JNU 1.2 Design <strong>and</strong> Implementation Guide<br />
Table 3: jnu-initialize-controller Output Fields (continued)<br />
Field<br />
Do you want to enter a read-write<br />
community string (y|n)?<br />
Do you want to enter SNMP trap<br />
parameters (y | n)?<br />
SNMP trap target address:<br />
Do you want to enter SNMP trap<br />
categories (y | n)?<br />
Do you want to enable SNMP trap for<br />
'otn-alarms' (y | n)?<br />
Do you want to enable SNMP trap for<br />
'sonet-alarms' (y | n)?<br />
Other categories:<br />
Do you want to enter other SNMP trap<br />
categories (y | n)?<br />
Please enter SNMP trap categories:<br />
Do you want to configure Syslog server<br />
[n]:<br />
56<br />
Syslog host address?<br />
port number [123]:<br />
Sylog facility 'all' [n]:<br />
Syslog facilities:<br />
Syslog severities:<br />
Please enter syslog facility name:<br />
Description<br />
Enter y to configure a read-write community string for the controller, <strong>and</strong> then enter<br />
the community string.<br />
Repeat this process to enter a second community string.<br />
Enter y to configure SNMP traps.<br />
If you entered y to configure SNMP traps, specify the address to which traps are<br />
sent.<br />
Enter y to specify trap categories.<br />
Enter y to specify Optical Transport <strong>Network</strong> (OTN) alarm categories.<br />
A list of available alarms displays.<br />
Enter alarms in a comma-separated list.<br />
Enter y to specify SONET/SDH alarm categories.<br />
A list of available alarms displays.<br />
Enter alarms in a comma-separated list.<br />
A list of additional trap categories that you can add to the trap configuration<br />
displays.<br />
Enter y to add other trap categories to your configuration.<br />
Comma-separated list of additional trap categories that you want to add to your<br />
configuration.<br />
Enter y to configure a server to which system log messages are sent.<br />
IP address of the system log server.<br />
Port number of the system log server.<br />
Class of messages to log. Enter y to enable all facilities; enter n to display a list of<br />
facilities that you can add to the configuration.<br />
List of facilities that you can add to the configuration.<br />
List of message severities.<br />
Name of the facilitiy that you want to add to the configuration.<br />
Copyright © 2013, Juniper <strong>Network</strong>s, Inc.
Table 3: jnu-initialize-controller Output Fields (continued)<br />
Field<br />
Please enter severity:<br />
Do you want to enter more syslog facilities<br />
[n]?<br />
Do you want to configure NTP [n]:<br />
NTP server address:<br />
Copyright © 2013, Juniper <strong>Network</strong>s, Inc.<br />
Description<br />
Specify the severity of the messages that belong to the facility. Messages with<br />
severities of the specified level <strong>and</strong> higher are logged.<br />
Enter y to configure additional facilities.<br />
Enter y to configure an NTP server.<br />
IP address of the NTP server.<br />
Chapter 8: JNU Operational Mode Comm<strong>and</strong>s<br />
57
JNU 1.2 Design <strong>and</strong> Implementation Guide<br />
Sample Output<br />
58<br />
user@jnu1-ctrlr> op initialize-controller<br />
Controller initializations:<br />
Please enter hostname [jnu-controller]:<br />
Please enter management IP address: 137.34.1.1<br />
Please enter JNU downlink IP prefix [192.168.0.1/24]:<br />
Please enter JNU VLAN id [4094]:<br />
Do you want to configure any satellites now [n]: y<br />
Please enter the number of satellites [1]: 2<br />
Satellite 1<br />
Please enter the hostname of the satellite: jnu-sat1<br />
Please enter satellite management IP address: 10.0.0.1<br />
Please enter the uplink IP address of the satellite: 192.168.0.2<br />
Please enter downlink interfaces to satellite: ge-0/0/0<br />
Do you want to use aggregated-ethernet for the downlink [y]: y<br />
Please enter downlink aggregate name [ae31]:<br />
Satellite 2<br />
Please enter the hostname of the satellite: jnu-sat2<br />
Please enter satellite management IP address: 10.0.0.2<br />
Please enter the uplink IP address of the satellite: 192.168.0.3<br />
Please enter downlink interfaces for satellite: ge-0/0/1,ge-0/0/2<br />
Do you want to configure SNMP [n]: y<br />
Do you want to enter a read-only community string (y|n)? y<br />
SNMP read-only community string: public<br />
Do you want to enter a read-write community string (y|n)? y<br />
SNMP read-only community string: private<br />
Do you want to enter SNMP trap parameters (y|n)? y<br />
SNMP trap target address: 169.37.0.1<br />
Do you want to enter SNMP trap categories (y|n)? y<br />
Do you want to enable SNMP trap for 'otn-alarms' (y|n)? y<br />
Available alarms:<br />
'oc-lof', 'oc-lom', 'oc-los', 'odu-ais', 'odu-bbe-threshold',<br />
'odu-bdi', 'odu-es-threshold', 'odu-lck', 'odu-oci',<br />
'odu-rx-aps-change', 'odu-sd', 'odu-ses-threshold', 'odu-sf',<br />
'odu-ttim', 'odu-uas-threshold', 'opu-ptm', 'otu-ais',<br />
'otu-bbe-threshold', 'otu-bdi', 'otu-es-threshold',<br />
'otu-fec-deg', 'otu-fec-exe', 'otu-iae', 'otu-sd',<br />
'otu-ses-threshold', 'otu-sf', 'otu-ttim', 'otu-usa-threshold',<br />
'wavelength-lock'<br />
Please enter otn-alarms: oc-lof,oc-lom<br />
Do you want to enable SNMP trap for 'sonet-alarms' (y|n)? y<br />
Available alarms:<br />
'ber-defect', 'ber-fault', 'line-ais', 'line-remote-defect-indication',<br />
'loss-of-cell', 'loss-of-frame', 'loss-of-light', 'loss-of-pointer',<br />
'loss-of-signal', 'path-ais', 'path-mismatch',<br />
'path-remote-defect-indication', 'pll-lock', 'remote-error-indication',<br />
'severely-errored-frame', 'unequipped', 'vt-ais', vt-label-mismatch',<br />
'vt-loss-of-cell', 'vt-loss-of-pointer', 'vt-remote-defect-indication',<br />
'vt-unequipped'<br />
Please enter sonet-alarms: path-ais<br />
Other categories:<br />
'authentication', 'chassis', 'configuration', 'link',<br />
'remote-operations', 'rmon-alarm', 'routing', 'services',<br />
'startup', 'vrrp-events'<br />
Do you want to enter other SNMP trap categories (y|n)? y<br />
Please enter SNMP trap categories: vrrp-events<br />
Do you want to configure Syslog server [n]: y<br />
Syslog host address? 167.37.0.1<br />
Copyright © 2013, Juniper <strong>Network</strong>s, Inc.
Copyright © 2013, Juniper <strong>Network</strong>s, Inc.<br />
port number [123]:<br />
Sylog facility 'all' [n]:<br />
Syslog facilities:<br />
'authorization', 'change-log', 'conflict-log', 'daemon',<br />
'dfc', 'explicit-priority', 'external', 'firewall',<br />
'ftp', 'interactive-comm<strong>and</strong>s', 'kernel', 'log-prefix',<br />
'ntp', 'pfe', 'security', 'user'<br />
Syslog severities:<br />
'alert', 'any', 'criticial', 'emergency', 'error',<br />
'info', 'none', 'notice', 'warning'<br />
Please enter syslog facility name: change-log<br />
Please enter severity: warning<br />
Do you want to enter more syslog facilities [n]?<br />
Do you want to configure NTP [n]: y<br />
NTP server address: 168.37.0.1<br />
JNU controller configuration completed<br />
Chapter 8: JNU Operational Mode Comm<strong>and</strong>s<br />
59
JNU 1.2 Design <strong>and</strong> Implementation Guide<br />
jnu-order-satellites<br />
60<br />
Syntax op<br />
jnu-order-satellites<br />
insert device-name-1 (before | after ) device-name-2)<br />
Release Information Comm<strong>and</strong> introduced in JNU 1.0.<br />
Description Change the order in which the software displays satellite devices when you run show<br />
comm<strong>and</strong>s. If you have a large number of satellites, you may want to organize them by<br />
platform or by other sort criteria.<br />
Options device-name-1—Name of the satellite device to be inserted.<br />
Related<br />
Documentation<br />
before —(Optional) Insert device-name-1 before device-name-2.<br />
after —(Optional) Insert device-name-1 after device-name-2.<br />
device-name-2—Name of the satellite device before or after which device-name-1 is<br />
•<br />
inserted.<br />
Using Operational Mode Comm<strong>and</strong>s with JNU Overview on page 49<br />
Copyright © 2013, Juniper <strong>Network</strong>s, Inc.
jnu-remote<br />
Syntax op<br />
jnu-remote<br />
comm<strong>and</strong> “operational-mode-comm<strong>and</strong>”<br />
device device-name<br />
Release Information Comm<strong>and</strong> introduced in JNU 1.0.<br />
Description Forward the specified <strong>Junos</strong> OS operational mode comm<strong>and</strong> to the satellite device, <strong>and</strong><br />
display the results on the controller.<br />
Options comm<strong>and</strong> “operational-mode-comm<strong>and</strong>”—Name of the operational mode comm<strong>and</strong> that<br />
Related<br />
Documentation<br />
Copyright © 2013, Juniper <strong>Network</strong>s, Inc.<br />
you want to send to the satellite device.<br />
device device-name—Name of the satellite device to which you want to sent the comm<strong>and</strong>.<br />
•<br />
Enter multiple satellite devices in a comma-separated list.<br />
Chapter 8: JNU Operational Mode Comm<strong>and</strong>s<br />
Using Operational Mode Comm<strong>and</strong>s with JNU Overview on page 49<br />
61
JNU 1.2 Design <strong>and</strong> Implementation Guide<br />
Sample Output<br />
jnu-remote The following example runs the show chassis hardware comm<strong>and</strong> on satellite devices<br />
62<br />
jnu-sat-ex1 <strong>and</strong> jnu1-sat-qfx2.<br />
user@jnu1-ctrlr> op jnu-remote device jnu-sat-ex1,jnu1-sat-qfx2 comm<strong>and</strong> "show chassis<br />
hardware"<br />
Device: jnu-sat-ex1<br />
----------------------------------<br />
Hardware inventory:<br />
Item Version Part number Serial number Description<br />
Chassis BM0211313979 EX4200-24T<br />
Routing Engine 0 REV 13 750-033065 BM0211313979 EX4200-24T, 8 POE<br />
FPC 0 REV 13 750-033065 BM0211313979 EX4200-24T, 8 POE<br />
CPU BUILTIN BUILTIN FPC CPU<br />
PIC 0 BUILTIN BUILTIN 24x 10/100/1000 Base-T<br />
PIC 1 REV 05 711-026017 CH0211328603 2x 10GE SFP+<br />
Xcvr 0 REV 01 740-030658 AD0951A01GC SFP+-10G-USR<br />
Power Supply 0 REV 05 740-020957 AT0511253210 PS 320W AC<br />
Fan Tray Fan Tray<br />
Device: jnu1-sat-qfx2<br />
----------------------------------<br />
Hardware inventory:<br />
Item Version Part number Serial number Description<br />
Chassis P1959 QFX3500<br />
Routing Engine 0 BUILTIN BUILTIN QFX Routing Engine<br />
FPC 0 REV 15 750-036931 P1959-C QFX 48x10G 4x40G Switch<br />
CPU BUILTIN BUILTIN FPC CPU<br />
PIC 0 BUILTIN BUILTIN 48x 10G-SFP+<br />
Xcvr 1 REV 01 740-021308 ZT521101981 SFP+-10G-SR<br />
Xcvr 10 REV 01 740-013111 9057111 SFP-T<br />
PIC 1 BUILTIN BUILTIN 15x 10G-SFP+<br />
MGMT BRD REV 09 750-036946 BBAR8776 QFX3500-MB<br />
Power Supply 0 Rev 04 740-032091 VE07482 QFX PS 650W AC<br />
Power Supply 1 Rev 04 740-032091 VE06647 QFX PS 650W AC<br />
Fan Tray 0 QFX Fan Tray<br />
Fan Tray 1 QFX Fan Tray<br />
Fan Tray 2 QFX Fan Tray<br />
Copyright © 2013, Juniper <strong>Network</strong>s, Inc.
jnu-rollback<br />
Syntax op<br />
jnu-rollback<br />
number <br />
Release Information Comm<strong>and</strong> introduced in JNU 1.0.<br />
Description Return to a previously committed configuration. The software saves the last 50 committed<br />
configurations. After running the op jnu-rollback comm<strong>and</strong>, you need to run the op<br />
jun-commit comm<strong>and</strong> to activate the c<strong>and</strong>idate configuration.<br />
Options number number—(Optional) Configuration to return to. The range of values is from 0<br />
Related<br />
Documentation<br />
Copyright © 2013, Juniper <strong>Network</strong>s, Inc.<br />
•<br />
through 49. The most recently saved configuration is number 0, <strong>and</strong> the oldest saved<br />
configuration is number 49. The default is 0.<br />
Chapter 8: JNU Operational Mode Comm<strong>and</strong>s<br />
Returning to a Previously Committed <strong>Junos</strong> OS Configuration on page 47<br />
63
JNU 1.2 Design <strong>and</strong> Implementation Guide<br />
jnu-show-satellites<br />
Syntax op<br />
jnu-show-satellites<br />
<br />
Release Information Comm<strong>and</strong> introduced in JNU 1.0.<br />
Description Display the state of each satellite to determine if the satellite is up <strong>and</strong> connected to the<br />
Required Privilege<br />
controller. You can also use this comm<strong>and</strong> to test <strong>and</strong> run the op script on the satellite<br />
devices.<br />
Options detail—(Optional) Tests <strong>and</strong> runs the op script on the satellite devices.<br />
Level<br />
view<br />
Output Fields Table 4 on page 64 lists the output fields for the jnu-show-satellites comm<strong>and</strong>. Output<br />
Table 4: jnu-show-satellites Output Fields<br />
64<br />
Field Name<br />
Satellite System<br />
State<br />
fields are listed in the approximate order in which they appear.<br />
Field Description<br />
Name of the satellite device<br />
Status of the satellite device.<br />
• Up—Satellite device is up <strong>and</strong> connected to the controller.<br />
• Down—Satellite device is not connected to the controller.<br />
Level of Output<br />
level-of-output none<br />
level-of-output none<br />
Copyright © 2013, Juniper <strong>Network</strong>s, Inc.
jnu-show-satellites<br />
jnu-show-satellites detail<br />
Copyright © 2013, Juniper <strong>Network</strong>s, Inc.<br />
user@jnu1-ctrlr> jnu-show-satellites<br />
Satellite-System State<br />
jnu1-sat-ex1 Up<br />
jnu1-sat-qfx2 Up<br />
Chapter 8: JNU Operational Mode Comm<strong>and</strong>s<br />
user@jnu1-ctrlr> jnu-show-satellites detail<br />
2012-07-15 23:10:30 OMST: reading op script input details<br />
2012-07-15 23:10:30 OMST: testing op details<br />
2012-07-15 23:10:30 OMST: running op script 'jnu-show-satellites.slax'<br />
2012-07-15 23:10:30 OMST: opening op script<br />
'/var/db/scripts/op/jnu-show-satellites.slax'<br />
2012-07-15 23:10:30 OMST: reading op script 'jnu-show-satellites.slax'<br />
Satellite-System State<br />
jnu1-sat-ex1 Up<br />
jnu1-sat-qfx2 Up<br />
2012-07-15 23:10:35 OMST: inspecting op output 'jnu-show-satellites.slax'<br />
2012-07-15 23:10:35 OMST: finished op script 'jnu-show-satellites.slax'<br />
65
JNU 1.2 Design <strong>and</strong> Implementation Guide<br />
jnu-show-configuration<br />
Syntax op<br />
jnu-show-configuration<br />
device device-name<br />
source c<strong>and</strong>idate | committed<br />
<br />
<br />
Release Information Comm<strong>and</strong> introduced in JNU 1.0.<br />
Description Display the configuration of the satellite.<br />
Required Privilege<br />
Options device device-name—Name of the satellite device for which you want to display the<br />
Level<br />
Related<br />
Documentation<br />
Sample Output<br />
configuration.<br />
source c<strong>and</strong>idate | committed—Source of the configuration to be displayed, either the<br />
c<strong>and</strong>idate configuration or the committed configuration.<br />
detail—(Optional) Display the specified level of output.<br />
display commit-script—(Optional) Displays the commit script for the satellite<br />
view<br />
•<br />
Running the Satellite Initialization Process on page 30<br />
jnu-show-configuration user@jnu1-ctrlr> op jnu-show-configuration device jnu1-sat-ex1 source committed<br />
Device: jnu1-sat-ex1<br />
----------------------------------<br />
66<br />
## Last commit: 2012-07-13 18:25:06 PDT by jnuadmin<br />
version 11.4R4;<br />
groups {<br />
jnu-satellite-mgmt {<br />
system {<br />
syslog {<br />
/* syslog parameters propagated from controller except source address */<br />
host 169.37.0.1 {<br />
security info;<br />
change-log info;<br />
source-address 10.0.0.1;<br />
}<br />
file messages {<br />
any any;<br />
}<br />
}<br />
ntp {<br />
/* Using controller mgmt IP address */<br />
Copyright © 2013, Juniper <strong>Network</strong>s, Inc.
Copyright © 2013, Juniper <strong>Network</strong>s, Inc.<br />
Chapter 8: JNU Operational Mode Comm<strong>and</strong>s<br />
server 192.168.0.1;<br />
}<br />
services {<br />
ssh;<br />
}<br />
}<br />
snmp {<br />
/* Other snmp parameters propagated from controller */<br />
community public:jnu-satellite1 {<br />
read-only;<br />
}<br />
/* Other snmp parameters propagated from controller */<br />
community private:jnu-satellite1 {<br />
read-only;<br />
}<br />
trap-options {<br />
source-address 10.0.0.1;<br />
}<br />
trap-group public:jnu-satellite1 {<br />
version v2;<br />
/* categories are configured by user, propagate from satellite */<br />
categories {<br />
authentication;<br />
routing;<br />
}<br />
targets {<br />
169.37.0.1;<br />
}<br />
}<br />
}<br />
interfaces {<br />
ge-0/0/0 {<br />
/* Not using AE interface on ACX */<br />
vlan-tagging;<br />
unit 16385 {<br />
vlan-id 4094;<br />
family inet {<br />
address 192.168.0.2/24;<br />
}<br />
}<br />
}<br />
}<br />
policy-options {<br />
policy-statement jnu-management {<br />
/* Routes that are to be leaked from jnu-vrf to<br />
main instance */<br />
from {<br />
route-filter 169.37.0.1/32 exact;<br />
route-filter 132.0.1.1/32 exact;<br />
protocol static;<br />
}<br />
then accept;<br />
}<br />
policy-statement reject-all {<br />
then reject;<br />
}<br />
67
JNU 1.2 Design <strong>and</strong> Implementation Guide<br />
68<br />
}<br />
routing-options {<br />
/* These configurations to leak routes from<br />
jnu-vrf to main instance */<br />
rib-groups jnu {<br />
import-rib [ jnu.inet.0 inet.0 ];<br />
import-policy jnu-management;<br />
}<br />
}<br />
routing-instances {<br />
jnu-vrf {<br />
/* Routing-instance containing<br />
uplink to controller */<br />
instance-type vrf;<br />
interface ge-0/0/0.16385;<br />
route-distinguisher 192.168.0.2:1;<br />
vrf-import reject-all;<br />
vrf-export reject-all;<br />
routing-options {<br />
routing-options {<br />
static {<br />
rib-group jnu;<br />
route 169.37.0.1/32 next-hop<br />
192.168.0.1;<br />
route 132.0.1.1/32 next-hop<br />
192.168.0.1;<br />
}<br />
}<br />
}<br />
}<br />
}<br />
}<br />
}<br />
Copyright © 2013, Juniper <strong>Network</strong>s, Inc.
op<br />
Syntax op<br />
config-free-form<br />
device device-name<br />
action (add | delete)<br />
“set statement-name value”<br />
config-free-form-precommit<br />
config-template-name<br />
device device-name<br />
action (set | delete)<br />
parameter-name parameter-value<br />
jnu-add-delete-satellites<br />
action set | delete<br />
ae-id id-value<br />
downlink interface-id<br />
ieee-802.3ad disable<br />
inet ip-address<br />
sat-mgmt-ip ip-address<br />
satellite satellite-name<br />
jnu-commit<br />
jnu-initialize-controller<br />
jnu-order-satellites<br />
insert device-name-1 (before | after ) device-name-2)<br />
jnu-remote<br />
comm<strong>and</strong> “operational-mode-comm<strong>and</strong>”<br />
device device-name<br />
jnu-rollback<br />
number <br />
jnu-show-satellites<br />
<br />
jnu-show-configuration<br />
device device-name<br />
source c<strong>and</strong>idate | committed<br />
<br />
<br />
<br />
<br />
Description Run operational comm<strong>and</strong>s on the controller.<br />
Options config-free-form-precommit —Do not run this comm<strong>and</strong>. It is an internal system comm<strong>and</strong>.<br />
Related<br />
Documentation<br />
Copyright © 2013, Juniper <strong>Network</strong>s, Inc.<br />
script —(Optional) Runs the specified op script in the /var/db/scripts/op directory.<br />
url url—(Optional) Runs the op script specified in the URL.<br />
The remaining comm<strong>and</strong>s are described separately.<br />
Chapter 8: JNU Operational Mode Comm<strong>and</strong>s<br />
• Using Operational Mode Comm<strong>and</strong>s with JNU Overview on page 49<br />
69
JNU 1.2 Design <strong>and</strong> Implementation Guide<br />
70<br />
Copyright © 2013, Juniper <strong>Network</strong>s, Inc.
CHAPTER 9<br />
Setting Up a Basic JNU Implementation<br />
• Example: Setting Up a Basic JNU Implementation on page 71<br />
Example: Setting Up a Basic JNU Implementation<br />
Requirements<br />
Copyright © 2013, Juniper <strong>Network</strong>s, Inc.<br />
This example shows how to set up a basic JNU implementation.<br />
• Requirements on page 71<br />
• Overview on page 72<br />
• Configuration on page 73<br />
• Verification on page 81<br />
This example uses the following hardware <strong>and</strong> software components:<br />
• One MX Series router that acts as the controller<br />
• One EX4200 switch that acts as a satellite device<br />
• One QFX3500 device that acts as a satellite device<br />
• <strong>Junos</strong> OS Release 11.4R4-S1 or later<br />
• JNU 1.0 or later<br />
71
JNU 1.2 Design <strong>and</strong> Implementation Guide<br />
Overview<br />
Topology<br />
Figure 4: Basic JNU Configuration<br />
MX Series controller<br />
jnu1-ctrl<br />
192.168.0.1/24<br />
ge-0/0/0<br />
ge-0/1/0<br />
192.168.0.2/24<br />
EX4200 Satellite<br />
Jnu-sat-ex1<br />
ge-0/1/1<br />
ge-0/0/1<br />
192.168.0.3/24<br />
QFX3500 Satellite<br />
Jnu1-sat-qfx2<br />
Table 5 on page 72 describes the configuration components used in this example.<br />
Table 5: Configuration Components Used in the Basic JNU Configuration<br />
72<br />
Configuration<br />
Component<br />
MX Series<br />
controller<br />
EX4200 satellite<br />
Component Name<br />
jnu1-ctrlr<br />
192.168.0.1/24<br />
xe-0/0/0<br />
xe-0/1/1<br />
jnu1-sat-ex1<br />
192.168.0.2/24<br />
xe-0/1/0<br />
Purpose<br />
Hostname of the controller<br />
g041391<br />
Controller management address used for communication with<br />
satellites<br />
Downlink interface to jnu1-sat-ex1 satellite<br />
Downlink interface to jnu1-sat-qfx2 satellite<br />
Hostname of the satellite<br />
Satellite management address used for communication with the<br />
controller<br />
Uplink interface to the controller<br />
Copyright © 2013, Juniper <strong>Network</strong>s, Inc.
Table 5: Configuration Components Used in the Basic JNU Configuration (continued)<br />
Configuration<br />
Component<br />
QFX3500 satellite<br />
Configuration<br />
Component Name<br />
jnu1-sat-qfx2<br />
192.168.0.3/24<br />
xe-0/0/1<br />
Copyright © 2013, Juniper <strong>Network</strong>s, Inc.<br />
Purpose<br />
Hostname of the satellite<br />
Satellite management address used for communication with the<br />
controller<br />
Uplink interface to the controller<br />
NOTE: Before you begin, you must set up IP addresses on the satellite devices<br />
that are used for the connection to the controller.<br />
• Load the JNU Software on page 74<br />
• Initialize the Controller on page 74<br />
• Initialize the EX4200 Satellite on page 76<br />
• Initialize the QFX3500 Satellite on page 79<br />
• Commit the Configuration on page 81<br />
Chapter 9: Setting Up a Basic JNU Implementation<br />
73
JNU 1.2 Design <strong>and</strong> Implementation Guide<br />
74<br />
Step-by-Step<br />
Procedure<br />
Step-by-Step<br />
Procedure<br />
Step-by-Step<br />
Procedure<br />
Load the JNU Software<br />
To load the JNU package onto the controller:<br />
1. Enter the following comm<strong>and</strong> on the MX Series controller.<br />
user@jnu1-ctrlr> request system software add jnu-1.2R1.0-signed.tgz<br />
Installing package '/var/tmp/jnu-1.2R1-signed.tgz' ...<br />
Verified jnu-1.0R1.tgz signed by PackageProduction_11_4_0 Adding jnu...<br />
Available space: 556676 require: 3220<br />
NOTICE: uncommitted changes have been saved in<br />
/var/db/config/juniper.conf.pre-install<br />
Mounted jnu package on /dev/md10...<br />
Restarting bslockd ...<br />
mgd: commit complete<br />
Saving package file in /var/sw/pkg/jnu-1.2R1-signed.tgz ...<br />
Saving state for rollback ...<br />
To load the JNU package onto the satellite device:<br />
1. Enter the following comm<strong>and</strong> on the satellite device.<br />
user@jnu-satellite1> request system software add jnu-1.2R1.0-signed.tgz<br />
Installing package '/var/tmp/jnu-1.2R1-signed.tgz' ...<br />
Verified jnu-1.0R1.tgz signed by PackageProduction_11_4_0 Adding jnu...<br />
Available space: 556676 require: 3220<br />
NOTICE: uncommitted changes have been saved in<br />
/var/db/config/juniper.conf.pre-install<br />
Mounted jnu package on /dev/md10...<br />
Restarting bslockd ...<br />
mgd: commit complete<br />
Saving package file in /var/sw/pkg/jnu-1.2R1-signed.tgz ...<br />
Saving state for rollback ...<br />
Initialize the Controller<br />
After you install the JNU software, you need to initially configure <strong>and</strong> initialize the MX<br />
Series controller. This example configures the controller, adds two satellite devices to<br />
the controller configuration, <strong>and</strong> configures SNMP system logging <strong>and</strong> NTP on the<br />
controller.<br />
To initially configure the controller:<br />
Copyright © 2013, Juniper <strong>Network</strong>s, Inc.
Copyright © 2013, Juniper <strong>Network</strong>s, Inc.<br />
1. Enter the following comm<strong>and</strong> <strong>and</strong> follow the prompts. For a description of the fields<br />
used to initialize the controller, see jnu-initialize-controller.<br />
user@jnu1-ctrlr> op url /var/db/scripts/op/jnu-initialize-controller.slax<br />
Controller initializations:<br />
Please enter hostname [jnu-controller]:<br />
Please enter management IP address: 137.34.1.1<br />
Please enter JNU downlink IP prefix [192.168.0.1/24]:<br />
Please enter JNU VLAN id [4094]:<br />
Do you want to configure any satellites now [n]: y<br />
Please enter the number of satellites [1]: 2<br />
Satellite 1<br />
Please enter the hostname of the satellite: jnu-sat1<br />
Please enter satellite management IP address: 10.0.0.1<br />
Please enter the uplink IP address of the satellite: 192.168.0.2<br />
Please enter downlink interfaces to satellite: ge-0/0/0<br />
Do you want to use aggregated-ethernet for the downlink [y]: y<br />
Please enter downlink aggregate name [ae31]:<br />
Satellite 2<br />
Please enter the hostname of the satellite: jnu-sat2<br />
Please enter satellite management IP address: 10.0.0.2<br />
Please enter the uplink IP address of the satellite: 192.168.0.3<br />
Please enter downlink interfaces for satellite: ge-0/0/1<br />
Do you want to use aggregated-ethernet for the downlink [y]: y<br />
Please enter downlink aggregate name [ae31]:<br />
Do you want to configure SNMP [n]: y<br />
Do you want to enter a read-only community string (y|n)? y<br />
SNMP read-only community string: public<br />
Do you want to enter a read-only community string (y|n)? y<br />
SNMP read-only community string: private<br />
Do you want to enter SNMP trap parameters (y|n)? y<br />
SNMP trap target address: 169.37.0.1<br />
Do you want to enter SNMP trap categories (y|n)? y<br />
Do you want to enable SNMP trap for 'otn-alarms' (y|n)? y<br />
Available alarms:<br />
'oc-lof', 'oc-lom', 'oc-los', 'odu-ais', 'odu-bbe-threshold',<br />
'odu-bdi', 'odu-es-threshold', 'odu-lck', 'odu-oci',<br />
'odu-rx-aps-change', 'odu-sd', 'odu-ses-threshold', 'odu-sf',<br />
'odu-ttim', 'odu-uas-threshold', 'opu-ptm', 'otu-ais',<br />
'otu-bbe-threshold', 'otu-bdi', 'otu-es-threshold',<br />
'otu-fec-deg', 'otu-fec-exe', 'otu-iae', 'otu-sd',<br />
'otu-ses-threshold', 'otu-sf', 'otu-ttim', 'otu-usa-threshold',<br />
'wavelength-lock'<br />
Please enter otn-alarms: oc-lof,oc-lom<br />
Do you want to enable SNMP trap for 'sonet-alarms' (y|n)? y<br />
Available alarms:<br />
'ber-defect', 'ber-fault', 'line-ais',<br />
'line-remote-defect-indication',<br />
'loss-of-cell', 'loss-of-frame', 'loss-of-light', 'loss-of-pointer',<br />
'loss-of-signal', 'path-ais', 'path-mismatch',<br />
'path-remote-defect-indication', 'pll-lock',<br />
'remote-error-indication',<br />
'severely-errored-frame', 'unequipped', 'vt-ais', vt-label-mismatch',<br />
'vt-loss-of-cell', 'vt-loss-of-pointer',<br />
'vt-remote-defect-indication',<br />
'vt-unequipped'<br />
Please enter sonet-alarms: path-ais<br />
Chapter 9: Setting Up a Basic JNU Implementation<br />
75
JNU 1.2 Design <strong>and</strong> Implementation Guide<br />
76<br />
Other categories:<br />
'authentication', 'chassis', 'configuration', 'link',<br />
'remote-operations', 'rmon-alarm', 'routing', 'services',<br />
'startup', 'vrrp-events'<br />
Do you want to enter other SNMP trap categories (y|n)? y<br />
Please enter SNMP trap categories: vrrp-events<br />
Do you want to configure Syslog server [n]: y<br />
Syslog host address? 167.37.0.1<br />
port number [123]:<br />
Sylog facility 'all' [n]:<br />
Syslog facilities:<br />
'authorization', 'change-log', 'conflict-log', 'daemon',<br />
'dfc', 'explicit-priority', 'external', 'firewall',<br />
'ftp', 'interactive-comm<strong>and</strong>s', 'kernel', 'log-prefix',<br />
'ntp', 'pfe', 'security', 'user'<br />
Syslog severities:<br />
'alert', 'any', 'criticial', 'emergency', 'error',<br />
'info', 'none', 'notice', 'warning'<br />
Please enter syslog facility name: change-log<br />
Please enter severity: warning<br />
Do you want to enter more syslog facilities [n]?<br />
Do you want to configure NTP [n]: y<br />
NTP server address: 168.37.0.1<br />
JNU controller configuration completed<br />
Results The following is an example of the configuration that is initialized on the controller.<br />
Step-by-Step<br />
Procedure<br />
Initialize the EX4200 Satellite<br />
To initialize the EX4200 satellite:<br />
1. Enter the following comm<strong>and</strong> on the satellite device, <strong>and</strong> follow the prompts.<br />
user@jnu-satellite1> op url /var/db/scripts/op/jnu-initialize-satellite.slax<br />
Satellite initializations:<br />
Please enter hostname [jnu-satellite1]: jnu1-sat-ex1<br />
Please enter management IP address: 10.0.0.1<br />
Please enter uplink IP prefix (192.168.0.2-254/24): 192.168.0.2/24<br />
Please enter uplink interface name: ge-0/0/0<br />
Do you want to use aggregated-ethernet for the uplink [n]: y<br />
Please enter uplink aggregate name [ae31] 63<br />
Please enter management VLAN id [4094]:<br />
Please enter controller downlink IP address [192.168.0.1]:<br />
Results The following is an example of the configuration that is configured <strong>and</strong> committed on<br />
the satellite device during the initialize process.<br />
groups {<br />
jnu-satellite-mgmt {<br />
chassis {<br />
aggregated-devices {<br />
ethernet-devices {<br />
device-count 63;<br />
}<br />
Copyright © 2013, Juniper <strong>Network</strong>s, Inc.
Copyright © 2013, Juniper <strong>Network</strong>s, Inc.<br />
Chapter 9: Setting Up a Basic JNU Implementation<br />
}<br />
}<br />
system {<br />
syslog {<br />
/ * syslog parameters propagated from controller except source address */<br />
host 169.37.0.1 {<br />
security info;<br />
change-log info;<br />
source-address 10.0.0.1;<br />
}<br />
file messages {<br />
any any;<br />
}<br />
}<br />
ntp {<br />
/ * Using controller mgmt IP address */<br />
server 192.168.0.1;<br />
}<br />
services {<br />
ssh;<br />
}<br />
}<br />
snmp {<br />
/ * Other snmp parameters propagated from controller */<br />
community public:jnu-satellite1 {<br />
read-only;<br />
}<br />
/ * Other snmp parameters propagated from controller */<br />
community private:jnu-satellite1 {<br />
read-only;<br />
}<br />
trap-options {<br />
source-address 10.0.0.1;<br />
}<br />
trap-group public:jnu-satellite1 {<br />
version v2;<br />
/ * categories are configured by user, propagate from satellite */<br />
categories {<br />
authentication;<br />
routing;<br />
}<br />
targets {<br />
169.37.0.1;<br />
}<br />
}<br />
}<br />
interfaces {<br />
ge-0/0/0 {<br />
/ * Using aggregate ethernet since there can be more than 1 uplink */<br />
gigether-options {<br />
802.3ad ae63;<br />
}<br />
}<br />
ae63 {<br />
/ * Aggregated ethernet interface uplink connection to controller */<br />
aggregated-ethernet-options {<br />
77
JNU 1.2 Design <strong>and</strong> Implementation Guide<br />
78<br />
lacp {<br />
active;<br />
}<br />
}<br />
unit 16385 {<br />
family ethernet-switching {<br />
port-mode trunk;<br />
vlan {<br />
members all;<br />
}<br />
}<br />
}<br />
}<br />
vlan {<br />
unit 4094 {<br />
family inet {<br />
address 192.168.0.2/24;<br />
}<br />
}<br />
}<br />
}<br />
vlans {<br />
jnu {<br />
vlan-id 4094;<br />
l3-interface vlan.4094;<br />
}<br />
}<br />
policy-options {<br />
policy-statement jnu-management {<br />
/ * Routes that are to be leaked from jnu-vrf to main instance */<br />
from {<br />
route-filter 169.37.0.1/32 exact;<br />
route-filter 132.0.1.1/32 exact;<br />
protocol static;<br />
}<br />
then accept;<br />
}<br />
policy-statement reject-all {<br />
then reject;<br />
}<br />
}<br />
routing-options {<br />
/ * These configurations to leak routes from jnu-vrf to main instance */<br />
rib-groups jnu {<br />
import-rib [ jnu.inet.0 inet.0 ];<br />
import-policy jnu-management;<br />
}<br />
}<br />
routing-instances {<br />
jnu-vrf {<br />
/ * Routing-instance containing uplink to controller */<br />
instance-type vrf;<br />
interface vlan.4094;<br />
route-distinguisher 192.168.0.2:1;<br />
vrf-import reject-all;<br />
vrf-export reject-all;<br />
Copyright © 2013, Juniper <strong>Network</strong>s, Inc.
Step-by-Step<br />
Procedure<br />
routing-options {<br />
routing-options {<br />
static {<br />
rib-group jnu;<br />
route 169.37.0.1/32 next-hop 192.168.0.1;<br />
route 132.0.1.1/32 next-hop 192.168.0.1;<br />
}<br />
}<br />
}<br />
}<br />
}<br />
}<br />
}<br />
Initialize the QFX3500 Satellite<br />
To initialize the QFX3500 satellite:<br />
1. Enter the following comm<strong>and</strong> on the satellite device, <strong>and</strong> follow the prompts.<br />
user@jnu-satellite> op url /var/db/scripts/op/jnu-initialize-satellite.slax<br />
Satellite initializations:<br />
Please enter hostname [jnu-satellite1]: jnu1-sat-qfx2<br />
Please enter management IP address: 10.0.0.1<br />
Please enter uplink IP prefix (192.168.0.2-254/24): 192.168.0.3/24<br />
Please enter uplink interface name: ge-0/1/1<br />
Please enter uplink aggregate name [ae62]: ae0<br />
Please enter management VLAN id [4094]:<br />
Please enter controller downlink IP address [192.168.0.1]:<br />
Results The following is an example of the configuration that is initialized on the satellite device.<br />
Copyright © 2013, Juniper <strong>Network</strong>s, Inc.<br />
Chapter 9: Setting Up a Basic JNU Implementation<br />
To display this configuration from the MX Series controller, enter the following comm<strong>and</strong>:<br />
user@jnu1-ctrlr> op jnu-show-configuration device jnu1-sat-qfx2 source c<strong>and</strong>idate<br />
chassis {<br />
aggregated-devices {<br />
ethernet-devices {<br />
device-count 63;<br />
}<br />
}<br />
}<br />
system {<br />
syslog {<br />
/* syslog parameters propagated from controller except source address */<br />
host 169.37.0.1 {<br />
security info;<br />
change-log info;<br />
source-address 192.168.0.3;<br />
}<br />
file messages {<br />
any any;<br />
}<br />
}<br />
ntp {<br />
server 132.0.1.1;<br />
79
JNU 1.2 Design <strong>and</strong> Implementation Guide<br />
80<br />
}<br />
}<br />
snmp {<br />
/* Other snmp parameters propagated from controller */<br />
community public.hyde {<br />
read-only;<br />
}<br />
trap-options {<br />
source-address 192.168.0.3;<br />
}<br />
trap-group eas {<br />
version v2;<br />
targets {<br />
169.37.0.1;<br />
}<br />
}<br />
}<br />
interfaces {<br />
ge-0/1/1 {<br />
/* Using aggregate ethernet since there can be more than 1 uplink */<br />
gigether-options {<br />
802.3ad ae63;<br />
}<br />
}<br />
ae63 {<br />
/* Aggregated ethernet interface uplink connection to controller */<br />
aggregated-ethernet-options {<br />
lacp {<br />
active;<br />
}<br />
}<br />
vlan-tagging;<br />
unit 16385 {<br />
vlan-id 4094;<br />
family inet {<br />
address 192.168.0.3/24;<br />
}<br />
}<br />
}<br />
}<br />
policy-options {<br />
policy-statement jnu-management {<br />
/* Routes that are to be leaked from jnu-vrf to main instance */<br />
from {<br />
route-filter 169.37.0.1/32 exact;<br />
route-filter 132.0.1.1/32 exact;<br />
protocol static;<br />
}<br />
then accept;<br />
}<br />
policy-statement reject-all {<br />
then reject;<br />
}<br />
}<br />
routing-options {<br />
/* These configurations leak routes from jnu-vrf to main instance */<br />
Copyright © 2013, Juniper <strong>Network</strong>s, Inc.
Verification<br />
Step-by-Step<br />
Procedure<br />
rib-groups jnu {<br />
import-rib [ jnu-vrf.inet.0 inet.0 ];<br />
import-policy jnu-management;<br />
}<br />
}<br />
routing-instances {<br />
jnu-vrf {<br />
/* Routing-instance containing uplink to controller */<br />
instance-type vrf;<br />
interface ae63.16385;<br />
route-distinguisher 192.168.0.3:1;<br />
vrf-import reject-all;<br />
vrf-export reject-all;<br />
routing-options {<br />
routing-options {<br />
static {<br />
rib-group jnu;<br />
route 169.37.0.1/32 next-hop 192.168.0.1;<br />
route 132.0.1.1/32 next-hop 192.168.0.1;<br />
}<br />
}<br />
}<br />
}<br />
}<br />
Commit the Configuration<br />
JNU uses commit scripts to automate the commit process on the controller <strong>and</strong> satellite<br />
devices. You commit a configuration for the satellite devices from the controller. Each<br />
satellite device inspects the c<strong>and</strong>idate configuration for errors.<br />
Modify <strong>and</strong> commit configuration changes only on the controller. When you commit a<br />
configuration on the controller, the flow of the commit process on the controller is as<br />
follows:<br />
1. To commit the new configuration on the controller <strong>and</strong> on all satellite devices:<br />
user@jnu1-ctrlr> op jnu-commit<br />
The new configuration is validated on each satellite device.<br />
2. If all the satellite devices successfully validate the new configuration, the controller<br />
runs the commit script <strong>and</strong> displays the following message:<br />
jnu1-sat-ex1:<br />
Configuration check succeeds<br />
jnu1-sat-qfx2:<br />
Configuration check succeeds<br />
• Verifying That Satellite Devices Are Active on page 81<br />
Verifying That Satellite Devices Are Active<br />
Purpose Verify that satellite devices are active.<br />
Copyright © 2013, Juniper <strong>Network</strong>s, Inc.<br />
Chapter 9: Setting Up a Basic JNU Implementation<br />
81
JNU 1.2 Design <strong>and</strong> Implementation Guide<br />
82<br />
Action From operational mode, enter the op jnu-show-satellites comm<strong>and</strong>.<br />
user@host>op jnu-show-satellites<br />
user@controller> op jnu-show-satellites<br />
Satellite-system State<br />
jnu-sat-ex1 Up<br />
jnu-sat-qfx2 Up<br />
Meaning The display shows that the two satellites are Up.<br />
Related<br />
Documentation<br />
• <strong>Junos</strong> <strong>Node</strong> <strong>Unifier</strong> Overview on page 4<br />
• Installing the JNU Software on the Controller on page 21<br />
• Installing the JNU Software on Satellite Devices on page 22<br />
• Initializing JNU Mode on the Controller on page 22<br />
• Running the Satellite Initialization Process on page 30<br />
• Commit Process for Satellites Already Connected to the Controller on page 45<br />
Copyright © 2013, Juniper <strong>Network</strong>s, Inc.
PART 4<br />
Monitoring <strong>and</strong> Troubleshooting in the JNU<br />
<strong>Network</strong><br />
Copyright © 2013, Juniper <strong>Network</strong>s, Inc.<br />
• Monitoring in the JNU <strong>Network</strong> on page 85<br />
83
JNU 1.2 Design <strong>and</strong> Implementation Guide<br />
84<br />
Copyright © 2013, Juniper <strong>Network</strong>s, Inc.
CHAPTER 10<br />
Monitoring in the JNU <strong>Network</strong><br />
• Centralized Collection of SNMP Statistics <strong>and</strong> Log Messages Overview on page 85<br />
• SNMP Get Process in the JNU <strong>Network</strong> on page 87<br />
• SNMP Trap Process in the JNU <strong>Network</strong> on page 88<br />
• System Logging in the JNU <strong>Network</strong> on page 89<br />
• <strong>Network</strong> Time Protocol (NTP) in the JNU <strong>Network</strong> on page 90<br />
• Configuring the JNU Controller as an SNMP Proxy Agent on page 91<br />
Centralized Collection of SNMP Statistics <strong>and</strong> Log Messages Overview<br />
SNMP Community Strings<br />
Collecting Log Messages<br />
Copyright © 2013, Juniper <strong>Network</strong>s, Inc.<br />
The JNU software provides a single point of collecting SNMP statistics <strong>and</strong> sending SNMP<br />
traps to the SNMP server. You use the <strong>Junos</strong> OS SNMP proxy feature to set up the<br />
controller as a proxy SNMP agent through which the network management system (NMS)<br />
can query satellite devices.<br />
The NMS polls the controller for SNMP statistics on both the controller <strong>and</strong> the satellite<br />
devices. SNMP statistics from the satellite devices are routed through the controller. A<br />
<strong>Network</strong> Address Translation (NAT) configuration set up by the controller initialization<br />
process is used to translate the source address of the satellite devices to the source<br />
address of the controller for traffic sent to the SNMP server. This process means that all<br />
SNMP traffic originates from one source address on the controller.<br />
Each satellite in the JNU group uses a different community string that is based on the<br />
hostname assigned to the satellite during the initialization process. The format of the<br />
string is controller-community-string.satellite-host-name. For example, if you configure<br />
the read-only community string to be public, <strong>and</strong> the satellite hostname to be sat1, the<br />
community string for the satellite is public:sat1.<br />
The JNU software provides a single point of collecting logging messages <strong>and</strong> sending<br />
them to the system log server. The controller sends all system log messages for the JNU<br />
group of satellites <strong>and</strong> controller to the server. The NAT configuration set up by the<br />
controller initialization process is used to translate the source address of the satellite<br />
devices to the source address of the controller for traffic sent to the system log server.<br />
85
JNU 1.2 Design <strong>and</strong> Implementation Guide<br />
86<br />
Related<br />
Documentation<br />
This process means that all logging traffic originates from one source address on the<br />
controller.<br />
•<br />
Configuring the JNU Controller as an SNMP Proxy Agent on page 91<br />
• SNMP Get Process in the JNU <strong>Network</strong> on page 87<br />
• SNMP Trap Process in the JNU <strong>Network</strong> on page 88<br />
• System Logging in the JNU <strong>Network</strong> on page 89<br />
Copyright © 2013, Juniper <strong>Network</strong>s, Inc.
SNMP Get Process in the JNU <strong>Network</strong><br />
Related<br />
Documentation<br />
Copyright © 2013, Juniper <strong>Network</strong>s, Inc.<br />
Figure 5 on page 87 shows the SNMP Get process in the JNU network.<br />
Figure 5: SNMP Get Process<br />
•<br />
4<br />
NMS (SNMP server,<br />
SNMP trap server)<br />
5<br />
1<br />
<strong>Network</strong> interface<br />
3 2<br />
Satellites<br />
Management Plane<br />
Controller acts as<br />
SNMP Proxy<br />
1— SNMP server sends a Get request message 4— The controller receives the Get reply <strong>and</strong><br />
to the controller with the community string<br />
for a satellite.<br />
processes it as an SNMP client.<br />
2— The controller, acting as SNMP proxy, 5— Acting as an SNMP server, the controller<br />
terminates the Get request from the SNMP<br />
server. It then acts as an SNMP client, <strong>and</strong><br />
sends the request to the appropriate<br />
satellite.<br />
3—The satellite sends a Get reply message to<br />
the controller.<br />
g041396<br />
then sends the Get reply message to the<br />
SNMP server.<br />
Centralized Collection of SNMP Statistics <strong>and</strong> Log Messages Overview on page 85<br />
• Configuring the JNU Controller as an SNMP Proxy Agent on page 91<br />
• SNMP Trap Process in the JNU <strong>Network</strong> on page 88<br />
Chapter 10: Monitoring in the JNU <strong>Network</strong><br />
87
JNU 1.2 Design <strong>and</strong> Implementation Guide<br />
SNMP Trap Process in the JNU <strong>Network</strong><br />
88<br />
Related<br />
Documentation<br />
Figure 6 on page 88 shows the SNMP trap process in the JNU network.<br />
Figure 6: SNMP Trap Process<br />
•<br />
NAT is<br />
applied<br />
2<br />
NMS<br />
(SNMP trap server)<br />
3<br />
4<br />
<strong>Network</strong> interface<br />
1 5<br />
Satellites<br />
Management Plane<br />
1— The satellite sends an SNMP trap<br />
4— For SNMPv3, the server responds to the<br />
notification or inform request to the<br />
controller.<br />
g041397<br />
inform request with an acknowledgment<br />
that it sends to the controller.<br />
2— The controller applies NAT to the trap 5— The controller sends the acknowledgment<br />
message so that the message source is the<br />
management IP address of the controller.<br />
to the satellite.<br />
3—The controller sends the trap message to<br />
the SNMP server.<br />
Centralized Collection of SNMP Statistics <strong>and</strong> Log Messages Overview on page 85<br />
• Configuring the JNU Controller as an SNMP Proxy Agent on page 91<br />
• SNMP Get Process in the JNU <strong>Network</strong> on page 87<br />
• System Logging in the JNU <strong>Network</strong> on page 89<br />
Copyright © 2013, Juniper <strong>Network</strong>s, Inc.
System Logging in the JNU <strong>Network</strong><br />
Related<br />
Documentation<br />
Copyright © 2013, Juniper <strong>Network</strong>s, Inc.<br />
Each device in the JNU group, including the controller, originates its own system log<br />
messages (called syslog messages). The hostname in messages sent from satellites<br />
<strong>and</strong> the controller is the hostname configured during the JNU initialization process. The<br />
syslog server uses the hostname to identify the JNU device that originated the message.<br />
Figure 7 on page 89 shows how log messages are processed for JNU satellites.<br />
Figure 7: System Logging Collection Process<br />
•<br />
NAT is<br />
applied<br />
2<br />
Syslog server<br />
3<br />
<strong>Network</strong> interface<br />
1<br />
Satellites<br />
Management Plane<br />
1— The satellite sends a syslog message to the 3— The controller sends the log message to the<br />
controller.<br />
syslog server.<br />
2—The controller applies NAT to the syslog<br />
message so that the message source is the<br />
management IP address of the controller.<br />
Centralized Collection of SNMP Statistics <strong>and</strong> Log Messages Overview on page 85<br />
• SNMP Get Process in the JNU <strong>Network</strong> on page 87<br />
• SNMP Trap Process in the JNU <strong>Network</strong> on page 88<br />
g041398<br />
Chapter 10: Monitoring in the JNU <strong>Network</strong><br />
89
JNU 1.2 Design <strong>and</strong> Implementation Guide<br />
<strong>Network</strong> Time Protocol (NTP) in the JNU <strong>Network</strong><br />
90<br />
When you initialize the controller, you can specify the address of an NTP server. If you do<br />
so, the controller synchronizes its time to the external NTP server, <strong>and</strong> the controller then<br />
acts as the NTP server for all the satellites in the JNU group. During satellite initialization,<br />
JNU creates an NTP configuration that sets the NTP server address to the controller<br />
downlink IP address.<br />
Copyright © 2013, Juniper <strong>Network</strong>s, Inc.
Configuring the JNU Controller as an SNMP Proxy Agent<br />
Copyright © 2013, Juniper <strong>Network</strong>s, Inc.<br />
You use the <strong>Junos</strong> OS SNMP proxy feature to set up the controller as a proxy SNMP agent<br />
through which the network management system (NMS) can query satellite devices.<br />
When the JNU controller acts as the proxy SNMP agent for the satellite devices, the NMS<br />
specifies the community name (for SNMPv1 <strong>and</strong> SNMPv2) or the context <strong>and</strong> security<br />
name (for SNMPv3) of the satellite from which it requires the information. If you have<br />
configured authentication <strong>and</strong> privacy methods <strong>and</strong> passwords for SNMPv3, those<br />
parameters are also specified in the query for SNMPv3 information.<br />
The community <strong>and</strong> security configuration for the proxy should match the corresponding<br />
configuration on the satellite device that is to be managed.<br />
If you configure SNMP when you run the controller initialization process, the JNU software<br />
creates an SNMP proxy configuration with SNMPv2 support. For example:<br />
proxy jnu-sat1 {<br />
device-name 192.168.0.2;<br />
version-v2c {<br />
snmp-community public:jnu-sat1;<br />
}<br />
routing-instance jnu-vrf;<br />
}<br />
Use this procedure if you need to add SNMPv3 support.<br />
To configure the controller as an SNMP proxy agent:<br />
1. Create a proxy configuration, <strong>and</strong> assign a name to the configuration.<br />
user@jnu1-ctrlr# edit snmp proxy proxy-ctrlr<br />
2. Assign the proxy configuration to a satellite device.<br />
[edit snmp proxy proxy-ctrlr]<br />
user@jnu1-ctrlr# set device-name jnu-sat-1<br />
3. (Optional) Configure SNMP version 3. Specify a security name to be used for messaging<br />
security <strong>and</strong> user access control. Specify the ID of the SNMP context that is accessible<br />
to the SNMP proxy.<br />
[edit snmp proxy proxy-ctrlr]<br />
user@jnu1-ctrlr# edit version-v3<br />
[edit snmp proxy proxy-ctrlr version-v3]<br />
user@jnu1-ctrlr# set security-name jnu-user<br />
user@jnu1-ctrlr# set context jnu<br />
NOTE: This security name must match the security name configured at<br />
the [edit snmp v3 target-parameters target-parameters-name parameters]<br />
hierarchy level when you configure traps.<br />
Chapter 10: Monitoring in the JNU <strong>Network</strong><br />
91
JNU 1.2 Design <strong>and</strong> Implementation Guide<br />
92<br />
Related<br />
Documentation<br />
You can use the show snmp proxy operational mode comm<strong>and</strong> to view proxy details on<br />
a device. The show snmp proxy comm<strong>and</strong> returns the proxy names, device names, SNMP<br />
version, community <strong>and</strong> security, <strong>and</strong> context information.<br />
• Centralized Collection of SNMP Statistics <strong>and</strong> Log Messages Overview on page 85<br />
• SNMP Get Process in the JNU <strong>Network</strong> on page 87<br />
• SNMP Trap Process in the JNU <strong>Network</strong> on page 88<br />
Copyright © 2013, Juniper <strong>Network</strong>s, Inc.