warning - Scag Power Equipment
warning - Scag Power Equipment
warning - Scag Power Equipment

Create successful ePaper yourself
Turn your PDF publications into a flip-book with our unique Google optimized e-Paper software.
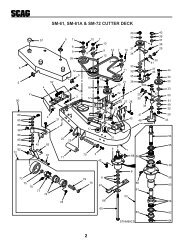
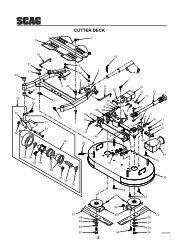
Section 73. Secure the cutter blades to prevent them fromrotating, (use the optional Blade Buddy tool, P/N9212, to assist in securing the cutter blades), removethe nut from the blade attaching bolt. Remove thecutter blade, bolt and spacer from the spindle shaft.(Figure 7-10)-NOTE-The front of the machine will have to be raisedslightly to remove the blade bolt from the cutterspindle.4. To install the new cutter blade, put the flat washeronto the blade bolt and slide the bolt into the hole inthe cutter blade.HEX NUT-TORQUETO 75 LB-FTSPINDLESHAFTCUTTERDECK6. Install the hex nut to the blade bolt at the top of thecutter spindle. Secure the blades from rotating andtorque to 75 ft/lbs. (See Figure 7-10)7.10 TIRESCheck the tire pressures after every 8 hours of operationor daily.Caster Wheels ......................................... Flat FreeDrive Wheels ......................................... 12 PSI7.11 CUTTER DECK GEARBOXA. Checking Lubricant LevelCAUTION:The cutter deck gearbox can reach highoperating temperatures. Allow the cutter deckgearbox to cool before servicing.HEX HEADBOLT / NUTSPINDLEASSEMBLYWASHERHEX HEAD BOLTFigure 7-10 Blade ReplacementCUTTER BLADESPACERCUTTERBLADE390S0160-NOTE-Be sure that the blade is installed with the liftwing toward the top.CHECKPLUGFigure 7-12 Cutter Deck GearboxCUTTER DECKGEARBOX390S0161The fluid level in the cutter deck gearbox (Figure 7-12)should be checked after every 100 hours of operation orbi-weekly, whichever occurs first.1. Lower the cutter deck to to its lowest position togain access to the cutter deck gearbox.5. Install the spacer onto the blade bolt and insert thebolt into the cutter spindle shaft.38