Estetica Magazine ESPAÑA (1/2018 COLLECTION)
Estetica Magazine es la revista de peluquería líder en el mundo. Fundada en Italia en 1946 y publicada, actualmente, en 60 países de todo el mundo, se ha convertido en el punto de referencia internacional para todos los peluqueros y profesionales que trabajan en el campo de la belleza. Técnicas, moda, formación y tendencias están en el centro de cada número de Estetica Magazine. Encontrarás más información sobre las ediciones impresas y digitales en www.esteticanetwork.com
Estetica Magazine es la revista de peluquería líder en el mundo. Fundada en Italia en 1946 y publicada, actualmente, en 60 países de todo el mundo, se ha convertido en el punto de referencia internacional para todos los peluqueros y profesionales que trabajan en el campo de la belleza. Técnicas, moda, formación y tendencias están en el centro de cada número de Estetica Magazine. Encontrarás más información sobre las ediciones impresas y digitales en www.esteticanetwork.com

Create successful ePaper yourself
Turn your PDF publications into a flip-book with our unique Google optimized e-Paper software.
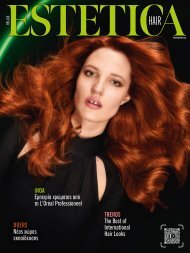
<strong>ESPAÑA</strong><br />
FOCUS<br />
Peina como un<br />
BaBylissPRO<br />
SPRING <strong>2018</strong><br />
Nuevas colecciones<br />
para esta primavera<br />
TÉCNICA<br />
Descubre los looks de<br />
temporada, paso a paso<br />
www.esteticamagazine.es
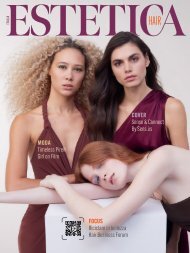
ESPAñA<br />
collection<br />
Photo: Luis Alvarez for BaBylissPRO<br />
Hair: Nicole Fowler for Aquage<br />
Make-up: Wanda Alvarez for Satin Smooth<br />
contents<br />
Publisher and Director<br />
Roberto Pissimiglia<br />
<strong>Estetica</strong>Network<br />
Editor-in-Chief<br />
Laura Castelli<br />
International Editorial<br />
Coordinator<br />
Fatima Pilone<br />
Editorial Staff<br />
Sabrina Bellezza, Valentina Salerno<br />
Art Direction<br />
Barbara Belletti<br />
Layout<br />
Manuela Artosi, Paola Baratta, Davide Cardente<br />
Production Supervisor<br />
Carlo Tiani<br />
EU Sales Manager<br />
Emilio De Martino<br />
e.demartino@estetica.it - Tel. +39 336206271<br />
ESTETICA MODACABELLO <strong>ESPAÑA</strong><br />
Sergi Bancells, Elisabet Parra,<br />
Leticia Niubó, Cristina Sanjuán, Marta Dubé,<br />
Bel M. Dolla, Elena Lorán<br />
Colaboradores<br />
Stéphanie Argentin,Victoria Clifford,<br />
Daniela Giambrone, Cristina Hernández,<br />
Judith Lorenzon, Marie Scarano<br />
Published by Edizioni Esav Srl<br />
Via Cavour, 50 - 10123 Torino (Italy)<br />
Tel. +39 011 83921111 - Fax +39 011 836964<br />
www.esteticanetwork.com<br />
info@estetica.it<br />
PrintED IN ITALY BY<br />
G. Canale & C.<br />
ad index<br />
BABYLISSPRO<br />
ESTILO MLG<br />
L’ORÉAL PROFESSIONNEL<br />
PERFECT BEAUTY<br />
REVLON PROFESSIONAL<br />
SALERM COSMETICS<br />
SALÓN LOOK<br />
SEBASTIAN PROFESSIONAL<br />
WELLA PROFESSIONALS<br />
Hair Trends<br />
Las tendencias que no te<br />
puedes perder<br />
Step-by-Steps<br />
Te guiamos creando looks<br />
ADVERTISING head office<br />
Corso Cairoli 16 - 10123 Turin - Italy<br />
Tel: 011 83921.113<br />
adv@estetica.it<br />
Authorization n. 3057 of 5/20/1981, Turin Law Court - Printed in<br />
Italy - Articles and photos, even unpublished, are not returned.<br />
Notice to subscribers (clause 13 of Data<br />
Protection Act, bill196/03) The personal data of<br />
subscribers used in sending this publication is saved also in<br />
computer databases (without being processed in any particular way);<br />
it will not be divulged to third parties and will be used only for the<br />
aforesaid purpose. Subscribers may, at any time, ask Edizioni Esav<br />
S.r.l. (Via Cavour 50, 10123 Torino email export@estetica.it<br />
- tel. +39 011 83921274) responsible for the procedure, to check, add,<br />
update, or alter the information, and/or exercise their right<br />
of law regarding the protection of personal data<br />
(clause 7 of Data Protection Act, bill 196/03).<br />
All rights reserved. Total or partial reproduction is prohibited<br />
in accordance with Italian legislation dated 11 March 1975<br />
para suscribirse<br />
Tel: 93 226 59 10<br />
Fax: 93 419 64 98<br />
e-mail: difusion@esteticamodacabello.es<br />
online: www.esteticamagazine.es
collections<br />
Trovare nuovi look per la<br />
primavera estate? Basta<br />
fare un tuffo nei trend di<br />
STAgione. E rinnovarsi...<br />
Feeling restless,<br />
yearning for new<br />
looks for this<br />
spring<br />
summer?<br />
Indulge in these<br />
inspirational trends<br />
for a new you!<br />
Ohne Ruhe und voller<br />
Sehnsucht nach den neuen<br />
Frühjahr/Sommer - Looks?<br />
Sich ganz diesen<br />
inspirierenden Trends<br />
hingebend, für ein neues ICH!<br />
À la recherche désespérée<br />
de nouveaux looks pour ce<br />
P/E ? Alors ces tendances<br />
sauront comment vous<br />
inspirer un Vous inédit !<br />
¿Impaciente y con ganas de<br />
nuevos looks para esta<br />
primavera verano? Disfruta<br />
con estas tendencias<br />
inspiradoras ¡Para una<br />
nueva tú!<br />
Creative Direction: Maurizio Contato @ Art Hair Studios for Wella<br />
Hair: Art Hair Studios for Wella/Photo: James Rudland<br />
Styling: Anna Perghem - Mind Store/Products: Wella
Hair: Goldwell Color Zoom ’18 Creative Team/Photo: Markus Jans/Make-up: Loni Baur/Styling: Ingo Nahrwold
Short and ruffled<br />
cuts for a look that’s<br />
carefree<br />
Easy does it when it<br />
comes to styling that<br />
leaves you time for<br />
what really matters<br />
Hair: Lewis Moore @ Lewis Moore Salons-HD Hair & Beauty/Photo: John Rawson/Make-up: Hannah Davies/Products: Joico<br />
Hair and make-up: Salone Firriolo/Photo: Giuseppe Deina/Clothing: Anna Rock<br />
Artistic direction: Mauro Galzignato for Kemon/Hair: Pierre Baltieri, Antonio Candido,<br />
Davide Carlucci, Diego Comandulli, Elisa Franco, Riccardo Rogari for Kemon/Photo: Omar<br />
Macchiavelli/Styling: Ylenia Puglia/Clothing: Asso
© Intercoiffure Deutschland<br />
kinky or<br />
traditional<br />
Artistic Direction: Anthony Mascolo/Hair: Joshua Mascolo and Gen Itoh and the Asian Tigi Creative Team led by<br />
Ralph Bos/Cut: Linda Huang/Colour: Ella Wang/Photo: Anthony Mascolo and Alex Barron-Hough/Products: Tigi
Hair: Jason Hall/Photo: Desmond Murray/Make-up: Jo Sugar/Styling: Daniella Bulpit
Hair: Luca Frangione for Nika/Make-up: Monica Svet/Photo: Nika Hair Beauty Excellence<br />
Simply<br />
sumptuous
Hair & products: Aveda<br />
Hair: Eric Zemmour and Team for L'Oréal Professionnel/Photo: Gérard Taride/Clothing: Galeries Lafayette/Tools: Greatlengths, Babyliss Pro, Mizutani<br />
Hair & make-up: Sherri Jessee/Photo: Jason Setiawan<br />
Hair: Colin McAndrew and The Medusa Artistic Team/Photo: John Rawson/Make-up: Maddie Austin/Styling: Jared Green
Hair: Rush Artistic Team/Photo: Jack Eames/Make-up: Kristina Vidic/Styling: Robert Morrison
Hair: Laurent Decreton for L’Oréal Professionnel/Colour: Patricia & Elodie/Photo: Giel Domen/Make-up: Magdalena Loza/Styling: Lieve Gerrits<br />
Feeling the<br />
difference
Hair: Errol Douglas MBE/Colour: Errol Douglas Colour Team<br />
Photo: Barry Jeffery/Make-up: Elizabeth Rita<br />
Hair: Lewis Moore @ Lewis Moore Salons-HD Hair & Beauty/Photo: John Rawson<br />
Make-up: Hannah Davies/Products: Joico<br />
Hair: Zentralverband Friseurhandwerk/Photo: Mario Nägler<br />
Hair: Leonardo Rizzo, Sanrizz International Creative Director for Alter Ego Italy/Colour: Sharon Cox, Sanrizz International Education Director, and<br />
Stefania Fraccaro, Field Education Manager, for Alter Ego Italy/Photo: Andrew O’Toole/Make-up: Silvia dell’Orto and Daniela Galeazzi<br />
Hair: Andrew Mulvenna @ Andrew Mulvenna Salon/Photo: John Rawson/Make-up: Lan Grealis/Styling: Jared Green
Hair: Suzie McGill & Dylan Brittain @ Rainbow Room International/Photo: John Rawson/Make-up: Lan Nguyen-Grealis<br />
Styling: Desiree Lederer/Products: Schwarzkopf Professional<br />
Artistic Direction: Luigi Martini for Sens.ùs/Creative Direction: Gian Enrico Barbagli for Sens.ùs/Hair: International<br />
Creative Team for Sens.ùs/Photo: Mauro Mancioppi/Make-up: Imma Mennuti and Giuseppe Giarratana<br />
Hair: Avant art/Artistic Direction: wi.iu'.upset®/Photo: Gennaro Navarra<br />
Make-up: Alessandra Riccio/Clothing: Backstage<br />
Hair & make-up direction: Kenji Toyota for Shiseido Beauty Creation Center/Hair & make-up: Mikiya<br />
Fujioka for Shiseido Beauty Creation Center/Photo: Satoshi Saikusa/Styling: Tsuyoshi Noguchi<br />
Hair: Joseph Ferraro @ Joseph Ferraro Hair/Photo: Jamie Blanshard/Make-up: Maddie Austin
Hair: Sanrizz Artistic Team/Photo: Jamie Blanshard/Make-up: Tamara Tott/Styling: Rubina Marchiori<br />
Breathing<br />
space<br />
Hair, cut and colour: Ludovic Chapalain and Jérôme Ponthieu for Intermède<br />
Photo: Anna Dabrowska/Make-up: Natacha Maillard/Styling: Benoît Tardif
Artistic Direction: Sacha Mascolo-Tarbuck for Toni&Guy/Hair: Indira Schauwecker for Toni&Guy<br />
Colour: Charley Henery/Photo: Jack Eames/Make-up: Lan Nguyen/Styling: Sara Dunn
Hair: Gandini Team/Photo: Paulo Renftle/Make-up: Alemka Krupic/Styling: Giuseppe Dicecca
Hair and make-up: William Cerf & Emma Guerri for Saint Algue/Photo: Romain Rosa/Styling: Aurore Donguy<br />
No matter which way,<br />
it’s always gonna be<br />
so glam!<br />
Up and down, sleek<br />
and textured, classic,<br />
retro, or hip. These<br />
looks will turn heads<br />
Artistic and Creative Direction: Christophe Nicholas Biot @ SoGlam! for Wella/Hair: SoGlam! Team/Photo: Danilo Fala’<br />
Make-up: Vichika Yorn/Styling: Federica Trotta/Products: Wella<br />
Hair: Artistic Team Vog Coiffure/Photo: Michel Perez/Make-up: Morgane Hilgers<br />
Products: L’Oréal Professionnel and Kérastase
Hair: Shane Henning @ Noddy’s on King Hairdressers/Make-up: Laura Nolan/Photo: Troyt Coburn
eyond<br />
all limits<br />
Hair: Laurent Decreton for L’Oréal Professionnel/Colour: Patricia & Elodie/Photo: Giel Domen/Make-up: Magdalena Loza/Styling: Lieve Gerrits<br />
Hair: Andrew Mulvenna @ Andrew Mulvenna Salon<br />
Hair: Photo: Lorem John Ipsumder/Photo: Rawson/Make-up: Optatem Lan Grealis/Styling: Einusam/Make-up: Jared Green Sagnimaionse Robis/Styling: Lorem Ipsumde
Hair: Christophe Gaillet for L’Oréal Professionnel/Photo: Weronika Kosinska/Make-up: Izabela Szelagowska
Artistic Direction: Fabien Provost for Franck Provost/Hair: Fabien Provost and Alexandrine Piel<br />
Colour: Denis Fischer/Photo: Adel Awad/Make-up: Charlotte Willer/Styling: Chloé Dugast<br />
Each curl becomes<br />
a modular unit of<br />
the sculpted coif...<br />
organic<br />
and original shapes<br />
that define a fashion<br />
all their own. Inimitable.<br />
Hair: Laetitia Guenaou/Photo: Jacek Ura/Make-up: Karolina Supernak/Styling: Weronika Wysoczyńska/Products: L’Oréal Professionnel<br />
Artistic Direction: Sacha Mascolo-Tarbuck for Toni&Guy/Photo: Jack Eames<br />
Make-up: Lan Nguyen/Styling: Sara Dunn
Artistic direction: Mauro Galzignato for Kemon/Hair: Pierre Baltieri, Antonio Candido, Davide Carlucci, Diego Comandulli,<br />
Elisa Franco, Riccardo Rogari for Kemon/Photo: Omar Macchiavelli/Styling: Ylenia Puglia/Clothing: Asso
diversity<br />
and nuance<br />
Hair: JPMS Artistic Team/Photo: Todd Marshard/Make-up: Fiona Stiles/Styling: Emma Trask/Products: Paul Mitchell
Creative Direction: Toni Pellegrino @ TheBestClub for Wella/Hair: TheBestClub Art Team for Wella<br />
Photo: Domingo Nardulli/Make-up: Sara Mencattelli/Styling: Eleonora Papetti and Riccardo Rubino<br />
Melodious<br />
miscellany<br />
Hair: Leonardo Rizzo, Sanrizz International Creative Director for Alter Ego Italy/Colour: Sharon Cox, Sanrizz International Education Director, and<br />
Stefania Fraccaro, Field Education Manager, for Alter Ego Italy/Photo: Andrew O’Toole/Make-up: Silvia dell’Orto and Daniela Galeazzi<br />
Artistic Direction: Sacha Mascolo-Tarbuck for Toni&Guy/Photo: Jack Eames<br />
Make-up: Lan Nguyen/Styling: Sara Dunn<br />
Hair: Leonardo Rizzo, Sanrizz International Creative Director for Alter Ego Italy/Colour: Sharon<br />
Cox, Sanrizz International Education Director, and Stefania Fraccaro, Field Education Manager,<br />
for Alter Ego Italy/Photo: Andrew O’Toole/Make-up: Silvia dell’Orto and Daniela Galeazzi
Revlon Professional® Sun Festival Collection/Artistic and Creative Direction: Miquel García Cotado/Photo: Jonas Bresnan/Production: Magna Productions
Hair and colour: Candice Mckay for Davines<br />
Photo: John Rawson/Make-up: Lan Grealis/Styling:<br />
Jared Green/Clothing: Black Coffee/Products: Davines
Hair: Errol Douglas MBE/Colour: Errol Douglas Colour Team/Photo: Barry Jeffery/Make-up: Elizabeth Rita/Styling: Jared Green<br />
Speaking<br />
bluntly
Hair: Natalie Cole @ Charlie Miller/Photo: Jason Miller<br />
Make-up: Lauren Gollan Make-up Academy<br />
Hair: Julian Dalrymple @ The Sitting Room Hairdressing/Photos: Richard Miles<br />
Make-up: Diane Alexander/Styling: Clare Frith<br />
Hair: Elise Antoine @ Mylord Coiffure France/Photo: Weronika Kosinska/Make-up: Izabela Szelagowska/Styling: Waleria Tokarzewska - Karaszewicz<br />
Hair: Silas Tsang @ Blushes/Colour: Dorothy Tsang @ Blushes/Photo: John Rawson<br />
Make-up: Lan Grealis/Styling: Jolanta Pilinkaite<br />
Hair: Gandini Team/Photo: Paulo Renftle/Make-up: Alemka Krupic/Styling: Giuseppe Dicecca
Hair: Sophie Chandler @ Rush/Photo: Tony Le-Britton/Make-up: Kelly Sadler<br />
Hair: Joseph Ferraro @ Joseph Ferraro Hair/Photo: Jamie Blanshard/Make-up: Maddie Austin<br />
Hair: Alexander Turnbull/Photo: Jack Eames/Products: Revlon<br />
Hair: Christophe Gaillet for L’Oréal Professionnel/Photo: Weronika Kosinska/Make-up: Izabela Szelagowska<br />
Hair: Errol Douglas MBE/Colour: Errol Douglas Colour Team/Photo: Barry Jeffery<br />
Make-up: Elizabeth Rita/Styling: Jared Green
Something old and<br />
something new<br />
breathing life into a<br />
fast fusion<br />
of shags, pixies<br />
and mullets for<br />
today’s generation<br />
Hair: Jason Hall/Photo: Desmond Murray/Make-up: Jo Sugar & Allana McTrusty/Styling: Alastair J Gourley<br />
Hair: Andrew Mulvenna @ Andrew Mulvenna Salon/Photo: John Rawson<br />
Make-up: Lan Grealis/Styling: Jared Green<br />
Hair: Goldwell Color Zoom ’18 Creative Team/Photo: Markus Jans/Make-up: Loni Baur/Styling: Ingo Nahrwold
Hair: Olivia Nevill/Make-up and styling: Ashley Gamble<br />
Beauty & Styling Team/Photo: Ashley Gamble Photography
Hair: JPMS Artistic Team/Photo: Todd Marshard/Make-up: Fiona Stiles/Styling: Emma Trask/Products: Paul Mitchell<br />
Colours with<br />
pizzazz
Hair: Leonardo Rizzo, Sanrizz International Creative Director for Alter Ego Italy<br />
Colour: Sharon Cox, Sanrizz International Education Director, and Stefania Fraccaro, Field Education<br />
Manager, for Alter Ego Italy/Photo: Andrew O’Toole/Make-up: Silvia dell’Orto and Daniela Galeazzi
follow us on:<br />
ITALY<br />
estetica.it<br />
facebook.com/estetica.it<br />
USA<br />
esteticamagazine.com<br />
facebook.com/<strong>Estetica</strong>USA<br />
UK<br />
esteticamagazine.co.uk<br />
facebook.com/<strong>Estetica</strong>Uk<br />
france<br />
esteticamagazine.fr<br />
facebook.com/<strong>Estetica</strong>France<br />
GERMANy<br />
esteticamagazine.de<br />
facebook.com/<strong>Estetica</strong>DeutscheAusgabe<br />
SPAin<br />
esteticamagazine.es<br />
facebook.com/<strong>Estetica</strong>Modacabello<br />
LATINA<br />
estetica-latina.com<br />
facebook.com/<strong>Estetica</strong>ModacabelloLatina<br />
the Netherlands<br />
esteticamagazine.nl<br />
facebook.com/<strong>Estetica</strong>Netherlands<br />
russia<br />
esteticamagazine.ru<br />
facebook.com/pages/<strong>Estetica</strong>-Russia/321329071361317<br />
Brazil<br />
estetica-brazil.com<br />
facebook.com/AmaBeleza<br />
Greece<br />
esteticamagazine.gr<br />
facebook.com/<strong>Estetica</strong>Hellas<br />
romania<br />
estetica.ro<br />
facebook.com/<strong>Estetica</strong>Romania<br />
Mexico<br />
esteticamagazine.mx<br />
facebook.com/<strong>Estetica</strong>Mexico<strong>Magazine</strong><br />
CZECH REPUBLIC & SLOVAK<br />
esteticamagazine.cz<br />
facebook.com/esteticamagazine.cz<br />
esteticanetwork.com – esteticamagazine.net<br />
@esteticanetwork<br />
@esteticamagazine
Un homenaje de amor a<br />
Leandro P. Rizzuto<br />
Un hombre, una leyenda, un soñador
El 3 de diciembre de 2017, Leandro P. Rizzuto falleció<br />
rodeado por el de amor de su familia.<br />
Hace cincuenta y nueve años, Lee y su padre, Julian, fundaron Continental<br />
Hair Products. La compañía tuvo un gran comienzo y creció rápidamente,<br />
pero solo siete años después falleció Julian Rizzuto. Leandro, de 28 años,<br />
asumió de inmediato el poder, tomando las riendas de una compañía<br />
que ya nunca dejaría ir. Trabajó durante todo el día, viajó por el país y el<br />
planeta más veces de las que pudo contar, y construyó la que se convirtió<br />
en una de las mayores compañías del mundo – Conair Corporation.<br />
Conair se inició con una inversión de $200 en el sótano de la casa Rizzuto en Brooklyn NY – verdaderamente<br />
la personificación del sueño americano. Lee finalmente llevó sus productos a comercios, tiendas<br />
y hogares en más de 125 países. Creó una escala sin precedentes de reconocimiento de la marca,<br />
con al menos uno de sus productos en casi todos los hogares de América del Norte. Después de haber<br />
vendido más de mil millones secadores de pelo, así como miles de otros productos Conair, la visión de<br />
Lee Rizzuto transforma cada aspecto del desarrollo profesional y de consumo de productos, marketing<br />
y merchandising.<br />
Lee tenía un brillo permanente en sus ojos, y nadie sonreía más que él cuando llegaba un nuevo producto a<br />
sus manos. Un genio que creó una nueva visión que cambiaría el mundo año tras año, Lee Rizzuto reconoció<br />
que la innovación y la tecnología eran la manera de mantener el crecimiento de Conair.<br />
Era un hombre que siempre se responsabilizaba no solo por los empleados, sino también por los inversores.<br />
Cuando Conair se hizo público en 1973, una inversión inicial de $10,000 trajo $300,000 solo 12 años más<br />
tarde. Esa fue una rentabilidad récord en la Bolsa de Valores de Nueva York en 1985. Lee tenía tanta fe en<br />
su empresa que compró de nuevo todas las acciones, lo que convirtió a la compañía en privada en lo que<br />
entonces fue la mayor compra jamás realizada por un individuo.<br />
A lo largo de los años, Lee realizó una serie de adquisiciones estratégicas que agregaron prestigiosas marcas<br />
al portafolio de Conair y emplearon a miles de personas en todo el mundo. Las marcas de Conair incluyen<br />
Cuisinart, Jheri Redding, BaByliss, Waring, Allegro, Interplak,<br />
Pollenex, Scünci, Rusk, Satin Smooth, Southwest Bell, Travel<br />
Smart, y Thinner.<br />
Destinatario de innumerables premios y honores, lo único<br />
que tocó el corazón de Lee más que su negocio y familia<br />
fue su amor a la vida. Conocer a las personas, impactar<br />
positivamente sus vidas y ayudar a quienes necesitaban<br />
ayuda era parte de su ADN. La filantropía fue su mayor<br />
pasión. Ayudó a las víctimas de los huracanes, a los necesitados<br />
de atención médica, iglesias y sinagogas, organizaciones<br />
culturales y comunitarias; incluso creó becas. Su<br />
generosidad fue legendaria, y dio con todo su corazón.<br />
Lee Rizzuto impactó<br />
positivamente a innumerables<br />
personas en sus 79 años de vida.<br />
Lee será muy añorado y recordado<br />
para siempre.<br />
La familia Rizzuto da gracias<br />
por todas las abrumadoras<br />
y sinceras condolencias recibidas.
Publirreportaje<br />
Un tándem<br />
perfecto<br />
el<br />
L’Oréal Professionnel<br />
sigue comprometida<br />
con el cine español<br />
como firma de<br />
peluquería oficial<br />
en las principales<br />
entregas de premios.<br />
#lorealprospain<br />
e la misma forma que sucede<br />
en Hollywood, el primer<br />
cuatrimestre del año es el<br />
más intenso para la<br />
industria del cine español,<br />
ya que concentra sus premios<br />
y festivales más prestigiosos. En<br />
concreto, en el mes de enero se<br />
entregaron los Premios Forqué, los<br />
Premios Feroz y los Premios Gaudí.<br />
Y en todos ellos estuvo L’Oréal<br />
Professionnel como firma de<br />
peluquería oficial. El primero de la<br />
temporada fueron los Premios<br />
Forqué, que celebraron su 23ª<br />
edición en el Palacio de Congresos<br />
de Zaragoza. El Glam Team que se<br />
encargó del backstage estuvo<br />
formado por tres firmas afincadas<br />
equipo de estilistas responsable<br />
de la imagen de los asistentes estuvo<br />
formado por las firmas Yolanda<br />
Aberasturi, Maricarmen Madrigal<br />
y Ramiro Mata. El Glam Team fue<br />
presentado ante la prensa unos días<br />
antes del evento de la mano de las<br />
actrices Ana Polvorosa, Sandra<br />
Escacena y Susana Abaitúa.<br />
Además, L’Oréal Professionnel tuvo<br />
un papel muy destacado en la gala,<br />
al entregar uno de los premios más<br />
esperados de la noche: el L'Oréal<br />
Professionnel a la mejor actriz<br />
protagonista. El galardón fue para<br />
Nathalie Poza por su actuación en<br />
“No sé decir adiós”, confirmando el<br />
dulce momento que atraviesa su<br />
carrera. L'Oréal Proffessionel<br />
también fue la firma responsable<br />
del cuidado del cabello de los<br />
Premios Gaudí del cine catalán, que<br />
para su 10ª edición confiaron en las<br />
Sobre estas líneas,<br />
Judith de la Fuente<br />
haciendo entrega<br />
del Premio L'Oréal<br />
Professionnel a<br />
Nathalie Poza.<br />
en la capital aragonesa: Marina<br />
Allegue, Marqués Peluquerías y<br />
Voga Estilistas. Por sus manos<br />
pasaron las estrellas más destacadas<br />
del momento, como las actrices<br />
Juana Acosta y Dafne Fernández, o<br />
los ex concursantes de Operación<br />
Triunfo Cepeda, Mimi y Nerea.<br />
Poco más de una semana después<br />
llegó la 5ª edición de los famosos<br />
Premios Feroz, que pasará a la<br />
historia como la más reivindicativa<br />
hasta la fecha en la lucha por la<br />
igualdad de género. En esta ocasión,<br />
firmas Compte, Josep Pons y Alberto<br />
Cerdán. Además, aún queda por<br />
delante una cita importante: el<br />
Festival de Málaga, que en 2017<br />
cumplió su 20 aniversario. L’Oréal<br />
Professionnel entregará por octavo<br />
año consecutivo su galardón Belleza<br />
Comprometida, que apoya la causa<br />
del VIH con una dotación de 6.000<br />
euros destinados a la investigación<br />
en la materia. Ya ostentan el premio<br />
Maribel Verdú, Adriana Ugarte y<br />
Nerea Barros, entre otras.<br />
Para más info:<br />
http://www.lorealprofessionnel.es/<br />
En el Festival de Málaga, L’Oréal<br />
Professionnel entregará su<br />
galardón Belleza Comprometida<br />
premios
step by step<br />
take your cue from<br />
these techniques for<br />
todaýs looks,<br />
in cutting, colouring,<br />
styling, and finishing.
Wahl GmbH<br />
Hair and photo: Wahl GmbH<br />
for Moser and label.m Germany<br />
Products: label.m<br />
Tools: Moser
1 2<br />
3<br />
4 5<br />
6 7<br />
8<br />
ENGLISH 1- Create a horseshoe-shaped section at the top of the head. 2- Shorten the side areas to the desired length with the Moser ChromStyle Pro, using the comb. 3- Using<br />
the 6 mm attachment, evenly cut the hair at the back of the head and at the sides up to the section at the top of the head. Then, using the 3 mm attachment, create a flowing<br />
transition from bottom to top. 4- Cleanly work the contours with the ChroMini Pro. 5- Parallel to the first horseshoe section, use the ChromStyle Pro to create an overlapping<br />
of the cutting line. Now, cut the entire top of the hair along the guide line with a minimal level of overlap. 6- Then, straighten all the hair on the top of the head using a hair<br />
straightener (Moser CeraStyle Pro). 7- Use the ChroMini Pro to provide a detailed finish to the guide line in order to ensure an exact, compact cutting line 8- Shape the precise,<br />
geometric effect in the fringe area in particular; this can be enhanced with a glossy effect upon finishing. This look can also be styled downward, or individually varied.<br />
italiano 1- Separare la parte superiore della testa. 2- Accorciare le zone laterali con Moser ChromStyle Pro sopra il pettine fino a ottenere la lunghezza desiderata. 3- Tagliare i<br />
capelli nella zona posteriore e sui lati fino alla sommità della testa in modo uniforme con la testina a 6 mm. Quindi eseguire una transizione graduale dal basso verso l’alto con la<br />
testina a 3 mm. 4- Rifinire i contorni in modo pulito con ChroMini Pro. 5- Parallelamente alla prima sezione a ferro di cavallo, creare una sovrapposizione della linea di taglio con<br />
ChromStyle Pro. Tagliare l’intera zona superiore in modo che sia leggermente sovrapposta e seguendo la linea guida. 6- Lisciare tutta la parte superiore con la piastra Moser CeraStyle<br />
Pro. 7- Rifinire nel dettaglio il perimetro con ChroMini Pro in modo da creare una linea di taglio precisa e compatta. 8- Mantenere un effetto geometrico netto, specialmente<br />
nella sezione a ferro di cavallo, che può essere esaltato con un finishing lucido. Questo look può essere direzionato verso il basso o personalizzato in base alle esigenze individuali.<br />
deutsch 1- Hufeißen-Abteilung am Oberkopf. 2- Die Seitenbereiche mit Moser ChromStyle Pro über den Kamm auf die gewünschte Länge kürzen. 3- Das Haar am Hinterkopf<br />
und an den Seiten bis zur Oberkopf-Abteilung mit Aufsatz 6 mm gleichmäßig kürzen. Dann mit Aufsatz 3 mm einen fl ießenden Übergang von unten nach oben herstellen. 4- Mit<br />
ChroMini Pro die Konturen sauber ausarbeiten. 5- Parallel zur ersten Hufeisenabteilung wird mit der ChromStyle Pro eine Überlappung der Schnittlinie erarbeitet. Nun das gesamte<br />
Deckhaar minimal überlappend entlang der Führungslinie kürzen. 6- Anschließend das gesamte Oberkopfhaar mit einem Glätteisen (Moser CeraStyle Pro) glätten. 7- Die<br />
Führungslinie mit ChroMini Pro detailliert nacharbeiten, so dass eine exakte, kompakte Schnittlinie entsteht. 8- Vor allem im Bereich der Ponypartie den präzisen geometrischen<br />
Effekt herausarbeiten, der beim Finish mit Glanz-Styling verstärkt werden kann. Dieser Look kann sowohl gerade nach unten gestylt oder individuell variiert werden.<br />
franÇais 1- Séparer la partie supérieure de la tête. 2- Raccourcir les zones latérales avec Moser ChromStyle Pro au-dessus du peigne jusqu’à obtenir la longueur voulue.<br />
3- Couper les cheveux dans la zone arrière et sur les côtés, jusqu’au sommet de la tête de façon uniforme avec finesse de 6 mm. Puis, effectuer une transition graduelle du bas<br />
vers le haut avec finesse de 3 mm. 4- Finir les contours avec netteté avec ChroMini Pro. 5- Parallèlement à la 1e section en fer à cheval, créer une superposition de la ligne de<br />
coupe avec ChromStyle Pro. Couper l’intégralité de la zone sup. de sorte qu’elle soit légèrement superposée et en suivant la ligne directrice. 6- Lisser toute la partie supérieure<br />
avec le lisseur Moser CeraStyle Pro. 7- Peaufiner le contour avec ChroMini Pro de sorte à créer une ligne de coupe nette et compacte. 8- Maintenir un effet géométrique précis,<br />
spécialement dans la zone en fer à cheval, qui peut être sublimé avec un coiffage final brillant. Ce look peut être dirigé vers le bas ou personnalisé selon les préférences.<br />
espaÑol 1- Separar la parte superior de la cabeza. 2- Acortar las zonas laterales con Moser ChromStyle Pro encima del peine hasta obtener la longitud deseada. 3- Cortar el cabello<br />
en la zona posterior y sobre los lados hasta la parte alta de la cabeza de forma uniforme con el cabezal de 6 mm. Luego realizar una transición gradual de abajo hacia arriba con el<br />
cabezal de 3 mm. 4- Terminar los contornos de forma limpia con ChroMini Pro. 5- Paralelamente a la primera sección en herradura, crear una superposición de la línea de corte con<br />
ChromStyle Pro. Cortar toda el área superior para que se solape ligeramente y siga la línea guía. 6- Alisar toda la parte superior con la plancha Moser CeraStyle Pro. 7- Terminar<br />
detalladamente el perímetro con ChroMini Pro para crear una línea de corte precisa y compacta. 8- Mantener un efecto geométrico preciso, especialmente en la sección a herradura,<br />
que se puede evidenciar con un acabado brillante. Este look puede dirigirse hacia abajo o personalizarse según las necesidades individuales.<br />
step by step 1
Fudge Professional<br />
Hair: X-presion @xpresioncreativos for Fudge Professional<br />
Colour: X-presion and Tracy Hayes for Fudge Professional<br />
Photo: Stefano Cattelan<br />
Step by step photo: Sergio Alfredini<br />
Make-up: Barbara Bonazza<br />
Styling: Manuela Mezzetti<br />
Products: Fudge Professional<br />
Coordination: PMS by <strong>Estetica</strong>
COLOUR FORMULA<br />
• A Headpaint 20g 10.0<br />
+ 20g 8.13 + 20g 99.43 + 0.5g 77.26<br />
+ Catalyst cream developer 6%<br />
• B Speed lightening powder<br />
+ Catalyst cream developer 3%<br />
• C Paintbox -12g Whiter Shade<br />
of Pale + 1g Chasing Blue<br />
• D Paintbox -20g Whiter Shade<br />
of Pale + 1g Chasing Blue<br />
• E Paintbox -12g Coral Blush<br />
+ 1g Pink Riot.<br />
1 2 3<br />
4<br />
5 6<br />
7<br />
ENGLISH 1- Apply Formula A from roots to ends. Development time 30 min. 2- Dry and straighten hair. Take a rectangular section on top of the head. Divide this rectangular<br />
section into six slices around 1 cm deep. 3- Take the first 1 cm slice section. Bring the hair onto a clear transparent wrap and use Skyscraper Hair Spray to hold hair in place.<br />
Apply Formula B in a horizontal block along the hair shaft using a silicon spatula to ensure a precision line. Cover with a transparent wrap. 4- Follow step 3, throughout the<br />
further 5 slices on top of the head. Alternate the size of the horizontal blocks within each section. Visual development maximum 50 min and shampoo the section. 5- Working<br />
on the pre-lightened areas, bring the first section onto a transparent wrap and use Skyscraper Hair Spray to hold hair in place. Apply Formula C to the pre-lightened slice.<br />
Cover with transparent wrap. 6/7- Bring the second pre-lightened slice onto the plastic wrap and colour with Formula D. Colour the third pre-lightened rectangular section with<br />
Formula E. Alternate with Formulas C, D and E through the remaining three slices. Allow for 20 min development and rinse.<br />
italiano 1- Applicare la Formula A dalle radici alle punte. Tempo di posa 30 minuti. 2- Asciugare e lisciare i capelli. Prendere una sezione rettangolare sulla sommità del capo.<br />
Suddividere questa sezione rettangolare in 6 ciocche di circa 1 cm. 3- Prendere la prima ciocca di 1 cm. Posizionare i capelli su pellicola trasparente e usare Skyscraper Hair<br />
Spray per fermarli in posizione. Applicare la Formula B in un blocco orizzontale secondo la lunghezza del capello, usando una spatola di silicone per creare una linea più precisa.<br />
Coprire con pellicola trasparente. 4- Continuare con lo stesso procedimento sulle restanti 5 sezioni sulla sommità del capo. In ogni sezione, alternare la grandezza dei blocchi<br />
orizzontali. Tenere sotto controllo lo sviluppo, lasciando in posa al massimo 50 minuti, e lavare la sezione. 5- Lavorando sulle zone precedentemente decolorate, posizionare la<br />
prima sezione sulla pellicola trasparente e usare Skyscraper Hair Spray per fermarla in posizione. Applicare la Formula C sulla sezione precedentemente decolorata. Coprire con<br />
pellicola trasparente. 6/7- Prendere la seconda sezione decolorata, posizionarla sulla pellicola trasparante e applicare la Formula D. Procedere allo stesso modo con la terza<br />
sezione, applicando però la Formula E. Alternare le Formule C, D ed E sulle 3 sezioni rimaste. Lasciare in posa 20 minuti e risciacquare.<br />
deutsch 1- Tragen Sie Formula A vom Ansatz bis zu den Spitzen auf. Einwirkzeit 30 Minuten. 2- Trocknen und glätten Sie das Haar. Kreieren Sie eine rechteckige Sektion am<br />
Oberkopf. Teilen Sie diese Sektion in sechs ungefähr 1 cm breite Abteilungen. 3- Legen Sie das Haar auf eine Klarsichtfolie und tragen Sie Skyscraper Hair Spray auf, um das<br />
Haar zu fixieren. Tragen Sie Formula B als horizontalen Block entlang des Haarschaftes mit einem Silikonspachtel auf, für eine präzise Linie. Abdecken mit einer Klarsichtfolie.<br />
4- Wenden Sie Schritt 3 bei den weiteren 5 Abteilungen an. Wechseln Sie die Größe der horizontalen Blöcke innerhalb jeder Abteilung. Visuelle Einwirkzeit max. 50 Minuten,<br />
dann die Sektion ausspülen. 5- Beim Arbeiten mit den vorher aufgehellten Bereichen, legen Sie die erste Abteilung auf eine Klarsichtfolie und sprühen Sie Skyscraper Hair Spray<br />
auf. Tragen Sie Formula C auf die aufgehellten Abteilungen auf. Abdecken mit einer Klarsichtfolie. 6/7- Legen Sie die zweite aufgehellte Abteilung auf eine Klarsichtfolie und<br />
färben Sie diese mit Formula D. Färben Sie die dritte aufgehellte rechteckige Abteilung mit der Formula E. Wechseln Sie bei den restlichen Abteilungen zwischen den Formulas<br />
C, D und E. Einwirkzeit 20 Minuten, dann ausspülen.<br />
franÇais 1- Appliquer la Formule A des racines aux pointes. Temps de pose : 30 mn. 2- Sécher et lisser les cheveux. Saisir une section rectangulaire sur le sommet de la tête.<br />
Séparer cette section en six mèches d’1 cm d’épaisseur. 3- Saisir la 1e section d’1 cm. Placer les cheveux sur une feuille transparente et utiliser Skyscraper Hair Spray pour<br />
maintenir en place. Appliquer la Formule B sur un bloc horizontal dans la zone frontale à l’aide d’une spatule en silicone pour une ligne nette. Recouvrir d’une feuille<br />
transparente. 4- Répliquer l’étape 3 pour les 5 autres mèches sur le haut de la tête. Alterner la taille des blocs horizontaux d’une section à l’autre. Pose avec contrôle visuel de 50<br />
mn maxi, puis shampoing des sections. 5- Sur les zones pré-éclaircies, placer la 1e section sur une feuille transparente et utiliser Skyscraper Hair Spray pour maintenir en place.<br />
Appliquer la Formule C sur la mèche pré-éclaircie. Recouvrir d’une feuille transparente. 6/7- Placer la 2e mèche pré-éclaircie sur une feuille transparente et colorer avec la<br />
Formule D. Colorer la 3e mèche pré-éclaircie rectangulaire avec la formule E. Alterner les Formules C, D et E sur les trois dernières mèches. Laisser reposer 20 mn et rincer.<br />
espaÑol 1- Aplicar Formula A de raíces a puntas. Dejar actuar 30 min. 2- Secar y alisar el cabello. Tomar una sección rectangular en la parte superior de la cabeza. Dividir esta<br />
sección rectangular en seis capas de 1 cm de profundidad. 3- Tomar la primera sección de 1 cm. Cubrir el cabello en una envoltura transparente y usar Skyscraper Hair Spray.<br />
Aplicar Formula B en el bloque horizontal a lo largo del fusto del cabello con una espátula de silicona para garantizar una línea de precisión. Cubrir con una envoltura<br />
transparente. 4- Seguir el paso 3, con las otras 5 capas en la parte superior de la cabeza. Alternar el tamaño de los bloques horizontales dentro de cada sección. Dejar actuar un<br />
máximo de 50 minutos y lavar la sección. 5- Trabajar en las áreas preiluminadas, cubrir la primera sección con una envoltura transparente y usar Skyscraper Hair Spray. Aplicar<br />
Formula C a la capa preiluminada. Cubrir con una envoltura transparente. 6/7- Poner la segunda capa preiluminada en la envoltura de plástico y teñir con Formula D. Teñir la<br />
tercera sección rectangular preiluminada con Formula E. Alternar con las Formulas C, D y E a través de las tres capas restantes. Dejar actuar 20 minutos y enjuagar.<br />
step by step 2
Sens.ùs HairLovers<br />
Artistic Direction: Luigi Martini<br />
Creative Direction: Gian Enrico Barbagli<br />
Hair concept: International Creative Team<br />
Cut: Jude Rizzo<br />
Colour: Amedea Terenziani<br />
Photo: Mauro Mancioppi<br />
Make-up: Imma Mennuti, Giuseppe Giarratana<br />
Styling: Luca Termine<br />
Products: Sens.ùs HairLovers
1 2 3<br />
COLOUR FORMULA<br />
• Formula n.1: Sens.ùs MC2 ½ 4.36 +<br />
½ 5.43 or Giulietta ½ 4.36 + ½ 5.43<br />
or M3K ½ 4.14 + ½ 5.43<br />
• Formula n.2: Direct Color 30g Clear<br />
+ 5g Yellow + 1g Acid Green<br />
Sens.ùs MC2 8.44 or Giulietta 8.44<br />
or ¾ 8.4 + ¼ modulator Arancio<br />
SOS pH Equalizer<br />
4 5 6 7<br />
8 9 10<br />
ENGLISH cut 1- Divide the hair as shown in the image. Start from the base of the rectangle in the back and mark a triangle with the tip at the lower part of the crown. 2- Trace a diagonal<br />
section from the side of the ear, elevate it with minimal gradation, and cut a guideline near the side hairline with scissors. Following the guide length, mark out diagonal sections on the<br />
parietal area and cut each strand on itself. 3- Release the triangle in the back. Begin on the right and trace a rear diagonal. Elevate at 45° and create a rear guide using the occipital point as<br />
a reference. Cut the remaining sections using the same technique. Repeat on the left. 4- Release the right-side triangle in the front, bring it forward and cut with a flat blade. Release the<br />
left-hand triangle and connect in minimum elevation. Continue along all the triangle. 5- Comb the fringe area forwards and connect with the right side. Repeat on the other side. 6- Start<br />
with the length of the apex and cut longitudinal sections diagonally outwards. colour 7- Trace a section from the end of the left eye, past the crown, and ending at the end of the right<br />
eye. Colour the roots at the top with 6.43. 8- Start at the perimeter and block colour using Formula n.1. In the top area trace a section from the apex and colour the rear lengths with<br />
nuance 8.44. 9- Divide the frontal zone in 4 longitudinal sections using a zig-zag technique. Start at the left, colour the lengths with Formula n. 2. Isolate with a thermal sheet. 10- Colour<br />
the lengths of the left internal section with nuance 8.44 and the right internal section with Formula n.2.<br />
italiano taGLIO 1- Suddividere come mostrato nell’immagine. Nella zona posteriore partire dalla base del rettangolo e creare un triangolo che ha come vertice il punto di bassa corona. 2- Tracciare<br />
una prima sezione diagonale dal punto basetta, elevarla in gradazione minima e tagliare una linea guida vicino all’attaccatura laterale. Seguendo la lunghezza guida, tracciare sezioni diagonali<br />
sul parietale e tagliare ogni ciocca su se stessa. 3- Sciogliere il triangolo posteriore. Partendo dal lato destro tracciare una diagonale posteriore. Elevare a 45° e creare una guida posteriore<br />
prendendo come riferimento il punto occipitale. Tagliare le successive sezioni con la stessa tecnica. Ripetere sul lato sinistro. 4- Sciogliere il triangolo laterale destro nella parte anteriore, trasportare<br />
e tagliare a lama piatta. Sciogliere il triangolo sinistro e collegare in elevazione minima. Continuare lungo tutto il triangolo. 5- Pettinare in avanti l’area frangia e collegarsi al lato destro. Ripetere<br />
sul lato opposto. 6- Partendo dalla lunghezza del vertice, tagliare per sezioni longitudinali in diagonale ad uscire. colore 7- Tracciare una sezione che parte da fine occhio sinistro, passa per la<br />
corona e termina a fine occhio destro. Colorare in radice la zona superiore con il 6.43. 8- Partire dal perimetro e colorare con tecnica a blocchi usando la Formula n.1. Nell’area superiore tracciare<br />
una sezione che passa dal vertice e colorare le lunghezze posteriori con la nuance 8.44. 9- Dividere la zona frontale in 4 sezioni longitudinali con tecnica a zig zag. Partendo da sinistra, colorare<br />
le lunghezze con la Formula n.2. Isolare con un foglio termico. 10- Colorare le lunghezze della sezione interna sinistra con la nuance 8.44 e sulla sezione interna destra con la Formula n.2.<br />
deutsch SCHNITT 1- Kreieren Sie Sektionen wie in der Abb. dargestellt. Im hinteren Bereich fangen Sie bei der Basis des Rechtecks an und kreieren ein Dreieck, dessen Scheitelpunkt<br />
unterhalb des Oberkopfes liegt. 2- Ziehen Sie eine erste diagonale Sektion vom unteren Punkt, heben Sie diese minimal an und schneiden Sie eine Leitlinie nahe der seitlichen Haarlinie.<br />
Der Längenführung folgend, ziehen Sie diagonale Sektionen im parietalen Bereich und schneiden Sie jede Strähne über sich selbst. 3- Lösen Sie das hintere Dreieck. Ausgehend von der<br />
rechten Seite zeichnen Sie eine hintere Diagonale. Um 45° anheben und eine hintere Führungslinie kreieren, mit dem Hinterhauptbein als Bezugspunkt. Schneiden Sie die nachfolgenden<br />
Sektionen mit der gleichen Technik. Links wiederholen. 4- Lösen Sie das Dreieck auf der vorderen, rechten Seite, überlegen und schneiden mit einer flachen Klinge. Lösen Sie das linke<br />
Dreieck und verbinden Sie es durch minimale Anhebung. Längs im gesamten Dreieck fortsetzen. 5- Kämmen Sie den Ponybereich nach vorne und verbinden Sie diesen mit der rechten<br />
Seite. Auf der gegenüberliegenden Seite wiederholen. 6- Beginnend bei der Länge des Scheitelpunktes, schneiden Sie die längsgerichteten Sektionen diagonal. farbe 7- Ziehen Sie eine<br />
Sektion vom Ende des linken Auges, über den Oberkopf bis zum rechten Auge. Färben Sie die Ansatz oben mit 6.43. 8- Beginnend beim Perimeter, färben Sie mit der Block-Technik<br />
unter Verwendung der Formula n.1. Ziehen Sie oben eine Sektion vom Scheitelpunkt an und färben Sie die hinteren Längen mit Nuance 8.44. 9- Teilen Sie den frontalen Bereich in 4<br />
längsgerichteten Sektionen mit der Zick Zack-Technik. Beginnend mit der linken Seite, färben Sie die hinteren Längen mit der Formula n.2. Mit einem thermischen Blatt isolieren.<br />
10- Färben Sie die Längen der internen linken Sektion mit Nuance 8.44 und mit der Formula n.2 die interne rechte Sektion.<br />
franÇais COUPE 1- Séparer les sections tel qu’indiqué dans la photo. Au dos, partir de la base du rectangle et tracer une section triang. ayant comme sommet le point bas de la couronne.<br />
2- Tracer une 1e section diag. au niveau de la patte, l’élever à la graduation 0 et couper une ligne guide près de la ligne d’implant. lat. Suivant la long. guide, tracer des sect. diag. sur la zone<br />
pariétale et couper chaque mèche sur elle-même. 3- Libérer le triang. arrière. En partant du côté D, tracer une diag. arrière. Élever à 45° et créer une ligne guide arrière en se référant à<br />
l’os occip. Couper les sect. succ. de la même façon. Répéter sur le côté G. 4- Libérer le triang. lat. D à l’avant, déplacer et couper à la lame plate. Libérer le triang. G et raccorder avec une<br />
graduation 0. Continuer tout le long du triangle. 5- Peigner la zone frange vers l’avant et se raccorder au côté D. Répéter sur l’autre côté. 6- Partant de la long. du vertex, couper des sections<br />
longit. en diag.vers l’extérieur. COULEUR 7- Tracer une section partant de l’extrémité de l’œil G, passant par le point de la couronne et se terminant à l’extrémité de l’œil D. Colorer la zone<br />
sup., à la racine, avec la nuance 6.43. 8- Partir du périmètre et colorer avec la techn. par blocs en utilisant la formule 1. Dans la zone sup., tracer une sect. qui passe par le vertex et colorer<br />
la zone arrière créée, sur les long. avec la nuance 8.44. 9- Diviser la zone front. en 4 sect. longit. avec techn. en zigzag Partant de la 1e sect. lat. G, colorer les long. avec la formule 2. Isoler<br />
les cheveux avec une feuille thermique. 10- Colorer les long. de la section interne G avec la nuance 8.44 et sur la sect. interne D avec formule 2.<br />
espaÑol cortE 1- Dividir como se muestra en la imagen. En la zona posterior, comenzar desde la base del rectángulo y crear un triángulo cuyo vértice sea el punto bajo de la corona.<br />
2- Dibujar una primera sección diagonal desde el punto base, levantarla a una gradación mínima y cortar una guía en el lateral. Siguiendo la longitud guía, dibujar secciones diagonales<br />
en el parietal y cortar cada mechón sobre sí mismo. 3- Deshacer el triángulo posterior. Comenzando desde el lado derecho, dibujar una diagonal hacia atrás. Elevar a 45° y crear una guía<br />
posterior usando el punto occipital como referencia. Cortar las siguientes secciones con la misma técnica. Repetir en el lado izquierdo. 4- Deshacer el triángulo lateral derecho en la<br />
parte frontal, transportar y cortar con la cuchilla plana. Deshacer el triángulo izquierdo y conectarlo en una elevación mínima. Continuar a lo largo de todo el triángulo. 5- Peinar el área<br />
marginal hacia adelante y conectarla al lado derecho. Repetir en el lado opuesto. 6- Comenzando desde la longitud del vértice, cortar diagonalmente en secciones longitudinales. COLOR<br />
7- Dibujar una sección que comienza al final del ojo izquierdo, pasa a través de la corona y termina al final del ojo derecho. Teñir el área superior en la raíz con 6.43. 8- Partiendo por el<br />
perímetro y teñir con la técnica a bloques usando Formula n°1. En el área superior trazar una sección que pase desde el vértice y tiña las longitudes posteriores con el matiz 8.44. 9- Dividir<br />
el área frontal en 4 secciones longitudinales con la técnica de zigzag. Comenzando desde la izquierda, teñir las longitudes con Formula 2. Aislar con papel térmico. 10- Teñir las longitudes<br />
de la sección interna izquierda con el color 8.44 y en la sección interna derecha con Formula n°2.<br />
step by step 3
Cyléa<br />
Hair: Anthony Galifot for Cyléa Formation by C.A.C.<br />
Assistant: Stéphane Caussin<br />
Photo: Stéphane Deneuvelaere<br />
Make-up: Laurent Tonder
1 2<br />
3<br />
4 5 6<br />
7<br />
8 10<br />
11<br />
9<br />
ENGLISH 1- Begin with the high part of the fade with the cutting head open, then come back down, working millimetre by millimetre. 2- Continue, holding the razor as shown in<br />
the photo. 3- Let the colours of the shading emerge. 4- Make it easier by stretching the scalp with your other hand. 5- To prevent barring, the movement must be circular,<br />
detaching only at the very end. 6- Clean the perimeter of the undercut with scissors. 7- Use the “all in one” to blend the colours of the shading. 8- Shave the base of the shading<br />
down to the skin. 9- Perfect the joint with the upper part of the head. 10- Make it easier by stretching the scalp with your other hand. 11- Perfect the look by shaving the lower<br />
part of the shading to make it as white as possible.<br />
italiano 1- Partire dalla parte alta della sfumatura con la testa di taglio aperta, quindi ridiscendere lavorando millimetro per millimetro. 2- Procedere tenendo il rasoio come<br />
mostrato nell’immagine. 3- Lasciar emergere i colori della sfumatura. 4- Aiutarsi distendendo il cuoio capelluto con l’altra mano. 5- Per evitare barrature, il movimento deve<br />
essere circolare, staccando solo alla fine. 6- Pulire con le forbici il perimetro dell’undercut. 7- Utilizzare la “all in one” per fondere i colori della sfumatura. 8- Rasare la base della<br />
sfumatura, fino a raggiungere la pelle. 9- Perfezionare la congiunzione con la parte alta della testa. 10- Aiutarsi distendendo il cuoio capelluto con l’altra mano. 11- Perfezionare<br />
rasando la parte bassa della sfumatura per renderla bianchissima.<br />
deutsch 1- Beginnen Sie mit einem offenen Rasierkopf oben beim Fade und arbeiten Sie sich Millimeter für Millimeter nach unten. 2-Halten Sie den Rasierer wie in der<br />
Abbildung dargestellt. 3- Lassen Sie die Farben des Schnittverlaufs wirken. 4- Mit Hilfe der anderen Hand dehnen Sie den Bereich nah der Kopfhaut. 5- Um Streifenbildung zu<br />
vermeiden, sollte die Bewegung kreisförmig sein und nur am Ende gelöst werden. 6- Säubern Sie mit der Schere den Umfang des Undercuts. 7- Verwenden Sie die „All in one“<br />
-Technik, um die Farben des Schnittverlaufs zu verblenden. 8- Rasieren Sie die Basis des Fades bis zur Haut. 9- Optimieren Sie die Verbindung mit dem oberen Teil des<br />
Kopfes. 10- Mit Hilfe der anderen Hand dehnen Sie den Bereich nah der Kopfhaut. 11- Optimieren Sie, indem Sie die Unterseite des Fades rasieren, bis das weiße der Kopfhaut<br />
zu sehen ist.<br />
franÇais 1- Partir du haut du dégradé avec la tête de coupe ouverte et redescendre millimètre par millimètre. 2- À chaque fois redescendre en contre peigne. 3- Laisser naitre<br />
les couleurs du dégradé. 4- Ne pas hésiter à étirer le cuir chevelu avec l’autre main. 5- Le mouvement, pour éviter les barres doit être circulaire et décroché à la fin. 6- Nettoyer au<br />
ciseau la bordure de l’undercut. 7- Utiliser la « all in one » pour fondre les teintes du dégradé. 8- Mettre à blanc la base du dégradé. 9- Affiner la jonction avec la zone d’épi.<br />
10- Ne pas hésiter à étirer le cuir chevelu avec l’autre main. 11- Raser le bas du dégradé pour un blanc pur.<br />
espaÑol 1- Comenzar desde la parte alta del degradado con el cabezal de corte abierto, luego descender trabajando milímetro por milímetro. 2- Proceder con la afeitadora<br />
como se muestra en la imagen. 3- Dejar que emerja el color del degradado. 4- Ayudarse distendiendo el cuero cabelludo con la otra mano. 5- Para evitar que el color se corra, el<br />
movimiento debe ser circular, dejándolo solo al final. 6- Limpiar con las tijeras el perímetro del undercut. 7- Usar el “all in one” para fundir los colores del degradado. 8- Afeitar<br />
la base del degradado, hasta alcanzar la piel. 9- Perfeccionar la conjunción con la parte alta del cabezal. 10- Ayudarse distendiendo el cuero cabelludo con la otra mano.<br />
11- Perfeccionar afeitando la parte inferior del degradado para dejarla muy blanca.<br />
step by step 4
Sherri Jessee<br />
Hair & make-up: Sherri Jessee<br />
Photo: Nathan Mays
1 2<br />
3 4 5<br />
6 8<br />
7<br />
ENGLISH 1- Create a section behind the ears in the nape and complete 4 strand braid on each side. 2- Take a section just above the occipital and place it on a hair pad. Roll it up<br />
to create a low chignon. 3- Gently stretch the hair over the hair pad and pin to the head securely. 4- This forms a low chignon with two small braids, one on either side. 5- Brush<br />
the side sections back smoothly, spray with Super Shape Hairspray, wrap across the bun, and secure. 6- Repeat on the other side. 7- Loosen the braid on each side beginning at<br />
the bottom and working your way up to the top. 8- Drape the braids across the chignon and sew or pin to secure.<br />
italiano 1- Creare una sezione sotto entrambe le orecchie, sulla nuca, e una treccia a 4 ciocche su ciascun lato. 2- Prendere una sezione appena al di sopra dell’osso<br />
occipitale e posizionare un posticcio. Avvolgerlo verso l’alto per creare uno chignon basso. 3- Tirare dolcemente i capelli sopra al posticcio e fermare saldamente con delle<br />
mollette. 4- Si ottiene così uno chignon basso con due piccole trecce laterali. Le due sezioni laterali sono ancora libere. 5- Prendere una sezione laterale e pettinarla all’indietro<br />
per renderla liscia e uniforme, spruzzare Super Shape Hairspray, quindi avvolgere la sezione sullo chignon e fissarla. 6- Ripetere lo stesso procedimento sull’altro lato.<br />
7- Allentare le trecce su entrambi i lati, iniziando dal fondo e lavorando verso l’alto, fino alla sommità. 8- Sistemare le trecce sullo chignon, quindi cucirle in posizione o<br />
fermarle con delle mollette.<br />
deutsch 1- Erstellen Sie einen Abschnitt unterhalb beider Ohren, entlang des Nackens, und kreieren Sie einen 4-strähnigen Flechtzopf auf jeder Seite. 2- Nehmen Sie einen<br />
Abschnitt direkt über dem Hinterhauptsbein und platzieren Sie ein Haarteil. Kreieren Sie einen niedrigen Chignon. 3- Ziehen Sie die Haare sanft über das Haarteil und fixieren<br />
Sie mit Bobby Pins. 4- Das ergibt einen niedrigen Chignon mit zwei kleinen geflochtenen Zöpfen an den Seiten. Die beiden Seitensektionen sind noch frei. 5- Nehmen Sie einen<br />
Abschnitt und kämmen Sie diesen nach hinten, so wird alles glatt und gleichmäßig. Tragen Sie Super Shape Hairspray auf und wickeln Sie diesen um den Chignon und dann<br />
fixieren. 6- Wiederholen Sie das gleiche auf der anderen Seite. 7- Lösen Sie die geflochtenen Zöpfe auf beiden Seiten, von unten und nach oben, bis zum Oberkopf. 8- Fixieren<br />
Sie die geflochtenen Zöpfe mit Bobby Pins am Chignon.<br />
franÇais 1- Former une section sous les deux oreilles, sur la nuque et créer une tresse à 4 brins sur chaque côté. 2- Saisir une section juste au-dessus de l’os occipital et mettre<br />
un postiche. L’enrouler vers le haut pour former un chignon bas. 3- Tirer délicatement les cheveux au-dessus du postiche et les immobiliser avec des épingles. 4- L’on obtient<br />
ainsi un chignon bas avec deux fines tresses latérales. Les deux sections latérales sont encore libres. 5- Prendre une section latérale et la coiffer vers l’arrière pour la lisser et la<br />
rendre uniforme, pulvériser du Super Shape Hairspray, puis enrouler la section sur le chignon et fixer. 6- Faire de même sur l’autre côté. 7- Desserrer les tresses sur les deux côtés,<br />
en commençant par le bas et en allant vers le haut, jusqu’au sommet. 8- Arranger les tresses sur le chignon, puis faire des points pour les fixer ou utiliser des épingles.<br />
espaÑol 1- Crear una sección debajo de ambas orejas en la nuca y crear una trenza de 4 hebras en cada lado. 2- Tomar una sección justo encima del hueso occipital y colocar un<br />
postizo. Enroscar hacia arriba para crear un moño bajo. 3- Tirar del cabello suavemente y fijarlo firmemente con clips. 4- Así se obtiene un moño bajo con dos pequeñas trenzas<br />
laterales. Las dos secciones laterales quedan libres. 5- Tomar una sección lateral y peinar hacia atrás para que quede lisa, fijar con laca Super Shape Hairspray, luego envolver la<br />
sección en el moño y fijarla. 6- Repetir el mismo procedimiento en el otro lado. 7- Aflojar las trenzas en ambos lados, comenzando desde abajo y trabajando hacia arriba, hasta<br />
la parte superior. 8- Colocar las trenzas en el moño, luego fijarlas en su lugar con clips.<br />
step by step 5
Kin Cosmetics<br />
Hair: Xevi Jubany y Oscar Vera<br />
Make-up: De Maria<br />
Photo: Sergi Jassanada<br />
Styling: Ángel Cabezuelo
COLOUR FORMULA 1 2 3<br />
Overall bleaching: Kinessences<br />
Blondes Bleaching Cream.<br />
Roots: Kinessences Blonde Beautifier<br />
02 Peach Blonde + Kinessences Color<br />
Developer 12 V.<br />
Lengths and ends: Kinessences Blonde<br />
Beautifier 02 Peach Blonde + 04 Lilac<br />
Blonde + 01 Pink Blonde +<br />
Kinessences Color Developer 12 V<br />
4 5 6 7<br />
8 9 10 11<br />
ENGLISH 1/2- Perform prior bleaching with Kinessences Blondes Bleaching Cream. Partition the hair. 3- On the lower rear of the head, apply Peach Blonde tone 2 of Kinessences<br />
Blonde Beautifier mixed with Kinessences Developer 12 V in a 1-to-1 ratio. 4- Draw out a diagonal section and apply: to the roots, Peach Blonde tone 2 of Kinessences Blonde<br />
Beautifier mixed with Kinessences Developer 12 V in a 1-to-1 ratio. In mid lengths and tips: tone 01 Pink Blonde of Kinessences Blonde Beautifier mixed with Kinessences Developer<br />
12 V in a 1-to-1 ratio. 5- Draw out a second section diagonally and apply: to the roots, Peach Blonde tone 02 of Kinessences Blonde Beautifier mixed with Kinessences Developer 12 V<br />
in a 1-to-1 ratio. In mid lengths and tips: Lilac Blonde tone 04 of Kinessences Blonde Beautifier mixed with Kinessences Developer 12 V in a 1-to-1 ratio. 6- Continue with a third<br />
section diagonally and apply overall color with Peach Blonde tone 02 of Kinessences Color Blonde Beautifier mixed with Kinessences Developer 12 V in a 1:1 ratio. 7- We continue to<br />
work on the following sections diagonally and interspersing the same sequence with tones applied to each of them, always ending with a section colored at the roots with Peach Blonde<br />
tone 02 and mid lengths and ends with Pink Blonde tone 01. 8/9- In the frontal zone and to the roots, apply Peach Blonde tone 02 of Kinessences Blonde Beautifier mixed with<br />
Kinessences Developer 12 V in a 1:1 ratio. 10- Leave in for an exposure time of 30 minutes. 11- Apply Peach Blonde tone 02 of Kinessences Blonde Beautifier mixed with Kinessences<br />
Developer 12 V in a 1:1 ratio to mid lengths and tips, with an exposure time of 5 minutes.<br />
italiano 1/2- Realizzare delle separazioni su capelli già decolorati con Kinessences Blondes Bleaching Cream. 3- Nella zona occipitale, applicare un mix di 02 Peach Blonde di<br />
Kinessences Blonde Beautifier e Kinessences Developer 12 V, in proporzione 1:1. 4- Creare una sezione diagonale e applicare: in radice, un mix di 02 Peach Blonde di Kinessences Blonde<br />
Beautifier e Kinessences Developer 12 V, in proporzione 1:1; su medie lunghezze e punte, un mix di 01 Pink Blonde di Kinessences Blonde Beautifier e Kinessences Developer 12 V, in<br />
proporzione 1:1. 5- Creare una seconda sezione diagonale e applicare: in radice, un mix di 02 Peach Blonde di Kinessences Blonde Beautifier e Kinessences Developer 12 V, in<br />
proporzione 1:1; su medie lunghezze e punte, un mix di 04 Lilac Blonde di Kinessences Blonde Beautifier e Kinessences Developer 12 V, in proporzione 1:1. 6- Su tutta una terza sezione<br />
diagonale, applicare un mix di 02 Peach Blonde di Kinessences Blonde Beautifier e Kinessences Developer 12 V, in proporzione 1:1. 7- Lavorare le sezioni successive sempre in diagonale,<br />
alternando i toni come in precedenza, terminando sempre con una sezione con 02 Peach Blonde in radice e 01 Pink Blonde su medie lunghezze e punte. 8/9- Nella zona frontale e in<br />
radice, applicare un mix di 02 Peach Blonde di Kinessences Blonde Beautifier e Kinessences Developer 12 V, in proporzione 1:1. 10- Tempo di posa: 30 min. 11- Applicare su medie<br />
lunghezze e punte un mix di 02 Peach Blonde di Kinessences Blonde Beautifier e Kinessences Developer 12 V, in proporzione 1:1. Lasciare in posa 5 min.<br />
deutsch 1/2- Bleichen Sie das Haar zuvor mit Kinessences Blondes Bleaching Cream. Teilen Sie das Haar. 3- Tragen Sie unten seitlich am Kopf Peach Blonde Tone 2 des Kinessences<br />
Blonde Beautifier gemischt mit Kinessences Developer 12 V im Verhältnis 1:1 auf. 4- Kreieren Sie eine diagonale Sektion und tragen Sie auf den Ansatz Peach Blonde Tone 2 des<br />
Kinessences Blonde Beautifier gemischt mit Kinessences Developer 12 V im Verhältnis 1:1 auf, auf die mittleren Längen und Spitzen Pink Blonde Tone 01 des Kinessences Blonde<br />
Beautifier gemischt mit Kinessences Developer 12 V im Verhältnis 1:1. 5- Kreieren Sie eine zweite diagonale Sektion und tragen Sie auf den Ansatz Peach Blonde Tone 2 des Kinessences<br />
Blonde Beautifier gemischt mit Kinessences Developer 12 V im Verhältnis 1:1 auf, auf die mittleren Längen und Spitzen Lilac Blonde Tone 04 des Kinessences Blonde Beautifier gemischt<br />
mit Kinessences Developer 12 V im Verhältnis 1:1. 6- Fahren Sie mit einer dritten diagonalen Sektion fort und tragen Sie überall Peach Blonde Tone 2 des Kinessences Blonde Beautifier<br />
gemischt mit Kinessences Developer 12 V im Verhältnis 1:1 auf. 7- Mit der selben Farbabfolge geht es weiter bei den anderen diagonalen Sektionen, dabei sollte die letzte Sektion immer<br />
am Ansatz mit Peach Blonde Tone 2 und bei den mittleren Längen und Spitzen mit Pink Blonde Tone 01 gefärbt werden. 8/9- Tragen Sie im frontalen Bereich und am Ansatz Peach<br />
Blonde Tone 2 des Kinessences Blonde Beautifier gemischt mit Kinessences Developer 12 V im Verhältnis 1:1 auf. 10- Einwirkzeit 30 Min. 11- Tragen Sie Peach Blonde Tone 2 des<br />
Kinessences Blonde Beautifier gemischt mit Kinessences Developer 12 V im Verhältnis 1:1 auf die mittleren Längen und Spitzen auf. Einwirkzeit 5 Min.<br />
franÇais 1/2- Décolorer d’abord avec Kinessences Blondes Bleaching Cream. Séparer les cheveux. 3- Sur la nuque, appliquer Peach Blonde ton 2 de Kinessences Blonde Beautifier mélangé<br />
à Kinessences Developer 12 V en proportion 1/1. 4- Prendre une section diag. et appliquer Peach Blonde ton 2 de Kinessences Blonde Beautifier mélangé à Kinessences Developer 12 V en<br />
proportion 1/1. Sur mi-longueurs et pointes : Pink Blonde ton 1 de Kinessences Blonde Beautifier mélangé à Kinessences Developer 12 V en proportion 1/1. 5- Prendre une 2e section diag.<br />
et appliquer : aux racines, Peach Blonde ton 2 de Kinessences Blonde Beautifier mélangé à Kinessences Developer 12 V en proportion 1/1. Sur mi-longueurs et pointes : Lilac Blonde ton 4<br />
de Kinessences Blonde Beautifier mélangé à Kinessences Developer 12 V en proportion 1/1. 6- Continuer avec une 3e section diag. et appliquer partout Peach Blonde ton 2 de Kinessences<br />
Blonde Beautifier mélangé à Kinessences Developer 12 V en proportion 1/1. 7- Continuer à travailler les sections suiv. en diagonal, en entrecoupant cette même séquence de tons sur<br />
chacune d’entre elles, en finissant toujours avec une section colorée aux racines avec Peach Blonde ton 2 et, mi-longueurs et pointes, Pink Blonde ton 1. 8/9- Dans la zone frontale at aux<br />
racines, appliquer Peach Blonde ton 2 de Kinessences Blonde Beautifier mélangé à Kinessences Developer 12 V en proportion 1/1. 10- Laisser reposer pendant 30 mn. 11- Appliquer Peach<br />
Blonde ton 2 de Kinessences Blonde Beautifier mélangé à Kinessences Developer 12 V en proportion 1/1 sur les mi-longueurs et pointes, en laissant reposer 5 mn.<br />
espaÑol 1/2- Realizar una decoloración previa con Kinessences Bleaching Cream y realizar particiones. 3- En la zona occipital, aplicar el tono 02 Peach Blonde de Kinessences Blonde<br />
Beautifier mezclado con Kinessences Developer 12 V en proporción 1+1. 4- Trazar una sección diagonal y aplicar: en raíz, el tono 02 Peach Blonde de Kinessences Blonde Beautifier<br />
mezclado con Kinessences Developer 12 V en proporción 1+1. En medios y puntas, el tono 01 Pink Blonde de Kinessences Blonde Beautifier mezclado con Kinessences Developer 12<br />
V en proporción 1+1. 5- Trazar una segunda sección en diagonal y aplicar: en raíz, el tono 02 Peach Blonde de Kinessences Blonde Beautifier mezclado con Kinessences Developer 12<br />
V en proporción 1+1. En medios y puntas: el tono 04 Lilac Blonde de Kinessences Blonde Beautifier mezclado con Kinessences Developer 12 V en proporción 1+1. 6- Continuar con<br />
una tercera sección en diagonal y aplicar color global con con el tono 02 Peach Blonde de Kinessences Color Blonde Beautifier mezclado con Kinessences Developer 12 V en<br />
proporción 1+1. 7- Las siguientes secciones las continuamos trabajando en diagonal e intercalando la misma secuencia en cuanto a tonos aplicados en cada una de ellas, finalizando<br />
siempre con sección coloreada en raíces con el tono 02 Peach Blonde y en medios y puntas con el tono 01 Pink Blonde. 8/9- En la zona frontal y en raíz, aplicar el tono 02 Peach Blonde<br />
de Kinessences Blonde Beautifier mezclado con Kinessences Developer 12 V en proporción 1+1. 10- Dejar un tiempo de exposición de 30 minutos. 11- Aplicar en medios y puntas el<br />
tono 02 Peach Blonde de Kinessences Blonde Beautifier mezclado con Kinessences Developer 12 V en proporción 1+1, con un tiempo de exposición 5 minutos.<br />
step by step 6
Dmitry Vinokurov<br />
Open Academy International Vinokurov and Friends<br />
Colour: Sergey Maslov, Sergey Zhilinsky, Irina<br />
Bakhtina, Artem Kotenev, John Toshov, Pavel Fomagin<br />
Photo: Alexey Olkhovoy<br />
Make-up: Denis Skakunov<br />
Products: Wella Professionals
1 2 3 4<br />
5 6 7 8<br />
9 10<br />
ENGLISH COLOUR 1- Base colour is 6/73 at the roots and 7/73 on the ends. Through the temporal zone from the face, foil the sections and apply Magma 89 + oxide 9% 1:2; the<br />
thickness of each strand is 0.5 cm. 2- Apply Illumina 5/81 + oxide 6% 1:1 to the rest of the hair. 3/4- After washing and drying, section off a triangular segment on the front parietal<br />
area. Apply Magma 89 + oxide FreeLights 12% 1:1,5 to each strand using the FreeLights technique, without foil. CUT 5- The zone across the lower nape is cut using the scissor-overcomb<br />
technique, point cutting the ends for a denser contour. Define a horseshoe shape. 6- Partition off 1cm thick sections following the contour of the hair. 7/8 - Level off the ends<br />
using a fine razor to maintain the density. 9/10- Apply Eimi Perfect Me to the hair while still damp and then apply Root Shoot through the roots. Dry hair by lifting at the roots and<br />
then continue to style using a large round brush to give extra smoothness to the hair.<br />
italiano COLOre 1- Il colore di base è 6/73 in radice e 7/73 sulle punte. Separare la zona temporale dal viso con delle stagnole e applicare Magma 89 + crema ossidante 9% in<br />
proporzione 1:2; lo spessore di ciascuna ciocca deve essere 0,5 cm. 2- Applicare Illumina 5/81 + crema ossidante 6% in proporzione 1:1 sul resto dei capelli. 3/4- Dopo il lavaggio e<br />
l’asciugatura, creare una sezione triangolare sulla parte anteriore dell’area parietale. Applicare Magma 89 + crema ossidante FreeLights 12% in proporzione 1:1,5 su ciascuna ciocca,<br />
usando la tecnica FreeLights, senza stagnole. Taglio 5- La parte bassa della nuca viene tagliata con la tecnica delle forbici sopra il pettine, definendo il perimetro in punta di forbice<br />
per un effetto più pieno. Creare una forma a ferro di cavallo. 6- Creare sezioni spesse 1 cm seguendo il perimetro dei capelli. 7/8- Pareggiare le punte usando uno sfilzino per<br />
mantenere la densità. 9/10- Applicare Eimi Perfect Me su capelli ancora umidi, quindi applicare Root Shoot sulle radici. Procedere all’asciugatura sollevando la capigliatura in radice,<br />
quindi realizzare lo styling con una grande spazzola tonda, per rendere i capelli lisci e lucenti.<br />
deutsch FARBE 1- Die Ausgangsfarbe ist 6/73 am Ansatz und 7/73 bei den Spitzen. Teilen Sie im Schläfenbereich Sektionen mit Folien ab und tragen Sie Magma 89 + Oxyd 9% im<br />
Verhältnis 1:2 auf; die Strähnendicke beträgt 0,5 cm. 2- Tragen Sie Illumina 5/81 + Oxyd 6% im Verhältnis 1:1 zum Rest des Haares auf. 3/4- Teilen Sie nach dem Waschen und<br />
Trocknen ein Dreieckssegment im vorderen parietalen Bereich ab. Tragen Sie Magma 89 + Oxyd FreeLights 12% im Verhältnis 1:1,5 auf. Jede Strähne wird mit der FreeLights<br />
Technik ohne Folie behandelt. SCHNITT 5- Der Bereich entlang des unteren Genicks wird mit der Scheren-über-Kamm Technik geschnitten, Point-Cutting bei den Spitzen für eine<br />
dichtere Kontur. Teilen Sie eine Hufeisenform ab. 6- Teilen Sie 1 cm dicke Sektionen ab, der Kontur des Haares folgend. 7/8- Gleichen Sie die Spitzen mithilfe eines feinen<br />
Rasiermessers aus, um die Dichte aufrechtzuerhalten. 9/10- Tragen Sie Eimi Perfect Me auf das noch feuchte Haar auf. Tragen Sie dann Root Shoot auf den Ansatz auf. Heben Sie<br />
beim Föhnen den Ansatz an und verwenden Sie für das Styling eine große Rundbürste, um dem Haar Extraglätte zu schenken.<br />
franÇais COULEUR 1- La couleur de base est 6/73 sur les racines et 7/73 sur les pointes. Depuis le visage, et sur la zone des tempes, poser des feuilles sur les sections et appliquer<br />
Magma 89 + oxyde 9% 1:2, l’épaisseur de chaque mèche est 0,5 cm. 2- Appliquer Illumina 5/81 + oxyde 6% 1:1 sur le reste des cheveux. 3/4- Après avoir lavé et séché les cheveux,<br />
former une section triangulaire sur la zone pariétale frontale. Appliquer Magma 89 + oxyde FreeLights 12% 1:1,5 sur chaque mèche à l’aide de la technique FreeLights, sans utiliser<br />
de feuilles. COUPE 5- Dans la zone de la nuque, couper les pointes avec la technique des ciseaux sous le peigne, pour épaissir le contour. Créer une forme de fer à cheval plus haut.<br />
6- Créer des sections d’1 cm d’épaisseur en suivant le contour des cheveux. 7/8- Égaliser avec un rasoir fin pour maintenir l’épaisseur. 9/10- Appliquer EIMI Perfect Me sur cheveux<br />
humides puis Root Shoot à partir des racines. Sécher les cheveux en soulevant les racines puis coiffer avec une grosse brosse ronde pour lisser encore plus les cheveux.<br />
espaÑol COLOR 1- Color de la base es de 6/73 en las raíces y 7/73 en las puntas. En la zona temporal desde el rostro, cubrir las secciones y aplicar Magma 89 + óxido 9% 1:2; el<br />
grosor de cada mechón es de 0,5 cm. 2- Aplicar Illumina 5/81 + óxido 6% 1:1 al resto del cabello. 3/4- Después del lavado y secado, cortar un segmento triangular en el área parietal<br />
frontal. Aplicar Magma 89 + óxido FreeLights 12% 1:1,5 en cada mechón utilizando la técnica FreeLights, sin papel de aluminio. CORTE 5- La zona inferior de la nuca se corta usando<br />
la técnica de tijera sobre peine, cortar las puntas para obtener un contorno más denso. Definir una forma a herradura. 6- Dividir en secciones con 1 cm de grosor siguiendo el<br />
contorno del cabello. 7/8- Nivelar los extremos usando una navaja fina para mantener la densidad. 9/10- Aplicar Eimi Perfect Me sobre el cabello húmedo y luego aplicar Root Shoot<br />
en las raíces. Secar el cabello levantando las raíces y luego continuar el estilismo con un cepillo redondo grande para dar suavidad extra al cabello.<br />
step by step 7
<strong>Estetica</strong> because...<br />
It's international<br />
The leading trade publication is Italian:<br />
1hairdressers worldwide read <strong>Estetica</strong><br />
2<br />
It's<br />
inspirational<br />
Clients in every salon read <strong>Estetica</strong>:<br />
an exclusive magazine found only<br />
in professional salons<br />
3It's hair fashion<br />
Previews of all the best<br />
international collections: with more<br />
than 150 images in every issue<br />
4<br />
It's<br />
educational<br />
All the new cutting and styling<br />
techniques and product launches:<br />
so you always have the latest news<br />
5It's shows and events<br />
Updates on all the leading sector<br />
happenings: as if you had been<br />
there yourself<br />
6<br />
lt's reputable<br />
Seventy years of history<br />
and expertise: always at the<br />
hairdresser's side
De principio a fin,<br />
Las mejores herramientas profesionales del mundo.<br />
www.babylisspro.com<br />
ALISA, ONDULA Y RIZA CON UNA SOLA HERRAMIENTA ¡INCREÍBLE!