Flexel® 3D LevMix System for Drum
Flexel® 3D LevMix System for Drum
Flexel® 3D LevMix System for Drum

You also want an ePaper? Increase the reach of your titles
YUMPU automatically turns print PDFs into web optimized ePapers that Google loves.
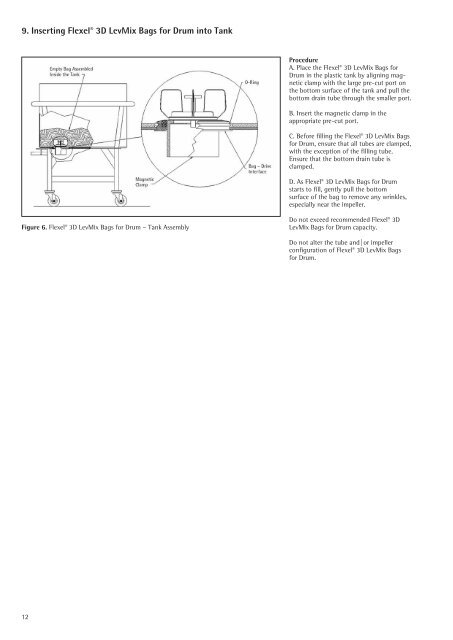
9. Inserting Flexel ® <strong>3D</strong> <strong>LevMix</strong> Bags <strong>for</strong> <strong>Drum</strong> into Tank<br />
Figure 6. Flexel ® <strong>3D</strong> <strong>LevMix</strong> Bags <strong>for</strong> <strong>Drum</strong> – Tank Assembly<br />
12<br />
Procedure<br />
A. Place the Flexel ® <strong>3D</strong> <strong>LevMix</strong> Bags <strong>for</strong><br />
<strong>Drum</strong> in the plastic tank by aligning magnetic<br />
clamp with the large pre-cut port on<br />
the bottom surface of the tank and pull the<br />
bottom drain tube through the smaller port.<br />
B. Insert the magnetic clamp in the<br />
appropriate pre-cut port.<br />
C. Be<strong>for</strong>e filling the Flexel ® <strong>3D</strong> <strong>LevMix</strong> Bags<br />
<strong>for</strong> <strong>Drum</strong>, ensure that all tubes are clamped,<br />
with the exception of the filling tube.<br />
Ensure that the bottom drain tube is<br />
clamped.<br />
D. As Flexel ® <strong>3D</strong> <strong>LevMix</strong> Bags <strong>for</strong> <strong>Drum</strong><br />
starts to fill, gently pull the bottom<br />
surface of the bag to remove any wrinkles,<br />
especially near the impeller.<br />
Do not exceed recommended Flexel ® <strong>3D</strong><br />
<strong>LevMix</strong> Bags <strong>for</strong> <strong>Drum</strong> capacity.<br />
Do not alter the tube and|or impeller<br />
configuration of Flexel ® <strong>3D</strong> <strong>LevMix</strong> Bags<br />
<strong>for</strong> <strong>Drum</strong>.