UltraSmart IUC-4100E, IUC-5100E - Innotek
UltraSmart IUC-4100E, IUC-5100E - Innotek
UltraSmart IUC-4100E, IUC-5100E - Innotek

You also want an ePaper? Increase the reach of your titles
YUMPU automatically turns print PDFs into web optimized ePapers that Google loves.
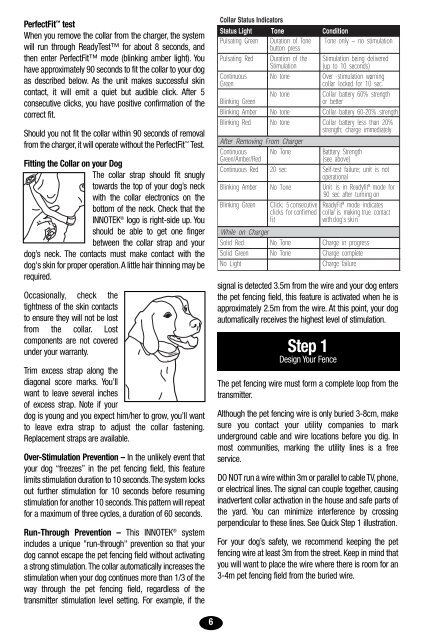
PerfectFit test<br />
When you remove the collar from the charger, the system<br />
will run through ReadyTest for about 8 seconds, and<br />
then enter PerfectFit mode (blinking amber light). You<br />
have approximately 90 seconds to fit the collar to your dog<br />
as described below. As the unit makes successful skin<br />
contact, it will emit a quiet but audible click. After 5<br />
consecutive clicks, you have positive confirmation of the<br />
correct fit.<br />
Should you not fit the collar within 90 seconds of removal<br />
from the charger, it will operate without the PerfectFit Test.<br />
Fitting the Collar on your Dog<br />
The collar strap should fit snugly<br />
towards the top of your dog’s neck<br />
with the collar electronics on the<br />
bottom of the neck. Check that the<br />
INNOTEK ® logo is right-side up. You<br />
should be able to get one finger<br />
between the collar strap and your<br />
dog’s neck. The contacts must make contact with the<br />
dog's skin for proper operation.A little hair thinning may be<br />
required.<br />
Occasionally, check the<br />
tightness of the skin contacts<br />
to ensure they will not be lost<br />
from the collar. Lost<br />
components are not covered<br />
under your warranty.<br />
Trim excess strap along the<br />
diagonal score marks. You’ll<br />
want to leave several inches<br />
of excess strap. Note if your<br />
dog is young and you expect him/her to grow, you’ll want<br />
to leave extra strap to adjust the collar fastening.<br />
Replacement straps are available.<br />
Over-Stimulation Prevention – In the unlikely event that<br />
your dog “freezes” in the pet fencing field, this feature<br />
limits stimulation duration to 10 seconds.The system locks<br />
out further stimulation for 10 seconds before resuming<br />
stimulation for another 10 seconds.This pattern will repeat<br />
for a maximum of three cycles, a duration of 60 seconds.<br />
Run-Through Prevention – This INNOTEK ® system<br />
includes a unique "run-through" prevention so that your<br />
dog cannot escape the pet fencing field without activating<br />
a strong stimulation. The collar automatically increases the<br />
stimulation when your dog continues more than 1/3 of the<br />
way through the pet fencing field, regardless of the<br />
transmitter stimulation level setting. For example, if the<br />
6<br />
signal is detected 3.5m from the wire and your dog enters<br />
the pet fencing field, this feature is activated when he is<br />
approximately 2.5m from the wire. At this point, your dog<br />
automatically receives the highest level of stimulation.<br />
Step 1<br />
Design Your Fence<br />
The pet fencing wire must form a complete loop from the<br />
transmitter.<br />
Although the pet fencing wire is only buried 3-8cm, make<br />
sure you contact your utility companies to mark<br />
underground cable and wire locations before you dig. In<br />
most communities, marking the utility lines is a free<br />
service.<br />
DO NOT run a wire within 3m or parallel to cable TV, phone,<br />
or electrical lines. The signal can couple together, causing<br />
inadvertent collar activation in the house and safe parts of<br />
the yard. You can minimize interference by crossing<br />
perpendicular to these lines. See Quick Step 1 illustration.<br />
For your dog’s safety, we recommend keeping the pet<br />
fencing wire at least 3m from the street. Keep in mind that<br />
you will want to place the wire where there is room for an<br />
3-4m pet fencing field from the buried wire.