- Page 3 and 4: Contents Package Contents .........
- Page 5 and 6: Introduction Congratulations on hav
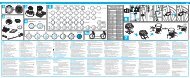
- Page 7 and 8: Using Your Computer 1.Main Unit Set
- Page 9: 2. Overview of Button Operation Thi
- Page 13 and 14: How do you measure the wheel circum
- Page 18 and 19: 5. General Display The display of G
- Page 20 and 21: 7. General Mode Display When you ar
- Page 22 and 23: 9. Temperature Display The followin
- Page 24 and 25: 12. EL Backlight 13. Sleep Mode Pre
- Page 26 and 27: 3. For Bike 1, when you do not ride
- Page 28 and 29: ALT Accumulated Altitude Gains (Dur
- Page 30 and 31: T.AL Total Accumulated Altitude Gai
- Page 32 and 33: DST/D Distance Per Day 0-999.99 km/
- Page 34 and 35: General Specifications Operating Te
- Page 36 and 37: Trouble Shooting Problem No display
- Page 39 and 40: Inhalt Packungsinhalt..............
- Page 41 and 42: Einführung Herzlichen Glückwunsch
- Page 43 and 44: Benutzung des Computers 1.Computer-
- Page 45 and 46: 2. Übersicht der Bedienungstasten
- Page 47 and 48: Taste B: C-Taste: Tasten A+B: Taste
- Page 49 and 50: Wie messe ich den Radumfang? Drehen
- Page 54 and 55: 5. Anzeige Die Anzeige im allgemein
- Page 56 and 57: 7. Allgemeiner Anzeigemodus Währen
- Page 58 and 59: 9. Temperaturanzeige14 Die folgende
- Page 60 and 61:
12. Displaybeleuchtung 13. Sleep-Mo
- Page 62 and 63:
Aktuelle Geschwindigkeit 1. Die akt
- Page 64 and 65:
Tempopfeil 1. Der Tempopfeil zeigt
- Page 66 and 67:
T. RT Gesamtfahrzeit 1. Mit dieser
- Page 68 and 69:
Technische Daten Symbol Funktion Be
- Page 70 and 71:
* Die folgenden Pedaldrehzahlfunkti
- Page 72 and 73:
Hilfe zur Problemlösung Problem Ke
- Page 75 and 76:
Table des matières Contenu de l'em
- Page 77 and 78:
Introduction Félicitations. Vous v
- Page 79 and 80:
Utilisation de l'ordinateur 1.Insta
- Page 81 and 82:
2. Présentation du fonctionnement
- Page 83 and 84:
Bouton B : Bouton C : BoutonsA+B :
- Page 85 and 86:
3. Mesure de la circonférence de l
- Page 87:
4. Réglages et fonctionnement de b
- Page 92 and 93:
6. Remplacement de la pile 1. Lorsq
- Page 94 and 95:
8. À propos de l'étalonnage de l'
- Page 96 and 97:
11. Réinitialisation des données
- Page 98 and 99:
Fonctions L'écran de l'ordinateur
- Page 100 and 101:
mesurer la durée écoulée pendant
- Page 102 and 103:
3. Attention : La partie inférieur
- Page 104 and 105:
Caractéristiques techniques Symbol
- Page 106 and 107:
* Les fonctions de cadence (RPM) su
- Page 108 and 109:
Dépannage Problème Pas d'affichag
- Page 110 and 111:
109
- Page 112 and 113:
Contenido del paquete 1. UNIDAD PRI
- Page 114 and 115:
como referencia para la próxima ve
- Page 116 and 117:
A continuación se muestra la panta
- Page 118 and 119:
Botón A: 1. Pulse el botón A para
- Page 120 and 121:
2. Pulse el botón A para cambiar e
- Page 122 and 123:
4. Programación y funcionamiento b
- Page 124 and 125:
123
- Page 126 and 127:
5. Pantalla general La pantalla de
- Page 128 and 129:
7. Pantalla de Modo general Al util
- Page 130 and 131:
9. Pantalla de temperatura La sigui
- Page 132 and 133:
12. Retroiluminación 13. Modo de r
- Page 134 and 135:
3. Para la Bicicleta 1, cuando no s
- Page 136 and 137:
Flecha del ritmo 1. La flecha del r
- Page 138 and 139:
T. RT Tiempo total de marcha 1. Con
- Page 140 and 141:
Características técnicas Símbolo
- Page 142 and 143:
* Las siguientes funciones de RPM (
- Page 144 and 145:
Resolución de problemas Problema L
- Page 146 and 147:
145
- Page 148 and 149:
Inhoud verpakking 1. HOOFDEENHEID H
- Page 150 and 151:
In de of bevindt zich een bijzonder
- Page 152 and 153:
Ter referentie vindt u hieronder he
- Page 154 and 155:
1. In instelmodus: Tips: 1. De gebr
- Page 156 and 157:
3. In de kalibratiemodus voor de ho
- Page 158 and 159:
Zelf de wielomtrek opmeten Draai he
- Page 160 and 161:
159
- Page 162 and 163:
161
- Page 164 and 165:
6. Batterij vervangen 1. Als het wa
- Page 166 and 167:
8. Hoogte kalibreren: Tip voor het
- Page 168 and 169:
11. Gegevens resetten 1. Houd de A-
- Page 170 and 171:
Functies Het scherm van de computer
- Page 172 and 173:
computer automatisch met het meten
- Page 174 and 175:
meten. Dit meetgat moet altijd scho
- Page 176 and 177:
Technische specificaties Symbool Fu
- Page 178 and 179:
* De volgende RPM-functies (toerent
- Page 180 and 181:
Problemen oplossen Probleem Geen be
- Page 182 and 183:
KOMPUTERY ROWEROWE BEZPRZEWODOWE I
- Page 184 and 185:
Zawarto opakowania 1. KOMPUTER ROWE
- Page 186 and 187:
wzgórzach lub w górach. W kadym k
- Page 188 and 189:
Widok Trybu Ogólnego podczas jazdy
- Page 190 and 191:
Przycisk B: Przycisk C: Przycisk D:
- Page 192 and 193:
Wskazówki na temat Trybu Ustawiani
- Page 194 and 195:
4. Ustawienia podstawowe i obsuga k
- Page 196 and 197:
195
- Page 198 and 199:
5. Widoki w Trybie Ogólnym W Trybi
- Page 200 and 201:
7. Funkcje niewidoczne w Trybie Og
- Page 202 and 203:
9. Wywietlanie temperatury Ponisz c
- Page 204 and 205:
12. Podwietlenie elektroluminescenc
- Page 206 and 207:
3.Jeli Rower 1 nie jedzie duej ni 4
- Page 208 and 209:
ALT Cakowity wzrost wysokoci (podcz
- Page 210 and 211:
T.AL Cakowity wzrost wysokoci ze ws
- Page 212 and 213:
ODO Licznik przejechanego 0-999 999
- Page 214 and 215:
Ogólne dane techniczne Temperatura
- Page 216 and 217:
Rozwizywanie problemów Problem Spr
- Page 218 and 219:
A. PHYSICAL DESCRIPTIONS 11 4 5 3 6
- Page 220:
A. PHYSICAL DESCRIPTIONS 5 1 3 4 6