537 - V-Tech Garage Equipment
537 - V-Tech Garage Equipment
537 - V-Tech Garage Equipment
- No tags were found...

You also want an ePaper? Increase the reach of your titles
YUMPU automatically turns print PDFs into web optimized ePapers that Google loves.
CAP. 5<br />
FUNZIONAMENTO<br />
CHAPTER 5<br />
OPERATION<br />
P1<br />
P2<br />
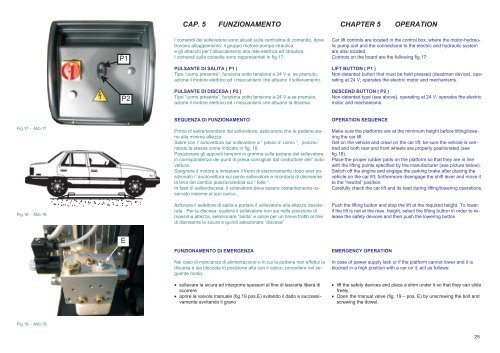
I comandi del sollevatore sono situati sulla centralina di comando, dove<br />
trovano alloggiamento: il gruppo motore-pompa idraulica,<br />
e gli attacchi per l’allacciamento alla rete elettrica ed idraulica.<br />
I comandi sulla consolle sono rappresentati in fig.17:<br />
PULSANTE DI SALITA ( P1 )<br />
Tipo “uomo presente“, funziona sotto tensione a 24 V e, se premuto,<br />
aziona il motore elettrico ed i meccanismi che attuano il sollevamento.<br />
PULSANTE DI DISCESA ( P2 )<br />
Tipo “uomo presente“, funziona sotto tensione a 24 V e,se premuto,<br />
azione il motore elettrico ed i meccanismi che attuano la discesa.<br />
Car lift controls are located in the control box, where the motor-hydraulic<br />
pump unit and the connections to the electric and hydraulic system<br />
are also located.<br />
Controls on the board are the following fig.17:<br />
LIFT BUTTON ( P1 )<br />
Non-detented button that must be held pressed (deadman device), operating<br />
at 24 V; operates the electric motor and mechanisms.<br />
DESCEND BUTTON ( P2 )<br />
Non-detented type (see above), operating at 24 V; operates the electric<br />
motor and mechanisms.<br />
Fig.17 - Abb.17<br />
Fig.18 - Abb.18<br />
SEQUENZA DI FUNZIONAMENTO<br />
Prima di salire/scendere dal sollevatore, assicurarsi che le pedane siano<br />
alla minima altezza.<br />
Salire con l’ autovettura sul sollevatore a “ passo d’ uomo “, posizionando<br />
la stessa come indicato in fig. 18.<br />
Posizionare gli appositi tamponi in gomma sulla pedana del sollevatore<br />
in corrispondenza dei punti di presa consigliati dal costruttore dell’ autovettura.<br />
Spegnere il motore e innestare il freno di stazionamento dopo aver posizionato<br />
l’ auotovettura sul ponte sollevatore e ricordarsi di disinserire<br />
la leva del cambio posizionandola sul “ folle “.<br />
In fase di salita/discesa, il sollevatore deve essere costantemente osservato<br />
insieme al suo carico.<br />
Azionare il selettore di salita e portare il sollevatore alla altezza desiderata<br />
. Per la discesa, qualora il sollevatore non sia nella posizione di<br />
massima altezza, selezionare “salita” e salire per un breve tratto al fine<br />
di disinserire la sicura e quindi selezionare “discesa”<br />
OPERATION SEQUENCE<br />
Make sure the platforms are at the minimum height before lifting/lowering<br />
the car lift.<br />
Get on the vehicle and crawl on the car lift; be sure the vehicle is centred<br />
and both rear and front wheels are properly positionated (see<br />
fig.18).<br />
Place the proper rubber pads on the platform so that they are in line<br />
with the lifting points specified by the manufacturer (see picture below).<br />
Switch off the engine and engage the parking brake after placing the<br />
vehicle on the car lift; furthermore disengage the shift lever and move it<br />
to the “neutral” position.<br />
Carefully check the car lift and its load during lifting/lowering operations.<br />
Push the lifting button and stop the lift at the required height. To lower,<br />
if the lift is not at the max. height, select the lifting button in order to release<br />
the safety devices and then push the lowering button.<br />
E<br />
FUNZIONAMENTO DI EMERGENZA<br />
Nel caso di mancanza di alimentazione o in cui la pedana non effettui la<br />
discesa e sia bloccata in posizione alta con il carico, procedere nel seguente<br />
modo:<br />
sollevare la sicura ed interporre spessori al fine di lasciarla libera di<br />
scorrere<br />
aprire la valvola manuale (fig.19 pos.E) svitando il dado e successivamente<br />
avvitando il grano<br />
EMERGENCY OPERATION<br />
In case of power supply lack or if the platform cannot lower and it is<br />
blocked in a high position with a car on it, act as follows:<br />
lift the safety devices and place a shim under it so that they can slide<br />
freely.<br />
Open the manual valve (fig. 19 – pos. E) by unscrewing the bolt and<br />
screwing the dowel.<br />
Fig.19 - Abb.19<br />
25