USER MANUAL English Français Español - Mcarterbrown.com
USER MANUAL English Français Español - Mcarterbrown.com
USER MANUAL English Français Español - Mcarterbrown.com

Create successful ePaper yourself
Turn your PDF publications into a flip-book with our unique Google optimized e-Paper software.
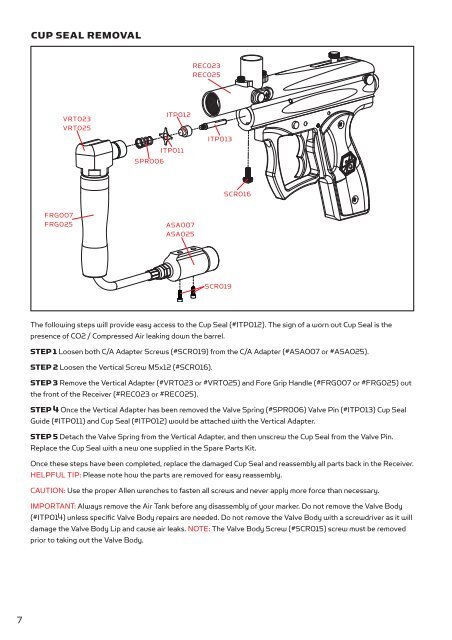
CUP SEAL REMOVALREC023REC025VRT023VRT025ITP012ITP011SPR006ITP013SCR016FRG007FRG025ASA007ASA025SCR019The following steps will provide easy access to the Cup Seal (#ITP012). The sign of a worn out Cup Seal is thepresence of CO2 / Compressed Air leaking down the barrel.STEP 1 Loosen both C/A Adapter Screws (#SCR019) from the C/A Adapter (#ASA007 or #ASA025).STEP 2 Loosen the Vertical Screw M5x12 (#SCR016).STEP 3 Remove the Vertical Adapter (#VRT023 or #VRT025) and Fore Grip Handle (#FRG007 or #FRG025) outthe front of the Receiver (#REC023 or #REC025).STEP 4 Once the Vertical Adapter has been removed the Valve Spring (#SPR006) Valve Pin (#ITP013) Cup SealGuide (#ITP011) and Cup Seal (#ITP012) would be attached with the Vertical Adapter.STEP 5 Detach the Valve Spring from the Vertical Adapter, and then unscrew the Cup Seal from the Valve Pin.Replace the Cup Seal with a new one supplied in the Spare Parts Kit.Once these steps have been <strong>com</strong>pleted, replace the damaged Cup Seal and reassembly all parts back in the Receiver.HELPFUL TIP: Please note how the parts are removed for easy reassembly.CAUTION: Use the proper Allen wrenches to fasten all screws and never apply more force than necessary.IMPORTANT: Always remove the Air Tank before any disassembly of your marker. Do not remove the Valve Body(#ITP014) unless specific Valve Body repairs are needed. Do not remove the Valve Body with a screwdriver as it willdamage the Valve Body Lip and cause air leaks. NOTE: The Valve Body Screw (#SCR015) screw must be removedprior to taking out the Valve Body.7