USER MANUAL English Français Español - Mcarterbrown.com
USER MANUAL English Français Español - Mcarterbrown.com
USER MANUAL English Français Español - Mcarterbrown.com

You also want an ePaper? Increase the reach of your titles
YUMPU automatically turns print PDFs into web optimized ePapers that Google loves.
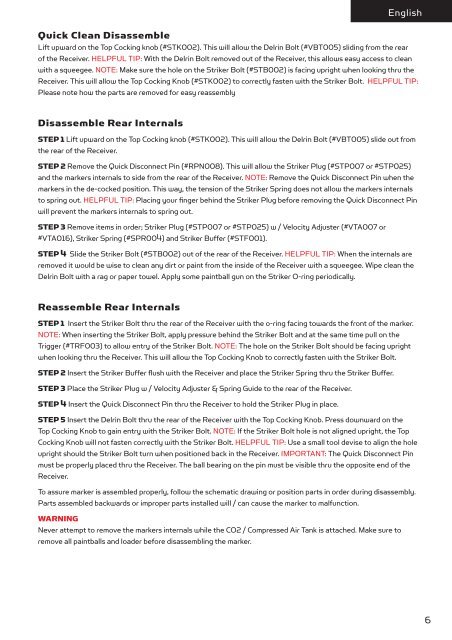
<strong>English</strong>Quick Clean DisassembleLift upward on the Top Cocking knob (#STK002). This will allow the Delrin Bolt (#VBT005) sliding from the rearof the Receiver. HELPFUL TIP: With the Delrin Bolt removed out of the Receiver, this allows easy access to cleanwith a squeegee. NOTE: Make sure the hole on the Striker Bolt (#STB002) is facing upright when looking thru theReceiver. This will allow the Top Cocking Knob (#STK002) to correctly fasten with the Striker Bolt. HELPFUL TIP:Please note how the parts are removed for easy reassemblyDisassemble Rear InternalsSTEP 1 Lift upward on the Top Cocking knob (#STK002). This will allow the Delrin Bolt (#VBT005) slide out fromthe rear of the Receiver.STEP 2 Remove the Quick Disconnect Pin (#RPN008). This will allow the Striker Plug (#STP007 or #STP025)and the markers internals to side from the rear of the Receiver. NOTE: Remove the Quick Disconnect Pin when themarkers in the de-cocked position. This way, the tension of the Striker Spring does not allow the markers internalsto spring out. HELPFUL TIP: Placing your finger behind the Striker Plug before removing the Quick Disconnect Pinwill prevent the markers internals to spring out.STEP 3 Remove items in order; Striker Plug (#STP007 or #STP025) w / Velocity Adjuster (#VTA007 or#VTA016), Striker Spring (#SPR004) and Striker Buffer (#STF001).STEP 4 Slide the Striker Bolt (#STB002) out of the rear of the Receiver. HELPFUL TIP: When the internals areremoved it would be wise to clean any dirt or paint from the inside of the Receiver with a squeegee. Wipe clean theDelrin Bolt with a rag or paper towel. Apply some paintball gun on the Striker O-ring periodically.Reassemble Rear InternalsSTEP 1 Insert the Striker Bolt thru the rear of the Receiver with the o-ring facing towards the front of the marker.NOTE: When inserting the Striker Bolt, apply pressure behind the Striker Bolt and at the same time pull on theTrigger (#TRF003) to allow entry of the Striker Bolt. NOTE: The hole on the Striker Bolt should be facing uprightwhen looking thru the Receiver. This will allow the Top Cocking Knob to correctly fasten with the Striker Bolt.STEP 2 Insert the Striker Buffer flush with the Receiver and place the Striker Spring thru the Striker Buffer.STEP 3 Place the Striker Plug w / Velocity Adjuster & Spring Guide to the rear of the Receiver.STEP 4 Insert the Quick Disconnect Pin thru the Receiver to hold the Striker Plug in place.STEP 5 Insert the Delrin Bolt thru the rear of the Receiver with the Top Cocking Knob. Press downward on theTop Cocking Knob to gain entry with the Striker Bolt. NOTE: If the Striker Bolt hole is not aligned upright, the TopCocking Knob will not fasten correctly with the Striker Bolt. HELPFUL TIP: Use a small tool devise to align the holeupright should the Striker Bolt turn when positioned back in the Receiver. IMPORTANT: The Quick Disconnect Pinmust be properly placed thru the Receiver. The ball bearing on the pin must be visible thru the opposite end of theReceiver.To assure marker is assembled properly, follow the schematic drawing or position parts in order during disassembly.Parts assembled backwards or improper parts installed will / can cause the marker to malfunction.WARNINGNever attempt to remove the markers internals while the CO2 / Compressed Air Tank is attached. Make sure toremove all paintballs and loader before disassembling the marker.6