T146025 handleiding CFSwing 2002.qxd - Alles voor de fiets
T146025 handleiding CFSwing 2002.qxd - Alles voor de fiets
T146025 handleiding CFSwing 2002.qxd - Alles voor de fiets

Create successful ePaper yourself
Turn your PDF publications into a flip-book with our unique Google optimized e-Paper software.
T1460 CYCLEFORCE SWINGNEDERLANDS 3DEUTSCH 9ENGLISH 15FRANÇAIS 21ESPAÑOL 27ITALIANO 33SERVICE FORM 39TACX SERVICE CENTRES 40LiabilityThe data in this manual are for information purposes only. Tacx bv constantly strives for innovation.Tacx reserves the right to modify or improve the products <strong>de</strong>scribed in this manual, without priorannouncement.Tacx shall not be held liable for any direct, inci<strong>de</strong>ntal or special damage resulting from or related tothe use of this material or the products <strong>de</strong>scribed here in.2
Inhoud verpakkingT1460 CYCLEFORCE SWINGInhoud verpakkingControleer of <strong>de</strong> on<strong>de</strong>rstaan<strong>de</strong> on<strong>de</strong>r<strong>de</strong>lenin <strong>de</strong> verpakking aanwezig zijn.- frame CycleForce Swing- wervelstroomrem- <strong>handleiding</strong>- 2 voeten- 2 einddoppen- 2 montagezakjesInhoud T1465 montagezakje trainerT1424.012xT1424.022xT1353.101xT1353.111xT14021xT1408.111xT1410.021xT1410.042xT1410.061xT1423.152xT1424.032xT1461.192xT1461.221xT1465.012xT1465.082xInhoud T1466 montagezakje aanpassingset unitT1466.011xT1466.021xT1466.031xT1466.041xT1260.074xT1461.194xT2459.034xNL3
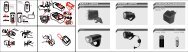
Montage CycleForce SwingMONTAGE CYCLEFORCE SWINGDe <strong>fiets</strong>trainer CycleForce Swing is standaard geschikt <strong>voor</strong> race- en hybri<strong>de</strong><strong>fiets</strong>en en mountain bikes met wieldiameter 610 tot 720 mm.10 mm13 mm (2x)Het monteren en afstellen van <strong>de</strong> trainer is éénmalig en gaat als volgt:1 Druk moer A in einddop B en schuif einddop in <strong>de</strong> buis van het frame (fig.1).2 Monteer voet C met bout D aan het frame. Draai bout D zodanig vast dat <strong>de</strong>voet nog verstelbaar is.3 Plaats frame uitgeklapt op een stevige en vlakke on<strong>de</strong>rgrond. Het frame is inenuit klapbaar door greep E volledig in te knijpen (fig.1).4 Draai voet C in <strong>de</strong> juiste positie (fig.2). Draai bout D goed vast en bevestigantisliprubber F (fig.3).5 Monteer 2 rubber ringen G en afstelbus K aan hen<strong>de</strong>l H (fig.3). Monteer vervolgens <strong>de</strong>complete hen<strong>de</strong>l aan het frame.6 Schuif wervelstroomrem I om afstelbus K van <strong>de</strong> hen<strong>de</strong>l (fig.4).7 Bevestig remunit met bout J en draai <strong>de</strong>ze zodanig vast dat <strong>de</strong> rem nog kan bewegen.8 Vervang <strong>de</strong> blockage van het achterwiel van <strong>de</strong> <strong>fiets</strong> door <strong>de</strong> meegelever<strong>de</strong> Tacx blockage X.Dit garan<strong>de</strong>ert optimale klempassing en stabiliteit. Plaats vervolgens <strong>de</strong> <strong>fiets</strong> in <strong>de</strong> trainer enstel vleugelbout L van <strong>de</strong> trainer zo af dat snelspanklem M zon<strong>de</strong>r al te veel kracht geslotenkan wor<strong>de</strong>n. Forceren kan beschadigingen veroorzaken!9 Fixeer vleugelbout L door vleugelmoer N naar binnen toe vast te draaien.10 Plaats inlage O in schakelaar P (fig.4) en monteer <strong>de</strong> schakelaar op het stuur. Gebruik bij sturenmet diameter 22,4 mm rubber strip S. Klik vervolgens <strong>de</strong> kabel in kabelclip Q zodat <strong>de</strong>ze <strong>de</strong><strong>fiets</strong>band niet raakt.NL-XBACDM1EIJQPKO3GSHFIJ KH2C44NL
TrainingsadviesTRAININGSADVIESEr is geen sport waarbij zo langdurig zware inspanningen van <strong>de</strong> sporter wor<strong>de</strong>n gevraagd als bij hetwielrennen. Wielrennen wordt algemeen beschouwd als een van <strong>de</strong> zwaarste sporten wat betreft <strong>de</strong>belasting van hart, longen en spieren. Voor het <strong>fiets</strong>en op <strong>de</strong> Tacx CycleForce Swing geldt tot opzekere hoogte hetzelf<strong>de</strong>, temeer omdat u die belastingen op een hoger niveau wenst te brengen. Eenuitgebrei<strong>de</strong>, jaarlijkse sportkeuring bij een gespecialiseer<strong>de</strong> instantie of sportarts is daarom een eerstevereiste <strong>voor</strong>dat u aan uw nieuwe <strong>fiets</strong>seizoen begint.Een <strong>de</strong>finitie <strong>voor</strong> training zou kunnen zijn: “Het systematisch toedienen van een prikkel om <strong>de</strong>prestatie te verhogen”. Trainen doen we met een doel. Een doel kan zijn gewicht kwijtraken, eencyclo sportieve uit te rij<strong>de</strong>n of om goud te behalen bij een kampioenschap. De “prikkel” die we toedienenkan bestaan uit lang en rustig <strong>fiets</strong>en of kort en snel <strong>fiets</strong>en. Belangrijk is dat in <strong>de</strong> opbouw van<strong>de</strong> training een systeem zit. Naar gelang het seizoen vor<strong>de</strong>rt gaan we langer, ver<strong>de</strong>r of zelfs hoger(bergen) <strong>fiets</strong>en. Variatie is het toverwoord om <strong>de</strong> prestaties daadwerkelijk te verbeteren.SupercompensatieTij<strong>de</strong>ns het trainen brengen we een verstoring teweeg in het lichaam; <strong>de</strong>ze verstoring (hart, longen,spieren) wordt tij<strong>de</strong>ns <strong>de</strong> rust hersteld en een stukje verbeterd. Dit principe noemen we supercompensatie.We wor<strong>de</strong>n dus niet sterker van het trainen maar van <strong>de</strong> rust daarna.Een volgen<strong>de</strong> training moet komen op het moment dat <strong>de</strong> supercompensatie curve <strong>de</strong> nullijn nog netniet geraakt heeft (fig.7). Om <strong>de</strong> conditie op een hoger niveau te brengen kan wor<strong>de</strong>n gesteld datminimaal 3 trainingseenhe<strong>de</strong>n per week nodig zijn. Met 2 trainingen kan men <strong>de</strong> conditie behou<strong>de</strong>nen 1 training per week is te weinig. Een trainingsplan kan door uzelf of door een trainer/coach wor<strong>de</strong>nsamengesteld.trainingsarbeid765herstelsupercompensatie0vemogen (watt)432175 10 15 20 25 30 35 40 45 50 55 60snelheid (km/h)De CycleForce Swing is een <strong>fiets</strong>trainer <strong>voor</strong> wielrenners die intensief en gericht op vermogen willentrainen, hun krachten willen vergroten en snel resultaten willen boeken. In <strong>de</strong> grafiek (fig.8) staat hetvermogen van <strong>de</strong> CF Swing (Y-as) uitgezet tegen <strong>de</strong> snelheid in km/u (X-as). Omdat <strong>de</strong> wervelstromremeen schakelaar heeft met 7 stan<strong>de</strong>n (slope), lopen er ook 7 lijnen in <strong>de</strong> grafiek. Het vermogenneemt toe wanneer er sneller en/of op een zwaar<strong>de</strong>re stand ge<strong>fiets</strong>t wordt. De CF Swing is bij uitstekgeschikt om specifieke krachttrainingen te doen, trainingen die op <strong>de</strong> weg nauwelijks uitvoerbaarzijn. Het is aan te ra<strong>de</strong>n om tij<strong>de</strong>ns het gebruik van <strong>de</strong> CF Swing een hartslagmeter te gebruiken.Voorbeel<strong>de</strong>n trainingsprogramma’sBegin een training altijd met een warming-up. Even 5 tot 10 minuten los<strong>fiets</strong>en op een klein verzet eneen trapfrequentie van 90/110 omw./min. Tij<strong>de</strong>ns <strong>de</strong>ze warming up kan men wat rekoefeningen doen(zelfs op <strong>de</strong> <strong>fiets</strong>). Eindig <strong>de</strong> training met een cooling-down van 5 tot 10 minuten en weer watrekoefeningen. Het overslaan van een goe<strong>de</strong> warming-up en of cooling-down kan lei<strong>de</strong>n totblessures.86NL
TrainingsadviesHersteltrainingtijd (min.) slope omw. (rpm) verzet bijzon<strong>de</strong>rhe<strong>de</strong>n3 1 100 kleinste lekker draaien/hoge snelheid3 1 100 1 zwaar<strong>de</strong>r lekker draaien/hoge snelheid3 1 100 1 zwaar<strong>de</strong>r lekker draaien/hoge snelheid3 1 100 1 zwaar<strong>de</strong>r lekker draaien/hoge snelheid3 1 100 1 zwaar<strong>de</strong>r lekker draaien/hoge snelheid3 1 100 1 zwaar<strong>de</strong>r lekker draaien/hoge snelheid3 1 100 1 lichter lekker draaien/hoge snelheid3 1 100 1 lichter lekker draaien/hoge snelheid3 1 100 1 lichter lekker draaien/hoge snelheid3 1 100 1 lichter lekker draaien/hoge snelheid3 1 100 1 lichter lekker draaien/hoge snelheid3 1 100 kleinste lekker draaien/hoge snelheid36Eventueel het geheel nog eens herhalen op stand 2 met 2 minuten telkens en nog eens op stand3 met 1 minuut herhaling.Voor <strong>de</strong> afwisseling kunt u natuurlijk ook op 80, 90, 110 of 120 omwentelingengaan <strong>fiets</strong>en.Krachttrainingtijd (min.) slope omw. (rpm) verzet bijzon<strong>de</strong>rhe<strong>de</strong>n1 3 115 vrij hoge snelheid1 1 80 vrij rustig draaien/herstel2 3 115 vrij hoge snelheid2 1 80 vrij rustig draaien/herstel3 3 115 vrij hoge snelheid3 1 80 vrij rustig draaien/herstel1 2 70/80 vrij alleen linkerbeen trekken/duwen1 2 70/80 vrij alleen rechterbeen trekken/duwen3 6 60 vrij staan op <strong>de</strong> pedalen!3 4 115 vrij hoge snelheid3 1 80 vrij rustig draaien/herstel2 4 115 vrij hoge snelheid2 1 80 vrij rustig draaien/herstel1 4 115 vrij hoge snelheid1 1 80 vrij rustig draaien/herstel10 1 vrij vrij cooling-down39Heuveltrainingtijd (min.) slope omw. (rpm) verzet bijzon<strong>de</strong>rhe<strong>de</strong>n4 2 80/90 vrij lekker draaien/constante snelheid3 3 > 80 vrij probeer snelheid hoog te hou<strong>de</strong>n1 7 60 53-14 staan op <strong>de</strong> pedalen!5 1 > 100 42-16 hoge trapfrequentie2 5 > 80 53-15 zitten/staan om <strong>de</strong> 30" afwisselen2 6 90/100 42-16 blijven zitten5 1 110/130 42-16 hoge trapfrequentie10 1 vrij vrij cooling-down32Trainingsadviezen en <strong>de</strong> laatste ontwikkelingen: www.tacx.nl.NL7
Storingen en garantieSTORINGENStoringMogelijk probleemOplossing1 De opstelling van <strong>de</strong>CycleForce Swingwiebelt2 Er blijft rubbervan <strong>de</strong> <strong>fiets</strong>bandaan <strong>de</strong> rol kleven3 Er ontstaat veellawaai door het<strong>fiets</strong>en1 Het frame van <strong>de</strong> CycleForceSwing staat niet vlak2 Het frame is niet goedgemonteerd3 De <strong>fiets</strong> staat niet goed inhet frame4 Frame is niet volledig uitgeklapt1 De ban<strong>de</strong>nspanning te laag2 De rol is niet goed tegen <strong>de</strong>band aangedrukt1 Er is een profielband gemonteerd2 Er zit een steentje (tikken!)in <strong>de</strong> band1 Plaats CycleForce Swing op vlakkevloer2 Controleer of alle bouten en moerengoed vast zitten3 Controleer of bijgelever<strong>de</strong> blockage isgemonteerd4 Klap frame volledig uit1 Controleer ban<strong>de</strong>nspanning, minimaal6 atmosfeer2 Draai rol stevig tegen <strong>de</strong> band1 Monteer band met geheel of ge<strong>de</strong>eltelijkglad ban<strong>de</strong>nprofiel2 Controleer bandGARANTIETacx produkten wor<strong>de</strong>n vervaardigd in overeenstemming met <strong>de</strong> hoogste kwaliteitsnormen.Op Tacx produkten is <strong>voor</strong> <strong>de</strong> perio<strong>de</strong> van één (1) jaar vanaf <strong>de</strong> aankoopdatum een garantietegen produktie- en materiaalfouten van toepassing. Bewaar <strong>de</strong> kassabon, want dit is uw aankoopbewijs! On<strong>de</strong>r<strong>de</strong>len die bij normaal gebruik slijtage vertonen vallen niet on<strong>de</strong>r <strong>de</strong> garantie.De garantie vervalt indien het produkt aantoonbare sporen vertoont van:1 gebruik <strong>voor</strong> een an<strong>de</strong>r doel dan waar<strong>voor</strong> bestemd2 onoor<strong>de</strong>elkundig gebruik, reparatie of <strong>de</strong>montage3 beschadigingen ten gevolge van ongevallen en verwaarlozing4 scha<strong>de</strong> die optreedt geduren<strong>de</strong> <strong>de</strong> verzending of het vervoer van het produktVerzendkosten- verzendkosten naar <strong>de</strong> Tacx <strong>de</strong>aler of Tacx Service Centre zijn <strong>voor</strong> eigen rekening- reparaties wor<strong>de</strong>n op kosten van het Tacx Service Centre retour gestuurdProcedure- Wanneer het produkt bij normaal gebruik om enigerlei re<strong>de</strong>n niet naar behoren functioneert,breng <strong>de</strong>ze dan met het bewijs van aankoop (kopie) en het ingevul<strong>de</strong> service formulier terugnaar uw <strong>de</strong>aler. U kunt het ook direct naar het Tacx Service Centre sturen in uw land.- Het Tacx Service Centre kan alleen retourzendingen in behan<strong>de</strong>ling nemen die vergezeld zijnvan een ingevuld service formulier.- Als wordt vastgesteld dat het produkt on<strong>de</strong>r garantie valt zal het Service Centre dit binnen30 dagen na ontvangst kostenloos repareren of vervangen.- De vaststelling of een produkt on<strong>de</strong>r garantie valt berust alleen bij Tacx bv. Wanneer het produktniet on<strong>de</strong>r garantie valt dan zal het wor<strong>de</strong>n gerepareerd en wor<strong>de</strong>n <strong>de</strong> kosten berekend.Wanneer <strong>de</strong> kosten van <strong>de</strong> reparatie hoger zijn dan 50,00 Euro ontvangt u <strong>voor</strong>af een prijsopgave.Na ontvangst van uw antwoord wordt het produkt gerepareerd of in <strong>de</strong> oorspronkelijkestaat retour gestuurd.8NL
Inhalt <strong>de</strong>r VerpackungT1460 CYCLEFORCE SWINGInhalt <strong>de</strong>r VerpackungKontrollieren Sie, ob die Packung alleunten aufgeführten Teile enthält.- Rahmen CycleForce Swing- Magnetbremse- Handbuch- 2 Füße- 2 Verschlußkappen- 2 MontagebeutelT1465 Montagebeutel TrainerT1424.012xT1424.022xT1353.101xT1353.111xT14021xT1408.111xT1410.021xT1410.042xT1410.061xT1423.152xT1424.032xT1461.192xT1461.221xT1465.012xT1465.082xT1466 Montagebeutel für Raddurchmesser-AnpassungT1466.011xT1466.021xT1466.031xT1466.041xT1260.074xT1461.194xT2459.034xD9
Montage <strong>de</strong>s CycleForce Swing9 Sichern Sie die Flügelschraube L durch Festdrehen <strong>de</strong>r Flügelmutter N.10 Legen Sie die Unterlage O in <strong>de</strong>n Schalter P (Abb.4) und bringen Sie anschließend <strong>de</strong>n Schalteram Lenker an. Bei Lenkern mit einem Durchmesser von 22,4 mm verwen<strong>de</strong>n Sie als Unterlage<strong>de</strong>n Gummistreifen S. Legen Sie anschließend das Kabel in die Führung Q, so daß das Kabelnicht am Reifen scheuert.11 Mit <strong>de</strong>m Hebel H läßt sich die Rolle <strong>de</strong>r Wirbelstrombremse gegen <strong>de</strong>n Reifen <strong>de</strong>s Fahrra<strong>de</strong>sklappen (Abb.5 & 6). Ist <strong>de</strong>r Hebel H zugeklappt, kann man nun über <strong>de</strong>n Knauf R <strong>de</strong>n Druck<strong>de</strong>r Rolle auf <strong>de</strong>n Reifen <strong>de</strong>s Hinterra<strong>de</strong>s einstellen. Achten Sie darauf, daß die Rolle straffgegen <strong>de</strong>n Reifen drückt, um ein Durchrutschen <strong>de</strong>s Reifens während <strong>de</strong>s Trainings zu vermei<strong>de</strong>n.HHR5 6Montageanpassung für Fahrrä<strong>de</strong>r mit einem an<strong>de</strong>ren Laufrad-DurchmesserBevor die komplette Hebeleinheit an <strong>de</strong>n Rahmen montiert wird (siehe Punkt 5), müssen dieKunststoff-Verlängerungs-Streifen befestigt wer<strong>de</strong>n.Raddurchmesser 610-640 mm: befestige Streifen W mit 4 Schrauben, Muttern und Ringen. (Abb.7)Raddurchmesser 690-720 mm: befestige Streifen Z (Abb.8)WZWZHH7 8Hinweis- Bei langanhalten<strong>de</strong>m und intensivem Gebrauch <strong>de</strong>s “CycleForce Swing” kann das Schwungrador<strong>de</strong>ntlich warm wer<strong>de</strong>n. Achten Sie <strong>de</strong>shalb darauf das Schwungrad nicht zu berühren!Klappen Sie die Wirbelstrombremse mit <strong>de</strong>m Hebel H nach Gebrauch vom Reifen weg undlassen Sie das Schwungrad abkuhlen.- Prüfen Sie, bevor Sie <strong>de</strong>n CycleForce Swing benutzen, ob <strong>de</strong>r Handgriff E nach <strong>de</strong>m Aufklappen<strong>de</strong>s Trainers vollständig zurückgefe<strong>de</strong>rt ist. Hiermit wird Beschädigung <strong>de</strong>s Rahmens vermie<strong>de</strong>n.- Sorgen Sie dafür, daß das Gerät bei <strong>de</strong>r Montage nicht auf das Schwungrad fällt. Dadurch könntein <strong>de</strong>r Achse eine Unwucht entstehen, die Schwingungen verursachen wür<strong>de</strong>.- Achten Sie darauf, daß <strong>de</strong>r Reifen stark aufgepumpt ist (min<strong>de</strong>stens 6 bar).- Bei einem ATB ist ein ganz o<strong>de</strong>r fast ganz glatter Reifen vorzuziehen, <strong>de</strong>nn Reifen mit Profilmachen zu viel Lärm und können obendrein schlüpfen.- Bremsen Sie beim Fahren auf <strong>de</strong>r CycleForce Swing nie abrupt ab. Das Schwungrad dreht sichdabei weiter, <strong>de</strong>r Hinterreifen rutscht und wür<strong>de</strong> unnötig verschließen.- Kontrollieren Sie regelmäßig, ob alle Schrauben und Muttern <strong>de</strong>s Trainers noch gut fest sitzen.D11
TrainingsempfehlungenRegenerationstrainingZeit (min) Slope Umdr. (rpm) Übersetzung Beson<strong>de</strong>rheiten3 1 100 kleinste treten/hohe Geschwindigkeit3 1 100 1 größer treten/hohe Geschwindigkeit3 1 100 1 größer treten/hohe Geschwindigkeit3 1 100 1 größer treten/hohe Geschwindigkeit3 1 100 1 größer treten/hohe Geschwindigkeit3 1 100 1 größer treten/hohe Geschwindigkeit3 1 100 1 kleiner treten/hohe Geschwindigkeit3 1 100 1 kleiner treten/hohe Geschwindigkeit3 1 100 1 kleiner treten/hohe Geschwindigkeit3 1 100 1 kleiner treten/hohe Geschwindigkeit3 1 100 1 kleiner treten/hohe Geschwindigkeit3 1 100 kleinste treten/hohe Geschwindigkeit36Bei Bedarf kann dieses Programm erneut gefahren wer<strong>de</strong>n, allerdings diesmal mit Slope 2 und einerZeitdauer von 2 Minuten o<strong>de</strong>r Slope auf Stufe 3 mit einer Dauer von 1 Minute. Zur Abwechslungkönnen Sie naturlich auch mit an<strong>de</strong>ren Trittfrequenzen fahren z.B. 80, 90, 110 o<strong>de</strong>r 120Umdrehungen pro Minute.KrafttrainingZeit (min) Slope Umdr. (rpm) Übersetzung Beson<strong>de</strong>rheiten1 3 115 frei hohe Geschwindigkeit1 1 80 frei ruhig treten/Regeneration2 3 115 frei hohe Geschwindigkeit2 1 80 frei ruhig treten/Regeneration3 3 115 frei hohe Geschwindigkeit3 1 80 frei ruhig treten/Regeneration1 2 70/80 frei nur linkes Bein drücken/ziehen1 2 70/80 frei nur rechtes Bein drücken/ziehen3 6 60 frei im Wiegetritt3 4 115 frei hohe Geschwindigkeit3 1 80 frei ruhig treten/Regeneration2 4 115 frei hohe Geschwindigkeit2 1 80 frei ruhig treten/Regeneration1 4 115 frei hohe Geschwindigkeit1 1 80 frei ruhig treten/Regeneration10 1 frei frei cooling-down39BergtrainingZeit (min) Slope Umdr. (rpm) Übersetzung Beson<strong>de</strong>rheiten4 2 80/90 frei locker treten/hohe Geschwindigkeit3 3 > 80 frei Geschwindigkeit möglichst hoch halten1 7 60 53-14 im Wiegetritt5 1 > 100 42-16 hohe Trittfrequenz2 5 > 80 53-15 sitzend/stehend im 30”-Wechsel2 6 90/100 42-16 sitzend5 1 110/130 42-16 hohe Trittfrequenz10 1 frei frei cooling-down32Trainingsempfehlungen und die letzten Entwicklungen: www.tacx.nlD13
Störungen und GarantieSTÖRUNGENStörungMöglicher FehlerLösung1 Der CycleForceSwing wackelt2 Beim Trainierenbleibt Gummi vomReifen auf <strong>de</strong>r Rollekleben3 StarkesRollgeräusch beimFahren1 Der Untergrund ist nichteben2 Der Trainer ist nicht richtigzusammengebaut wor<strong>de</strong>n3 Fahrrad steht nicht richtig imTrainer4 Trainer nicht richtig auseinan<strong>de</strong>rgeklappt1 Der Reifendruck ist zu niedrig2 Die Rolle wird nicht richtig an<strong>de</strong>n Reifen gedrückt1 Der Reifen hat zu grobesProfil2 Stein im Mantel1 Stellen Sie <strong>de</strong>n Trainer auf einenebenen Fußbo<strong>de</strong>n2 Prüfen Sie, ob alle Schrauben undMuttern richtig festgedreht sind3 Prüfen Sie, ob <strong>de</strong>n mitgelieferteSchnellspanner angebracht ist4 Klappen Sie <strong>de</strong>n Trainer ganzauseinan<strong>de</strong>r1 Prüfen Sie <strong>de</strong>n Reifendrück, min<strong>de</strong>stens6 bar2 Drehen Sie die Rolle fest an dasHinterrad1 Bringen Sie eien Reifen mit wenigo<strong>de</strong>r gar keinem Profil an2 Prüfen Sie <strong>de</strong>n Reifen aufBeschädigungenGARANTIEBESTIMMUNGENTacx-Produkte wer<strong>de</strong>n unter Einhaltung <strong>de</strong>r strengsten Qualitätsnormen hergestellt. Im Fallevon Produktions- und Materialfehlern tritt bei Tacx-Produkten eine Garantie von 1 Jahr abEinkaufsdatum in Kraft. Bewahren Sie <strong>de</strong>shalb Ihren Kassenzettel sorgfältig auf, da dieser alsEinkaufsbeweis dient!Die Garantie für ein Tacx-Produkt wird ungültig in folgen<strong>de</strong>n Fällen:1 Gebrauch <strong>de</strong>s Gerätes fur einen an<strong>de</strong>ren, als <strong>de</strong>n vorgesehenen Zweck2 Unsachgemäßer Gebrauch, Reparatur o<strong>de</strong>r Montage3 Beschädigungen in Folge von Unfällen und/o<strong>de</strong>r Verwahrlosung4 Schä<strong>de</strong>n, verursacht während <strong>de</strong>s Versan<strong>de</strong>s o<strong>de</strong>r Tranportes <strong>de</strong>s ProduktesVersandkosten- Versandkosten zu <strong>de</strong>m nächstem Tacx- Händler o<strong>de</strong>r Tacx Service Centre müssen vom Kun<strong>de</strong>nselbst übernommen wer<strong>de</strong>n- Reparaturen wer<strong>de</strong>n auf Kosten <strong>de</strong>s Tacx Service Centres zurück geschicktAblauf- Sollte das Produkt bei sachgemäßen Gebrauch aus irgen<strong>de</strong>inem Grund nicht ordnungsgemäßfunktionieren, bringen Sie es zusammen mit <strong>de</strong>m Kaufbeleg (Kopie) und <strong>de</strong>m ausgefülltenService-Formular zurück zu Ihrem Händler. Sie können <strong>de</strong>n <strong>de</strong>fekten Trainer mitsamt <strong>de</strong>rgenannten Unterlagen auch an das Tacx Service Centre in Ihrer Nähe schicken.- Folgen Sie <strong>de</strong>n Anweisungen für Rücksendungen. Das Tacx Service Centre kann nur solcheRücksendungen bearbeiten, bei <strong>de</strong>nen das ausgefüllte Service-Formular beiliegt.- Nach<strong>de</strong>m festgestellt wur<strong>de</strong>, daß das beanstan<strong>de</strong>te Produkt unter die Garantie fällt, wird dasdas Produkt innerhalb von 30 Tagen nach Eintreffen kostenlos reparieren o<strong>de</strong>r ersetzen- Die Entscheidung, ob das beanstan<strong>de</strong>te Produkt unter die Garantie fällt, liegt ganz allein beiTacx bv. Sollte <strong>de</strong>r beanstan<strong>de</strong>te Scha<strong>de</strong>n nicht unter die Garantie fallen, wird das Produktrepariert und die anfallen<strong>de</strong>n Kosten <strong>de</strong>m Kun<strong>de</strong>n in Rechnung gestellt. Sollten die Kostendie 50,- Euro ubersteigen, erhalten Sie vorab einen Kostenvoranschlag. Sobald Sie auf <strong>de</strong>nKostenvoranschlag geantwortet haben, wird das Produkt entwe<strong>de</strong>r repariert o<strong>de</strong>r in seinemursprünglichen Zustand zu Ihnen zurückgeschickt.14D
Contents of packageT1460 CYCLEFORCE SWINGContents of packageMake sure the following parts havebeen inclu<strong>de</strong>d in the packing.- Frame CycleForce Swing- Mag unit- Manual- 2 End caps- 2 Feet- 2 Fitting kitsT1465 Fitting kit TrainerT1424.012xT1424.022xT1353.101xT1353.111xT14021xT1408.111xT1410.021xT1410.042xT1410.061xT1423.152xT1424.032xT1461.192xT1461.221xT1465.012xT1465.082xT1466 Fitting kit adapter setT1466.011xT1466.021xT1466.031xT1466.041xT1260.074xT1461.194xT2459.034x15GB
Assembling CycleForce SwingASSEMBLING CYCLEFORCE SWINGThe cycletrainer CycleForce Swing is suitable for use with racing, hybrid andmountain bikes with a wheel diameter of 630 tm 690 mm.10 mm13 mm (2x)The following steps show how to assemble and adjust the trainer.1 Press nut A into cap B and sli<strong>de</strong> the cap into the frame tube (fig.1).2 Assemble base C to the frame using bolt D. Tighten bolt D but make surethe base is still adjustable.3 Unfold the trainer and place it on a level surface. By fully squeezing grip E,the trainer can be fol<strong>de</strong>d out or collapsed (fig.1).4 Turn base C to the correct position (fig.2). Tighten bolt D firmly and attachanti-slip rubber F (fig.3).5 Assemble 2 rubber rings G and part K to handle H (fig.3). Than assemble the complete handleto the frame6 Shove unit I into part K of the handle (fig.4).7 Assemble the mag unit and and turn bolt J untill the mag unit is firmly tightened but it shouldstill be able to move (fig.3).8 Replace the quick-release skewer on the rear wheel with the skewer X supplied by Tacx. Thisassures i<strong>de</strong>al clamp fitting and stability. Place the bike in the trainer and adjust the wing bolt Lof the trainer, so that the speed tension clamp M will close without forcing. Forcing could causedamage!9 Fix wing bolt L by tightening wing nut N.10 Place insert O in remote control P (fig.4) and then install the remote control on the handlebars.With handlebars with diameter 22,4 mm, use rubber strap S. Than click the cable into clip Qin such a way that it does not touch the tire.NL-XBACDM1EIJQPO3KGSHFIJ KH2C164GB
Assembling CycleForce Swing9 With handle H the roll of the mag unit can be moved to and from the tire of the bike(fig.5 and 6). When handle H has been fol<strong>de</strong>d, knob R can be used to regulate the pressure ofthe roll against the tire. Make sure the roll is firmly placed against the tire so that slipping of thetire is not possible.HHR5 6Alteration in mounting of bicycle with different wheel diameterBefore assembling the complete handle to the frame, see nr. 5 of the instructions, you need toplace the heightening or extension pieces.Wheel diameter 610 - 640 mm: assemble heightening piece W with 4 bolts, nuts and rings (fig.7).Wheel diameter 690 - 720 mm: assemble extension piece Z (fig.8).WZWZHH7 8Tip- Lengthy and intensive usage of the CycleForce Swing can cause the unit to heat up substantially.Fold the unit with handle H after usage and allow the unit to cool off before touching it.- Before using the CycleForce Swing, after unfolding the trainer, check to see that grip E has fullyreturned to its original position. This will prevent damage to the frame.- Make sure that the unit does not fall on the fly wheel during assembly. This could create animbalance in the axis, causing vibrations.- Make sure that the tyre is well inflated (at least six atmosphere).- ATB tyres should preferably have completely or partially smooth profiles. Rough profiles cancausenoise and tyre slippage.- Never brake abruptly while using the CycleForce. When the brakes are applied to the rearwheel, the fly wheel keeps on turning. This results in unnecessary wear and tear to the rear tyre.- Regularly check to see whether the bolts and nuts of the cycletrainer are tight.- Please use the cable clip of the frame to neatly organise the cables when the trainer is stored.GB17
Training RecommendationsTRAINING RECOMMENDATIONSOf all sports requiring a major physical effort from the athlete, cycling heads the list. Cycling is generallyseen as the most physically difficult sport in terms of the pressure that heart, lungs and musclesare subjected to. For those using the Tacx Cycletrainers, the same holds true to a certain <strong>de</strong>gree,especially since you want to increase the pressures you un<strong>de</strong>rgo. An extensive, annual medical checkupwith a professional sports doctor is the first requirement before you start a new cycling season.A possible <strong>de</strong>finition of training could be 'The systematic application of stimuli to improve performance'.We have a goal when we train. The goal could be to lose weight, to complete a particular sportingcycle on the bike or to win a gold medal during a championship race. The 'stimuli' that we applycould consist of riding long distances at a steady pace, or sprinting short distances. It is important tobuild up the intensity of the training. As the season progresses, we ri<strong>de</strong> longer, further or even cycleat altitu<strong>de</strong> (in the mountains). When it comes to real improvement of performance, variation is themagic word.Super CompensationWhen we train, we cause a disruption in the body. This disruption (of heart, lungs, muscles) recoverswhen we rest and improves slightly. We call this principle super compensation. It is not the trainingthat makes us stronger; it is the rest period that follows. The subsequent training should take placejust before the super compensation curve reaches the zero line (fig.7). To raise one's physical fitnessto a higher level, it is necessary to train a minimum of three times a week. Training twice a week issufficient to retain one's physical fitness. Once a week is not enough. You can <strong>de</strong>vise your own trainingschedule or have your coach or trainer do so.7Trainingwork65Recovery7Supercompensation05 10 15 20 25 30 35 40 45 50 55 60The CycleForce Swing is a bike trainer for cyclists who want to train intensively and achieve certaincapacity, who want to increase their physical strength and get quick results. The graph (fig.8) comparesthe capacity of the CF Swing (Y-axis) to speed in km/h (X-axis). Since eddy current brakes haveswitches with seven positions (slopes), the graph contains seven lines. Capacity increases proportionateto the increase in speed or the resistance offered by the switch position. The CF Swing is i<strong>de</strong>allysuited for specific power training, of the kind that is nearly impossible to do on the road. During trainingwith the CF Swing, it would be advisable to use a pulse meter.Examples of Training ProgrammesAlways do warming-up exercises before you start training. Five or ten minutes of relaxed cycling withlittle resistance and a pedal frequency of between 90 and 110 revolutions per minute. During thewarming-up period, you can do some stretching exercises (even on the bike). End the training with acooling-down period of between five and ten minutes, again followed by some stretching exercises.Avoiding warming-up and cooling-down sessions could lead to injuries.Power (watt)Speed (km/h)4321818GB
Training RecommendationsRecovery work-outTime(min) Slope rpm Gear Details3 1 100 lowest relaxed pedalling/high speed3 1 100 1 heavier relaxed pedalling/high speed3 1 100 1 heavier relaxed pedalling/high speed3 1 100 1 heavier relaxed pedalling/high speed3 1 100 1 heavier relaxed pedalling/high speed3 1 100 1 heavier relaxed pedalling/high speed3 1 100 1 lighter relaxed pedalling/high speed3 1 100 1 lighter relaxed pedalling/high speed3 1 100 1 lighter relaxed pedalling/high speed3 1 100 1 lighter relaxed pedalling/high speed3 1 100 1 lighter relaxed pedalling/high speed3 1 100 lowest relaxed pedalling/high speed36You might want to repeat this again on position 2 in 2 minutes each time and again on position 3with 1 minute repeaters. For variation you could ri<strong>de</strong> with pedal frequency 80, 90, 110 or 120.Power work-outTime(min) Slope rpm Gear Details1 3 115 free high speed1 1 80 free relaxed pedalling/recovery2 3 115 free high speed2 1 80 free relaxed pedalling/recovery3 3 115 free high speed3 1 80 free relaxed pedalling/recovery1 2 70/80 free just left leg push/pull1 2 70/80 free just right leg push/pull3 6 60 free stand on pedals!3 4 115 free high speed3 1 80 free relaxed pedalling/recovery2 4 115 free high speed2 1 80 free relaxed pedalling/recovery1 4 115 free high speed1 1 80 free relaxed pedalling/recovery10 1 vrij free cooling-down39Hill work-outTime(min) Slope rpm Gear Details4 2 80/90 free relaxed pedalling/constant speed3 3 > 80 free try to keep speed high1 7 60 53-14 stand on pedals!5 1 > 100 42-16 high pedal frequency2 5 > 80 53-15 sit/stand every 30"2 6 90/100 42-16 remain seated5 1 110/130 42-16 high pedal frequency10 1 free free cooling-down32You can find training advice and the latest <strong>de</strong>velopments at the Tacx homepage: www.tacx.nlGB19
Error Messages and WarrantyERROR MESSAGESFailurePotential problemSolution1 The arrangement ofCycleForce Swingwhen the bike wobbles2 Rubber from thebike tyre sticks tothe roller3 The bike makes alot of noise1 The CycleForce frame is notlevel2 The frame has not beenassembled properly3 The bike does not fit properlyin the frame4 The frame is not fully exten<strong>de</strong>d1 The tyre pressure is too low2 The roller does not pressproperly against the tyre1 A profile tyre was installed.2 There is a pebble (ticking) inthe tyre1 Place the trainer on a level floor2 Check whether all bolts and nuts areproperly tightened3 Check whether the Tacx Quick-releaseskewer has been mounted4 Unfold frame completely1 Check tyre pressure, minimal 6atmosphere2 Turn role so that it presses solidlyagainst the tyre1 Mount tyre with totally or partiallysmooth tyre profile2 Check tyre for damageWARRANTY PROVISIONSTacx products are manufactured in accordance with the highest quality standards. A warrantyperiod of one (1) year from the date of purchase applies to manufacturing or material <strong>de</strong>fectsof all Tacx products. Save the sales slip, since that is your proof of purchase!The warranty shall expire if the product shows clear evi<strong>de</strong>nce of the following:1 use for any purpose other than that for which it was inten<strong>de</strong>d2 inexpert use, repairs or dismantling3 damage due to acci<strong>de</strong>nts or neglect4 <strong>de</strong>fects that occur during shipment or transport of the productShipping Costs- Shipping charges to a Tacx <strong>de</strong>aler or Tacx Service Centre are for the owner’s account.- Tacx Service Centre will carry out repairs and provi<strong>de</strong> return shipping without charge.Procedure- If, during normal use, a product does not function properly for any reason whatsoever, return itto your <strong>de</strong>aler, along with proof of purchase (copy of the sales slip) and a completed serviceform. You can also ship it directly to the nearest Tacx Service Centre in your country. There isa list of Tacx Service Centres in the Tacx catalogue, the user's manual and at the Tacx web site.- Follow the instructions for return shipments. The Tacx Service Centre will only accept returnshipments accompanied with completed service forms.- The Tacx Service Centre will repair or replace products covered by the warranty within 30days, free of charge.- Tacx bv shall be the sole judge as to whether a product is covered by the warranty. If a productis not covered by the warranty, it will be repaired and the charges will be billed. If the cost ofrepair exceeds 50.00 Euro, you will receive a cost estimate in advance. After receiving yourconfirmation, the product will either be repaired or returned to you in its original state.20GB
Contenu <strong>de</strong> l’emballageT1460 CYCLEFORCE SWINGContenu <strong>de</strong> l’emballageVérifiez si tous les accessoires suivantsfigurent bien dans l’emballage.- Cadre CycleForce Swing- Simulateur <strong>de</strong> résistance- Manuel- 2 Pieds- 2 Embouts- 2 Sachets <strong>de</strong> montageT1465 Sachet <strong>de</strong> montage entraîneurT1424.012xT1424.022xT1353.101xT1353.111xT14021xT1408.111xT1410.021xT1410.042xT1410.061xT1423.152xT1424.032xT1461.192xT1461.221xT1465.012xT1465.082xT1466 sachet <strong>de</strong> montage set d’adaptation unitéT1466.011xT1466.021xT1466.031xT1466.041xT1260.074xT1461.194xT2459.034x21F
Montage du CycleForce SwingMONTAGE DU CYCLEFORCE SWINGLe CycleForce Swing est <strong>de</strong>stiné aussi bien aux vélos <strong>de</strong> course qu’aux VTTainsi qu’aux vélos hybri<strong>de</strong>s dont la dimension <strong>de</strong> roues varie <strong>de</strong> 630 à 690 mm.10 mm13 mm (2x)Le montage et le réglage du home-trainer sont à effectuer une fois pour toutesselon les instructions suivantes:1 Enfoncer l’écrou A dans l’embout B et glisser l’embout dans le tube du cadre(fig.1).2 Fixer le pied C au cadre à l’ai<strong>de</strong> du boulon D. Serrer le boulon D <strong>de</strong> tellemanière que le pied reste réglable.3 Placer le cadre déplié sur une base soli<strong>de</strong> et plâne. Le cadre se plie et se déplieen serrant à fond la poignée E (fig.1).4 Placer le pied C en position adéquate (fig.2). Bien serrer le boulon D et fixer le caoutchoucanti-dérapant F (fig.3).5 Monter les bagues en caoutchouc G et la douille K sur le levier H (fig.3). Fixer ensuitel’ensemble du levier au cadre.6 Adapter le rouleau <strong>de</strong> résistance I à la douille K du levier (fig.4)7 Fixer le rouleau <strong>de</strong> résistance et tourner le boulon J <strong>de</strong> telle sorte que l’unité puisse restermobile (fig.3).8 Remplacer le blocage rapi<strong>de</strong> <strong>de</strong> la roue arrière par le blocage Tacx X fourni pour obtenir unestabilité et un calage parfaits. Positionner ensuite le vélo sur le rouleau et régler l’écrou papillonL <strong>de</strong> l’appareil <strong>de</strong> façon à pouvoir fermer le blocage rapi<strong>de</strong> M sans forcer. Un serrage excessifpeut occasionner <strong>de</strong>s dégâts!9 Fixer l’écrou-papillon L en serrant la vis-papillon N.NL-XBACDM1EIJQPKOS3GHFIJ KH2C4F
Montage du CycleForce Swing10 Placer la pièce O dans la manette <strong>de</strong> changement P (fig.4) et monter la manette <strong>de</strong> changementsur le guidon. Pour les guidons <strong>de</strong> 22,4 mm <strong>de</strong> diamètre, utiliser le caoutchouc autocollant S.Fixer ensuite le câble dans le support Q afin qu’il ne touche pas le pneu.11 Le levier H permet d’amener ou d’éloigner le volant d’inertie sur le pneu du vélo (fig.5 et 6).Lorsque le levier H est en position <strong>de</strong> contact, on peut relâcher la pression du rouleau sur lepneu à l’ai<strong>de</strong> du patin R. Veiller à ce que le rouleau soit bien au contact du pneu afin d’éviter leseffets <strong>de</strong> patinage en cours d’utilisation.HHR5 6Montage modifié pour vélos à diamètre <strong>de</strong> roues différentAvant que le levier complet soit fixé au cadre, se référer au point 5 <strong>de</strong>s instructions concernant lesplaquettes <strong>de</strong> rehaussement ou <strong>de</strong> rallongement.Diamètre <strong>de</strong> roue <strong>de</strong> 610 à 640 mm: utiliser les plaquettes <strong>de</strong> rehaussement W à quatre boulons,écrous et bagues (fig. 7)Diamètre <strong>de</strong> roue <strong>de</strong> 690 à 720 mm: utiliser les plaquettes <strong>de</strong> rallongement Z (fig. 8)WZWZHH7 8Conseils- Une longue utilisation intensive peut entraîner une surchauffe <strong>de</strong> l’unité. Dans ce cas <strong>de</strong>figure, éviter le contact manuel: libérer le volant d’inertie à l’ai<strong>de</strong> du levier H et laisserl’appareil refroidir.- Avant d’utiliser le CycleForce Swing ou après avoir déplié le cadre, vérifier la bonne position <strong>de</strong>la poignée E afin d’éviter toute dégradation au niveau du cadre.- Lors du montage, veiller à ce que le simulateur <strong>de</strong> résistance ne s’affaisse pas. Cela pourraitentraîner un déséquilibre au niveau <strong>de</strong> l’axe et provoquer <strong>de</strong>s vibrations.- S’assurer que le pneu est bien gonflé (6 atm. minimum).- Pour les VTT, il est préférable d’utiliser un profil <strong>de</strong> pneu entièrement ou partiellement lisse, uneforte sculpture entraînant <strong>de</strong>s effets <strong>de</strong> bruit et <strong>de</strong> patinage.- Eviter <strong>de</strong> freiner brutalement durant une séance d’entraînement sur le Swing. En cas <strong>de</strong> freinagesur la roue arrière, le volant d’inertie continue <strong>de</strong> tourner, soumettant le pneu à une usure inutile.- Contrôler régulièrement le serrage <strong>de</strong>s vis et écrous du home-trainer.- Pour ranger le home-trainer, utiliser le support <strong>de</strong> câble du cadre pour le positionner correctement.F23
Conseils pour l’entrainementCONSEILS POUR L’ENTRAINEMENTIl n’existe aucun sport requérant <strong>de</strong>s efforts aussi durs et prolongés <strong>de</strong> la part du sportif que dans lecyclisme. L’on considère généralement le cyclisme comme l’un <strong>de</strong>s sports les plus durs pour ce quiconcerne la sollicitation du coeur, <strong>de</strong>s poumons et <strong>de</strong>s muscles. Pour la pratique <strong>de</strong>s Cycle ForceSwing, il en va <strong>de</strong> même jusqu’à un certain point, d’autant plus que vous souhaitez amener ces sollicitationsà un plus haut niveau. C’est la raison pour laquelle une visite médicale approfondie pour sportifsauprès d’un spécialisé constitue un premier impératif, avant d’attaquer une nouvelle saison cycliste.On pourrait ainsi résumer la définition <strong>de</strong> l’entraînement: “La recherche systématique d’une amélioration<strong>de</strong>s performances”. On s'entraîne toujours, en effet, dans un but précis: perdre du poids, roulerplus vite qu’un collègue cyclo, ou décrocher la médaille d’or au championnat. Autant d’objectifs diverstributaires <strong>de</strong> différentes manières <strong>de</strong> pratiquer le vélo. L’essentiel est <strong>de</strong> respecter une systématisationdans la façon d’élaborer l’entraînement. Au fur et à mesure <strong>de</strong> la saison, les sorties se font pluslongues et plus sélectives. La variation est le point <strong>de</strong> passage obligé d’une amélioration substantielle<strong>de</strong>s performances.Super-compensationAu cours d’un entraînement, l’organisme est soumis à une perturbation (cardiaque, respiratoire, musculaire),laquelle débouche sur une amélioration <strong>de</strong>s potentialités en phase <strong>de</strong> repos: c’est le principe<strong>de</strong> la super-compensation. Ce n’est donc pas l’entraînement en tant que tel qui rend plus fort, mais lerepos qui y fait suite. L’entraînement suivant doit donc intervenir au moment précis où la courbe <strong>de</strong>super-compensation n’a pas encore tout à fait atteint le point zéro (fig.7). Pour améliorer sa conditionphysique, on estime que trois entraînements par semaine au minimum sont nécessaires. Deux séancespermettent <strong>de</strong> préserver la condition, une seule séance s’avère insuffisante. A défaut <strong>de</strong> disposerd’un coach-entraîneur, vous pouvez donc déterminer vous-même un schéma d’entraînement.7entraînement65récupérationsupercompensation0puissance (watt)432175 10 15 20 25 30 35 40 45 50 55 60vitesse (km/h)Le CycleForce Swing est un home-trainer <strong>de</strong>stiné aux cyclistes soucieux <strong>de</strong> s’entraîner <strong>de</strong> manièreintensive et ponctuelle, <strong>de</strong> gagner en puissance et d’obtenir ainsi <strong>de</strong>s résultats rapi<strong>de</strong>s. Le graphique<strong>de</strong> la figure 8 met en rapport la puissance du CF Swing (axe Y) et la vitesse en km/heure (axe X). Levolant d’inertie étant muni d’une comman<strong>de</strong> <strong>de</strong> variation à sept positions (slope), sept lignes apparaissentdonc dans le graphique. La puissance varie donc en fonction <strong>de</strong> la rapidité <strong>de</strong> pédalage et/ou du<strong>de</strong>gré <strong>de</strong> résistance. Le CF Swing est donc idéal pour la programmation d’entraînements en puissancequ’il est pratiquement impossible d’effectuer sur route en gran<strong>de</strong>ur nature. Il est conseillé d'utiliser uncardio-fréquence-mètre.Exemples <strong>de</strong> programmes d’entraînementsFaites toujours précé<strong>de</strong>r un entraînement d’une séance d’échauffement: 5 à 10 minutes sur un petitdéveloppement avec fréquence <strong>de</strong> pédalage <strong>de</strong> 90 à 110 tours/minute. Durant cet échauffement, onpeut procé<strong>de</strong>r à <strong>de</strong>s étirements (même sur le vélo). En fin d’entraînement, respectez un temps <strong>de</strong>décompression (cooling down) <strong>de</strong> 5 à 10 minutes également et répétez les étirements. Une doubleprécaution <strong>de</strong>stinée à éviter les blessures musculaires.824F
Conseils pour l’entrainementEntraînement en récupérationtemps (min) slope fréquence braquet <strong>de</strong>scription3 1 100 petit vitesse élevée/tourner les jambes3 1 100 1 supérieur vitesse élevée/tourner les jambes3 1 100 1 supérieur vitesse élevée/tourner les jambes3 1 100 1 supérieur vitesse élevée/tourner les jambes3 1 100 1 supérieur vitesse élevée/tourner les jambes3 1 100 1 supérieur vitesse élevée/tourner les jambes3 1 100 1 inférieur vitesse élevée/tourner les jambes3 1 100 1 inférieur vitesse élevée/tourner les jambes3 1 100 1 inférieur vitesse élevée/tourner les jambes3 1 100 1 inférieur vitesse élevée/tourner les jambes3 1 100 1 inférieur vitesse élevée/tourner les jambes3 1 100 petit vitesse élevée/tourner les jambes36Répétez éventuellement le programme en position 2 avec une périodicité <strong>de</strong> 2 minutes et en position3 avec une périodicité <strong>de</strong> 1 minute. Vous pouvez également varier la fréquence <strong>de</strong> pédalage: 80, 90,110 ou 120 tours/minute.Entraînement en puissancetemps (min) slope fréquence braquet <strong>de</strong>scription1 3 115 au choix vitesse élevée1 1 80 au choix récupération2 3 115 au choix vitesse élevée2 1 80 au choix récupération3 3 115 au choix vitesse élevée3 1 80 au choix récupération1 2 70/80 au choix solliciter seulement la jambe gauche1 2 70/80 au choix solliciter seulement la jambe droite3 6 60 au choix <strong>de</strong>bout sur les pédales!3 4 115 au choix vitesse élevée3 1 80 au choix récupération2 4 115 au choix vitesse élevée2 1 80 au choix récupération1 4 115 au choix vitesse élevée1 1 80 au choix récupération10 1 au choix au choix cooling-down39Entraînement en côtetemps (min) slope fréquence braquet <strong>de</strong>scription4 2 80/90 au choix vitesse constante/tourner les jambes3 3 > 80 au choix augmenter la vitesse1 7 60 53-14 <strong>de</strong>bout sur les pédales!5 1 > 100 42-16 haute fréquence <strong>de</strong> pédalage2 5 > 80 53-15 assis/<strong>de</strong>bout: permutation toutes les 30”2 6 90/100 42-16 position assise5 1 110/130 42-16 haute fréquence <strong>de</strong> pédalage10 1 au choix au choix cooling-down32Vous pourrez par ailleurs trouver sur Internet (www.tacx.nl) <strong>de</strong>s conseils d’entraînement.F25
Disfonctionnements et GarantieDISFONCTIONNEMENTSAvarieCause probableSolution1 L’entraîneur vacille2 Des particules <strong>de</strong>pneu restent colléessur le rouleau3 Fonctionnementtrès bruyant lorsd’un entraînement1 le sol n’est pas plan2 Mauvais montage du cadre3 Le vélo n’est pas correctementmonté sur le cadre4 Le cadre n’est pas complètementdéplié1 La pression du pneu est tropfaible2 Le rouleau n’est pas bien aucontact du pneu1 Profil du pneumatique2 Présence d’un petit corpsétranger dans le pneu1 Placer l’entraîneur sur un sol plat2 Vérifier que tous les boulons etécrous sont bien serrés3 Vérifier que le blocage rapi<strong>de</strong> faisantpartie <strong>de</strong> la fourniture a été monté4 Dépliez le simulateur entièrement1 Contrôler la pression du pneu:minimum 6 atm.2 Serrer le rouleau fermement contrele pneu1 Monter en pneu à profil entièrementou partiellement lisse2 Contrôler le pneuDISPOSITIONS DE GARANTIELes produits Tacx sont fabriqués conformément aux normes <strong>de</strong> qualités les plus sévères. Ilssont garantis contre tous les vices <strong>de</strong> fabrication et d’application matérielle pendant un an (1)à partir <strong>de</strong> la date d’achat. Votre ticket <strong>de</strong> caisse constitue votre preuve d’achat: conservez leprécautionneusement!La garantie <strong>de</strong>vient caduque si le CycleForce Swing laisse apparaître les indices suivants:1 utilisation à un autre usage que celui auquel il est <strong>de</strong>stiné;2 dégradations dûes à un usage inapproprié, à une réparation ou un démontage;3 dégâts consécutifs à un acci<strong>de</strong>nt ou à une négligence;4 dégradations durant l’expédition ou le transport du produitFrais d’expédition- les frais d’expédition vers le détaillant Tacx ou le Tacx Service Centre sont à charge <strong>de</strong> l’acheteur- En cas <strong>de</strong> réparation, les frais d’expédition seront renvoyés au Tacx Service CentreProcédure- Lorsque le produit ne fonctionne pas correctement en utilisation normale pour une raisonquelconque, rapportez-le chez votre détaillant avec la preuve d’achat (ou copie <strong>de</strong> elle-ci) et leformulaire <strong>de</strong> service complèté. Vous pouvez également le faire parvenir directement au TacxService Centre <strong>de</strong> votre pays. La liste <strong>de</strong>s Service Centres figure dans le catalogue Tacx, dans lemanuel d’utilisation ainsi que sur le website <strong>de</strong> Tacx.- Suivez les instructions <strong>de</strong> réexpédition. Le Tacx Service Centre ne traite que les renvois accompagnésd’un formulaire <strong>de</strong> service dûment rempli.- S’il est établi que le produit est toujours sous garantie, le Service Centre s’engage à le réparerou à le remplacer gratuitement endéans les 30 jours suivant la réception. Tacx bv est seulehabilitée à déterminer si un produit est toujours couvert par la garantie. Dans le cas contraire,le produit sera réparé et les frais <strong>de</strong> réparation comptabilisés. S’ils sont supérieurs à 50,00Euros, vous recevrez au préalable un <strong>de</strong>vis. Après réception <strong>de</strong> votre réponse, le produit seraréparé ou vous sera renvoyés dans l’état où il se trouve.26F
Contenido <strong>de</strong>l embalajeT1460 CYCLEFORCE SWINGContenido <strong>de</strong>l embalajeVerifique que los siguientes accesorios seencuentran todos <strong>de</strong>ntro <strong>de</strong>l embalaje.- Frame CycleForce Swing- Simulador <strong>de</strong> resistencia- Manual- 2 Capuchón- 2 Pie- 2 bolsitas <strong>de</strong> montajeT1465 bolsitas <strong>de</strong> montaje trainerT1424.012xT1424.022xT1353.101xT1353.111xT14021xT1408.111xT1410.021xT1410.042xT1410.061xT1423.152xT1424.032xT1461.192xT1461.221xT1465.012xT1465.082xT1466 bolsita <strong>de</strong> montaje con set <strong>de</strong> adaptaciónT1466.011xT1466.021xT1466.031xT1466.041xT1260.074xT1461.194xT2459.034x27E
Montaje <strong>de</strong>l CycleForce SwingMONTAJE DEL CYCLEFORCE SWINGEl simulador CycleForce Swing es idóneo para las bicicletas <strong>de</strong> carreras ehíbridas y mountain bikes con una rueda <strong>de</strong> 630 a 690 mm.10 mm13 mm (2x)El montaje y el ajuste <strong>de</strong>l simulador se efectúa una sola vez según lassiguientes instrucciones:1 Coloca la tuerca A en el alojamiento <strong>de</strong> la tapa B e introduce la tapa en eltubo <strong>de</strong>l caballete (fig.1).2 Fija el pie C al caballete utilizando el tornillo D. Aprieta el tornillo D, pero <strong>de</strong>forma que se siga moviendo el pie.3 Coloca el entrenador plegado en una base sólida y plana. El caballete se pliegay se <strong>de</strong>spliega apretando la empuñadura E hasta el fondo (fig.1).4 Gira el pie C hasta la posición a<strong>de</strong>cuada (fig.2). Aprieta firmemente el tornillo D y fija la gomaanti<strong>de</strong>slizante F (fig.3).5 Monte 2 aran<strong>de</strong>las <strong>de</strong> caucho G y el manguito <strong>de</strong> ajuste en la manivela H (fig.3). A continación,monte la manivela completa al cuadro6 Introduzca el freno <strong>de</strong> resistencia I en el manguito K <strong>de</strong> ajuste <strong>de</strong> la manivela (fig.4).7 Monte el freno <strong>de</strong> resistancia y gire la tuerca J <strong>de</strong> manera que el freno aún pueda moverse (fig.4).8 Sustituye el cierre rápido <strong>de</strong> la rueda trasera <strong>de</strong> tu bicicleta por el cierre rápido Tacx X queviene suministrado, para conseguir una estabilidad y adaptación óptimas. Coloca la bicicleta enel ciclo-entrenador y ajusta el tornillo L <strong>de</strong> tal manera que pueda accionarse la palanca <strong>de</strong>cierre M sin forzar. ¡Forzar la palanca pue<strong>de</strong> ocasionar daños!9 Fija el tornillo L apretando la tuerca N.10 Introduzca O en el control remoto P (fig.4) e instale entonces el control remoto en el manillar.En el caso <strong>de</strong> manillares <strong>de</strong> 22,4 mm <strong>de</strong> diámetro, haga uso <strong>de</strong>l estribo <strong>de</strong> caucho S. Coloqueaciendo clic el cable en el sujetador Q <strong>de</strong> manera que no toque la rueda.-XNLBACDM1EIJQPKOS3GHFI2J K4H28CE
Montaje <strong>de</strong>l CycleForce Swing11 Con la manivela H se pu<strong>de</strong> colocar y soltar el rodillo <strong>de</strong>l freno <strong>de</strong> resistencia contra la cubierta<strong>de</strong> la bicicleta. (fig.5 y 6). Cuando la manivela H esté sobre la cubierta, el botón <strong>de</strong> ajuste Rpue<strong>de</strong> variar la presión <strong>de</strong>l rodillo sobre la rueda. El rodillo <strong>de</strong>be estar bien presionado contrala cubierta <strong>de</strong> la rueda <strong>de</strong> manera que no se <strong>de</strong>rrape al pedalear.HHR5 6Montaje diferente para bicicletas con diámetro <strong>de</strong> rueda divergenteAntes <strong>de</strong> que montar la manivela completa al cuadro, véase el punto 5 <strong>de</strong> las instrucciones, se han<strong>de</strong> fijar laminas <strong>de</strong> elevación o alargamiento.Diámetro 610 - 640 mm: fijar láminas <strong>de</strong> elevación W con 4 pernos, tuercas y aran<strong>de</strong>las (fig.7).Diámetro 690 -720 mm: fijar láminas <strong>de</strong> alargamiento Z (fig.8).WZWZHH7 8Consejos- Cuando se hace un uso largo e intensivo <strong>de</strong>l CycleForce Swing, la rueda volante se puedacalentar consi<strong>de</strong>rablemente. ¡No toque pues la rueda volante! Suelte el freno <strong>de</strong> resistenciacon la manivela H <strong>de</strong>spués <strong>de</strong> su uso y <strong>de</strong>je que la rueda volante se enfríe.- Antes <strong>de</strong> utilizar el CycleForce Swing o <strong>de</strong>spués <strong>de</strong> haber <strong>de</strong>splegado el caballete, verifica la posicióncorrecta <strong>de</strong> la empuñadura E, para evitar cualquier daño al caballete.- Durante el montaje, procura que el simulador no se caiga sobre el volante magnético. Estopodría ocasionar un <strong>de</strong>sequilibrio en el eje <strong>de</strong> giro y provocar vibraciones.- Asegúrate que la rueda esté bien hinchada (mínimo 6 atmósferas, 4 para una BTT).- Para las BTT, es preferible utilizar un perfil <strong>de</strong> rueda total o parcialmente liso, ya que un perfil <strong>de</strong>tacos podría originar ruidos y <strong>de</strong>slizamiento <strong>de</strong> la rueda.- Evita frenar bruscamente durante una sesión <strong>de</strong> entrenamiento en el CycleForce. Si accionas elfreno trasero, el volante magnético sigue rodando por inercia, sometiendo así la cubierta a un<strong>de</strong>sgaste innecesario.- Comprueba periódicamente que los tornillos y tuercas <strong>de</strong>l entrenador siguen bien ajustados.- Haga uso <strong>de</strong> los sujetadores <strong>de</strong>l cable <strong>de</strong>l cuadro para que el cable no se estropee o moleste a lahora <strong>de</strong> recoger el simulador.E29
Consejos para entrenamientosCONSEJOS PARA ENTRENAMIENTOSNo existe ningún <strong>de</strong>porte en el que se exija <strong>de</strong>l <strong>de</strong>portista tanta tensión durante tanto tiempa comoen el ciclismo. El ciclismo es consi<strong>de</strong>rado como uno <strong>de</strong> los <strong>de</strong>portes más duros en lo que se refiere ala carga <strong>de</strong>l corazón, <strong>de</strong> los pulmones y <strong>de</strong> los músculos. En cierto modo pue<strong>de</strong> <strong>de</strong>cirse lo mismosobre el ir en bicicleta con los entrenadores Cycle Force Swing Tacx, incluso más por cuanto usted<strong>de</strong>see aumentar las cargas a un nivel más alto. Por consiguiente será una exigencia prioritaria que sesometa usted anualmente a un chequeo amplio por un médico <strong>de</strong>portivo especialista, antes que <strong>de</strong>comienzo la nueva temporada ciclista.El entrenamiento se podría <strong>de</strong>finir como: “Suministrarse sistemáticamente un estímulo para aumentarlas prestaciones”. Entrenamos con un fin. Este pue<strong>de</strong> variar <strong>de</strong> a<strong>de</strong>lgazar, relajar los músculos tras unesfuerzo o ganar el oro en un campeonato. El “estímulo” que suministramos pue<strong>de</strong> constar <strong>de</strong> pedaleartranquilamente durante mucho tiempo o muy rápidamente durante poco tiempo. Lo importantees que haya un sistema <strong>de</strong> entrenamiento escalonado. A medida que pasa el tiempo po<strong>de</strong>mos pedalearmás tiempo y mayores distancias o incluso subir picos más elevados. La palabra clave para mejorarverda<strong>de</strong>ramente las prestaciones es la variación.SupercompensaciónCuando entrenamos, estamos provocando una perturbación en nuestro cuerpo; esta perturbación(corazón, pulmones, músculos) es restablecida y mejorada un poco en los <strong>de</strong>scansos. Este principio lo<strong>de</strong>nominamos supercompensación. No es que nos hagamos más fuertes por el entrenamiento sinojusto por el <strong>de</strong>scanso posterior. El siguiente momento <strong>de</strong> entrenamiento ha <strong>de</strong> efectuarse cuando lalínea <strong>de</strong> supercompensación roce el cero (fig.7). Para hacer que nuestra condición física mejore, sepue<strong>de</strong> establecer un mínimos <strong>de</strong> 3 unida<strong>de</strong>s <strong>de</strong> entrenamiento por semana. Con 2 entrenamientos sepue<strong>de</strong> mantener la condición pero 1 entrenamiento por semana no es suficiente. El esquema <strong>de</strong>entrenamiento lo pue<strong>de</strong> <strong>de</strong>terminar usted o un entrenador.esfuerzo <strong>de</strong>entrenamiento765recupera-super-com-pen-sación0potencia (watt)432175 10 15 20 25 30 35 40 45 50 55 60velocidad (km/h)El CycleForce Swing es un simulador para ciclistas que quieren entrenar su potencia <strong>de</strong> manera intensivay dirigida, aumentar sus fuerzas y obtener resultados a corto plazo. En el gráfico (fig.8) se presentala potencia <strong>de</strong>l CycleForce Swing (eje Y) comparada con la velocidad en km/h (eje X). Visto que elequipo <strong>de</strong> resistencia tiene un interruptor con 7 posiciones ("slope"), en el gráfico hay 7 líneas. Lapotencia aumenta a medida que se pedalea más rápido o en una posición <strong>de</strong> mayor resistencia. ElCycleForce Swing es idóneo para realizar entrenamientos <strong>de</strong> fuerza, entrenamientos que son difíciles<strong>de</strong> efectuar sobre el terreno. Es aconsejable hacer uso <strong>de</strong> un contador <strong>de</strong>l ritmo cardiaco cuando sehaga uso <strong>de</strong>l CycleForce Swing.Ejemplos <strong>de</strong> programas <strong>de</strong> entrenamientoEmpiece el entrenamiento con un calentamiento: pedalee entre 5 y 10 minutos sin apenas resistenciay con una frecuencia <strong>de</strong> 90/100 pedaladas por minuto. Durante este calentamiento pue<strong>de</strong> efectuarejercicios <strong>de</strong> estiramiento <strong>de</strong> músculos (incluso en la bicicleta). El entrenamiento finaliza con un colingdown <strong>de</strong> 5 a 10 minutos y <strong>de</strong> nuevo algunos ejercicios <strong>de</strong> estiramiento. Si omite realizar el calentamientoo el cooling down, pue<strong>de</strong> sufrir lesiones.830E
Consejos para entrenamientosEntrenamiento <strong>de</strong> recuperacióntiempo (min) slope revoluciones resistencia características3 1 100 mínima ligero/alta velocidad3 1 100 1 superior ligero/alta velocidad3 1 100 1 superior ligero/alta velocidad3 1 100 1 superior ligero/alta velocidad3 1 100 1 superior ligero/alta velocidad3 1 100 1 superior ligero/alta velocidad3 1 100 1 inferior ligero/alta velocidad3 1 100 1 inferior ligero/alta velocidad3 1 100 1 inferior ligero/alta velocidad3 1 100 1 inferior ligero/alta velocidad3 1 100 1 inferior ligero/alta velocidad3 1 100 mínima ligero/alta velocidad36Eventualmente se pue<strong>de</strong> repetir este entrenamiento en la marcha 2 cada dos minutos y en la marcha 3, repitiendo cada 1 minuto. Para una mayor variación naturalmente también pue<strong>de</strong> pedalearcon 80, 90, 110 ó 120 revoluciones por minuto.Entrenamiento <strong>de</strong> fuerzatiempo (min) slope revolucionesresistencia características1 3 115 libre alta velocidad1 1 80 libre pedaleo tranquilo/recuperación2 3 115 libre alta velocidad2 1 80 libre pedaleo tranquilo/recuperación3 3 115 libre alta velocidad3 1 80 libre pedaleo tranquilo/recuperación1 2 70/80 libre sólo pierna izquierda tirar/empujar1 2 70/80 libre sólo pierna <strong>de</strong>recha tirar/empujar3 6 60 libre <strong>de</strong> pie en los pedales3 4 115 libre alta velocidad3 1 80 libre pedaleo tranquilo/recuperación2 4 115 libre alta velocidad2 1 80 libre pedaleo tranquilo/recuperación1 4 115 libre alta velocidad1 1 80 libre pedaleo tranquilo/recuperación10 1 libre libre cooling-down39Entrenamiento <strong>de</strong> montañatiempo (min) slope revolucionesresistencia características4 2 80/90 libre pedaleo ligero/alta velocidad3 3 > 80 libre intente mantener una alta velocidad1 7 60 53-14 <strong>de</strong> pie en los pedales5 1 > 100 42-16 alta frecuencia <strong>de</strong> pedaleo2 5 > 80 53-15 alternar sentado/<strong>de</strong> pie cada 30”2 6 90/100 42-16 mantenerse sentado5 1 110/130 42-16 alta frecuencia <strong>de</strong> pedaleo10 1 libre libre cooling-down32Más consejos <strong>de</strong> entrenamientos y los últimos <strong>de</strong>sarrollos: www.tacx.nlE31
Disfunciones y garantíaDISFUNCIONESErrorCausas posiblesSolución1 Fenómeno <strong>de</strong> vibracìonesen la bicicleta2 Partículas <strong>de</strong> cubierta<strong>de</strong> quedan pegadasal rodillo3 Funcionamientomuy ruidoso duranteun entrenamiento1 El suelo no está liso2 El entrenador no ha sido bienmontado3 La bicicleta no está biencolocada en el entrenador4 El aparato no está bien<strong>de</strong>splagado1 Baja presión en las ruedas2 La presión <strong>de</strong> <strong>de</strong>l rodillosobre la cubierta no es suficiente1 El perfil <strong>de</strong> la rueda2 Piedrecita en la rueda1 Sitúe el entrenador sobre un piso liso2 Controle si está bien apretados todoslos tornillos y tuercas3 Controle a ver si ha sido montado elblocaje suministrado4 Despliéguelo <strong>de</strong>l todo1 Controle la presión <strong>de</strong> las ruedas,mínimo 6 atmósferas2 Fíjelo fuertemente contra la rueda1 Instale una rueda con el perfil total oparcialmente liso2 Controle que no se dañe la ruedaGARANTÍALos productos <strong>de</strong> Tacx han sido elaborados conforme a las normas <strong>de</strong> calidad más estrictas. Losproductos <strong>de</strong> Tacx tienen una garantía <strong>de</strong> un (1) año <strong>de</strong>s<strong>de</strong> la fecha <strong>de</strong> compra aplicable contralos <strong>de</strong>fectos <strong>de</strong> producción o material. Guar<strong>de</strong> bien el vale <strong>de</strong> caja pues éste es su justificante<strong>de</strong> la compra. Los accesorios que por el uso normal sufren <strong>de</strong>sgaste no caen en la garantía.La garantía vence si el producto muestra claramente:1 que se ha <strong>de</strong>stinado para un uso distinto que para el que ha sido fabricado2 que el uso, las reparaciones o el <strong>de</strong>smontaje se han efectuado <strong>de</strong> una manera inexperta3 daños como consecuencia <strong>de</strong> acci<strong>de</strong>ntes o negligencia4 que se trata <strong>de</strong> daños causados por el envío o transporte <strong>de</strong>l productoGastos <strong>de</strong> envío- los gastos <strong>de</strong> envío al suministrador <strong>de</strong> Tacx o el Centro <strong>de</strong> Servicios <strong>de</strong> Tacx Service Centercorren por cuenta <strong>de</strong>l cliente.- los aparatos reparados son enviados a cargo <strong>de</strong>l Centro <strong>de</strong> Servicios <strong>de</strong> Tacx.Gastos <strong>de</strong> envío- Cuando el producto, por algún motivo, no funcione como es <strong>de</strong>bido a pesar <strong>de</strong> hacerse un usonormal <strong>de</strong>l mismo, llévelo junto con el justificante <strong>de</strong> la compra (copia) y el formulario <strong>de</strong> serviciorellenado a su suministrador. También lo pue<strong>de</strong> enviar directamente al Centro <strong>de</strong> Servicios<strong>de</strong> Tacx en su país.- El Centro <strong>de</strong> Servicios <strong>de</strong> Tacx sólo pue<strong>de</strong> dar trámite a estos envíos si van acompañados <strong>de</strong> unformulario <strong>de</strong> servicio rellenado.- Si se <strong>de</strong>termina que el producto cae bajo la garantía, el Centro <strong>de</strong> Servicios <strong>de</strong> Tacx lo repararáo sustituirá <strong>de</strong> manera gratuita en el plazo <strong>de</strong> 30 días.- La <strong>de</strong>terminación si un producto cae bajo la garantía, es únicamente competencia <strong>de</strong> Tacx bv.Si un producto no cae bajo la garantía, el aparato será reparado y los gastos correrán por cuenta<strong>de</strong>l cliente. Si los gastos <strong>de</strong> la reparación superan los 50,00 euros, se le presentará previamenteuna indicación <strong>de</strong>l precio. Dependiendo <strong>de</strong> su respuesta, el producto será reparado o<strong>de</strong>vuelto tal como se recibió.32E
Contenuto <strong>de</strong>lla confezioneT1460 CYCLEFORCE SWINGContenuto <strong>de</strong>lla confezioneAssicuratevi che tutte le parti sianoincluse nella confezione.- Telaio CycleForce Swing- Simulatore di resistenza- Manuale- 2 Capuchón- 2 Pie- 2 sachettos di montaggioT1465 Sachetto di montaggio pedanaT1424.012xT1424.022xT1353.101xT1353.111xT14021xT1408.111xT1410.021xT1410.042xT1410.061xT1423.152xT1424.032xT1461.192xT1461.221xT1465.012xT1465.082xT1466 sacchetto di montaggio per il set adattatoreT1466.011xT1466.021xT1466.031xT1466.041xT1260.074xT1461.194xT2459.034x33I
Montaggio <strong>de</strong>l CycleForce Swing11 Con la leva H è possibile avvicinare e allontanare il rullo <strong>de</strong>ll’unità magnetica dalla gomma.(fig.5 & 6). Dopo aver chiuso la leva H, si può usare la manopola R per regolare la pressione <strong>de</strong>lrullo contro la gomma. Assicuratevi che il rullo si saldamente appoggiato alla gomma per evitareche questa scivoli.HHR5 6Differenze <strong>de</strong>lle modalità di montaggio per biciclette con un diverso diametro di ruotaPrima di proce<strong>de</strong>re al montaggio <strong>de</strong>l manubrio completo sul telaio, operazione per cui rimandiamoal punto 5 <strong>de</strong>lle istruzioni, occorre fissare le fasce di rialzo e di prolunga.Diametro di ruota compreso nell'intervallo 610 - 640 mm: fissare le fascette di rialzo W con4 bulloni, dadi e anelli (fig.7).Diametro di ruota compreso nell’intervallo 690 - 720 mm: fissare le prolunghe Z (fig.8).WZWZHH7 8Suggerimenti- Un uso prolungato e intensivo <strong>de</strong>lla CycleForce Swing può provocare un notevole riscaldamento <strong>de</strong>ll’unità. Avvolgere l’unità con la leva H dopo l’uso e lasciare che si raffreddi prima ditoccarla.- Prima di usare la Cycle Force Swing, si consiglia di controllare che - una volta aperto l’apparecchiola maniglia E sia posizionata all indietro fino in fondo. Con ciò si evitano danni al telaio.- Assicurarsi che l’unità I non venga appoggiata sul volano durante l’assemblaggio. Ciò potrebbeprovocare uno sbilanciamento <strong>de</strong>ll’asse causando vibrazioni.- Assicurarsi che la gomma sia gonfiata bene (almeno sei atmosfere).- Le MTB dovrebbero avere preferibilmente gomme con profilo totalmente o parzialmente liscio.Un profilo ruvido può causare rumore e far scivolare la ruota.- Mentre pedalate sul Cycle Force Swing non frenate mai improvvisa mente. Frenando sulla ruotaposteriore, il volano continua il suo movimento, per cui si viene a creare un inutile logorio <strong>de</strong>lcopertone posteriore.- Controllare regolarmente che viti e dadi <strong>de</strong>l trainer siano ben saldi.- Usare il fermagio per i cavi <strong>de</strong>l telaio per mantenere i cavi in ordine quando il trainer è montato.I35
Consigli per l’allenamentoCONSIGLI PER L’ALLENAMENTOIn nessun altro sport come nel ciclismo viene richiesto alla persona che lo practica uno stato cosìlungo e pesante di sforzo e resistenza. Il ciclismo è conosciuto come uno tra gli sport più pesanti perquanto riguarda il carico su cuore, polmoni e muscoli. Ciò vale, più o meno, anche durante l'uso <strong>de</strong>gliCycle Force Swing Tacx, specialmente per il fatto che voi stessi <strong>de</strong>si<strong>de</strong>rate portare questi carichi alivelli più alti. Per questo, prima di iniziare la nuova stagione ciclistica, vi consigliamo innanzitutto direcarvi, almeno una volta all'anno, da un medico sportivo specializzato per sottoporvi ad un completocheck-up spotivo.Una possibile <strong>de</strong>finizione di allenamento potrebbe essere: “L'applicazione sistematica di stimoli permigliorare le prestazioni”. Quando ci alleniamo abbiamo uno scopo. Lo scopo potrebbe essere per<strong>de</strong>repeso, effettuare un particolare tipo di pedalata sportiva o vincere la medaglia d’oro durante unagara di campionato. Gli stimoli che applichiamo possono consistere nel coprire distanze lunghe aca<strong>de</strong>nza regolare, o fare volate su distanze brevi. E’importante programmare l’intensità <strong>de</strong>ll’allenamento.Col progredire <strong>de</strong>lla stagione, pedaliamo per più tempo, percorriamo distanze maggiori operfino andiamo ad una certa altitudine (montagna). Quando si tratta di migliorare veramente leprestazioni, la parola magica è variazione.Super-comensazioneQuando ci alleniamo, portiamo scompiglio al corpo. Tale scompiglio (<strong>de</strong>l cuore, <strong>de</strong>i polmoni e <strong>de</strong>imuscoli) si ricompone e migliora leggermente quando ci riposiamo. Questo principio viene chiamatosuper-compensazione. Non è l’allenamento che ci ren<strong>de</strong> più forti; è il tempo di recupero che lo segue.L’allenamento successivo dovrebbe essere fatto appena prima che la curva di super-compensazioneraggiunga il punto zero. (fig.7). Per aumentare la forma fisica, è necessario allenarsi almeno tre voltealla settimana. Allenarsi due volte alla settimana è sufficiente per mantenere la forma fisica. Una voltaalla settimana non basta. Potete progettare voi il vostro piano di allenamento o chie<strong>de</strong>rlo al vostroallenatore.Lavoro diallenamento7RecuperoSupercompensazione05 10 15 20 25 30 35 40 45 50 55 60Velocità (km/h)La CycleForce Swing è un trainere per ciclisti che vogliono allenarsi in modo intensivo e raggiungereuna certa potenza, che vogliono aumentare la resistenza fisica e ottenere velocemente risultat. Il grafico(fig.8) confronta la potenza <strong>de</strong>lla CF Swing (asse <strong>de</strong>lle Y) con la velocità in in km/h (asse <strong>de</strong>lle X).Poichè gli attuali freni hanno sette posizioni (pen<strong>de</strong>nze), il grafico contiene sette linee. La potenzaaumenta proporzionalmente alla velocità o alla resistenza <strong>de</strong>terminata dalla posizione <strong>de</strong>l freno.La CF Swing è adatta ad un allenamento specifico <strong>de</strong>lla potenza, in modo quasi ineguagliabile su strada.Durante l'allenamento con la CF Swing, è raccomandabile l'uso <strong>de</strong>l misuratore cardiaco.Esempi di programmi di allenamentoFate sempre un po’di riscaldamento prima di iniziare l’allenamento. Cinque o dieci minuti di pedalatarilassata con reisistenza bassa e frequenza fra 90 e 110 giri di pedale al minuto. Durante il periodo diallenamento potete fare <strong>de</strong>gli esercizi di stretching (anche sulla biciceltta). Conclu<strong>de</strong>te l’allenamentocon un periodo di raffreddamento fra i cinque e i dieci minuti, seguito, anch’esso, da esercizi di stretching.Tralasciare le fasi di riscaldamento e raffreddamento può essere dannoso.Potenzia (watt)7654321836I
Consigli per l’allenamentoPiano di recuperotempo (min) slope giri pedale rapporto particolari3 1 100 minimo pedalata rilassata/velocità alta3 1 100 1 duro pedalata rilassata/velocità alta3 1 100 1 duro pedalata rilassata/velocità alta3 1 100 1 duro pedalata rilassata/velocità alta3 1 100 1 duro pedalata rilassata/velocità alta3 1 100 1 duro pedalata rilassata/velocità alta3 1 100 1 leggero pedalata rilassata/velocità alta3 1 100 1 leggero pedalata rilassata/velocità alta3 1 100 1 leggero pedalata rilassata/velocità alta3 1 100 1 leggero pedalata rilassata/velocità alta3 1 100 1 leggero pedalata rilassata/velocità alta3 1 100 minimo pedalata rilassata/velocità alta36Se voltete potete ripetere il tutto nella posizione 2 ogni volta per due minuti e ancora in posizione 3con ripetizioni da 1 minuto. Come variazione pote pedalare ad una frequenza di 80, 90, 110 or 120.Programma potenzatempo (min) slope giri pedale rapporto particolari1 3 115 libero velocità alta1 1 80 libero pedalata rilassata/recupero2 3 115 libero velocità alta2 1 80 libero pedalata rilassata/recupero3 3 115 libero velocità alta3 1 80 libero pedalata rilassata/recupero1 2 70/80 libero forzare solo sulla gamba sinistra1 2 70/80 libero forzare solo sulla gamba <strong>de</strong>stra3 6 60 libero in piedi sui pedali!3 4 115 libero velocità alta3 1 80 libero pedalata rilassata/recupero2 4 115 libero velocità alta2 1 80 libero pedalata rilassata/recupero1 4 115 libero velocità alta1 1 80 libero pedalata rilassata/recupero10 1 libero libero raffreddamento39Programma Hilltempo (min) slope giri pedale rapporto particolari4 2 80/90 libero pedalata rilassata/velocità costante3 3 > 80 libero cercare di mantenere la velocità alta1 7 60 53-14 sare in piedi sui pedali!5 1 > 100 42-16 frequenza di pedalata alta2 5 > 80 53-15 se<strong>de</strong>rsi/alzarsi ogni 30”2 6 90/100 42-16 rimanere seduti5 1 110/130 42-16 frequenza di pedalata alta10 1 libero libero raffreddamento32Potete trovare i consigli e i resultati <strong>de</strong>lle ultime ricerche sull’allenamento: www.tacx.nl.I37
Constatazione di <strong>de</strong>fetti e garanziaCONSTATAZIONE DI DEFETTIDifettoCause possibiliSoluzione1 Regolazione <strong>de</strong>lCycleForce Swingquando la biciclettavibra2 La gomma <strong>de</strong>lcopertone si attaccaal rullo3 La bicicletta famolto rumore1 Il telaio <strong>de</strong>l CycleForce non èorizzontale2 Il telaio è stato assemblato inmodo non corretto3 La bicicletta non è inseritabene nel telaio4 Il telaio non è stato completamenteaperto1 La pressione <strong>de</strong>lla ruota ètroppo bassa2 Il rullo non esercita la giustapressione sulla gomma1 Profilo <strong>de</strong>i copertoni2 C’è un sassolino nel copertone1 Montate il telaio su una superficiepiana2 Accertatevi che tutti i bulloni e vitisiano ben avvitati3 Accertatevi che l’apposito di bloccaggiosia montato4 Apire il telaio <strong>de</strong>l tutto1 Controllate che la tensione <strong>de</strong>llagomme sia di almeno 6 atmosfere2 Girate il rullo in modo che stia bene acontatto contro la ruota1 Montate copertoni dal profilo completamenteo parzialmente liscio2 Controllate il copertoneTERMINI DI GARANZIAI prodotti Tacx sono realizzati secondo i più alti standard di qualità. La garanzia di un (1) annodalla data d'acquisto riguarda difetti di produzione o difetti <strong>de</strong>i materiali di tutti i prodotti Tacx.Conservate lo scontrino, dal momento che esso costituisce la prova <strong>de</strong>ll'acquisto!La garanzia per<strong>de</strong> di validità in caso che i prodotti mostrino segni evi<strong>de</strong>nti di:1 uso per uno scopo diverso da quello cui sono <strong>de</strong>stinati2 uso inappropriato, riparazioni, smontaggi3 danni provocati da inci<strong>de</strong>nti o incuria4 danni <strong>de</strong>rivanti dall’immballaggio o dal trasporto <strong>de</strong>l prodottoCosti di spedizione- I costi di spedizione ad un Rivenditore o ad un Centro di Assistenza Tacx sono a carico <strong>de</strong>lproprietario.- Il Servizio di Assistenza Tacx provve<strong>de</strong>rà alle riparazioni e alla spedizione per la restituzionegratuitamente.Procedura- Se durante il normale utilizzo un prodotto non funziona in modo appropriato per qualsiasiragione restituitelo al nostro Rivenditore insieme alla prova <strong>de</strong>ll’acquisto (copia <strong>de</strong>llo scontrino)e al modulo compilato per l’assistenza. Potete anche spedirlo direttamente al Servizio diAssistenza Tacx più vicino nel vostro paese. C’è un elenco <strong>de</strong>i Centri di Assistenza Tacx nelcatalogo, nel manuale di istruzioni e nel sito Internet.- Seguite le istruzioni per la spedizione. Il Servizio di Assistenza Tacx accetta restituzioni solo seaccompagnate dal modulo compilato.- Il Servizio di Assistenza ripara o sostiutisce gratuitamente i prodotti coperti dalla garanzia entro30 giorni.- Tacx bv è l’unico arbitro per <strong>de</strong>cis<strong>de</strong>re se il prodotto è coperto dalla garanzia. Se un prodottonon è coperto da garanzia, esso viene riparato e la spesa verrà fatturata. Se il costo di riparazionesupera i 50.00 Euro, riceverete anticipatamente un preventivo di spesa. Il prodotto verràriparato o vi sarà restitutito nella condizione originaria dopo la vostra risposta.38I
Service FormSERVICE FORMBefore shipping the product for repair, read the error messages in the accompanying user'smanual and go through the FAQs on the Tacx website (www.tacx.nl). To be eligible for service,use this form and fill in all information clearly.Name, Initials ...... ...... ...... ...... ...... ...... ...... ...... ...... ... ... ... ... ... ... ... ... ... ... ... ... ... ... ... ... ... ... ... ... ... ... ... ... ... ... ... ... ... ... ..Address ...... ...... ...... ...... ...... ...... ...... ...... ...... ...... ... ... ... ... ... ... ... ... ... ... ... ... ... ... ... ... ... ... ... ... ... ... ... ... ... ... ... ... ... ... ... ...Postal Co<strong>de</strong> ...... ...... ...... ...... ...... ...... ...... ...... ...... ..... ... ... ... ... ... ... ... ... ... ... ... ... ... ... ... ... ... ... ... ... ... ... ... ... ... ... ... ... ... ..Town ... ... ... ... ... ... ... ... ... ... ... ... ... ... ... ... ... ... ... ... ... ... ... ... ... ... ... ... ... ... ... ... ... ... ... ... ... ... ... ... ... ... ... ... ... ... ... ... ... ... ... ... ... .Country ...... ...... ...... ...... ...... ...... ...... ...... ...... ...... ... ... ... ... ... ... ... ... ... ... ... ... ... ... ... ... ... ... ... ... ... ... ... ... ... ... ... ... ... ... ... ..Telephone ...... ...... ...... ...... ...... ...... ...... ...... ...... ...... ... ... ... ... ... ... ... ... ... ... ... ... ... ... ... ... ... ... ... ... ... ... ... ... ... ... ... ... ... ... ..Mo<strong>de</strong>l: Tacx CycleForce SwingDate of Purchase.............................................................................................................................Receipt of Purchase (copy enclosed)Warranty Expired?yesyesnonoDescription of complaint: ...... ...... ...... ...... ...... ...... ...... ...... .... ... ... ... ... ... ... ... ... ... ... ... ... ... ... ... ... ... ... ... ... ... ... ... ... .... ... ... ... ... ... ... ... ... ... ... ... ... ... ... ... ... ... ... ... ... ... ... ... ... ... ... ... ... ... ... ... ... ... ... ... ... ... ... ... ... ... ... ... ... ... ... ... ... ... ... ... ... ... ... ... ..... ... ... ... ... ... ... ... ... ... ... ... ... ... ... ... ... ... ... ... ... ... ... ... ... ... ... ... ... ... ... ... ... ... ... ... ... ... ... ... ... ... ... ... ... ... ... ... ... ... ... ... ... ... ... ... ..... ... ... ... ... ... ... ... ... ... ... ... ... ... ... ... ... ... ... ... ... ... ... ... ... ... ... ... ... ... ... ... ... ... ... ... ... ... ... ... ... ... ... ... ... ... ... ... ... ... ... ... ... ... ... ... ..... ... ... ... ... ... ... ... ... ... ... ... ... ... ... ... ... ... ... ... ... ... ... ... ... ... ... ... ... ... ... ... ... ... ... ... ... ... ... ... ... ... ... ... ... ... ... ... ... ... ... ... ... ... ... ... ..Other information for Tacx Service Centre: ...... ...... ...... ...... ...... ...... ...... ... ... ... ... ... ... ... ... ... ... ... ... ... ... ... ... .... ... ... ... ... ... ... ... ... ... ... ... ... ... ... ... ... ... ... ... ... ... ... ... ... ... ... ... ... ... ... ... ... ... ... ... ... ... ... ... ... ... ... ... ... ... ... ... ... ... ... ... ... ... ... ... ..... ... ... ... ... ... ... ... ... ... ... ... ... ... ... ... ... ... ... ... ... ... ... ... ... ... ... ... ... ... ... ... ... ... ... ... ... ... ... ... ... ... ... ... ... ... ... ... ... ... ... ... ... ... ... ... ..... ... ... ... ... ... ... ... ... ... ... ... ... ... ... ... ... ... ... ... ... ... ... ... ... ... ... ... ... ... ... ... ... ... ... ... ... ... ... ... ... ... ... ... ... ... ... ... ... ... ... ... ... ... ... ... ..... ... ... ... ... ... ... ... ... ... ... ... ... ... ... ... ... ... ... ... ... ... ... ... ... ... ... ... ... ... ... ... ... ... ... ... ... ... ... ... ... ... ... ... ... ... ... ... ... ... ... ... ... ... ... ... ..... ... ... ... ... ... ... ... ... ... ... ... ... ... ... ... ... ... ... ... ... ... ... ... ... ... ... ... ... ... ... ... ... ... ... ... ... ... ... ... ... ... ... ... ... ... ... ... ... ... ... ... ... ... ... ... ..... ... ... ... ... ... ... ... ... ... ... ... ... ... ... ... ... ... ... ... ... ... ... ... ... ... ... ... ... ... ... ... ... ... ... ... ... ... ... ... ... ... ... ... ... ... ... ... ... ... ... ... ... ... ... ... ..... ... ... ... ... ... ... ... ... ... ... ... ... ... ... ... ... ... ... ... ... ... ... ... ... ... ... ... ... ... ... ... ... ... ... ... ... ... ... ... ... ... ... ... ... ... ... ... ... ... ... ... ... ... ... ... ..... ... ... ... ... ... ... ... ... ... ... ... ... ... ... ... ... ... ... ... ... ... ... ... ... ... ... ... ... ... ... ... ... ... ... ... ... ... ... ... ... ... ... ... ... ... ... ... ... ... ... ... ... ... ... ... ..39