Samsung i70 (EC-I70ZZBBA/E1 ) - Manuel de l'utilisateur 7.56 MB, pdf, Anglais
Samsung i70 (EC-I70ZZBBA/E1 ) - Manuel de l'utilisateur 7.56 MB, pdf, Anglais
Samsung i70 (EC-I70ZZBBA/E1 ) - Manuel de l'utilisateur 7.56 MB, pdf, Anglais
You also want an ePaper? Increase the reach of your titles
YUMPU automatically turns print PDFs into web optimized ePapers that Google loves.
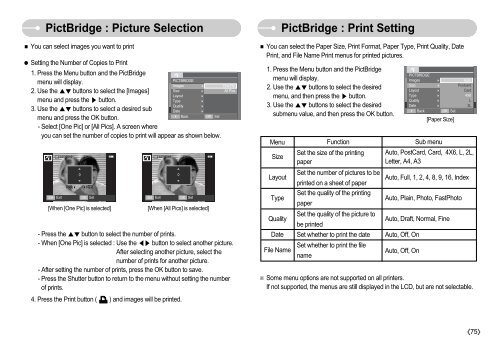
PictBridge : Picture Selection<br />
You can select images you want to print<br />
Setting the Number of Copies to Print<br />
1. Press the Menu button and the PictBridge<br />
menu will display.<br />
PICTBRIDGE<br />
Images<br />
2. Use the buttons to select the [Images]<br />
Size<br />
<br />
Layout <br />
menu and press the button.<br />
Type<br />
<br />
Quality <br />
3. Use the buttons to select a <strong>de</strong>sired sub<br />
Date<br />
<br />
menu and press the OK button.<br />
- Select [One Pic] or [All Pics]. A screen where<br />
Back<br />
OK Set<br />
you can set the number of copies to print will appear as shown below.<br />
SH<br />
Exit<br />
<br />
0<br />
<br />
Prev Next<br />
OK<br />
Set<br />
[When [One Pic] is selected]<br />
One Pic<br />
All Pics<br />
- Press the button to select the number of prints.<br />
- When [One Pic] is selected : Use the button to select another picture.<br />
After selecting another picture, select the<br />
number of prints for another picture.<br />
- After setting the number of prints, press the OK button to save.<br />
- Press the Shutter button to return to the menu without setting the number<br />
of prints.<br />
4. Press the Print button ( ) and images will be printed.<br />
SH<br />
Exit<br />
<br />
<br />
<br />
0<br />
<br />
OK<br />
Set<br />
[When [All Pics] is selected]<br />
PictBridge : Print Setting<br />
You can select the Paper Size, Print Format, Paper Type, Print Quality, Date<br />
Print, and File Name Print menus for printed pictures.<br />
1. Press the Menu button and the PictBridge<br />
menu will display.<br />
2. Use the buttons to select the <strong>de</strong>sired<br />
menu, and then press the button.<br />
3. Use the buttons to select the <strong>de</strong>sired<br />
submenu value, and then press the OK button.<br />
Menu<br />
Size<br />
Function<br />
Set the size of the printing<br />
paper<br />
PICTBRIDGE<br />
Images<br />
Size<br />
Layout<br />
Type<br />
Quality<br />
Date<br />
Sub menu<br />
Auto<br />
Postcard<br />
Card<br />
4X6<br />
L<br />
2L<br />
Auto, PostCard, Card, 4X6, L, 2L,<br />
Letter, A4, A3<br />
Layout<br />
Set the number of pictures to be<br />
printed on a sheet of paper<br />
Auto, Full, 1, 2, 4, 8, 9, 16, In<strong>de</strong>x<br />
Type<br />
Set the quality of the printing<br />
paper<br />
Auto, Plain, Photo, FastPhoto<br />
Quality<br />
Set the quality of the picture to<br />
be printed<br />
Auto, Draft, Normal, Fine<br />
Date Set whether to print the date Auto, Off, On<br />
File Name<br />
Set whether to print the file<br />
name<br />
Auto, Off, On<br />
Some menu options are not supported on all printers.<br />
If not supported, the menus are still displayed in the LCD, but are not selectable.<br />
<br />
<br />
<br />
<br />
<br />
<br />
<br />
Back<br />
OK<br />
Set<br />
[Paper Size]<br />
75


