
Create successful ePaper yourself
Turn your PDF publications into a flip-book with our unique Google optimized e-Paper software.
Owner’s Manual<br />
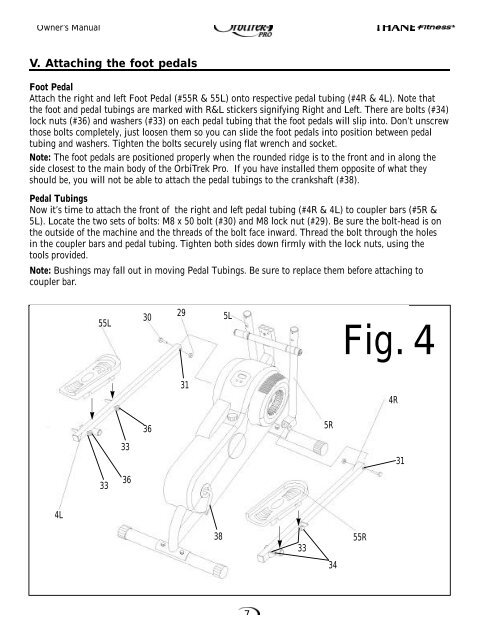
V. Attaching the foot pedals<br />
Foot Pedal<br />
Attach the right and left Foot Pedal (#55R & 55L) onto respective pedal tubing (#4R & 4L). Note that<br />
the foot and pedal tubings are marked with R&L stickers signifying Right and Left. There are bolts (#34)<br />
lock nuts (#36) and washers (#33) on each pedal tubing that the foot pedals will slip into. Don’t unscrew<br />
those bolts completely, just loosen them so you can slide the foot pedals into position between pedal<br />
tubing and washers. Tighten the bolts securely using flat wrench and socket.<br />
Note: The foot pedals are positioned properly when the rounded ridge is to the front and in along the<br />
side closest to the main body of the OrbiTrek Pro. If you have installed them opposite of what they<br />
should be, you will not be able to attach the pedal tubings to the crankshaft (#38).<br />
Pedal Tubings<br />
Now it’s time to attach the front of the right and left pedal tubing (#4R & 4L) to coupler bars (#5R &<br />
5L). Locate the two sets of bolts: M8 x 50 bolt (#30) and M8 lock nut (#29). Be sure the bolt-head is on<br />
the outside of the machine and the threads of the bolt face inward. Thread the bolt through the holes<br />
in the coupler bars and pedal tubing. Tighten both sides down firmly with the lock nuts, using the<br />
tools provided.<br />
Note: Bushings may fall out in moving Pedal Tubings. Be sure to replace them before attaching to<br />
coupler bar.<br />
4L<br />
55L<br />
33<br />
33<br />
36<br />
30<br />
36<br />
29 5L<br />
31<br />
38<br />
7<br />
33<br />
5R<br />
34<br />
Fig. 4<br />
55R<br />
4R<br />
31