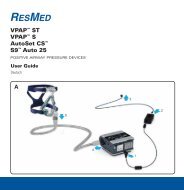
VPAP⢠ST VPAP⢠S AutoSet CS⢠S9⢠Auto 25 A - Sanitätshaus ...
VPAP⢠ST VPAP⢠S AutoSet CS⢠S9⢠Auto 25 A - Sanitätshaus ...
VPAP⢠ST VPAP⢠S AutoSet CS⢠S9⢠Auto 25 A - Sanitätshaus ...

Create successful ePaper yourself
Turn your PDF publications into a flip-book with our unique Google optimized e-Paper software.
2<br />
English<br />
• ear or sinus discomfort<br />
• eye irritation<br />
• skin rashes.<br />
Masks and humidifiers<br />
Recommended masks and humidifiers are available on www.resmed.com on the Products page under<br />
Service & Support. For information on using your mask or humidifier, refer to the manual supplied with<br />
your mask or humidifier.<br />
Setup<br />
Refer to illustration A.<br />
1. Connect the DC plug of the power supply unit to the rear of the device.<br />
2. Connect the power cord to the power supply unit.<br />
3. Plug the other end of the power cord into the power outlet.<br />
4. Connect one end of the air tubing firmly onto the air outlet.<br />
5. Connect the assembled mask system to the free end of the air tubing.<br />
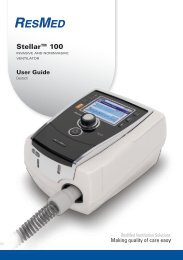
Control panel<br />
Refer to illustration B.<br />
The control panel of your device includes the following items:<br />
1. Start/Stop button: Starts or stops treatment<br />
2. Home menu<br />
3. LCD screen<br />
4. Info menu: Allows you to view your sleep statistics<br />
5. Setup menu: Allows you to make changes to settings<br />
6. Push dial: Turning the dial allows you to scroll through the menu and change settings. Pushing the<br />
dial allows you to enter into a menu and confirm your choice.<br />
Navigating the menus<br />
Refer to illustration C.<br />
In general, to navigate the menus:<br />
1. Turn until the parameter you require is displayed in blue.<br />
2. Press . The selection is highlighted in orange.<br />
3. Turn until you see the setting that you require.<br />
4. Press to confirm your choice. The screen returns to blue.