×
Your ePaper is waiting for publication!
By publishing your document, the content will be optimally indexed by Google via AI and sorted into the right category for over 500 million ePaper readers on YUMPU.
This will ensure high visibility and many readers!
PUBLISH DOCUMENT
No, I renounce more range.
You can find your publication here:
Share your interactive ePaper on all platforms and on your website with our embed function
⬤
⬤
EAGLE - Cadsoft
EAGLE - Cadsoft
EAGLE - Cadsoft
SHOW MORE
SHOW LESS
Create successful ePaper yourself
Turn your PDF publications into a flip-book with our unique Google optimized e-Paper software.
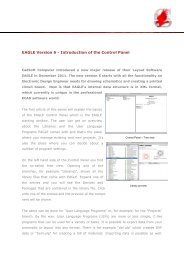
4.1 Control Panel 控制面板<br />
如果在不打开任何项目的情况下启动 <strong>EAGLE</strong>(不读取任何 <strong>EAGLE</strong>.epf 文件,并<br />
且 在 上 次 关 闭 <strong>EAGLE</strong> 前 已 经 关 闭 了 项 目 ) 并 创 建 一 个 新 项 目 ( 从<br />
File/New/Project 创建),则所有的元件库自动进入使用状态。然而,当打<br />
开一个已有的项目时,如果该项目在新项目创建之前仅使用了部分元件库,则<br />
只有这一部分元件库会进入使用状态。<br />
如果元件库编辑器(Library Editor)窗口已经打开,则您可以将某个完整<br />
的元件组(Device set)或者 Package 从 控制面板(Control Panel)中拖<br />
拽到元件库编辑器(Library Editor)中。通过这种方法您就可以在不同的<br />
元件库(Library)之间进行复制操作。<br />
➢ 控制面板(Control Panel):在 Library 中浏览元件 Device<br />
39
4.1 Control Panel 控制面板 如果在不打开任何项目的情况下启动 <strong>EAGLE</strong>(不读取任何 <strong>EAGLE</strong>.epf 文件,并 且 在 上 次 关 闭 <strong>EAGLE</strong> 前 已 经 关 闭 了 项 目 ) 并 创 建 一 个 新 项 目 ( 从 File/New/Project 创建),则所有的元件库自动进入使用状态。然而,当打 开一个已有的项目时,如果该项目在新项目创建之前仅使用了部分元件库,则 只有这一部分元件库会进入使用状态。 如果元件库编辑器(Library Editor)窗口已经打开,则您可以将某个完整 的元件组(Device set)或者 Package 从 控制面板(Control Panel)中拖 拽到元件库编辑器(Library Editor)中。通过这种方法您就可以在不同的 元件库(Library)之间进行复制操作。 ➢ 控制面板(Control Panel):在 Library 中浏览元件 Device 39
4 <strong>EAGLE</strong> 概述 Design Rules 设计规则 在 <strong>EAGLE</strong> 中可以配置特殊的 Design Rules 来规范电路板设计。这些规则可以 通过数据组(data sets)的形式保存在特殊的文件里(*.dru)。 用于当前项目的参数组可以在树形浏览框中的设计规则(Design Rules)项 中进行配置。如果没有为设计规则(DRC 命令)提供配置数据,那么 <strong>EAGLE</strong> 将 自动配置参数。文件右方的标记为当前项目指定了默认参数设置。PCB 设计将 根据这些标准来进行设计规则检查(DRC)。关于设计规则检查(DRC)和设 计规则(Design Rules)的更多信息请参考第 121 页。 User Language Programs 用户语言程序、Scripts 脚本、 CAM 处理程序文件(CAM Jobs) 这些选项显示了各个目录下的用户语言程序文件( *.ulp )、脚本文件 (*.scr)和 CAM 处理程序文件(*.cam)。它们是 CAM 处理程序输出数据时需 要使用的文件。如果在控制面板(Control Panel)中选中某个文件,则会显 示该文件的详细描述。 通过选项/目录设置菜单可以对路径进行设置。在本章节中会对此进行更为详 细的介绍。 Projects 项目 各 种 项 目 都 通 过 控 制 面 板 ( Control Panel ) 进 行 管 理 。 展 开 项 目 (Projects)选项将显示不同的文件夹。这些文件夹都位于选项/目录设置/ 项目菜单中所设定的路径下。在该菜单中可以设定一条以上的路径。 一 个 项 目 通 常 包 含 一 个 名 称 为 该 项 目 名 的 文 件 夹 和 该 项 目 的 配 置 文 件 <strong>EAGLE</strong>.epf。该文件夹通常包含了您的项目的所有文件,例如原理图和 PCB 设 计文件、特殊库文件、脚本文件等。 包含项目文件 <strong>EAGLE</strong>.epf 的项目(Project)文件夹显示为红色。“普通”文 件夹则显示为黄色。 在项目(Projects)树形分支中可以选择需要编辑的项目。在项目名称右方 您可以看到一个灰色或绿色标记。通过该标记就可以打开或关闭项目。当单击 灰色标记时,将会打开该项目。标记随之变为绿色。当再次单击绿色标记或单 击另一个灰色标记时,当前项目将会关闭或者当前项目关闭后另一个项目随之 打开。通过这种方法可以在不同项目之间轻松切换。 打开或关闭项目的另一个方法是在树形浏览框中双击该项目内的文件或者选中 该项目内的文件后按下空格键(Space)或回车键(Enter)。 当关闭项目时,如果已经选中了选项/备份设置菜单中的自动保存项目文件选 项,则当前打开的编辑器窗口的设置将会保存在相应的项目文件 <strong>EAGLE</strong>.epf 中。 如果项目文件是由另一个 <strong>EAGLE</strong> 版本生成,而不是当前版本,则会询问您是否 同意覆盖该文件。 在项目树形分支中的文件夹上单击鼠标右键可以创建新项目。鼠标右键的弹出 菜单(Context Menu)支持新文件和新目录的创建以及对单个项目进行管理。 通过选项新建项目菜单所创建的新文件夹需要以项目的名称命名。项目文件 <strong>EAGLE</strong>.epf 将会自动生成。 您也可以通过文件/打开/项目或者文件/新建/项目菜单来打开项目或创建一 个新项目。 40
Page 1 and 2: EAGLE EASILY APPLICABLE GRAPHICAL L Page 3 and 4: 目录 第 1 章 介绍............ Page 5 and 6: 目录 Command 命令参数........ Page 7 and 8: 目录 REPLACE 替换.............. Page 9 and 10: 目录 极坐标值:............... Page 11 and 12: 目录 没有原理图编辑器的 Page 13 and 14: 目录 mnExtdSteps 0..9999......... Page 15 and 16: 目录 元件 NAME 和 VALUE 的占 Page 17 and 18: 目录 Job gerb274x.cam............ Page 19 and 20: 第1章 介绍 本手册描述了 E Page 21 and 22: 1.2 重要修改信息 件库之间 Page 23 and 24: Pin 引脚: 原理图符号上的 Page 25 and 26: 2 安装 如果您已经在 http:// Page 27 and 28: 2 安装 路 径 设 定 参 数 Page 29 and 30: 2 安装 在多用户授权的限 Page 31 and 32: 第3章 EAGLE 的功能和版本 3. Page 33 and 34: � 元件可锁定以防止移动 Page 35 and 36: This page has been left free intent Page 37: 4 EAGLE 概述 ➢ Control Panel: Page 41 and 42: 4 EAGLE 概述 Open 打开 打开 Page 43 and 44: 4 EAGLE 概述 User Interface 用 Page 45 and 46: 4 EAGLE 概述 EAGLE License 产品 Page 47 and 48: 4 EAGLE 概述 如何得到一条 Page 49 and 50: 4 EAGLE 概述 The Action Toolbar Page 51 and 52: 4 EAGLE 概述 SHOW 高亮显示 Page 53 and 54: 4 EAGLE 概述 另外该命令也 Page 55 and 56: 4 EAGLE 概述 TEXT 放置文本 Page 57 and 58: 4 EAGLE 概述 命令栏工具栏 Page 59 and 60: 4 EAGLE 概述 TECHNOLOGY 如果一 Page 61 and 62: 4 EAGLE 概述 也可以在命令 Page 63 and 64: 4 EAGLE 概述 按住 Ctrl 键,鼠 Page 65 and 66: 4 EAGLE 概述 Ctrl + Left 顺着 Page 67 and 68: 4 EAGLE 概述 VIA 过孔 在电路 Page 69 and 70: 4 EAGLE 概述 ➢ 元件库编辑 Page 71 and 72: 4 EAGLE 概述 Symbol 编辑模式 Page 73 and 74: 4 EAGLE 概述 NAME 命名 改变 G Page 75 and 76: 4 EAGLE 概述 在原理图编辑 Page 77 and 78: 第5章 EAGLE 使用原则 5.1 命 Page 79 and 80: ➢ 原理图中元件的右键弹 Page 81 and 82: Script 脚本文件 5.1 命令使 Page 83 and 84: 输入: DISPLAY option layer_name.. Page 85 and 86: 5.2 EAGLE 的命令语言 如果命 Page 87 and 88: 5.4 DISPLAY、GRID 和 WINDOW 命 Page 89 and 90: ADD DIL14 'U1' ← • • • 5.5
Page 91 and 92: ➢ 图片输出设置 5.6 数据
Page 93 and 94: 5.9 对 EAGLE 进行个性化配置
Page 95 and 96: SET CONFIRM OFF; 5.9 对 EAGLE 进
Page 97 and 98: 5.9 对 EAGLE 进行个性化配置
Page 99 and 100: eagle.scr 文件实例: 5.9 对 EAG
Page 101 and 102: 第6章 从原理图到电路板设
Page 103 and 104: 6.1 创建原理框图 ADD 命令
Page 105 and 106: 6.1 创建原理框图 如果一个
Page 107 and 108: 6.1 创建原理框图 XREF 选项
Page 109 and 110: ➢ 网络簇:参数设置 上图
Page 111 and 112: ➢ Swaplevel 参数:引脚层可
Page 113 and 114: 全局属性可以单独在原理
Page 115 and 116: 6.1 创建原理框图 属性对话
Page 117 and 118: 原理图中需要注意的要点 S
Page 119 and 120: 6.1 创建原理框图 比如以上
Page 121 and 122: Supply 电源层中散热和绝缘
Page 123 and 124: 6.2 创建 PCB 板之前的注意
Page 125 and 126: 6.2 创建 PCB 板之前的注意
Page 127 and 128: ➢ 设计规则:阻焊层和焊膏
Page 129 and 130: 6.3 创建电路板 如果您希望
Page 131 and 132: 6.3 创建电路板 将元件 IC1
Page 133 and 134: 6.3 创建电路板 如 果 选 中
Page 135 and 136: 6.3 创建电路板 如果您要设
Page 137 and 138: Width 线宽: 6.3 创建电路板
Page 139 and 140: ➢ 启动设计规则检查 6.4 DR
Page 141 and 142: 6.4 DRC - 检查 PCB 设计并纠
Page 143 and 144: 6.4 DRC - 检查 PCB 设计并纠
Page 145 and 146: 6.5 多层电路板 如果除了过
Page 147 and 148: (1+(2*3)+16) Core 两个面的铜
Page 149 and 150: ➢ 实例 3:6 层板的层设置 6
Page 151 and 152: ➢ 实例 5:8 层板的层设置 6
Page 153 and 154: UPDATE /home/mydir/EAGLE/library/li
Page 155 and 156: 蛇形线 差分线对的等长调
Page 157 and 158: 6.8 装配变量 变量名称才会
Page 159 and 160: ➢ 移动鼠标对差分线进行
Page 161 and 162: 6.9 打印原理图和 PCB 设计
Page 163 and 164: 6.11 原理图与 PCB 设计图之
Page 165 and 166: 第7章 Autorouter 自动布线器
Page 167 and 168: 7.4 自动布线前需要定义的
Page 169 and 170: 静态内存空间 x (1.1..2,0)[字
Page 171 and 172: - 水平方向 | 垂直方向 / 45
Page 173 and 174: 7.6 花销因数如何影响布线
Page 175 and 176: 与优化过程不相关。 cfPolyg
Page 177 and 178: 7.10 用户信息 Status 状态显
Page 179 and 180: 7.12 实用技巧 | : Y 轴为首
Page 181 and 182: 7.13 Follow-me 布线 如果不能
Page 183 and 184: 7.13 Follow-me 布线 在 Maximum
Page 185 and 186: 第8章 通过实例来讲解如何
Page 187 and 188: 焊盘名称: 2。 8.1 定义一个
Page 189 and 190: 电阻Symbol 定义一个新原理
Page 191 and 192: NC 未连接的网络 8.1 定义一
Page 193 and 194: 8.1 定义一个简单的电阻 可
Page 195 and 196: ➢ Device 窗口:完整定义一
Page 197 and 198: ➢ 541032 的数据手册 8.2 定
Page 199 and 200: 设置 Grid 尺寸 8.2 定义一个
Page 201 and 202: Description 描述: 8.2 定义一
Page 203 and 204: 放置 SMD 焊盘 层)。 8.2 定
Page 205 and 206: 画丝印。 8.2 定义一个复杂
Page 207 and 208: 8.2 定义一个复杂的 Device
Page 209 and 210: ➢ 原理图符号编辑器:逻辑
Page 211 and 212: 8.2 定义一个复杂的 Device
Page 213 and 214: ➢ CONNECT 对话框 8.2 定义一
Page 215 and 216: 8.2 定义一个复杂的 Device Qu
Page 217 and 218: 8.3 Supply Voltages 电源电压
Page 219 and 220: ➢ 电源符号:GND 电源符号
Page 221 and 222: Name 栏输入:Distributor,Value
Page 223 and 224: 8.6 Attributes 属性 这些文本
Page 225 and 226: ➢ 板载连接器的封装 8.8
Page 227 and 228: 定义 Device 8.9 定义元件的
Page 229 and 230: 8.11 Solder Side 焊接面的元件
Page 231 and 232: Package Variant 定义封装变量
Page 233 and 234: 8.14 创建新的 Package Variants
Page 235 and 236: 接下来单击 COPY 按钮,对象
Page 237 and 238: ➢ 更新模式需求 组成您自
Page 239 and 240: This page has been left free intent
Page 241 and 242: 9 准备制造数据 Gerber Plot Da
Page 243 and 244: 9 准备制造数据 更多的信
Page 245 and 246: 9 准备制造数据 ➢ bom.ulp:
Page 247 and 248: 9 准备制造数据 现在,执行
Page 249 and 250: 9 准备制造数据 如果其他
Page 251 and 252: 9 准备制造数据 右边的信
Page 253 and 254: 9 准备制造数据 ❑ %N.crc ❑
Page 255 and 256: 9 准备制造数据 带Blind Vias
Page 257 and 258: 9 准备制造数据 � Upside dow
Page 259 and 260: 9 准备制造数据 将gerber.cam
Page 261 and 262: 9 准备制造数据 定义钻孔
Page 263 and 264: 9 准备制造数据 Type = DrillSt
Page 265 and 266: 9 准备制造数据 D101 rectangle
Page 267 and 268: 第10章 附录 10.1 层描述及
Page 269 and 270: 10.2 EAGLE 文件 *.pro Autorouter
Page 271 and 272: 10.3 EAGLE 参数概述 -N 禁止
Page 273 and 274: 'Grid { \ Metric { \ Fine : Grid mm
Page 275 and 276: 将元件名称作为所有元件
Page 277 and 278: 10.7 错误信息 当载入文件
Page 279 and 280: 忽略不适合的对象 Skipped un
Page 281 and 282: 10.8 EAGLE 授权协议 10.8 EAGLE
Page 283 and 284: 10.8 EAGLE 授权协议 5.2 除了
Page 285 and 286: 12. 协议可分割性 10.8 EAGLE
Page 287 and 288: 10.8 EAGLE 授权协议 版也可
Page 289 and 290: Index Component side 284 Cream fram
Page 291 and 292: Index Distance 138, 139 Documentati
Page 293 and 294: Index Update Package 268 Use 55 更
Page 295 and 296: Index Roundness 142 Stop flag 230 T
×
Inappropriate
Flag as Inappropriate
Abortire
×
Inappropriate
You have already flagged this document.
Delete template?
Are you sure you want to delete your template?
×
DOWNLOAD ePAPER
This ePaper is currently not available for download.