You also want an ePaper? Increase the reach of your titles
YUMPU automatically turns print PDFs into web optimized ePapers that Google loves.
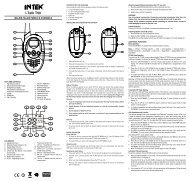
Controls and Indicators<br />
R. Memory Channel Number (1-8)<br />
It indicates the selected memory channel number, total 8 memory channels are available (1-8).<br />
S. M Icon<br />
The M Icon (S) is lighted when the radio is in MEMORY MODE.<br />
T. PS Icon<br />
The PS Icon (T) is lighted when the Automatic Power Save Circuit has been enabled.<br />
U. VOX Icon<br />
The VOX Icon (U) is lighted when the VOX (handsfree use) is enabled.<br />
V. BUSY Icon<br />
The BUSY Icon (V) appears when radio is receiving a signal or when Squelch is open.<br />
4. Earset-Microphone-Charge Jack<br />
Connect an external earset-microphone to this jack. Connect the supplied 230VAC battery travel<br />
charger to this jack.<br />
WARNING !<br />
Use only original accessories. Connecting and using accessories other than the original<br />
ones, may cause serious damage to the radio and will void the warranty.<br />
Always set the volume to minimum before connecting an external earset, in order to avoid<br />
damaging the earset or the user’s ear.<br />
5. UP Key<br />
The UP (5) key is used to change channel and toggle setting in Menu mode.<br />
6. 16 Key (Emergency Rescue Channel 16)<br />
Press this key to immediately access and enable the emergency rescue channel 16 (156.800 MHz).<br />
7. DOWN Key<br />
The DOWN (7) key is used to change channel and toggle setting in Menu mode.<br />
8. MENU / MEMORY key<br />
Use the MENU (8) key to enable and program the various functions of the radio. Pressing the<br />
MENU (8) key will scroll the various functions. Press and hold the MENU (8) key for about 3<br />
seconds to enter in the MEMORY MODE (refer to MEMORY CHANNEL OPERATION at page 15<br />
and 16).<br />
English<br />
- 8 -