OPERATIONNOTE: Illustrations are located on page 2and on pages 172 through 177.CAUTION: Use only attachments andaccessories approved by the manufacturerof the snow thrower (such as tire chains,electric start kits, etc.).Know Your <strong>Snow</strong> <strong>Thrower</strong> (Figure 1)Read this <strong>Instruction</strong> <strong>Book</strong> and safety rulesbefore operation the snow thrower. Compare theillustration with your snow thrower to familiarizeyourself with the location of various controls andadjustments.How To Control The Discharge Of The<strong>Snow</strong>1740879WARNING: Never direct thedischarge of snow towardbystanders.WARNING: Always stop the enginebefore unclogging the dischargechute or the auger housing andbefore leaving the snow thrower.1. (Figure 1) Turn the crank assembly (2) tochange the discharge direction of the snow.2. Push the remote chute lever (20) forward todischarge the snow high and far. Pull theremote chute lever (20) back to dischargethe snow down.How To Stop The <strong>Snow</strong> <strong>Thrower</strong>(Figure 1)1. To stop discharging snow, release the augerdrive lever (5).2. To stop the wheels, release the tractiondrive lever (1).3. To stop the engine, move the stop switch(13) to the OFF position.CAUTION: To stop the engine, do not movethe choke control to CHOKE position.Backfire or engine damage can occur.How To Go Forward or Backward(Figure 1)1. To change the ground speed, first release thetraction drive lever (1) and then move thespeed shift lever (6) to the desired speed.2. Ground speed is determined by snowconditions. Select the speed by moving thespeed shift lever (6) into the appropriatenotch on the shift lever plate.Speed 1, 2 Wet, HeavySpeed 3 LightSpeed 4 Very LightSpeed 5, 6 Transport only3. To go forward, engage the traction drivelever (1). Maintain a firm hold on the handleas the snow thrower starts to move forward.Guide the snow thrower by moving thehandle either left or right. Do not attempt topush the snow thrower.4. To go backward, release the tractor drivelever (1).5. Move the speed shift lever (6) into eitherfirst or second reverse.6. Engage the traction drive lever (1).IMPORTANT: Do not move the speed shiftlever (6) while the traction drive lever (1) isengaged.How To Throw <strong>Snow</strong> (Figure 1)1. Engage the auger drive lever (5).2. To stop throwing snow, release the augerdrive lever (5).WARNING: The operation of anysnow thrower can result in foreignobjects being thrown into the eyes,which can result in severe eye damage.Always wear safety glasses or eye shieldswhile operating the snow thrower. Werecommend standard safety glasses or usea wide vision safety ma<strong>sk</strong> over yourglasses.How To Use The Wheel Lockout Pin(Figure 13)1. The right hand wheel is secured to the axlewith a klick pin (1). This unit was shippedwith this klick pin (1) through the wheel holein the locked position (2).2. For ease of maneuverability in light snowconditions, change the klick pin (1) to anunlocked position (3).3. Disconnect the klick pin (1) from the wheellocked position (2). Push the klick pin (1)through the unlocked axle hole only. The unitis now in the single wheel drive unlockedposition (3).Before Starting The Engine1. Before you service or start the engine,familiarize yourself with the snow thrower. Besure you understand the function andlocation of all controls.2. Check the tension of the clutch cable beforestarting the engine. See “How To Adjust TheClutch Cable” in the Maintenance section ofthis manual.3. Make sure that all fasteners are tight.4. Make sure the height adjust <strong>sk</strong>ids areproperly adjusted. See “How To Adjust TheHeight Of The Skids” in the Maintenancesection of this manual.5. Check the air pressure in the tires. Thecorrect air pressure is 14 PSI (1 BAR) to 17PSI (1.25 BAR). Do not exceed themaximum amount of air pressure shown onthe side of the tire.How To Stop The Engine (Figure 1)1. Push the stop switch (13) to the OFFposition.2. Pull out the safety key (8).CAUTION: To stop the engine, do not movethe choke control to CHOKE position.Backfire or engine damage can occur.How To Start The Engine (Figure 1)<strong>Model</strong>s equipped with an Electric StarterNOTE: An electric starter kit can be added torecoil start engines. Electric starter kits areavailable from your nearest authorizedservice center.10enWARNING: The starter is equippedwith a three−wire power cord andplug and is designed to operate on220 volt A.C. household current. The powercord must be properly grounded at all timesto avoid the possibility of electrical shockwhich can injure the operator. Carefullyfollow all instructions in the “How To StartThe Engine” section. Make sure that yourhouse wiring is a three−wire groundedsystem. If you are not sure, a<strong>sk</strong> a licensedelectrician. If your house wire system is nota three−wire grounded system, do not usethis electric starter under any conditions. Ifyour system is grounded but a three−holegrounded receptacle is not available to startthe engine, have a three−hole groundedreceptacle installed by a licensedelectrician. To connect a 220 volt A.C. powercord, always connect the power cord to theswitch box (11) on the engine first. Then,plug the other end into the three−holegrounded receptacle. When disconnectingthe power cord, always unplug the end fromthe three−hole grounded receptacle first.How To Start A Cold Engine (Figure 1)1. Check the engine oil.2. Fill the fuel tank with regular unleaded petrol.See “How To Prepare The Engine”.3. Make sure the traction drive lever (1) andthe auger drive lever (5) are in thedisengaged (released) position.4. Push the stop switch (13) to the ONposition.5. Push in the safety key (8).6. Rotate the choke knob (14) to the CHOKEposition.7. (Electric Start) Connect the power cord tothe starter motor located on the engine.8. (Electric Start) Plug the other end of thepower cord into a three−hole, grounded 220VOLT, A.C. receptacle. (See the WARNINGin this section).9. Push the primer button (9). Every time youpush the primer button (9), wait twoseconds. For the number of times required topush the primer button (9), see the enginemanufacturer’s instructions.10.(Electric Start) Push on the electric startbutton (10) until the engine starts. Do notcrank for more than 5 seconds at a time.Wait one minute between starts to allow thestarter to cool.11. (Recoil Start) Slowly pull the recoil starterhandle (12) until resistance is felt and thenpull rapidly to start the engine. Do not allowthe recoil starter handle (12) to snap back.Slowly return the recoil starter handle (12).12.If the engine does not start in 5 or 6 tries,See the “Trouble Shooting Chart”<strong>Instruction</strong>s.13.Allow the engine to warm up for severalminutes. As the engine warms up, adjust thechoke knob (14) toward the RUN position.Wait until the engine runs smoothly beforeeach choke adjustment.14.(Electric Start) First disconnect the powercord from the three−hole receptacle. Then,disconnect the power cord from the startermotor.NOTE: In temperatures below 0°F (-18°C)allow the engine to warm up for severalminutes before blowing snow.
WARNING: Never run the engineindoors or in enclosed, poorlyventilated areas. Engine exhaustcontains carbon monoxide, an odorlessand deadly gas. Keep hands, feet, hair andloose clothing away from any moving partslocated on the engine or the snow thrower.The temperature of muffler and nearbyareas may exceed 150°F (66°C). Avoidthese areas.How To Start A Warm Engine (Figure 1)If an engine has been running and is still warm,leave the choke control (14) in the off positionand do not push the primer button (9). If theengine fails to start, follow the instructions “HowTo Start A Cold Engine”.NOTE: Do not use the primer button (9) tostart a warm engine.How To Start An Engine With A Frozen ElectricStarter (Figure 1)If the electric starter is frozen and will not turnthe engine, follow the instructions below.1. Pull as much starter rope as possible out ofthe starter.2. Release the starter handle and let it snapback against the starter. Repeat until theengine starts.Warm engines will cause condensation in coldweather. To prevent possible freeze−up of recoilstarter and engine controls, proceed as followsafter each snow removal job.CUSTOMER RESPONSIBILITIES1. Run the snow thrower a few minutes afterthrowing snow to prevent freeze−up of theauger/impeller.2. With engine off, allow engine to cool forseveral minutes.3. Pull starter rope very slowly until resistanceis felt, then stop. Allow the starter rope torecoil. Repeat three times.4. With the engine not running, wipe all snowand moisture from the carburetor cover inarea of controls and levers. Also, move thechoke control and starter handle severaltimes.How To Remove <strong>Snow</strong> or Debris FromThe Auger HousingWARNING: Do not attempt toremove snow or debris that maybecome lodged in auger housingwith your hands. Use the clean−out tool ora pry bar to remove snow or debris.(Figure 5) On some models, a clean−out tool isattached to the top of the auger housing. Usethe clean−out tool to remove snow from theauger housing.1. (Figure 1) Release the auger drive lever(5).2. Move the throttle control (13) to the stopposition.3. Pull out the safety key (8).4. Disconnect the spark plug wire.5. Do not place your hands in the augerhousing (4) or the discharge chute (3).6. (Figure 5) Use the clean−out tool (1) or apry bar to remove any snow or debris.MAINTENANCE CHART<strong>Snow</strong> Throwing Tipsen1. For maximum snow thrower efficiency inremoving snow, adjust ground speed. Goslower in deep, freezing or wet snow. If thewheels slips, reduce forward speed.2. Most efficient snow throwing is accomplishedwhen the snow is removed immediately afterif falls.CAUTION: Do not overload the machinecapacity by attempting to clear snow attoo fast a rate.3. For complete snow removal, slightly overlapeach previous path.4. Whenever possible, discharge the snowdown wind.5. For normal usage, set the <strong>sk</strong>ids so that thescraper bar is 1/8” (3 mm) above the <strong>sk</strong>ids.For extremely hard−packed snow surfaces,adjust the <strong>sk</strong>ids upward so that the scraperbar touches the ground.6. Rocks and gravel must not be picked up andthrown by the machine. On gravel or crushedrock surfaces, set the <strong>sk</strong>ids at 1−1/4 inch(32 mm) below the scraper bar. See “How ToAdjust The Height Of The Skids” in theMaintenance section.7. After each snow throwing job, allow theengine to idle for a few minutes. The snowand accumulated ice will melt off the engine.8. Clean the snow thrower after each use.9. Remove ice, snow and debris from the entiresnow thrower. Flush with water to remove allsalt or other chemicals. Wipe snow throwerdry.SERVICE RECORDSFill in dates as youcomplete regularservice.BeforeEachUseFirst2HoursEvery5HoursEvery10HoursEvery25HoursEachSeasonCheck Engine Oil Level √ √ √Change Engine Oil √ √Check And Tighten All Screws and Nuts √ √Check Spark Plug √ √Adjust Drive Belt √ √ √BeforeStorageSERVICE DATESCheck FuelDrain Fuel√√Check Auger Clutch Cable Adjustment(See Cable Adjustment) √ √Check Traction Clutch Cable Adjustment(See Cable Adjustment) √ √Lubricate All Pivot Points √ √Lubricate Auger Shaft(See Shear Bolt Replacement) √ √Lubricate Drive Chains and Sprockets √ √174087911
- Page 1 and 2: en Instruction Book Snow ThrowerMod
- Page 3 and 4: CONTENTSHAZARD SYMBOLS AND THEIR ME
- Page 5 and 6: en •
- Page 7 and 8: enRULES FOR SAFE OPERATIONWARNING:
- Page 9: ASSEMBLYRead and follow the assembl
- Page 13 and 14: 5. Pull the cable (6) back through
- Page 15 and 16: How To Order Replacement PartsThe r
- Page 17 and 18: fr
- Page 19 and 20: fr •
- Page 21 and 22: 16.Ne touchez jamais à un moteur c
- Page 23 and 24: Vérifier le niveau d’huile. Voir
- Page 25 and 26: frTABLEAU DE MAINTENANCERESPONSABIL
- Page 27 and 28: 4. Resserrer les écrous (2).5. (Fi
- Page 29 and 30: Commande de pièces détachéesLe r
- Page 31 and 32: de
- Page 33 and 34: de •
- Page 35 and 36: de15.Betreiben Sie die Schneefräse
- Page 37 and 38: WARNUNG: Verwenden Sie nur dieBenzi
- Page 39 and 40: deWARTUNGSDIAGRAMMVERANTWORTUNGEN D
- Page 41 and 42: 3. (Abb. 19) Lösen Sie die Mutter
- Page 43 and 44: Bitte kontaktieren Sie Ihren lokale
- Page 45 and 46: it
- Page 47 and 48: it •
- Page 49 and 50: it13.Staccare l’alimentazione al
- Page 51 and 52: Vedere le istruzioni del produttore
- Page 53 and 54: itTABELLA DI MANUTENZIONERESPONSABI
- Page 55 and 56: 4. Serrare il dado (2).5. (Figura 2
- Page 57 and 58: Ordinazione di parti di ricambioLe
- Page 59 and 60: no
- Page 61 and 62:
no •
- Page 63 and 64:
no19.La aldri en maskin som er i ga
- Page 65 and 66:
Viktig! Før du starter:Kontroller
- Page 67 and 68:
VEDLIKEHOLDBEMERK: Illustrasjonene
- Page 69 and 70:
5. Dersom en justering er nødvendi
- Page 71 and 72:
INNEHÅLLVARNINGSSYMBOLER OCH FÖRK
- Page 73 and 74:
sv •
- Page 75 and 76:
svREGLER FÖR SÄKERT HANDHAVANDEVA
- Page 77 and 78:
MONTERINGLäs och följ instruktion
- Page 79 and 80:
VARNING: Kör aldrig motorninomhus
- Page 81 and 82:
5. Dra kabeln (6) tillbaka genom fj
- Page 83 and 84:
FELSÖKNINGSSCHEMAPROBLEM ORSAK ÅT
- Page 85 and 86:
fi
- Page 87 and 88:
fi •
- Page 89 and 90:
fi18.Älä koskaan suuntaa lumisuih
- Page 91 and 92:
Poistettavan lumen ohjaaminen174087
- Page 93 and 94:
HUOLTOHUOMAA: Kuvat ovat sivulla 2
- Page 95 and 96:
2. Irrota sytytystulpan johto.3. (K
- Page 97 and 98:
SPIS TREŚCISYMBOLE OSTRZEGAWCZE I
- Page 99 and 100:
plNIEBEZPIECZEŃSTWONie dopuścić,
- Page 101 and 102:
plZASADY DOTYCZĄCE BEZPIECZNEJ OBS
- Page 103 and 104:
MONTAŻProsimy zapoznać się z ins
- Page 105 and 106:
Rozruch zimnego silnika (Rysunek 1)
- Page 107 and 108:
3. (Rysunek 22) Poluzować śruby (
- Page 109 and 110:
2. Odłączyć przewód świecy zap
- Page 111 and 112:
TURINYSPAVOJAUS SIMBOLIAI IR JŲ RE
- Page 113 and 114:
ltPAVOJUSBūkite atsargus - besisuk
- Page 115 and 116:
ltSAUGAUS EKSPLOATAVIMO TAISYKLĖS
- Page 117 and 118:
SURINKIMASPerskaitykite ir laikykit
- Page 119 and 120:
9. Paspauskite degalų purkštuko m
- Page 121 and 122:
Netepamos dalys (15 pav.)1. Netepki
- Page 123 and 124:
2. Atjunkite uždegimo žvakės lai
- Page 125 and 126:
TARTALOMVESZÉLYJELZŐ SZIMBÓLUMOK
- Page 127 and 128:
huVESZÉLYA forgó csiga súlyos, s
- Page 129 and 130:
huA BIZTONSÁGOS ÜZEMELTETÉS SZAB
- Page 131 and 132:
ÖSSZESZERELÉSOlvassa el és tarts
- Page 133 and 134:
12.Ha a motor 5-6 kísérlet után
- Page 135 and 136:
2. Ha a zsír vagy olaj a hajtótá
- Page 137 and 138:
15.(29 ábra) Szerelje vissza a job
- Page 139 and 140:
sk
- Page 141 and 142:
sk •
- Page 143 and 144:
sk
- Page 145 and 146:
VAROVANIE: Káble NEOHBAJTE.
- Page 147 and 148:
° °
- Page 149 and 150:
1740879
- Page 151 and 152:
sk
- Page 153 and 154:
СОДЕРЖАНИЕОБОЗНАЧ
- Page 155 and 156:
Эксплутационные об
- Page 157 and 158:
uПРЕДУПРЕЖДЕНИЕДви
- Page 159 and 160:
u4. В случае значите
- Page 161 and 162:
СБОРКАПрочитайте и
- Page 163 and 164:
ПРИМЕЧАНИЕ: Блок эл
- Page 165 and 166:
Все корректировки
- Page 167 and 168:
Как снять ремень фр
- Page 169 and 170:
СХЕМА С УКАЗАНИЕМ М
- Page 171 and 172:
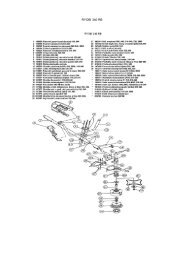
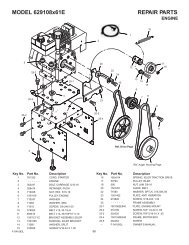
22− 95242− 39432 − 7382621740
- Page 173 and 174:
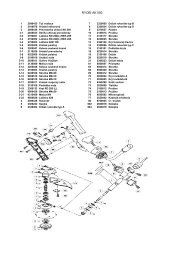
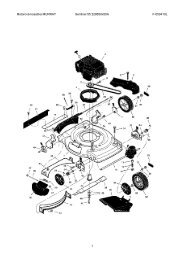
128927910681011141052311 1217625174
- Page 175 and 176:
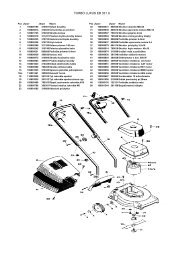
18151391912103421716131411811202124
- Page 177:
2829111111223101530 311116716714178