Create successful ePaper yourself
Turn your PDF publications into a flip-book with our unique Google optimized e-Paper software.
235<br />
115<br />
90<br />
118<br />
185<br />
438<br />
400<br />
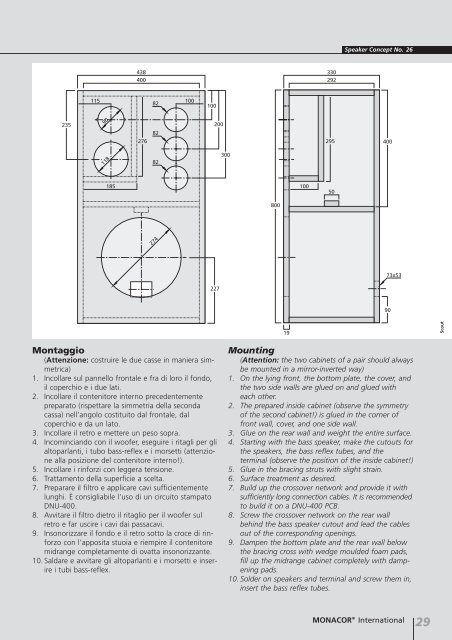
Montaggio<br />
(Attenzione: costruire le due <strong>casse</strong> in maniera simmetrica)<br />
1. Incollare sul pannello frontale e fra di loro il fondo,<br />
il coperchio e i due lati.<br />
2. Incollare il contenitore interno precedentemente<br />
preparato (rispettare la simmetria della seconda<br />
cassa) nell'angolo costituito dal frontale, dal<br />
coperchio e da un lato.<br />
3. Incollare il retro e mettere un peso sopra.<br />
4. Incominciando con il woofer, eseguire i ritagli per gli<br />
altoparlanti, i tubo bass-reflex e i morsetti (attenzione<br />
alla posizione del contenitore interno!).<br />
5. Incollare i rinforzi con leggera tensione.<br />
6. Trattamento della superficie a scelta.<br />
7. Preparare il filtro e applicare cavi sufficientemente<br />
lunghi. È consigliabile l'uso di un circuito stampato<br />
DNU-400.<br />
8. Avvitare il filtro dietro il ritaglio per il woofer sul<br />
retro e far uscire i cavi dai passacavi.<br />
9. Insonorizzare il fondo e il retro sotto la croce di rinforzo<br />
con l'apposita stuoia e riempire il contenitore<br />
midrange completamente di ovatta insonorizzante.<br />
10. Saldare e avvitare gli altoparlanti e i morsetti e inserire<br />
i tubi bass-reflex.<br />
276<br />
82<br />
82<br />
82<br />
274<br />
100<br />
100<br />
200<br />
227<br />
300<br />
800<br />
19<br />
100<br />
330<br />
292<br />
Mounting<br />
(Attention: the two cabinets of a pair should always<br />
be mounted in a mirror-inverted way)<br />
1. On the lying front, the bottom plate, the cover, and<br />
the two side walls are glued on and glued with<br />
each other.<br />
2. The prepared inside cabinet (observe the symmetry<br />
of the second cabinet!) is glued in the corner of<br />
front wall, cover, and one side wall.<br />
3. Glue on the rear wall and weight the entire surface.<br />
4. Starting with the bass speaker, make the cutouts for<br />
the speakers, the bass reflex tubes, and the<br />
terminal (observe the position of the inside cabinet!)<br />
5. Glue in the bracing struts with slight strain.<br />
6. Surface treatment as desired.<br />
7. Build up the crossover network and provide it with<br />
sufficiently long connection cables. It is recommended<br />
to build it on a DNU-400 PCB.<br />
8. Screw the crossover network on the rear wall<br />
behind the bass speaker cutout and lead the cables<br />
out of the corresponding openings.<br />
9. Dampen the bottom plate and the rear wall below<br />
the bracing cross with wedge moulded foam pads,<br />
fill up the midrange cabinet completely with dampening<br />
pads.<br />
10. Solder on speakers and terminal and screw them in,<br />
insert the bass reflex tubes.<br />
295<br />
50<br />
Speaker Concept No. 26<br />
400<br />
73x53<br />
90<br />
MONACOR ® International 29<br />
Scout


