WS SportTac, WS5, WS Workstyle - Peltor - 3M
WS SportTac, WS5, WS Workstyle - Peltor - 3M
WS SportTac, WS5, WS Workstyle - Peltor - 3M

You also want an ePaper? Increase the reach of your titles
YUMPU automatically turns print PDFs into web optimized ePapers that Google loves.
<strong>WS</strong> <strong>SportTac</strong>, <strong>WS</strong>5, <strong>WS</strong> <strong>Workstyle</strong><br />
This product has been tested and approved against the personal protection<br />
equipment (PPE) directive 89/686/EEC, and is also in compliance with the<br />
electromagnetic compatibility (EMC) directive 2004/108/EC for CE marking.<br />
NOTE: Read these instructions carefully before use and save for future<br />
reference.<br />
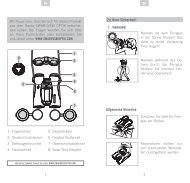
1. WHAT IS WHAT<br />
(A:1). Headband wire (stainless steel)<br />
(A:2) Two-point fastener (headband wire)<br />
(A:3) Ear cushion (PVC foil and Polyester foam)<br />
(A:4) Microphone for surround sound<br />
(A:5) Attenuation cushion (Polyester foam)<br />
(A:6) Inner shell<br />
(A:7) Outer shell<br />
(A:8) Clamp<br />
(A:9) Headband (sheet metal)<br />
A:10). Headband padding (Thermoplastic Elastomer or Leather)<br />
(A:11) AUX audio input, 3.5 mm stereo<br />
(A:12) Audio input, J22<br />
(A:13) On/Off/Mode<br />
(A:14) VOL+, VOL –<br />
(A:15) Speech microphone<br />
(A:16) Bluetooth button<br />
(A:17) Charger jack<br />
(A:18) Charger<br />
(A:19) Rechargeable AAA NiMH batteries<br />
(A:20) Stereo cable 3,5mm. FL6CE<br />
2. FITTING AND ADJUSTMENT<br />
(B:1) Open the headband.<br />
(B:2) Slide out the shells. Tilt the upper part of the shell outwards to ensure the<br />
wires are positioned away from the headband.<br />
(B:3) Adjust the height of the shells by sliding them up or down whilst holding<br />
the headband in place.<br />
(B:4) The headband should be positioned across the top of the head.<br />
(B:5) Before folding the hearing protector, press the shells together. Leave<br />
about 4 mm of the headband wire visible.<br />
(B:6) Fold the headband as shown. Ensure that the ear cushions are not<br />
creased and that they lie flat against each other. Note: Be sure to remove the<br />
cord from the audio input (A:11) before folding the headband.<br />
3. USAGE/FUNCTIONS<br />
3:1 Inserting the batteries<br />
Remove the left outer shell.<br />
(C:1) Insert a blunt tool or finger under the edge of the clamp and pull outwards<br />
3–4 mm.<br />
(C:2) Press/slide the clamp down. Remove the shell.<br />
Insert the rechargeable AAA NiMH batteries included with the product. Ensure<br />
that the poles are correctly aligned.<br />
The headset can also operate on alkaline batteries.<br />
Warning! Do NOT charge alkaline batteries as this may damage the headset.<br />
Replace the outer shell:<br />
(C:3) Ensure that the clamp is fully pressed down.<br />
Position the shell from the top down, ensuring that the hook on the top of the<br />
shell (C:4) fits in the hole on the inner shell (C:5).<br />
(C:6) Press/slide the clamp up once the shell is in place.<br />
3:2 Charging your headset<br />
Connect the charger to the charger jack on the headset (A:17).<br />
Charge the headset for 8 hours to achieve the maximum battery capacity.<br />
3