Lambda Sensors |
Lambda Sensors |
Lambda Sensors |

Create successful ePaper yourself
Turn your PDF publications into a flip-book with our unique Google optimized e-Paper software.
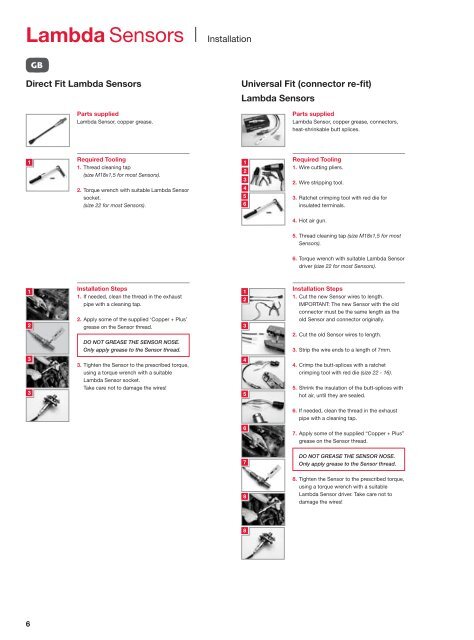
<strong>Lambda</strong> <strong>Sensors</strong> Installation<br />
Direct Fit <strong>Lambda</strong> <strong>Sensors</strong><br />
Parts supplied<br />
<strong>Lambda</strong> Sensor, copper grease.<br />
1<br />
Required Tooling<br />
1<br />
1. Thread cleaning tap<br />
2<br />
(size M18x1,5 for most <strong>Sensors</strong>).<br />
1<br />
2<br />
2. Torque wrench with suitable <strong>Lambda</strong> Sensor<br />
socket.<br />
(size 22 for most <strong>Sensors</strong>).<br />
Installation Steps<br />
1. If needed, clean the thread in the exhaust<br />
pipe with a cleaning tap.<br />
2. Apply some of the supplied ‘Copper + Plus’<br />
grease on the Sensor thread.<br />
DO NOT GREASE THE SENSOR NOSE.<br />
Only apply grease to the Sensor thread.<br />
. Tighten the Sensor to the prescribed torque,<br />
using a torque wrench with a suitable<br />
<strong>Lambda</strong> Sensor socket.<br />
Take care not to damage the wires!<br />
Universal Fit (connector re-fit)<br />
<strong>Lambda</strong> <strong>Sensors</strong><br />
5<br />
1<br />
2<br />
5<br />
7<br />
8<br />
8<br />
Parts supplied<br />
<strong>Lambda</strong> Sensor, copper grease, connectors,<br />
heat-shrinkable butt splices.<br />
Required Tooling<br />
1. Wire cutting pliers.<br />
2. Wire stripping tool.<br />
. Ratchet crimping tool with red die for<br />
insulated terminals.<br />
. Hot air gun.<br />
5. Thread cleaning tap (size M18x1,5 for most<br />
<strong>Sensors</strong>).<br />
. Torque wrench with suitable <strong>Lambda</strong> Sensor<br />
driver (size 22 for most <strong>Sensors</strong>).<br />
Installation Steps<br />
1. Cut the new Sensor wires to length.<br />
IMPORTANT: The new Sensor with the old<br />
connector must be the same length as the<br />
old Sensor and connector originally.<br />
2. Cut the old Sensor wires to length.<br />
. Strip the wire ends to a length of 7mm.<br />
. Crimp the butt-splices with a ratchet<br />
crimping tool with red die (size 22 - 16).<br />
5. Shrink the insulation of the butt-splices with<br />
hot air, until they are sealed.<br />
. If needed, clean the thread in the exhaust<br />
pipe with a cleaning tap.<br />
7. Apply some of the supplied “Copper + Plus”<br />
grease on the Sensor thread.<br />
DO NOT GREASE THE SENSOR NOSE.<br />
Only apply grease to the Sensor thread.<br />
8. Tighten the Sensor to the prescribed torque,<br />
using a torque wrench with a suitable<br />
<strong>Lambda</strong> Sensor driver. Take care not to<br />
damage the wires!