Create successful ePaper yourself
Turn your PDF publications into a flip-book with our unique Google optimized e-Paper software.
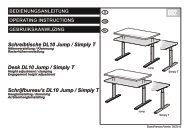
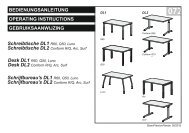
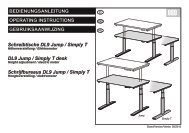
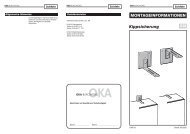
BEDIENUNGSANLEITUNG<br />
7<br />
6.4 Höhenverstellung mit<br />
DESK PANEL “AUF/AB”<br />
Horizontaler Kabelkanal<br />
kippbar<br />
D GB NL<br />
Platte nach oben<br />
Platte nach unten<br />
Die Pfeiltasten starten die Plattenbewegung;<br />
die Funktion ist nur bei gedrückter Taste<br />
aktiviert;<br />
6.5 Antikollision<br />
Bei Bedienung mit Memory-Funktion ist zur<br />
Sicherheit Antikollisionsschutz vorgesehen.<br />
Bei unvorhergesehenen Hindernissen wird<br />
die Auf- oder Abwärtsbewegung der Tischplatte<br />
unterbrochen und der Tisch fährt<br />
ca. 3 cm in die Gegenrichtung.<br />
Kabelkanal zur Bestückung abkippen<br />
1. Kunststofflasche K nach vorn biegen und<br />
dadurch Arretierung lösen<br />
Abb. 7.1<br />
2. Kabelkanal abkippen und bestücken<br />
Abb. 7.2<br />
3. Kabelkanal wieder hochklappen bis Einrastung<br />
erfolgt;<br />
6.4 Height adjustment via<br />
the DESK PANEL with UP & DOWN<br />
work top up<br />
work top down<br />
The work top can be moved by pressing<br />
the pushbutton with the relevant arrow; the<br />
function is only activated while the<br />
pushbutton is kept pressed.<br />
6.5 Anti-collision protection<br />
6.5 Antibotsing<br />
When using the memory function, an anti- Bij bediening met de memory-functie is voor<br />
collision protection will be activated for safety de veiligheid een antibotsingbeveiliging<br />
reasons. Should an obstacle be encountered voorzien. Bij onvoorziene hindernissen<br />
during the work top's up or down movement, wordt de op- of neerwaartse beweging van<br />
it will be stopped automatically and the work het tafelblad onderbroken en de tafel be-<br />
top will move approx. 3 cm in the opposite weegt ca. 3 cm in de tegenovergestelde<br />
direction.<br />
richting.<br />
Tiltable horizontal<br />
cable tray<br />
For laying the cable, tilt the cable tray down<br />
as follows:<br />
1. Bend the plastic bracket K forward which<br />
will unlock the catch. Fig. 7.1<br />
2. Fold the cable tray down and lay the cable<br />
inside. Fig. 7.2<br />
3. Fold the cable tray up until it snaps into<br />
place.<br />
7.1 7.2<br />
1.<br />
K<br />
K<br />
1.<br />
<strong>Sit</strong> & <strong>Stand</strong> <strong>Free</strong>/<strong>Move</strong><br />
6.4 Hoogteverstelling met<br />
DESK PANEL “OMHOOG/OMLAAG”<br />
blad naar boven<br />
blad naar beneden<br />
De pijltjestoetsen starten de beweging van<br />
het tafelblad; de functie is alleen geactiveerd<br />
als de toets ingedrukt is.<br />
Horizontaal kabelkanaal<br />
neerklapbaar<br />
Kabelkanaal neerklappen voor de uitrusting<br />
ervan.<br />
1. Kunststof strip K naar voren buigen en<br />
daardoor de vergrendeling losmaken.<br />
Afb. 7.1<br />
2. Kabelkanaal neerklappen en uitrusten<br />
Afb. 7.2<br />
3. Kabelkanaal opnieuw opklappen<br />
tot het vergrendelt.<br />
2.<br />
2.