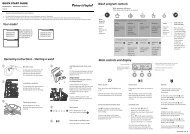
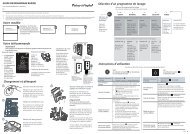
- Page 1 and 2: Installation instructions and user
- Page 3 and 4: Contents Safety and warnings 2 Inst
- Page 5 and 6: Safety and warnings When moving you
- Page 7 and 8: Installation instructions: 1 Ensure
- Page 9 and 10: Installation instructions Important
- Page 11 and 12: Installation instructions E402B, E4
- Page 13 and 14: 4. Installation Your Fisher & Payke
- Page 15 and 16: Installation instructions Before pl
- Page 17 and 18: Display features 4. Freezer Functio
- Page 19 and 20: First use Ice maker When you first
- Page 21 and 22: The temperature of your refrigerato
- Page 23 and 24: User warnings Using the display opt
- Page 25 and 26: Slim storage drawer (where fitted)
- Page 27 and 28: Water filter (where fitted) All the
- Page 29 and 30: Active Smart maintenance Replacemen
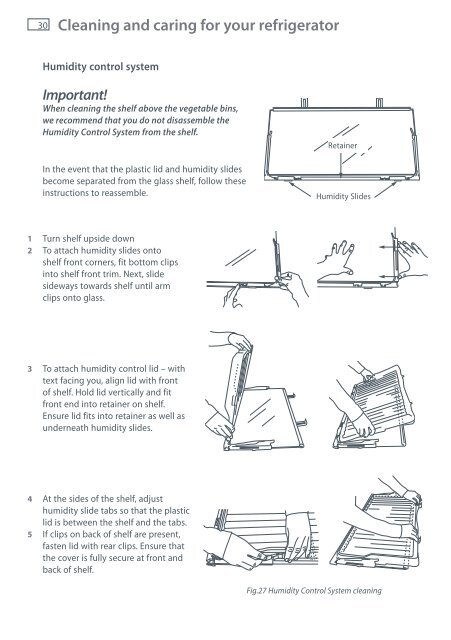
- Page 31: Interior It is important to keep th
- Page 35 and 36: Storing food in your refrigerator S
- Page 37 and 38: Storing food in your freezer The us
- Page 39 and 40: Problem solving checklist If there
- Page 41 and 42: Problem solving checklist Problem P
- Page 43: How to get service Customer care Be
- Page 46 and 47: 44 Sikkerhedsforanstaltninger og ad
- Page 48 and 49: 46 Installationsanvisninger Filters
- Page 50 and 51: 48 Installationsanvisninger 11 Mont
- Page 52 and 53: 50 Installationsanvisninger Følg t
- Page 54 and 55: 52 Installationsanvisninger 3. Vent
- Page 56 and 57: 54 Installationsanvisninger 6. Afhj
- Page 58 and 59: 56 Alt om displayet Taster 4 5 6 7
- Page 60 and 61: 58 Brug af vanddispenseren Anvendel
- Page 62 and 63: 60 Brug af indstillingerne på disp
- Page 64 and 65: 62 Brug af indstillingerne på disp
- Page 66 and 67: 64 Specialfunktioner i Active Smart
- Page 68 and 69: 66 Specialfunktioner i Active Smart
- Page 70 and 71: 68 Vandfilter (hvor monteret) Såda
- Page 72 and 73: 70 Rengøring og behandling af køl
- Page 74 and 75: 72 Rengøring og behandling af køl
- Page 76 and 77: 74 Køleskabslyde Normale køleskab
- Page 78 and 79: 76 Opbevaring af fødevarer i køle
- Page 80 and 81: 78 Opbevaring af fødevarer i fryse
- Page 82 and 83:
80 Checkliste til løsning af probl
- Page 84 and 85:
82 Checkliste til løsning af probl
- Page 87 and 88:
Innehåll Säkerhet och varningar 8
- Page 89 and 90:
Förvara mat och dryck Förvara ald
- Page 91 and 92:
Installationsinstruktioner 1 Förs
- Page 93 and 94:
Installationsinstruktioner Viktigt!
- Page 95 and 96:
Installationsinstruktioner E402B, E
- Page 97 and 98:
4. Installation Ditt Fisher & Payke
- Page 99 and 100:
Installationsinstruktioner Innan du
- Page 101 and 102:
Displayens funktioner 4. Frysfunkti
- Page 103 and 104:
Ismaskin Första gången När du st
- Page 105 and 106:
Temperaturen i ditt kylskåp och di
- Page 107 and 108:
Användarvarningar Använda alterna
- Page 109 and 110:
Låg förvaringslåda (när sådan
- Page 111 and 112:
Vattenfilter (om sådant monterats)
- Page 113 and 114:
Active Smart underhåll Byte av den
- Page 115 and 116:
Interiör Rengöring och underhåll
- Page 117 and 118:
Rengöring och underhåll av ditt k
- Page 119 and 120:
Förvara mat i ditt kylskåp Om mat
- Page 121 and 122:
Förvara mat i din frys Om man för
- Page 123 and 124:
Checklista för problemlösning Om
- Page 125 and 126:
Problem Möjliga orsaker Lösning D
- Page 127 and 128:
Hur du erhåller service Kundtjäns
- Page 129 and 130:
Inhalt Sicherheits- und Warnhinweis
- Page 131 and 132:
Sicherheits- und Warnhinweise Wenn
- Page 133 and 134:
Installationsanweisungen: 1 Kühlsc
- Page 135 and 136:
Installationsanweisungen Wichtig!
- Page 137 and 138:
Installationsanweisungen E402B, E44
- Page 139 and 140:
4. Installation Ihr Fisher & Paykel
- Page 141 and 142:
Vor dem Einräumen von Lebensmittel
- Page 143 and 144:
Bedienelemente 4. Gefrierfach-Funkt
- Page 145 and 146:
Eismaschine Erstgebrauch Wenn Sie I
- Page 147 and 148:
Die Optionen der Bedienanzeige Die
- Page 149 and 150:
Warnhinweise Die Optionen der Bedie
- Page 151 and 152:
Active Smart Sonderfunktionen Schma
- Page 153 and 154:
Wasserfilter (falls eingesetzt) Das
- Page 155 and 156:
Austausch des Innenlichts (Halogeng
- Page 157 and 158:
Innen Das Innere des Kühlschranks
- Page 159 and 160:
Entfernen von Fächern oder befesti
- Page 161 and 162:
Lebensmittelaufbewahrung im Kühlsc
- Page 163 and 164:
Lebensmittelaufbewahrung im Gefrier
- Page 165 and 166:
Sollten Schwierigkeiten mit dem Ger
- Page 167 and 168:
Problembehandlung Problem Grund Pro
- Page 169 and 170:
Ihr Kundendienst Bevor Sie den Kund
- Page 171 and 172:
Innhold Sikkerhet og advarsler 170
- Page 173 and 174:
Lagring av mat- og drikkevarer Flyk
- Page 175 and 176:
Monteringsanvisninger 1 Sjekk at kj
- Page 177 and 178:
Monteringsanvisninger Viktig! Alle
- Page 179 and 180:
Monteringsanvisninger E402B, E442B,
- Page 181 and 182:
4. Montering Ditt Fisher & Paykel A
- Page 183 and 184:
Monteringsanvisninger Før det plas
- Page 185 and 186:
Displayfunksjoner 4. Fryserfunksjon
- Page 187 and 188:
Ismaskin Første gangs bruk Når du
- Page 189 and 190:
Temperaturen i kjøleskapet og frys
- Page 191 and 192:
Brukeradvarsler Bruke skjermalterna
- Page 193 and 194:
Smal oppbevaringshylle (der det er
- Page 195 and 196:
Vannfilter (hvis det er montert) Al
- Page 197 and 198:
Utskifting av innvendig lys (haloge
- Page 199 and 200:
Innvendig Rengjøring og stell av k
- Page 201 and 202:
Fjerne skåler eller fastmonterte b
- Page 203 and 204:
Oppbevaring av mat i kjøleskapet L
- Page 205 and 206:
Oppbevaring av mat i fryseren Bruk
- Page 207 and 208:
Kontrolliste ved problemløsing Der
- Page 209 and 210:
Problem Mulige årsaker Hva må du
- Page 211 and 212:
Tilkalling av service Kundestøtte
- Page 213 and 214:
Inhoud Veiligheid en waarschuwingen
- Page 215 and 216:
Veiligheid en waarschuwingen Uitger
- Page 217 and 218:
Installatievoorschriften: 1 Control
- Page 219 and 220:
Installatievoorschriften Belangrijk
- Page 221 and 222:
Installatievoorschriften E402B, E44
- Page 223 and 224:
4. Installatie Uw Fisher & Paykel A
- Page 225 and 226:
Alvorens voedsel in het toestel te
- Page 227 and 228:
Displayfuncties 4. Vriesfuncties (p
- Page 229 and 230:
IJsblokjesmaker Gebruik van uw ijsb
- Page 231 and 232:
De temperatuur van uw koelkast en v
- Page 233 and 234:
Waarschuwingen voor de gebruiker Ge
- Page 235 and 236:
Ondiepe lade (wanneer aanwezig) Spe
- Page 237 and 238:
Waterfilter (wanneer aanwezig) Het
- Page 239 and 240:
Vervangen van de binnenverlichting
- Page 241 and 242:
Binnenkant Reiniging en verzorging
- Page 243 and 244:
Reiniging en verzorging van uw koel
- Page 245 and 246:
Voedsel bewaren in uw koelkast Door
- Page 247 and 248:
Voedsel bewaren in uw vriesruimte H
- Page 249 and 250:
Checklist voor het oplossen van pro
- Page 251 and 252:
Checklist voor het oplossen van pro
- Page 253 and 254:
Hoe komt u aan service? Alvorens na
- Page 255 and 256:
Sommaire Sécurité et avertissemen
- Page 257 and 258:
Sécurité et avertissements Répar
- Page 259 and 260:
Conseils d’installation : 1 Véri
- Page 261 and 262:
Conseils d’installation Important
- Page 263 and 264:
Conseils d’installation E402B, E4
- Page 265 and 266:
4. Installation Votre réfrigérate
- Page 267 and 268:
Conseils d’installation Avant de
- Page 269 and 270:
Caractéristiques de l’afficheur
- Page 271 and 272:
Mode d’emploi de votre appareil
- Page 273 and 274:
La température de votre réfrigér
- Page 275 and 276:
Alertes utilisateur Options du réf
- Page 277 and 278:
Active Smart - caractéristiques pa
- Page 279 and 280:
Filtre à eau (s’il est installé
- Page 281 and 282:
Fig. 25 Remplacement de l'ampoule h
- Page 283 and 284:
Intérieur Nettoyage et entretien d
- Page 285 and 286:
Nettoyage et entretien de votre ré
- Page 287 and 288:
Ranger les aliments dans votre réf
- Page 289 and 290:
Ranger les aliments dans votre cong
- Page 291 and 292:
Liste de contrôle de résolution d
- Page 293 and 294:
Problème Causes possibles Que fair
- Page 295 and 296:
Comment obtenir un service après-v
- Page 297 and 298:
Indice Precauzioni di sicurezza e a
- Page 299 and 300:
Precauzioni di sicurezza e avverten
- Page 301 and 302:
Istruzioni per l’installazione: 1
- Page 303 and 304:
Istruzioni per l’installazione Im
- Page 305 and 306:
Istruzioni per l’installazione E4
- Page 307 and 308:
4. Installazione Il vostro frigorif
- Page 309 and 310:
Istruzioni per l’installazione Pr
- Page 311 and 312:
Caratteristiche del display 4. Funz
- Page 313 and 314:
Uso del dispositivo di produzione g
- Page 315 and 316:
La temperatura del vostro frigorife
- Page 317 and 318:
Avvertenze utente Opzioni del frigo
- Page 319 and 320:
Scomparto sottile (se presente) Fun
- Page 321 and 322:
Filtro acqua (se presente) Tutta l'
- Page 323 and 324:
Manutenzione di Active Smart Sostit
- Page 325 and 326:
Interno Pulizia e cura del frigorif
- Page 327 and 328:
Per rimuovere i vassoi o i contenit
- Page 329 and 330:
Conservazione degli alimenti nel fr
- Page 331 and 332:
Conservazione degli alimenti nel fr
- Page 333 and 334:
Elenco di controllo per la risoluzi
- Page 335 and 336:
Elenco di controllo per la risoluzi
- Page 337 and 338:
Come ottenere assistenza per il pro
- Page 339 and 340:
Περιεχόμενα Ασφάλε
- Page 341 and 342:
Ασφάλεια και προει
- Page 343 and 344:
Οδηγίες εγκατάστασ
- Page 345 and 346:
Οδηγίες εγκατάστασ
- Page 347 and 348:
Οδηγίες εγκατάστασ
- Page 349 and 350:
4. Εγκατάσταση Το ψυ
- Page 351 and 352:
Πριν βάλετε τρόφιμ
- Page 353 and 354:
Χαρακτηριστικά της
- Page 355 and 356:
Παγομηχανή Χρήση γ
- Page 357 and 358:
Χρήση των επιλογών
- Page 359 and 360:
Προειδοποιήσεις Χρ
- Page 361 and 362:
Λεπτό συρτάρι (αν υ
- Page 363 and 364:
Φίλτρο νερού (αν υπ
- Page 365 and 366:
Αντικατάσταση της
- Page 367 and 368:
Εσωτερικό Καθαρισμ
- Page 369 and 370:
Καθαρισμός και φρο
- Page 371 and 372:
Τοποθέτηση τροφίμω
- Page 373 and 374:
Τοποθέτηση τροφίμω
- Page 375 and 376:
Πίνακας αντιμετώπι
- Page 377 and 378:
Πρόβλημα Πιθανές α
- Page 379 and 380:
Πώς να καλέσετε το
- Page 383 and 384:
Copyright © Fisher & Paykel 2009.