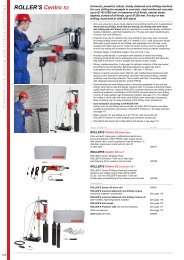
ROLLER'S Ortem 22 ROLLER'S Ortem 32 - Albert Roller
ROLLER'S Ortem 22 ROLLER'S Ortem 32 - Albert Roller
ROLLER'S Ortem 22 ROLLER'S Ortem 32 - Albert Roller

You also want an ePaper? Increase the reach of your titles
YUMPU automatically turns print PDFs into web optimized ePapers that Google loves.
eng eng<br />
suitable for dealing with tight bends or several bends in succession. For obstructions<br />
presenting particular problems, e.g. when it is necessary to slice through<br />
roots, the drain cleaning cable type S, made of heavier gauge wire (accessory),<br />
is recommended. The cable with a core (accessory) contains a weather- and<br />
temperature-resistant plastic core which prevents dirt from collecting inside the<br />
cable or long fibres from lodging in the spirals.<br />
2.3. Selection of suitable drain cleaning tool<br />
2.3.1. Straight auger<br />
Used as the starting tool to withdraw a sample, from which the cause of the<br />
obstruction can be determined. Also to clear a solid blockage caused by textiles,<br />
paper, kitchen waste etc., to permit the flow of water.<br />
2.3.2. Bulbous auger<br />
Used for minor obstructions caused by textiles or paper, due to its high flexibility.<br />
The extended club-type head facilitates advancement in tight bends.<br />
2.3.3. Funnel auger<br />
Used for textile and paper obstructions in particular. Is especially useful for<br />
cleaning larger diameter pipes, due to its generous radius of action. Can also<br />
be used as a recovery tool for cables left in the pipe.<br />
2.3.4. Retrieving auger<br />
Used to recover cables left in the pipe by means of an extended, specially<br />
angled grappling arm. Not suitable for boring operations.<br />
2.3.5. Serrated blade borer<br />
Used to bore out greasy or heavily silted pipes. This tool is riveted to the<br />
connector (not soldered or welded), so as to prevent any deformation of the<br />
hardened spring steel blades.<br />
2.3.6. Serrated cross-blade borer<br />
Multi-purpose tool for obstructions of all kinds, including incrustations (e.g.<br />
limescale deposits on the inside of the pipe). This tool is riveted to the connector<br />
(not soldered or welded), so as to prevent any deformation of the hardened<br />
spring steel blades.<br />
2.3.7. Forked cutters<br />
Size 16 with one blade as a forked cutter or two blades as a cross-forked<br />
cutter, made of hardened spring steel and designed to remove moderate to<br />
severe silting or persistent grease contamination. Size <strong>22</strong> and <strong>32</strong> with serrated,<br />
replaceable blade as a serrated forked cutter, made of hardened spring steel<br />
and with multiple uses, e.g. to remove silting or to reduce (break down) root<br />
infestation.<br />
2.3.8. Root cutter<br />
Tool with hardened, replaceable ring-type saw, cutting to the front and rear.<br />
Specially designed for root infested pipes.<br />
2.3.9. Chain flail<br />
The most important tool of all for the removal of greasy deposits and incrustations<br />
(e.g. limescale deposits on the inside of the pipe) as the final drain cleaning<br />
operation. The version with smooth rings should be used for breakable pipes<br />
made of e.g. plastic, while the version with spiked links should be used for cast<br />
or concrete pipes.<br />
3. Operation<br />
3.1. Investigation of the obstruction<br />
Position the machine 30 – 50 cm in front of the opening giving access to the<br />
affected pipe.<br />
Check to ensure that the guard (2) has been installed on the chuck mount,<br />
together with the guide hose (1) for the cable. Install if necessary!<br />
The guide hose prevents the cable from twisting if the tool becomes blocked,<br />
as well as cushioning its vibrations and collecting any dirt it may have picked<br />
up.<br />
Feed a length of cable (5) into the machine, with the grooved part of the connector<br />
(8) leading, until approximately 50 cm projects from the machine. Never connect<br />
more than one length of cable at a time. Connect the drain cleaning tool (6) to<br />
the free end of the cable, i.e. insert sideways into the T-groove of the cable<br />
connector until it locks home. Use the straight auger as the first tool. Introduce<br />
the tool and cable into the pipe. Switch on the machine with the switch (3) set<br />
to rotate clockwise (switch position „1“). Draw the cable manually out of the<br />
machine and feed it into the pipe until the cable develops a bend.<br />
WARNING<br />
Wear a suitable glove!<br />
With the other hand, press down hard on the carrying handle (4) until the cable<br />
rotates. Spring force applied to the cable produces the necessary thrust. When<br />
the bend has straightened, pull the handle (4) upwards. The cable will immediately<br />
come to a standstill. Feed in the cable manually again until a bend<br />
develops, then apply firm pressure to the handle (4) until the bend straightens.<br />
Keep repeating this procedure. Connect up further lengths of cable as necessary<br />
until it reaches the obstruction and clears it. When it reaches the obstruction<br />
(resistance), it is important to ensure that it is advanced with care (one<br />
centimetre at a time). If it seizes, the handle must be pulled upwards immediately,<br />
otherwise the cable may break.<br />
However, if a tool has become blocked by an obstruction, it should be freed by<br />
the repeated reversal of the direction of rotation of the machine, i.e. anticklock-<br />
wise (switch position „R“) and clockwise (switch position „1“). Use the anticlockwise<br />
setting only for this process. All other operations including the recovery<br />
of the cable are carried out in the clockwise direction.<br />
3.2. Recovering the cable<br />
Recovery of the cable takes place in the clockwise direction. Withdraw the<br />
rotating cable from the pipe until it develops a bend. Release the pressure from<br />
the handle (4) and push the cable back into the machine. Press down on the<br />
handle and withdraw more cable from the pipe until it again develops a bend.<br />
Repeat this process until a length of cable has been completely fed into the<br />
machine or guide hose and it can be disconnected from the following length of<br />
cable. Remove disconnected lengths of cable from the machine and guide<br />
hose. Repeat this process until the entire length of cable has been removed<br />
from the pipe.<br />
3.3. Cleaning the pipe<br />
From an examination of the contamination affecting the withdrawn straight<br />
auger, it is generally possible to form conclusions as to the cause of the obstruction<br />
and therefore to select a suitable tool (see 2.3) with which the entire cross<br />
section of the pipe can then be completely cleaned.<br />
3.4. Adapter drum with 8 mm cable (accessory)<br />
Remove the chuck mount guard (2) and cable guide hose (1) and replace them<br />
with the adapter drum (Fig. 3 (10)) with the 8 mm diameter cable. The adapter<br />
drum incorporates a collet for the 8 mm diameter cable. The operating procedure<br />
with this cable is the same as that for the 16, <strong>22</strong> and <strong>32</strong> mm diameter<br />
cables.<br />
4. Maintenance<br />
DANGER<br />
Pull out the mains plug before carrying out maintenance or repair work!<br />
This work may only be performed by qualified personnel.<br />
4.1. Maintenance<br />
The ROLLER’S <strong>Ortem</strong> is maintenance-free. The bearings of the drive shaft run<br />
in a permanent grease filling and therefore require no lubrication. Clean pipe<br />
and drain cleaning cables after each use.<br />
4.2. Inspection/Upkeep<br />
This work may only be carried out by qualified personnel and with original spare<br />
parts.<br />
5. Trouble<br />
5.1. Trouble: Cable is not rotating despite of pressed down pressure loading<br />
handle.<br />
Cause: ● Tool got stuck at an obstruction (see 3.1.).<br />
5.2. Trouble: Cable left in the pipe.<br />
Cause: ● Connector was not closed.<br />
● Broken cable.<br />
6. Disposal<br />
The units may not be thrown into the domestic waste at the end of use. They<br />
must be disposed of properly by law.<br />
7. Manufacturer’s Warranty<br />
The warranty period shall be 12 months from delivery of the new product to the<br />
first user. The date of delivery shall be documented by the submission of the<br />
original purchase documents, which must include the date of purchase and the<br />
designation of the product. All functional defects occurring within the warranty<br />
period, which are clearly the consequence of defects in production or materials,<br />
will be remedied free of charge. The remedy of defects shall not extend or<br />
renew the warranty period for the product. Damage attributable to natural wear<br />
and tear, incorrect treatment or misuse, failure to observe the operational<br />
instructions, unsuitable operating materials, excessive demand, use for unauthorized<br />
purposes, interventions by the customer or a third party or other<br />
reasons, for which ROLLER is not responsible, shall be excluded from the<br />
warranty<br />
Services under the warranty may only be provided by customer service stations<br />
authorized for this purpose by ROLLER. Complaints will only be accepted if<br />
the product is returned to a customer service station authorized by ROLLER<br />
without prior interference in an unassembled condition. Replaced products and<br />
parts shall become the property of ROLLER.<br />
The user shall be responsible for the cost of shipping and returning the product.<br />
The legal rights of the user, in particular the right to make claims against the<br />
seller under the warranty terms, shall not be affected. This manufacturer’s<br />
warranty only applies for new products which are purchased in the European<br />
Union, in Norway or in Switzerland.<br />
This warranty is subject to German law with the exclusion of the United Nations<br />
Convention on Contracts for the International Sales of Goods (CISG).<br />
8. Spare parts lists<br />
For spare parts lists, see www.albert-roller.de → Downloads → Parts lists.