EQ7 Series Instruction Manual - TECO-Westinghouse Motor Company
EQ7 Series Instruction Manual - TECO-Westinghouse Motor Company
EQ7 Series Instruction Manual - TECO-Westinghouse Motor Company

Create successful ePaper yourself
Turn your PDF publications into a flip-book with our unique Google optimized e-Paper software.
Preface<br />
The <strong>EQ7</strong> product is designed to drive a three-phase induction motor. Read through this instruction manual to<br />
become familiar with proper handling and correct use. Improper handling might result in incorrect operation,<br />
shorter life cycle, or failure of this product as well as the motor.<br />
Have this <strong>Instruction</strong> <strong>Manual</strong> delivered to the end user of this product. Keep this <strong>Instruction</strong> <strong>Manual</strong> in a safe<br />
place accessible by only people in connection with the VFD until this product is no longer being used.<br />
Read this <strong>Instruction</strong> <strong>Manual</strong> in conjunction with <strong>EQ7</strong> User <strong>Manual</strong>.<br />
All <strong>EQ7</strong> documentation is subject to change without notice. Be sure to obtain the latest editions for use or visit<br />
our website at www.tecowestinghouse.com.<br />
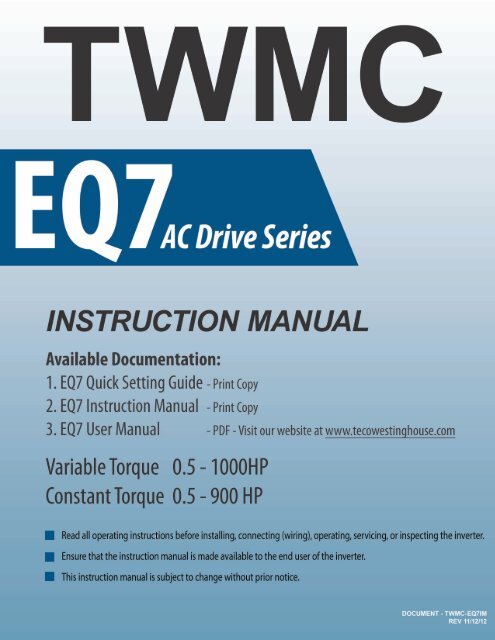
Available Documentation:<br />
1. <strong>EQ7</strong> Quick Setting Guide<br />
2. <strong>EQ7</strong> <strong>Instruction</strong> <strong>Manual</strong><br />
3. <strong>EQ7</strong> User <strong>Manual</strong><br />
Safety Precautions<br />
Read this instruction manual thoroughly before proceeding with installation, connections (wiring), operation, or<br />
maintenance and inspection. Ensure you have sound knowledge of the device and familiarize yourself with all<br />
safety information and precautions before proceeding to operate the inverter.<br />
Safety precautions are classified into the following two categories in this manual.<br />
Failure to heed the information indicated by this symbol may lead to<br />
dangerous conditions, possibly resulting in death or serious bodily<br />
injuries.<br />
Failure to heed the information indicated by this symbol may lead to<br />
dangerous conditions, possibly resulting in minor or light bodily injuries<br />
and/or substantial property damage.<br />
Failure to ignore the information contained under the CAUTION title can also result in serious consequences.<br />
These safety precautions are of utmost importance and must be observed at all times.<br />
Icons<br />
The following icons are used throughout this quick start manual.<br />
This icon indicates information which, if not followed, can result in the inverter not operating to full efficiency,<br />
as well as information concerning incorrect operations and settings which can result in accidents.<br />
This icon indicates information that can prove handy when performing certain settings or operations.<br />
<br />
This icon indicates a reference to more detailed information.<br />
i
Table of Contents<br />
Safety and Conformity ......................................................................................................... iv<br />
Application ............................................................................................................................................................. iv<br />
Installation .............................................................................................................................................................. iv<br />
Wiring ..................................................................................................................................................................... v<br />
Operation ............................................................................................................................................................... vi<br />
Maintenance, Inspection and Part Replacements ................................................................................................. vii<br />
Conformity with UL standards and CSA standards (cUL –listed for Canada) ....................................................... viii<br />
1. Drive Model Identification, Installation and Wiring Practices ....................................... 1-1<br />
1.1 Drive Models Constant Torque (CT) / Variable Torque (VT) HP Ratings ....................................................... 1-2<br />
1.2 Installation and wiring practices ....................................................................................................................... 1-3<br />
1.3 Precautions in running Inverters ...................................................................................................................... 1-11<br />
1.4 Precautions in using special motors ................................................................................................................ 1-11<br />
2. Mounting and Wiring the Inverter.................................................................................... 2-1<br />
2.1 Operating Environment .................................................................................................................................... 2-1<br />
2.2 Installing the Inverter ....................................................................................................................................... 2-1<br />
2.3 Wiring ............................................................................................................................................................... 2-4<br />
2.4 Mounting and Connecting the Keypad ............................................................................................................ 2-27<br />
2.5 Input Power and <strong>Motor</strong> Connection ................................................................................................................. 2-28<br />
3. Operation using the Keypad ............................................................................................ 3-1<br />
3.1 LED Monitor, LCD Monitor, and Keys ............................................................................................................. 3-1<br />
3.2 Overview of Operating Modes ......................................................................................................................... 3-3<br />
3.3 Running Mode ................................................................................................................................................. 3-4<br />
3.4 Programming Mode ......................................................................................................................................... 3-8<br />
4. Function Codes / Parameters ......................................................................................... 4-1<br />
4.1 Function Code Tables ..................................................................................................................................... 4-1<br />
4.2 Details of Function Codes ............................................................................................................................... 4-25<br />
5. Check <strong>Motor</strong> Rotation and Direction ............................................................................... 5-1<br />
6. Speed Reference Command Configuration .................................................................... 6-1<br />
6.1 Reference from the Keypad ............................................................................................................................. 6-1<br />
6.2 Reference from an Analog Signal (0-10V / 4-20mA) / Speed Pot ................................................................... 6-2<br />
6.3 Reference from Serial Communication – RS485 ............................................................................................ 6-4<br />
ii
7. Operation Method Configuration (Run / Stop) ............................................................... 7-1<br />
7.1 Run / Stop from the Keypad ............................................................................................................................ 7-1<br />
7.2 Run / Stop from External Switch / Contact or Pushbutton .............................................................................. 7-2<br />
7.3 Run / Stop from Serial Communication – RS485 ............................................................................................ 7-4<br />
8. <strong>Motor</strong> and Application Specific Settings ........................................................................ 8-1<br />
8.1 Set <strong>Motor</strong> Nameplate Data .............................................................................................................................. 8-1<br />
8.2 Acceleration and Deceleration Time................................................................................................................ 8-2<br />
8.3 Torque Boost Setting ....................................................................................................................................... 8-3<br />
8.3 Load Selection / Auto Torque Boost / Auto Energy Saving Operation ............................................................ 8-4<br />
8.4 Reset <strong>EQ7</strong> back to Factory Default ................................................................................................................. 8-6<br />
9. Using PID Control for Constant Flow / Pressure Applications ..................................... 9-1<br />
9.1 What is PID Control ......................................................................................................................................... 9-1<br />
9.2 Connect Transducer Feedback Signal ........................................................................................................... 9-2<br />
9.3 Setpoint Scaling / Transducer Feedback Scaling ............................................................................................ 9-4<br />
10. Troubleshooting ............................................................................................................. 10-1<br />
10.1 Protective Functions ...................................................................................................................................... 10-1<br />
10.2 Before Proceeding with Troubleshooting ..................................................................................................... 10-2<br />
10.3 If Neither an Alarm Nor “Light Alarm” Indication( ) Appears on the LED Monitor .................................. 10-5<br />
10.4 If an Alarm Code Appears on the LED Monitor ............................................................................................. 10-12<br />
10.5 If the “Light Alarm” Indication ( ) Appears on the LED Monitor .............................................................. 10-25<br />
10.6 If an Abnormal Pattern Appears on the LED Monitor .................................................................................... 10-26<br />
10.7 If the inverter is running on Single-Phase Power .......................................................................................... 10-27<br />
11. Specifications ................................................................................................................. 11-1<br />
11.1 Drive Ratings ................................................................................................................................................. 11-1<br />
11.2 Common Specifications ................................................................................................................................. 11-7<br />
11.3 External Dimensions, Drive, Panel Cutting, DCR, Keypad ........................................................................... 11-12<br />
iii
Application<br />
• The <strong>EQ7</strong> drive is designed to drive a three-phase induction motor. Do not use it for single-phase<br />
motors or for other purposes.<br />
Fire or an accident could occur.<br />
• The <strong>EQ7</strong> drive may not be used for a life-support system or other purposes directly related to the<br />
human safety.<br />
• Though the <strong>EQ7</strong> drive is manufactured under strict quality control, install safety devices for<br />
applications where serious accidents or property damages are foreseen in relation to the failure of<br />
it.<br />
An accident could occur.<br />
Installation<br />
• Install the inverter on a base made of metal or other non-flammable material.<br />
Otherwise, a fire could occur.<br />
• Do not place flammable object nearby.<br />
Doing so could cause fire.<br />
• Inverters with a capacity of 50 HP or above, whose protective structure is IP00 (Open Chassis),<br />
involve a possibility that a human body may touch the live conductors of the main circuit terminal<br />
block. Inverters to which an optional DC reactor is connected also involve the same. Install such<br />
inverters in an inaccessible place.<br />
Otherwise, electric shock or injuries could occur.<br />
• Do not support the inverter by its front cover during transportation.<br />
Doing so could cause a drop of the inverter and injuries.<br />
• Prevent lint, paper fibers, sawdust, dust, metallic chips, or other foreign materials from getting into<br />
the inverter or from accumulating on the heat sink.<br />
• When changing the positions of the top and bottom mounting bases, use only the specified screws.<br />
Otherwise, a fire or an accident might result.<br />
• Do not install or operate an inverter that is damaged or lacking parts.<br />
Doing so could cause fire, an accident or injuries.<br />
iv
Wiring<br />
• If no zero-phase current (earth leakage current) detective device such as a ground-fault relay is<br />
installed in the upstream power supply line in order to avoid the entire power supply system's<br />
shutdown undesirable to factory operation, install a residual-current-operated protective device<br />
(RCD)/earth leakage circuit breaker (ELCB) individually to inverters to break the individual inverter<br />
power supply lines only.<br />
Otherwise, a fire could occur.<br />
• When wiring the inverter to the power source, insert a recommended molded case circuit breaker<br />
(MCCB) or residual-current-operated protective device (RCD)/earth leakage circuit breaker (ELCB)<br />
(with overcurrent protection) in the path of each pair of power lines to inverters. Use the<br />
recommended devices within the recommended current capacity.<br />
• Use wires of the specified size.<br />
• Tighten terminals with specified torque.<br />
Otherwise, a fire could occur.<br />
• When there is more than one combination of an inverter and motor, do not use a multi-conductor<br />
cable for the purpose of running the leads together.<br />
• Do not connect a surge absorber to the inverter's output (secondary) circuit.<br />
Doing so could cause a fire.<br />
• Be sure to connect an optional DC reactor (DCR) when the capacity of the power supply<br />
transformer exceeds 500 kVA and is 10 times or more the inverter rated capacity.<br />
Otherwise, a fire could occur.<br />
• Ground the inverter in compliance with the national or local electric code.<br />
• Be sure to ground the inverter's grounding terminals G.<br />
Otherwise, an electric shock or a fire could occur.<br />
• Qualified electricians should carry out wiring.<br />
• Be sure to perform wiring after turning the power OFF.<br />
Otherwise, an electric shock could occur.<br />
• Be sure to perform wiring after installing the inverter unit.<br />
Otherwise, an electric shock or injuries could occur.<br />
• Ensure that the number of input phases and the rated voltage of the product match the number of<br />
phases and the voltage of the AC power supply to which the product is to be connected.<br />
Otherwise, a fire or an accident could occur.<br />
• Do not connect the power supply wires to output terminals (U, V, and W).<br />
• When connecting a DC braking resistor (DBR), never connect it to terminals other than terminals<br />
P(+) and DB.<br />
Doing so could cause fire or an accident.<br />
• In general, the insulation of the control signal wires are not specifically designed to withstand a high<br />
voltage (i.e., reinforced insulation is not applied). Therefore, if a control signal wire comes into direct<br />
contact with a live conductor of the main circuit, the insulation may break down, which would<br />
expose the signal wire to the high voltage of the main circuit. Make sure that the control signal wires<br />
will not come into contact with live conductors of the main circuit.<br />
Doing so could cause an accident or an electric shock.<br />
v
• Before changing the switches or touching the control circuit terminal symbol plate, turn OFF the<br />
power and wait at least five minutes for inverters of 40 HP or below, or at least ten minutes<br />
for inverters of 50 HP or above. Make sure that the LED monitor and charging lamp are turned<br />
OFF. Further, make sure, using a multimeter or a similar instrument, that the DC link bus voltage<br />
between the terminals P(+) and N(-) has dropped to the safe level (+25 VDC or below).<br />
Otherwise, an electric shock could occur.<br />
• The inverter, motor and wiring generate electric noise. This may cause the malfunction of nearby<br />
sensors and devices. To prevent malfunctioning, implement noise control measures.<br />
Otherwise an accident could occur.<br />
Operation<br />
• Be sure to mount the front cover before turning the power ON. Do not remove the cover when the<br />
inverter power is ON.<br />
Otherwise, an electric shock could occur.<br />
• Do not operate switches with wet hands.<br />
Doing so could cause electric shock.<br />
• If the auto-reset function has been selected, the inverter may automatically restart and drive the<br />
motor depending on the cause of tripping. Design the machinery or equipment so that human safety<br />
is ensured at the time of restarting.<br />
Otherwise, an accident could occur.<br />
• If the stall prevention function (current limiter), automatic deceleration (anti-regenerative control), or<br />
overload prevention control has been selected, the inverter may operate with<br />
acceleration/deceleration or frequency different from the commanded ones. Design the machine so<br />
that safety is ensured even in such cases.<br />
• If any of the protective functions have been activated, first remove the cause. Then, after checking<br />
that the all run commands are set to OFF, release the alarm. If the alarm is released while any run<br />
commands are set to ON, the inverter may supply the power to the motor, running the motor.<br />
Otherwise, an accident could occur.<br />
• If you enable the "Restart mode after momentary power failure" (Function code F14 = 3 to 5), then<br />
the inverter automatically restarts running the motor when the power is recovered.<br />
Design the machinery or equipment so that human safety is ensured after restarting.<br />
• If the user configures the function codes wrongly without completely understanding this <strong>Instruction</strong><br />
<strong>Manual</strong> and the <strong>EQ7</strong> DRIVE User's <strong>Manual</strong>, the motor may rotate with a torque or at a speed not<br />
permitted for the machine.<br />
An accident or injuries could occur.<br />
• Even if the inverter has interrupted power to the motor, if the voltage is applied to the main circuit<br />
input terminals L1/R, L2/S and L3/T, voltage may be output to inverter output terminals U, V, and W.<br />
• Even if the run command is set to OFF, voltage is output to inverter output terminals U, V, and W if<br />
the servo-lock command is ON.<br />
• Even if the motor is stopped due to DC braking or preliminary excitation, voltage is output to inverter<br />
output terminals U, V, and W.<br />
An electric shock may occur.<br />
• The inverter can easily accept high-speed operation. When changing the speed setting, carefully<br />
check the specifications of motors or equipment beforehand.<br />
Otherwise, injuries could occur.<br />
vi
• Do not touch the heat sink and braking resistor because they become very hot.<br />
Doing so could cause burns.<br />
• The DC brake function of the inverter does not provide any holding mechanism.<br />
Injuries could occur.<br />
• Ensure safety before modifying the function code settings.<br />
Run commands (e.g., "Run forward" FWD), stop commands (e.g., "Coast to a stop" BX), and<br />
frequency change commands can be assigned to digital input terminals. Depending upon the<br />
assignment states of those terminals, modifying the function code setting may cause a sudden<br />
motor start or an abrupt change in speed.<br />
• When the inverter is controlled with the digital input signals, switching run or frequency command<br />
sources with the related terminal commands (e.g., SS1, SS2, SS4, SS8, Hz2/Hz1, Hz/PID, IVS, and<br />
LE) may cause a sudden motor start or an abrupt change in speed.<br />
• Ensure safety before modifying customizable logic related function code settings (U codes and<br />
related function codes) or turning ON the "Cancel customizable logic" terminal command CLC.<br />
Depending upon the settings, such modification or cancellation of the customizable logic may<br />
change the operation sequence to cause a sudden motor start or an unexpected motor operation.<br />
An accident or injuries could occur.<br />
Maintenance, inspection and parts replacement<br />
• Before proceeding to the maintenance/inspection jobs, turn OFF the power and wait at least five<br />
minutes for inverters of 40 HP or below, or at least ten minutes for inverters of 50 HP or<br />
above. Make sure that the LED monitor and charging lamp are turned OFF. Further, make sure,<br />
using a multimeter or a similar instrument, that the DC link bus voltage between the terminals P(+)<br />
and N(-) has dropped to the safe level (+25 VDC or below).<br />
Otherwise, an electric shock could occur.<br />
• Maintenance, inspection, and parts replacement should be made only by qualified persons.<br />
• Take off the watch, rings and other metallic objects before starting work.<br />
• Use insulated tools.<br />
Otherwise, an electric shock or injuries could occur.<br />
• Never modify the inverter.<br />
Doing so could cause an electric shock or injuries.<br />
Disposal<br />
• Treat the inverter as an industrial waste when disposing of it.<br />
Otherwise injuries could occur.<br />
GENERAL PRECAUTIONS<br />
Drawings in this manual may be illustrated without covers or safety shields for explanation of detail<br />
parts. Restore the covers and shields in the original state and observe the description in the manual<br />
before starting operation.<br />
vii
Conformity with UL standards and CSA standards (cUL-listed for Canada)<br />
UL/cUL-listed inverters are subject to the regulations set forth by the UL standards and CSA standards (cULlisted<br />
for Canada) by installation within precautions listed below.<br />
1. Solid state motor overload protection (motor protection by electronic thermal overload relay) is provided in each<br />
model.<br />
Use function codes F10 to F12 to set the protection level.<br />
2. Use Cu wire only.<br />
3. Use Class 1 wire only for control circuits.<br />
4. Short circuit rating<br />
"Suitable For Use On A Circuit Of Delivering Not More Than 100,000 rms Symmetrical Amperes, 240 Volts<br />
Maximum for 230 V class input 40 HP or below, 230 Volts maximum for 230 V class input 50 HP or above<br />
when protected by Class J Fuses or a Circuit Breaker having an interrupting rating not less than 100,000 rms<br />
Symmetrical Amperes, 240 Volts Maximum." Models FRN; rated for 230 V class input.<br />
"Suitable For Use On A Circuit Of Delivering Not More Than 100,000 rms Symmetrical Amperes, 480 Volts<br />
Maximum when protected by Class J Fuses or a Circuit Breaker having an interrupting rating not less than<br />
100,000 rms Symmetrical Amperes, 480 Volts Maximum." Models FRN; rated for 460 V class input.<br />
"Integral solid state short circuit protection does not provide branch circuit protection. Branch circuit protection<br />
must be provided in accordance with the National Electrical Code and any additional local codes."<br />
5. Field wiring connections must be made by a UL Listed and CSA Certified closed-loop terminal connector sized<br />
for the wire gauge involved. Connector must be fixed using the crimp tool specified by the connector<br />
manufacturer.<br />
6. All circuits with terminals L1/R, L2/S, L3/T, R0, T0, R1, T1 must have a common disconnect and be connected<br />
to the same pole of the disconnect if the terminals are connected to the power supply.<br />
7. When using the inverter as a UL Enclosed Type (UL TYPE1), purchase Type 1 kit (option) and mount it on the<br />
inverter as instructed.<br />
viii
Conformity with UL standards and CSA standards (cUL-listed for Canada) (continued)<br />
8. Install UL certified fuses or circuit breaker between the power supply and the inverter, referring to the table below.<br />
Power supply voltage<br />
Nominal<br />
applied motor<br />
(HP)<br />
Threephase<br />
Single-<br />
phase<br />
Inverter type<br />
CT/VT mode<br />
Class J fuse size (A)<br />
Circuit breaker trip size (A)<br />
Required<br />
torque<br />
lb-in (N•m)<br />
Main terminal<br />
Aux. control power<br />
supply<br />
Aux. Fan power supply<br />
L1/R, L2/S, L3/T<br />
60C (140F)<br />
Cu wire<br />
75C (167F)<br />
Cu wire<br />
Wire size<br />
AWG (mm 2 )<br />
Main terminal<br />
Remarks<br />
60C (140F)<br />
Cu wire<br />
U, V, W<br />
75C (167F)<br />
Cu wire<br />
Remarks<br />
Aux. control power<br />
supply<br />
Aux. fan power supply<br />
230 V<br />
0.5 0.25 <strong>EQ7</strong>-20P5-C 10 5 10.6<br />
-<br />
1 0.5 <strong>EQ7</strong>-2001-C 15 10 (1.2)<br />
2 1 <strong>EQ7</strong>-2002-C 20 15<br />
CT/<br />
3 1.5 <strong>EQ7</strong>-2003-C<br />
VT<br />
30 20 15.9<br />
(1.8)<br />
5<br />
<strong>EQ7</strong>-2005-C 40 30<br />
3<br />
<strong>EQ7</strong>-2007-C<br />
7.5<br />
60 50<br />
CT<br />
<strong>EQ7</strong>-2010-C<br />
VT<br />
10 5<br />
75 75 30.9<br />
CT<br />
<strong>EQ7</strong>-2015-C<br />
(3.5)<br />
VT<br />
15 7.5<br />
100 100<br />
CT<br />
<strong>EQ7</strong>-2020-C<br />
VT<br />
20<br />
150 125<br />
CT<br />
10 <strong>EQ7</strong>-2025-C<br />
VT<br />
25<br />
175 150<br />
CT<br />
51.3<br />
<strong>EQ7</strong>-2030-C<br />
VT<br />
(5.8)<br />
30 15<br />
200 175<br />
CT<br />
10.6<br />
<strong>EQ7</strong>-2040-C<br />
(1.2)<br />
VT<br />
40 20<br />
250 200<br />
CT<br />
119.4<br />
<strong>EQ7</strong>-2050-C<br />
(13.5)<br />
VT<br />
50 25<br />
350 250<br />
CT<br />
<strong>EQ7</strong>-2060-C<br />
VT<br />
60<br />
400 300<br />
CT<br />
238.9<br />
<strong>EQ7</strong>-2075-C<br />
30<br />
VT<br />
(27)<br />
75<br />
450<br />
CT<br />
<strong>EQ7</strong>-2100-C<br />
350<br />
VT<br />
100<br />
500<br />
CT<br />
<strong>EQ7</strong>-2125-C<br />
40<br />
VT<br />
125<br />
600 400 424.7<br />
CT<br />
(48)<br />
<strong>EQ7</strong>-2150-C<br />
150 50 VT 700 500<br />
-<br />
10.6<br />
(1.2)<br />
14<br />
(2.1)<br />
10<br />
(5.3)<br />
-<br />
3<br />
(26.7)<br />
1<br />
(42.4)<br />
-<br />
14<br />
(2.1)<br />
10<br />
(5.3)<br />
8<br />
(8.4)<br />
6<br />
(13.3)<br />
4<br />
(21.2)<br />
3<br />
(26.7)<br />
2<br />
(33.6)<br />
2/0<br />
(67.4)<br />
3/0<br />
(85)<br />
4/0<br />
(107.2)<br />
2/0×2<br />
(67.4×2)<br />
3/0×2<br />
(85×2)<br />
4/0×2<br />
(107.2×2<br />
)<br />
300×2<br />
(152×2)<br />
*1<br />
-<br />
-<br />
*2<br />
*3<br />
-<br />
*2<br />
*3<br />
14<br />
(2.1)<br />
12<br />
(3.3)<br />
-<br />
4<br />
(21.2)<br />
3<br />
(26.7)<br />
2<br />
(33.6)<br />
-<br />
14<br />
(2.1)<br />
12<br />
(3.3)<br />
8<br />
(8.4)<br />
6<br />
(13.3)<br />
4<br />
(21.2)<br />
3<br />
(26.7)<br />
2<br />
(33.6)<br />
1<br />
(42.4)<br />
1/0<br />
(53.5)<br />
4/0<br />
(107.2)<br />
3/0×2<br />
(85×2)<br />
4/0×2<br />
(107.2×2<br />
)<br />
300×2<br />
(152×2)<br />
Note 1: Control circuit terminals Tightening torque: 6.1 lb-in (0.7 N•m), Recommended wire size: AWG 19 or 18 (0.65 to 0.82 mm 2 )<br />
*1 No terminal end treatment is required for connection.<br />
*2 Use 75C (167F) Cu (Copper) wire only.<br />
*3 The wire size of UL Open Type and Enclosed Type are common. Please contact us if UL Open Type exclusive wire is necessary.<br />
*1<br />
-<br />
-<br />
*2<br />
*3<br />
-<br />
*2<br />
*3<br />
-<br />
14<br />
(2.1)<br />
*1<br />
*2<br />
-<br />
14<br />
(2.1)<br />
ix
Conformity with UL standards and CSA standards (cUL-listed for Canada) (continued)<br />
Power supply voltage<br />
460 V<br />
Nominal applied<br />
motor<br />
(HP)<br />
Threephase<br />
Singlephase<br />
Inverter type<br />
CT/VT mode<br />
Class J fuse size (A)<br />
Circuit breaker trip size (A)<br />
Main terminal<br />
Required<br />
torque<br />
lb-in (N•m)<br />
Aux. control power supply<br />
Aux. Fan power supply<br />
L1/R, L2/S, L3/T<br />
60C (140F)<br />
Cu wire<br />
75C (167F)<br />
Cu wire<br />
0.5 0.25 <strong>EQ7</strong>-40P5-C<br />
3 10.6<br />
5 -<br />
1 0.5 <strong>EQ7</strong>-4001-C 6 (1.2)<br />
14 14<br />
2 1 <strong>EQ7</strong>-4002-C CT/ 10 10<br />
(2.1) (2.1)<br />
VT<br />
15.9<br />
3 1.5 <strong>EQ7</strong>-4003-C 15 15<br />
(1.8)<br />
5<br />
<strong>EQ7</strong>-4005-C 20 20<br />
<strong>EQ7</strong>-4007-C<br />
12<br />
7.5 3<br />
30 30<br />
CT<br />
(3.3) *1<br />
<strong>EQ7</strong>-4010-C<br />
VT<br />
10<br />
10<br />
40 40<br />
CT<br />
30.9<br />
(5.3)<br />
5 <strong>EQ7</strong>-4015-C<br />
-<br />
VT<br />
(3.5)<br />
15<br />
60 50<br />
CT<br />
8<br />
7.5 <strong>EQ7</strong>-4020-C<br />
(8.4)<br />
VT<br />
20<br />
70 60<br />
CT<br />
<strong>EQ7</strong>-4025-C<br />
10<br />
-<br />
6<br />
VT<br />
25<br />
90 75<br />
(13.3) 6<br />
CT<br />
<strong>EQ7</strong>-4030-C<br />
51.3<br />
(13.3)<br />
VT<br />
(5.8)<br />
4<br />
30 15<br />
100 100<br />
CT<br />
(21.2)<br />
<strong>EQ7</strong>-4040-C<br />
VT<br />
3 4<br />
40 20<br />
125<br />
(26.7) (21.2)<br />
CT 125<br />
<strong>EQ7</strong>-4050-C<br />
VT<br />
2 3<br />
50 25<br />
175<br />
CT<br />
10.6 (33.6) (26.7)<br />
<strong>EQ7</strong>-4060-C<br />
VT<br />
(1.2)<br />
2<br />
60<br />
200 150 119.4<br />
CT<br />
(33.6)<br />
30 <strong>EQ7</strong>-4075-C<br />
(13.5)<br />
VT<br />
75<br />
200<br />
CT<br />
1/0<br />
<strong>EQ7</strong>-4100-C<br />
(53.5)<br />
VT 250<br />
-<br />
100 40<br />
175<br />
CT<br />
<strong>EQ7</strong>-4125-C<br />
2/0<br />
VT 300 200<br />
(67.4)<br />
125<br />
50<br />
238.9<br />
<strong>EQ7</strong>-4150-C CT/VT 350 250 (27)<br />
-<br />
150 1/0×2<br />
<strong>EQ7</strong>-4200-C CT/VT 400 300<br />
(53.5×2<br />
60<br />
200<br />
10.6 )<br />
<strong>EQ7</strong>-4250-C CT/VT 500 350<br />
(1.2)<br />
3/0×2<br />
250 75<br />
(85×2)<br />
<strong>EQ7</strong>-4300-C CT/VT 600<br />
424.7<br />
300<br />
(48)<br />
350<br />
100<br />
<strong>EQ7</strong>-4350-C CT/VT 700<br />
<strong>EQ7</strong>-4450-C CT 700<br />
500<br />
4/0×2<br />
(107.2×<br />
2)<br />
250×2<br />
(127×2)<br />
Wire size<br />
AWG (mm 2 )<br />
Main terminal<br />
Remarks<br />
-<br />
*2<br />
*3<br />
-<br />
*2<br />
*3<br />
60C (140F)<br />
Cu wire<br />
14<br />
(2.1)<br />
-<br />
U, V, W<br />
75C (167F)<br />
Cu wire<br />
14<br />
(2.1)<br />
12<br />
(3.3)<br />
10<br />
(5.3)<br />
8<br />
(8.4)<br />
6<br />
(13.3) 6<br />
(13.3)<br />
4<br />
(21.2)<br />
2<br />
(33.6) 2<br />
(33.6)<br />
-<br />
1/0<br />
(53.5)<br />
4/0<br />
(107.2)<br />
1/0×2<br />
(53.5×2)<br />
2/0×2<br />
(67.4×2)<br />
3/0×2<br />
(85×2)<br />
250×2<br />
(127×2)<br />
300×2<br />
(152×2)<br />
Note 1: Control circuit terminals Tightening torque: 6.1 lb-in (0.7 N•m), Recommended wire size: AWG 19 or 18 (0.65 to 0.82 mm 2 )<br />
*1 No terminal end treatment is required for connection.<br />
*2 Use 75C (167F) Cu (Copper) wire only.<br />
*3 The wire size of UL Open Type and Enclosed Type are common. Please contact us if UL Open Type exclusive wire is necessary.<br />
Remarks<br />
*1<br />
-<br />
-<br />
*2<br />
*3<br />
-<br />
*2<br />
*3<br />
Aux. control power supply<br />
-<br />
14<br />
(2.1)<br />
*1<br />
*2<br />
Aux. fan power supply<br />
-<br />
14<br />
(2.1)<br />
*1<br />
*2<br />
x
Conformity with UL standards and CSA standards (cUL-listed for Canada) (continued)<br />
Power supply voltage<br />
Nominal applied<br />
motor<br />
HP<br />
Threephase<br />
Singlephase<br />
Inverter type<br />
CT//VT mode<br />
Class J fuse size (A)<br />
Circuit breaker trip size (A)<br />
Main terminal<br />
Required<br />
torque lb-in<br />
(N•m)<br />
Aux. control power supply<br />
Aux. Fan power supply<br />
60C (140F)<br />
Cu wire<br />
L1/R, L2/S, L3/T<br />
75C (167F)<br />
Cu wire<br />
Wire size<br />
AWG (mm 2 )<br />
Main terminal<br />
Remarks<br />
60C (140F)<br />
Cu wire<br />
U, V, W<br />
75C (167F)<br />
Cu wire<br />
Remarks<br />
Aux. control power supply<br />
Aux. fan power supply<br />
460 V<br />
300×2<br />
350 -<br />
CT 800<br />
(152×2)<br />
<strong>EQ7</strong>-4450-C<br />
400×2<br />
450<br />
VT 600<br />
(203×2)<br />
125<br />
250×2<br />
400<br />
1000<br />
<strong>EQ7</strong>-4500-C CT<br />
(127×2)<br />
450 -<br />
300×2<br />
-<br />
<strong>EQ7</strong>-4600-C CT<br />
(152×2)<br />
150<br />
<strong>EQ7</strong>-4500-C VT 800<br />
500<br />
400×2<br />
- <strong>EQ7</strong>-4600-C CT<br />
(203×2)<br />
- 150 <strong>EQ7</strong>-4700-C CT<br />
1200 424.7 10.6 10.6<br />
200 <strong>EQ7</strong>-4600-C VT<br />
-<br />
(48) (1.2) (1.2)<br />
600<br />
500×2<br />
- <strong>EQ7</strong>-4700-C CT<br />
(253×2)<br />
-<br />
<strong>EQ7</strong>-4800-C CT<br />
200<br />
<strong>EQ7</strong>-4700-C VT 1200<br />
600×2<br />
700<br />
1400<br />
-<br />
CT<br />
(304×2)<br />
<strong>EQ7</strong>-4800-C<br />
VT 350×3<br />
800 250<br />
1600<br />
CT<br />
(177×3)<br />
<strong>EQ7</strong>-4900-C<br />
VT 500×3<br />
900 300<br />
2000 1400<br />
CT<br />
(253×3)<br />
<strong>EQ7</strong>-41000-C<br />
600×3<br />
1000 400 VT 2200 1600<br />
(304×3)<br />
-<br />
*2<br />
*3<br />
*2<br />
*4<br />
-<br />
350×2<br />
(177×2)<br />
400×2<br />
(203×2)<br />
300×2<br />
(152×2)<br />
350×2<br />
(177×2)<br />
400×2<br />
(203×2)<br />
500×2<br />
(253×2)<br />
600×2<br />
(304×2)<br />
400×3<br />
(203×3)<br />
600×3<br />
(304×3)<br />
500×4<br />
(253×4)<br />
Note: Control circuit terminals Tightening torque: 6.1 lb-in (0.7 N•m), Recommended wire size: AWG 19 or 18 (0.65 to 0.82 mm 2 )<br />
*1 No terminal end treatment is required for connection.<br />
*2 Use 75C (167F) Cu (Copper) wire only.<br />
*3 The wire size of UL Open Type and Enclosed Type are common. Please contact us if UL Open Type exclusive wire is necessary.<br />
*4 It is showing the wire size for UL Open Type.<br />
See additional material INR-SI47-1365-JE for UL Enclosed Type (Pack with TYPE1 kit).<br />
-<br />
*2<br />
*3<br />
*2<br />
*4<br />
14<br />
(2.1)<br />
*1<br />
*2<br />
14<br />
(2.1)<br />
*1<br />
*2<br />
xi
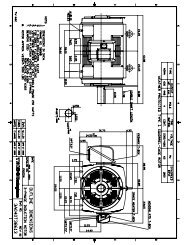
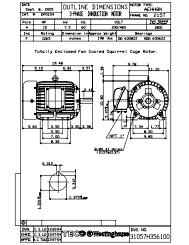
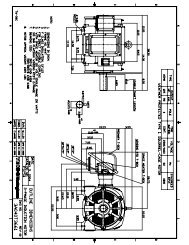
Chapter 1 Drive Model Identification<br />
It is essential to verify the <strong>EQ7</strong> drive nameplate and make sure that the <strong>EQ7</strong> drive has the correct rating so it can be<br />
used in your application with the proper sized AC motor.<br />
Unpack the <strong>EQ7</strong> drive and check the following:<br />
(1) The <strong>EQ7</strong> drive and quick start guide (this document) are contained in the package. The <strong>EQ7</strong> DRIVE-2100-C /<br />
<strong>EQ7</strong> DRIVE-4100-C and higher rated types come with a DC reactor (DCR). Be sure to connect the DCR.<br />
(2) The <strong>EQ7</strong> drive has not been damaged during transportation there should be no dents or parts missing.<br />
(3) The <strong>EQ7</strong> drive is the type you ordered. You can check the type and specifications on the main nameplate. (Main<br />
and sub nameplates are attached to the <strong>EQ7</strong> drive and are located as shown below.)<br />
(4) Check that the input voltage range meets the input power requirements.<br />
(5) Ensure that for variable torque applications the motor rated current matches the variable torque FLA or for<br />
constant torque applications it matches the constant torque FLA. Verify that the output voltage rating on the <strong>EQ7</strong><br />
drive label meets the motor requirements (nameplate).<br />
TYPE: Type of inverter<br />
Figure 1.1 Nameplate<br />
<strong>EQ7</strong> – X XXX - X<br />
C = Chassis; IP20 or IP00<br />
HP Rating (Variable Torque)<br />
2 = 230V, 4 = 460V<br />
Product Type<br />
1-1
1.1 Drive Models Constant Torque (CT) / Variable Torque (VT) HP Ratings<br />
Voltage <strong>EQ7</strong> DRIVE Variable Torque HP Constant Torque HP<br />
Frame /<br />
Enclosure<br />
<strong>EQ7</strong>-20P5-C 0.5 0.5 Plastic<br />
<strong>EQ7</strong>-2001-C 1 1 Plastic<br />
<strong>EQ7</strong>-2002-C 2 2 Plastic<br />
<strong>EQ7</strong>-2003-C 3 3 Plastic<br />
<strong>EQ7</strong>-2005-C 5 5 Plastic<br />
<strong>EQ7</strong>-2007-C 7.5 7.5 Plastic<br />
<strong>EQ7</strong>-2010-C 10 7.5 Plastic<br />
<strong>EQ7</strong>-2015-C 15 10 Plastic<br />
230V<br />
<strong>EQ7</strong>-2020-C 20 15 Plastic<br />
<strong>EQ7</strong>-2025-C 25 20 Plastic<br />
<strong>EQ7</strong>-2030-C 30 25 Plastic<br />
<strong>EQ7</strong>-2040-C 40 30 Plastic<br />
<strong>EQ7</strong>-2050-C 50 40 Sheet Metal<br />
<strong>EQ7</strong>-2060-C 60 50 Sheet Metal<br />
<strong>EQ7</strong>-2075-C 75 60 Sheet Metal<br />
<strong>EQ7</strong>-2100-C 100 75 Sheet Metal<br />
<strong>EQ7</strong>-2125-C 125 100 Sheet Metal<br />
<strong>EQ7</strong>-2150-C 150 125 Sheet Metal<br />
<strong>EQ7</strong>-40P5-C 0.5 0.5 Plastic<br />
<strong>EQ7</strong>-4001-C 1 1 Plastic<br />
<strong>EQ7</strong>-4002-C 2 2 Plastic<br />
<strong>EQ7</strong>-4003-C 3 3 Plastic<br />
<strong>EQ7</strong>-4005-C 5 5 Plastic<br />
<strong>EQ7</strong>-4007-C 7.5 7.5 Plastic<br />
<strong>EQ7</strong>-4010-C 10 7.5 Plastic<br />
<strong>EQ7</strong>-4015-C 15 10 Plastic<br />
<strong>EQ7</strong>-4020-C 20 15 Plastic<br />
<strong>EQ7</strong>-4025-C 25 20 Plastic<br />
<strong>EQ7</strong>-4030-C 30 25 Plastic<br />
<strong>EQ7</strong>-4040-C 40 30 Plastic<br />
<strong>EQ7</strong>-4050-C 50 40 Sheet Metal<br />
<strong>EQ7</strong>-4060-C 60 50 Sheet Metal<br />
460V <strong>EQ7</strong>-4075-C 75 60 Sheet Metal<br />
<strong>EQ7</strong>-4100-C 100 75 Sheet Metal<br />
<strong>EQ7</strong>-4125-C 125 100 Sheet Metal<br />
<strong>EQ7</strong>-4150-C 150 125/150* Sheet Metal<br />
<strong>EQ7</strong>-4200-C 200 200* Sheet Metal<br />
<strong>EQ7</strong>-4250-C 250 250* Sheet Metal<br />
<strong>EQ7</strong>-4300-C 300 300* Sheet Metal<br />
<strong>EQ7</strong>-4350-C 350 350* Sheet Metal<br />
<strong>EQ7</strong>-4450-C 400/450 350 Sheet Metal<br />
<strong>EQ7</strong>-4500-C 500 400/450* Sheet Metal<br />
<strong>EQ7</strong>-4600-C 600 500* Sheet Metal<br />
<strong>EQ7</strong>-4700-C 700 600* Sheet Metal<br />
<strong>EQ7</strong>-4800-C 800 700* Sheet Metal<br />
<strong>EQ7</strong>-4900-C 900 800 Sheet Metal<br />
<strong>EQ7</strong>-41000-C 1000 900 Sheet Metal<br />
Table 1.1<br />
This table shows the Variable Torque and Constant Torque ratings for all <strong>EQ7</strong> drive models.<br />
* The HP ratings marked with (*) are suitable for constant torque V/F Control. Refer to <strong>EQ7</strong> <strong>Instruction</strong> <strong>Manual</strong><br />
chapter 11 for constant torque vector control HP ratings.<br />
1-2
1.2 Installation and wiring practices<br />
Mounting of the <strong>EQ7</strong> drive is extremely important for accessibility as well as for the environment. Various <strong>EQ7</strong> drive<br />
models are available and the mounting dimensions (footprint) may be different. Install the <strong>EQ7</strong> drive in an<br />
environment that satisfies the requirements.<br />
<strong>TECO</strong>-<strong>Westinghouse</strong> <strong>Motor</strong> <strong>Company</strong> strongly recommends installing inverters in a panel for safety reasons, in<br />
particular, when installing the ones that have an enclosure rating of IP00.<br />
When installing the <strong>EQ7</strong> drive in a place out of the specified environmental requirements, it is necessary to derate the<br />
inverter or consider the panel engineering design suitable for the special environment or the panel installation<br />
location. For details consult your <strong>TECO</strong>-<strong>Westinghouse</strong> <strong>Motor</strong> <strong>Company</strong> representative. The special environments<br />
listed below require using the specially designed panel or considering the panel installation location.<br />
• Installation environment<br />
Environments Possible problems Sample measures Applications<br />
Highly concentrated<br />
sulfurizing gas or<br />
other corrosive gases<br />
A lot of conductive<br />
dust or foreign<br />
material (e.g., metal<br />
powders or shavings,<br />
carbon fibers, or<br />
carbon dust)<br />
A lot of fibrous or<br />
paper dust<br />
High humidity or dew<br />
condensation<br />
Vibration or shock<br />
exceeding the<br />
specified level<br />
Fumigation for export<br />
packaging<br />
Corrosive gases cause parts<br />
inside the inverter to corrode,<br />
resulting in an inverter<br />
malfunction.<br />
Entry of conductive dust into<br />
the inverter causes a short<br />
circuit.<br />
Fibrous or paper dust<br />
accumulated on the heat sink<br />
lowers the cooing effect.<br />
Entry of dust into the inverter<br />
causes the electronic circuitry<br />
to malfunction.<br />
In an environment where a<br />
humidifier is used or where the<br />
air conditioner is not equipped<br />
with a dehumidifier, high<br />
humidity or dew condensation<br />
results, which causes a shortcircuiting<br />
or malfunction of<br />
electronic circuitry inside the<br />
inverter.<br />
If a large vibration or shock<br />
exceeding the specified level is<br />
applied to the inverter, for<br />
example, due to a carrier<br />
running on seam joints of rails<br />
or blasting at a construction<br />
site, the inverter structure gets<br />
damaged.<br />
Halogen compounds such as<br />
methyl bromide used in<br />
fumigation corrodes some<br />
parts inside the inverter.<br />
Any of the following measures may be<br />
necessary.<br />
-Mount the inverter in a sealed panel<br />
with IP6X or air-purge mechanism.<br />
-Place the panel in a room free from<br />
influence of the gases.<br />
Any of the following measures may be<br />
necessary.<br />
-Mount the inverter in a sealed panel.<br />
-Place the panel in a room free from<br />
influence of the conductive dust.<br />
Any of the following measures may be<br />
necessary.<br />
-Mount the inverter in a sealed panel<br />
that shuts out dust.<br />
-Ensure a maintenance space for<br />
periodical cleaning of the heat sink in<br />
panel engineering design.<br />
-Employ external cooling when<br />
mounting the inverter in a panel for<br />
easy maintenance and perform<br />
periodical maintenance.<br />
- Put a heating module such<br />
as a space heater in the panel.<br />
-Insert shock-absorbing materials<br />
between the mounting base of the<br />
inverter and the panel for safe<br />
mounting.<br />
-When exporting an inverter built in a<br />
panel or equipment, pack them in a<br />
previously fumigated wooden crate.<br />
-When packing an inverter alone for<br />
export, use a laminated veneer lumber<br />
(LVL).<br />
Table 1.2: Installation environment<br />
Paper manufacturing, sewage<br />
disposal, sludge treatment,<br />
tire manufacturing, gypsum<br />
manufacturing, metal<br />
processing, and a particular<br />
process in textile factories.<br />
Wiredrawing machines, metal<br />
processing, extruding<br />
machines, printing presses,<br />
combustors, and industrial<br />
waste treatment.<br />
Textile manufacturing and<br />
paper manufacturing.<br />
Outdoor installation.<br />
Film manufacturing line,<br />
pumps and food processing.<br />
Installation of an inverter<br />
panel on a carrier or selfpropelled<br />
machine.<br />
Ventilating fan at a<br />
construction site or a press<br />
machine.<br />
Exporting.<br />
1-3
• Storage environment<br />
The storage environment in which the inverter is stored after purchase is different from the operation environment.<br />
For details, refer to the <strong>EQ7</strong> DRIVE User's <strong>Manual</strong>, Chapter 2.<br />
• Wiring precautions<br />
(1) Route the wiring of the control circuit terminals as far from the wiring of the main circuit as possible. Otherwise<br />
electric noise may cause malfunctions.<br />
(2) Place the control circuit wires inside the inverter to keep them away from the live parts of the main circuit (such as<br />
the terminal block of the main circuit).<br />
(3) If more than one motor is to be connected to a single inverter, the wiring length should be the sum of the length of<br />
the wires to the motors.<br />
(4) Drive output terminals (U, V, W)<br />
1) Connect these terminals to a 3-phase motor in the correct phase sequence. If the direction of motor rotation is<br />
incorrect, exchange any two of the U, V, and W phases.<br />
2) Do not connect a power factor correction capacitor or surge suppressor to the inverter output.<br />
3) If the cable from the inverter to the motor is very long, a high-frequency current may be generated by stray<br />
capacitance between the cables and result in an overcurrent trip of the inverter, an increase in leakage current,<br />
or a reduction in current indication precision.<br />
When a motor is driven by a PWM-type inverter, the motor terminals may be subject to surge voltage<br />
generated by inverter element switching. If the motor cable (with 460 V series motors, in particular) is particularly<br />
long, surge voltage will deteriorate motor insulation. To prevent this, use the following guidelines:<br />
Inverter 7.5 HP and larger<br />
<strong>Motor</strong> Insulation Level 1000 V 1300 V 1600 V<br />
460 VAC Input Voltage 66 ft (20 m) 328 ft (100 m) 1312 ft (400 m)*<br />
230 VAC Input Voltage 1312 ft (400 m)* 1312 ft (400 m)* 1312 ft (400 m)*<br />
Inverter 5 HP and smaller<br />
<strong>Motor</strong> Insulation Level 1000 V 1300 V 1600 V<br />
460 VAC Input Voltage 66 ft (20 m) 165 ft (50 m)* 165 ft (50 m)*<br />
230 VAC Input Voltage 328 ft (100 m)* 328 ft (100 m)* 328 ft (100 m)*<br />
* For this case the cable length is determined by secondary effects and not voltage spiking.<br />
• When a motor protective thermal O/L relay is inserted between the inverter and the motor, the thermal<br />
O/L relay may malfunction (particularly in the 460 V series), even when the cable length is 165 ft (50 m) or<br />
less. To correct, insert a filter or reduce the carrier frequency. (Use function code F26 "<strong>Motor</strong> sound".)<br />
• For the vector control mode, wiring length is 328 ft (100 m) or less.<br />
(5) When an output circuit filter is inserted in the secondary circuit or the wiring between the inverter and the<br />
motor is long, a voltage loss occurs due to reactance of the filter or wiring so that the insufficient voltage may cause<br />
output current oscillation or a lack of motor output torque. To avoid it, select the constant torque load by setting the<br />
function code F37 (Load Selection/Auto Torque Boost/Auto Energy Saving Operation 1) to "1" and keep the inverter<br />
output voltage at a higher level by configuring H50/H52 (Non-linear V/f Pattern, Frequency) and H51/H53 (Non-linear<br />
V/f Pattern, Voltage).<br />
1-4
• Precautions for connection of peripheral equipment<br />
(1) Phase-advancing capacitors for power factor correction<br />
Do not mount a phase-advancing capacitor for power factor correction in the inverter's input (primary) or output<br />
(secondary) circuit. Mounting it in the input (primary) circuit takes no effect. To correct the inverter power factor,<br />
use an optional DC reactor (DCR). Mounting it in the output (secondary) circuit causes an overcurrent trip,<br />
disabling operation.<br />
An overvoltage trip that occurs when the inverter is stopped or running with a light load is assumed to be due to<br />
surge current generated by open/close of phase-advancing capacitors in the power system. An optional DC/AC<br />
reactor (DCR/ACR) is recommended as a measure to be taken at the inverter side.<br />
Input current to an inverter contains a harmonic component that may affect other motors and phase-advancing<br />
capacitors on the same power supply line. If the harmonic component causes any problems, connect an optional<br />
DCR/ACR to the inverter. In some cases, it is necessary to insert a reactor in series with the phase-advancing<br />
capacitors.<br />
(2) Power supply lines (Application of a DC/AC reactor)<br />
Use an optional DC reactor (DCR) when the capacity of the power supply transformer is 500 kVA or more and is<br />
10 times or more the inverter rated capacity or when there are thyristor-driven loads. If no DCR is used, the<br />
percentage-reactance of the power supply decreases, and harmonic components and their peak levels increase.<br />
These factors may break rectifiers or capacitors in the converter section of the inverter, or decrease the<br />
capacitance of the capacitors.<br />
If the input voltage unbalance rate is 2% to 3%, use an optional AC reactor (ACR).<br />
Voltage unbalance(%)=<br />
Max voltage(V) - Min voltage(V)<br />
Three-phase average voltage(V)<br />
×67 (IEC 61800-<br />
3)<br />
(3) DC reactor (DCR) for correcting the inverter input power factor (for suppressing harmonics)<br />
To correct the inverter input power factor (to suppress harmonics), use an optional DCR. Using a DCR increases<br />
the reactance of inverter’s power source so as to decrease harmonic components on the power source lines and<br />
correct the power factor of the inverter.<br />
DCR models Input power factor Remarks<br />
DCR2/4-/A/B Approx. 90% to 95% The last letter identifies the capacitance.<br />
DCR2/4-C Approx. 86% to 90% Exclusively designed for inverters of 50 HP or above.<br />
For selecting DCR models, refer to Chapter 11 "SPECIFICATIONS."<br />
(4) PWM converter for correcting the inverter input power factor<br />
Using a PWM converter (High power-factor, regenerative PWM converter) corrects the inverter power factor up to<br />
nearly 100%. When combining an inverter with a PWM converter, disable the main power down detection by<br />
setting the function code H72 to "0." If the main power loss detection is enabled (H72 = 1 by factory default), the<br />
inverter interprets the main power as being shut down, ignoring an entry of a run command.<br />
1-5
(5) Molded case circuit breaker (MCCB) or residual-current-operated protective device (RCD)/earth leakage circuit<br />
breaker (ELCB)<br />
Install a recommended MCCB or RCD/ELCB (with overcurrent protection) in the primary circuit of the inverter to<br />
protect the wiring. Since using an MCCB or RCD/ELCB with a lager capacity than recommended ones breaks the<br />
protective coordination of the power supply system, be sure to select recommended ones. Also select ones with<br />
short-circuit breaking capacity suitable for the power source impedance.<br />
Molded Case Circuit Breaker (MCCB) and Residual-Current-Operated Protective Device (RCD)/Earth Leakage<br />
Circuit Breaker (ELCB)<br />
Power<br />
supply<br />
voltage<br />
230 V<br />
Nominal<br />
applied<br />
motor<br />
(HP)<br />
Three<br />
-<br />
phase<br />
Singlephase<br />
Inverter type<br />
CT/VT<br />
mode<br />
Rated current of<br />
MCCB and<br />
RCD/ELCB (A)<br />
w/ DCR<br />
w/o<br />
DCR<br />
0.5 0.25 <strong>EQ7</strong>-20P5-C<br />
5<br />
5<br />
1 0.5 <strong>EQ7</strong>-2001-C 10<br />
2 1 <strong>EQ7</strong>-2002-C<br />
15<br />
CT/VT 10<br />
3 1.5 <strong>EQ7</strong>-2003-C 20<br />
5<br />
<strong>EQ7</strong>-2005-C 20 30<br />
3 <strong>EQ7</strong>-2007-C<br />
7.5<br />
30 50<br />
CT<br />
<strong>EQ7</strong>-2010-C<br />
VT<br />
10 5<br />
40 75<br />
CT<br />
<strong>EQ7</strong>-2015-C<br />
VT<br />
15 7.5<br />
50 100<br />
CT<br />
<strong>EQ7</strong>-2020-C<br />
VT<br />
20<br />
75 125<br />
CT<br />
10 <strong>EQ7</strong>-2025-C<br />
VT<br />
25<br />
150<br />
CT<br />
<strong>EQ7</strong>-2030-C<br />
100<br />
VT<br />
30 15<br />
175<br />
CT<br />
<strong>EQ7</strong>-2040-C<br />
VT<br />
40 20<br />
150 200<br />
CT<br />
<strong>EQ7</strong>-2050-C<br />
VT<br />
50 25<br />
175 250<br />
CT<br />
<strong>EQ7</strong>-2060-C<br />
VT<br />
60<br />
200 300<br />
CT<br />
<strong>EQ7</strong>-2075-C<br />
30<br />
VT<br />
75<br />
250 350<br />
CT<br />
<strong>EQ7</strong>-2100-C<br />
VT<br />
100<br />
350<br />
CT<br />
<strong>EQ7</strong>-2125-C<br />
40<br />
VT<br />
--<br />
125<br />
400<br />
CT<br />
<strong>EQ7</strong>-2150-C<br />
150 50 VT 350<br />
Power<br />
supply<br />
voltage<br />
460 V<br />
Nominal<br />
applied<br />
motor<br />
(HP)<br />
Three<br />
-<br />
phase<br />
Singlephase<br />
Inverter type<br />
0.5 0.25 <strong>EQ7</strong>-40P5-C<br />
1 0.5 <strong>EQ7</strong>-4001-C<br />
CT/VT<br />
mode<br />
Rated current of<br />
MCCB and<br />
RCD/ELCB (A)<br />
w/ DCR<br />
w/o<br />
DCR<br />
2 1 <strong>EQ7</strong>-4002-C 10<br />
CT/VT<br />
3 1.5 <strong>EQ7</strong>-4003-C<br />
15<br />
10<br />
5<br />
<strong>EQ7</strong>-4005-C 20<br />
7.5<br />
10<br />
15<br />
20<br />
25<br />
3<br />
<strong>EQ7</strong>-4007-C<br />
<strong>EQ7</strong>-4010-C<br />
5 <strong>EQ7</strong>-4015-C<br />
7.5 <strong>EQ7</strong>-4020-C<br />
10<br />
30 15<br />
40 20<br />
50 25<br />
60<br />
75<br />
30<br />
100 40<br />
<strong>EQ7</strong>-4025-C<br />
<strong>EQ7</strong>-4030-C<br />
<strong>EQ7</strong>-4040-C<br />
<strong>EQ7</strong>-4050-C<br />
<strong>EQ7</strong>-4060-C<br />
<strong>EQ7</strong>-4075-C<br />
<strong>EQ7</strong>-4100-C<br />
<strong>EQ7</strong>-4125-C<br />
CT<br />
VT<br />
CT<br />
VT<br />
CT<br />
VT<br />
CT<br />
VT<br />
CT<br />
VT<br />
CT<br />
VT<br />
CT<br />
VT<br />
CT<br />
VT<br />
CT<br />
VT<br />
CT<br />
VT<br />
CT<br />
5<br />
5<br />
15 30<br />
20 40<br />
30 50<br />
40 60<br />
40 75<br />
50 100<br />
75<br />
100<br />
125<br />
150<br />
125 200<br />
175 --<br />
1-6
Molded Case Circuit Breaker (MCCB) and Residual-<br />
Current-Operated Protective Device (RCD)/Earth<br />
Power<br />
supply<br />
voltage<br />
460 V<br />
Nominal<br />
applied<br />
motor<br />
(HP)<br />
Three<br />
-<br />
phase<br />
125<br />
150<br />
200<br />
Singlephase<br />
50<br />
60<br />
250 75<br />
300<br />
350<br />
350 -<br />
450<br />
400<br />
Inverter type<br />
<strong>EQ7</strong>-4125-C<br />
<strong>EQ7</strong>-4150-C<br />
<strong>EQ7</strong>-4200-C<br />
<strong>EQ7</strong>-4250-C<br />
CT/VT<br />
mode<br />
VT<br />
CT<br />
CT/VT<br />
CT<br />
CT/VT<br />
CT<br />
<strong>EQ7</strong>-4300-C CT/VT<br />
100 <strong>EQ7</strong>-4350-C CT/VT<br />
125<br />
450 -<br />
<strong>EQ7</strong>-4450-C<br />
<strong>EQ7</strong>-4500-C<br />
Rated current of<br />
MCCB and<br />
RCD/ELCB (A)<br />
w/ DCR<br />
200<br />
250<br />
300<br />
CT/VT 350<br />
CT<br />
VT<br />
CT<br />
- 150 <strong>EQ7</strong>-4600-C CT<br />
500<br />
600<br />
800<br />
w/o<br />
DCR<br />
--<br />
Leakage Circuit Breaker (ELCB)<br />
Power<br />
supply<br />
voltage<br />
460 V<br />
Nominal<br />
applied<br />
motor<br />
(HP)<br />
Threephase<br />
500<br />
Singlephase<br />
Inverter type<br />
CT/VT<br />
mode<br />
150 <strong>EQ7</strong>-4500-C VT<br />
- <strong>EQ7</strong>-4600-C CT<br />
- 150 <strong>EQ7</strong>-4700-C CT<br />
600<br />
200 <strong>EQ7</strong>-4600-C VT<br />
- <strong>EQ7</strong>-4700-C CT<br />
Rated current of<br />
MCCB and<br />
RCD/ELCB (A)<br />
w/ DCR<br />
800<br />
-<br />
<strong>EQ7</strong>-4800-C CT<br />
200<br />
<strong>EQ7</strong>-4700-C VT 1200<br />
700<br />
-<br />
CT<br />
<strong>EQ7</strong>-4800-C<br />
VT<br />
800 250<br />
CT<br />
<strong>EQ7</strong>-4900-C<br />
VT<br />
900 300<br />
1400<br />
CT<br />
<strong>EQ7</strong>-41000-C<br />
1000 400 VT 1600<br />
w/o<br />
DCR<br />
--<br />
If no zero-phase current (earth leakage current) detective device such as a ground-fault relay is installed in the<br />
upstream power supply line in order to avoid the entire power supply system's shutdown undesirable to factory<br />
operation, install a residual-current-operated protective device (RCD)/earth leakage circuit breaker (ELCB)<br />
individually to inverters to break the individual inverter power supply lines only.<br />
Otherwise, a fire could occur.<br />
(6) Magnetic contactor (MC) in the inverter input (primary) circuit<br />
Avoid frequent ON/OFF operation of the magnetic contactor (MC) in the input circuit; otherwise, the inverter failure<br />
may result. If frequent start/stop of the motor is required, use FWD/REV terminal signals or the / keys on the<br />
inverter's keypad.<br />
The frequency of the MC's ON/OFF should not be more than once per 30 minutes. To assure 10-year or longer<br />
service life of the inverter, it should not be more than once per hour.<br />
1-7
• From the system's safety point of view, it is recommended to employ such a sequence that shuts down<br />
the magnetic contactor (MC) in the inverter input circuit with an alarm output signal ALM issued on<br />
inverter's programmable output terminals. The sequence minimizes the secondary damage even if the<br />
inverter breaks.<br />
When the sequence is employed, connecting the MC's primary power line to the inverter's auxiliary<br />
control power input makes it possible to monitor the inverter's alarm status on the keypad.<br />
• The breakdown of a braking unit or misconnection of an external braking resistor may trigger that of the<br />
inverter's internal parts (e.g., charging resistor). To avoid such a breakdown linkage, introduce an MC<br />
and configure a sequence that shuts down the MC if a DC link voltage establishment signal is not<br />
issued within three seconds after the MC is switched on.<br />
For the braking transistor built-in type of inverters, assign a transistor error output signal DBAL on<br />
inverter's programmable output terminals to switch off the MC in the input circuit.<br />
(7) Magnetic contactor (MC) in the inverter output (secondary) circuit<br />
If a magnetic contactor (MC) is inserted in the inverter's output (secondary) circuit for switching the motor to a<br />
commercial power or for any other purposes, it should be switched on and off when both the inverter and motor<br />
are completely stopped. This prevents the contact point from getting rough due to a switching arc of the MC. The<br />
MC should not be equipped with any main circuit surge killer.<br />
Applying a commercial power to the inverter's output circuit breaks the inverter. To avoid it, interlock the MC on the<br />
motor's commercial power line with the one in the inverter output circuit so that they are not switched ON at the<br />
same time.<br />
(8) Surge absorber/surge killer<br />
Do not install any surge absorber or surge killer in the inverter's output (secondary) lines.<br />
• Noise reduction<br />
If noise generated from the inverter affects other devices, or that generated from peripheral equipment causes the<br />
inverter to malfunction, follow the basic measures outlined below.<br />
(1) If noise generated from the inverter affects the other devices through power wires or grounding wires:<br />
- Isolate the grounding terminals of the inverter from those of the other devices.<br />
- Connect a noise filter to the inverter power wires.<br />
- Isolate the power system of the other devices from that of the inverter with an insulated transformer.<br />
- Decrease the inverter's carrier frequency (F26).<br />
1-8
(2) If induction or radio noise generated from the inverter affects other devices:<br />
- Isolate the main circuit wires from the control circuit wires and other device wires.<br />
- Put the main circuit wires through a metal conduit pipe, and connect the pipe to the ground near the inverter.<br />
- Install the inverter into the metal panel and connect the whole panel to the ground.<br />
- Connect a noise filter to the inverter's power wires.<br />
- Decrease the inverter's carrier frequency (F26).<br />
(3) When implementing measures against noise generated from peripheral equipment:<br />
- For inverter's control signal wires, use twisted or shielded-twisted wires. When using shielded-twisted wires,<br />
connect the shield of the shielded wires to the common terminals of the control circuit.<br />
- Connect a surge absorber in parallel with magnetic contactor's coils or other solenoids (if any).<br />
• Leakage current<br />
A high frequency current component generated by insulated gate bipolar transistors (IGBTs) switching on/off inside the<br />
inverter becomes leakage current through stray capacitance of inverter input and output wires or a motor. If any of the<br />
problems listed below occurs, take an appropriate measure against them.<br />
Problem<br />
An earth leakage circuit<br />
breaker* that is<br />
connected to the input<br />
(primary) side has<br />
tripped.<br />
*With overcurrent<br />
protection<br />
An external thermal relay<br />
was activated.<br />
Measures<br />
1) Decrease the carrier frequency.<br />
2) Make the wires between the inverter and motor shorter.<br />
3) Use an earth leakage circuit breaker with lower sensitivity than the one currently<br />
used.<br />
4) Use an earth leakage circuit breaker that features measures against the high<br />
frequency current component.<br />
1) Decrease the carrier frequency.<br />
2) Increase the current setting of the thermal relay.<br />
3) Use the electronic thermal overload protection built in the inverter, instead of the<br />
external thermal relay.<br />
• Selecting inverter capacity<br />
(1) To drive a general-purpose motor, select an inverter according to the nominal applied motor rating listed in the<br />
standard specifications table. When high starting torque is required or quick acceleration or deceleration is<br />
required, select an inverter with one rank higher capacity than the standard.<br />
(2) Special motors may have larger rated current than general-purpose ones. In such a case, select an inverter that<br />
meets the following condition.<br />
Inverter rated current > <strong>Motor</strong> rated current<br />
1-9
1.3 Precautions in running inverters<br />
Precautions for running inverters to drive motors or motor-driven machinery are described below.<br />
• <strong>Motor</strong> temperature<br />
When an inverter is used to run a general-purpose motor, the motor temperature becomes higher than when it is<br />
operated with a commercial power supply. In the low-speed range, the motor cooling effect will be weakened, so<br />
decrease the output torque of the motor when running the inverter in the low-speed range.<br />
• <strong>Motor</strong> noise<br />
When a general-purpose motor is driven by an inverter, the noise level is higher than that when it is driven by a<br />
commercial power supply. To reduce noise, raise carrier frequency of the inverter. Operation at 60 Hz or higher can<br />
also result in higher noise level.<br />
• Machine vibration<br />
When an inverter-driven motor is mounted to a machine, resonance may be caused by the natural frequencies of the<br />
motor-driven machinery. Driving a 2-pole motor at 60 Hz or higher may cause abnormal vibration. If it happens, do any<br />
of the following:<br />
- Consider the use of a rubber coupling or vibration-proof rubber.<br />
- Use the inverter's jump frequency control feature to skip the resonance frequency zone(s).<br />
- Use the vibration suppression related function codes that may be effective. For details, refer to the description of<br />
H80 in Chapter 4 "FUNCTION CODES" of the user manual.<br />
1.4 Precautions in using special motors<br />
When using special motors, please read the following section:<br />
• Explosion-proof motors<br />
When driving an explosion-proof motor with an inverter, use a combination of a motor and an inverter that has been<br />
approved in advance.<br />
• Submersible motors and pumps<br />
These motors have a larger rated current than general-purpose motors. Select an inverter with rated output current<br />
that is greater than that of the motor. These motors differ from general-purpose motors in thermal characteristics.<br />
Decrease the thermal time constant of the electronic thermal overload protection to match the motor rating.<br />
• Brake motors<br />
For motors equipped with parallel-connected brakes, their power supply for braking must be supplied from the inverter<br />
input (primary) circuit. If the power supply for braking is mistakenly connected to the inverter's output (secondary)<br />
circuit, the brake may not work when the inverter output is shut down. Do not use inverters for driving motors<br />
equipped with series-connected brakes.<br />
• Geared motors<br />
If the power transmission mechanism uses an oil-lubricated gearbox or speed changer/reducer, then continuous<br />
operation at low speed may cause poor lubrication. Avoid such operation.<br />
• Synchronous motors<br />
It is necessary to take special measures suitable for this motor type. Contact your <strong>TECO</strong>-<strong>Westinghouse</strong> <strong>Motor</strong><br />
<strong>Company</strong> representative for details.<br />
• Single-phase motors<br />
Single-phase motors are not suitable for inverter-driven variable speed operation.<br />
1-10
• High-speed motors<br />
If the reference frequency is set to 120 Hz or higher to drive a high-speed motor, test-run the combination of the<br />
inverter and motor beforehand to check it for the safe operation.<br />
Precautions for use on single-phase power<br />
An inverter is a device that converts alternating current of the input line to direct current via the ac-to-dc rectifier and<br />
then converts it to alternating current via the dc-to-ac switching inverter circuit in order to output the required<br />
alternating current. The <strong>EQ7</strong> drive is designed to connect to the three-phase power and this manual stipulates the<br />
specifications for the use on the three-phase power.<br />
If the inverter designed for connection to three-phase power runs on single-phase power, ripples (voltage fluctuation)<br />
on the DC link bus voltage rectified from the input power become larger than those in the inverter running on threephase<br />
power. The DC-voltage ripple affects the inverter output; that is, ripples could be superimposed on the output<br />
voltage or current, making control hard.<br />
Accordingly, the inverter may not work in full performance or function correctly. To use the <strong>EQ7</strong> drive on single-phase<br />
power, therefore, you need to take the following into account.<br />
• Output current<br />
Select the inverter capacity to keep the output current within the specified level, referring to chapter 11. Output current<br />
exceeding the limit extremely increases voltage ripples on the DC link bus, impeding normal operation or resulting in<br />
an inverter breakdown.<br />
• Wiring<br />
When connecting 230 V inverters of 60 HP or above or 460 V ones of 125 HP or above to single-phase power, use L1<br />
and L3 phases since cooling fans and magnetic contactors inside the inverter are supplied with power via L1 and L3.<br />
Using L2 does not work cooling fans or magnetic contactors, causing abnormal heat, in the worst case, resulting in an<br />
inverter breakdown.<br />
• Connecting peripheral devices<br />
For the specifications of circuit breakers and fuses to apply, refer to pages 1-6 and 1-7.<br />
• Configuring function codes<br />
(1) Cancel the input phase loss protection of the protection/maintenance function with function code H98 (Bit 1 = 0).<br />
This is because the inverter judges single-phase power as a phase loss.<br />
(2) Limit the drive mode to the VT / CT-V mode (Function code F80 = 0 or 1).<br />
(3) Do not use "Vector control without speed sensor" or torque control. (Function codes F42 5, H18 = 0)<br />
(4) "V/f control with slip compensation inactive" is recommended (F42 = 0). Any other drive control calculates the<br />
motor model using the motor parameters inside the inverter. As ripples on the DC link bus voltage become larger,<br />
therefore, calculation causes some errors so that the inverter may not provide the desired performance. Consider<br />
this problem before use. In particular, when using "Vector control with speed sensor" (F42 = 6), dancer control<br />
(J01 = 3), or brake signals (J68, J69, J70, etc.), assure the operation and safety of those speed sensors.<br />
1-11
Chapter 2 Mounting and Wiring the Inverter<br />
2.1 Operating Environment<br />
Install the inverter in an environment that satisfies the requirements listed in Table 2.1.<br />
Item<br />
Site location<br />
Surrounding/ambient<br />
temperature<br />
Relative humidity<br />
Atmosphere<br />
Table 2.1 Environmental Requirements<br />
Indoors<br />
Specifications<br />
-10 to +50C (14 to 122F) (Note 1)<br />
5 to 95% (No condensation)<br />
The inverter must not be exposed to dust, direct sunlight,<br />
corrosive gases, flammable gases, oil mist, vapor or water drops.<br />
Pollution degree 2 (IEC60664-1) (Note 2)<br />
The atmosphere can contain a small amount of salt.<br />
(0.01 mg/cm2 or less per year)<br />
The inverter must not be subjected to sudden changes in<br />
temperature that will cause condensation to form.<br />
Altitude 3300 ft (1000 m) max. (Note 3)<br />
Atmospheric<br />
pressure<br />
Vibration<br />
86 to 106 kPa<br />
2.2 Installing the Inverter<br />
Inverters of<br />
100 HP or below (230 V series)<br />
125 HP or below (460 V series)<br />
0.12 inch (3 mm)<br />
Inverters of<br />
125 HP or above (230 V series)<br />
150 HP or above (460 V series)<br />
0.12 inch (3 mm)<br />
(Max. amplitude)<br />
(Max. amplitude)<br />
2 to less than 9 Hz 2 to less than 9 Hz<br />
9.8 m/s 2 9 to less than 20 Hz 2 m/s 2 9 to less than 55 Hz<br />
2 m/s 2 20 to less than 55 Hz 1 m/s 2 55 to less than 200 Hz<br />
1 m/s 2 55 to less than 200 Hz<br />
(1) Mounting base<br />
Install the inverter on a base made of metal or other non-flammable material.<br />
Table 2.2 Output Current Derating<br />
Factor in Relation to Altitude<br />
Altitude<br />
3300 ft (1000 m)<br />
or lower<br />
3300 to 4900 ft<br />
(1000 to 1500 m)<br />
4900 to 6600 ft<br />
(1500 to 2000 m)<br />
6600 to 8200 ft<br />
(2000 to 2500 m)<br />
8200 to 9800 ft<br />
(2500 to 3000 m)<br />
Output current<br />
derating factor<br />
1.00<br />
0.97<br />
0.95<br />
0.91<br />
0.88<br />
(Note 1) When inverters (40 HP or<br />
below) are mounted side-by-side without<br />
any clearance between them, the<br />
surrounding temperature should be within<br />
the range from -10 to +40C (14 to 104F).<br />
This specification also applies to the<br />
inverters (40 HP) equipped with a NEMA1<br />
kit.<br />
(Note 2) Do not install the inverter in an<br />
environment where it may be exposed to<br />
lint, cotton waste or moist dust or dirt<br />
which will clog the heat sink of the<br />
inverter. If the inverter is to be used in<br />
such an environment, install it in a<br />
dustproof panel.<br />
(Note 3) If you use the inverter in an<br />
altitude above 3300 ft (1000 m), you<br />
should apply an output current derating<br />
factor as listed in Table 2.2.<br />
Install the inverter on a base made of metal or other non-flammable material.<br />
Otherwise, a fire could occur.<br />
(2) Clearances<br />
Ensure that the minimum clearances indicated in Figure 2.1 and Table 2.3 are<br />
maintained at all times. When mounting the inverter in the panel of your system,<br />
take extra care with ventilation inside the panel as the surrounding temperature<br />
easily rises. Do not mount the inverter in a small panel with poor ventilation.<br />
• When mounting two or more inverters<br />
When mounting two or more inverters in the same unit or panel, install them side<br />
by side. When one must be mounted above the other, be sure to separate them<br />
with a partition plate, or the like, so that any heat radiating from an inverter will not<br />
affect the one/s above.<br />
As long as the surrounding temperature is 40°C (104°F) or lower, inverters of 40<br />
HP or below can be mounted side by side without any clearance between them.<br />
Table 2.3 Clearances<br />
inch (mm)<br />
Inverter capacity A B C<br />
0.5 to 2 HP 2.0 (50)<br />
3 to 40 HP 0.39 (10)<br />
3.9 (100)<br />
50 to 450 HP<br />
3.9 (100)<br />
2.0 (50)<br />
500 to 1000 HP 5.9 (150) 5.9 (150)<br />
C: Space required in front of the inverter unit<br />
0<br />
Figure 2.1 Mounting Direction and<br />
Required Clearances<br />
2-1
• When employing external cooling<br />
In external cooling, the heat sink, which dissipates about 70% of the total heat (total<br />
loss) generated into air, is situated outside the equipment or the panel. The external<br />
cooling, therefore, significantly reduces heat radiating inside the equipment or panel.<br />
To employ external cooling for inverters (except DCR built-in type) of 40 HP or below,<br />
use the mounting adapter for external cooling (option); for those of 50 HP or above,<br />
simply change the positions of the mounting bases.<br />
The DCR built-in type of 40 HP or below cannot employ external cooling.<br />
Prevent lint, paper fibers, sawdust, dust, metallic chips, or other foreign<br />
materials from getting into the inverter or from accumulating on the heat sink.<br />
Otherwise, a fire or accident could occur.<br />
Figure 2.2 External Cooling<br />
To utilize external cooling for inverters of 50 HP or above, change the positions of the top and bottom mounting bases<br />
from the edge to the center of the inverter as shown in Figure 2.3.<br />
Screws differ in size and count for each inverter. Refer to the table below.<br />
Inverter type<br />
<strong>EQ7</strong>-2050-C /<strong>EQ7</strong>-2060-C<br />
<strong>EQ7</strong>-4050-C<br />
<strong>EQ7</strong>-4100-C<br />
<strong>EQ7</strong>-2075-C / <strong>EQ7</strong>-4100-C<br />
<strong>EQ7</strong>-4125-C<br />
<strong>EQ7</strong>-2125-C<br />
<strong>EQ7</strong>-4150-C / <strong>EQ7</strong>-4200-C<br />
<strong>EQ7</strong>-4250-C / <strong>EQ7</strong>-4300-C<br />
<strong>EQ7</strong>-2150-C<br />
<strong>EQ7</strong>-4350-C / <strong>EQ7</strong>-4450-C<br />
<strong>EQ7</strong>-4500-C / <strong>EQ7</strong>-4600-C<br />
<strong>EQ7</strong>-4700-C / <strong>EQ7</strong>-4800-C<br />
<strong>EQ7</strong>-4900-C / <strong>EQ7</strong>-41000-C<br />
Table 2.4 Screw Size, Count and Tightening Torque<br />
Base fixing screw<br />
(Screw size and q'ty)<br />
M6 20<br />
5 pcs for upper side,<br />
3 pcs for lower side<br />
M6 20<br />
3 pcs each for upper and lower<br />
sides<br />
M5 12<br />
7 pcs each for upper and lower<br />
sides<br />
M5 16<br />
7 pcs each for upper and lower<br />
sides<br />
M5 16<br />
8 pcs each for upper and lower<br />
sides<br />
M5 16<br />
2 pcs each for upper and lower<br />
sides<br />
M6 20<br />
6 pcs each for upper and lower<br />
sides<br />
M8 20<br />
8 pcs each for upper and lower<br />
sides<br />
Case fixing screw<br />
(Screw size and q'ty)<br />
M6 20<br />
2 pcs for upper side<br />
M6 12<br />
3 pcs for upper side<br />
M5 12<br />
7 pcs for upper side<br />
M5 16<br />
7 pcs for upper side<br />
M5 16<br />
8 pcs for upper side<br />
M5 16<br />
2 pcs each for upper and lower<br />
sides<br />
M6 20<br />
6 pcs each for upper and lower<br />
sides<br />
M8 20<br />
8 pcs each for upper and lower<br />
sides<br />
Tightening<br />
torque<br />
lb-in (Nm)<br />
51.3<br />
(5.8)<br />
51.3<br />
(5.8)<br />
31.0<br />
(3.5)<br />
31.0<br />
(3.5)<br />
31.0<br />
(3.5)<br />
31.0<br />
(3.5)<br />
51.3<br />
(5.8)<br />
119<br />
(13.5)<br />
1) Remove all base fixing screws and case fixing screws from the top of the inverter.<br />
2) Move the top mounting base to the center of the inverter and secure it to the case fixing screw holes with the base<br />
fixing screws. (After changing the position of the top mounting base, some screws may be left unused.)<br />
3) Remove the base fixing screws from the bottom of the inverter, move the bottom mounting base to the center of the<br />
inverter, and secure it with the base fixing screws, just as in step 2). (Inverters of 450 HP or below have no case<br />
fixing screws on the bottom.)<br />
2-2
Figure 2.3 Changing the Positions of the Top and Bottom Mounting Bases<br />
When changing the positions of the top and bottom mounting bases, use only the specified screws.<br />
Otherwise, a fire or accident could occur.<br />
(3) Mounting notes<br />
The <strong>EQ7</strong>-2007-C / <strong>EQ7</strong>-4007-C through <strong>EQ7</strong>-2040-C / <strong>EQ7</strong>-4040-C should be mounted with four screws or bolts using<br />
screw holes A or B shown below. Note that, at each of the top and bottom of the inverter, the two screws or bolts should<br />
be located in a bilaterally symmetrical position.<br />
2-3
2.3 Wiring<br />
Follow the procedure below. (In the following description, the inverter has already been installed.)<br />
2.3.1 Removing and mounting the front cover and the wiring guide<br />
(1) For inverters of 40 HP or below<br />
First loosen the front cover fixing screw, slide the cover downward holding both sides, tilt it forward, and then pull it<br />
upward, as shown below.<br />
While pressing the wiring guide upward, pull it out and forward.<br />
After carrying out wiring (see Sections 2.3.2 through 2.3.6), put the wiring guide and the front cover back into place<br />
in the reverse order of removal.<br />
Figure 2.4 Removing the Front Cover and the Wiring Guide (e.g <strong>EQ7</strong>-4020-C)<br />
(2) For inverters of 50 to 1000 HP<br />
Loosen the four front cover fixing screws, hold the cover with both hands, slide it upward slightly, and pull it forward,<br />
as shown below.<br />
After carrying out wiring (see Sections 2.3.2 through 2.3.6), align the screw holes provided in the front cover with the<br />
screws on the inverter case, and then put the front cover back into place in the reverse order of removal.<br />
To expose the control printed circuit board (control PCB), open the keypad enclosure.<br />
Figure 2.5 Removing the Front Cover (e.g. <strong>EQ7</strong>-4050-C)<br />
Tightening torque: 15.9 lb-in (1.8 Nm) (M4)<br />
31.0 lb-in (3.5 Nm) (M5)<br />
2-4
2.3.2 Screw specifications and recommended wire sizes<br />
(1) Arrangement of main circuit terminals<br />
The tables and figures given below show the screw specifications and wire sizes. Note that the terminal arrangements<br />
differ depending on the inverter types. In each of the figures, two grounding terminals ( G) are not exclusive to the<br />
power supply wiring (primary circuit) or motor wiring (secondary circuit).<br />
Use crimp terminals covered with an insulation sheath or with an insulation tube.<br />
The recommended wires for main circuit terminals are selected according to the sizes conforming to UL508C.<br />
Three-phase<br />
230 V<br />
Inverter type<br />
Three-phase<br />
460 V<br />
<strong>EQ7</strong>-20P5-C <strong>EQ7</strong>-40P5-C<br />
<strong>EQ7</strong>-2001-C <strong>EQ7</strong>-4001-C<br />
<strong>EQ7</strong>-2002-C <strong>EQ7</strong>-4002-C<br />
<strong>EQ7</strong>-2003-C <strong>EQ7</strong>-4003-C<br />
<strong>EQ7</strong>-2005-C <strong>EQ7</strong>-4005-C<br />
<strong>EQ7</strong>-2007-C <strong>EQ7</strong>-4007-C<br />
<strong>EQ7</strong>-2010-C <strong>EQ7</strong>-4010-C<br />
<strong>EQ7</strong>-2015-C <strong>EQ7</strong>-4015-C<br />
<strong>EQ7</strong>-2020-C <strong>EQ7</strong>-4010-C<br />
<strong>EQ7</strong>-2025-C <strong>EQ7</strong>-4025-C<br />
<strong>EQ7</strong>-2030-C <strong>EQ7</strong>-4030-C<br />
<strong>EQ7</strong>-2040-C <strong>EQ7</strong>-4040-C<br />
<strong>EQ7</strong>-4050-C<br />
<strong>EQ7</strong>-2050-C<br />
<strong>EQ7</strong>-4060-C<br />
<strong>EQ7</strong>-4075-C<br />
<strong>EQ7</strong>-4100-C<br />
<strong>EQ7</strong>-2060-C<br />
<strong>EQ7</strong>-2075-C <strong>EQ7</strong>-4125-C<br />
<strong>EQ7</strong>-2100-C<br />
-- <strong>EQ7</strong>-4150-C<br />
-- <strong>EQ7</strong>-4200-C<br />
Refer to:<br />
Table 2.5 Screw Specifications<br />
Screw<br />
size<br />
Main circuit<br />
terminals<br />
Tightening<br />
torque<br />
lb-in (N·m)<br />
Screw<br />
size<br />
Grounding<br />
terminals<br />
Screw specifications<br />
Tightening<br />
torque<br />
lb-in (N·m)<br />
Auxiliary control<br />
power input<br />
terminals<br />
[R0, T0]<br />
Screw<br />
size<br />
Tightening<br />
torque<br />
lb-in (N·m)<br />
Figure A M3.5 10.6 (1.2) M3.5 10.6 (1.2) -- --<br />
Figure B M4 15.9 (1.8) M4 15.9 (1.8)<br />
Figure C M5 31.0 (3.5) M5 31.0 (3.5)<br />
Figure D M6 51.3 (5.8) M6 51.3 (5.8)<br />
Figure E M8 119 (13.5)<br />
Figure F<br />
Figure G<br />
<strong>EQ7</strong>-2125-C -- Figure M<br />
-- <strong>EQ7</strong>-4250-C<br />
-- <strong>EQ7</strong>-4300-C<br />
Figure H<br />
<strong>EQ7</strong>-2150-C<br />
<strong>EQ7</strong>-4350-C<br />
<strong>EQ7</strong>-4450-C<br />
Figure I<br />
-- <strong>EQ7</strong>-4500-C<br />
-- <strong>EQ7</strong>-4600-C<br />
Figure J<br />
-- <strong>EQ7</strong>-4700-C<br />
-- <strong>EQ7</strong>-4800-C<br />
Figure K<br />
-- <strong>EQ7</strong>-4900-C<br />
-- <strong>EQ7</strong>-41000-C<br />
Figure L<br />
M10 239 (27)<br />
M8 119 (13.5)<br />
M12 425 (48) M10 239 (27)<br />
M3.5 10.6 (1.2)<br />
Screw<br />
size<br />
Auxiliary fan<br />
power input<br />
terminals<br />
[R1, T1]<br />
Tightening<br />
torque<br />
lb-in (N·m)<br />
-- --<br />
M3.5 10.6 (1.2)<br />
When the inverter power is ON, a high voltage is applied to the following terminals.<br />
Main circuit terminals: L1/R, L2/S, L3/T, P1, P(+), N(-), DB, U, V, W, R0, T0, R1, T1, AUX-contact (30A, 30B, 30C,<br />
Y5A, Y5C)<br />
Insulation level<br />
Main circuit - Enclosure : Basic insulation (Overvoltage category III, Pollution degree 2)<br />
Main circuit - Control circuit : Reinforced insulation (Overvoltage category III, Pollution degree 2)<br />
Relay output - Control circuit : Reinforced insulation (Overvoltage category II, Pollution degree 2)<br />
An electric shock may occur.<br />
2-5
Unit: inch (mm)<br />
*<br />
Refer to<br />
Section<br />
2.3.3 (9).<br />
2-6
Power supply<br />
voltage<br />
Single-phase/<br />
Three-phase<br />
230V<br />
Single-phase/<br />
Three-phase<br />
460V<br />
Variable<br />
Torque mode<br />
Table 2.6 Recommended Wire Sizes<br />
Inverter type Recommended wire size AWG (mm 2 )<br />
Constant<br />
Torque mode<br />
CT-Vector<br />
mode<br />
L1/R, L2/S,<br />
L3/T<br />
Grounding<br />
[ G]<br />
U, V, W<br />
DCR<br />
[P1, P(+)]<br />
<strong>EQ7</strong>-20P5-C <strong>EQ7</strong>-20P5-C <strong>EQ7</strong>-20P5-C<br />
14 (2.1)<br />
<strong>EQ7</strong>-2001-C <strong>EQ7</strong>-2001-C <strong>EQ7</strong>-2001-C<br />
14 (2.1)<br />
14 (2.1) 14 (2.1)<br />
<strong>EQ7</strong>-2002-C <strong>EQ7</strong>-2002-C <strong>EQ7</strong>-2002-C 12 (3.3)<br />
<strong>EQ7</strong>-2003-C <strong>EQ7</strong>-2003-C <strong>EQ7</strong>-2003-C<br />
<strong>EQ7</strong>-2005-C <strong>EQ7</strong>-2005-C <strong>EQ7</strong>-2005-C 10 (5.3) 12 (3.3) 10 (5.3)<br />
10 (5.3)<br />
<strong>EQ7</strong>-2007-C <strong>EQ7</strong>-2007-C <strong>EQ7</strong>-2007-C<br />
-- <strong>EQ7</strong>-2010-C<br />
8 (8.4)<br />
<strong>EQ7</strong>-2010-C <strong>EQ7</strong>-2010-C --<br />
8 (8.4)<br />
8 (8.4)<br />
-- -- <strong>EQ7</strong>-2015-C<br />
8 (8.4)<br />
<strong>EQ7</strong>-2015-C <strong>EQ7</strong>-2015-C <strong>EQ7</strong>-2020-C 6 (13.3) 4 (21.2)<br />
<strong>EQ7</strong>-2020-C <strong>EQ7</strong>-2020-C <strong>EQ7</strong>-2025-C 4 (21.2)<br />
6 (13.3) 3 (26.7)<br />
<strong>EQ7</strong>-2025-C <strong>EQ7</strong>-2025-C <strong>EQ7</strong>-2030-C 3 (26.7) 6 (13.3) 4 (21.2) 2 (33.6)<br />
<strong>EQ7</strong>-2030-C <strong>EQ7</strong>-2030-C <strong>EQ7</strong>-2040-C 2 (33.6) 3 (26.7) 1 (42.4)<br />
<strong>EQ7</strong>-2040-C <strong>EQ7</strong>-2040-C --<br />
2 (33.6)<br />
2/0 (67.4) 4 (21.2)<br />
-- <strong>EQ7</strong>-2050-C 1 (42.4)<br />
2/0 (67.4)<br />
<strong>EQ7</strong>-2050-C <strong>EQ7</strong>-2050-C --<br />
1/0 (53.5)<br />
3/0 (85)<br />
-- -- <strong>EQ7</strong>-2060-C<br />
3 (26.7)<br />
4/0 (107.2)<br />
<strong>EQ7</strong>-2060-C <strong>EQ7</strong>-2060-C <strong>EQ7</strong>-2075-C 4/0 (107.2) 4/0 (107.2) 250 (127)<br />
<strong>EQ7</strong>-2075-C <strong>EQ7</strong>-2075-C <strong>EQ7</strong>-2100-C 2/0 (67.4) 2<br />
2 (33.6)<br />
<strong>EQ7</strong>-2100-C <strong>EQ7</strong>-2100-C <strong>EQ7</strong>-2125-C 3/0 (85) 2 3/0 (85) 2<br />
350 (177)<br />
<strong>EQ7</strong>-2125-C <strong>EQ7</strong>-2125-C <strong>EQ7</strong>-2150-C 4/0 (107.2) 2 1 (42.4)<br />
4/0 (107.2) <br />
2<br />
500 (253)<br />
<strong>EQ7</strong>-2150-C <strong>EQ7</strong>-2150-C -- 300 (152) 2 1/0 (53.5)<br />
4/0 (107.2) <br />
300 (152) 2<br />
2<br />
<strong>EQ7</strong>-40P5-C <strong>EQ7</strong>-40P5-C <strong>EQ7</strong>-40P5-C<br />
<strong>EQ7</strong>-4001-C <strong>EQ7</strong>-4001-C <strong>EQ7</strong>-4001-C<br />
14 (2.1)<br />
<strong>EQ7</strong>-4002-C <strong>EQ7</strong>-4002-C <strong>EQ7</strong>-4002-C 14 (2.1)<br />
14 (2.1) 14 (2.1)<br />
<strong>EQ7</strong>-4003-C <strong>EQ7</strong>-4003-C <strong>EQ7</strong>-4003-C<br />
<strong>EQ7</strong>-4005-C <strong>EQ7</strong>-4005-C <strong>EQ7</strong>-4005-C 12 (3.3)<br />
<strong>EQ7</strong>-4007-C <strong>EQ7</strong>-4007-C <strong>EQ7</strong>-4007-C<br />
12 (3.3)<br />
-- -- <strong>EQ7</strong>-4010-C<br />
12 (3.3)<br />
12 (3.3)<br />
<strong>EQ7</strong>-4010-C <strong>EQ7</strong>-4010-C <strong>EQ7</strong>-4015-C 10 (5.3) 10 (5.3)<br />
10 (5.3)<br />
<strong>EQ7</strong>-4015-C <strong>EQ7</strong>-4015-C --<br />
10 (5.3)<br />
-- -- <strong>EQ7</strong>-4020-C 8 (8.4)<br />
8 (8.4)<br />
<strong>EQ7</strong>-4020-C <strong>EQ7</strong>-4020-C --<br />
8 (8.4)<br />
-- -- <strong>EQ7</strong>-4025-C<br />
8 (8.4)<br />
<strong>EQ7</strong>-4025-C <strong>EQ7</strong>-4025-C <strong>EQ7</strong>-4030-C 6 (13.3)<br />
6 (13.3) 6 (13.3)<br />
<strong>EQ7</strong>-4030-C <strong>EQ7</strong>-4030-C <strong>EQ7</strong>-4040-C<br />
<strong>EQ7</strong>-4040-C <strong>EQ7</strong>-4040-C --<br />
4 (21.2)<br />
4 (21.2)<br />
-- -- <strong>EQ7</strong>-4050-C<br />
6 (13.3)<br />
<strong>EQ7</strong>-4050-C <strong>EQ7</strong>-4050-C <strong>EQ7</strong>-4060-C 3 (26.7) 2 (33.6)<br />
2 (33.6)<br />
<strong>EQ7</strong>-4060-C <strong>EQ7</strong>-4060-C <strong>EQ7</strong>-4075-C 2 (33.6) 1 (42.4)<br />
<strong>EQ7</strong>-4075-C <strong>EQ7</strong>-4075-C <strong>EQ7</strong>-4100-C<br />
1/0 (53.5)<br />
<strong>EQ7</strong>-4100-C <strong>EQ7</strong>-4100-C -- 1/0 (53.5) 1/0 (53.5)<br />
4 (21.2)<br />
-- -- <strong>EQ7</strong>-4125-C<br />
2/0 (67.4) 4/0 (107.2)<br />
<strong>EQ7</strong>-4125-C <strong>EQ7</strong>-4125-C <strong>EQ7</strong>-4150-C 3/0 (85)<br />
<strong>EQ7</strong>-4150-C <strong>EQ7</strong>-4150-C <strong>EQ7</strong>-4200-C<br />
1/0 (53.5) 4/0 (107.2)<br />
1/0 (53.5) 3 (26.7)<br />
<strong>EQ7</strong>-4200-C <strong>EQ7</strong>-4200-C <strong>EQ7</strong>-4250-C 2 (33.6) 250 (127)<br />
<strong>EQ7</strong>-4250-C <strong>EQ7</strong>-4250-C <strong>EQ7</strong>-4300-C 3/0 (85) 2 2 (33.6) 3/0 (85) 2 350 (177)<br />
<strong>EQ7</strong>-4300-C <strong>EQ7</strong>-4300-C <strong>EQ7</strong>-4350-C 4/0 (107.2) 2 1 (42.4) 250 (127) 2 600 (304)<br />
<strong>EQ7</strong>-4350-C <strong>EQ7</strong>-4350-C <strong>EQ7</strong>-4450-C 250 (127) 2<br />
300 (152) 2 4/0 (107.2) <br />
1/0 (53.5)<br />
2<br />
-- <strong>EQ7</strong>-4450-C -- 300 (152) 2 350 (177) 2 250 (127) 2<br />
<strong>EQ7</strong>-4450-C -- -- 400 (203) 2<br />
400 (203) 2 300 (152) 2<br />
-- -- <strong>EQ7</strong>-4500-C 250 (127) 2 2/0 (67.4) 300 (152) 2<br />
-- <strong>EQ7</strong>-4500-C <strong>EQ7</strong>-4600-C 300 (152) 2 350 (177) 2 350 (177) 2<br />
<strong>EQ7</strong>-4500-C <strong>EQ7</strong>-4600-C <strong>EQ7</strong>-4700-C 400 (203) 2<br />
400 (203) 2 400 (203) 2<br />
3/0 (85)<br />
<strong>EQ7</strong>-4600-C <strong>EQ7</strong>-4700-C <strong>EQ7</strong>-4800-C 500 (253) 2 500 (253) 2 500 (253) 2<br />
<strong>EQ7</strong>-4700-C <strong>EQ7</strong>-4800-C -- 600 (304) 2<br />
600 (304) 2 300 (152) 3<br />
4/0 (107.2)<br />
<strong>EQ7</strong>-4800-C -- <strong>EQ7</strong>-4900-C 350 (177) 3 400 (203) 3 400 (203) 3<br />
<strong>EQ7</strong>-4900-C -- <strong>EQ7</strong>-41000-C 500 (253) 3 250 (127) 600 (304) 3 600 (304) 3<br />
<strong>EQ7</strong>-41000-C -- -- 600 (304) 3 350 (177) 500 (253) 4 400 (203) 4<br />
Note: The wire sizes above are specified for 75C (167F) copper (Cu) wire.<br />
Braking<br />
resistor<br />
[P(+), DB]<br />
10 (5.3)<br />
--<br />
10 (5.3)<br />
--<br />
2-7
Terminals common to all inverters<br />
Auxiliary control power input terminals [R0] and [T0]<br />
Auxiliary fan power input terminals [R1] and [T1]<br />
Recommended wire size<br />
AWG (mm 2 )<br />
14 (2.1)<br />
2 HP or above<br />
Remarks<br />
230 V series with 60 HP or above<br />
460 V series with 125 HP or above<br />
(2) Arrangement of control circuit terminals (common to all inverter types)<br />
Terminal type Screw size: M3 (0.7 N·m) Spring (screwless)<br />
Recommended wiring size<br />
0.65 to 0.82 (AWG 19 or<br />
(mm 2 0.75<br />
)*<br />
18)<br />
* Using wires exceeding the recommended sizes may lift the front cover<br />
depending upon the number of wires used, impeding keypad's normal<br />
operation.<br />
2.3.3 Wiring precautions<br />
Follow the rules below when performing wiring for the inverter.<br />
(1) Make sure that the source voltage is within the rated voltage range specified on the nameplate.<br />
(2) Be sure to connect the three-phase power wires to the main circuit power input terminals L1/R, L2/S and L3/T of<br />
the inverter. If the power wires are connected to other terminals, the inverter will be damaged when the power is<br />
turned ON.<br />
(3) Always connect the grounding terminal to prevent electric shock, fire or other disasters and to reduce electric<br />
noise.<br />
(4) Use crimp terminals covered with insulated sleeves for the main circuit terminal wiring to ensure a reliable<br />
connection.<br />
(5) Keep the power supply wiring (primary circuit) and motor wiring (secondary circuit) of the main circuit, and control<br />
circuit wiring as far away as possible from each other.<br />
(6) After removing a screw from the main circuit terminal block, be sure to restore the screw even if no wire is<br />
connected.<br />
(7) Use the wiring guide to separate wiring. For inverters of 5 HP or below, the wiring guide separates the main circuit<br />
wires and the control circuit wires. For those of 7.5 to 40 HP, it separates the upper and lower main circuit wires,<br />
and control circuit wires. Be careful about the wiring order.<br />
e.g. <strong>EQ7</strong>-4005-C<br />
e.g. <strong>EQ7</strong>-2020-C<br />
• Preparing for the wiring guide<br />
Inverters of 20 to 40 HP (three-phase, 230 V series) are sometimes lacking in wiring space for main circuit wires<br />
depending upon the wire materials used. To assure a sufficient wiring space, remove the clip-off sections (see<br />
below) as required with a nipper. Note that the enclosure rating of IP20 may not be ensured when the wiring guide<br />
itself is removed to secure a space for thick main circuit wiring.<br />
2-8
Before removal of clip-off sections<br />
Wiring Guide (e.g. <strong>EQ7</strong>-4025-C)<br />
After removal of clip-off sections<br />
(8) In some types of inverters, the wires from the main circuit terminal block cannot be routed straight into the terminal.<br />
Route such wires as shown below so that the front cover can be reinstalled.<br />
(9) For inverters of 900 and 1000 HP, two L2/S input terminals are arranged vertically to the terminal block. When<br />
connecting wires to these terminals, use the bolts, washers and nuts that come with the inverter, as shown below.<br />
2-9
• When wiring the inverter to the power source, insert a recommended molded case circuit breaker (MCCB) or<br />
residual-current-operated protective device (RCD)/earth leakage circuit breaker (ELCB) (with overcurrent<br />
protection) in the path of each pair of power lines to inverters. Use the recommended devices within the<br />
recommended current capacity.<br />
• Be sure to use wires in the specified size.<br />
• Tighten terminals with specified torque.<br />
Otherwise, a fire could occur.<br />
• When there is more than one combination of an inverter and motor, do not use a multiconductor cable for the<br />
purpose of running the leads together.<br />
• Do not connect a surge killer to the inverter's output (secondary) circuit.<br />
Doing so could cause a fire.<br />
• Ground the inverter in compliance with the national or local electric code.<br />
• Be sure to ground the inverter's grounding terminals G.<br />
Otherwise, an electric shock or fire could occur.<br />
• Qualified electricians should carry out wiring.<br />
• Be sure to perform wiring after turning the power OFF.<br />
Otherwise, electric shock could occur.<br />
• Be sure to perform wiring after installing the inverter unit.<br />
Otherwise, electric shock or injuries could occur.<br />
• Ensure that the number of input phases and the rated voltage of the product match the number of phases and<br />
the voltage of the AC power supply to which the product is to be connected.<br />
Otherwise, a fire or an accident could occur.<br />
• Do not connect the power source wires to inverter output terminals (U, V, and W).<br />
Doing so could cause fire or an accident.<br />
2-10
2.3.4 Wiring of main circuit terminals and grounding terminals<br />
This section shows connection diagrams with the Enable input function used.<br />
SINK mode input by factory default<br />
2-11
*1 Install a recommended molded case circuit breaker (MCCB) or residual-current-operated protective device<br />
(RCD)/earth leakage circuit breaker (ELCB) (with overcurrent protection function) in the primary circuit of the<br />
inverter to protect wiring. Ensure that the circuit breaker capacity is equivalent to or lower than the recommended<br />
capacity.<br />
*2 Install a magnetic contactor (MC) for each inverter to separate the inverter from the power supply, apart from the<br />
MCCB or RCD/ELCB, when necessary.<br />
Connect a surge absorber in parallel when installing a coil such as the MC or solenoid near the inverter.<br />
*3 The R0 and T0 terminals are provided for inverters with a capacity of 2 HP or above.<br />
To retain an alarm output signal ALM issued on inverter's programmable output terminals by the protective function<br />
or to keep the keypad alive even if the main power has shut down, connect these terminals to the power supply<br />
lines. Without power supply to these terminals, the inverter can run.<br />
*4 Normally no need to be connected. Use these terminals when the inverter is equipped with a high power-factor,<br />
regenerative PWM converter (RHC series).<br />
*5 When connecting an optional DC reactor (DCR), remove the jumper bar from the terminals P1 and P(+).<br />
<strong>EQ7</strong>-2100-C/<strong>EQ7</strong>-4100-C and larger HP models require a DCR (packed with the <strong>EQ7</strong>) to be connected.<br />
Use a DCR when the capacity of the power supply transformer exceeds 500 kVA and is 10 times or more the<br />
inverter rated capacity, or when there are thyristor-driven loads in the same power supply line.<br />
*6 <strong>EQ7</strong>-2015-C/<strong>EQ7</strong>-4015-C and smaller have a built-in braking resistor (DBR) between the terminals P(+) and DB.<br />
When connecting an external braking resistor (DBR), be sure to disconnect the built-in one.<br />
*7 A grounding terminal for a motor. Use this terminal if needed.<br />
*8 For control signal wires, use twisted or shielded-twisted wires. When using shielded-twisted wires, connect the<br />
shield of them to the common terminals of the control circuit. To prevent malfunction due to noise, keep the control<br />
circuit wiring away from the main circuit wiring as far as possible (recommended: 10 cm/3.9 inches or more). Never<br />
install them in the same wire duct. When crossing the control circuit wiring with the main circuit wiring, set them at<br />
right angles.<br />
*9 The connection diagram shows factory default functions assigned to digital input terminals [X1] to [X7], [FWD] and<br />
[REV], transistor output terminals [Y1] to [Y4], and relay contact output terminals [Y5A/C] and [30A/B/C].<br />
*10 Switching connectors in the main circuits. For details, refer to "<strong>Instruction</strong> manual section 2.3.4 Switching<br />
connectors" later in this section.<br />
*11 Slide switches on the control printed circuit board (control PCB). Use these switches to customize the inverter<br />
operations. For details, refer to Section 2.3.6 "Setting up the slide switches."<br />
*12 When the Enable input function is not to be used, keep terminals [EN1]-[PLC] and terminals [EN2]-[PLC]<br />
short-circuited using jumper wires. For opening and closing the hardware circuit between terminals [EN1] and [PLC]<br />
and between [EN2] and [PLC], use safety components such as safety relays and safety switches that comply with<br />
EN954-1 or EN ISO13849-1 Category 3 or higher.<br />
*13 To bring the inverter into compliance with the European Standard, Low Voltage Directive EN61800-5-1, be sure to<br />
insert the specified fuse in the primary circuit of the inverter.<br />
Primary grounding terminal ( G) for inverter enclosure<br />
Two grounding terminals ( G) are not exclusive to the power supply wiring (primary circuit) or motor wiring (secondary<br />
circuit). Be sure to ground either of the two grounding terminals for safety and noise reduction. The inverter is designed<br />
for use with safety grounding to avoid electric shock, fire and other disasters.<br />
The grounding terminal for inverter enclosure should be grounded as follows:<br />
1) Ground the inverter in compliance with the national or local electric code.<br />
2) Use a thick grounding wire with a large surface area and keep the wiring length as short as possible.<br />
Inverter output terminals U, V, and W and secondary grounding terminals ( G) for motor<br />
Inverter’s output terminals should be connected as follows:<br />
1) Connect the three wires of the 3-phase motor to terminals U, V, and W, aligning the phases each other.<br />
2) Connect the secondary grounding wire to the grounding terminal ( G).<br />
When there is more than one combination of an inverter and motor, do not use a multi-conductor cable for the<br />
purpose of running the leads together.<br />
2-12
DC reactor terminals P1 and P (+)<br />
Connect a DC reactor (DCR) to these terminals for power factor correction.<br />
1) Remove the jumper bar from terminals P1 and P(+).<br />
2) Connect an optional DCR to those terminals.<br />
• The wiring length should be 33 ft (10 m) or below.<br />
• Do not remove the jumper bar when a DCR is not used.<br />
• The <strong>EQ7</strong>-2100-C / <strong>EQ7</strong>-4100-C and higher types come with a DCR. Be sure to connect the DCR.<br />
• If a PWM converter is connected to the inverter, no DCR is required.<br />
Be sure to connect an optional DC reactor (DCR) when the capacity of the power supply transformer exceeds 500<br />
kVA and is 10 times or more the inverter rated capacity.<br />
Otherwise, a fire could occur.<br />
DC braking resistor terminals P(+) and DB (for inverters of 40 HP or below)<br />
Capacity<br />
(HP)<br />
Braking transistor<br />
Built-in DC braking<br />
resistor (DBR)<br />
Optional devices<br />
Option mounting<br />
steps required<br />
0.5 to 15 Built-in Built-in<br />
External DC braking resistor<br />
(with a larger capacity)<br />
1), 2), 3)<br />
20 to 40 Built-in None External DC braking resistor 2), 3)<br />
For inverters of 15 HP or below, if the capacity of the built-in DC braking resistor (DBR) is insufficient since the inverter<br />
undergoes frequent start/stop or heavy inertial load, mount an optional external DC braking resistor (DBR) with a larger<br />
capacity to increase the braking capability, using the following steps. Before mounting the external DBR, remove the<br />
built-in DBR.<br />
1) For inverters of 0.5 to 5 HP, disconnect the wiring of the built-in DBR from terminals P(+) and DB; for those of 7.5 to<br />
15 HP, disconnect the wiring from terminal DB and the internal relay terminal (see the figure below).<br />
Insulate the terminals of the disconnected wires with insulating tape or other materials.<br />
2) Connect an optional DBR to terminals P(+) and DB.<br />
The internal relay terminal on inverters of 7.5 to 15 HP is left unused.<br />
3) Arrange the DBR and inverter so that the wiring length comes to 16 ft (5 m) or less and twist the two DBR wires or<br />
route them together in parallel.<br />
When connecting a DC braking resistor (DBR), never connect it to terminals other than terminals P(+) and DB.<br />
Otherwise, a fire could occur.<br />
2-13
DC link bus terminals P(+) and N(-)<br />
Capacity<br />
(HP)<br />
Braking<br />
transistor<br />
Built-in DC braking<br />
resistor (DBR)<br />
50 to 1000 None None<br />
Optional devices<br />
Braking unit<br />
DC braking resistor<br />
(DBR)<br />
Devices and terminals<br />
Inverter - Braking unit:<br />
P(+) and N(-)<br />
Braking unit -DBR:<br />
P(+) and DB<br />
1) Connecting an optional braking unit or DC braking resistor (DBR)<br />
Inverters of 50 HP or above require both a braking unit and DBR.<br />
Connect the terminals P(+) and N(-) of a braking unit to those on the inverter. Arrange the inverter and the braking<br />
unit so that the wiring length comes to 16 ft (5 m) or less and twist the two wires or route them together in parallel.<br />
Next, connect the terminals P(+) and DB of a DBR to those on the braking unit. Arrange the braking unit and DBR<br />
so that the wiring length comes to 33 ft (10 m) or less and twist the two wires or route them together in parallel.<br />
For details about the wiring, refer to the Braking Unit <strong>Instruction</strong> <strong>Manual</strong>.<br />
2) Connecting other external devices<br />
A DC link bus of other inverter(s) or a PWM converter is connectable to these terminals.<br />
When you need to use the DC link bus terminals P(+) and N(-), consult your <strong>TECO</strong>-<strong>Westinghouse</strong> <strong>Motor</strong><br />
<strong>Company</strong> representative.<br />
Switching connectors<br />
• Power switching connectors (CN UX) (on inverters of 125 HP or above for 460 V)<br />
Inverters of 125 HP or above for 460 V are equipped with a set of switching connectors (male) which should be<br />
configured according to the power source voltage and frequency. By factory default, a jumper (female connector) is set<br />
to U1. If the power supply to the main power inputs (L1/R, L2/S, L3/T) or the auxiliary fan power input terminals (R1,<br />
T1) matches the conditions listed below, change the jumper to U2.<br />
For the switching instructions, see Figures 2.6 and 2.7.<br />
(a) <strong>EQ7</strong>-4125-C to <strong>EQ7</strong>-4200-C<br />
Connector<br />
configuration<br />
CN UX (red)<br />
CN UX (red)<br />
Power source voltage<br />
398 to 440 V/50 Hz, 430 to 480 V/60 Hz<br />
(Factory default)<br />
380 to 398 V/50 Hz<br />
380 to 430 V/60 Hz<br />
(b) <strong>EQ7</strong>-4250-C to <strong>EQ7</strong>-41000-C<br />
Connector configuration<br />
CN UX (red)<br />
CN UX (red)<br />
Power source voltage<br />
398 to 440 V/50 Hz, 430 to 480 V/60 Hz<br />
(Factory default)<br />
380 to 398 V/50 Hz,<br />
380 to 430 V/60 Hz<br />
The allowable power input voltage fluctuation is within -15% to +10% of the power source voltage.<br />
2-14
• Fan power supply switching connectors (CN R and CN W) (on inverters of 60 HP or above for 230 V and<br />
those of 125 HP or above for 460 V)<br />
The standard <strong>EQ7</strong> series accepts DC-linked power input in combination with a PWM converter. Inverters of 60 HP or<br />
above for 230 V and those of 125 HP or above for 460 V, however, contain AC-driven components such as AC fans. To<br />
supply AC power to those components, exchange the CN R and CN W connectors as shown below and connect the<br />
AC power line to the auxiliary fan power input terminals (R1, T1).<br />
For the switching instructions, see Figures 2.6 and 2.7.<br />
(a) <strong>EQ7</strong>-2060-C to <strong>EQ7</strong>-2125-C, <strong>EQ7</strong>-4125-C to <strong>EQ7</strong>-4200-C<br />
Connector configuration<br />
CN R (red)<br />
CN W (white)<br />
CN W (white)<br />
CN R (red)<br />
Use conditions<br />
When not using terminal R1 or T1<br />
(Factory default)<br />
When using terminals R1 and T1<br />
• Feeding the DC-linked power<br />
• Combined with a PWM converter<br />
b) <strong>EQ7</strong>-2150-C, <strong>EQ7</strong>-4150-C to <strong>EQ7</strong>-41000-C<br />
Connector<br />
configuration<br />
Use conditions<br />
CN W<br />
(white)<br />
When not using terminal R1 or T1<br />
(Factory default)<br />
CN R<br />
(red)<br />
CN R<br />
(red)<br />
CN W<br />
(white)<br />
When using terminals R1 and T1<br />
• Feeding the DC-linked power<br />
• Combined with a PWM converter<br />
By factory default, the fan power supply switching connectors CN R and CN W are set on the FAN and NC<br />
positions, respectively. Do not exchange them unless you drive the inverter with a DC-linked power supply.<br />
Wrong configuration of these switching connectors cannot drive the cooling fans, causing a heat sink overheat<br />
alarm 0h1 or a charger circuit alarm pbf.<br />
• Location of the switching connectors<br />
The switching connectors are located on the power printed circuit board (power PCB) as shown below.<br />
Keypad enclosure<br />
Power switching<br />
connectors (CN UX)<br />
Fan power<br />
supply switching<br />
connectors<br />
(CN R and<br />
CN W)<br />
Auxiliary fan<br />
power input<br />
terminals<br />
Auxiliary<br />
power input<br />
terminals<br />
(a) <strong>EQ7</strong>-2060-C to <strong>EQ7</strong>-2125-C,<br />
<strong>EQ7</strong>-4125-C to <strong>EQ7</strong>-4200-C<br />
Auxiliary power input<br />
terminals<br />
Power PCB<br />
Auxiliary fan power input<br />
terminals<br />
Power switching<br />
connectors (CN UX)<br />
(b) <strong>EQ7</strong>-2150-C,<br />
<strong>EQ7</strong>-4250-C to <strong>EQ7</strong>-41000-C<br />
Figure 2.6 Location of Switching Connectors and Auxiliary Power Input Terminals<br />
Fan power<br />
supply<br />
switching<br />
connectors<br />
(CN R and<br />
CN W)<br />
2-15
To remove each of the jumpers, pinch its upper side<br />
between your fingers, unlock its fastener, and pull it up.<br />
When mounting it, fit the jumper over the connector until it<br />
snaps into place.<br />
Figure 2.7 Inserting/Removing the Jumpers<br />
Main circuit power input terminals L1/R, L2/S, and L3/T (three-phase input)<br />
The three-phase input power lines are connected to these terminals.<br />
1) For safety, make sure that the molded case circuit breaker (MCCB) or magnetic contactor (MC) is turned OFF<br />
before wiring the main circuit power input terminals.<br />
2) Connect the main circuit power supply wires (L1/R, L2/S and L3/T) to the input terminals of the inverter via an<br />
MCCB or residual-current-operated protective device (RCD)/earth leakage circuit breaker (ELCB)*, and an MC if<br />
necessary.<br />
It is not necessary to align phases of the power supply wires and the input terminals of the inverter with each other.<br />
* With overcurrent protection<br />
It is recommended to insert a manually operable magnetic contactor (MC) that allows you to disconnect the<br />
inverter from the power supply in an emergency (e.g., when the protective function is activated), preventing a<br />
failure or accident from causing secondary disasters.<br />
Auxiliary control power input terminals R0 and T0 (on inverters of 2 HP or above)<br />
In general, the inverter runs normally without power supplied to the auxiliary control power input terminals R0 and T0. If<br />
the inverter main power is shut down, however, no power is supplied to the control circuit so that the inverter cannot<br />
issue a variety of output signals or display on the keypad.<br />
To retain an alarm output signal ALM issued on inverter's programmable output terminals by the protective function or<br />
to keep the keypad alive even if the main power has shut down, connect the auxiliary control power input terminals R0<br />
and T0 to the power supply lines. If a magnetic contactor (MC) is installed in the inverter's primary circuit, connect the<br />
primary circuit of the MC to these terminals R0 and T0.<br />
Terminal rating:<br />
200 to 240 VAC, 50/60 Hz, Maximum current 1.0 A (230 V series with 40 HP or below)<br />
200 to 230 VAC, 50/60 Hz, Maximum current 1.0 A (230 V series with 50 HP or above)<br />
380 to 480 VAC, 50/60 Hz, Maximum current 0.5 A (460 V series)<br />
When introducing a residual-current-operated protective device (RCD)/earth leakage circuit breaker (ELCB),<br />
connect its output (secondary) side to terminals R0 and T0. Connecting its input (primary) side to those<br />
terminals causes the RCD/ELCB to malfunction since the input power voltage to the inverter is three-phase but<br />
the one to terminals R0 and T0 is single-phase. To avoid such problems, be sure to insert an isolation<br />
transformer or auxiliary B contacts of a magnetic contactor in the location shown in Figure 2.8.<br />
Figure 2.8 Connection Example of Residual-current-operated Protective Device (RCD)/<br />
Earth Leakage Circuit Breaker (ELCB)<br />
2-16
When connecting a PWM converter with an inverter, do not connect the power supply line directly to terminals<br />
R0 and T0. If a PWM is to be connected, insert an isolation transformer or auxiliary B contacts of a magnetic<br />
contactor at the power supply side.<br />
For connection examples at the PWM converter side, refer to the PWM Converter <strong>Instruction</strong> <strong>Manual</strong>.<br />
Figure 2.9 Connection Example of PWM Converter<br />
Auxiliary fan power input terminals R1 and T1<br />
Inverters of 60 HP or above for 230 V and those of 125 HP or above for 460 V are equipped with terminals R1 and T1.<br />
Only if the inverter works with the DC-linked power input whose source is a PWM converter, these terminals are used<br />
to feed AC power to the fans, while they are not used in any power system of ordinary configuration.<br />
In this case, set up the fan power supply switching connectors (CN R and CN W).<br />
Terminal rating:<br />
200 to 220 VAC/50 Hz, 200 to 230 VAC/60 Hz, Maximum current 1.0 A (230 V series with 60 HP or above)<br />
380 to 440 VAC/50 Hz, 380 to 480 VAC/60 Hz, Maximum current 1.0 A (460 V series with 125 to 800 HP)<br />
380 to 440 VAC/50 Hz, 380 to 480 VAC/60 Hz, Maximum current 2.0 A (460 V series with 900 and 1000 HP)<br />
2-17
2.3.5 Wiring for control circuit terminals<br />
This section shows connection diagrams with the Enable input function used.<br />
In general, the covers of the control signal wires are not specifically designed to withstand a high voltage (i.e.,<br />
reinforced insulation is not applied). Therefore, if a control signal wire comes into direct contact with a live<br />
conductor of the main circuit, the insulation of the cover might break down, which would expose the signal wire<br />
to a high voltage of the main circuit. Make sure that the control signal wires will not come into contact with live<br />
conductors of the main circuit.<br />
Failure to observe these precautions could cause electric shock or an accident.<br />
Noise may be emitted from the inverter, motor and wires.<br />
Take appropriate measures to prevent the nearby sensors and devices from malfunctioning due to such noise.<br />
An accident could occur.<br />
• Connecting/disconnecting wires to/from a control circuit terminal of spring (screwless) type<br />
Strip the wire end by 8 to 10 mm/0.31 to 0.39 inch as shown below.<br />
Strip length of wire end<br />
Type of screwdriver (tip shape)<br />
8 to 10 mm<br />
0.31 to 0.39 inch<br />
Flat (0.6 3.5 mm/0.024 0.14 inch)<br />
For strand wires, the strip length specified above should apply after twisting of them.<br />
If the strip length is out of the specified range, the wire may not be firmly clamped or may be<br />
short-circuited with other wires.<br />
Twist the end of the stripped wires for easy insertion and insert it firmly into the wire inlet on the control circuit<br />
terminal. If the insertion is difficult, hold down the clamp release button on the terminal with a flat screwdriver.<br />
When disconnecting the wires from the terminal, hold down the clamp release button on the terminal with a flat<br />
screwdriver and pull out the wires. Connecting wire to terminal disconnecting wire from terminal<br />
Wires<br />
Flat screwdriver<br />
Wire inlet<br />
Wires<br />
Clamp release button<br />
2-18
Table 2.7 lists the symbols, names and functions of the control circuit terminals. The wiring to the control circuit<br />
terminals differs depending upon the setting of the function codes, which reflects the use of the inverter. Route wires<br />
properly to reduce the influence of noise.<br />
Table 2.7 Symbols, Names and Functions of the Control Circuit Terminals<br />
Classification<br />
Symbol Name Functions<br />
[13] Power supply<br />
for the<br />
potentiometer<br />
Power supply (+10 VDC) for an external frequency command potentiometer<br />
(Variable resistor: 1 to 5k)<br />
The potentiometer of 1/2 W rating or more should be connected.<br />
[12] Analog<br />
setting<br />
voltage input<br />
(1) The frequency is commanded according to the external voltage input.<br />
• 0 to 10 VDC/0 to 100% (Normal operation)<br />
• +10 to 0 VDC/0 to 100% (Inverse operation)<br />
(2) In addition to frequency setting, PID command, PID feedback signal, auxiliary frequency<br />
command setting, ratio setting, torque limiter level setting, or analog input monitor can be<br />
assigned to this terminal.<br />
(3) Hardware specifications<br />
• Input impedance: 22k<br />
• The maximum input is 15 VDC, however, the voltage higher than 10 VDC is handled<br />
as 10 VDC.<br />
• Inputting a bipolar analog voltage (0 to 10 VDC) to terminal [12] requires setting function<br />
code C35 to "0."<br />
Analog input<br />
[C1]<br />
[V2]<br />
Analog<br />
setting<br />
current input<br />
PTC/NTC<br />
thermistor<br />
input<br />
Analog<br />
setting<br />
voltage input<br />
(1) The frequency is commanded according to the external current input.<br />
• 4 to 20 mA DC/0 to 100% (Normal operation)<br />
• 20 to 4 mA DC/0 to 100 % (Inverse operation)<br />
(2) In addition to frequency setting, PID command, PID feedback signal, auxiliary frequency<br />
command setting, ratio setting, torque limiter level setting, or analog input monitor can be<br />
assigned to this terminal.<br />
(3) Hardware specifications<br />
• Input impedance: 250<br />
• The maximum input is +30 mA DC, however, the current larger than +20 mA DC is<br />
handled as +20 mA DC.<br />
(1) Connects PTC (Positive Temperature<br />
Coefficient)/NTC (Negative Temperature<br />
Coefficient) thermistor for motor<br />
protection. Ensure that the slide switch<br />
SW5 on the control PCB is turned to the<br />
PTC/NTC position (see section 2.3.6<br />
"Setting up the slide switches").<br />
The figure shown at the right illustrates the<br />
internal circuit diagram where SW5<br />
(switching the input of terminal [C1]<br />
between C1 and PTC/NTC) is turned to<br />
the PTC/NTC position. For details on<br />
SW5, refer to <strong>Instruction</strong> manual section<br />
2.3.6 "Setting up the slide switches." In<br />
this case, you must change data of the<br />
function code H26.<br />
Figure 2.10 Internal Circuit Diagram<br />
(SW5 Selecting PTC/NTC)<br />
(1) The frequency is commanded according to the external voltage input.<br />
• 0 to 10 VDC/0 to 100 % (Normal operation)<br />
• +10 to 0 VDC/0 to 100% (Inverse operation)<br />
(2) In addition to frequency setting, PID command, PID feedback signal, auxiliary frequency<br />
command setting, ratio setting, torque limiter level setting, or analog input monitor can be<br />
assigned to this terminal.<br />
(3) Hardware specifications<br />
• Input impedance: 22k<br />
• The maximum input is 15 VDC, however, the voltage higher than 10 VDC is handled<br />
as 10 VDC.<br />
• Inputting a bipolar analog voltage (0 to 10 VDC) to terminal [V2] requires setting<br />
function code C45 to "0."<br />
[11] Analog<br />
common<br />
Common for analog input/output signals ([13], [12], [C1], [V2], [FM1] and [FM2]).<br />
Isolated from terminals [CM] and [CMY].<br />
2-19
Table 2.7 Symbols, Names and Functions of the Control Circuit Terminals (Continued)<br />
Classification<br />
Symbol Name Functions<br />
- Since low level analog signals are handled, these signals are especially susceptible to the external noise<br />
effects. Route the wiring as short as possible (within 66 ft (20 m)) and use shielded wires. In principle, ground<br />
the shielded sheath of wires; if effects of external inductive noises are considerable, connection to terminal [11]<br />
may be effective. As shown in Figure 2.11, be sure to ground the single end of the shield to enhance the shield<br />
effect.<br />
- Use a twin-contact relay for low level signals if the relay is used in the control circuit. Do not connect the relay's<br />
contact to terminal [11].<br />
- When the inverter is connected to an external device outputting the analog signal, the external device may<br />
malfunction due to electric noise generated by the inverter. If this happens, according to the circumstances,<br />
connect a ferrite core (a toroidal core or equivalent) to the device outputting the analog signal or connect a<br />
capacitor having the good cut-off characteristics for high frequency between control signal wires as shown in<br />
Figure 2.12.<br />
- Do not apply a voltage of +7.5 VDC or higher to terminal [C1]. Doing so could damage the internal control<br />
circuit.<br />
Figure 2.11 Connection of Shielded Wire<br />
Figure 2.12 Example of Electric Noise Reduction<br />
Digital input<br />
[X1]<br />
[X2]<br />
[X3]<br />
Digital input 1<br />
Digital input 2<br />
Digital input 3<br />
(1) Various signals such as "Coast to a stop," "Enable external alarm trip," and "Select<br />
multi-frequency" can be assigned to terminals [X1] to [X7], [FWD] and [REV] by setting<br />
function codes E01 to E07, E98, and E99. For details, refer to Chapter 4, Section 4.2<br />
"Details of Function Codes."<br />
(2) Input mode, i.e. SINK/SOURCE, is changeable by using the slide switch SW1. (Refer to<br />
[X4] Digital input 4<br />
<strong>Instruction</strong> manual section 2.3.6 "Setting up the slide switches.")<br />
[X5] Digital input 5 (3) Switches the logic value (1/0) for ON/OFF of the terminals [X1] to [X7], [FWD], or [REV]. If<br />
[X6] Digital input 6 the logic value for ON of the terminal [X1] is 1 in the normal logic system, for example, OFF<br />
is 1 in the negative logic system and vice versa.<br />
[X7]<br />
[FWD]<br />
Digital input 7<br />
Run forward<br />
(4) Digital input terminal [X7] can be defined as a pulse train input terminal with the function<br />
codes.<br />
command Maximum wiring length 20 m/66 ft<br />
[REV]<br />
Run reverse<br />
command<br />
Maximum input pulse 30 kHz: When connected to a pulse generator with open collector<br />
transistor output<br />
(Needs a pull-up or pull-down resistor. See notes on page<br />
2-22.)<br />
100 kHz: When connected to a pulse generator with complementary<br />
transistor output<br />
For the settings of the function codes, refer to Chapter 4 "FUNCTION CODES."<br />
(Digital input circuit specifications)<br />
Figure 2.13 Digital Input Circuit<br />
Operating<br />
voltage<br />
(SINK)<br />
Operating<br />
voltage<br />
(SOURCE)<br />
Operating current at ON<br />
(Input voltage is at 0 V)<br />
(For [X7])<br />
Item Min. Max.<br />
Allowable leakage current at<br />
OFF<br />
ON level 0 V 2 V<br />
OFF level 22 V 27 V<br />
ON level 22 V 27 V<br />
OFF level 0 V 2 V<br />
2.5 mA 5 mA<br />
(9.7 mA) (16 mA)<br />
<br />
0.5 mA<br />
2-20
Table 2.7 Symbols, Names and Functions of the Control Circuit Terminals (Continued)<br />
Classification<br />
Symbol Name Functions<br />
[EN1]<br />
[EN2]<br />
Enable inputs<br />
(1) Turning off the circuit between terminals [EN1] and [PLC] or terminals [EN2] and [PLC]<br />
stops the inverter's output transistor. (Safe Torque Off: STO)<br />
(2) These terminals are exclusively used for the source mode input and cannot be switched to<br />
the sink mode.<br />
(3) If either one of these input terminals is kept OFF for 50 ms or more, the inverter interprets it<br />
as a discrepancy, causing an alarm ecf. This alarm state can be cleared only by turning the<br />
inverter power off and on clears this alarm.<br />
For details of connection to this terminal and precautions, refer to User <strong>Manual</strong> Chapter 9,<br />
Section 9.4 "Compliance with EN954-1, Category 3."<br />
<br />
[PLC]<br />
[EN1]<br />
[EN2]<br />
<br />
5.4k<br />
5.4k<br />
+24 VDC<br />
Photocoupler<br />
Operating<br />
voltage<br />
Item Min. Max.<br />
Operating current at ON<br />
(Input voltage is at 27 V)<br />
Allowable leakage current at<br />
OFF<br />
ON level 22 V 27 V<br />
OFF level 0 V 2 V<br />
2.5 mA 5 mA<br />
<br />
0.5 mA<br />
[CM]<br />
Digital input<br />
[PLC]<br />
[CM]<br />
PLC signal<br />
power<br />
Digital input<br />
common<br />
(1) Connects to the power supply of PLC output signals.<br />
Rated voltage: +24 VDC (Allowable range: +22 to +27 VDC), Maximum 100 mA DC<br />
(2) This terminal also supplies power to the load connected to the transistor output terminals.<br />
Refer to "Transistor output" described later in this table for more.<br />
Common terminal for digital input signals<br />
This terminal is electrically isolated from the terminals [11]s and [CMY].<br />
• Using a relay contact to turn [X1] to [X7], [FWD], or [REV] ON or OFF<br />
Figure 2.14 shows two examples of a circuit that uses a relay contact to turn control signal input [X1] to [X7],<br />
[FWD], or [REV] ON or OFF. In circuit (a), the slide switch SW1 is turned to SINK, whereas in circuit (b) it is turned<br />
to SOURCE.<br />
Note: To configure this kind of circuit, use a highly reliable relay.<br />
<br />
<br />
[PLC]<br />
SINK<br />
[PLC]<br />
SINK<br />
[X1] t o [X7],<br />
[FWD], [REV]<br />
SOURCE<br />
Photocoupler<br />
+24 VDC<br />
[X1] to [X7],<br />
[FWD], [REV]<br />
SOURCE<br />
Photocoupler<br />
+24 VDC<br />
[CM]<br />
[CM]<br />
(a) With the switch turned to SINK<br />
Figure 2.14 Circuit Configuration Using a Relay Contact<br />
(b) With the switch turned to SOURCE<br />
• Using a programmable logic controller (PLC) to turn [X1] to [X7], [FWD], or [REV] ON or OFF<br />
Figure 2.15 shows two examples of a circuit that uses a programmable logic controller (PLC) to turn control signal<br />
input [X1] to [X7], [FWD], or [REV] ON or OFF. In circuit (a), the slide switch SW1 is turned to SINK, whereas in<br />
circuit (b) it is turned to SOURCE.<br />
In circuit (a) below, short-circuiting or opening the transistor's open collector circuit in the PLC using an external<br />
power supply turns ON or OFF control signal [X1] to [X7], [FWD], or [REV]. When using this type of circuit, observe<br />
the following:<br />
- Connect the + node of the external power supply (which should be isolated from the PLC's power) to terminal<br />
[PLC] of the inverter.<br />
- Do not connect terminal [CM] of the inverter to the common terminal of the PLC.<br />
2-21
Table 2.7 Symbols, Names and Functions of the Control Circuit Terminals (Continued)<br />
Classification<br />
Symbol Name Functions<br />
Programmable<br />
logic controller<br />
<br />
Programmable<br />
logic controller<br />
<br />
[PLC]<br />
SINK<br />
[PLC]<br />
SINK<br />
SOURCE<br />
[X1] t o [ X7],<br />
[FWD], [REV]<br />
Photocoupler<br />
+24 VDC<br />
SOURCE<br />
[X1] to [X7],<br />
[FWD], [REV]<br />
Photocoupler<br />
+24 VDC<br />
Digital input<br />
Analog output<br />
<br />
[FM1]<br />
[FM2]<br />
[CM]<br />
(a) With the switch turned to SINK<br />
[CM]<br />
Figure 2.15 Circuit Configuration Using a PLC<br />
(b) With the switch turned to SOURCE<br />
For details about the slide switch setting, refer to <strong>Instruction</strong> manual for section 2.3.6 "Setting up the slide switches."<br />
• For inputting a pulse train through the digital input terminal [X7]<br />
• Inputting from a pulse generator with an open collector transistor output<br />
Stray capacity on the wiring between the pulse generator and the inverter may disable transmission of the pulse<br />
train. As a countermeasure against this problem, insert a pull-up resistor between the open collector output<br />
signal (terminal [X7]) and the power source terminal (terminal [PLC]) if the switch selects the SINK mode input;<br />
insert a pull-down resistor between the output signal and the digital common terminal (terminal [CM]) if the switch<br />
selects the SOURCE mode input.<br />
A recommended pull-up/down resistor is 1k 2 W. Check if the pulse train is correctly transmitted because stray<br />
capacity is significantly affected by the wire types and wiring conditions.<br />
Analog<br />
monitor<br />
[11] Analog<br />
common<br />
Both terminals output monitor signals for analog DC voltage (0 to +10 V) or analog DC current<br />
(+4 to +20 mA). The output form (VO/IO) for each of [FM1] and [FM2] can be switched with the<br />
slide switches on the control PCB and the function codes, as listed below.<br />
Terminal<br />
[FM1]<br />
[FM2]<br />
Terminal function is<br />
specified by:<br />
Output form<br />
Analog DC voltage Analog DC current<br />
Content is<br />
specified by:<br />
Slide switch SW4 VO1 IO1 Function code<br />
Function code F29 0 1<br />
F31<br />
Slide switch SW6 VO2 IO2 Function code<br />
Function code F32 0 1<br />
F35<br />
The signal content can be selected from the following with function codes F31 and F35.<br />
• Output frequency • Output current • Output voltage<br />
• Output torque • Load factor • Input power<br />
• PID feedback amount • Speed (PG feedback value) • DC link bus voltage<br />
• Universal AO • <strong>Motor</strong> output • Calibration<br />
• PID command<br />
• PID output<br />
* Input impedance of the external device: Min. 5k (at 0 to 10 VDC output)<br />
(While the terminal is outputting 0 to 10 VDC, it is capable of driving up to two analog<br />
voltmeters with 10 k impedance.)<br />
* Input impedance of the external device: Max. 500 (at 4 to 20 mA DC output)<br />
* Adjustable range of the gain: 0 to 300%<br />
Two common terminals for analog input and output signals.<br />
These terminals are electrically isolated from terminals [CM] and [CMY].<br />
2-22
Table 2.7 Symbols, Names and Functions of the Control Circuit Terminals (Continued)<br />
Classification<br />
Symbol Name Functions<br />
[Y1]<br />
[Y2]<br />
Transistor<br />
output 1<br />
Transistor<br />
output 2<br />
(1) Various signals such as inverter running, speed/freq. arrival and overload early warning can<br />
be assigned to any terminals, [Y1] to [Y4] by setting function code E20 to E24. Refer to<br />
Chapter 4, Section 4.2 "Details of Function Codes" for details.<br />
(2) Switches the logic value (1/0) for ON/OFF of the terminals between [Y1] to [Y4], and [CMY].<br />
If the logic value for ON between [Y1] to [Y4] and [CMY] is 1 in the normal logic system, for<br />
example, OFF is 1 in the negative logic system and vice versa.<br />
[Y3]<br />
Transistor<br />
output 3<br />
(Transistor output circuit specification)<br />
Photocoupler<br />
Current<br />
31 to 35 V<br />
<br />
[Y1]<br />
to<br />
[Y4]<br />
[CMY]<br />
Voltage<br />
Operation<br />
voltage<br />
Item<br />
ON level<br />
OFF level<br />
Maximum current at ON<br />
Leakage current at OFF<br />
Max.<br />
2 V<br />
27 V<br />
50 mA<br />
0.1 mA<br />
Figure 2.16 Transistor Output Circuit<br />
Figure 2.17 shows examples of connection between the control circuit and a PLC.<br />
Transistor output<br />
[Y4]<br />
[CMY]<br />
Transistor<br />
output 4<br />
Transistor<br />
output<br />
common<br />
- When a transistor output drives a control relay, connect a surge-absorbing diode<br />
across relay’s coil terminals.<br />
- When any equipment or device connected to the transistor output needs to be<br />
supplied with DC power, feed the power (+24 VDC: allowable range: +22 to +27 VDC,<br />
100 mA max.) through the [PLC] terminal. Short-circuit between the terminals [CMY]<br />
and [CM] in this case.<br />
Common terminal for transistor output signals<br />
This terminal is electrically isolated from terminals [CM] and [11]s.<br />
• Connecting programmable logic controller (PLC) to terminal [Y1], [Y2], [Y3] or [Y4]<br />
Figure 2.17 shows two examples of circuit connection between the transistor output of the inverter’s control<br />
circuit and a PLC. In example (a), the input circuit of the PLC serves as a SINK for the control circuit output,<br />
whereas in example (b), it serves as a SOURCE for the output.<br />
Photocoupler<br />
<br />
Current<br />
Programmable<br />
logic controller<br />
Photocoupler<br />
<br />
Current<br />
C0<br />
Programmable<br />
logic controller<br />
31 to<br />
35 V<br />
[Y1]<br />
to<br />
[Y4]<br />
[CMY]<br />
+24 VDC<br />
SINK input<br />
31 to<br />
35 V<br />
[Y1]<br />
to<br />
[Y4]<br />
[CMY]<br />
+24 VDC<br />
SOURCE input<br />
C0<br />
(a) PLC serving as SINK<br />
Figure 2.17 Connecting PLC to Control Circuit<br />
(b) PLC serving as SOURCE<br />
Relay output<br />
[Y5A/C]<br />
General<br />
purpose relay<br />
output<br />
(1) A general-purpose relay contact output usable as well as the function of the transistor output<br />
terminal [Y1], [Y2], [Y3] or [Y4].<br />
Contact rating: 250 VAC 0.3 A, cos = 0.3, 48 VDC, 0.5 A<br />
(2) Switching of the normal/negative logic output is applicable to the following two contact<br />
output modes: "Active ON" (Terminals [Y5A] and [Y5C] are closed (excited) if the signal is<br />
active.) and "Active OFF" (Terminals [Y5A] and [Y5C] are opened (non-excited) if the signal<br />
is active while they are normally closed.).<br />
2-23
Table 2.7 Symbols, Names and Functions of the Control Circuit Terminals (Continued)<br />
Classification<br />
Relay output<br />
Symbol Name Functions<br />
[30A/B/C]<br />
Alarm relay<br />
output<br />
(for any error)<br />
(1) Outputs a contact signal (SPDT) when a protective function has been activated to stop<br />
the motor.<br />
Contact rating: 250 VAC, 0.3A, cos = 0.3, 48 VDC, 0.5A<br />
(2) Any one of output signals assigned to terminals [Y1] to [Y4] can also be assigned to this<br />
relay contact to use it for signal output.<br />
(3) Switching of the normal/negative logic output is applicable to the following two<br />
contact output modes: "Active ON" (Terminals [30A] and [30C] are closed (excited) if the<br />
signal is active.) and "Active OFF" (Terminals [30A] and [30C] are opened (non-excited) if<br />
the signal is active while they are normally closed.).<br />
[DX+]/<br />
[DX-]/<br />
[SD]<br />
RS-485<br />
communications<br />
port 2<br />
(Terminals on<br />
control PCB)<br />
A communications port transmits data through the RS-485 multipoint protocol between the<br />
inverter and a computer or other equipment such as a PLC.<br />
(For setting of the terminating resistor, refer to Section 2.3.6 "Setting up the slide switches.")<br />
Communication<br />
RJ-45<br />
connector<br />
for the<br />
keypad<br />
RS-485<br />
communications<br />
port 1<br />
(Standard RJ-45<br />
connector)<br />
(1) Used to connect the inverter with the keypad. The inverter supplies the power to the<br />
keypad through the pins specified below. The extension cable for remote operation also<br />
uses wires connected to these pins for supplying the keypad power.<br />
(2) Remove the keypad from the standard RJ-45 connector and connect the RS-485<br />
communications cable to control the inverter through the PC or PLC (Programmable<br />
Logic Controller). For setting of the terminating resistor, refer to Section 2.3.6 "Setting up<br />
the slide switches."<br />
Figure 2.18 RJ-45 Connector and its Pin Assignment*<br />
* Pins 1, 2, 7, and 8 are exclusively assigned to power lines for the keypad, so do not<br />
use those pins for any other equipment.<br />
2-24
Wiring for control circuit terminals<br />
For <strong>EQ7</strong>2125-C, <strong>EQ7</strong>2150-C and <strong>EQ7</strong>4250-C to <strong>EQ7</strong>41000-C<br />
(1) As shown in Figure 2.19, route the control circuit wires along the left side panel to the outside of the inverter.<br />
(2) Secure those wires to the wiring support, using a cable tie (e.g., Insulok) with 0.15 inch (3.8 mm) or less in width<br />
and 0.059 inch (1.5 mm) or less in thickness.<br />
Cable tie<br />
Wiring support<br />
Control circuit terminal block<br />
Wiring for control<br />
circuit terminals<br />
Section A<br />
Details of Section A<br />
Left side panel<br />
Wiring for control<br />
circuit terminals<br />
Figure 2.19 Wiring Route and Fixing Position for the Control Circuit Wires<br />
- Route the wiring of the control circuit terminals as far from the wiring of the main circuit as possible.<br />
Otherwise electric noise may cause malfunctions.<br />
- Fix the control circuit wires with a cable tie inside the inverter to keep them away from the live parts of the<br />
main circuit (such as the terminal block of the main circuit).<br />
2.3.6 Setting up the slide switches<br />
Before changing the switches or touching the control circuit terminal symbol plate, turn OFF the power and wait at<br />
least five minutes for inverters of 40 HP or below, or at least ten minutes for those of 50 HP or above. Make<br />
sure that the LED monitor and charging lamp are turned OFF. Further, make sure, using a multimeter or a similar<br />
instrument, that the DC link bus voltage between the terminals P(+) and N(-) has dropped to the safe level (+25 VDC<br />
or below).<br />
An electric shock may result if this warning is not heeded as there may be some residual electric charge in<br />
the DC bus capacitor even after the power has been turned OFF.<br />
Switching the slide switches located on the control PCB allows you to customize the operation mode of the analog<br />
output terminals, digital I/O terminals, and communications ports. The locations of those switches are shown in Figure<br />
2.20.<br />
To access the slide switches, remove the front cover so that you can see the control PCB. For inverters of 50 HP or<br />
above, open also the keypad enclosure.<br />
For details on how to remove the front cover and how to open and close the keypad enclosure, refer to Section<br />
2.3.1 "Removing and mounting the front cover and the wiring guide."<br />
2-25
Table 2.8 lists function of each slide switch.<br />
Switch<br />
SW1<br />
SW2<br />
SW3<br />
Table 2.8 Function of Each Slide Switch<br />
Function<br />
Switches the service mode of the digital input terminals between SINK and SOURCE.<br />
▪ This switches the input mode of digital input terminals [X1] to [X7], [FWD] and [REV] to be<br />
used as the SINK or SOURCE mode.<br />
▪ The factory default is SINK.<br />
Switches the terminating resistor of RS-485 communications port on the inverter ON and OFF.<br />
(RS-485 communications port 2, on the control PCB)<br />
▪ If the inverter is connected to the RS-485 communications network as a terminating device,<br />
turn SW2 to ON.<br />
Switches the terminating resistor of RS-485 communications port on the inverter ON and OFF.<br />
(RS-485 communications port 1, for connecting the keypad)<br />
▪ To connect a keypad to the inverter, turn SW3 to OFF. (Factory default)<br />
▪ If the inverter is connected to the RS-485 communications network as a terminating device,<br />
turn SW3 to ON.<br />
Switches the output form of analog output terminals [FM1] and [FM2] between voltage and<br />
current.<br />
When changing the setting of SW4 and SW6, also change the data of function codes F29 and<br />
F32, respectively.<br />
SW4/SW6<br />
[FM1]<br />
[FM2]<br />
Output form<br />
SW4 F29 data SW6 F32 data<br />
Voltage output (Factory default) VO1 0 VO2 0<br />
Current output IO1 1 IO2 1<br />
Switches the property of the analog input terminal [C1] between analog setting current input,<br />
PTC thermistor input, and NTC thermistor input.<br />
When changing this switch setting, also change the data of function code H26.<br />
SW5<br />
Function SW5 H26 data<br />
Analog setting current input (Factory default) C1 0<br />
PTC thermistor input PTC/NTC 1 (alarm) or 2<br />
(warning)<br />
NTC thermistor input PTC/NTC 3<br />
Figure 2.20 shows the location of slide switches on the control PCB for the input/output terminal configuration.<br />
Switch Configuration and Factory Defaults<br />
Factory<br />
default<br />
SW1 SW2 SW3<br />
SINK<br />
SOURCE<br />
SW4/SW<br />
6<br />
SW5<br />
OFF OFF VO1/VO2 C1<br />
ON<br />
---<br />
ON<br />
IO1/IO2<br />
PTC/NTC<br />
Figure 2.20 Location of the Slide Switches<br />
on the Control PCB<br />
To move a switch slider, use a tool with a narrow tip (e.g., a tip of tweezers). Be careful not to touch other<br />
electronic parts, etc. If the slider is in an ambiguous position, the circuit is unclear whether it is turned ON<br />
or OFF and the digital input remains in an undefined state. Be sure to place the slider so that it contacts<br />
either side of the switch.<br />
2-26
2.4 Mounting and Connecting the Keypad<br />
The standard keypad TP-G1W-J1 meets UL Type 4 (NEMA4) by itself.<br />
• On the panel or at a remote site<br />
The keypad can be mounted on the panel wall as shown below or installed at a remote site for operation on hand.<br />
Mount the keypad with four M3 x 12 screws provided--two fine thread<br />
screws and two coarse thread tapping screws. The recommended<br />
tightening torque is 6.2 lb-in (0.7 Nm).<br />
For panel cutting dimensions, refer to Chapter 11, Section 11.3.2.<br />
RJ-45<br />
connector<br />
Panel<br />
0.51 inches (13 mm)<br />
(Effective length of<br />
tapping screw)<br />
M3 x 12<br />
(Coarse thread tapping screws)<br />
M3 x 12<br />
(Fine thread screws)<br />
0.43 inches (11 mm)<br />
(Effective length of<br />
screw)<br />
Inside the panel<br />
0.05 to 0.09 inch*<br />
(1.2 to 2.3 mm)<br />
* If the thickness of the panel wall is out of<br />
the range specified above, use screws of<br />
an appropriate length.<br />
Figure 2.21 Mounting the Keypad on the Panel Wall<br />
To mount the keypad on a place other than an inverter, the parts listed below are needed.<br />
Parts name Type Remarks<br />
Extension cable<br />
LAN cable<br />
0BASE-T/100BASE-TX straight type cable<br />
compliant with US ANSI/TIA/EIA-568A Category 5. (Less than 66 ft (20 m))<br />
• On the inverter<br />
To remove the keypad from the inverter, pull it forward while holding down the hook (pointed by the arrow in Figure<br />
2.22). When mounting it, put the keypad back into place in the reverse order of removal.<br />
Figure 2.22 Removing the Keypad<br />
2-27
2.5 Input Power and <strong>Motor</strong> Connection<br />
Checking prior to powering on<br />
Fig.2.23 below shows the electrical connections for the input power and motor terminals for various <strong>EQ7</strong> DRIVE<br />
models. Verify the input power and motor terminals of the model you are installing. WITH POWER OFF, make the<br />
appropriate connections.<br />
Make sure to follow good wiring practices and all applicable codes. Ensure that the equipment is grounded<br />
properly as shown.<br />
DANGER, LETHAL VOLTAGES ARE PRESENT- Before applying power to the <strong>EQ7</strong> drive, ensure that the<br />
terminal cover is fastened and all wiring connections are secure. After the power has been turned OFF, wait at<br />
least ten minutes until the charge indicator extinguishes completely before touching any wiring, circuit boards<br />
or components.<br />
WARNING DO NOT CONNECT ANY OF THE<br />
FOLLOWING TERMINALS TO EARTH GROUND<br />
DB<br />
P1 P(+) N(-)<br />
INPUT POWER<br />
*1 *1<br />
MOTOR<br />
GND<br />
L1/R L2/S L3/T<br />
<strong>EQ7</strong><br />
U V W<br />
GND<br />
Ground<br />
(R/L1)<br />
(S/L2)<br />
(T/L3)<br />
To change direction of<br />
motor rotation swap any<br />
two of the three motor<br />
leads.<br />
Input<br />
Protection<br />
(Fuse or Magnetic<br />
Contactor)<br />
(U/T1)<br />
(V/T2)<br />
(W/T3)<br />
Ground<br />
P1<br />
P(+)<br />
L1 L2 L3<br />
Use L1, L2, L3 for<br />
3Ø Input Power<br />
Use L1 & L3 for<br />
2<br />
1Ø Input Power *<br />
3Ø Induction<br />
motor<br />
Connect<br />
frame to<br />
ground<br />
Fig. 2.23<br />
DCR<br />
*1. Refer to page 2-11 & 2-12 for connecting a DC reactor from the terminals P1 and P(+).<br />
*2. Make sure the drive is properly sized for single phase input (consult factory).<br />
(Refer to Table 2.6 Recommended Wire Sizes in this manual).<br />
2-28
Never connect power supply wires to the <strong>EQ7</strong> drive output terminals U, V, and W. Doing so and turning<br />
the power ON damages the inverter.<br />
Be sure to connect the grounding wires of the <strong>EQ7</strong> drive and the motor to the ground electrodes.<br />
Otherwise, an electric shock could occur.<br />
Check the following before powering on the <strong>EQ7</strong> drive.<br />
1) Check that the wiring is correct. Especially check the wiring to the <strong>EQ7</strong> drive input terminals L1/R, L2/S<br />
and L3/T and output terminals U, V, and W. Also check that the grounding wires are connected to the<br />
grounding terminals ( G) correctly. See Figure 2.23.<br />
2) Check the control circuit terminals and main circuit terminals for short circuits or ground faults.<br />
3) Check for loose terminals, connectors and screws.<br />
4) Check that the motor is separated from mechanical equipment.<br />
5) Make sure that all switches of devices connected to the inverter are turned OFF. Powering on the<br />
inverter with any of those switches being ON may cause an unexpected motor operation.<br />
6) Check that safety measures are taken against runaway of the equipment. Also ensure that all safety<br />
guards are in place to prevent human injury.<br />
2-29
Chapter 3 Operation using the Keypad<br />
3.1 LED Monitor, LCD Monitor, and Keys<br />
The keypad allows you to start and stop the motor, view various data including maintenance information and alarm<br />
information, configure function codes, monitor I/O signal status, copy data, and calculate the load factor.<br />
7-segment LED Monitor<br />
LCD monitor<br />
Indication units<br />
Program<br />
key<br />
Shift key<br />
RUN key (forward)<br />
LED light<br />
RUN key (reverse)<br />
Reset key<br />
STOP key<br />
UP key<br />
DOWN key<br />
Remote/Local key<br />
Function/Data key<br />
Table 3.1: Overview of Keypad Functions<br />
Item Monitor Functions<br />
Monitors<br />
Indication<br />
Units<br />
Five-digit, 7-segment LED monitor which displays the following according to the operation modes:<br />
• In Run mode: Running status information (e.g., output frequency, current, and voltage).<br />
• In Programming mode: Same as above.<br />
• In Alarm mode: Alarm code, which identifies the alarm when the protective function is activated.<br />
LCD monitor which displays the following according to the operation modes:<br />
• In Run mode: Running status information.<br />
• In Programming mode: Menus, function codes and their settings.<br />
• In Alarm mode: Alarm code, which identifies the alarm when the protective function is activated.<br />
In Run mode, these show the unit for the number displayed on the 7-segment LED monitor and the<br />
running status information on the LCD monitor. For details, see the next page.<br />
3-1
Table 3.1 Overview of Keypad Functions (Continued)<br />
Item Keys Functions<br />
Switches the operation modes of the inverter.<br />
Shifts the cursor to the right for entry of a numerical value.<br />
Programming<br />
keys<br />
Operation keys<br />
and<br />
Pressing this key after removing the cause of an alarm switches the inverter to Running<br />
mode. This key is used to reset settings or screen transition.<br />
UP and DOWN keys, which are used to select the setting items or change the function code<br />
data.<br />
Function/Data key, which switches the operation mode as follows:<br />
• In Run mode: Pressing this key switches the information to be displayed<br />
concerning the status of the inverter (output frequency (Hz), output<br />
current (A), output voltage (V), etc.).<br />
• In Programming mode: Pressing this key displays the function code and establishes the<br />
newly entered data.<br />
• In Alarm mode: Pressing this key displays the details of the problem indicated by the<br />
alarm code that has come up on the LED monitor.<br />
Starts running the motor in the forward rotation.<br />
Starts running the motor in the reverse rotation.<br />
Stops the motor.<br />
Holding down this key for more than 1 second toggles between local and remote modes.<br />
LED<br />
lamp<br />
Lights while a run command is supplied to the inverter.<br />
Details of Indicator Indexes<br />
Type Item Description (information, condition, and status)<br />
Unit of<br />
number on<br />
LED monitor<br />
Hz Output frequency and reference frequency<br />
A Output current<br />
V Output voltage<br />
% Calculated torque, load factor, and speed<br />
r/min Preset and actual motor speeds and preset and actual load shaft speeds<br />
m/min Preset and actual line speeds<br />
kW Input power and motor output<br />
X10 Data exceeding 99,999<br />
min Preset and actual constant feeding rate times<br />
sec Timer<br />
PID PID process value<br />
3-2
Type Item Description (information, condition, and status)<br />
Running status<br />
Run command<br />
source<br />
FWD<br />
REV<br />
STOP<br />
REM<br />
LOC<br />
COMM<br />
JOG<br />
HAND<br />
Running in the forward rotation<br />
Running in the reverse rotation<br />
No output frequency<br />
Remote mode<br />
Local mode<br />
Via communications link (RS-485 (standard, optional), fieldbus option)<br />
Jogging mode<br />
Via keypad (This item lights also in local mode.)<br />
3.2 Overview of Operation Modes<br />
The <strong>EQ7</strong> features the following three operation modes.<br />
Table 3.2 Operation Modes<br />
Mode<br />
Running Mode<br />
Programming Mode<br />
Alarm Mode<br />
Description<br />
This mode allows you to specify run/stop commands in regular operation. It is also possible to<br />
monitor the running status in real time.<br />
If a light alarm occurs, the * appears on the LED monitor.<br />
This mode allows you to configure function code data and check a variety of information relating<br />
to the inverter status and maintenance.<br />
If an alarm condition arises, the inverter automatically enters the Alarm mode in which you can<br />
view the corresponding alarm code* and its related information on the LED and LCD monitors.<br />
* Alarm code that represents the cause((s) of the alarm(s) that has been triggered by the protective<br />
function. For details, refer to the "Protective Functions" in Chapter 10, Section 10.1.<br />
Figures 3.1 shows the status transition of the inverter between these three operation modes.<br />
Power ON<br />
Running mode<br />
Run/Stop of motor<br />
Monitor of running status<br />
Detection of<br />
a light alarm<br />
Release of<br />
a light alarm<br />
or<br />
Programming mode<br />
Configuration of function<br />
code data and monitor of<br />
maintenance/alarm info<br />
and various status<br />
Run/Stop of motor<br />
Light alarm displayed<br />
Occurrence of<br />
an alarm<br />
Release of<br />
an alarm<br />
(Press this key if<br />
an alarm has<br />
occurred.)<br />
Alarm mode<br />
Display of alarm status<br />
Figure 3.1 Status Transition between Operation Modes<br />
3-3
3.3 Running Mode<br />
3.3.1 Running or stopping the motor<br />
By factory default, pressing the key starts running the motor in the forward direction and pressing the key<br />
decelerates the motor to a stop. The<br />
in Running and Programming modes.<br />
key is disabled. Running or stopping the motor with the keypad is enabled only<br />
To run the motor in reverse direction or run the motor in reversible mode, change the setting of function code F02.<br />
For details of function code F02, refer to Chapter 4 "FUNCTION CODES."<br />
Figure 3.2 Rotational Direction of <strong>Motor</strong><br />
Note) The rotational direction of an IEC-compliant motor is opposite to the one shown above.<br />
• Displaying the running status on the LCD monitor<br />
(1) When function code E45 (LCD monitor item selection) is set at "0"<br />
The LCD monitor displays the running status, the rotational direction, and the operation guide.<br />
(The upper indicators show the unit of values displayed on the LED monitor as detailed in Section 3.3.2. The lower<br />
ones show the running status and run command source.)<br />
Running status<br />
Rotational direction<br />
Operation guide<br />
Figure 3.3 Display of Running Status<br />
The running status and the rotational direction are displayed as shown in Table 3.3.<br />
Table 3.3 Running Status and Rotational Direction<br />
Status/Direction Display Meaning<br />
Running status<br />
Rotational direction<br />
RUN<br />
STOP<br />
FWD<br />
REV<br />
Blank<br />
A run command is given or the inverter is running the motor.<br />
A run command is not given and the inverter is stopped.<br />
Running in the forward rotation<br />
Running in the reverse rotation<br />
Stopped<br />
3-4
(2) When function code E45 (LCD monitor item selection) is set at "1"<br />
The LCD monitor displays the output frequency, output current, and calculated torque in a bar chart.<br />
(The upper indicators show the unit of values displayed on the LED monitor as detailed in Section 3.3.2. The lower<br />
ones show the running status and run command source.)<br />
Bar chart<br />
Output frequency<br />
Output current<br />
Calculated torque<br />
The full scale (maximum value) for each parameter is as follows:<br />
Output frequency: Maximum frequency<br />
Output current: 200% of inverter’s rated current<br />
Calculated torque: 200% of rated torque generated by motor<br />
Figure 3.4 Bar Chart<br />
3.3.2 Monitoring the running status on the LED monitor<br />
The items listed below can be monitored on the 7-segment LED monitor. Immediately after the power is turned ON, the<br />
monitor item specified by function code E43 is displayed.<br />
Pressing the key in Running mode switches between monitor items in the sequence shown in Table 3.4. The "Monitor<br />
page #" column shows the monitor page of the items supported.<br />
Monitored Items on the<br />
LED Monitor<br />
Table 3.4 Items Monitored<br />
Example Unit Meaning of Displayed Value<br />
Function<br />
code E43<br />
Speed Monitor Function code E48 specifies what to be displayed. 0<br />
Output frequency 1<br />
(before slip<br />
compensation)<br />
Output frequency 2<br />
(after slip<br />
compensation)<br />
Hz Frequency actually being output (Hz) (E48 = 0)<br />
Hz Frequency actually being output (Hz) (E48 = 1)<br />
Reference frequency Hz Frequency actually being specified (Hz) (E48 = 2)<br />
<strong>Motor</strong> speed<br />
Load shaft speed<br />
Line speed<br />
r/mi<br />
n<br />
r/mi<br />
n<br />
m/mi<br />
n<br />
Display speed (%) %<br />
Output frequency (Hz) x 120<br />
P01<br />
(E48 = 3)<br />
Output frequency (Hz) x E50 (E48 = 4)<br />
Output frequency (Hz) x E50 (E48 = 5)<br />
Output frequency (Hz)<br />
Maximum frequency (Hz)<br />
x 100 (E48 = 7)<br />
Monitor page<br />
#<br />
Output current A Current output from the inverter in RMS 3 8<br />
Input power kW Input power to the inverter 9 9<br />
Calculated torque %<br />
<strong>Motor</strong> output torque in %<br />
(Calculated value)<br />
0<br />
8 10<br />
Output voltage V Voltage output from the inverter in RMS 4 11<br />
<strong>Motor</strong> output kW <strong>Motor</strong> output in kW 16 12<br />
Load factor %<br />
Load factor of the motor in % as the rated<br />
output being at 100%<br />
15 13<br />
3-5
Table 3.4 Items Monitored (Continued)<br />
Monitored Items on the<br />
LED Monitor<br />
PID command<br />
(Note 1)<br />
PID feedback amount<br />
PID output<br />
Analog input<br />
Torque current<br />
(Note 1)<br />
(Note 1)<br />
(Note 2)<br />
(Note 3)<br />
Magnetic flux command<br />
Input watt-hour<br />
(Note 3)<br />
Example Unit Meaning of Displayed Value<br />
Function<br />
code E43<br />
Monitor<br />
page #<br />
-<br />
PID command/feedback amount<br />
transformed to that of physical value of<br />
10 14<br />
the object to be controlled (e.g.,<br />
- temperature). Refer to function codes<br />
E40 and E41 for details.<br />
12 15<br />
%<br />
-<br />
%<br />
%<br />
kWh<br />
PID output in % as the maximum<br />
frequency being at 100%<br />
Analog input to the inverter in a format<br />
suitable for a desired scale<br />
Refer to function codes E40 and E41<br />
for details.<br />
Torque current command value or<br />
calculated torque current<br />
Magnetic flux command value<br />
(Available only under vector control)<br />
Input watt-hour (kWh)<br />
100<br />
14 16<br />
17 18<br />
23 21<br />
24 22<br />
25 23<br />
The LCD monitor (given below) shows information related to the item shown on the LED monitor. The monitor items on<br />
the LED monitor can be switched by pressing the key.<br />
Monitor items<br />
Monitor page #<br />
(See Table 3.4.)<br />
Operation guide<br />
Figure 3.5 LCD Monitor Sample Detailed for the LED Monitor Item<br />
(Note 1) These PID related items appear only under PID control specified by function code J01 (= 1, 2 or 3). When a PID<br />
command or PID output is displayed, the dot at the lowest digit on the LED monitor blinks; when a PID feedback<br />
amount is displayed, it is lit.<br />
(Note 2) The analog input monitor appears only when the analog input monitor is enabled by any of function codes E61 to E63<br />
(Select terminal function).<br />
(Note 3) Under V/f control, a zero (0) is displayed.<br />
3-6
3.3.3 Monitoring light alarms<br />
The <strong>EQ7</strong> identifies abnormal states in two categories--Alarm and Light alarm. If the former occurs, the inverter<br />
immediately trips; if the latter occurs, the appears on the LED monitor and the "L-ALARM" appears blinking in the<br />
operation guide area on the LCD monitor, but the inverter continues to run without tripping.<br />
Which abnormal states are categorized as a light alarm ("Light alarm" object) should be defined with function codes H81<br />
and H82 beforehand.<br />
Assigning the LALM signal to any one of the digital output terminals with any of function codes E20 to E24 and E27<br />
(data = 98) enables the inverter to output the LALM signal on that terminal upon occurrence of a light alarm.<br />
Means that a light<br />
alarm has occurred.<br />
Running status<br />
Rotational direction<br />
Indicator indexes<br />
Operation guides<br />
Means that a light<br />
alarm has occurred.<br />
Figure 3.6 Display of Light Alarm<br />
For details of the light alarms, refer to Chapter 10 "TROUBLESHOOTING."<br />
• How to check a light alarm<br />
If a light alarm occurs, the appears on the LED monitor. To check the current light alarm, enter Programming mode<br />
by pressing the key and select LALM1 on Menu #5 "Maintenance Information."<br />
It is also possible to check the last three light alarms by selecting LALM2 (last) to LALM4 (3rd last).<br />
For details of the menu transition of the maintenance information, refer to Section 3.4.6 "Reading maintenance<br />
information."<br />
• How to remove the current light alarm<br />
After checking the current light alarm, to switch the LED monitor from the<br />
display (e.g., output frequency), press the key in Running mode.<br />
indication back to the running status<br />
If the light alarm has been removed, the "L-ALARM" disappears and the LALM output signal turns OFF. If not (e.g. DC<br />
fan lock), the on the LED monitor disappears so that normal monitoring becomes available, but the "L-ALARM"<br />
remains displayed on the LCD monitor (as shown below) and the LALM output signal remains ON.<br />
The has<br />
disappeared and the<br />
normal LED monitor is<br />
displayed.<br />
Running status<br />
Rotational direction<br />
Indicator indexes<br />
Operation guides<br />
The operation guides<br />
remain displayed.<br />
3-7
3.4 Programming Mode<br />
Programming mode provides you with these functions--setting and checking function code data, monitoring<br />
maintenance information and checking input/output (I/O) signal status. These functions can be easily selected with a<br />
menu-driven system. Table 3.5 lists menus available in Programming mode.<br />
When the inverter enters Programming mode from the second time on, the menu selected last in Programming mode<br />
will be displayed.<br />
Table 3.5 Menus Available in Programming Mode<br />
Menu # Menu Used to:<br />
User<br />
<strong>Manual</strong><br />
Section:<br />
0 Quick Setup Display only basic function codes previously selected. 3.4.1<br />
1 Data Setting<br />
2 Data Checking<br />
3 Drive Monitoring<br />
Display and change the data of the function code selected.<br />
(Note)<br />
Display the function code selected and its data on the same<br />
screen. Also this menu is used to change the function code<br />
data or check whether the data has been changed from the<br />
factory default.<br />
Display the running information required for maintenance or<br />
test running.<br />
4 I/O Checking Display external interface information. 3.4.5<br />
5 Maintenance Information<br />
6 Alarm Information<br />
Display maintenance information including cumulative run<br />
time.<br />
Display the recent four alarm codes. Also this menu is used<br />
to view the information on the running status at the time the<br />
alarm occurred.<br />
7 Alarm Cause Display the cause of the alarm. 3.4.8<br />
8 Data Copying Read or write function code data, as well as verifying it. 3.4.9<br />
9<br />
Load Factor<br />
Measurement<br />
Measure the maximum output current, average output<br />
current, and average braking power.<br />
3.4.2<br />
3.4.3<br />
3.4.4<br />
3.4.6<br />
3.4.7<br />
3.4.10<br />
10 User Setting Add or delete function codes covered by Quick Setup. 3.4.11<br />
11<br />
Communication<br />
Debugging<br />
Confirm the data of function codes exclusively designed for<br />
communication (S, M, W, X, and Z codes).<br />
3.4.12<br />
Figure 3.7 shows the transitions between menus in Programming mode.<br />
Figure 3.7 Menu Transition in Programming Mode<br />
If no key is pressed for approx. 5 minutes, the inverter automatically goes back to Running mode and turns the backlight<br />
OFF.<br />
3-8
3.4.1 Setting up function codes quickly using Quick Setup -- Menu #0 "Quick Setup" --<br />
Menu #0 "Quick Setup" in Programming mode quickly displays and sets up a basic set of function codes specified<br />
beforehand.<br />
Using Menu #10 "User Setting" adds or deletes function codes to/from the set of function codes registered for Quick<br />
Setup by default. The set of function codes registered for Quick Setup is held in the inverter memory (not the keypad). If<br />
the keypad on a particular inverter is mounted on any other inverter, therefore, the set of function codes held in the latter<br />
inverter is subject to Quick Setup.<br />
The set of function codes subject to Quick Setup can be copied with the copy function (Menu #8 "Data Copying").<br />
Performing data initialization (function code H03) resets the set of function codes subject to Quick Setup to the factory<br />
default.<br />
For the list of function codes subject to Quick Setup by factory default, refer to Chapter 4 "FUNCTION CODES."<br />
The menu transition in Menu #0 is just like that in Menu #1 "Data Setting" given in the next section.<br />
Basic key operation<br />
Same as the basic key operation for Menu #1 "Data Setting."<br />
3.4.2 Setting up function codes -- Menu #1 "Data Setting" --<br />
Menu #1 "Data Setting" in Programming mode allows you to set up all function codes for making the inverter functions<br />
match your needs.<br />
Function Code<br />
Group<br />
Function<br />
Table 3.6 Function Code List<br />
Description<br />
F codes Fundamental functions Functions concerning basic motor running<br />
E codes<br />
Extension terminal<br />
functions<br />
Functions concerning the assignment of control circuit terminals<br />
Functions concerning the display of the LED monitor<br />
C codes Control functions Functions associated with frequency settings<br />
P codes<br />
H codes<br />
A codes<br />
<strong>Motor</strong> 1 parameters<br />
High performance functions<br />
<strong>Motor</strong> 2 parameters<br />
Functions for setting up characteristics parameters (such as<br />
capacity) of the 1st motor<br />
Highly added-value functions<br />
Functions for sophisticated control<br />
Functions for setting up characteristics parameters (such as<br />
capacity) of the 2nd motor<br />
J codes Application functions 1 Functions for applications such as PID control<br />
d codes Application functions 2 Functions for applications such as speed control<br />
y codes Link functions Functions for controlling communication<br />
o codes Option functions Functions for options (Note)<br />
(Note) The o codes are displayed only when the corresponding option is mounted on the inverter. For details, refer to the<br />
instruction manual of the corresponding option.<br />
• Function codes requiring simultaneous keying<br />
To modify the data of function code F00 (data protection), H03 (data initialization), or H97 (clear alarm data),<br />
simultaneous keying of " + keys" or ” + keys" is required.<br />
• Changing, validating, and saving function code data when the inverter is running<br />
Some function codes can be modified when the inverter is running. The modification may or may not take effect<br />
immediately. For details, refer to the "Change when running" column in Chapter 5, Section 5.1 "Function Code Tables."<br />
3-9
Basic configuration of screens<br />
Figure 3.8 shows the LCD screen transition for Menu #1 "Data Setting."<br />
A hierarchy exists among those screens that are shifted in the order of "menu screen," "list of function codes," and<br />
"function code data modification screens."<br />
On the modification screen of the target function code, you can modify or check its data.<br />
Menu screen<br />
List of function codes<br />
Function code data<br />
modification screens<br />
Figure 3.8 Configuration of Screens for "DATA SET"<br />
Screen samples for changing function code data<br />
The "list of function codes" shows function codes, their names, and operation guides.<br />
Function code<br />
Function code name<br />
The function code currently selected blinks, indicating that the cursor has moved<br />
to this position (F03 blinks in this example).<br />
Operation guide, scrolling horizontally to display the function of each key.<br />
The "function code data modification screen" shows the function code, its name, its data (before and after change),<br />
allowable entry range, and operation guides.<br />
<br />
Function code #, name<br />
: Function code that has been changed from factory default<br />
Data<br />
Allowable entry range<br />
Operation guide<br />
<br />
Data before change<br />
Data being changed<br />
Figure 3.9 Screen Samples for Changing Function Code Data<br />
3-10
Basic key operation<br />
This section gives a description of the basic key operation, following the example of the data changing flow shown<br />
below. This example shows how to change F03 data (maximum frequency) from 58.0 Hz to 58.1 Hz.<br />
(1) Turn the inverter ON. It automatically enters Running mode. In that mode, press the key to switch to<br />
Programming mode and display the menu screen.<br />
(2) Move the pointer to "1. DATA SET" with the and keys, then press the key to proceed to a list of function<br />
codes.<br />
(3) Select the desired function code (F03 in this example) with the and keys, then press the key to display the<br />
corresponding function code data screen.<br />
(4) Change the function code data with the and keys.<br />
Pressing the key causes the blinking digit place to shift (cursor shifting) (The blinking digit can be changed).<br />
(5) Press the key to establish the function code data.<br />
The data will be saved in the inverter's memory. The display returns to a list of function codes and the cursor moves<br />
to the next function code (F04 in this example).<br />
Pressing the key instead of the key cancels the new function code data, reverts to the previous data, returns to<br />
a list of function codes, and returns the cursor to the previous function code (F03 in this example).<br />
(6) Press the key to go back to the menu screen.<br />
(1) To display this menu screen, press key in Running mode to switch to Programming mode.<br />
/<br />
(2) Move the pointer to "1. DATA SET" with and keys.<br />
Press<br />
key to establish the selected menu and proceed to a list of function codes.<br />
((6) To go back to the menu screen, press key.)<br />
/<br />
(3) Move the cursor with and keys to select the desired function code.<br />
Press<br />
key to establish the selected function code and display its data screen.<br />
/<br />
(4) Change the function code data with and keys.<br />
(5) Press key to establish the function code data.<br />
To cancel change of data, press<br />
key.<br />
Figure 3.10 Screen Transition for "Data Checking"<br />
3-11
3.4.3 Checking changed function codes -- Menu #2 "Data Checking" --<br />
Menu #2 "Data Checking" in Programming mode allows you to check function codes and their data that has been<br />
changed. The function codes whose data has been changed from the factory defaults are marked with an asterisk ( ).<br />
Select a function code and press the key to view or change its data.<br />
The LCD screen transition from Menu #2 is the same as that from Menu #1 "Data Setting," except a list of function codes<br />
as shown below.<br />
Function code<br />
Changed<br />
Function code data<br />
Operation guide, scrolling horizontally to display the function of each key.<br />
Basic key operation<br />
Figure 3.11 List of Function Codes<br />
Same as the basic key operation for Menu #1 "Data Setting."<br />
3.4.4 Monitoring the running status -- Menu #3 "Drive Monitoring" --<br />
Menu #3 "Drive Monitoring" in Programming mode allows you to monitor the running status during maintenance and test<br />
running.<br />
Table 3.7 Drive Monitoring Items<br />
Page # in<br />
operation<br />
guide<br />
1<br />
2<br />
3<br />
Item Symbol Description<br />
Output frequency Fot1 Output frequency (before slip compensation)<br />
Output frequency Fot2 Output frequency (after slip compensation)<br />
Output current Iout Output current<br />
Output voltage Vout Output voltage<br />
Calculated torque TRQ Calculated output torque generated by motor<br />
Reference frequency Fref Frequency specified by a frequency command<br />
Running direction<br />
FWD<br />
REV<br />
(Blank)<br />
Forward<br />
Reverse<br />
Stopped<br />
Current limit IL Current limiting<br />
Undervoltage<br />
Voltage limit<br />
LU<br />
VL<br />
Undervoltage detected<br />
Voltage limiting<br />
Torque limit TL Torque limiting<br />
Speed limit SL Speed limiting<br />
<strong>Motor</strong> selected M1-M4 <strong>Motor</strong> 1 to 4<br />
Drive control<br />
<strong>Motor</strong> speed<br />
VF<br />
DTV<br />
VF-SC<br />
VF-PG<br />
VC-SL<br />
VC-PG<br />
SYN<br />
V/f control without slip compensation<br />
Dynamic torque vector control<br />
V/f control with slip compensation<br />
Dynamic torque vector control with speed sensor<br />
Vector control without speed sensor<br />
Vector control with speed sensor<br />
(Output frequency Hz)<br />
×<br />
120<br />
P01<br />
Load shaft speed LOD Output frequency (Hz) Function code E50<br />
Line speed LIN Output frequency (Hz) Function code E50<br />
Constant peripheral<br />
speed control monitor<br />
LSC<br />
Actual peripheral speed under constant peripheral speed<br />
control<br />
3-12
Table 3.7 Drive Monitoring Items (Continued)<br />
Page # in<br />
operation<br />
guide<br />
4<br />
5<br />
6<br />
7<br />
8<br />
Item Symbol Description<br />
PID command value SV The PID command value and PID feedback amount are displayed<br />
after conversion to the virtual physical values (e.g., temperature<br />
or pressure) of the object to be controlled using function code E40<br />
PID feedback amount<br />
PV<br />
and E41 data (PID display coefficients A and B).<br />
Display value = (PID command value or feedback amount) <br />
(Coefficient A - B) + B<br />
PID output value<br />
MV<br />
PID output value, displayed in % (assuming the maximum<br />
frequency (F03) as 100%).<br />
Torque limit value A TLA Driving torque limit value A (based on motor rated torque)<br />
Torque limit value B TLB Driving torque limit value B (based on motor rated torque)<br />
Reference torque bias TRQB Reserved.<br />
Current position pulse P Current position pulse for positioning control<br />
Stop position target pulse E Stop position target pulse for positioning control<br />
Position deviation pulse dP Position deviation pulse for positioning control<br />
Positioning control status MODE Positioning control status<br />
<strong>Motor</strong> temperature NTC Temperature detected by the NTC thermistor built in the motor<br />
Ratio setting<br />
Magnetic flux command<br />
value<br />
Deviation in SY synchronous<br />
operation<br />
Current position pulse,<br />
4-multiplied<br />
Stop position target pulse,<br />
4-multiplied<br />
Position deviation pulse,<br />
4-multiplied<br />
Rati<br />
When this setting is 100%, the LED monitor shows 1.00 time of<br />
the value to be displayed.<br />
FLUX Flux command value in %.<br />
SY-d<br />
P4<br />
E4<br />
dP4<br />
Positioning control status MODE Reserved.<br />
Deviation in SY synchronous operation<br />
Current position pulse for positioning control<br />
Stop position target pulse for positioning control<br />
Position deviation pulse for positioning control<br />
Basic key operation<br />
(1) Turn the inverter ON. It automatically enters Running mode. In that mode, press the key to switch to<br />
Programming mode and display the menu screen.<br />
(2) Move the pointer to "3. OPR MNTR" with the and keys.<br />
(3) Press the key to establish the selected menu and proceed to a list of monitoring items (consisting of several<br />
pages).<br />
(4) Use the and keys to select the page on which the desired monitoring item is shown, then check the running<br />
status information of that item.<br />
(5) Press the key to go back to the menu screen.<br />
Figure 3.12 shows an example of the LCD screen transition starting from Menu #3 "Drive Monitoring."<br />
(1) To display this menu screen, press key in Running mode to switch to Programming mode.<br />
(2) Move the pointer to "3. OPR MNTR" with and keys.<br />
/<br />
Select desired menu by moving the pointer with / key.<br />
3-13
(3) Press key to establish the desired menu and proceed to a list of monitoring items.<br />
((5) To go back to the menu screen, press key.)<br />
/<br />
Output frequency (before slip compensation)<br />
Output frequency (after slip compensation)<br />
Output current<br />
Output voltage<br />
1/8: Page # in operation guide, means that this page continues to the next page.<br />
(4) Use and keys to select the page on which the desired monitor item is shown.<br />
Calculated torque<br />
Reference frequency<br />
Running status (See Table 3.7.)<br />
/<br />
<strong>Motor</strong> speed<br />
Load shaft speed<br />
Line speed<br />
Constant peripheral speed control monitor<br />
/<br />
PID command value<br />
PID feedback amount<br />
PID output value<br />
/<br />
Torque limit value A<br />
Torque limit value B<br />
Reserved.<br />
/<br />
Current position pulse<br />
Stop position target pulse<br />
Position deviation pulse<br />
Positioning control status<br />
/<br />
<strong>Motor</strong> temperature<br />
Ratio setting<br />
Magnetic flux command value<br />
Deviation in SY synchronous operation<br />
/<br />
Current position pulse<br />
Stop position target pulse<br />
Position deviation pulse<br />
Reserved.<br />
: End of page<br />
Common operation items<br />
To access the target data, switch to the desired page using the and keys.<br />
: This page continues to the next page.<br />
: This page is continued from the previous page and continues to the next page.<br />
: This page is continued from the previous page.<br />
Figure 3.12 Screen Transition for "Drive Monitoring"<br />
3-14
3.4.5 Checking I/O signal status -- Menu #4 "I/O Checking" --<br />
Menu #4 "I/O Checking" in Programming mode allows you to check the I/O states of digital and analog signals. It is used<br />
to check the running status during maintenance or test running.<br />
Page # in<br />
operation<br />
guide<br />
1<br />
2<br />
Table 3.8 I/O Check Items<br />
Item Symbol Description<br />
Input signals on the<br />
control circuit<br />
terminals<br />
Input signals via<br />
communications link<br />
3 Output signals<br />
4<br />
I/O signals<br />
(hexadecimal)<br />
5 Analog input signals<br />
6 Analog output signals<br />
7<br />
Input signals on the<br />
digital input interface<br />
card (option)<br />
Output signals on the<br />
digital output interface<br />
card (option)<br />
FWD, REV,<br />
X1 - X7, EN<br />
FWD, REV,<br />
X1 - X7, XF,<br />
XR, RST<br />
Y1 - Y4, Y5,<br />
30ABC<br />
Di<br />
Do<br />
LNK<br />
ON/OFF state of input signals on the control circuit terminal<br />
block.<br />
(Highlighted when short-circuited; normal when open)<br />
Input information for function code S06 (communication)<br />
(Highlighted when 1; normal when 0)<br />
Output signal information<br />
Input signals on the control circuit terminal block (in<br />
hexadecimal)<br />
Output signals (in hexadecimal)<br />
Input signal entered via communications link (in hexadecimal)<br />
12 Input voltage on terminal [12]<br />
C1<br />
V2<br />
FM1<br />
FM1<br />
FM2<br />
FM2<br />
Di-o<br />
Do-o<br />
Input current on terminal [C1]<br />
Input voltage on terminal [V2]<br />
Output voltage on terminal [FM1] *<br />
Output current on terminal [FM1]<br />
Output voltage on terminal [FM2]<br />
Output current on terminal [FM2]<br />
Input signals on the option card in hexadecimal<br />
Output signals on the option card in hexadecimal<br />
Pulse train input X7 Pulse count signals of pulse train input on terminal [X7]<br />
8 PG pulse rate<br />
9<br />
I/O signals of analog<br />
input/output interface<br />
card (option)<br />
P1<br />
Z1<br />
P2<br />
Z2<br />
Pulse rate (p/s) of the A/B phase signal fed back from the<br />
reference PG<br />
Pulse rate (p/s) of the Z phase signal fed back from the<br />
reference PG<br />
Pulse rate (p/s) of the A/B phase signal fed back from the slave<br />
PG<br />
Pulse rate (p/s) of the Z phase signal fed back from the slave<br />
PG<br />
32 Input voltage on terminal [32] (option)<br />
C2<br />
A0<br />
CS<br />
Input current on terminal [C2] (option)<br />
Output voltage on terminal [A0] (option)<br />
Output current on terminal [CS] (option)<br />
* Some screens differ depending upon the specifications even on the same inverter models.<br />
3-15
Basic key operation<br />
(1) Turn the inverter ON. It automatically enters Running mode. In that mode, press the key to switch to<br />
Programming mode and display the menu screen.<br />
(2) Move the pointer to "4. I/O CHECK" with the and keys.<br />
(3) Press the key to establish the selected menu and proceed to a list of I/O check items (consisting of several<br />
pages).<br />
(4) Use the and keys to select the page on which the desired item is shown, then check the running status<br />
information of that item.<br />
(5) Press the key to go back to the menu screen.<br />
Figure 3.13 shows an example of the LCD screen transition starting from Menu #4 "I/O Checking."<br />
(1) To display this menu screen, press key in Running mode to switch to Programming mode.<br />
/<br />
(2) Move the pointer to "4. I/O CHECK" with and keys.<br />
(3) Press key to establish the selected menu and proceed to a list of I/O check items.<br />
((5) To go back to the menu screen, press key.)<br />
Press<br />
Input signals<br />
key to<br />
at<br />
establish<br />
the control<br />
the<br />
circuit<br />
desired<br />
terminal<br />
menu.<br />
block<br />
Press<br />
Highlighted<br />
key<br />
when<br />
to establish<br />
short-circuited<br />
the desired menu.<br />
Normal when open<br />
/<br />
(4) Use and keys to select the page of the desired item.<br />
Input signals via communications link (See Note 1 on the next page.)<br />
Highlighted when 1<br />
Normal when 0<br />
/<br />
Output signals<br />
Highlighted when ON<br />
Normal when OFF<br />
/<br />
I/O signals (hexadecimal) (See Note 2 on the next page.)<br />
Input signals at the control circuit terminal block<br />
Output signal<br />
Input signals via communications link (See Note 1 on the next page.)<br />
/<br />
Analog input signals<br />
Input voltage at terminal [12]<br />
Input current at terminal [C1]<br />
Input voltage at terminal [V2]<br />
/<br />
Analog output signals<br />
Output voltage at terminal [FM1]<br />
Output current at terminal [FM1]<br />
Output voltage at terminal [FM2]<br />
Output current at terminal [FM2]<br />
/<br />
3-16
I/O signals (option) (in hex.) (See Note 2 given below.)<br />
Input signal<br />
Output signal<br />
Pulse rate signal<br />
/<br />
PG pulse rate (option)<br />
A/B phase signal from reference PG<br />
Z phase signal from reference PG<br />
A/B phase signal from slave PG<br />
Z phase signal from slave PG<br />
/<br />
Analog I/O signals (option)<br />
Input voltage at terminal [32]<br />
Input current at terminal [C2]<br />
Output voltage at terminal [A0]<br />
Output current at terminal [CS]<br />
Common operation items<br />
To access the target data, switch to the desired page using the and keys.<br />
: This page continues to the next page.<br />
: This page is continued from the previous page and continues to the next page.<br />
: This page is continued from the previous page.<br />
Figure 3.13 Screen Transition for "I/O Checking"<br />
Note: “---“shown on the display indicates an option card that is not installed.<br />
3-17
Chapter 4 Function Codes / Parameters<br />
Refer to the user manual for function code descriptions not covered in this section.<br />
4.1 Function Code Tables<br />
Function codes enable the <strong>EQ7</strong> series of inverters to be set up to match your system requirements.<br />
Each function code consists of a 3-letter alphanumeric string. The first letter is an alphabet that identifies its group and the following two<br />
letters are numerals that identify each individual code in the group. The function codes are classified into 13 groups: Fundamental<br />
Functions (F codes), Extension Terminal Functions (E codes), Control Functions (C codes), <strong>Motor</strong> 1 Parameters (P codes), High<br />
Performance Functions (H codes), <strong>Motor</strong> 2 (A codes), Application Functions 1 and 2 (J and d), Link Functions (y codes) and Option<br />
Functions (o codes). To determine the property of each function code, set data to the function code.<br />
This manual does not contain the descriptions of Option Function (o codes). For Option Function (o codes), refer to the instruction<br />
manual for each option.<br />
The following descriptions supplement those given in the function code tables on the following pages.<br />
• Changing, validating, and saving function code data when the inverter is running<br />
Function codes are indicated by the following based on whether they can be changed or not when the inverter is running:<br />
Notation Change when running Validating and saving function code data<br />
If the data of the codes marked with Y* is changed with and keys,<br />
Y* Possible<br />
the change will immediately take effect; however, the change is not saved<br />
into the inverter's memory. To save the change, press the key. If you<br />
press the key without pressing the key to exit the current state,<br />
then the changed data will be discarded and the previous data will take<br />
effect for the inverter operation.<br />
Even if the data of the codes marked with Y is changed with and<br />
Y<br />
Possible keys, the change will not take effect. Pressing the key will make the<br />
change take effect and save it into the inverter's memory.<br />
N Impossible —<br />
• Copying data<br />
The keypad is capable of copying of the function code data stored in the inverter's memory into the keypad's memory (refer to Menu #7<br />
"Data copying" in Programming mode). With this feature, you can easily transfer the data saved in a source inverter to other destination<br />
inverters.<br />
If the specifications of the source and destination inverters differ, some code data may not be copied to ensure safe operation of your<br />
power system. Whether data will be copied or not is detailed with the following symbols in the "Data copying" column of the function code<br />
tables given on the following pages.<br />
Y: Will be copied unconditionally.<br />
Y1: Will not be copied if the rated capacity differs from the source inverter.<br />
Y2: Will not be copied if the rated input voltage differs from the source inverter.<br />
N: Will not be copied. (The function code marked with "N" is not subject to the Verify operation, either.)<br />
For details of copying operation, refer to the User <strong>Manual</strong> Chapter 3, Section 3.4.9.<br />
• Using negative logic for programmable I/O terminals<br />
The negative logic signaling system can be used for the programmable, digital input and output terminals by setting the function code<br />
data specifying the properties for those terminals. Negative logic refers to the inverted ON/OFF (logical value 1 (true)/0 (false)) state of<br />
input or output signal. An active-ON signal (the function takes effect if the terminal is short-circuited.) in the normal logic system is<br />
functionally equivalent to active-OFF signal (the function takes effect if the terminal is opened.) in the negative logic system. Active-ON<br />
signals can be switched to active-OFF signals, and vice versa, with the function code data setting, except some signals.<br />
To set the negative logic system for an input or output terminal, enter data of 1000s (by adding 1000 to the data for the normal logic) in<br />
the corresponding function code.<br />
Example: "Coast to a stop" command BX assigned to any of digital input terminals [X1] to [X7] using any of function codes E01 through<br />
E07<br />
Function code data<br />
Description<br />
7 Turning BX ON causes the motor to coast to a stop. (Active-ON)<br />
1007 Turning BX OFF causes the motor to coast to a stop. (Active-OFF)<br />
4-1
• Drive control<br />
The <strong>EQ7</strong> runs under any of the following drive controls. Some function codes apply exclusively to the specific drive control, which is<br />
indicated by letters Y (Applicable) and N (Not applicable) in the "Drive control" column in the function code tables given on the following<br />
pages.<br />
Abbreviation in "Drive control"<br />
column in function code tables<br />
V/f<br />
w/o PG<br />
Control target (H18)<br />
Speed<br />
(Frequency for V/f)<br />
Drive control (F42)<br />
V/f control<br />
Dynamic torque control<br />
Vector control without speed sensor<br />
w/ PG Vector control with speed sensor<br />
Torque control Torque Vector control with/without speed sensor<br />
For details about the drive control, refer to "Function code F42 (Drive Control Selection 1)."<br />
The <strong>EQ7</strong> is a general-purpose inverter whose operation is customized by frequency-basis function codes, like<br />
conventional inverters. Under the speed-basis drive control, however, the control target is a motor speed, not a<br />
frequency, so convert the frequency to the motor speed according to the following expression.<br />
<strong>Motor</strong> speed (r/min) = 120 Frequency (Hz) Number of poles<br />
4-2
F codes: Fundamental Functions<br />
Code Name Data setting range<br />
F00 Data Protection<br />
0: Disable both data protection and digital<br />
reference protection<br />
1: Enable data protection and disable digital<br />
reference protection<br />
2: Disable data protection and enable digital<br />
reference protection<br />
3: Enable both data protection and digital<br />
reference protection<br />
F01 Frequency Command 1 0: / keys on keypad<br />
1: Voltage input to terminal [12] (-10 to +10<br />
VDC)<br />
2: Current input to terminal [C1] (4 to 20 mA<br />
DC)<br />
3: Sum of voltage and current inputs to<br />
terminals [12] and [C1]<br />
5: Voltage input to terminal [V2] (-10 to +10<br />
VDC)<br />
7: Terminal command UP/DOWN control<br />
8: / keys on keypad<br />
(balanceless-bumpless switching<br />
available)<br />
11: Digital input interface card (option)<br />
12: Pulse train input<br />
F02 Operation Method<br />
0: Keypad<br />
1: Terminal command FWD or REV<br />
2: Keypad (Forward direction)<br />
3: Keypad (Reverse direction)<br />
Change when<br />
running<br />
Data<br />
copying<br />
Default<br />
setting<br />
Drive control<br />
Vector<br />
Refer to<br />
Control Page<br />
V/f<br />
w/ Torque<br />
w/o PG control<br />
PG<br />
Y Y 0 Y Y Y Y 4-26<br />
N Y 0 Y Y Y N 4-26<br />
N Y 0 Y Y Y Y 4-34<br />
F03 Maximum Frequency 1 25.0 to 500.0 Hz N Y 60.0 Y Y Y Y<br />
F04 Base Frequency 1 25.0 to 500.0 Hz N Y 60.0 Y Y Y Y<br />
F05 Rated Voltage at Base Frequency 1<br />
0: Output a voltage in proportion to<br />
input voltage<br />
80 to 240 V: Output an AVR-controlled<br />
voltage<br />
(for 230 V series)<br />
160 to 500 V: Output an AVR-controlled<br />
voltage<br />
(for 460 V series)<br />
N Y2<br />
230<br />
460<br />
Y Y Y Y<br />
F06 Maximum Output Voltage 1<br />
80 to 240 V: Output an AVR-controlled<br />
voltage<br />
(for 230 V series)<br />
160 to 500 V: Output an AVR-controlled<br />
voltage<br />
(for 460 V series)<br />
N Y2 230<br />
460<br />
Y N N Y<br />
F07 Acceleration Time 1<br />
0.00 to 6000 s<br />
Y Y *1 Y Y Y N 4-37<br />
F08 Deceleration Time 1 Note: Entering 0.00 cancels the acceleration<br />
time, requiring external soft-start.<br />
Y Y *1 Y Y Y N<br />
F09 Torque Boost 1<br />
0.0% to 20.0% (percentage with respect to<br />
"Rated Voltage at Base Frequency 1")<br />
Y Y 0.0 Y N N N 4-40<br />
4-56<br />
F10 Electronic Thermal Overload Protection for<br />
<strong>Motor</strong> 1<br />
(Select motor characteristics)<br />
Y Y 1 Y Y Y Y 4-41<br />
1: For a general-purpose motor with<br />
shaft-driven cooling fan<br />
2: For an inverter-driven motor, non-ventilated<br />
motor, or motor with separately powered<br />
cooling fan<br />
F11 (Overload detection level) 0.00: Disable<br />
1% to 135% of the rated current (allowable<br />
continuous drive current) of the motor<br />
Y<br />
Y1<br />
Y2<br />
*2 Y Y Y Y<br />
F12 (Thermal time constant) 0.5 to 75.0 min Y Y *3 Y Y Y Y<br />
F14 Restart Mode after Momentary Power<br />
Y Y 0 Y Y Y N 4-43<br />
Failure (Mode selection)<br />
0: Trip immediately<br />
1: Trip after a recovery from power failure<br />
2: Trip after decelerate-to-stop<br />
3: Continue to run, for heavy inertia or general<br />
loads<br />
4: Restart at the frequency at which the power<br />
failure occurred, for general loads<br />
5: Restart at the starting frequency<br />
F15 Frequency Limiter (High) 0.0 to 500.0 Hz Y Y 70.0 Y Y Y N 4-49<br />
F16 Frequency Limiter (Low) 0.0 to 500.0 Hz Y Y 0.0 Y Y Y N 4-49<br />
F18 Bias (Frequency command 1) -100.00% to 100.00% Y* Y 0.00 Y Y Y N 4-50<br />
4-26<br />
F20 DC Braking 1 (Braking starting frequency) 0.0 to 60.0 Hz Y Y 0.0 Y Y Y N 4-50<br />
F21 (Braking level) 0% to 80% (LD/MD mode) *4, 0% to 100% Y Y 0 Y Y Y N<br />
(HD mode)<br />
F22 (Braking time) 0.00 (Disable); 0.01 to 30.00 s Y Y 0.00 Y Y Y N<br />
F23 Starting Frequency 1 0.0 to 60.0 Hz Y Y 0.5 Y Y Y N 4-51<br />
F24 (Holding time) 0.00 to 10.00 s Y Y 0.00 Y Y Y N<br />
F25 Stop Frequency 0.0 to 60.0 Hz Y Y 0.2 Y Y Y N<br />
The shaded function codes are applicable to the quick setup.<br />
Y: Applicable / N: Not Applicable.<br />
4-3
Code Name Data setting range<br />
F26 <strong>Motor</strong> Sound (Carrier frequency) Variable Torque Models<br />
0.5 to 30HP: 0.75 to 16 KHz<br />
40 to 100HP: 0.75 to 10 KHz<br />
125 to 900HP: 0.75 to 6 KHz<br />
1000HP: 0.75 to 4 KHz<br />
Constant Torque Models<br />
0.5 to 75HP: 0.75 to 16 KHz<br />
100 to 125HP: 0.75 to 10 KHz<br />
150 to 700HP: 0.75 to 2 KHz<br />
800 to 900HP: 0.75 to 6 KHz<br />
CT-V Models<br />
0.5 to 75HP: 0.75 to 16 KHz<br />
100 to 700HP: 0.75 to 10 KHz<br />
800 to 900HP: 0.75 to 6 KHz<br />
F27 <strong>Motor</strong> Sound (Tone) 0: Level 0 (Inactive)<br />
1: Level 1<br />
2: Level 2<br />
F29<br />
Analog Output [FM1]<br />
(Mode selection)<br />
3: Level 3<br />
0: Output in voltage (0 to 10 VDC)<br />
1: Output in current (4 to 20 mA DC)<br />
2: Output in current (0 to 20 mA DC)<br />
Change when<br />
running<br />
Data<br />
copying<br />
Default<br />
setting<br />
Drive control<br />
Vector<br />
Refer to<br />
Page<br />
V/f<br />
Control w/ Torque<br />
w/o PG control<br />
PG<br />
Y Y 2KHz Y Y Y Y 4-54<br />
Y Y 0 Y N N Y 4-54<br />
Y Y 0 Y Y Y Y<br />
F30 (Voltage adjustment) 0% to 300% Y* Y 100 Y Y Y Y<br />
F31 (Function) Select a function to be monitored from the<br />
followings.<br />
0: Output frequency 1 (before slip<br />
compensation)<br />
1: Output frequency 2 (after slip<br />
compensation)<br />
2: Output current<br />
3: Output voltage<br />
4: Output torque<br />
5: Load factor<br />
6: Input power<br />
7: PID feedback amount (PV)<br />
8: PG feedback value<br />
9: DC link bus voltage<br />
10: Universal AO<br />
13: <strong>Motor</strong> output<br />
14: Calibration (+)<br />
15: PID command (SV)<br />
16: PID output (MV)<br />
Y Y 0 Y Y Y Y<br />
F32<br />
Analog Output [FM2]<br />
(Mode selection)<br />
17: Positional deviation in synchronous run<br />
mode<br />
0: Output in voltage (0 to 10 VDC)<br />
1: Output in current (4 to 20 mA DC)<br />
2: Output in current (0 to 20 mA DC)<br />
N N Y N<br />
Y Y 0 Y Y Y Y<br />
F34 (Voltage adjustment) 0% to 300% Y* Y 100 Y Y Y Y<br />
F35 (Function) Select a function to be monitored from the<br />
followings.<br />
0: Output frequency 1 (before slip<br />
compensation)<br />
1: Output frequency 2 (after slip<br />
compensation)<br />
2: Output current<br />
3: Output voltage<br />
4: Output torque<br />
5: Load factor<br />
6: Input power<br />
7: PID feedback amount (PV)<br />
8: PG feedback value<br />
9: DC link bus voltage<br />
10: Universal AO<br />
13: <strong>Motor</strong> output<br />
14: Calibration (+)<br />
15: PID command (SV)<br />
16: PID output (MV)<br />
Y Y 0 Y Y Y Y<br />
The shaded function codes are applicable to the quick setup.<br />
Y: Applicable / N: Not Applicable.<br />
17: Positional deviation in synchronous run<br />
mode<br />
N N Y N<br />
4-4
Code Name Data setting range<br />
F37 Load Selection/<br />
Auto Torque Boost/<br />
Auto Energy Saving Operation 1<br />
0: Variable torque load<br />
1: Constant torque load<br />
2: Auto torque boost<br />
3: Auto energy saving<br />
(Variable torque load during ACC/DEC)<br />
4: Auto energy saving<br />
(Constant torque load during<br />
ACC/DEC)<br />
5: Auto energy saving<br />
(Auto torque boost during ACC/DEC)<br />
Drive control<br />
Vector<br />
Default V/f<br />
Refer to<br />
Control w/ Torque<br />
setting<br />
Page<br />
w/o PG control<br />
PG<br />
N Y 1 Y N Y N 4-56<br />
F38 Stop Frequency(Detection mode) 0: Detected speed 1: Reference speed N Y 0 N N Y N 4-58<br />
F39 (Holding Time) 0.00 to 10.00 s Y Y 0.00 Y Y Y N<br />
F40 Torque Limiter 1-1 -300% to 300%; 999 (Disable) Y Y 999 Y Y Y Y<br />
F41 1-2 -300% to 300%; 999 (Disable) Y Y 999 Y Y Y Y<br />
F42 Drive Control Selection 1<br />
0: V/f control with slip compensation N Y 0 Y Y Y Y 4-65<br />
inactive<br />
1: Dynamic torque control<br />
5: Vector control without speed sensor<br />
6: Vector control with speed sensor<br />
F43 Current Limiter (Mode selection) 0: Disable (No current limiter works.) Y Y 2 Y N N N 4-67<br />
1: Enable at constant speed (Disable during<br />
ACC/DEC)<br />
2: Enable during ACC/constant speed<br />
operation<br />
F44<br />
(Level) 20% to 200% (The data is interpreted as Y Y *5 Y N N N<br />
the rated output current of the inverter for<br />
100%.)<br />
F50 Electronic Thermal Overload Protection for 0 (Braking resistor built-in type), 1 to 9000 Y Y1 Y2 *6 Y Y Y Y 4-68<br />
Braking Resistor<br />
(Discharging capability)<br />
kWs,<br />
OFF (Disable)<br />
F51 (Allowable average loss) 0.001 to 99.99 kW Y Y1 Y2 0.001 Y Y Y Y<br />
F52 (Resistance) 0.01 to 999Ω Y Y1 Y2 0.01 Y Y Y Y<br />
F80 Switching between LD, MD and HD drive<br />
modes<br />
1: LD (Variable Torque mode)<br />
2: MD (Constant Torque mode)<br />
0: HD (CT-Vector mode)<br />
N Y 1 Y Y Y Y 4-69<br />
The shaded function codes are applicable to the quick setup.<br />
*1 6.00 s for inverters of 40 HP or below; 20.00 s for those of 50 HP or above<br />
*2 The motor rated current is automatically set. See Table B (P03/A17).<br />
*3 5.0 min for inverters of 40 HP or below; 10.0 min for those of 50 HP or above<br />
*4 0% to 100% for inverters of 7.5 HP or below<br />
*5 160% for inverters of 7.5 HP or below; 130% for those of 10 HP or above<br />
*6 0 for inverters of 15 HP or below; OFF for those of 20 HP or above<br />
The shaded function codes are applicable to the quick setup.<br />
Y: Applicable / N: Not Applicable.<br />
Change when<br />
running<br />
Data<br />
copying<br />
4-5
E codes: Extension Terminal Functions<br />
Code Name Data setting range<br />
Change when<br />
running<br />
Data copying<br />
Default<br />
setting<br />
V/f<br />
Drive control<br />
Vector<br />
Control w/<br />
w/o PG<br />
PG<br />
Selecting function code data assigns the corresponding<br />
function to terminals [X1] to [X7] as listed below.<br />
E01 Terminal [X1] Function 0 (1000): Select multi-frequency (0 to 1 steps) (SS1) N Y 0 Y Y Y N<br />
E02 Terminal [X2] Function 1 (1001): Select multi-frequency (0 to 3 steps) (SS2) N Y 1 Y Y Y N<br />
E03 Terminal [X3] Function 2 (1002): Select multi-frequency (0 to 7 steps) (SS4) N Y 2 Y Y Y N<br />
E04 Terminal [X4] Function 3 (1003): Select multi-frequency (0 to 15 steps) (SS8) N Y 3 Y Y Y N<br />
E05 Terminal [X5] Function 4 (1004): Select ACC/DEC time (2 steps) (RT1) N Y 4 Y Y Y N<br />
E06 Terminal [X6] Function 5 (1005): Select ACC/DEC time (4 steps) (RT2) N Y 5 Y Y Y N<br />
E07 Terminal [X7] Function 6 (1006): Enable 3-wire operation (HLD) N Y 8 Y Y Y Y<br />
7 (1007): Coast to a stop (BX) Y Y Y Y<br />
8 (1008): Reset alarm (RST) Y Y Y Y<br />
Torque<br />
control<br />
9 (1009): Enable external alarm trip (THR)<br />
Y Y Y Y<br />
(9 = Active OFF, 1009 = Active ON)<br />
10 (1010): Ready for jogging (JOG) Y Y Y N<br />
11 (1011): Select frequency command 2/1 (Hz2/Hz1) Y Y Y N<br />
12 (1012): Select motor 2 (M2) Y Y Y Y<br />
13: Enable DC braking (DCBRK) Y Y Y N<br />
14 (1014): Select torque limiter level 2/1 (TL2/TL1) Y Y Y Y<br />
15: Switch to commercial power (50 Hz) (SW50) Y N N N<br />
16: Switch to commercial power (60 Hz) (SW60) Y N N N<br />
17 (1017): UP (Increase output frequency) (UP) Y Y Y N<br />
18 (1018): DOWN (Decrease output frequency) (DOWN) Y Y Y N<br />
19 (1019): Enable data change with keypad (WE-KP) Y Y Y Y<br />
20 (1020): Cancel PID control (Hz/PID) Y Y Y N<br />
21 (1021): Switch normal/inverse operation (IVS) Y Y Y N<br />
22 (1022): Interlock (IL) Y Y Y Y<br />
23 (1023): Cancel torque control (Hz/TRQ) N N N Y<br />
24 (1024):Enable communications link via<br />
Y Y Y<br />
RS-485 or fieldbus (option) (LE) Y<br />
25 (1025): Universal DI (U-DI) Y Y Y Y<br />
26 (1026): Enable auto search for idling motor<br />
speed at starting (STM) Y Y N Y<br />
30 (1030): Force to stop (STOP)<br />
Y Y Y Y<br />
(30 = Active OFF, 1030 = Active ON)<br />
32 (1032): Pre-excitation (EXITE) N Y Y N<br />
33 (1033): Reset PID integral and differential<br />
components (PID-RST) Y Y Y N<br />
34 (1034): Hold PID integral component (PID-HLD) Y Y Y N<br />
35 (1035): Select local (keypad) operation (LOC) Y Y Y Y<br />
39: Protect motor from dew condensation (DWP) Y Y Y Y<br />
40: Enable integrated sequence to switch<br />
to commercial power (50 Hz) (ISW50) Y N N N<br />
41: Enable integrated sequence to switch<br />
to commercial power (60 Hz) (ISW60) Y N N N<br />
47 (1047): Servo-lock command (LOCK) N N Y N<br />
48: Pulse train input (available only on<br />
terminal [X7] (E07)) (PIN) Y Y Y Y<br />
49 (1049): Pulse train sign (available on terminals<br />
except [X7] (E01 to E06))<br />
(SIGN)<br />
Y Y Y Y<br />
59 (1059): Enable battery operation (BATRY)<br />
Y Y Y Y<br />
70 (1070): Cancel constant peripheral speed<br />
control (Hz/LSC) Y Y Y N<br />
71 (1071): Hold the constant peripheral speed<br />
control frequency in the memory (LSC-HLD) Y Y Y N<br />
72 (1072): Count the run time of commercial<br />
power-driven motor 1 (CRUN-M1) Y N N Y<br />
73 (1073): Count the run time of commercial<br />
power-driven motor 2 (CRUN-M2) Y N N Y<br />
76 (1076): Select droop control (DROOP) Y Y Y N<br />
77 (1077): Cancel PG alarm (PG-CCL) N N Y Y<br />
80 (1080): Cancel customizable logic (CLC) Y Y Y Y<br />
81 (1081): Clear all customizable logic timers (CLTC) Y Y Y Y<br />
100: No function assigned (NONE) Y Y Y Y<br />
Setting the value in parentheses ( ) shown above assigns a<br />
negative logic input to a terminal.<br />
Refer to<br />
Page<br />
4-71<br />
The shaded function codes are applicable to the quick setup.<br />
Y: Applicable / N: Not Applicable.<br />
4-6
Change when<br />
running<br />
Data copying<br />
Default<br />
setting<br />
Drive control<br />
Code Name Data setting range<br />
Vector<br />
Refer to<br />
Page<br />
V/f<br />
Control w/ Torque<br />
w/o PG control<br />
PG<br />
E10 Acceleration Time 2 0.00 to 6000 s<br />
Y Y *1 Y Y Y N 4-37<br />
E11 Deceleration Time 2 Note: Entering 0.00 cancels the acceleration time, requiring Y Y *1 Y Y Y N<br />
E12 Acceleration Time 3 external soft-start and -stop.<br />
Y Y *1 Y Y Y N<br />
E13 Deceleration Time 3 Y Y *1 Y Y Y N<br />
E14 Acceleration Time 4 Y Y *1 Y Y Y N<br />
E15 Deceleration Time 4 Y Y *1 Y Y Y N<br />
E16 Torque Limiter 2-1 -300% to 300%; 999 (Disable) Y Y 999 Y Y Y Y 4-58<br />
E17 Torque Limiter 2-2 -300% to 300%; 999 (Disable) Y Y 999 Y Y Y Y<br />
Selecting function code data assigns the corresponding<br />
function to terminals [Y1] to [Y5A/C] and [30A/B/C] as listed<br />
below.<br />
E20 Terminal [Y1] Function 0 (1000): Inverter running (RUN) N Y 0 Y Y Y Y<br />
E21 Terminal [Y2] Function 1 (1001): Frequency (speed) arrival signal (FAR) N Y 1 Y Y Y N<br />
E22 Terminal [Y3] Function 2 (1002): Frequency (speed) detected (FDT) N Y 2 Y Y Y Y<br />
E23 Terminal [Y4] Function 3 (1003): Undervoltage detected (Inverter stopped) (LU) N Y 7 Y Y Y Y<br />
E24 Terminal [Y5A/C]<br />
Function<br />
E27 Terminal [30A/B/C]<br />
Function<br />
(Relay output)<br />
4 (1004): Torque polarity detected (B/D)<br />
5 (1005): Inverter output limiting (IOL)<br />
N Y 15 Y Y Y Y<br />
N Y 99 Y Y Y Y<br />
6 (1006): Auto-restarting after momentary power<br />
failure (IPF) Y Y Y Y<br />
7 (1007): <strong>Motor</strong> overload early warning (OL) Y Y Y Y<br />
8 (1008): Keypad operation enabled (KP) Y Y Y Y<br />
10 (1010): Inverter ready to run (RDY) Y Y Y Y<br />
11: Switch motor drive source between<br />
commercial power and inverter output<br />
(For MC on commercial line) (SW88) Y N N N<br />
12: Switch motor drive source between<br />
commercial power and inverter output<br />
(For secondary side) (SW52-2) Y N N N<br />
13: Switch motor drive source between<br />
commercial power and inverter output<br />
(For primary side) (SW52-1) Y N N N<br />
15 (1015): Select AX terminal function<br />
(For MC on primary side) (AX) Y Y Y Y<br />
22 (1022): Inverter output limiting with delay (IOL2) Y Y Y Y<br />
25 (1025): Cooling fan in operation (FAN) Y Y Y Y<br />
26 (1026): Auto-resetting (TRY) Y Y Y Y<br />
27 (1027): Universal DO (U-DO) Y Y Y Y<br />
28 (1028): Heat sink overheat early warning (OH) Y Y Y Y<br />
29 (1029): Synchronization completed (SY) N N Y N<br />
30 (1030): Lifetime alarm (LIFE) Y Y Y Y<br />
31 (1031): Frequency (speed) detected 2 (FDT2) Y Y Y Y<br />
33 (1033): Reference loss detected (REF OFF) Y Y Y Y<br />
35 (1035): Inverter output on (RUN2) Y Y Y Y<br />
36 (1036): Overload prevention control (OLP) Y Y Y N<br />
37 (1037): Current detected (ID) Y Y Y Y<br />
38 (1038): Current detected 2 (ID2) Y Y Y Y<br />
39 (1039): Current detected 3 (ID3) Y Y Y Y<br />
41 (1041): Low current detected (IDL) Y Y Y Y<br />
42 (1042): PID alarm (PID-ALM) Y Y Y N<br />
43 (1043): Under PID control (PID-CTL) Y Y Y N<br />
44 (1044): <strong>Motor</strong> stopped due to slow<br />
flowrate under PID control (PID-STP) Y Y Y N<br />
45 (1045): Low output torque detected (U-TL) Y Y Y Y<br />
46 (1046): Torque detected 1 (TD1) Y Y Y Y<br />
47 (1047): Torque detected 2 (TD2) Y Y Y Y<br />
48 (1048): <strong>Motor</strong> 1 selected (SWM1) Y Y Y Y<br />
49 (1049): <strong>Motor</strong> 2 selected (SWM2) Y Y Y Y<br />
52 (1052): Running forward (FRUN) Y Y Y Y<br />
53 (1053): Running reverse (RRUN) Y Y Y Y<br />
54 (1054): In remote operation (RMT) Y Y Y Y<br />
56 (1056): <strong>Motor</strong> overheat detected by thermistor (THM) Y Y Y Y<br />
57 (1057): Brake signal (BRKS) Y Y Y N<br />
58 (1058): Frequency (speed) detected 3 (FDT3) Y Y Y Y<br />
59 (1059): Terminal [C1] wire break (C1OFF) Y Y Y Y<br />
*1 6.00 s for inverters of 40 HP or below; 20.00 s for those of 50 HP or above<br />
Item values in parentheses indicated value for negative logic.<br />
Y: Applicable / N: Not Applicable.<br />
4-88<br />
4-7
Code Name Data setting range<br />
Change when<br />
running<br />
Data copying<br />
Default<br />
setting<br />
Drive control<br />
Vector<br />
Refer to<br />
Page<br />
V/f<br />
Control w/ Torque<br />
w/o PG control<br />
PG<br />
70 (1070): Speed valid (DNZS) N Y Y Y 4-88<br />
71 (1071): Speed agreement (DSAG) N Y Y N<br />
72 (1072): Frequency (speed) arrival signal 3 (FAR3) Y Y Y N<br />
76 (1076): PG error detected (PG-ERR) N Y Y N<br />
82 (1082): Positioning completion signal (PSET) N N Y N<br />
84 (1084): Maintenance timer (MNT) Y Y Y Y<br />
98 (1098): Light alarm (L-ALM) Y Y Y Y<br />
99 (1099): Alarm output (for any alarm) (ALM) Y Y Y Y<br />
101 (1101): Enable circuit failure detected (DECF) Y Y Y Y<br />
102 (1102): Enable input OFF (EN OFF) Y Y Y Y<br />
105 (1105): Braking transistor broken (DBAL) Y Y Y Y<br />
111 (1111): Customizable logic output signal 1 (CLO1) Y Y Y Y<br />
112 (1112): Customizable logic output signal 2(CLO2) Y Y Y Y<br />
113 (1113): Customizable logic output signal 3(CLO3) Y Y Y Y<br />
114 (1114): Customizable logic output signal 4(CLO4) Y Y Y Y<br />
115 (1115): Customizable logic output signal 5(CLO5) Y Y Y Y<br />
Setting the value in parentheses ( ) shown above<br />
assigns a negative logic output to a terminal.<br />
E30 Frequency Arrival (Hysteresis 0.0 to 10.0 Hz Y Y 2.5 Y Y Y N 4-93<br />
width)<br />
E31 Frequency Detection 1 (Level) 0.0 to 500.0 Hz Y Y 60.0 Y Y Y Y 4-94<br />
E32 (Hysteresis width) 0.0 to 500.0 Hz Y Y 1.0 Y Y Y Y<br />
E34 Overload Early Warning/Current 0.00 (Disable); Current value of 1% to 200% of the<br />
Detection<br />
(Level) inverter rated current<br />
Y Y1 Y2 *2 Y Y Y Y 4-95<br />
E35 (Timer) 0.01 to 600.00s Y Y 10.00 Y Y Y Y<br />
E36 Frequency Detection 2 (Level) 0.0 to 500.0 Hz Y Y 60.0 Y Y Y Y 4-96<br />
E37 Current Detection 2/<br />
Low Current Detection<br />
0.00 (Disable); Current value of 1% to 200% of the<br />
(Level) inverter rated current<br />
Y Y1 Y2 *2 Y Y Y Y 4-96<br />
E38 (Timer) 0.01 to 600.00 s Y Y 10.00 Y Y Y Y 4-96<br />
E40 PID Display Coefficient A -999 to 0.00 to 9990 Y Y 100 Y Y Y N 4-96<br />
E41 PID Display Coefficient B -999 to 0.00 to 9990 Y Y 0.00 Y Y Y N<br />
E42 LED Display Filter 0.0 to 5.0 s Y Y 0.5 Y Y Y Y 4-97<br />
E43 LED Monitor (Item selection) 0: Speed monitor (select by E48)<br />
Y Y 0 Y Y Y Y 4-98<br />
3: Output current<br />
4: Output voltage<br />
8: Calculated torque<br />
9: Input power<br />
10: PID command<br />
12: PID feedback amount<br />
14: PID output<br />
15: Load factor<br />
16: <strong>Motor</strong> output<br />
17: Analog input<br />
23: Torque current (%)<br />
24: Magnetic flux command (%)<br />
25: Input watt-hour<br />
E44 Display when stopped 0: Specified value 1: Output value Y Y 0 Y Y Y Y 4-99<br />
E45 LCD Monitor (Item selection) 0: Running status, rotational direction and operation Y Y 0 Y Y Y Y<br />
guide<br />
1: Bar charts for output frequency, current and<br />
calculated torque<br />
E46 Language selection<br />
Type: TP-G1W-J1<br />
Y Y 1 Y Y Y Y 4-100<br />
0: Japanese<br />
1: English<br />
2: German<br />
3: French<br />
4: Spanish<br />
5: Italian<br />
E47 Contrast control 0 (Low) to 10 (High) Y Y 5 Y Y Y Y<br />
E48 LED Monitor(Speed monitor 0: Output frequency 1 (Before slip compensation) Y Y 0 Y Y Y Y 4-100<br />
item)<br />
1: Output frequency 2 (After slip compensation)<br />
2: Reference frequency<br />
3: <strong>Motor</strong> speed in r/min<br />
4: Load shaft speed in r/min<br />
5: Line speed in m/min<br />
7: Display speed in %<br />
*2 The motor rated current is automatically set. See Table B (P03/A17).<br />
Item values in parentheses indicated value for negative logic.<br />
Y: Applicable / N: Not Applicable.<br />
4-8
Change when<br />
running<br />
Data copying<br />
Default<br />
setting<br />
Drive control<br />
Code Name Data setting range<br />
Vector<br />
Refer to<br />
Page<br />
V/f<br />
Control w/ Torque<br />
w/o PG control<br />
PG<br />
E50 Coefficient for Speed Indication 0.01 to 200.00 Y Y 30.00 Y Y Y Y 4-100<br />
E51 Display Coefficient for Input<br />
Watt-hour Data<br />
0.000 (Cancel/reset), 0.001 to 9999 Y Y 0.010 Y Y Y Y<br />
E54 Frequency Detection 3 (Level) 0.0 to 500.0 Hz Y Y 60.0 Y Y Y Y 4-101<br />
4-94<br />
E55 Current Detection 3 (Level) 0.00 (Disable);<br />
Y Y1 Y2 *2 Y Y Y Y 4-101<br />
Current value of 1% to 200% of the inverter rated<br />
current<br />
4-95<br />
E56 (Timer) 0.01 to 600.00 s Y Y 10.00 Y Y Y Y 4-102<br />
E61 Terminal [12] Extended Function 0: None<br />
N Y 0 Y Y Y Y<br />
E62 Terminal [C1] Extended 1: Auxiliary frequency command 1<br />
N Y 0 Y Y Y Y<br />
Function<br />
2: Auxiliary frequency command 2<br />
E63 Terminal [V2] Extended 3: PID command 1<br />
N Y 0 Y Y Y Y<br />
Function<br />
5: PID feedback amount<br />
6: Ratio setting<br />
7: Analog torque limit value A<br />
8: Analog torque limit value B<br />
10:Torque command<br />
11: Torque current command<br />
17: Speed limit FWD<br />
18: Speed limit REV<br />
20: Analog input monitor<br />
E64 Saving of Digital Reference 0: Automatic saving (when main power is turned OFF) Y Y 1 Y Y Y Y 4-103<br />
Frequency<br />
1: Saving by pressing key<br />
E65 Reference Loss Detection 0: Decelerate to stop, 20% to 120%, 999: Disable Y Y 999 Y Y Y Y<br />
(Continuous running frequency)<br />
E78 Torque Detection 1 (Level) 0% to 300% Y Y 100 Y Y Y Y 4-104<br />
E79 (Timer) 0.01 to 600.00 s Y Y 10.00 Y Y Y Y<br />
E80 Torque Detection 2/<br />
0% to 300% Y Y 20 Y Y Y Y<br />
Low Torque Detection (Level)<br />
E81 (Timer) 0.01 to 600.00 s Y Y 20.00 Y Y Y Y<br />
Selecting function code data assigns the corresponding<br />
4-71<br />
function to terminals [FWD] and [REV] as listed below.<br />
4-104<br />
E98 Terminal [FWD] Function 0 (1000): Select multi-frequency (0 to 1 steps) (SS1) N Y 98 Y Y Y N<br />
E99 Terminal [REV] Function 1 (1001): Select multi-frequency (0 to 3 steps) (SS2) N Y 99 Y Y Y N<br />
2 (1002): Select multi-frequency (0 to 7 steps) (SS4) Y Y Y N<br />
3 (1003): Select multi-frequency (0 to 15 steps) (SS8) Y Y Y N<br />
4 (1004): Select ACC/DEC time (2 steps) (RT1) Y Y Y N<br />
5 (1005): Select ACC/DEC time (4 steps) (RT2) Y Y Y N<br />
6 (1006): Enable 3-wire operation (HLD) Y Y Y Y<br />
7 (1007): Coast to a stop (BX) Y Y Y Y<br />
8 (1008): Reset alarm (RST) Y Y Y Y<br />
9 (1009): Enable external alarm trip<br />
(9 = Active OFF, 1009 = Active ON)<br />
(THR)<br />
Y Y Y Y<br />
10 (1010): Ready for jogging (JOG) Y Y Y N<br />
11 (1011): Select frequency command 2/1 (Hz2/Hz1) Y Y Y N<br />
12 (1012): Select motor 2 (M2) Y Y Y Y<br />
13: Enable DC braking (DCBRK) Y Y Y N<br />
14 (1014): Select torque limiter level 2/1 (TL2/TL1) Y Y Y Y<br />
15: Switch to commercial power (50 Hz) (SW50) Y N N N<br />
16: Switch to commercial power (60 Hz) (SW60) Y N N N<br />
17 (1017): UP (Increase output frequency) (UP) Y Y Y N<br />
18 (1018): DOWN (Decrease output frequency)<br />
Y Y Y N<br />
(DOWN)<br />
19 (1019): Enable data change with keypad (WE-KP) Y Y Y Y<br />
20 (1020): Cancel PID control (Hz/PID) Y Y Y N<br />
21 (1021): Switch normal/inverse operation (IVS) Y Y Y N<br />
22 (1022): Interlock (IL) Y Y Y Y<br />
23 (1023): Cancel torque control (Hz/TRQ) N N N Y<br />
24 (1024): Enable communications link via RS-485<br />
or fieldbus (LE) Y Y Y Y<br />
25 (1025): Universal DI (U-DI) Y Y Y Y<br />
26 (1026): Enable auto search for idling motor<br />
speed at starting (STM) Y Y N Y<br />
The shaded function codes are applicable to the quick setup.<br />
*2 The motor rated current is automatically set. See Table B (P03/A17).<br />
Item values in parentheses indicated value for negative logic.<br />
Y: Applicable / N: Not Applicable.<br />
4-9
Code Name Data setting range<br />
Item values in parentheses indicated value for negative logic.<br />
Y: Applicable / N: Not Applicable.<br />
Change when<br />
running<br />
Data copying<br />
Default<br />
setting<br />
Drive control<br />
V/f<br />
Vector<br />
Refer to<br />
Control w/ Torque Page<br />
w/o PG control<br />
PG<br />
Y Y Y Y 4-71<br />
4-104<br />
30 (1030): Force to stop (STOP)<br />
(30 = Active OFF, 1030 = Active ON)<br />
32 (1032): Pre-excitation (EXITE) N Y Y N<br />
33 (1033): Reset PID integral and differential<br />
components (PID-RST) Y Y Y N<br />
34 (1034): Hold PID integral component (PID-HLD) Y Y Y N<br />
35 (1035): Select local (keypad) operation (LOC) Y Y Y Y<br />
39: Protect motor from dew condensation (DWP) Y Y Y Y<br />
40: Enable integrated sequence to switch<br />
to commercial power (50 Hz) (ISW50) Y N N N<br />
41: Enable integrated sequence to switch<br />
to commercial power (60 Hz) (ISW60) Y N N N<br />
47 (1047): Servo-lock command (LOCK) N N Y N<br />
49 (1049): Pulse train sign (SIGN)<br />
Y Y Y Y<br />
59 (1059): Enabled battery operation (BATRY)<br />
Y Y Y Y<br />
70 (1070): Cancel constant peripheral speed<br />
Y Y Y N<br />
control<br />
(Hz/LSC)<br />
71 (1071): Hold the constant peripheral speed<br />
Y Y Y N<br />
control frequency in the memory(LSC-HLD)<br />
72 (1072): Count the run time of commercial<br />
power-driven motor 1 (CRUN-M1) Y N N Y<br />
73 (1073): Count the run time of commercial<br />
power-driven motor 2 (CRUN-M2) Y N N Y<br />
76 (1076): Select droop control (DROOP) Y Y Y N<br />
77 (1077): Cancel PG alarm (PG-CCL) N N Y Y<br />
80 (1080): Cancel customizable logic (CLC) Y Y Y Y<br />
81 (1081): Clear all customizable logic timers (CLTC) Y Y Y Y<br />
98: Run forward (FWD) Y Y Y Y<br />
99: Run reverse (REV) Y Y Y Y<br />
100: No function assigned (NONE) Y Y Y Y<br />
Setting the value in parentheses ( ) shown above<br />
assigns a negative logic input to a terminal.<br />
4-10
C codes: Control Functions of Frequency<br />
Code Name Data setting range<br />
Change when<br />
running<br />
Data copying<br />
Default<br />
setting<br />
Drive control<br />
Refer to<br />
Page<br />
Vector<br />
V/f<br />
Control w/ Torque<br />
w/o PG control<br />
PG<br />
C01 Jump Frequency 1 0.0 to 500.0 Hz Y Y 0.0 Y Y Y N 4-105<br />
C02 2 Y Y 0.0 Y Y Y N<br />
C03 3 Y Y 0.0 Y Y Y N<br />
C04 (Hysteresis width) 0.0 to 30.0 Hz Y Y 3.0 Y Y Y N<br />
C05 Multi-frequency 1 0.00 to 500.00 Hz Y Y 0.00 Y Y Y N<br />
C06 2 Y Y 0.00 Y Y Y N<br />
C07 3 Y Y 0.00 Y Y Y N<br />
C08 4 Y Y 0.00 Y Y Y N<br />
C09 5 Y Y 0.00 Y Y Y N<br />
C10 6 Y Y 0.00 Y Y Y N<br />
C11 7 Y Y 0.00 Y Y Y N<br />
C12 8 Y Y 0.00 Y Y Y N<br />
C13 9 Y Y 0.00 Y Y Y N<br />
C14 10 Y Y 0.00 Y Y Y N<br />
C15 11 Y Y 0.00 Y Y Y N<br />
C16 12 Y Y 0.00 Y Y Y N<br />
C17 13 Y Y 0.00 Y Y Y N<br />
C18 14 Y Y 0.00 Y Y Y N<br />
C19 15 Y Y 0.00 Y Y Y N<br />
C20 Jogging Frequency 0.00 to 500.00 Hz Y Y 0.00 Y Y Y N 4-107<br />
C30 Frequency Command 2 0: Enable / keys on the keypad<br />
1: Voltage input to terminal [12] (-10 to +10 VDC)<br />
2: Current input to terminal [C1] (4 to 20 mA DC)<br />
3: Sum of voltage and current inputs to terminals<br />
[12]and [C1]<br />
5: Voltage input to terminal [V2] (-10 to +10 VDC)<br />
7: Terminal command UP/DOWN control<br />
8: Enable / keys on the keypad<br />
(balanceless-bumpless switching available)<br />
11: Digital input interface card (option)<br />
12: Pulse train input<br />
N Y 2 Y Y Y N 4-26<br />
4-107<br />
C31 Analog Input Adjustment for [12] -5.0% to 5.0% Y* Y 0.0 Y Y Y Y 4-107<br />
(Offset)<br />
C32 (Gain) 0.00% to 400.00% Y* Y 100.00 Y Y Y Y<br />
C33 (Filter time constant) 0.00 to 5.00 s Y Y 0.05 Y Y Y Y<br />
C34 (Gain base point) 0.00% to 100.00% Y* Y 100.00 Y Y Y Y<br />
C35 (Polarity) 0: Bipolar 1: Unipolar N Y 1 Y Y Y Y<br />
C36 Analog Input Adjustment for [C1] -5.0% to 5.0% Y* Y 0.0 Y Y Y Y<br />
(Offset)<br />
C37 (Gain) 0.00% to 400.00% Y* Y 100.00 Y Y Y Y<br />
C38 (Filter time constant) 0.00 to 5.00s Y Y 0.05 Y Y Y Y<br />
C39 (Gain base point) 0.00% to 100.00% Y* Y 100.00 Y Y Y Y<br />
C40 Terminal [C1] Range Selection 0: 4 to 20 mA<br />
N Y 0 Y Y Y Y<br />
1: 0 to 20 mA<br />
C41 Analog Input Adjustment for [V2] -5.0% to 5.0% Y* Y 0.0 Y Y Y Y<br />
(Offset)<br />
C42 (Gain) 0.00% to 400.00% Y* Y 100.00 Y Y Y Y<br />
C43 (Filter time constant) 0.00 to 5.00 s Y Y 0.05 Y Y Y Y<br />
C44 (Gain base point) 0.00% to 100.00% Y* Y 100.00 Y Y Y Y<br />
C45 (Polarity) 0: Bipolar 1: Unipolar N Y 1 Y Y Y Y 4-26<br />
4-107<br />
C50 Bias (Frequency command 1)<br />
(Bias base point)<br />
0.00% to 100.00% Y* Y 0.00 Y Y Y Y 4-26<br />
4-108<br />
C51 Bias (PID command 1)(Bias value) -100.00% to 100.00% Y* Y 0.00 Y Y Y Y<br />
C52 (Bias base point) 0.00% to 100.00% Y* Y 0.00 Y Y Y Y 4-108<br />
C53 Selection of Normal/Inverse 0: Normal operation<br />
Y Y 0 Y Y Y Y 4-71<br />
Operation(Frequency command 1) 1: Inverse operation<br />
4-108<br />
Y: Applicable / N: Not Applicable.<br />
4-11
P codes: <strong>Motor</strong> 1 Parameters<br />
Change when<br />
running<br />
Data copying<br />
Default<br />
setting<br />
Drive control<br />
Refer to<br />
Code Name Data setting range<br />
Vector<br />
Page<br />
V/f<br />
Control w/ Torque<br />
w/o PG control<br />
PG<br />
P01 <strong>Motor</strong> 1 (No. of poles) 2 to 22 poles N Y1 Y2 4 Y Y Y Y 4-109<br />
P02 (Rated capacity) 0.01 to 1000 kW (when P99 = 0, 2, 3 or 4)<br />
N Y1 Y2 *7 Y Y Y Y 4-109<br />
0.01 to 1000 HP (when P99 = 1)<br />
P03 (Rated current) 0.00 to 2000 A N Y1 Y2 *7 Y Y Y Y<br />
P04<br />
(Auto-tuning) 0: Disable<br />
N N 0 Y Y Y Y 4-110<br />
1: Tune while the motor stops. (%R1, %X and rated<br />
slip frequency)<br />
2: Tune while the motor is rotating under V/f control<br />
(%R1, %X, rated slip frequency, no-load current,<br />
magnetic saturation factors 1 to 5, and magnetic<br />
saturation extension factors "a" to "c")<br />
3: Tune while the motor is rotating under vector<br />
control<br />
(%R1, %X, rated slip frequency, no-load current,<br />
magnetic saturation factors 1 to 5, and magnetic<br />
saturation extension factors "a" to "c." Available<br />
when the vector control is enabled.)<br />
P05 (Online tuning) 0: Disable 1: Enable Y Y 0 Y N N N 4-111<br />
P06 (No-load current) 0.00 to 2000 A N Y1 Y2 *7 Y Y Y Y<br />
P07 (%R1) 0.00% to 50.00% Y Y1 Y2 *7 Y Y Y Y<br />
P08 (%X) 0.00% to 50.00% Y Y1 Y2 *7 Y Y Y Y<br />
P09 (Slip compensation gain for<br />
driving)<br />
0.0% to 200.0% Y* Y 100.0<br />
Y Y Y N<br />
P10 (Slip compensation response<br />
time)<br />
0.01 to 10.00 s Y Y1 Y2 0.12<br />
Y N N N<br />
P11 (Slip compensation gain for<br />
braking)<br />
0.0% to 200.0% Y* Y 100.0<br />
Y Y Y N<br />
P12 (Rated slip frequency) 0.00 to 15.00 Hz N Y1 Y2 *7 Y Y Y N<br />
P13 (Iron loss factor 1) 0.00% to 20.00% Y Y1 Y2 *7 Y Y Y Y<br />
P14 (Iron loss factor 2) 0.00% to 20.00% Y Y1 Y2 0.00 Y Y Y Y<br />
P15 (Iron loss factor 3) 0.00% to 20.00% Y Y1 Y2 0.00 Y Y Y Y<br />
P16 (Magnetic saturation factor 1) 0.0% to 300.0% Y Y1 Y2 *7 Y Y Y Y<br />
P17 (Magnetic saturation factor 2) 0.0% to 300.0% Y Y1 Y2 *7 Y Y Y Y<br />
P18 (Magnetic saturation factor 3) 0.0% to 300.0% Y Y1 Y2 *7 Y Y Y Y<br />
P19 (Magnetic saturation factor 4) 0.0% to 300.0% Y Y1 Y2 *7 Y Y Y Y<br />
P20 (Magnetic saturation factor 5) 0.0% to 300.0% Y Y1 Y2 *7 Y Y Y Y<br />
P21 (Magnetic saturation extension 0.0% to 300.0% Y Y1 Y2 *7 Y Y Y Y<br />
factor "a")<br />
P22 (Magnetic saturation extension 0.0% to 300.0% Y Y1 Y2 *7 Y Y Y Y<br />
factor "b")<br />
P23 (Magnetic saturation extension 0.0% to 300.0% Y Y1 Y2 *7 Y Y Y Y<br />
factor "c")<br />
P53 (%X correction factor 1) 0% to 300% Y Y1 Y2 100 Y Y Y Y 4-113<br />
P54 (%X correction factor 2) 0% to 300% Y Y1 Y2 100 Y Y Y Y<br />
P55 (Torque current under vector 0.00 to 2000 A N Y1 Y2 *7 N Y Y Y<br />
control)<br />
P56 (Induced voltage factor under 50% to 100% N Y1 Y2 85 (90) N Y Y Y<br />
vector control)<br />
*8<br />
P57 Reserved *9 ― - - - - - - - ―<br />
P99 <strong>Motor</strong> 1 Selection 0: <strong>Motor</strong> characteristics 0 (Reserved)<br />
1: <strong>Motor</strong> characteristics 1 (HP rating motors)<br />
2: <strong>Motor</strong> characteristics 2 (Reserved)<br />
3: <strong>Motor</strong> characteristics 3 (Reserved)<br />
4: <strong>Motor</strong> characteristics 1 (kW rating motors)<br />
N Y1 Y2 1 Y Y Y Y 4-113<br />
The shaded function code are applicable to the quick setup.<br />
*7 The motor parameters are automatically set, depending upon the inverter's capacity. See Table B.<br />
*8 85% for inverters of 150 HP or less; 90% for those of 175 HP or above.<br />
*9 Factory use. Do not access these function codes.<br />
The shaded function codes are applicable to the quick setup.<br />
Y: Applicable / N: Not Applicable.<br />
4-112<br />
4-12
H codes: High Performance Functions<br />
Code Name Data setting range<br />
H03 Data Initialization 0: Disable initialization<br />
1: Initialize all function code data to the factory<br />
defaults<br />
2: Initialize motor 1 parameters<br />
3: Initialize motor 2 parameters<br />
Change when<br />
running<br />
Data<br />
copying<br />
Default<br />
setting<br />
Drive control<br />
Vector<br />
V/f<br />
Control w/ Torque<br />
w/o PG control<br />
PG<br />
N N 0 Y Y Y Y *11<br />
H04 Auto-reset (Times) 0: Disable; 1 to 10 Y Y 0 Y Y Y Y<br />
H05 (Reset interval) 0.5 to 20.0 s Y Y 5.0 Y Y Y Y<br />
H06 Cooling Fan ON/OFF Control 0: Disable (Always in operation)<br />
Y Y 0 Y Y Y Y<br />
1: Enable (ON/OFF controllable)<br />
H07 Acceleration/Deceleration<br />
Pattern<br />
Y Y 0 Y Y Y N<br />
0: Linear<br />
1: S-curve (Weak)<br />
2: S-curve (Arbitrary, according to H57 to H60 data)<br />
3: Curvilinear<br />
H08 Rotational Direction Limitation 0: Disable<br />
1: Enable (Reverse rotation inhibited)<br />
2: Enable (Forward rotation inhibited)<br />
H09 Starting Mode (Auto search) 0: Disable<br />
1: Enable (At restart after momentary power failure)<br />
2: Enable (At restart after momentary power failure<br />
and at normal start)<br />
N Y 0 Y Y Y N<br />
N Y 0 Y N N N<br />
H11 Deceleration Mode 0: Normal deceleration 1: Coast-to-stop Y Y 0 Y Y Y N<br />
H12 Instantaneous Overcurrent 0: Disable<br />
Y Y 1 Y N N N<br />
Limiting<br />
1: Enable<br />
(Mode selection)<br />
H13 Restart Mode after Momentary<br />
Power Failure (Restart time)<br />
H14 (Frequency fall rate) 0.00: Deceleration time selected by F08,<br />
0.01 to 100.00 Hz/s, 999: Follow the current limit<br />
command<br />
0.1 to 20.0 s Y Y1 Y2 *10 Y Y Y N<br />
H15 (Continuous running level) 200 to 300 V for 230 V series<br />
400 to 600 V for 460 V series<br />
H16 (Allowable momentary power 0.0 to 30.0 s<br />
failure time) 999: Automatically determined by inverter<br />
H18 Torque Control (Mode selection) 0: Disable (Speed control)<br />
2: Enable (Torque current command)<br />
3: Enable (Torque command)<br />
H26<br />
Thermistor (for motor)<br />
(Mode selection)<br />
0: Disable<br />
1: PTC (The inverter immediately trips with 0h4<br />
displayed.)<br />
2: PTC (The inverter issues output signal THM and<br />
continues to run.)<br />
3: NTC (When connected)<br />
Y Y 999 Y Y N N<br />
Y Y2 235 Y N N N<br />
470<br />
Y Y 999 Y Y Y N<br />
N Y 0 N Y Y Y<br />
Y Y 0 Y Y Y Y<br />
H27 (Level) 0.00 to 5.00 V Y Y 0.35 Y Y Y Y<br />
H28 Droop Control -60.0 to 0.0 Hz Y Y 0.0 Y Y Y N<br />
H30 Communications Link Function<br />
(Mode selection)<br />
Y Y 0 Y Y Y Y<br />
Frequency command Run command<br />
0: F01/C30 F02<br />
1: RS-485 (Port 1) F02<br />
2: F01/C30 RS-485 (Port 1)<br />
3: RS-485 (Port 1) RS-485 (Port 1)<br />
4: RS-485 (Port 2) F02<br />
5: RS-485 (Port 2) RS-485 (Port 1)<br />
6: F01/C30 RS-485 (Port 2)<br />
7: RS-485 (Port 1) RS-485 (Port 2)<br />
8: RS-485 (Port 2) RS-485 (Port 2)<br />
H42 Capacitance of DC Link Bus<br />
Capacitor<br />
Indication for replacement of DC link bus capacitor<br />
0 to 65535<br />
H43 Cumulative Run Time of Cooling Indication for replacement of cooling fan<br />
Fan<br />
0 to 99990 hours<br />
H44 Startup Counter for <strong>Motor</strong> 1 Indication of cumulative startup count<br />
0 to 65535 times<br />
H45 Mock Alarm 0: Disable<br />
1: Enable (Once a mock alarm occurs, the data<br />
automatically returns to 0.)<br />
H46<br />
H47<br />
H48<br />
Starting Mode<br />
(Auto search delay time 2)<br />
Initial Capacitance of DC Link<br />
Bus Capacitor<br />
Cumulative Run Time of<br />
Capacitors on Printed Circuit<br />
Boards<br />
Y N - Y Y Y Y<br />
Y N - Y Y Y Y<br />
Y N - Y Y Y Y<br />
Y N 0 Y Y Y Y<br />
0.1 to 20.0 s Y Y1 Y2 *7 Y Y N Y<br />
Indication for replacement of DC link bus capacitor<br />
0 to 65535<br />
Indication for replacement of capacitors<br />
0 to 99990 hours<br />
(The cumulative run time can be modified or reset.)<br />
*7 The motor parameters are automatically set, depending upon the inverter's capacity. See Table B.<br />
*10 The factory default differs depending upon the inverter's capacity. See Table A.<br />
*11 Refer to the User <strong>Manual</strong> for detailed information on these parameters.<br />
Y: Applicable / N: Not Applicable.<br />
Y N - Y Y Y Y<br />
Y N - Y Y Y Y<br />
Refer to<br />
Page<br />
4-13
Change when<br />
running<br />
Data<br />
copying<br />
Default<br />
setting<br />
Drive control<br />
Code Name Data setting range<br />
Vector<br />
Refer to<br />
Page<br />
V/f<br />
Control w/ Torque<br />
w/o PG control<br />
PG<br />
H49 Starting Mode<br />
0.0 to 10.0 s Y Y 0.0 Y Y Y Y *11<br />
(Auto search delay time 1)<br />
H50 Non-linear V/f Pattern 1 0.0: Cancel, 0.1 to 500.0 Hz N Y 0.0 Y N N N<br />
(Frequency)<br />
H51 (Voltage) 0 to 240: Output an AVR-controlled voltage N Y2 0 Y N N N<br />
(for 230 V series)<br />
0 to 500: Output an AVR-controlled voltage<br />
(for 460 V series)<br />
H52 Non-linear V/f Pattern 2<br />
(Frequency)<br />
H53 (Voltage) 0 to 240: Output an AVR-controlled voltage<br />
(for 230 V series)<br />
0 to 500: Output an AVR-controlled voltage<br />
(for 460 V series)<br />
0.0: Cancel, 0.1 to 500.0 Hz N Y 0.0 Y N N N<br />
N Y2 0 Y N N N<br />
H54 Acceleration Time (Jogging) 0.00 to 6000 s Y Y *1 Y Y Y N<br />
H55 Deceleration Time (Jogging) 0.00 to 6000 s Y Y *1 Y Y Y N<br />
H56 Deceleration Time for Forced 0.00 to 6000 s Y Y *1 Y Y Y N<br />
Stop<br />
H57 1st S-curve acceleration range<br />
(Leading edge)<br />
0% to 100% Y Y 10 Y Y Y N<br />
H58 2nd S-curve acceleration range<br />
(Trailing edge)<br />
0% to 100% Y Y 10 Y Y Y N<br />
H59 1st S-curve deceleration range 0% to 100% Y Y 10 Y Y Y N<br />
(Leading edge)<br />
H60 2nd S-curve deceleration range 0% to 100% Y Y 10 Y Y Y N<br />
(Trailing edge)<br />
H61 UP/DOWN Control<br />
(Initial frequency setting)<br />
0: 0.00 Hz<br />
1: Last UP/DOWN command value on releasing the<br />
N Y 1 Y Y Y N<br />
run command<br />
H63 Low Limiter (Mode selection) 0: Limit by F16 (Frequency limiter: Low) and<br />
continue to run<br />
1: If the output frequency lowers below the one<br />
limited by F16 (Frequency limiter: Low),<br />
decelerate to stop the motor.<br />
Y Y 0 Y Y Y N<br />
H64 (Lower limiting frequency) 0.0: Depends on F16 (Frequency limiter, Low) Y Y 1.6 Y N N N<br />
0.1 to 60.0 Hz<br />
H65 Non-linear V/f Pattern 3 0.0: Cancel, 0.1 to 500.0 Hz N Y 0.0 Y N N N<br />
(Frequency)<br />
H66 (Voltage) 0 to 240: Output an AVR-controlled voltage<br />
(for 230 V series)<br />
0 to 500: Output an AVR-controlled voltage<br />
(for 460 V series)<br />
N Y2 0 Y N N N<br />
H67 Auto Energy Saving Operation<br />
(Mode selection)<br />
H68 Slip Compensation 1<br />
(Operating conditions)<br />
H69<br />
Automatic Deceleration<br />
(Mode selection)<br />
0: Enable during running at constant speed<br />
1: Enable in all modes<br />
0: Enable during ACC/DEC and at base frequency<br />
or above<br />
1: Disable during ACC/DEC and enable at base<br />
frequency or above<br />
2: Enable during ACC/DEC and disable at base<br />
frequency or above<br />
3: Disable during ACC/DEC and at base frequency<br />
or above<br />
0: Disable<br />
2: Torque limit control with Force-to-stop if actual<br />
deceleration time exceeds three times the<br />
specified one<br />
3: DC link bus voltage control with Force-to-stop if<br />
actual deceleration time exceeds three times the<br />
specified one<br />
4: Torque limit control with Force-to-stop disabled<br />
5: DC link bus voltage control with Force-to-stop<br />
disabled<br />
H70 Overload Prevention Control 0.00:Follow the deceleration time selected<br />
0.01 to 100.0 Hz/s<br />
999: Cancel<br />
Y Y 0 Y N Y N<br />
N Y 0 Y N N N<br />
Y Y 0 Y Y Y N<br />
Y Y 999 Y Y Y N<br />
H71 Deceleration Characteristics 0: Disable 1: Enable Y Y 0 Y N N N<br />
H72 Main Power Down Detection 0: Disable 1: Enable Y Y 1 Y Y Y Y<br />
(Mode selection)<br />
*1 6.00 s for inverters of 40 HP or below; 20.00 s for those of 50 HP or above.<br />
*11 Refer to the User <strong>Manual</strong> for detailed information on these parameters.<br />
Y: Applicable / N: Not Applicable.<br />
4-14
Code Name Data setting range<br />
H73<br />
Torque Limiter<br />
(Operating conditions)<br />
0: Enable during ACC/DEC and running at<br />
constant speed<br />
1: Disable during ACC/DEC and enable during<br />
running at constant speed<br />
2: Enable during ACC/DEC and disable during<br />
running at constant speed<br />
H74 (Control target) 0: <strong>Motor</strong>-generating torque limit<br />
1: Torque current limit<br />
2: Output power limit<br />
H75 (Target quadrants) 0: Drive/brake<br />
1: Same for all four quadrants<br />
2: Upper/lower limits<br />
Change when<br />
running<br />
Data<br />
copying<br />
Default<br />
setting<br />
Drive Control<br />
Refer to<br />
Page<br />
Vector<br />
V/f<br />
Control w/ Torque<br />
w/o PG control<br />
PG<br />
N Y 0 Y Y Y Y *11<br />
N Y 1 N Y Y Y<br />
N Y 0 N Y Y Y<br />
H76 (Frequency increment limit 0.0 to 500.0 Hz Y Y 5.0 Y N N N<br />
for braking)<br />
H77 Service Life of DC Link Bus 0 to 87600 hours Y N - Y Y Y Y<br />
Capacitor (Remaining time)<br />
H78 Maintenance Interval (M1) 0: Disable; 1 to 99990 hours Y N 87600 Y Y Y Y<br />
H79 Preset Startup Count for 0: Disable; 1 to 65535 times Y N 0 Y Y Y Y<br />
Maintenance (M1)<br />
H80 Output Current Fluctuation 0.00 to 1.00 Y Y 0.20 Y N N Y<br />
Damping Gain for <strong>Motor</strong> 1<br />
H81 Light Alarm Selection 1 0000 to FFFF (hex.) Y Y 0 Y Y Y Y<br />
H82 Light Alarm Selection 2 0000 to FFFF (hex.) Y Y 0 Y Y Y Y<br />
H84 Pre-excitation (Initial level) 100% to 400% Y Y 100 N Y Y Y<br />
H85 (Time) 0.00: Disable; 0.01 to 30.00 s Y Y 0.00 N Y Y Y<br />
H86 Reserved *9 ― - - - - - - -<br />
H87 Reserved *9 ― - - - - - - -<br />
H88 Reserved *9 ― - - - - - - -<br />
H89 Reserved *9 ― - - - - - - -<br />
H90 Reserved *9 ― - - - - - - -<br />
H91 PID Feedback Wire Break 0.0: Disable alarm detection<br />
Y Y 0.0 Y Y Y N<br />
Detection<br />
0.1 to 60.0 s<br />
H92 Continuity of Running (P) 0.000 to 10.000 times; 999 Y Y1Y2 999 Y N N N<br />
H93 (I) 0.010 to 10.000 s; 999 Y Y1Y2 999 Y N N N<br />
H94 Cumulative <strong>Motor</strong> Run Time 1 0 to 99990 hours<br />
N N - Y Y Y Y<br />
(The cumulative run time can be modified or reset.)<br />
H95 DC Braking<br />
0: Slow<br />
Y Y 1 Y N N N<br />
(Braking response mode) 1: Quick<br />
H96 STOP Key Priority/<br />
Start Check Function<br />
Y Y 3 Y Y Y Y<br />
Data STOP key priority Start check function<br />
0: Disable Disable<br />
1:<br />
2:<br />
Enable<br />
Disable<br />
Disable<br />
Enable<br />
3: Enable Enable<br />
H97 Clear Alarm Data 0: Disable<br />
1: Enable (Setting "1" clears alarm data and then<br />
returns to "0.")<br />
H98<br />
Protection/Maintenance Function<br />
(Mode selection)<br />
0 to 255: Display data in decimal format<br />
Bit 0: Lower the carrier frequency automatically<br />
(0: Disabled; 1: Enabled)<br />
Bit 1: Detect input phase loss<br />
(0: Disabled; 1: Enabled)<br />
Bit 2: Detect output phase loss<br />
(0: Disabled; 1: Enabled)<br />
Bit 3: Select life judgment threshold of DC link bus<br />
capacitor<br />
(0: Factory default level; 1: User setup level)<br />
Bit 4: Judge the life of DC link bus capacitor<br />
(0: Disabled; 1: Enabled)<br />
Bit 5: Detect DC fan lock (0: Enabled; 1: Disabled)<br />
Bit 6: Detect braking transistor error<br />
(for 40 HP or below)<br />
(0: Disabled; 1: Enabled)<br />
Bit 7: Switch IP20/IP40 enclosure<br />
(0: IP20; 1: IP40)<br />
*9 Factory use. Do not access these function codes.<br />
*11 Refer to the User <strong>Manual</strong> for detailed information on these parameters.<br />
Y: Applicable / N: Not Applicable.<br />
Y N 0 Y Y Y Y<br />
Y Y 83 Y Y Y Y<br />
4-15
A codes: <strong>Motor</strong> 2 Parameters<br />
Change when<br />
running<br />
Data copying<br />
Default<br />
setting<br />
Drive Control<br />
Code Name Data setting range<br />
Vector<br />
V/f<br />
Control w/ Torque<br />
w/o PG control<br />
PG<br />
A01 Maximum Frequency 2 25.0 to 500.0 Hz N Y 60.0 Y Y Y Y *11<br />
A02 Base Frequency 2 25.0 to 500.0 Hz N Y 60.0 Y Y Y Y<br />
A03<br />
Rated Voltage at Base Frequency<br />
2<br />
0: Output a voltage in proportion to input<br />
voltage<br />
80 to 240: Output an AVR-controlled voltage<br />
(for 230 V series)<br />
160 to 500: Output an AVR-controlled voltage<br />
(for 460 V series)<br />
A04 Maximum Output Voltage 2 80 to 240: Output an AVR-controlled voltage<br />
(for 230 V series)<br />
160 to 500: Output an AVR-controlled voltage<br />
(for 460 V series)<br />
A05 Torque Boost 2 0.0% to 20.0%<br />
(percentage with respect to "A03: Rated Voltage at<br />
Base Frequency 2")<br />
A06<br />
Electronic Thermal Overload<br />
Protection for <strong>Motor</strong> 2<br />
(Select motor characteristics)<br />
1: For a general-purpose motor with shaft-driven<br />
cooling fan<br />
2: For an inverter-driven motor, non-ventilated<br />
motor, or motor with separately powered cooling<br />
fan<br />
A07 (Overload detection level) 0.00: Disable<br />
1% to 135% of the rated current (allowable<br />
continuous drive current) of the motor<br />
N<br />
Y2<br />
230<br />
460<br />
N Y2 230<br />
460<br />
Y Y Y Y<br />
Y N N Y<br />
Y Y 0.0 Y N N N<br />
Y Y 1 Y Y Y Y<br />
Y<br />
Y1<br />
Y2<br />
*2 Y Y Y Y<br />
A08 (Thermal time constant) 0.5 to 75.0 min Y Y *3 Y Y Y Y<br />
A09 DC Braking 2<br />
0.0 to 60.0 Hz Y Y 0.0 Y Y Y N<br />
(Braking starting frequency)<br />
A10 (Braking level) 0% to 80% (LD/MD mode)*4, 0% to 100% (HD Y Y 0 Y Y Y N<br />
mode)<br />
A11 (Braking time) 0.00: Disable; 0.01 to 30.00 s Y Y 0.00 Y Y Y N<br />
A12 Starting Frequency 2 0.0 to 60.0 Hz Y Y 0.5 Y Y Y N<br />
A13 Load Selection/<br />
Auto Torque Boost<br />
Auto Energy Saving Operation 2<br />
N Y 1 Y N Y N<br />
0: Variable torque load<br />
1: Constant torque load<br />
2: Auto-torque boost<br />
3: Auto-energy saving operation<br />
(Variable torque load during ACC/DEC)<br />
4: Auto-energy saving operation<br />
(Constant torque load during ACC/DEC)<br />
5: Auto-energy saving operation<br />
(Auto-torque boost during ACC/DEC)<br />
A14 Drive Control Selection 2 0: V/f control with slip compensation inactive<br />
1: Dynamic torque control<br />
5: Vector control without speed sensor<br />
6: Vector control with speed sensor<br />
A15 <strong>Motor</strong> 2 (No. of poles) 2 to 22 poles N Y1<br />
Y2<br />
A16 (Rated capacity) 0.01 to 1000 kW (when A39 = 0, 2. 3 or 4)<br />
N Y1<br />
0.01 to 1000 HP (when A39 = 1)<br />
Y2<br />
A17 (Rated current) 0.00 to 2000 A N Y1<br />
Y2<br />
N Y 0 Y Y Y Y<br />
4 Y Y Y Y<br />
*7 Y Y Y Y<br />
*7 Y Y Y Y<br />
Refer to<br />
Page<br />
*2 The motor rated current is automatically set. See Table B (P03/A17).<br />
*3 5.0 min for inverters of 40 HP or below; 10.0 min for those of 50 HP or above.<br />
*4 0% to 100% for inverters of 7.5 HP or below.<br />
*7 The motor parameters are automatically set, depending upon the inverter's capacity. See Table B.<br />
*11 Refer to the User <strong>Manual</strong> for detailed information on these parameters.<br />
Y: Applicable / N: Not Applicable.<br />
4-16
Code Name Data setting range<br />
A18 <strong>Motor</strong> 2 (Auto-tuning) 0: Disable<br />
1: Tune while the motor stops. (%R1, %X and<br />
rated slip frequency)<br />
2: Tune while the motor is rotating under V/f<br />
control (%R1, %X, rated slip frequency, no-load<br />
current, magnetic saturation factors 1 to 5, and<br />
magnetic saturation extension factors "a" to "c")<br />
3: Tune while the motor is rotating under vector<br />
control (%R1, %X, rated slip frequency, no-load<br />
current, magnetic saturation factors 1 to 5, and<br />
magnetic saturation extension factors "a" to "c."<br />
Available when the vector control is enabled.<br />
4-17<br />
Change when<br />
running<br />
Data copying<br />
Default<br />
setting<br />
Drive Control<br />
Refer to<br />
Page<br />
Vector<br />
Control<br />
V/f<br />
w/ Torque<br />
w/o PG control<br />
PG<br />
N N 0 Y Y Y Y *11<br />
A19 (Online tuning) 0: Disable 1: Enable Y Y 0 Y N N N<br />
A20 (No-load current) 0.00 to 2000 A N Y1<br />
Y2<br />
*7 Y Y Y Y<br />
A21 (%R1) 0.00% to 50.00% Y Y1<br />
Y2<br />
*7 Y Y Y Y<br />
A22 (%X) 0.00% to 50.00% Y Y1<br />
Y2<br />
*7 Y Y Y Y<br />
A23 (Slip compensation gain for driving) 0.0% to 200.0% Y* Y 100.0 Y Y Y N<br />
A24 (Slip compensation response time) 0.01 to 10.00s Y Y1<br />
Y2<br />
0.12 Y N N N<br />
A25 (Slip compensation gain for braking) 0.0% to 200.0% Y* Y 100.0 Y Y Y N<br />
A26 (Rated slip frequency) 0.00 to 15.00 Hz N Y1<br />
Y2<br />
*7 Y Y Y N<br />
A27 (Iron loss factor 1) 0.00% to 20.00% Y Y1<br />
Y2<br />
*7 Y Y Y Y<br />
A28 (Iron loss factor 2) 0.00% to 20.00% Y Y1<br />
Y2<br />
0.00 Y Y Y Y<br />
A29 (Iron loss factor 3) 0.00% to 20.00% Y Y1<br />
Y2<br />
0.00 Y Y Y Y<br />
A30 (Magnetic saturation factor 1) 0.0% to 300.0% Y Y1<br />
Y2<br />
*7 Y Y Y Y<br />
A31 (Magnetic saturation factor 2) 0.0% to 300.0% Y Y1<br />
Y2<br />
*7 Y Y Y Y<br />
A32 (Magnetic saturation factor 3) 0.0% to 300.0% Y Y1<br />
Y2<br />
*7 Y Y Y Y<br />
A33 (Magnetic saturation factor 4) 0.0% to 300.0% Y Y1<br />
Y2<br />
*7 Y Y Y Y<br />
A34 (Magnetic saturation factor 5) 0.0% to 300.0% Y Y1<br />
Y2<br />
*7 Y Y Y Y<br />
A35 (Magnetic saturation extension<br />
factor "a")<br />
0.0% to 300.0% Y Y1<br />
Y2<br />
*7 Y Y Y Y<br />
A36 (Magnetic saturation extension<br />
factor "b")<br />
0.0% to 300.0% Y Y1<br />
Y2<br />
*7 Y Y Y Y<br />
A37 (Magnetic saturation extension<br />
factor "c")<br />
0.0% to 300.0% Y Y1<br />
Y2<br />
*7 Y Y Y Y<br />
A39 <strong>Motor</strong> 2 Selection 0: <strong>Motor</strong> characteristics 0 ( Consult Factory) N Y1 1 Y Y Y Y<br />
1: <strong>Motor</strong> characteristics 1 (HP rating motors)<br />
Y2<br />
2: <strong>Motor</strong> characteristics 2 (Consult Factory)<br />
3: <strong>Motor</strong> characteristics 3 (Consult Factory)<br />
4: Consult Factory<br />
A40 Slip Compensation 2<br />
(Operating conditions)<br />
0: Enable during ACC/DEC and at base frequency<br />
or above<br />
1: Disable during ACC/DEC and enable at base<br />
frequency or above<br />
2: Enable during ACC/DEC and disable at base<br />
frequency or above<br />
3: Disable during ACC/DEC and at base frequency<br />
or above<br />
N Y 0 Y N N N<br />
0.00 to 1.00 Y Y 0.20 Y N N N<br />
A41 Output Current Fluctuation Damping<br />
Gain for <strong>Motor</strong> 2<br />
A42 <strong>Motor</strong>/Parameter Switching 2 0: <strong>Motor</strong> (Switch to the 2nd motor)<br />
N Y 0 Y Y Y Y 4-73<br />
(Mode selection) 1: Parameter (Switch to particular A codes)<br />
A43 Speed Control 2<br />
(Speed command filter)<br />
0.000 to 5.000 s Y Y 0.020 N Y Y N *11<br />
A44 (Speed detection filter) 0.000 to 0.100 s Y* Y 0.005 N Y Y N<br />
A45 P (Gain) 0.1 to 200.0 times Y* Y 10.0 N Y Y N<br />
A46 I (Integral time) 0.001 to 9.999 s<br />
Y* Y 0.100 N Y Y N<br />
999: Disable integral action<br />
A48 (Output filter) 0.000 to 0.100 s Y Y 0.002 N Y Y N<br />
A49 (Notch filter resonance frequency) 1 to 200 Hz Y Y 200 N N Y N<br />
A50 (Notch filter attenuation level) 0 to 20 dB Y Y 0 N N Y N<br />
A51 Cumulative <strong>Motor</strong> Run Time 2 0 to 99990 hours<br />
(The cumulative run time can be modified or<br />
reset.)<br />
A52 Startup Counter for <strong>Motor</strong> 2 Indication of cumulative startup count<br />
0 to 65535 times<br />
N N - Y Y Y Y<br />
Y N - Y Y Y Y
Change when<br />
running<br />
Data copying<br />
Default<br />
setting<br />
Drive Control<br />
Code Name Data setting range<br />
Vector<br />
Control<br />
V/f<br />
w/ Torque<br />
w/o PG control<br />
PG<br />
A53 <strong>Motor</strong> 2 (%X correction factor 1) 0% to 300% Y Y1<br />
Y2<br />
100 Y Y Y Y *11<br />
A54 (%X correction factor 2) 0% to 300% Y Y1<br />
Y2<br />
100 Y Y Y Y<br />
A55 (Torque current under vector control) 0.00 to 2000 A N Y1<br />
Y2<br />
*7 N Y Y Y<br />
A56 (Induced voltage factor under<br />
vector control)<br />
50 to 100 N Y1<br />
Y2<br />
85 (90)<br />
*8<br />
N Y Y Y<br />
A57 Reserved *9 ― - - - - - - -<br />
*7 The motor parameters are automatically set, depending upon the inverter's capacity. See Table B.<br />
*8 85% for inverters of 150 HP or less; 90% for those of 175 HP or above.<br />
*9 Factory use. Do not access these function codes.<br />
*11 Refer to the User <strong>Manual</strong> for detailed information on these parameters.<br />
Y: Applicable / N: Not Applicable.<br />
Refer to<br />
Page<br />
4-18
J codes: Application Functions 1<br />
Code Name Data setting range<br />
J01 PID Control (Mode selection) 0: Disable<br />
1: Enable (Process control, normal operation)<br />
2: Enable (Process control, inverse operation)<br />
3: Enable (Dancer control)<br />
J02 (Remote command SV) 0: / keys on keypad<br />
1: PID command 1<br />
(Analog input terminals [12], [C1], and [V2])<br />
3: UP/DOWN<br />
Change when<br />
running<br />
Data copying<br />
Default<br />
setting<br />
Drive Control<br />
Refer to<br />
Page<br />
Vector<br />
V/f<br />
Control w/ Torque<br />
w/o PG control<br />
PG<br />
N Y 0 Y Y Y N *11<br />
N Y 0 Y Y Y N<br />
4: Command via communications link<br />
J03 P (Gain) 0.000 to 30.000 times Y Y 0.100 Y Y Y N<br />
J04 I (Integral time) 0.0 to 3600.0 s Y Y 0.0 Y Y Y N<br />
J05 D (Differential time) 0.00 to 600.00 s Y Y 0.00 Y Y Y N<br />
J06 (Feedback filter) 0.0 to 900.0 s Y Y 0.5 Y Y Y N<br />
J08 (Pressurization starting frequency) 0.0 to 500.0 Hz Y Y 0.0 Y Y Y N<br />
J09 (Pressurizing time) 0 to 60 s Y Y 0 Y Y Y N<br />
J10 (Anti reset windup) 0% to 200% Y Y 200 Y Y Y N<br />
J11 (Select alarm output) 0: Absolute-value alarm<br />
1: Absolute-value alarm (with Hold)<br />
2: Absolute-value alarm (with Latch)<br />
3: Absolute-value alarm (with Hold and Latch)<br />
4: Deviation alarm<br />
5: Deviation alarm (with Hold)<br />
6: Deviation alarm (with Latch)<br />
7: Deviation alarm (with Hold and Latch)<br />
Y Y 0 Y Y Y N<br />
J12 (Upper level alarm (AH)) -100% to 100% Y Y 100 Y Y Y N<br />
J13 (Lower level alarm (AL)) -100% to 100% Y Y 0 Y Y Y N<br />
J15 (Stop frequency for slow flowrate) 0.0: Disable; 1.0 to 500.0 Hz Y Y 0.0 Y Y Y N<br />
J16 (Slow flowrate level stop latency) 0 to 60 s Y Y 30 Y Y Y N<br />
J17 (Starting frequency) 0.0 to 500.0 Hz Y Y 0.0 Y Y Y N<br />
J18 (Upper limit of PID process output) -150% to 150%; 999: Depends on setting of F15 Y Y 999 Y Y Y N<br />
J19 (Lower limit of PID process output) -150% to 150%; 999: Depends on setting of F16 Y Y 999 Y Y Y N<br />
J21<br />
J22<br />
Dew Condensation Prevention<br />
(Duty)<br />
Commercial Power Switching<br />
Sequence<br />
1% to 50% Y Y 1 Y Y Y Y<br />
0: Keep inverter operation (Stop due to alarm)<br />
1: Automatically switch to commercial-power<br />
operation<br />
N Y 0 Y N N Y<br />
J56 PID Control(Speed command filter) 0.00 to 5.00 s Y Y 0.10 Y Y Y N<br />
J57 (Dancer reference position) -100% to 0% to 100% Y Y 0 Y Y Y N<br />
J58 (Detection width of dancer 0: Disable switching PID constant<br />
Y Y 0 Y Y Y N<br />
position deviation) 1% to 100% (<strong>Manual</strong>ly set value)<br />
J59 P (Gain) 2 0.000 to 30.000 times Y Y 0.100 Y Y Y N<br />
J60 I (Integral time) 2 0.0 to 3600.0 s Y Y 0.0 Y Y Y N<br />
J61 D (Differential time) 2 0.00 to 600.00 s Y Y 0.00 Y Y Y N<br />
J62 (PID control block selection) 0 to 3<br />
bit 0: PID output polarity<br />
0: Plus (add), 1: Minus (subtract)<br />
bit 1: Select compensation factor for PID output<br />
0 = Ratio (relative to the main setting)<br />
1 = Speed command (relative to maximum<br />
frequency)<br />
N Y 0 Y Y Y N<br />
J68 Brake Signal(Brake-OFF current) 0% to 300% Y Y 100 Y Y Y N<br />
J69 (Brake-OFF frequency/speed) 0.0 to 25.0 Hz Y Y 1.0 Y N N N<br />
J70 (Brake-OFF timer) 0.0 to 5.0 s Y Y 1.0 Y Y Y N<br />
J71 (Brake-ON frequency/speed) 0.0 to 25.0 Hz Y Y 1.0 Y N N N<br />
J72 (Brake-ON timer) 0.0 to 5.0 s Y Y 1.0 Y Y Y N<br />
J95 (Brake-OFF torque) 0% to 300% Y Y 100 N Y Y N<br />
J96 (Speed condition selection 0 to 31 N Y 0<br />
(Braking conditions)) Bit 0: Criterion speed for brake-ON<br />
(0: Detected speed, 1: Reference speed)<br />
N Y Y N<br />
Bit 1: Reserved. N N N N<br />
Bit 2: Response for brake-OFF current<br />
(0: Slow response, 1: Quick response)<br />
Y Y Y N<br />
Bit 3: Criterion frequency for brake-ON<br />
N Y Y N<br />
(0: Stop frequency (F25),<br />
1: Brake-ON frequency (J71)<br />
Bit 4: Output condition of brake signal<br />
(0: Independent of a run command ON/OFF<br />
N Y Y N<br />
1: Only when a run command is OFF)<br />
J97 Servo-lock (Gain) 0.00 to 10.00 times Y* Y 0.10 N N Y N<br />
J98 (Completion timer) 0.000 to 1.000 s Y Y 0.100 N N Y N<br />
J99 (Completion range) 0 to 9999 pulses Y Y 10 N N Y N<br />
Y: Applicable / N: Not Applicable.<br />
4-19
d codes: Application Functions 2<br />
Change when<br />
running<br />
Data copying<br />
Default<br />
setting<br />
Drive Control<br />
Code Name Data setting range<br />
Vector<br />
V/f<br />
Control w/ Torque<br />
w/o PG control<br />
PG<br />
d01 Speed Control 1<br />
(Speed command filter)<br />
0.000 to 5.000 s Y Y 0.020 N Y Y N *11<br />
d02 (Speed detection filter) 0.000 to 0.100 s Y* Y 0.005 N Y Y N<br />
d03 P (Gain) 0.1 to 200.0 times Y* Y 10.0 N Y Y N<br />
d04 I (Integral time) 0.001 to 9.999 s Y* Y 0.100 N Y Y N<br />
d06 (Output filter) 0.000 to 0.100 s Y Y 0.002 N Y Y N<br />
d07 (Notch filter resonance frequency) 1 to 200 Hz Y Y 200 N N Y N<br />
d08 (Notch filter attenuation level) 0 to 20 dB Y Y 0 N N Y N<br />
d09 Speed Control (Jogging)<br />
(Speed command filter)<br />
0.000 to 5.000 s Y Y 0.020 N Y Y N<br />
d10 (Speed detection filter) 0.000 to 0.100 s Y* Y 0.005 N Y Y N<br />
d11 P (Gain) 0.1 to 200.0 times Y* Y 10.0 N Y Y N<br />
d12 I (Integral time) 0.001 to 9.999 s Y* Y 0.100 N Y Y N<br />
d13 (Output filter) 0.000 to 0.100 s Y Y 0.002 N Y Y N<br />
d14 Feedback Input<br />
(Pulse input format)<br />
0: Pulse train sign/Pulse train input<br />
1: Forward rotation pulse/Reverse rotation pulse<br />
2: A/B phase with 90 degree phase shift<br />
N Y 2 N N Y Y<br />
d15 (Encoder pulse resolution) 20 to 60000 pulses N Y 1024 N N Y Y<br />
d16 (Pulse count factor 1) 1 to 9999 N Y 1 N N Y Y<br />
d17 (Pulse count factor 2) 1 to 9999 N Y 1 N N Y Y<br />
d21 Speed Agreement/PG Error<br />
0.0% to 50.0% Y Y 10.0 N Y Y N<br />
(Hysteresis width)<br />
d22 (Detection timer) 0.00 to 10.00 s Y Y 0.50 N Y Y N<br />
d23 PG Error Processing 0: Continue to run 1<br />
1: Stop running with alarm 1<br />
2: Stop running with alarm 2<br />
3: Continue to run 2<br />
4: Stop running with alarm 3<br />
5: Stop running with alarm 4<br />
N Y 2 N Y Y Y<br />
d24 Zero Speed Control<br />
0: Not permit at startup<br />
N Y 0 N Y Y N<br />
1: Permit at startup<br />
d25 ASR Switching Time 0.000 to 1.000 s Y Y 0.000 N Y Y Y<br />
d32 Torque Control (Speed limit 1) 0 to 110 % Y Y 100 N Y Y Y<br />
d33 (Speed limit 2) 0 to 110 % Y Y 100 N Y Y Y<br />
d41 Application-defined Control 0: Disable (Ordinary control) N Y 0 Y Y Y Y<br />
1: Enable (Constant peripheral speed control) N N N N<br />
2: Enable (Simultaneous synchronization, without<br />
Z phase)<br />
N N Y N<br />
3: Enable (Standby synchronization) N N Y N<br />
4: Enable (Simultaneous synchronization, with Z<br />
phase)<br />
N N Y N<br />
d51 Reserved *9 ― - - - - - - -<br />
d52 Reserved *9 ― - - - - - - -<br />
d53 Reserved *9 ― - - - - - - -<br />
d54 Reserved *9 ― - - - - - - -<br />
d55 Reserved *9 ― - - - - - - -<br />
d59 Command (Pulse Rate Input)<br />
(Pulse input format)<br />
0: Pulse train sign/Pulse train input<br />
1: Forward rotation pulse/Reverse rotation pulse<br />
2: A/B phase with 90 degree phase shift<br />
N Y 0 Y Y Y Y<br />
d60 (Encoder pulse resolution) 20 to 3600 pulses N Y 1024 N N Y N<br />
d61 (Filter time constant) 0.000 to 5.000 s Y Y 0.005 Y Y Y Y<br />
d62 (Pulse count factor 1) 1 to 9999 N Y 1 Y Y Y Y<br />
d63 (Pulse count factor 2) 1 to 9999 N Y 1 Y Y Y Y<br />
d67 Starting Mode (Auto search) 0: Disable<br />
1: Enable (At restart after momentary power<br />
failure)<br />
2: Enable (At restart after momentary power failure<br />
and at normal start)<br />
N Y 2 N Y N Y<br />
d68 Reserved *9 ― - - - - - - -<br />
d69 Reserved *9 ― - - - - - - -<br />
d70 Speed Control Limiter 0.00 to 100.00% Y Y 100.00 N N Y N<br />
*9 Factory use. Do not access these function codes.<br />
*11 Refer to the User <strong>Manual</strong> for detailed information on these parameters.<br />
Y: Applicable / N: Not Applicable.<br />
Refer to<br />
Page<br />
4-20
Change when<br />
running<br />
Data copying<br />
Default<br />
setting<br />
Drive Control<br />
Code Name Data setting range<br />
Vector<br />
V/f<br />
Control<br />
w/o<br />
PG<br />
w/<br />
PG<br />
Torque<br />
control<br />
d71 Synchronous Operation<br />
0.00 to 1.50 times Y Y 1.00 N N Y N *11<br />
(Main speed regulator gain)<br />
d72 (APR P gain) 0.00 to 200.00 times Y Y 1500 N N Y N<br />
d73 (APR positive output limiter) 20 to 200%, 999: No limiter Y Y 999 N N Y N<br />
d74 (APR negative output limiter) 20 to 200%, 999: No limiter Y Y 999 N N Y N<br />
d75 (Z phase alignment gain) 0.00 to 10.00 times Y Y 1.00 N N Y N<br />
d76 (Synchronous offset angle) 0 to 359 degrees Y Y 0 N N Y N<br />
d77 (Synchronization completion detection 0 to 100 degrees<br />
angle)<br />
Y Y 15 N N Y N<br />
d78 (Excessive deviation detection range) 0 to 65535 (in units of 10 pulses) Y Y 65535 N N Y N<br />
d98 Reserved *9 ― - - - - - - -<br />
d99 Reserved *9 ― - - - - - - -<br />
*9 Factory use. Do not access these function codes.<br />
*11 Refer to the User <strong>Manual</strong> for detailed information on these parameters.<br />
Y: Applicable / N: Not Applicable.<br />
Refer to<br />
Page<br />
4-21
y codes: LINK Functions<br />
Change when<br />
running<br />
Data copying<br />
Default<br />
setting<br />
Drive Control<br />
Code Name Data setting range<br />
Vector<br />
V/f<br />
Control w/ Torque<br />
w/o PG control<br />
PG<br />
y01 RS-485 Communication 1<br />
1 to 255 N Y 1 Y Y Y Y *11<br />
(Station address)<br />
y02 (Communications error processing) 0: Immediately trip with alarm er8<br />
Y Y 0 Y Y Y Y<br />
1: Trip with alarm er8 after running for the period<br />
specified by timer y03<br />
2: Retry during the period specified by timer y03. If<br />
the retry fails, trip with alarm er8.<br />
If it succeeds, continue to run.<br />
3: Continue to run<br />
y03 (Timer) 0.0 to 60.0 s Y Y 2.0 Y Y Y Y<br />
y04 (Baud rate) 0: 2400 bps<br />
1: 4800 bps<br />
2: 9600 bps<br />
3: 19200 bps<br />
4: 38400 bps<br />
Y Y 3 Y Y Y Y<br />
y05 (Data length) 0: 8 bits 1: 7 bits Y Y 0 Y Y Y Y<br />
y06 (Parity check) 0: None (2 stop bits)<br />
1: Even parity (1 stop bit)<br />
2: Odd parity (1 stop bit)<br />
3: None (1 stop bit)<br />
Y Y 0 Y Y Y Y<br />
y07 (Stop bits) 0: 2 bits 1: 1 bit Y Y 0 Y Y Y Y<br />
y08 RS-485 Communication 1(No-response 0: No detection; 1 to 60 s Y Y 0 Y Y Y Y<br />
error detection time)<br />
y09 (Response interval) 0.00 to 1.00 s Y Y 0.01 Y Y Y Y<br />
y10 (Protocol selection) 0: Modbus RTU protocol<br />
Y Y 1 Y Y Y Y<br />
1: <strong>TECO</strong> Link Software protocol (SX protocol)<br />
y11 RS-485 Communication 2<br />
(Station address)<br />
1 to 255 N Y 1 Y Y Y Y<br />
y12 (Communications error processing) 0: Immediately trip with alarm erp<br />
1: Trip with alarm erp after running for the period<br />
specified by timer y13<br />
2: Retry during the period specified by timer y13. If<br />
the retry fails, trip with alarm erp. If it<br />
succeeds, continue to run.<br />
3: Continue to run<br />
Y Y 0 Y Y Y Y<br />
y13 (Timer) 0.0 to 60.0 s Y Y 2.0 Y Y Y Y<br />
y14 (Baud rate) 0: 2400 bps, 1: 4800 bps, 2: 9600 bps<br />
Y Y 3 Y Y Y Y<br />
3: 19200 bps, 4: 38400 bps<br />
y15 (Data length) 0: 8 bits 1: 7 bits Y Y 0 Y Y Y Y<br />
y16 (Parity check) 0: None (2 stop bits)<br />
1: Even parity (1 stop bit)<br />
2: Odd parity (1 stop bit)<br />
3: None (1 stop bit)<br />
Y Y 0 Y Y Y Y<br />
y17 (Stop bits) 0: 2 bits 1: 1 bit Y Y 0 Y Y Y Y<br />
y18 (No-response error detection time) 0: No detection; 1 to 60 s Y Y 0 Y Y Y Y<br />
y19 (Response interval) 0.00 to 1.00 s Y Y 0.01 Y Y Y Y<br />
y20 (Protocol selection) 0: Modbus RTU protocol Y Y 0 Y Y Y Y<br />
y97 Communication Data Storage Selection 0: Save into nonvolatile storage (Rewritable times<br />
limited)<br />
1: Write into temporary storage (Rewritable times<br />
unlimited)<br />
2: Save all data from temporary storage to<br />
nonvolatile one<br />
(After saving data, the y97 data automatically<br />
returns to "1.")<br />
y98 Bus Link Function(Mode selection) Frequency command Run command<br />
0: Follow H30 data Follow H30 data<br />
1: Via fieldbus option Follow H30 data<br />
2: Follow H30 data Via fieldbus option<br />
3: Via fieldbus option Via fieldbus option<br />
y99 Loader Link Function<br />
(Mode selection)<br />
Frequency command Run command<br />
0: Follow H30 and y98 data<br />
Follow H30 and y98 data<br />
1: Via RS-485 link Follow H30 and y98<br />
data (<strong>TECO</strong> Link Software)<br />
2: Follow H30 and y98 data Via RS-485 link<br />
(<strong>TECO</strong> Link Software)<br />
3: Via RS-485 link Via RS-485 link<br />
(<strong>TECO</strong> Link Software) (<strong>TECO</strong> Link Software)<br />
*11 Refer to the User <strong>Manual</strong> for detailed information on these parameters.<br />
Y: Applicable / N: Not Applicable.<br />
Y Y 0 Y Y Y Y<br />
Y Y 0 Y Y Y Y<br />
Y N 0 Y Y Y Y<br />
Refer to<br />
Page<br />
4-22
Inverter<br />
capacity<br />
HP<br />
0.5<br />
Auto-restart after<br />
momentary power failure<br />
H13<br />
Inverter<br />
capacity<br />
HP<br />
100<br />
1 125<br />
2 150<br />
3 200<br />
0.5<br />
5 250<br />
7 300<br />
10 350<br />
15 450<br />
20<br />
500<br />
25 600<br />
30 700<br />
1.0<br />
40 800<br />
50 900<br />
60 1000<br />
75 1.5<br />
Auto-restart after<br />
momentary power failure<br />
H13<br />
1.5<br />
2.0<br />
2.5<br />
4.0<br />
5.0<br />
Inverter<br />
capacity<br />
HP<br />
0.5<br />
Auto-restart after<br />
momentary power failure<br />
H13<br />
Inverter<br />
capacity<br />
HP<br />
100<br />
1 125<br />
2 150<br />
3 200<br />
0.5<br />
5 250<br />
7 300<br />
10 350<br />
15 450<br />
20<br />
500<br />
25 600<br />
30 700<br />
1.0<br />
40 800<br />
50 900<br />
60 1000<br />
75 1.5<br />
Auto-restart after<br />
momentary power failure<br />
H13<br />
1.5<br />
2.0<br />
2.5<br />
4.0<br />
5.0<br />
4-23
Table B <strong>Motor</strong> Parameters<br />
When the "HP rating motors" is selected with P99/A39 (data = 1)<br />
Three-phase 230 V series (<strong>EQ7</strong>-2_ _ _-C)<br />
4-24
Table B <strong>Motor</strong> Parameters (Continued)<br />
Three-phase 460 V series (<strong>EQ7</strong>-4_ _ _-C)<br />
.<br />
4-25
4.2 Details of Function Codes<br />
This section provides the details of the function codes. The descriptions are, in principle, arranged in the order of<br />
function code groups and in numerical order. However, highly relevant function codes are collectively described where<br />
one of them first appears.<br />
4.2.1 Fundamental Functions<br />
F00<br />
Data Protection<br />
F00 specifies whether to protect function code data (except F00) and digital reference data (such as frequency<br />
command and PID command) from accidentally getting changed by pressing the / keys on the keypad.<br />
Data for F00<br />
Changing function code data<br />
Changing digital reference data<br />
From the keypad Via communications link with the / keys<br />
0 Allowed Allowed Allowed<br />
1 Not allowed * Allowed Allowed<br />
2 Allowed Allowed Not allowed<br />
3 Not allowed * Allowed Not allowed<br />
*Only F00 data can be modified with the keypad, while all other function codes cannot.<br />
To change F00 data, simultaneously press " + " (from 0 to 1) or " + " (from 1 to 0) keys.<br />
For similar purposes, WE-KP, a signal that enables editing of function code data from the keypad is provided as a<br />
terminal command for digital input terminals. (Refer to the descriptions of E01 through E07, data = 19)<br />
The relationship between the terminal command WE-KP and F00 data are as shown below.<br />
WE-KP<br />
OFF<br />
ON<br />
Changing function code data<br />
From the keypad<br />
Via communications link<br />
Not allowed<br />
Follow the F00 setting<br />
Allowed<br />
F01<br />
• If you mistakenly assign the terminal command WE-KP, you can no longer edit or modify function code<br />
data. To undo this temporarily turn this WE-KP-assigned terminal ON and reassign the WE-KP to a<br />
correct command.<br />
• WE-KP is only a signal that allows changing function code data, so it does not protect the frequency<br />
settings or PID command specified by the and keys.<br />
Even when F00 = 1 or 3, function code data can be changed via the communications link.<br />
Frequency Command 1 (Related parameters listed here)<br />
F18 (Bias, Frequency command 1) C30 (Frequency Command 2)<br />
C31 to C35 (Analog Input Adjustment for [12]) C36 to C39 (Analog Input Adjustment for [C1])<br />
C41 to C45 (Analog Input Adjustment for [V2]) C50 (Bias (Frequency command 1), Bias base point)<br />
H61 (UP/DOWN Control, Initial frequency setting) d59, d61 to d63 (Command (Pulse Rate Input))<br />
F01 or C30 sets a command source that specifies reference frequency 1 or reference frequency 2.<br />
Data for<br />
F01, C30<br />
4-26<br />
Function<br />
0 Enable / keys on the keypad. [ 1 ]<br />
1 Enable the voltage input to terminal [12] (0 to 10 VDC, maximum frequency obtained at 10 VDC).<br />
2<br />
Enable the current input to terminal [C1] (+4 to +20 mA DC, maximum frequency obtained at +20 mA<br />
DC). (SW5 on the control PCB should be turned to the C1 side (factory default).)<br />
Enable the sum of voltage (0 to 10 VDC) and current inputs (+4 to +20 mA DC) given to terminals [12]<br />
3<br />
and [C1], respectively. See the two items listed above for the setting range and the value required for [ 2 ]<br />
maximum frequencies. (SW5 on the control PCB should be turned to the C1 side (factory default).)<br />
Note: If the sum exceeds the maximum frequency (F03), the maximum frequency will apply.<br />
5<br />
Enable the voltage input to terminal [V2] (-10 to ±10 VDC, maximum frequency obtained at ±10 VDC).<br />
(SW5 on the control circuit board should be turned to the V2 position (factory default).)<br />
7<br />
Enable UP and DOWN commands assigned to the digital input terminals.<br />
The UP command (any of E01 to E07 = 17) and DOWN command (any of E01 to E07 = 18) should be<br />
assigned to any of digital input terminals [X1] to [X7].<br />
[ 3 ]<br />
For details, refer to the descriptions of E01 through E07.<br />
8 Enable / keys on the keypad (balanceless-bumpless switching available). [ 1 ]<br />
11<br />
Enable a digital input interface card (option).<br />
(For details, refer to the Digital Input Interface Card <strong>Instruction</strong> <strong>Manual</strong>.)<br />
-<br />
12<br />
Enable the "Pulse train input" PIN command assigned to digital input terminal [X7] (E07 = 48), or a PG<br />
interface card (option).<br />
[ 4 ]<br />
Refer<br />
to:
Configuring a reference frequency<br />
[ 1 ] Using and keys (F01 = 0 (factory default) or 8)<br />
(1) Set function code F01 at "0" or "8" ( / keys on keypad). This cannot be done when the keypad is in<br />
Programming or Alarm mode. To enable frequency setting using the and keys, first place the keypad in<br />
Running mode.<br />
(2) Press the or key. The 7-segment LED monitor displays the reference frequency and the LCD monitor<br />
displays the related information including the operation guide, as shown below.<br />
The lowest digit blinks.<br />
Keypad takes precedence.<br />
Allowable entry range<br />
Operation guide<br />
Example of Reference Frequency Configuration Screen<br />
(3) To change the reference frequency, press the or key again. To save the new setting into the<br />
inverter's memory, press the key (when E64 = 1 (factory default)). When the power is turned ON next time,<br />
the new setting will be used as an initial reference frequency.<br />
In addition to saving with the key described above, "Automatic saving when the main power is turned<br />
OFF" is also possible (when E64 = 0).<br />
When you start accessing the reference frequency or any other parameter with the and keys,<br />
the least significant digit on the display blinks and starts changing. As you are holding down the key,<br />
blinking gradually moves to the upper digit places and the upper digits becomes changeable.<br />
Pressing the<br />
digits.<br />
key moves the changeable digit place (blinking), making it easy to change upper<br />
Setting function code C30 at "0" (Enable / keys on the keypad) and selecting frequency<br />
command 2 as a frequency command source makes it possible to access the reference frequency in<br />
the same manner using the and keys.<br />
If you have set function code F01 at "0" ( / keys on keypad) but have selected a frequency<br />
command source other than frequency 1 (i.e., frequency 2, via communications link, or as a<br />
multi-frequency), then using the or key cannot change the frequency command even if the<br />
keypad is in Running mode. Pressing either of these keys just displays the currently selected<br />
frequency command.<br />
Setting function code F01 at "8" ( / keys on keypad) enables the balanceless-bumpless<br />
switching. When the frequency command source is switched to the keypad from any other source, the<br />
inverter inherits the current frequency that has applied before switching, providing smooth switching<br />
and shockless running.<br />
When the frequency command source is other than the digital reference setting, the LCD monitor<br />
displays the following.<br />
Keypad is not enabled.<br />
Setting on the analog terminal [12] is<br />
effective. (See the table below.)<br />
4-27
The table below lists the available command sources and their symbols.<br />
Available Command Sources<br />
Symbol Command source Symbol Command source Symbol Command source<br />
HAND Keypad MULTI Multi-frequency PID-HAND<br />
12 Terminal [12] PID-P1<br />
C1 Terminal [C1] RS485-1 RS-485 (Port 1) * 1 PID-P2<br />
PID keypad<br />
command<br />
PID command 1<br />
(Analog command)<br />
PID command 2<br />
(Analog command)<br />
12 + C1<br />
Terminal [12] +<br />
Terminal [C1]<br />
RS485-2 RS-485 (Port 2) * 2 PID-U/D<br />
PID UP/DOWN<br />
command<br />
V2 Terminal [V2] BUS Bus option PID_LINK<br />
PID communications<br />
command<br />
U/D UP/DOWN control LOADER<br />
Inverter support<br />
software<br />
"<strong>TECO</strong> Link Software"<br />
PID+MULTI<br />
PID multi-frequency<br />
command<br />
*1 COM port 1 which refers to the RJ-45 connector on the inverter.<br />
*2 COM port 2 which is on the inverter's terminal block.<br />
[ 2 ] Using analog input (F01 = 1 to 3, or 5)<br />
When any analog input (voltage input to terminals [12] and [V2], or current input to terminal [C1]) is selected by<br />
F01, it is possible to arbitrarily specify the reference frequency by multiplying the gain and adding the bias. The<br />
polarity can be selected and the filter time constant and offset can be adjusted.<br />
Adjustable elements of frequency command 1<br />
Data for<br />
F01<br />
Input terminal<br />
1 [12]<br />
Input range<br />
0 to +10 V,<br />
-10 to +10V<br />
Bias<br />
Bias<br />
Base<br />
point<br />
Gain<br />
Gain<br />
Base<br />
point<br />
Polarity<br />
Filter<br />
time<br />
constant<br />
Offset<br />
F18 C50 C32 C34 C35 C33 C31<br />
2 [C1] 4 to 20 mA F18 C50 C37 C39 - C38 C36<br />
3<br />
[12] + [C1]<br />
(Sum of the two<br />
values)<br />
5 [V2]<br />
0 to +10 V,<br />
-10 to +10 V<br />
F18 C50 C32 C34 C35 C33 C31<br />
4 to 20 mA F18 C50 C37 C39 - C38 C36<br />
0 to +10 V,<br />
-10 to +10 V<br />
F18 C50 C42 C44 C45 C43 C41<br />
• Offset (C31, C36, C41)<br />
C31, C36 or C41 specifies an offset for analog input voltage or current. The offset also applies to signals from<br />
external devices (PLCs, Feedback Sensors, Signal Converters, etc…).<br />
• Filter time constant (C33, C38, C43)<br />
C33, C38, or C43 specifies a filter time constant for analog input voltage or current. Choose an appropriate value<br />
for the time constant taking into account the response speed of the machinery system since a large time constant<br />
slows down the response. When the input voltage fluctuates due to noise, specify a larger time constant.<br />
• Polarity (C35, C45)<br />
C35 or C45 specifies the input range for analog input voltage.<br />
Data for C35/C45<br />
0 -10 to +10 VDC<br />
Terminal input specifications<br />
1 0 to +10 VDC (negative value of voltage is regarded as 0 V)<br />
4-28
• Gain and bias<br />
If F01 = 3 (the sum of [12] + [C1] is enabled), the bias and gain are independently applied to each of the<br />
voltage and current inputs given to terminals [12] and [C1], and the sum of the two values is applied as the<br />
reference frequency.<br />
In the case of unipolar input (terminal [12] with C35 = 1, terminal [C1], terminal [V2] with C45 = 1)<br />
As shown in the graph above, the relationship between the analog input and the reference frequency specified by<br />
frequency command 1 can arbitrarily be determined by points "A" and "B." Point "A" is defined by the combination<br />
of the bias (F18) and its base point (C50); Point "B," by the combination of the gain (C32, C37 or C42) and its base<br />
point (C34, C39 or C44).<br />
The combination of C32 and C34 applies to terminal [12], that of C37 and C39, to [C1] (C1 function), and that of<br />
C42 and C44, to [C1] (V2 function).<br />
Configure the bias (F18) and gain (C32, C37 or C42), assuming the maximum frequency as 100%, and the bias<br />
base point (C50) and gain base point (C34, C39 or C44), assuming the full scale (10 VDC or 20 mA DC) of analog<br />
input as 100%.<br />
• The analog input less than the bias base point (C50) is limited by the bias value (F18).<br />
• Specifying that the data of the bias base point (C50) is equal to or greater than that of each gain base<br />
point (C34, C39 or C44) will be interpreted as invalid, so the inverter will reset the reference frequency<br />
to 0 Hz.<br />
Example: Setting the bias, gain and their base points when the reference frequency 0 to 60 Hz follows the analog<br />
input of 1 to 5 VDC to terminal [12] (in frequency command 1).<br />
(Point A)<br />
To set the reference frequency to 0 Hz for an analog input being at 1 V, set the bias to 0% (F18 = 0). Since 1 V is<br />
the bias base point and it is equal to 10% of 10 V (full scale of terminal [12]), set the bias base point to 10% (C50 =<br />
10).<br />
(Point B)<br />
To make the maximum frequency equal to the reference frequency for an analog input being at 5 V, set the gain to<br />
100% (C32 = 100). Since 5 V is the gain base point and it is equal to 50% of 10 V (full scale of terminal [12]), set<br />
the gain base point to 50% (C34 = 50).<br />
4-29
In the case of bipolar input (terminal [12] with C35 = 0, terminal [V2] with C45 = 0)<br />
Setting C35 and C45 data to "0" enables terminal [12] and [V2] to be used for bipolar input (-10 V to +10 V)<br />
respectively.<br />
When both F18 (Bias) and C50 (Bias base point) are set to "0," the negative and positive voltage inputs produce<br />
reference frequencies symmetric about the origin point as shown below.<br />
Configuring F18 (Bias) and C50 (Bias base point) to specify an arbitrary value (Points A1, A2, and A3)<br />
gives the bias as shown above.<br />
A reference frequency can be specified not only with the frequency (Hz) but also with other menu items,<br />
depending on the setting of function code E48 (= 3 to 5, or 7).<br />
[ 3 ] Using digital input signals UP/DOWN (F01 = 7)<br />
When the UP/DOWN control is selected for frequency setting with a run command ON, turning the terminal<br />
command UP or DOWN ON causes the output frequency to increase or decrease, respectively, within the range<br />
from 0 Hz to the maximum frequency as listed below.<br />
To enable the UP/DOWN control for frequency setting, it is necessary to set F01 data to "7" and assign the UP<br />
and DOWN commands to any of digital input terminals [X1] to [X7], [FWD] and [REV] with any of E01 to E07 (data<br />
= 17 or 18).<br />
UP<br />
DOWN<br />
Data = 17 Data = 18<br />
Function<br />
OFF OFF Keep the current output frequency.<br />
ON<br />
OFF<br />
Increase the output frequency with the acceleration time currently<br />
specified.<br />
OFF<br />
ON<br />
Decrease the output frequency with the deceleration time currently<br />
specified.<br />
ON ON Keep the current output frequency.<br />
4-30
• Specifying the initial value for the UP/DOWN control<br />
Specify the initial value to start the UP/DOWN control.<br />
Data for H61<br />
0<br />
1<br />
Initial value to start the UP/DOWN control<br />
Mode fixing the value at "0":<br />
The inverter automatically clears the value to "0" when restarted (including powered<br />
ON). Speed up by the UP command.<br />
Mode holding the final output frequency in the previous UP/DOWN control:<br />
The inverter internally holds the last output frequency set by the UP/DOWN control and<br />
applies the held frequency at the next restart (including powering ON).<br />
At the time of restart, if an UP or DOWN terminal command is entered before the internal frequency<br />
reaches the output frequency saved in the memory, the inverter saves the current output frequency into the<br />
memory and starts the UP/DOWN control with the new frequency.<br />
Pressing one of these keys overwrites the frequency held in the inverter.<br />
Initial frequency for the UP/DOWN control when the frequency command source is switched<br />
When the frequency command source is switched to the UP/DOWN control from other sources, the initial<br />
frequency for the UP/DOWN control is as listed below:<br />
Frequency command<br />
source<br />
Other than UP/DOWN<br />
(F01, C30)<br />
PID control<br />
Multi-frequency<br />
Communications link<br />
Switching command<br />
Select frequency<br />
command 2/1 (Hz2/Hz1)<br />
Cancel PID control<br />
(Hz/PID)<br />
Select multi-frequency<br />
(SS1, SS2, SS4 and SS8)<br />
Enable communications<br />
link<br />
via RS-485 or fieldbus (LE)<br />
Initial frequency for UP/DOWN control<br />
H61 = 0 H61 = 1<br />
Reference frequency given by the frequency<br />
command source used just before switching<br />
Reference frequency given by PID control (PID<br />
controller output)<br />
Reference frequency<br />
given by the<br />
frequency command<br />
source used just<br />
before switching<br />
Reference frequency<br />
at the time of previous<br />
UP/DOWN control<br />
4-31
[ 4 ] Using pulse train input (F01 = 12)<br />
The <strong>EQ7</strong> can accommodate different types of pulse train inputs. Select the type of signal (d59) and scaling<br />
(d62, d63) as described here.<br />
• Selecting the pulse train input format (d59)<br />
A pulse train in the format selected by the function code d59 can give a frequency command to the inverter. Three<br />
types of formats are available; the pulse train sign/pulse train input, the forward rotation pulse/reverse rotation<br />
pulse, and the A and B phases with 90 degree phase difference. If no optional PG interface card is mounted, the<br />
inverter ignores the setting of the function code d59 and accepts only the pulse train sign/pulse train input.<br />
The table below lists pulse train formats and their operations.<br />
Pulse train input format<br />
selected by d59<br />
0: Pulse train sign/<br />
Pulse train input<br />
1: Forward rotation<br />
pulse/Reverse rotation<br />
pulse<br />
2: A and B phases with<br />
90 degree phase<br />
difference<br />
Operation overview<br />
Frequency/speed command according to the pulse train rate is given to the<br />
inverter. The pulse train sign specifies the polarity of the frequency/speed<br />
command.<br />
For the inverter without an optional PG interface card<br />
Pulse train input: PIN assigned to the digital terminal [X7] (data = 48)<br />
Pulse train sign: SIGN assigned to a digital terminal other than [X7] (data<br />
= 49)<br />
If no SIGN is assigned, polarity of any pulse train input is positive.<br />
Frequency/speed command according to the pulse train rate is given to the<br />
inverter. The forward rotation pulse gives a frequency/speed command with<br />
positive polarity, and a reverse rotation pulse, with negative polarity.<br />
Pulse trains generated by A and B phases with 90 degree phase difference<br />
give a frequency/speed command based on their pulse rate and the phase<br />
difference to an inverter.<br />
For details of operations using the optional PG interface card, refer to the <strong>Instruction</strong> <strong>Manual</strong> for it.<br />
Pulse train sign/Pulse train input<br />
Forward rotation pulse/Reverse rotation pulse<br />
A and B phases with 90 degree phase difference<br />
4-32
• Pulse count factor 1 (d62), Pulse count factor 2 (d63)<br />
For the pulse train input, function codes d62 (Command (Pulse rate input), (Pulse count factor 1)) and d63<br />
(Command (Pulse rate input), (Pulse count factor 2)) define the relationship between the input pulse rate and the<br />
frequency command (reference).<br />
Relationship between the Pulse Train Input Rate and Frequency Command (Reference)<br />
As shown in the figure above, enter the pulse train input rate into function code d62 (Command (Pulse rate input),<br />
(Pulse count factor 1)), and enter the frequency reference defined by d62 into d63 (Command (Pulse rate input),<br />
(Pulse count factor 2)). The relationship between the pulse train input rate (kp/s) inputted to the PIN terminal and<br />
the frequency reference f* (Hz) (or speed command) is given by the expression below.<br />
f * (Hz) = Np (kp/s) ×<br />
Pulse count factor 2 (d63)<br />
Pulse count factor 1 (d62)<br />
f* (Hz) : Frequency reference<br />
Np (kp/s) : Input pulse rate<br />
In the case of A and B phases with 90 degree phase difference, note that<br />
the pulse train rate is not the one 4-multiplied.<br />
The pulse train sign, forward/reverse rotation pulse, and A/B phase difference define the polarity of the pulse train<br />
input. Combination of the polarity of the pulse train input and the FWD/REV command determines the rotational<br />
direction of the motor. The table below shows the relationship between the polarity of the pulse train input and the<br />
motor rotational direction.<br />
Pulse Train Polarity Run command <strong>Motor</strong> rotational direction<br />
Positive (+) FWD (Run forward command) Forward<br />
Positive (+) REV (Run reverse command) Reverse<br />
Negative (-) FWD (Run forward command) Reverse<br />
Negative (-) REV (Run reverse command) Forward<br />
Mounting an optional PG interface card automatically switches the pulse train input source to the<br />
card and disables the input from the terminal [X7].<br />
• Filter time constant (d61)<br />
d61 specifies a filter time constant for pulse train input. Choose an appropriate value for the time constant taking<br />
into account the response speed of the machinery system since a large time constant slows down the response.<br />
When the reference frequency fluctuates due to small number of pulses, specify a larger time constant.<br />
Switching frequency command<br />
Using the terminal command Hz2/Hz1 assigned to one of the digital input terminals switches between frequency<br />
command 1 (F01) and frequency command 2 (C30).<br />
For details about Hz2/Hz1, refer to E01 to E07 (data = 11).<br />
Terminal command Hz2/Hz1<br />
Frequency command source<br />
OFF Follow F01 (Frequency command 1)<br />
ON Follow C30 (Frequency command 2)<br />
4-33
F02<br />
Operation Method<br />
F02 selects the source that specifies a run command.<br />
Data for F02 Run Command Description<br />
0<br />
1<br />
2<br />
3<br />
Keypad Enables the , , and keys to run the motor in the<br />
forward and reverse directions, and stop the motor.<br />
Terminal command FWD or REV Enables input terminal commands FWD and REV to run the<br />
motor in the forward and reverse directions, and stop the<br />
motor.<br />
Keypad<br />
(Forward rotation)<br />
Keypad<br />
(Reverse rotation)<br />
Enables the and keys to run the motor in the<br />
forward direction and stop it. Running the motor in the<br />
reverse direction is not possible.<br />
Enables the and keys to run the motor in the<br />
reverse direction and stop it. Running the motor in the<br />
forward direction is not possible.<br />
• When F02 = 1, the "Run forward" FWD and "Run reverse" REV terminal commands must be assigned<br />
to terminals [FWD] and [REV], respectively.<br />
• When the FWD or REV is ON, the F02 data cannot be changed.<br />
• When changing terminal command assignments to terminals [FWD] and [REV] from other configured<br />
commands (see E98, E99) to the FWD or REV with F02 being set to "1," be sure to deactivate the input<br />
terminal signals OFF beforehand; otherwise, the motor may unintentionally rotate.<br />
• 3-wire operation with external input signals (digital input terminal commands)<br />
The default setting of the FWD and REV are 2-wire. Assigning the terminal command HLD self-holds the forward<br />
FWD or reverse REV run command, to enable 3-wire inverter operation. Short-circuiting the HLD-assigned<br />
terminal and [CM] (i.e., when HLD is ON) self-holds the first FWD or REV at its rising edge. Turning the HLD OFF<br />
releases the self-holding. When no HLD is assigned, 2-wire operation involving only FWD and REV takes effect.<br />
The HLD input at terminals E01 to E07 is typically a normally closed, momentary stop contact.<br />
In addition to the run command sources described above, higher priority command sources including remote and<br />
local mode (see Section 7.3.6 of the user manual) and communications link are provided. For details, refer to the<br />
block diagrams in Chapter 6 in <strong>EQ7</strong> User's <strong>Manual</strong>.<br />
4-34
F03 Maximum Frequency 1<br />
F03 specifies the maximum frequency to limit the output frequency. Specifying the maximum frequency exceeding<br />
the rating of the equipment driven by the inverter may cause damage or a dangerous situation. Make sure that the<br />
maximum frequency setting matches the equipment rating.<br />
- Data setting range: 25.0 to 500.0 (Hz)<br />
• For variable torque mode inverters, set the maximum frequency at 120 Hz or below.<br />
• Under vector control with speed sensor, set the maximum frequency at 200 Hz or below, and under<br />
vector control without speed sensor, at 120 Hz or below.<br />
• If a setting exceeding the maximum setting value (e.g., 500 Hz) is made, the reference speed and<br />
analog output (FMA) will be based on the full scale/reference value (10V/500 Hz). However, the<br />
frequency is internally limited. Even if 10 V is inputted, the frequency 500 Hz will be internally limited to<br />
200 Hz.<br />
The inverter can easily accept high-speed operation. When changing the speed setting, carefully check the<br />
specifications of motors or equipment beforehand.<br />
Otherwise injuries could occur.<br />
Modifying F03 data to allow a higher reference frequency requires also changing F15 data specifying a<br />
frequency limiter (high).<br />
F04 to F05<br />
F06<br />
Base Frequency 1, Rated Voltage at Base Frequency 1<br />
Maximum Output Voltage 1<br />
H50, H51 (Non-linear V/f Pattern 1 (Frequency and Voltage))<br />
H52, H53 (Non-linear V/f Pattern 2 (Frequency and Voltage))<br />
H65, H66 (Non-linear V/f Pattern 3 (Frequency and Voltage))<br />
These function codes specify the base frequency and corresponding voltage at the base frequency essentially<br />
required for running the motor properly. If combined with the related function codes H50 through H53, H65 and<br />
H66, these function codes may customize the non-linear V/f pattern by specifying increase or decrease in voltage<br />
at any point on the V/f pattern.<br />
The following description includes setups required for the non-linear V/f pattern.<br />
At high frequencies, the motor impedance may increase, resulting in an insufficient output voltage and a decrease<br />
in output torque. To prevent this problem use F06 (Maximum Output Voltage 1) to increase the voltage. Note,<br />
however, that the inverter cannot output voltage exceeding its input power voltage.<br />
V/f point<br />
Function code<br />
Frequency Voltage<br />
Remarks<br />
The setting of the maximum output voltage is<br />
Maximum frequency F03 F06<br />
disabled when the auto torque boost, torque vector<br />
control, vector control without speed sensor, or<br />
vector control with speed sensor is selected.<br />
Base frequency F04 F05<br />
Non-linear V/f pattern 3 H65 H66 Disabled when the auto torque boost, torque vector<br />
Non-linear V/f pattern 2 H52 H53 control, vector control without speed sensor, or<br />
Non-linear V/f pattern 1 H50 H51 vector control with speed sensor is selected.<br />
4-35
Examples:<br />
• Normal (linear) V/f pattern<br />
• V/f pattern with three non-linear points<br />
• Base Frequency 1 (F04)<br />
Data setting range: 25.0 to 500.0 (Hz)<br />
Set the rated frequency printed on the nameplate labeled on the motor.<br />
• Rated Voltage at Base Frequency 1 (F05)<br />
Data setting range:<br />
0: Output a voltage in proportion to input voltage (The Automatic Voltage Regulator (AVR) is disabled.)<br />
80 to 240 (V): Output an AVR-controlled voltage for 230 V series<br />
160 to 500 (V): Output an AVR-controlled voltage for 460 V series<br />
Set "0" or the rated voltage printed on the nameplate labeled on the motor.<br />
- If F05 = 0, the rated voltage at base frequency is determined by the AC Line Voltage of the inverter. The output<br />
voltage will vary as the input voltage fluctuates.<br />
- If F05 = an arbitrary value other than 0, the inverter automatically keeps the output voltage constant in line with<br />
the setting. When any of the auto torque boost, auto energy saving, etc. is enabled, the F05 data should be<br />
equal to the rated voltage of the motor.<br />
4-36
In vector control, current feedback control is performed. In the current feedback control, the current is<br />
controlled with the difference between the motor induced voltage and the inverter output voltage. For a<br />
proper control, the inverter output voltage should be sufficiently higher than the motor induced voltage.<br />
Generally, the voltage difference is about 20 V for 230 V series, about 40 V for 460 V series.<br />
The maximum voltage the inverter can output cannot exceed the inverter input voltage. Configure these<br />
voltages correctly in accordance with the motor specifications.<br />
When enabling the vector control without speed sensor using a general-purpose motor, set the F05<br />
(Rated Voltage at Base Frequency 1) data at the rated voltage of the motor. The voltage difference<br />
described above is specified by function code P56 (Induced voltage factor under vector control).<br />
Generally, there is no need to modify the initial setting.<br />
• Non-linear V/f Patterns 1, 2 and 3 for Frequency (H50, H52 and H65)<br />
If F05 (Rated Voltage at Base Frequency 1) is set to "0," settings of H50 through H53, H65, H66 and F06 do<br />
not take effect. (When the non-linear point is below the base frequency, the linear V/f pattern applies; when it<br />
is above, the output voltage is kept constant.)<br />
Data setting range:<br />
0.0 (cancel); 0.1 to 500.0 (Hz)<br />
Set the frequency component at an arbitrary point in the non-linear V/f pattern.<br />
Setting "0.0" to H50, H52 or H65 disables the non-linear V/f pattern operation.<br />
• Non-linear V/f Patterns 1, 2 and 3 for Voltage (H51, H53 and H66)<br />
Data setting range: 0 to 240 (V): Output an AVR-controlled voltage for 230 V series<br />
0 to 500 (V): Output an AVR-controlled voltage for 460 V series<br />
Sets the voltage component at an arbitrary point in the non-linear V/f pattern.<br />
• Maximum Output Voltage 1 (F06)<br />
Data setting range: 80 to 240 (V): Output an AVR-controlled voltage for 230 V series<br />
160 to 500 (V): Output an AVR-controlled voltage for 460 V series<br />
Set the voltage for the maximum frequency 1 (F03).<br />
F07, F08 Acceleration Time 1, Deceleration Time 1<br />
E10, E12, E14 (Acceleration Time 2, 3 and 4)<br />
E11, E13, E15 (Deceleration Time 2, 3 and 4)<br />
H07 (Acceleration/Deceleration Pattern)<br />
H56 (Deceleration Time for Forced Stop)<br />
H54, H55 (Acceleration Time/Deceleration Time, Jogging)<br />
H57 to H60 (1st and 2nd S-curve Acceleration/Deceleration Range)<br />
F07 specifies the acceleration time, the length of time the frequency increases from 0 Hz to the maximum<br />
frequency. F08 specifies the deceleration time, the length of time the frequency decreases from the maximum<br />
frequency down to 0 Hz.<br />
- Data setting range: 0.00 to 6000 (s)<br />
Under V/f control<br />
4-37
Under vector control without speed sensor<br />
Under vector control with speed sensor<br />
• Acceleration/deceleration time<br />
Acceleration/<br />
deceleration time<br />
Acceleration/<br />
deceleration time 1<br />
Acceleration/<br />
deceleration time 2<br />
Acceleration/<br />
deceleration time 3<br />
Acceleration/<br />
deceleration time 4<br />
Function code<br />
ACC<br />
time<br />
DEC<br />
time<br />
At jogging operation H54 H55<br />
At forced stop - H56<br />
Switching factor of acceleration/deceleration time<br />
( Refer to the descriptions of E01 to E07.)<br />
F07 F08<br />
RT1 RT2 The combinations of ON/OFF states of the<br />
OFF OFF<br />
two terminal commands RT2 and RT1 offer<br />
four choices of acceleration/deceleration<br />
E10<br />
E12<br />
E11<br />
E13 ON<br />
OFF<br />
OFF<br />
ON<br />
(Data = 4, 5)<br />
If no terminal command is assigned, only the<br />
acceleration/deceleration time 1 (F07/F08) is<br />
effective.<br />
time 1 to 4.<br />
E14 E15 ON ON<br />
When the terminal command JOG is ON, jogging operation<br />
is possible. (Data = 10)<br />
( Refer to the description of C20.)<br />
When the terminal command STOP is OFF, the motor<br />
decelerates to a stop in accordance with the deceleration<br />
time for forced stop (H56). After the motor stops, the inverter<br />
enters the alarm state with the alarm er6 displayed. (Data =<br />
30)<br />
4-38
• Acceleration/Deceleration pattern (H07)<br />
H07 specifies the acceleration and deceleration patterns (patterns to control output frequency).<br />
Data for<br />
H07<br />
0<br />
1<br />
2<br />
3<br />
Acceleration/<br />
deceleration<br />
pattern<br />
Linear<br />
S-curve<br />
(Fixed)<br />
S-curve<br />
(Adjustable)<br />
Curvilinear<br />
Motion<br />
The inverter runs the motor with the constant acceleration and<br />
deceleration.<br />
To reduce an impact that Fixed:<br />
acceleration/deceleration The acceleration/deceleration rate<br />
would make on the machine, to be applied to all of the four<br />
the inverter gradually<br />
inflection zones is fixed at 5% of<br />
accelerates or decelerates the maximum frequency.<br />
the motor in both the starting<br />
Adjustable:<br />
and ending zones of<br />
acceleration or deceleration. The acceleration/deceleration rate<br />
can be arbitrarily specified for each<br />
of the four inflection zones.<br />
Acceleration/deceleration is linear below the base frequency<br />
(constant torque) but it slows down above the base frequency to<br />
maintain a certain level of load factor (constant output).<br />
This acceleration/deceleration pattern allows the motor to accelerate<br />
or decelerate with the maximum performance of the motor.<br />
Function<br />
code<br />
-<br />
-<br />
H57<br />
H58<br />
H59<br />
H60<br />
-<br />
S-curve acceleration/deceleration<br />
To reduce an impact that acceleration/deceleration would make on the machine, the inverter gradually accelerates<br />
or decelerates the motor in both the starting and ending zones of acceleration or deceleration. Two types of<br />
S-curve acceleration/deceleration rates are available; applying 5% (fixed) of the maximum frequency to all of the<br />
four inflection zones, or specifying adjustable rate for each of the four zones with function codes H57 to H60. The<br />
reference acceleration/deceleration time determines the duration of acceleration/deceleration in the linear period;<br />
hence, the actual acceleration/deceleration time is longer after applying S-curve.<br />
Acceleration<br />
Deceleration<br />
Starting zone Ending zone Starting zone Ending zone<br />
S-curve (Fixed) 5% 5% 5% 5%<br />
S-curve (Adjustable)<br />
Setting range: 0 to<br />
100%<br />
H57<br />
Acceleration rate<br />
for the 1st S-curve<br />
(Leading edge)<br />
H58<br />
Acceleration rate<br />
for the 2nd<br />
S-curve<br />
(Trailing edge)<br />
H59<br />
Deceleration rate<br />
for the 1st<br />
S-curve<br />
(Leading edge)<br />
H60<br />
Deceleration rate<br />
for the 2nd<br />
S-curve<br />
(Trailing edge)<br />
<br />
Acceleration or deceleration time (s) = (2 5/100 + 90/100+ 2 5/100) (reference acceleration or deceleration time)<br />
= 1.1 (reference acceleration or deceleration time)<br />
<br />
Acceleration or deceleration time (s) = (2 10/100 + 70/100 + 2 20/100) (reference acceleration or deceleration time)<br />
= 1.3 (reference acceleration or deceleration time)<br />
4-39
Curvilinear acceleration/deceleration<br />
Acceleration/deceleration is linear below the base frequency (constant torque) but it slows down above the base<br />
frequency to maintain a certain level of load factor (constant output).<br />
This acceleration/deceleration pattern allows the motor to accelerate or decelerate with its maximum performance.<br />
The figures at left show the acceleration<br />
characteristics. Similar characteristics apply to the<br />
deceleration.<br />
• Choosing S-curve acceleration/deceleration or curvilinear acceleration/deceleration in Acceleration/<br />
Deceleration Pattern (H07), extends acceleration/deceleration times are longer than specified times.<br />
• Specifying an improperly short acceleration/deceleration time may activate the current limiter, torque<br />
limiter, or anti-regenerative control, resulting in a longer observed acceleration/deceleration time.<br />
F09 Torque Boost 1 (Refer to F37 on page 4-56.)<br />
4-40
F10 to F12 Electronic Thermal Overload Protection for <strong>Motor</strong> 1<br />
(Select motor characteristics, Overload detection level, and Thermal time constant)<br />
F10 through F12 specify the thermal characteristics of the motor for its electronic thermal overload protection that<br />
are used to detect overload conditions of the motor.<br />
Upon detection of overload conditions of the motor, the inverter ceases outputting and issues a motor overload<br />
alarm to protect motor 1.<br />
• Thermal characteristics of the motor specified by F10 and F12 are also used for the overload early<br />
warning. Even if only using the overload early warning, set these characteristics data to these function<br />
codes. (Refer to the description of E34.)<br />
• For motors with PTC thermistor, connecting the PTC thermistor to the terminal [V2] enables the motor<br />
overheat protective function. For details, refer to the description of H26.<br />
• Select motor characteristics (F10)<br />
F10 selects the cooling mechanism of the motor--shaft-driven or separately powered cooling fan.<br />
Data for F10<br />
1<br />
2<br />
Function<br />
For a general-purpose motor with shaft-driven cooling fan<br />
(The cooling effect will decrease in low frequency operation.)<br />
For an inverter-driven motor, non-ventilated motor, or motor with separately powered cooling<br />
fan<br />
(The cooling effect is constant regardless of the output frequency.)<br />
The figure below shows operating characteristics of the electronic thermal overload protection when F10 = 1. The<br />
characteristic factors 1 through 3 as well as their corresponding switching frequencies f2 and f3 vary with the<br />
characteristics of the motor. The tables below list the factors of the motor selected by P99 (<strong>Motor</strong> 1 Selection).<br />
Cooling Characteristics of <strong>Motor</strong> with Shaft-driven Cooling Fan<br />
Nominal applied<br />
motor<br />
HP<br />
Nominal Applied <strong>Motor</strong> and Characteristic Factors when P99 (<strong>Motor</strong> 1 selection) = 0 or 4<br />
Thermal time<br />
constant <br />
(Factory default)<br />
Reference current<br />
for setting the<br />
thermal time<br />
constant (Imax)<br />
Output frequency for motor<br />
characteristic factor<br />
Characteristic<br />
factor (%)<br />
f2 f3 1 2 3<br />
0.5, 1<br />
75 85 100<br />
7 Hz<br />
2 to 5 85 85 100<br />
7.5 to 15 5 min<br />
5 Hz 6 Hz 90 95 100<br />
20 Allowable continuous<br />
7 Hz 85 85 100<br />
current<br />
25, 30<br />
150%<br />
5 Hz 92 100 100<br />
40 to 60<br />
Base Base 54 85 95<br />
75 to 125 10 min<br />
frequency frequency 51 95 95<br />
150 or above 33% 83% 53 85 90<br />
4-41
Nominal applied<br />
motor<br />
HP<br />
Nominal Applied <strong>Motor</strong> and Characteristic Factors when P99 (<strong>Motor</strong> 1 Selection) = 1 or 3<br />
Thermal time<br />
constant <br />
(Factory default)<br />
0.25 to 30 5 min<br />
Reference current<br />
for setting the<br />
thermal time<br />
constant (Imax)<br />
Allowable<br />
continuous current<br />
150%<br />
Output frequency for<br />
motor characteristic factor<br />
Characteristic<br />
factor (%)<br />
f2 f3 1 2 3<br />
Base<br />
frequency<br />
33%<br />
Base<br />
frequency<br />
33%<br />
69 90 90<br />
40 to 60<br />
Base 54 85 95<br />
75 to 125 10 min<br />
frequency 51 95 95<br />
150 or above 83% 53 85 90<br />
If F10 is set to "2," changes of the output frequency do not affect the cooling effect. Therefore, the overload<br />
detection level (F11) remains constant.<br />
• Overload detection level (F11)<br />
Data setting range: 1 to 135% of the rated current (allowable continuous drive current) of the inverter<br />
In general, set the F11 data to the allowable continuous current of motor when driven at the base frequency (i.e.<br />
1.0 to 1.1 times of the rated current of the motor.)<br />
To disable the electronic thermal overload protection, set the F11 data to "0.00."<br />
• Thermal time constant (F12) Data setting range: 0.5 to 75.0 (minutes)<br />
F12 specifies the thermal time constant of the motor. If the current of 150% of the overload detection level<br />
specified by F11 is attained for the time specified by F12, the electronic thermal overload protection becomes<br />
activated to detect the motor overload. The thermal time constant for general-purpose motors is approx. 5 minutes<br />
for motors of 30 HP or below and 10 minutes for motors of 40 HP or above by factory default.<br />
(Example) When the F12 data is set at 5 minutes<br />
As shown below, the electronic thermal overload protection is activated to detect an alarm condition (alarm code<br />
) when the output current of 150% of the overload detection level (specified by F11) is attained for 5 minutes,<br />
and 120% for approx. 12.5 minutes.<br />
The actual time required for issuing a motor overload alarm tends to be shorter than the specified value, taking<br />
into account the time period from when the output current exceeds the rated current (100%) until it reaches 150%<br />
of the overload detection level.<br />
Example of Operating Characteristics<br />
4-42
F14<br />
Restart Mode after Momentary Power Failure (Mode selection)<br />
H13 (Restart Mode after Momentary Power Failure (Restart time))<br />
H14 (Restart Mode after Momentary Power Failure (Frequency fall rate))<br />
H15 (Restart Mode after Momentary Power Failure (Continuous running level))<br />
H16 (Restart Mode after Momentary Power Failure (Allowable momentary power failure time))<br />
H92 (Continuity of running (P))<br />
H93 (Continuity of running (I))<br />
F14 specifies the action to be taken by the inverter (trip and restart) in the event of a momentary power failure.<br />
• Restart mode after momentary power failure (Mode selection) (F14)<br />
• Under V/f control (F42 = 0 or 2)<br />
Data for F14<br />
Auto search disabled<br />
Description<br />
Auto search enabled<br />
0: Trip immediately As soon as the DC link bus voltage drops below the undervoltage detection level due to a<br />
momentary power failure, the inverter issues undervoltage alarm lu and shuts down its output so<br />
that the motor enters a coast-to-stop state.<br />
1: Trip after recovery<br />
from power failure<br />
2: Trip after<br />
decelerate-to-stop<br />
3: Continue to run<br />
(for heavy inertia or<br />
general loads)<br />
4: Restart at the<br />
frequency at which<br />
the power failure<br />
occurred<br />
(for general loads)<br />
5: Restart at the<br />
starting frequency<br />
As soon as the DC link bus voltage drops below the undervoltage detection level due to a<br />
momentary power failure, the inverter shuts down its output so that the motor enters a coast-to-stop<br />
state, but it does not enter the undervoltage state or issue undervoltage alarm lu .<br />
The moment the power is restored, an undervoltage alarm lu is issued, while the motor remains in a<br />
coast-to-stop state.<br />
As soon as the DC link bus voltage drops below the continuous running level due to a momentary<br />
power failure, decelerate-to-shop control is invoked. Decelerate-to-stop control regenerates kinetic<br />
energy from the load's moment of inertia, slowing down the motor and continuing the deceleration<br />
operation. After decelerate-to-stop operation, an undervoltage alarm lu is issued.<br />
As soon as the DC link bus voltage drops below the continuous running level due to a momentary<br />
power failure, continuous running control is invoked. Continuous running control regenerates kinetic<br />
energy from the load’s moment of inertia, continues running, and waits the recovery of power. When<br />
an undervoltage condition is detected due to a lack of energy to be regenerated, the output<br />
frequency at that time is saved, the output of the inverter is shut down, and the motor enters a<br />
coast-to-stop state.<br />
If a run command has been input,<br />
restoring power restarts the inverter at the<br />
output frequency saved when<br />
undervoltage was detected.<br />
This setting is ideal for fan applications with a large moment of inertia.<br />
If a run command has been input, restoring power<br />
performs auto search for idling motor speed and<br />
restarts running the motor at the frequency calculated<br />
based on the searched speed.<br />
As soon as the DC link bus voltage drops below the undervoltage detection level due to a<br />
momentary power failure, the inverter shuts down the output so that the motor enters a<br />
coast-to-stop state.<br />
If a run command has been input,<br />
restoring power restarts the inverter at the<br />
output frequency saved when<br />
undervoltage was detected.<br />
If a run command has been input, restoring power<br />
performs auto search for idling motor speed and restarts<br />
running the motor at the frequency calculated based on<br />
the searched speed.<br />
This setting is ideal for applications with a moment of inertia large enough not to slow down the<br />
motor quickly, such as fans, even after the motor enters a coast-to-stop state upon occurrence of a<br />
momentary power failure.<br />
As soon as the DC link bus voltage drops below the undervoltage detection level due to a<br />
momentary power failure, the inverter shuts down the output so that the motor enters a<br />
coast-to-stop state.<br />
If a run command has been input,<br />
restoring power restarts the inverter at the<br />
starting frequency specified by function<br />
code F23.<br />
If a run command has been input, restoring power<br />
performs auto search for idling motor speed and restarts<br />
running the motor at the frequency calculated based on<br />
the searched speed.<br />
This setting is ideal for heavy load applications such as pumps, having a small moment of inertia, in<br />
which the motor speed quickly goes down to zero as soon as it enters a coast-to-stop state upon<br />
occurrence of a momentary power failure.<br />
Auto search is enabled by turning ON the digital terminal command STM ("Enable auto search for idling motor speed at<br />
starting") or setting the H09 data to "1" or "2."<br />
For details about the digital terminal command STM and auto search, refer to the description of H09 (Starting Mode, Auto<br />
search).<br />
4-43
• Under vector control without speed sensor (F42 = 1 or 5)<br />
Data for F14<br />
Auto search disabled<br />
Description<br />
Auto search enabled<br />
0: Trip immediately As soon as the DC link bus voltage drops below the undervoltage detection level due to a<br />
momentary power failure, the inverter issues undervoltage alarm lu and shuts down its output so<br />
that the motor enters a coast-to-stop state.<br />
1: Trip after recovery<br />
from power failure<br />
2: Trip after<br />
decelerate-to-stop<br />
3: Continue to run<br />
(for heavy inertia or<br />
general loads)<br />
4: Restart at the<br />
frequency at which<br />
the power failure<br />
occurred<br />
(for general loads)<br />
5: Restart at the starting<br />
frequency<br />
As soon as the DC link bus voltage drops below the undervoltage detection level due to a<br />
momentary power failure, the inverter shuts down its output so that the motor enters a<br />
coast-to-stop state, but it does not enter the undervoltage state or issue undervoltage alarm lu .<br />
The moment the power is restored, an undervoltage alarm lu is issued, while the motor remains in<br />
a coast-to-stop state.<br />
As soon as the DC link bus voltage drops below the continuous running level due to a momentary<br />
power failure, decelerate-to-shop control is invoked. Decelerate-to-stop control regenerates kinetic<br />
energy from the load's moment of inertia, slowing down the motor and continuing the deceleration<br />
operation. After decelerate-to-stop operation, an undervoltage alarm lu is issued.<br />
As soon as the DC link bus voltage drops below the undervoltage detection level due to a<br />
momentary power failure, the inverter shuts down the output so that the motor enters a<br />
coast-to-stop state.<br />
If the F14 data is set to "3," the "Continue to run" function is disabled.<br />
If a run command has been input,<br />
restoring power restarts the inverter at the<br />
output frequency saved when<br />
undervoltage was detected.<br />
If a run command has been input, restoring power<br />
performs auto search for idling motor speed and<br />
restarts running the motor at the frequency calculated<br />
based on the searched speed.<br />
As soon as the DC link bus voltage drops below the undervoltage detection level due to a<br />
momentary power failure, the inverter shuts down the output so that the motor enters a<br />
coast-to-stop state.<br />
If a run command has been input,<br />
restoring power restarts the inverter at<br />
the starting frequency specified by<br />
function code F23.<br />
If a run command has been input, restoring power<br />
performs auto search for idling motor speed and<br />
restarts running the motor at the frequency calculated<br />
based on the searched speed.<br />
This setting is ideal for heavy load applications such as pumps, having a small moment of inertia,<br />
in which the motor speed quickly goes down to zero as soon as it enters a coast-to-stop state<br />
upon occurrence of a momentary power failure.<br />
Auto search is enabled by turning ON the digital terminal command STM ("Enable auto search for idling motor speed at<br />
starting") or setting the d67 data to "1" or "2."<br />
For details about the digital terminal command STM and auto search, refer to the description of d67 (Starting Mode, Auto<br />
search).<br />
• Under vector control with speed sensor (F42 = 6)<br />
Data for F14<br />
Description<br />
0: Trip immediately As soon as the DC link bus voltage drops below the undervoltage detection level due to a<br />
momentary power failure, the inverter issues undervoltage alarm lu and shuts down its output so<br />
that the motor enters a coast-to-stop state.<br />
1: Trip after recovery<br />
from power failure<br />
2: Trip after<br />
decelerate-to-stop<br />
3: Continue to run<br />
(for heavy inertia or<br />
general loads)<br />
4: Restart at the<br />
frequency at which<br />
the power failure<br />
occurred<br />
(for general loads)<br />
5: Restart at the starting<br />
frequency<br />
As soon as the DC link bus voltage drops below the undervoltage detection level due to a<br />
momentary power failure, the inverter shuts down its output so that the motor enters a<br />
coast-to-stop state, but it does not enter the undervoltage state or issue undervoltage alarm lu .<br />
The moment the power is restored, an undervoltage alarm lu is issued, while the motor remains in<br />
a coast-to-stop state.<br />
As soon as the DC link bus voltage drops below the continuous running level due to a momentary<br />
power failure, decelerate-to-shop control is invoked. Decelerate-to-stop control regenerates<br />
kinetic energy from the load's moment of inertia, slowing down the motor and continuing the<br />
deceleration operation. After decelerate-to-stop operation, an undervoltage alarm lu is issued.<br />
As soon as the DC link bus voltage drops below the undervoltage detection level due to a<br />
momentary power failure, the inverter shuts down the output so that the motor enters a<br />
coast-to-stop state.<br />
If the F14 data is set to "3," the "Continue to run" function is disabled.<br />
If a run command has been input, restoring power restarts the inverter at the motor speed<br />
detected by the speed sensor.<br />
4-44
If you enable the "Restart mode after momentary power failure" (Function code F14 = 3, 4, or 5), the inverter<br />
automatically restarts the motor running when the power is recovered. Design the machinery or equipment so<br />
that personnel safety is ensured after restarting.<br />
Otherwise an accident could occur.<br />
• Restart mode after momentary power failure (Basic operation with auto search disabled)<br />
The inverter recognizes a momentary power failure upon detecting the condition that DC link bus voltage goes<br />
below the undervoltage detection level, while the inverter is running. If the load of the motor is light and the<br />
duration of the momentary power failure is extremely short, the voltage drop may not be great enough for a<br />
momentary power failure to be recognized, and the motor may continue to run uninterrupted.<br />
Upon recognizing a momentary power failure, the inverter enters the restart mode (after a recovery from<br />
momentary power failure) and prepares for restart. When power is restored, the inverter goes through an initial<br />
charging stage and enters the ready-to-run state. When a momentary power failure occurs, the power supply<br />
voltage for external circuits such as relay sequence circuits may also drop so as to disable the run command. If<br />
this occurs, the inverter waits 2 seconds for a run command input after the inverter enters a ready-to-run state.<br />
When received; the inverter begins the restart processing in accordance with the F14 data (Mode selection). If no<br />
run command has been received within 2-seconds, the inverter cancels the restart mode (after a recovery from<br />
momentary power failure) and needs to be started again at starting frequency. Therefore, ensure that a run<br />
command is entered within 2 seconds after a recovery of power, or install a mechanical latch relay.<br />
When starting and stopping via the keypad (F02=0), the above operation will also apply regardless of the whether<br />
FWD, REV, or F02 = 2 or 3 sets rotational direction.<br />
• When the power is restored, the inverter will wait up to 2 seconds for a run command. However, the<br />
setting of H16 (allowable momentary power failure supply) overrides the 2 second limit if set below 2<br />
seconds.<br />
• If the "Coast to a stop" terminal command BX is entered during the power failure, the inverter exits the<br />
restart mode and enters the normal running mode. If a run command is entered with power applied, the<br />
inverter will start from the normal starting frequency.<br />
• The inverter recognizes a momentary power failure by detecting an undervoltage condition whereby the<br />
voltage of the DC link bus goes below the lower limit. In a configuration where a magnetic contactor is<br />
installed on the output side of the inverter, the inverter may fail to recognize a momentary power failure<br />
because it also may shut down the operating power of the magnetic contactor, causing the contactor<br />
circuit to open. If this occurs, the inverter is cut off from the motor and load, and the voltage drop in the<br />
DC link bus is not great enough to be recognized as a power failure. In such an event, restart after a<br />
recovery from momentary power failure does not work properly as designed. To remedy this, connect<br />
the interlock command IL line to the auxiliary contact of the magnetic contactor, so that a momentary<br />
power failure can sure be detected. For details, refer to the descriptions of E01 through E07.<br />
Function code E01 to E07, data = 22<br />
IL<br />
OFF<br />
ON<br />
No momentary power failure has occurred.<br />
Description<br />
A momentary power failure has occurred. (Restart after a momentary power failure enabled)<br />
4-45
During a momentary power failure, the motor slows down. After power is restored, the inverter restarts at the<br />
frequency just prior to power failure. Then, the current limiting function works and the output frequency of the<br />
inverter automatically decreases. When the output frequency matches the motor speed, the motor accelerates up<br />
to the output frequency. See the figure below. (In this case, the instantaneous overcurrent limiting must be<br />
enabled (H12 = 1)).<br />
• Auto-restarting after momentary power failure IPF<br />
This output signal is ON during the period after the occurrence of momentary power failure until the completion of<br />
restart (the output has reached the reference frequency). Beware that when the IPF is ON, the motor slows down.<br />
( For details about IPF, refer to E20 through E24 and E27 (data = 6).)<br />
• Restart mode after momentary power failure (Basic operation with auto search enabled)<br />
Auto search for idling motor speed fails if it is done while the motor retains residual voltage. It is therefore<br />
necessary to leave sufficient time for the motor (auto search delay time) to discharge the residual voltage. The<br />
delay time is specified by H46 (Starting Mode (Auto search delay time 2)).<br />
The inverter will not start unless the time specified by H46 has elapsed, even if the starting conditions are satisfied.<br />
( For details, refer to H09 and d67.)<br />
• To use auto search for idling motor speed, it is necessary to have tuned the inverter.<br />
• When the estimated speed exceeds the maximum frequency or the upper limit frequency, the inverter<br />
disables auto search and starts running the motor at that frequency.<br />
• During auto search, if an overcurrent or overvoltage trip occurs, the inverter restarts the suspended<br />
auto search.<br />
• Perform auto search at 60 Hz or below.<br />
• Note that auto search may not fully provide the performance depending on load conditions, motor<br />
parameters, wiring length, and other external factors.<br />
• Do not execute motor tuning with output filter unless the filter is a reactor type only. A tuning error may<br />
result otherwise.<br />
4-46
• Restart mode after momentary power failure (Allowable momentary power failure time) (H16)<br />
H16 specifies the maximum allowable duration (0.0 to 30.0 seconds) from an occurrence of a momentary power<br />
failure (undervoltage) until the inverter is to be restarted. Specify the coast-to-stop time which the machine system<br />
and facility can tolerate.<br />
If the power is restored within the specified duration, the inverter restarts in the restart mode specified by F14. If<br />
not, the inverter recognizes that the power has been shut down and the inverter does not apply the restart mode.<br />
If H16 (Allowable momentary power failure time) is set to "999," restart will take place until the DC link bus voltage<br />
drops down to the minimum allowable voltage for restart after a momentary power failure (50 V for 230 V series<br />
and 100 V for 460 V series). If the DC link bus voltage drops below the allowable voltage, the inverter recognizes<br />
that the power has been shut down and does not restart.<br />
Power supply voltage<br />
Allowable voltage for restart after momentary power failure<br />
230 V series 50 V<br />
460 V series 100 V<br />
The time required from when the DC link bus voltage drops from the threshold of undervoltage until it<br />
reaches the allowable voltage for restart after a momentary power failure greatly varies depending on the<br />
inverter capacity, the presence of options, and other factors.<br />
• Restart mode after momentary power failure (Restart time) (H13)<br />
H13 specifies the time period from momentary power failure occurrence until the inverter reacts for restarting<br />
process.<br />
If the inverter starts the motor while motor’s residual voltage is still in a high level, a large inrush current may flow<br />
or an overvoltage alarm may occur due to an occurrence of temporary regeneration. For safety, therefore, it is<br />
advisable to set H13 to a certain level so that the restart will take place only after the residual voltage has dropped<br />
to a low level. Note that even when power is restored, restart will not take place until the restart time (H13) has<br />
elapsed.<br />
4-47
Factory default: By factory default, H13 is set to a matched value for the standard motor (see Table A in Section<br />
5.1 "Function Code Tables"). Basically, it is not necessary to change H13 data. However, if the long restart time<br />
causes deteriorated performance or causes any other problem, reduce the setting to about a half of the default<br />
value, ensuring that no alarm occurs.<br />
Function code H13 (Restart mode after momentary power failure -- Restart time) also applies to the<br />
switching operation between line and inverter (refer to the descriptions of E01 through E07).<br />
• Restart mode after momentary power failure (Frequency fall rate) (H14)<br />
During restart after a momentary power failure, if the inverter output frequency and the idling motor speed cannot<br />
be harmonized with each other, an overcurrent persists, activating the overcurrent limiter. If it happens, the<br />
inverter automatically reduces the output frequency to match the idling motor speed according to the reduction<br />
rate (Frequency fall rate: Hz/s) specified by H14.<br />
Data for H14<br />
Inverter’s action for the output frequency fall<br />
0.00 Follow the deceleration time specified<br />
0.01 to 100.00 (Hz/s) Follow data specified by H14<br />
999<br />
Follow the setting of the PI controller in the current limiter.<br />
(The PI constant is prefixed inside the inverter.)<br />
If the frequency drop rate is too high, regeneration may take place at the moment the motor rotation<br />
matches the inverter output frequency, causing an overvoltage trip. On the contrary, if the frequency fall<br />
rate is too low, the time required for the output frequency to match the motor speed (duration of current<br />
limiting action) may be excessive, triggering the inverter overload prevention control.<br />
• Restart after momentary power failure (Continuous running level) (H15)<br />
Continuity of running (P and I) (H92, H93)<br />
• Trip after decelerate-to-stop<br />
If a momentary power failure occurs when F14 is set to "2" (Trip after decelerate-to-stop), the inverter enters the<br />
control sequence of the decelerate-to-stop when the DC link bus voltage drops below the continuous running level<br />
specified by H15.<br />
Under the decelerate-to-stop control, the inverter decelerates its output frequency keeping the DC link bus voltage<br />
constant using the PI processor. (P (proportional) and I (integral) components of the PI processor are specified by<br />
H92 and H93, respectively.)<br />
For normal inverter operation, it is not necessary to modify H15, H92 or H93.<br />
• Continue to run<br />
If a momentary power failure occurs when F14 is set to "3" (Continue to run), the inverter enters the control<br />
sequence of the continuous running when the DC link bus voltage drops below the continuous running level<br />
specified by H15.<br />
Under the continuous running control, the inverter continues to run keeping the DC link bus voltage constant using<br />
the PI processor. (P (proportional) and I (integral) components of the PI processor are specified by H92 and H93,<br />
respectively.) For normal inverter operation, it is not necessary to modify H15, H92 or H93.<br />
Power supply voltage<br />
<br />
40 HP or below 50 HP or above<br />
230 V series 5 V 10 V<br />
460 V series 10 V 20 V<br />
4-48
Even if selecting "Trip after decelerate-to-stop" or "Continue to run," the inverter may not be able to do so<br />
when the load's inertia is small or the load is heavy, due to undervoltage caused by a control delay. In<br />
such a case, when "Trip after decelerate-to-stop" is selected, the inverter allows the motor to coast to a<br />
stop; when "Continue to run" is selected, the inverter saves the output frequency being applied when the<br />
undervoltage alarm occurred and restarts at the saved frequency after a recovery from the momentary<br />
power failure.<br />
When the input power voltage for the inverter is high, setting the continuous running level high makes the<br />
control more stable even if the load's inertia is relatively small. Raising the continuous running level too<br />
high, however, might cause the continuous running control activated even during normal operation.<br />
When the input power voltage for the inverter is extremely low, continuous running control might be<br />
activated even during normal operation, at the beginning of acceleration or at an abrupt change in load.<br />
To avoid this, lower the continuous running level. However, possible undervoltage results from voltage<br />
drop due to a control delay if set too low.<br />
Changing the continuous running level, make sure that the continuous running control will be performed<br />
properly, by considering the fluctuations of the load and the input voltage.<br />
F15, F16 Frequency Limiter (High), Frequency Limiter (Low) H63 Low Limiter (Mode selection)<br />
• Frequency Limiter (High and Low) (F15, F16) Data setting range: 0.0 to 500.0 (Hz)<br />
F15 and F16 specify the upper and lower limits of the output frequency or reference frequency, respectively. The<br />
frequency to which the limit is applied differs depending on the control system, as seen in the table.<br />
Frequency Limiter<br />
V/f control<br />
Frequency to which the limit is applied<br />
Vector control without/with speed sensor<br />
Frequency Limiter (High) F15 Output frequency Reference speed (reference frequency)<br />
Frequency Limiter (Low) F16 Reference frequency Reference speed (reference frequency)<br />
When the limit is applied to the reference frequency or reference speed, delayed responses of<br />
control may cause an overshoot or undershoot, and the frequency may temporarily go beyond the<br />
limit level.<br />
• Low Limiter (Mode selection) (H63)<br />
H63 specifies the operation to be carried out when the reference frequency drops below the low level specified by<br />
F16, as follows:<br />
Data for H63<br />
Operation<br />
0 The output frequency will be held at the low level specified by F16.<br />
1 The inverter decelerates to stop the motor.<br />
(H63 = 0) (H63 = 1)<br />
• When changing the frequency limiter (High) (F15) in order to raise the reference frequency, be sure to<br />
change the maximum frequency (F03) accordingly.<br />
• Maintain the following relationship among the data for frequency control:<br />
F15 > F16, F15 > F23, and F15 > F25<br />
F03 > F16<br />
where, F23 and F25 specify the starting and stop frequencies, respectively.<br />
If any erroneous data for these function codes is entered, the inverter may not run the motor at the<br />
desired speed, nor start it normally.<br />
4-49
F18 Bias (Frequency command 1) (Refer to F01.) page 4-26<br />
F20 to F22<br />
H95<br />
DC Braking 1 (Braking starting frequency, Braking level, and Braking time)<br />
DC Braking (Braking response mode)<br />
F20 through F22 specify the DC braking that prevents motor 1 from running by inertia during decelerate-to-stop<br />
operation.<br />
If the motor decelerates-to-stop by turning OFF the run command or by decreasing the reference frequency below<br />
the stop frequency, the inverter activates the DC braking by injecting current at the braking level (F21) during the<br />
braking time (F22) when the output frequency is at or below the DC braking starting frequency (F20).<br />
Setting the braking time to "0.0" (F22 = 0) disables the DC braking.<br />
• Braking starting frequency (F20) Data setting range: 0.0 to 60.0 (Hz)<br />
F20 specifies the frequency at which the DC braking starts its operation during motor decelerate-to-stop state.<br />
• Braking level (F21) Data setting range: 0 to 80 (%) Variable/Constant torque inverters<br />
0 to 100 (%) CT-Vector-mode inverters<br />
F21 specifies the output current level to be applied when the DC braking is activated. The function code data<br />
should be set, assuming the rated output current of the inverter as 100%, in increments of 1%.<br />
The inverter rated output current differs between the variable torque and constant torque modes.<br />
0% to 100% for inverters of 7.5 HP or below.<br />
• Braking time (F22) Data setting range: 0.01 to 30.00 (s), 0.00 (Disable)<br />
F22 specifies the braking period that activates DC braking.<br />
• Braking response mode (H95)<br />
H95 specifies the DC braking response mode. When vector control without/with speed sensor is selected, the<br />
response is constant.<br />
Data for H95 Characteristics Note<br />
0<br />
Slow response. Slows the rising edge of the<br />
current, thereby preventing reverse rotation at<br />
the start of DC braking.<br />
Insufficient braking torque may result at<br />
the start of DC braking.<br />
1<br />
Quick response. Quickens the rising edge of the<br />
current, thereby accelerating the build-up of the<br />
braking torque.<br />
Reverse rotation may result depending<br />
on the moment of inertia of the<br />
mechanical load and the coupling<br />
mechanism.<br />
4-50
It is also possible to use an external digital input signal as an "Enable DC braking" terminal command<br />
DCBRK. As long as the DCBRK command is ON, the inverter performs DC braking, regardless of the<br />
braking time specified by F22.<br />
( Refer to E01 through E07, data =13.)<br />
Turning the DCBRK command ON even when the inverter is in a stopped state activates the DC braking.<br />
This feature allows the motor to be excited before starting, resulting in smoother acceleration (quicker<br />
build-up of acceleration torque) (under V/f control).<br />
When vector control without/with speed sensor is selected, use the pre-exciting feature for establishing<br />
the magnetic flux. ( For details, refer to H84.)<br />
In general, DC braking is used to prevent the motor rotation by inertia during the stopping process. Under<br />
vector control with speed sensor, however, zero speed control will be more effective for applications<br />
where load is applied to the motor even in a stopped state.<br />
If the zero speed control continues for a long time, the motor may slightly rotate due to a control error. To<br />
eliminate any rotation, use the servo-lock function. ( For details, refer to J97.)<br />
In general, specify data of function code F20 at a value close to the rated slip frequency of motor. If<br />
setting is at an extremely high value, control may become unstable and an overvoltage alarm may result<br />
in some cases.<br />
Even if the motor is stopped by DC braking, voltage is output to inverter output terminals U, V, and W.<br />
An electric shock may occur.<br />
The DC brake function of the inverter does not provide any holding mechanism.<br />
Injuries could occur.<br />
F23 to F25<br />
Starting Frequency 1, Starting Frequency 1 (Holding time), Stop Frequency<br />
F38 (Stop Frequency (Detection mode)) F39 (Stop Frequency (Holding time))<br />
H92 (Continuity of Running (P)<br />
H93 (Continuity of Running (I)<br />
d24 (Zero Speed Control)<br />
Under V/f control<br />
At the startup of an inverter, the initial output frequency is equal to the starting frequency. The inverter shuts off its<br />
output when the output frequency reaches the stop frequency.<br />
Set the starting frequency to a level at which the motor can generate enough torque for startup. Generally, set the<br />
motor's rated slip frequency as the starting frequency.<br />
Specifying the holding time for the starting frequency compensates for the delay time for the establishment of a<br />
magnetic flux in the motor; specifying that for the stop frequency stabilizes the motor speed at the stop of the<br />
inverter.<br />
• Starting frequency 1 (F23)<br />
Data setting range: 0.0 to 60.0 (Hz)<br />
F23 specifies the starting frequency at the startup of an inverter. Under V/f control, even if the starting frequency is<br />
set at 0.0 Hz, the inverter starts at 0.1 Hz.<br />
4-51
• Starting frequency 1 (Holding time) (F24) Data setting range: 0.00 to 10.00 (s)<br />
F24 specifies the holding time for the starting frequency 1.<br />
• Stop frequency (F25)<br />
Data setting range: 0.0 to 60.0 (Hz)<br />
F25 specifies the stop frequency at the stop of the inverter. Under V/f control, even if the stop frequency is set at<br />
0.0 Hz, the inverter stops at 0.1 Hz.<br />
• Stop frequency (Holding time) (F39) Data setting range: 0.00 to 10.00 (s)<br />
F39 specifies the holding time for the stop frequency.<br />
If the starting frequency is lower than the stop frequency, the inverter will not output any power as long as<br />
the reference frequency does not exceed the stop frequency.<br />
Under vector control with/without speed sensor (F42 = 5, 6)<br />
At the startup, the inverter first starts at the "0" speed and accelerates to the starting frequency according to the<br />
specified acceleration time. After holding the starting frequency for the specified period, the inverter again<br />
accelerates to the reference speed according to the specified acceleration time.<br />
The inverter stops its output when the reference speed or detected one (specified by F38) reaches the stop<br />
frequency specified by F25.<br />
Specifying the holding time for the starting frequency compensates for the delay time for the establishment of a<br />
magnetic flux in the motor; specifying that for the stop frequency stabilizes the motor speed at the stop of the<br />
inverter.<br />
• Starting Frequency 1 (F23)<br />
Data setting range: 0.0 to 60.0 (Hz)<br />
F23 specifies the starting frequency at the startup of an inverter.<br />
• Starting Frequency 1 (Holding time) (F24) Data setting range: 0.00 to 10.00 (s)<br />
F24 specifies the holding time for the starting frequency 1.<br />
• Stop Frequency (F25)<br />
F25 specifies the stop frequency at the stop of the inverter.<br />
Data setting range: 0.0 to 60.0 (Hz)<br />
• Stop Frequency (Holding time) (F39) Data setting range: 0.00 to 10.00 (s)<br />
F39 specifies the holding time for the stop frequency.<br />
• Zero Speed Control (d24)<br />
To enable zero speed control under vector control with speed sensor, it is necessary to set the speed command<br />
(frequency command) at below the starting and stop frequencies. If the starting and stop frequencies are 0.0 Hz,<br />
however, the zero speed control is enabled only when the speed command is 0.00 Hz. d24 specifies the operation<br />
for the zero speed control at the startup of the inverter.<br />
Data for d24 Zero speed control Descriptions<br />
0 Not allowed at startup<br />
1 Allowed at startup<br />
Even setting the speed command at below the starting and stop<br />
frequencies and turning a run command ON does not enable the zero<br />
speed control.<br />
To enable the zero speed control, set the speed command at above the<br />
starting frequency and then start up the inverter again.<br />
Setting the speed command at below the starting and stop frequencies<br />
and turning a run command ON enables the zero speed control.<br />
4-52
The table below shows the conditions for zero speed control to be enabled or disabled.<br />
At startup<br />
At stop<br />
Speed command Run command Data for d24 Operation<br />
OFF ― Stop (Gate OFF)<br />
Below the starting and<br />
0 Stop (Gate OFF)<br />
stop frequencies<br />
ON<br />
1 Zero speed control<br />
Below the stop<br />
ON ― Zero speed control<br />
frequency<br />
OFF ― Stop (Gate OFF)<br />
• Stop Frequency (Detection mode) (F38) (Under vector control with speed sensor)<br />
F38 specifies whether to use the detected or reference speed as criterion to shut down the inverter output. Usually<br />
the inverter uses the detected speed. However, if the inverter undergoes a load exceeding its capability, e.g., an<br />
external excessive load, the motor cannot stop so that the detected speed may not reach the stop frequency level.<br />
When such a situation arises, select an appropriate speed that can reach the stop frequency level even if the<br />
detected speed does not, in order to stop the inverter without fail for general fail-safe operation.<br />
- Data setting range: 0 (Detected speed)<br />
1 (Reference speed)<br />
4-53
F26, F27 <strong>Motor</strong> Sound (Carrier frequency and Tone) H98 (Protection/Maintenance Function (Mode selection))<br />
• <strong>Motor</strong> Sound (Carrier frequency) (F26)<br />
F26 controls the carrier frequency so as to reduce an audible noise generated by the motor or electromagnetic<br />
noise from the inverter itself, and to decrease a leakage current from the main output (secondary) wirings.<br />
Item Characteristics Remarks<br />
0.75 to 16 kHz<br />
0.5 to 30 HP (VT mode)<br />
0.5 to 75 HP (CT, CT-V mode)<br />
Carrier frequency<br />
0.75 to 10 kHz<br />
40 to 100 HP (VT mode)<br />
125 to 800 HP (CT-V mode)<br />
0.75 to 6 kHz<br />
125 to 900 HP (VT mode)<br />
800 and 900 HP (CT-V mode)<br />
0.75 to 4 kHz 1000 HP (VT mode)<br />
0.75 to 2 kHz 150 to 700HP (CT Mode)<br />
<strong>Motor</strong> sound noise emission High Low<br />
<strong>Motor</strong> temperature<br />
(due to harmonics components)<br />
High Low<br />
Ripples in output current<br />
waveform<br />
Large Small<br />
Leakage current Low High<br />
Electromagnetic noise emission Low High<br />
Inverter loss Low High<br />
VT = Variable Torque, CT = Constant Torque, CT-V = Constant Torque Vector<br />
Specifying a too low carrier frequency will cause the output current waveform to have a large amount of<br />
ripples. As a result, the motor loss increases, causing the motor temperature to rise. Furthermore, the<br />
large amount of ripples tends to cause a current limiting alarm. When the carrier frequency is set to 1 kHz<br />
or below, therefore, reduce the load so that the inverter output current comes to be 80% or less of the<br />
rated current.<br />
When a high carrier frequency is specified, the temperature of the inverter may rise due to a surrounding<br />
temperature rise or an increase of the load. If it happens, the inverter automatically decreases the carrier<br />
frequency to prevent the inverter overload alarm 0lu . With consideration for motor noise, the automatic<br />
reduction of carrier frequency can be disabled. Refer to the description of H98.<br />
It is recommended to set the carrier frequency at 5 kHz or above under vector control without/with speed<br />
sensor. DO NOT set it at 1 kHz or below.<br />
• <strong>Motor</strong> Sound (Tone) (F27)<br />
F27 changes the motor running sound tone (only for motors under V/f control). This setting is effective when the<br />
carrier frequency specified by function code F26 is 7 kHz or lower. Changing the tone level may reduce the high<br />
and harsh running noise from the motor.<br />
If the tone level is set too high, the output current may become unstable, or mechanical vibration and<br />
noise may increase.<br />
Also, this function code may not be very effective for certain types of motor.<br />
Data for F27<br />
Function<br />
0 Disable (Tone level 0)<br />
1 Enable (Tone level 1)<br />
2 Enable (Tone level 2)<br />
3 Enable (Tone level 3)<br />
4-54
F29 to F31<br />
F32, F34,<br />
F35<br />
Analog Output [FM1] and [FM2] (Mode selection, Voltage adjustment, Function)<br />
These function codes allow terminals [FM1] and [FM2] to output monitored data such as the output frequency and<br />
the output current in an analog DC voltage or current. The magnitude of analog voltage or current is adjustable.<br />
• Mode selection (F29 and F32)<br />
F29 and F32 specify the type of signal to terminals [FM1] and [FM2], respectively. Set the slide switches on the<br />
control printed circuit board properly (control PCB). Refer to Chapter 2 "Mounting and Wiring of the Inverter."<br />
Output form<br />
F29<br />
Terminal [FM1]<br />
Position of slide switch<br />
SW4 on the control PCB<br />
F32<br />
Terminal [FM2]<br />
Position of slide switch<br />
SW6 on the control PCB<br />
Voltage (0 to +10 VDC) 0 VO1 0 VO2<br />
Current (4 to +20 mA DC) 1 IO1 1 IO2<br />
Current (0 to +20 mA DC) 2 IO1 2 IO2<br />
The output current is not isolated from analog input, and does not have an isolated power supply.<br />
Therefore, if an electrical potential relationship between the inverter and peripheral equipment has been<br />
established, e.g., by connecting an analog, cascade connection of a current output device is not<br />
available.<br />
Keep the connection wire length as short as possible.<br />
• Voltage adjustment (F30 and F34)<br />
F30 adjusts the output voltage within the range of 0 to 300%.<br />
• Function (F31 and F35)<br />
F31 and F35 specify what is output to analog output terminals [FM1] and [FM2], respectively.<br />
Data for<br />
F31/F35<br />
0<br />
[FM1]/[FM2] output<br />
Output frequency 1<br />
(before slip<br />
compensation)<br />
Function<br />
(Monitor the following)<br />
Output frequency of the inverter<br />
(Equivalent to the motor<br />
synchronous speed)<br />
Meter scale<br />
(Full scale at 100%)<br />
Maximum frequency (F03)<br />
1<br />
Output frequency 2<br />
(after slip<br />
Output frequency of the inverter Maximum frequency (F03)<br />
compensation)<br />
2 Output current Output current (RMS) of the inverter Twice the inverter rated current<br />
3 Output voltage Output voltage (RMS) of the inverter<br />
250 V for 230 V series,<br />
500 V for 460 V series<br />
4 Output torque <strong>Motor</strong> shaft torque Twice the rated motor torque<br />
5 Load factor<br />
Load factor<br />
(Equivalent to the indication of the Twice the rated motor load<br />
load meter)<br />
6 Input power Input power of the inverter<br />
Twice the rated output of the<br />
inverter<br />
7<br />
PID feedback amount<br />
(PV)<br />
Feedback amount under PID control 100% of the feedback amount<br />
4-55
Data for<br />
F31/F35<br />
8<br />
[FM1]/[FM2] output<br />
PG feedback value<br />
(speed)<br />
Function<br />
(Monitor the following)<br />
Speed detected through the PG<br />
interface, or estimated speed under<br />
vector control without speed sensor<br />
Meter scale<br />
(Full scale at 100%)<br />
Maximum speed as 100%<br />
9 DC link bus voltage DC link bus voltage of the inverter<br />
500 V for 230 V series,<br />
1000 V for 460 V series<br />
10 Universal AO<br />
Command via communications link<br />
(Refer to the RS-485 Communication 20000 as 100%<br />
User's <strong>Manual</strong>.)<br />
13 <strong>Motor</strong> output <strong>Motor</strong> output (kW) Twice the rated motor output<br />
14 Calibration (+)<br />
Full scale output of the meter<br />
calibration<br />
This always outputs the full-scale<br />
(100%).<br />
15 PID command (SV) Command value under PID control 100% of the feedback amount<br />
16 PID output (MV)<br />
Output level of the PID controller<br />
under PID control (Frequency<br />
command)<br />
Maximum frequency (F03)<br />
17<br />
Positional deviation in<br />
synchronous running<br />
Deviation in angle<br />
0% to 50% to 100%,<br />
representing -180° to 0° to +180°<br />
of the deviation<br />
If F31/F35 = 16 (PID output), J01 = 3 (Dancer control), and J62 = 2 or 3 (Ratio compensation enabled),<br />
the PID output is equivalent to the ratio against the primary reference frequency and may vary within<br />
300% of the frequency. The monitor displays the PID output in a converted absolute value. To indicate<br />
the value up to the full-scale of 300%, set F30/F34 data to "33" (%).<br />
F37 Load Selection/ Auto Torque Boost/ Auto Energy Saving Operation 1<br />
F09 (Torque Boost 1)<br />
H67 (Auto Energy Saving Operation (Mode selection)<br />
F37 specifies V/f pattern, torque boost type, and auto energy saving operation in accordance with the<br />
characteristics of the load.<br />
Specify the torque boost level with F09 in order to assure sufficient starting torque.<br />
Data for F37 V/f pattern Torque boost<br />
0<br />
Variable<br />
torque V/f<br />
pattern<br />
Torque boost<br />
specified by F09<br />
1<br />
2<br />
Linear<br />
V/f pattern Auto torque boost<br />
3<br />
Variable<br />
torque V/f<br />
pattern<br />
Torque boost<br />
specified by F09<br />
4<br />
5<br />
Linear<br />
V/f pattern Auto torque boost<br />
Auto energy<br />
saving<br />
Disable<br />
Enable<br />
Applicable load<br />
Variable torque load<br />
(General-purpose fans and<br />
pumps)<br />
Constant torque load<br />
Constant torque load<br />
(To be selected if a motor may be<br />
over-excited at no load.)<br />
Variable torque load<br />
(General-purpose fans and<br />
pumps)<br />
Constant torque load<br />
Constant torque load<br />
(To be selected if a motor may be<br />
over-excited at no load.)<br />
If a required "load torque + acceleration toque" is more than 50% of the constant torque, it is recommended<br />
to select the linear V/f pattern (factory default).<br />
• Under the vector control with speed sensor, F37 is used to specify whether the auto energy saving<br />
operation is enabled or disabled. (V/f pattern and torque boost are disabled.)<br />
Data for F37<br />
Operation<br />
0 to 2 Auto energy saving operation OFF<br />
3 to 5 Auto energy saving operation ON<br />
• Under the vector control without speed sensor, both F37 and F09 are disabled. The auto energy saving<br />
operation is also disabled.<br />
4-56
• V/f characteristics<br />
The <strong>EQ7</strong> series of inverters offers a variety of V/f patterns and torque boosts, which include V/f patterns suitable<br />
for variable torque load such as general fans and pumps and for constant torque load (including special pumps<br />
requiring high starting torque). Two types of torque boosts are available: manual and automatic.<br />
(F09)<br />
(F09)<br />
Variable torque V/f pattern (F37 = 0) Linear V/f pattern (F37 = 1)<br />
When the variable torque V/f pattern is selected (F37 = 0 or 3), the output voltage may be low at a low<br />
frequency zone, resulting in insufficient output torque, depending on the characteristics of the motor and<br />
load. In such a case, it is recommended to increase the output voltage at the low frequency zone using<br />
the non-linear V/f pattern.<br />
Recommended value:<br />
H50 = 1/10 of the base frequency<br />
H51 = 1/10 of the voltage at base frequency<br />
• Torque boost<br />
Data setting range: 0.0 to 20.0 (%) (100%/Rated voltage at base frequency)<br />
• <strong>Manual</strong> torque boost (F09)<br />
In torque boost using F09, constant voltage is added to the basic V/f pattern, regardless of the load. To secure a<br />
sufficient starting torque, manually adjust the output voltage to optimally match the motor and its load by using F09.<br />
Specify an appropriate level that guarantees smooth start-up and yet does not cause over-excitation at no or light<br />
load.<br />
Torque boost per F09 ensures high driving stability since the output voltage remains constant regardless of the<br />
load fluctuation.<br />
• Specifying a high torque boost level will generate a high torque, but may cause overcurrent due to<br />
over-excitation at no load which can overheat the motor. To avoid this, adjust torque boost to an<br />
appropriate level.<br />
• When the non-linear V/f pattern and the torque boost are used together, the torque boost takes effect<br />
below the frequency on the non-linear V/f pattern’s point.<br />
4-57
• Auto torque boost (F37 = 2, 5)<br />
If the auto torque boost is selected, the inverter automatically optimizes the output voltage to fit the motor with its<br />
load. Under light load, the inverter decreases the output voltage to prevent the motor from over-excitation. Under<br />
heavy load, it increases the output voltage to increase the output torque of the motor.<br />
• Since this function relies also on the characteristics of the motor, set the base frequency 1 (F04), the<br />
rated voltage at base frequency 1 (F05), and other pertinent motor parameters (P01 through P03 and<br />
P06 through P99) in line with the motor capacity and characteristics, or else perform auto-tuning (P04).<br />
• When a special motor is driven or the load does not have sufficient rigidity, the maximum torque might<br />
decrease or the motor operation might become unstable. In such cases, do not use auto torque boost<br />
instead choose manual torque boost per F09 (F37 = 0 or 1).<br />
• Auto energy saving operation (H67)<br />
If the auto energy saving operation is enabled, the inverter automatically controls the supply voltage to the motor<br />
to minimize the total power loss of motor and inverter. (Note that this feature may not be effective depending upon<br />
the motor or load characteristics. Check the advantage of energy saving before you actually apply this feature to<br />
your machinery.)<br />
Select whether applying this feature to constant speed operation only or applying to constant speed operation and<br />
accelerating/decelerating operation.<br />
Data for H67<br />
Auto energy saving operation<br />
0 Enable only during running at constant speed<br />
Enable during running at constant speed or accelerating/decelerating<br />
1<br />
(Note: For accelerating/decelerating, enable only when the load is light.)<br />
If auto energy saving operation is enabled, the response to a motor speed changes from constant speed operation<br />
may be slow. Do not use this feature for machinery that requires quick acceleration/deceleration.<br />
• Use auto energy saving only where the base frequency is 60 Hz or lower. If the base frequency is set at<br />
60 Hz or higher, little or no energy saving advantage may result. The auto energy saving operation is<br />
designed for use with the frequency lower than the base frequency. If the frequency becomes higher than<br />
the base frequency, the auto energy saving operation will be invalid.<br />
• Since this function relies also on the characteristics of the motor, set the base frequency 1 (F04), the<br />
rated voltage at base frequency 1 (F05), and other pertinent motor parameters (P01 through P03 and<br />
P06 through P99) in line with the motor capacity and characteristics, or else perform auto-tuning (P04).<br />
• Under the vector control without speed sensor, the auto energy saving operation is disabled.<br />
F38, F39 Stop frequency (Detection mode, Holding time) (Refer to F23.) see page 4-51<br />
F40, F41 Torque Limiter 1-1, E16, E17 Torque Limiter 2-1, Torque Limiter 2-2<br />
Torque Limiter 1-2<br />
H73 Torque Limiter (Operating conditions)<br />
H76 Torque Limiter (Frequency increment limit for braking)<br />
Under V/f control<br />
If the inverter’s output torque exceeds the specified levels of the torque limiters (F40, F41, E16, E17, and E61 to<br />
E63), the inverter controls the output frequency and limits the output torque to prevent a stall.<br />
To use the torque limiters, it is necessary to configure the function codes listed in the table on the next page.<br />
In braking, the inverter increases the output frequency to limit the output torque. Depending on the<br />
conditions during operation, the output frequency could be excessive. H76 (Frequency increment limit for<br />
braking) is provided to limit the increasing frequency component.<br />
4-58
Related function codes<br />
Function<br />
code<br />
Name<br />
V/f control<br />
Vector<br />
control<br />
F40 Torque Limiter 1-1 Y Y<br />
F41 Torque Limiter 1-2 Y Y<br />
E16 Torque Limiter 2-1 Y Y<br />
E17 Torque Limiter 2-2 Y Y<br />
H73<br />
Torque Limiter (Operating<br />
conditions)<br />
Y<br />
Y<br />
H74 Torque Limiter (Control target) N Y<br />
H75 Torque Limiter (Target quadrants) N Y<br />
H76<br />
Torque Limiter<br />
(Frequency increment limit for<br />
Y<br />
N<br />
braking)<br />
E61 to E63<br />
Terminal [12] Extended Function<br />
Terminal [C1] Extended Function<br />
Terminal [V2] Extended Function<br />
Y<br />
Y<br />
Remarks<br />
7: Analog torque limit value A<br />
8: Analog torque limit value B<br />
• Torque limit control mode<br />
Torque limit is performed by limiting torque current flowing across<br />
the motor.<br />
The graph below shows the relationship between the torque and the<br />
output frequency at the constant torque current limit.<br />
• Torque limiters 1-1, 1-2, 2-1 and 2-2 (F40, F41, E16 and E17)<br />
Data setting range: -300 to 300 (%), 999 (Disable)<br />
These function codes specify the operation level at which the torque<br />
limiters become activated, as the percentage of the motor rated torque.<br />
Function code Name Torque limit feature<br />
F40 Torque limiter 1-1 Driving torque current limiter 1<br />
F41 Torque limiter 1-2 Braking torque current limiter 1<br />
E16 Torque limiter 2-1 Driving torque current limiter 2<br />
E17 Torque limiter 2-2 Braking torque current limiter 2<br />
Although the data setting range for F40, F41, E16, and E17 is from positive to negative values (–300% to<br />
+300%), specify positive values in practice. Specifying a negative value causes the inverter to interpret it<br />
as an absolute value.<br />
The torque limiter determined depending on the overload current actually limits the torque current output.<br />
Therefore, the torque current output is automatically limited at a value lower than 300%, the maximum<br />
setting value.<br />
• Analog torque limit values (E61 to E63)<br />
The torque limit values can be specified by analog inputs through terminals [12], [C1], and [V2] (voltage or current).<br />
Set E61, E62, and E63 (Terminal [12] Extended Function, Terminal [C1] Extended Function, and Terminal [V2]<br />
Extended Function) as listed below.<br />
Data for E61, E62, or E63 Function Description<br />
7 Analog torque limit value A Use the analog input as the torque limit value<br />
specified by function code data (= 7 or 8).<br />
8 Analog torque limit value B Input specifications: 200% / 10 V or 20 mA<br />
If the same setting is made for different terminals, the priority order is E61>E62>E63.<br />
4-59
• Torque limiter levels specified via communications link (S10, S11)<br />
The torque limiter levels can be changed via the communications link. Function codes S10 and S11 exclusively<br />
reserved for the communications link respond to function codes F40 and F41.<br />
• Switching torque limiters<br />
The torque limiters can be switched by the function code setting and the terminal command TL2/TL1 ("Select<br />
torque limiter level 2/1") assigned to any of the digital input terminals.<br />
To assign the TL2/TL1 as the terminal function, set any of E01 through E07 to "14." If no TL2/TL1 is assigned,<br />
torque limiter levels 1-1 and 1-2 (F40 and F41) take effect by default.<br />
• Torque limiter (Operating conditions) (H73)<br />
H73 specifies whether the torque limiter is enabled or disabled during acceleration/deceleration and running at<br />
constant speed.<br />
Data for H73 During accelerating/decelerating During running at constant speed<br />
0 Enable Enable<br />
1 Disable Enable<br />
2 Enable Disable<br />
• Torque limiter (Frequency increment limit for braking) (H76)<br />
Data setting range: 0.0 to 500.0 (Hz)<br />
H76 specifies the increment limit of the frequency in limiting torque for braking. The factory default is 5.0 Hz. If the<br />
increasing frequency during braking reaches the limit value, the torque limiters no longer function, resulting in an<br />
overvoltage trip. Such a problem may be avoided by increasing the setting value of H76.<br />
The torque limiter and current limiter are very similar in function. If both are activated concurrently, they<br />
may conflict with each other and cause hunting (undesirable oscillation of the system). Avoid concurrent<br />
activation of these limiters.<br />
4-60
Under vector control without/with speed sensor (F42 = 5, 6)<br />
If the inverter’s output torque exceeds the specified levels of the torque limiters (F40, F41, E16, E17, and E61 to<br />
E63), the inverter controls the speed regulator's output (torque command) in speed control or a torque command<br />
in torque control in order to limit the motor-generating torque.<br />
To use the torque limiters, it is necessary to configure the function codes listed in the table below.<br />
Related function codes<br />
Function<br />
Vector<br />
Name<br />
V/f control<br />
code<br />
control<br />
F40 Torque Limiter 1-1 Y Y<br />
F41 Torque Limiter 1-2 Y Y<br />
E16 Torque Limiter 2-1 Y Y<br />
E17 Torque Limiter 2-2 Y Y<br />
H73<br />
Torque Limiter (Operating<br />
conditions)<br />
Y<br />
Y<br />
H74 Torque Limiter (Control target) N Y<br />
H75 Torque Limiter (Target quadrants) N Y<br />
H76<br />
Torque Limiter<br />
(Frequency increment limit for<br />
Y<br />
N<br />
braking)<br />
E61 to E63<br />
Terminal [12] Extended Function<br />
Terminal [C1] Extended Function<br />
Terminal [V2] Extended Function<br />
Y<br />
Y<br />
Remarks<br />
7: Analog torque limit value<br />
A<br />
8: Analog torque limit value<br />
B<br />
• Torque Limiter (Control target) (H74)<br />
Under vector control, the inverter can limit motor-generating torque or output power, as well as a torque current<br />
(default).<br />
Data for H74<br />
Control target<br />
0 <strong>Motor</strong>-generating torque limit<br />
1 Torque current limit<br />
2 Output power limit<br />
4-61
• Torque Limiter (Target quadrants) (H75)<br />
H75 selects the configuration of target quadrants (Drive/brake, Forward/reverse rotation) in which the specified<br />
torque limiter(s) is activated, from "Drive/brake torque limit," "Same torque limit for all four quadrants," and<br />
"Upper/lower torque limits" shown in the table below.<br />
Data for H75<br />
Target quadrants<br />
0: Drive/brake Torque limiter A applies to driving (both of forward and reverse), and torque limiter B to<br />
braking (both of forward and reverse).<br />
1: Same for all<br />
four<br />
quadrants<br />
Torque limiter A applies to all four quadrants; that is, the same torque limit applies to both<br />
driving and braking in the forward and reverse rotations.<br />
2: Upper/lower<br />
limits<br />
Torque limiter A applies to the upper limit, and torque limiter B to the lower limit.<br />
Depending upon the polarity of torque limiters A and B, the following patterns are available.<br />
Torque limiter A Torque limiter B<br />
Pattern 1 Positive Positive<br />
Pattern 2 Positive Negative<br />
Pattern 3 Negative Negative<br />
Pattern 1 Pattern 2<br />
4-62
Data for H75<br />
Target quadrants<br />
Pattern 3<br />
• If the value of torque limiter A is less than that of torque limiter B, torque limiter A<br />
applies to both the upper and lower limits.<br />
• Selecting the "Upper/lower torque limits" may cause reciprocating oscillation<br />
between the upper and lower limit values, depending upon a small difference<br />
between the upper and lower limits, a slow response from the speed control<br />
sequence, and other conditions.<br />
• Torque limiters 1-1, 1-2, 2-1 and 2-2 (F40, F41, E16 and E17)<br />
Data setting range: -300 to 300 (%), 999 (Disable)<br />
These function codes specify the operation level at which the torque limiters become activated, as the percentage<br />
of the motor rated torque.<br />
Function code<br />
Name<br />
F40 Torque limiter 1-1<br />
F41 Torque limiter 1-2<br />
E16 Torque limiter 2-1<br />
E17 Torque limiter 2-2<br />
Although the data setting range for F40, F41, E16, and E17 is from positive to negative values (–300% to<br />
+300%), specify positive values in practice except when the "Upper/lower torque limits" (H75 = 2) is<br />
selected. Specifying a negative value causes the inverter to interpret it as an absolute value.<br />
The torque limiter determined depending on the overload current actually limits the torque current output.<br />
Therefore, the torque current output is automatically limited at a value lower than 300%, the maximum<br />
setting value.<br />
• Analog torque limit values (E61 to E63)<br />
The torque limit values can be specified by analog inputs through terminals [12], [C1], and [V2] (voltage or current).<br />
Set E61, E62, and E63 (Terminal [12] Extended Function, Terminal [C1] Extended Function, and Terminal [V2]<br />
Extended Function) as listed below.<br />
Data for E61, E62, or E63 Function Description<br />
7 Analog torque limit value A Use the analog input as the torque limit value<br />
specified by function code data (= 7 or 8).<br />
8 Analog torque limit value B Input specifications: 200% / 10 V or 20 mA<br />
If the same setting is made for different terminals, the priority order is E61>E62>E63.<br />
• Torque limiter levels specified via communications link (S10, S11)<br />
The torque limiter levels can be changed via the communications link. Function codes S10 and S11 exclusively<br />
reserved for the communications link respond to function codes F40 and F41.<br />
• Switching torque limiters<br />
The torque limiters can be switched by the function code setting and the terminal command TL2/TL1 ("Select<br />
torque limiter level 2/1") assigned to any of the digital input terminals.<br />
To assign the TL2/TL1 as the terminal function, set any of E01 through E07 to "14." If no TL2/TL1 is assigned,<br />
torque limiter levels 1-1 and 1-2 (F40 and F41) take effect by default.<br />
4-63
• Torque limiter (Operating conditions) (H73)<br />
H73 specifies whether the torque limiter is enabled or disabled during acceleration/deceleration and running at<br />
constant speed.<br />
Data for H73 During accelerating/decelerating During running at constant speed<br />
0 Enable Enable<br />
1 Disable Enable<br />
2 Enable Disable<br />
The torque limiter and current limiter are very similar in function. If both are activated concurrently, they<br />
may conflict with each other and cause hunting (undesirable oscillation of the system). Avoid concurrent<br />
activation of these limiters.<br />
4-64
F42 Drive Control Selection 1 H68 (Slip Compensation 1 (Operating conditions))<br />
F42 specifies the motor drive control.<br />
Data for<br />
Drive control<br />
F42<br />
0 V/f control with slip compensation inactive<br />
Basic control<br />
Speed<br />
feedback<br />
Speed control<br />
Frequency control<br />
1<br />
Dynamic torque control<br />
(with slip compensation and auto torque<br />
boost)<br />
V/f<br />
control<br />
Disable<br />
Frequency control<br />
with slip<br />
compensation<br />
Estimated<br />
5 Vector control without speed sensor Vector speed<br />
control<br />
6 Vector control with speed sensor Enable<br />
Speed control<br />
with automatic speed<br />
regulator (ASR)<br />
• V/f control with slip compensation inactive<br />
Under this control, the inverter controls a motor with the voltage and frequency according to the V/f pattern<br />
specified by function codes. This control disables all automatically controlled features such as the slip<br />
compensation, so no unpredictable output fluctuation occurs, enabling stable operation with constant output<br />
frequency.<br />
Note: To active slip compensation, refer to P09~P11 as below. Applying any load to an induction motor causes a<br />
rotational slip due to the motor characteristics, decreasing the motor rotation. The inverter’s slip compensation<br />
function prevents the motor from decreasing the rotation due to the slip. That is, this function is effective for<br />
improving the motor speed control accuracy.<br />
Function code<br />
Operation<br />
P12 Rated slip frequency Specify the rated slip frequency.<br />
P09<br />
P11<br />
P10<br />
Slip compensation gain for driving<br />
Slip compensation gain for braking<br />
Slip compensation response time<br />
Adjust the slip compensation amount for driving.<br />
Slip compensation amount for driving =<br />
Rated slip x Slip compensation gain for driving<br />
Adjust the slip compensation amount for braking.<br />
Slip compensation amount for braking =<br />
Rated slip x Slip compensation gain for braking<br />
Specify the slip compensation response time.<br />
Basically, there is no need to modify the default setting.<br />
To improve the accuracy of slip compensation, perform auto-tuning.<br />
H68 enables or disables the slip compensation function according to the motor driving conditions.<br />
Data for H68<br />
<strong>Motor</strong> driving conditions<br />
Accel/Decel<br />
Constant speed<br />
<strong>Motor</strong> driving frequency zone<br />
Base frequency or<br />
below<br />
Above the base<br />
frequency<br />
0 Enable Enable Enable Enable<br />
1 Disable Enable Enable Enable<br />
2 Enable Enable Enable Disable<br />
3 Disable Enable Enable Disable<br />
• Dynamic torque control<br />
To get the maximal torque out of a motor, this control calculates the motor torque matched to the load applied and<br />
uses it to optimize the voltage and current vector output.<br />
Selecting this control automatically enables the auto torque boost and slip compensation function so that it is<br />
effective for improving the system response to external disturbances such as load fluctuation, and the motor<br />
speed control accuracy.<br />
Note that the inverter may not respond to a rapid load fluctuation since this control is an open-loop V/f control that<br />
does not perform current control, unlike vector control. One advantage of this control is that the maximum torque<br />
per output current is larger than that of vector control.<br />
4-65
• Vector control without speed sensor<br />
This control estimates the motor speed based on the inverter's output voltage and current to use the estimated<br />
speed for speed control. It also decomposes the motor drive current into the exciting and torque current<br />
components, and controls each of those components in vector. No PG (pulse generator) interface card is required.<br />
It is possible to obtain the desired response by adjusting the control constants (PI constants) using the speed<br />
regulator (PI controller).<br />
The control regulating the motor current requires some voltage margin between the voltage that the inverter can<br />
output and the induced voltage of the motor. Usually a general-purpose motor is so designed that the voltage<br />
matches the commercial power. Under the control, therefore, it is necessary to suppress the motor terminal<br />
voltage to the lower level in order to secure the voltage margin required.<br />
However, driving the motor with the motor terminal voltage suppressed to the lower level cannot generate the<br />
rated torque even if the rated current originally specified for the motor is applied. To ensure the rated torque, it is<br />
necessary to increase the rated current. (This also applies to vector control with speed sensor.)<br />
This control is not available in MD-mode inverters, so do not set F42 data to "5" for those inverters.<br />
• Vector control with speed sensor<br />
This control requires an optional PG (pulse generator) and an optional PG interface card to be mounted on a<br />
motor shaft and an inverter, respectively. The inverter detects the motor's rotational position and speed according<br />
to PG feedback signals and uses them for speed control. It also decomposes the motor drive current into the<br />
exciting and torque current components, and controls each of components in vector.<br />
It is possible to obtain the desired response by adjusting the control constants (PI constants) using the speed<br />
regulator (PI controller).<br />
The control enables speed control with higher accuracy and quicker response than vector control without speed<br />
sensor.<br />
Since slip compensation, dynamic torque control, and vector control with/without speed sensor use motor<br />
parameters, the following conditions should be satisfied to obtain full control performance.<br />
• A single motor should be controlled per inverter.<br />
• <strong>Motor</strong> parameters P02, P03, P06 to P23, P55 and P56 are properly configured. Or, auto-tuning (P04) is<br />
performed.<br />
• Under dynamic torque control, the capacity of the motor to be controlled is two or more ratings lower<br />
than that of the inverter; under vector control with/without speed sensor, it is the same as that of the<br />
inverter. Otherwise, the inverter may not control the motor due to decrease of the current detection<br />
resolution.<br />
• The wiring distance between the inverter and motor is 164 ft (50 m) or less. If it is longer, the inverter<br />
may not control the motor due to leakage current flowing through stray capacitance to the ground or<br />
between wires. Especially, small capacity inverters whose rated current is small may be unable to<br />
properly control the motor correctly even when the wiring is less than 164 ft (50 m). In that case, make<br />
the wiring length as short as possible or use a wire with small stray capacitance (e.g., loosely-bundled<br />
cable) to minimize the stray capacitance.<br />
4-66
F43, F44 Current Limiter (Mode selection, Level) H12 (Instantaneous Overcurrent Limiting (Mode selection))<br />
When the output current of the inverter exceeds the level specified by the current limiter (F44), the inverter<br />
automatically manages its output frequency to prevent a stall and limits the output current. The default setting of<br />
the current limiter is 130% and 160% for VT and CT mode inverters, respectively. (Once the VT or CT mode is<br />
selected by F80, the current limit for each mode is automatically specified.)<br />
Note that for VT and CT mode inverters of 7.5 HP or below, the current limiter is initialized to 160% with F80.<br />
If overload current, 160% (or 130%) or more of the current limit level, flows instantaneously so that an output<br />
frequency decrease problem arises due to the current limiter, consider increasing the current limit level.<br />
The current limiter mode should be also selected with F43. If F43 = 1, the current limiter is enabled only during<br />
constant speed operation. If F43 = 2, it is enabled during both of acceleration and constant speed operation.<br />
Choose F43 = 1 if you need to run the inverter at full capability during acceleration and to limit the output current<br />
during constant speed operation.<br />
• Mode selection (F43)<br />
F43 selects the motor running state in which the current limiter becomes active.<br />
Data for F43<br />
Running states that enable the current limiter<br />
During acceleration During constant speed During deceleration<br />
0 Disable Disable Disable<br />
1 Disable Enable Disable<br />
2 Enable Enable Disable<br />
• Level (F44) Data setting range: 20 to 200 (%) (in ratio to the inverter rating)<br />
F44 specifies the operation level at which the output current limiter becomes activated, in ratio to the inverter<br />
rating.<br />
The inverter's rated current differs depending upon the VT or CT mode selected.<br />
• Instantaneous Overcurrent Limiting (Mode selection) (H12)<br />
H12 specifies whether the inverter invokes the current limit processing or enters the overcurrent trip when its<br />
output current exceeds the instantaneous overcurrent limiting level. Under the current limit processing, the inverter<br />
immediately turns OFF its output gates to suppress the further current increase and continues to control the output<br />
frequency.<br />
Data for H12<br />
0<br />
1 Enable<br />
Function<br />
Disable<br />
An overcurrent trip occurs at the instantaneous overcurrent limiting level.<br />
If any equipment or machine malfunctions when the motor torque temporarily drops during current limiting<br />
processing, it is necessary to cause an overcurrent trip (H12 = 0) and actuate a mechanical brake at the same<br />
time.<br />
• Since the current limit operation with F43 and F44 is performed by software, it may cause a delay in<br />
control. For quick response current limiting, also enable the instantaneous overcurrent limiting with<br />
H12.<br />
• If an excessive load is applied when the current limiter operation level is set extremely low, the inverter<br />
will rapidly lower its output frequency. This may cause an overvoltage trip or dangerous turnover of the<br />
motor rotation due to undershooting. Depending on the load, extremely short acceleration time may<br />
activate the current limiting to suppress the increase of the inverter output frequency, causing the<br />
system oscillation (hunting) or activating the inverter overvoltage trip (alarm 0u ). When specifying the<br />
acceleration time, therefore, take into account machinery characteristics and moment of inertia of the<br />
load.<br />
• The torque limiter and current limiter are very similar functions. If both are activated concurrently, they<br />
may conflict and cause hunting in the system. Avoid concurrent activation of these limiters.<br />
• The vector control itself contains the current control system, so it disables the current limiter specified<br />
by F43 and F44, as well as automatically disabling the instantaneous overcurrent limiting (specified by<br />
H12). Accordingly, the inverter causes an overcurrent trip when its output current exceeds the<br />
instantaneous overcurrent limiting level.<br />
4-67
F50 to F52<br />
Electronic Thermal Overload Protection for Braking Resistor<br />
(Discharging capability, Allowable average loss and Resistance)<br />
These function codes specify the electronic thermal overload protection feature for the braking resistor.<br />
Set the discharging capability, allowable average loss and resistance to F50, F51 and F52, respectively. These<br />
values are determined by the inverter and braking resistor models. For the discharging capability, allowable<br />
average loss and resistance, check with the manufacturer of the braking resistor and set the function codes<br />
accordingly.<br />
Depending on the thermal marginal characteristics of the braking resistor, the electronic thermal overload<br />
protection feature may act so that the inverter issues the overheat protection alarm even if the actual<br />
temperature rise is not large enough. If it happens, review the relationship between the performance<br />
index of the braking resistor and settings of related function codes.<br />
The standard models of braking resistor can output temperature detection signal for overheat. Assign an<br />
"Enable external alarm trip" terminal command THR to any of digital input terminals [X1] to [X7], [FWD]<br />
and [REV] and connect that terminal and its common terminal to braking resistor's terminals 2 and 1.<br />
Calculating the discharging capability and allowable average loss of the braking resistor and configuring<br />
the function code data<br />
When using a braking resistor, check with the resistor manufacturer about the resistor rating and then configure<br />
the related function codes.<br />
The calculation procedures for the discharging capability and allowable average loss of the braking resistor differ<br />
depending on the application of the braking load as shown below.<br />
- Applying braking load during deceleration<br />
During normal deceleration, the braking load decreases as the speed slows down. In the deceleration with<br />
constant torque, the braking load decreases in proportion to the speed. Use equations (1) and (3) given below.<br />
- Applying braking load during running at a constant speed<br />
Different from during deceleration, in applications where the braking load is externally applied during running at a<br />
constant speed, the braking load is constant. Use equations (2) and (4) given below.<br />
Braking load (kW)<br />
Braking load (kW)<br />
Time<br />
Applying braking load during deceleration<br />
Time<br />
Applying braking load during running at a constant speed<br />
• Discharging capability (F50)<br />
The discharging capability refers to kWs allowable for a single braking cycle, which is obtained based on the<br />
braking time and the motor rated capacity.<br />
Data for F50<br />
Function<br />
0 To be applied to the braking resistor built-in type<br />
1 to 9000 1 to 9000 (kWs)<br />
OFF Disable the electronic thermal overload protection<br />
During deceleration:<br />
Discharging capability (kWs) =<br />
During running at a constant speed:<br />
Braking time (s) x <strong>Motor</strong> rated capacity (HP) x 0.75<br />
2<br />
Discharging capability (kWs) = Braking time (s) <strong>Motor</strong> rated capacity (HP) 0.75<br />
Equation (1)<br />
Equation (2)<br />
When the F50 data is set to "0" (To be applied to the braking resistor built-in type), no specification of the<br />
discharging capability is required.<br />
4-68
• Allowable average loss (F51)<br />
The allowable average loss refers to a tolerance for motor continuous operation, which is obtained based on<br />
the %ED (%) and motor rated capacity (HP).<br />
Data for F51<br />
0.001 to 99.99 0.001 to 99.99 (kW)<br />
Function<br />
During deceleration:<br />
Allowable average loss (kW) =<br />
%ED(%) ÷ 100 x <strong>Motor</strong> rated capacity (HP) x 0.75<br />
2<br />
Equation (3)<br />
During constant speed operation:<br />
Allowable average loss (kW) =<br />
• Resistance (F52)<br />
F52 specifies the resistance of the braking resistor.<br />
%ED(%) ÷ 100 x <strong>Motor</strong> rated capacity (HP) x 0.75<br />
2<br />
Equation (4)<br />
F80<br />
Switching between LD, MD and HD drive modes<br />
F80 specifies whether to drive the inverter in the low duty (LD), medium duty (MD), or high duty (HD) mode as<br />
described below.<br />
To change the F80 data, it is necessary to press the" + keys" or " + keys" (simultaneously keying).<br />
F80<br />
data<br />
1<br />
Drive mode Application Continuous rated current level<br />
LD (Variable<br />
Torque) mode<br />
Light load<br />
Drive a motor whose capacity is the<br />
same as the inverter's one.<br />
Overload<br />
capability<br />
Maximum<br />
frequency<br />
120% for 1 min. 120 Hz<br />
2<br />
MD (Constant<br />
Torque) mode<br />
Medium load<br />
Drives a motor whose capacity is the<br />
same as the inverter's one or derates<br />
a motor one rank lower than the<br />
inverter's capacity.<br />
150% for 1 min. 120 Hz<br />
0<br />
HD (CT-Vector)<br />
mode<br />
Heavy load<br />
Derates a motor one or two ranks<br />
lower than the inverter's capacity.<br />
150% for 1 min.<br />
200% for 3 s<br />
500 Hz<br />
Switching to the MD/HD mode increases the overload capability (%) against the continuous current level up to<br />
150%, but it requires derating the motor one or two ranks lower than the inverter's capacity.<br />
Note: For 7.5 HP or smaller, when LD mode is selected, the HD mode specification applies.<br />
For the rated current level, see Chapter 11 "SPECIFICATIONS."<br />
4-69
The LD/MD-mode inverter is subject to restrictions on the function code data setting range and internal processing<br />
as listed below.<br />
Function<br />
codes<br />
F21*<br />
F26<br />
F44<br />
F03*<br />
―<br />
Name Variable Torque Constant Torque CT-Vector Remarks<br />
DC braking<br />
(Braking level)<br />
<strong>Motor</strong> sound<br />
(Carrier<br />
frequency)<br />
Current limiter<br />
(Level)<br />
Maximum<br />
frequency<br />
Current<br />
indication and<br />
output<br />
Setting range: 0 to 80%<br />
Setting range:<br />
0.75 to 16 kHz<br />
(0.5 to 30 HP)<br />
0.75 to 10 kHz<br />
(40 to 100 HP)<br />
0.75 to 6 kHz<br />
(125 to 900 HP)<br />
0.75 to 4 kHz<br />
(1000 HP)<br />
Initial value:<br />
130%<br />
Setting range:<br />
0.75 to 2 kHz<br />
(125 to 700 HP)<br />
Initial value:<br />
145%<br />
Setting range: 25 to 500 Hz<br />
Upper limit: 120 Hz<br />
Based on the<br />
rated current level<br />
for variable<br />
torque mode<br />
Based on the<br />
rated current level<br />
for constant<br />
torque mode<br />
Setting range:<br />
0 to 100%<br />
Setting range:<br />
0.75 to 16 kHz<br />
(0.5 to 125 HP)<br />
0.75 to 10 kHz<br />
(125 to 700 HP)<br />
0.75 to 6 kHz<br />
(800 and 900 HP)<br />
Initial value: 160%<br />
Setting range:<br />
25 to 500 Hz<br />
Upper limit:<br />
500 Hz<br />
Based on the rated<br />
current level for<br />
CT-Vector mode<br />
In the LD/MD mode, a<br />
value out of the range, if<br />
specified, automatically<br />
changes to the maximum<br />
value allowable in the LD<br />
mode.<br />
Switching the drive mode<br />
with function code F80<br />
automatically initializes the<br />
F44 data to the value<br />
specified at left.<br />
In the variable/constant<br />
torque mode, if the<br />
maximum frequency<br />
exceeds 120 Hz, the<br />
actual output frequency is<br />
internally limited to 120 Hz.<br />
Even switching to the Variable/Constant Torque mode cannot automatically change the motor rated capacity<br />
(P02*), so configure the P02* data to match the applied motor rating as required.<br />
―<br />
4-70
4.2.2 E codes (Extension Terminal Functions)<br />
E01 to E07 Terminal [X1] to [X7] Function<br />
E98 (Terminal [FWD] Function)<br />
E99 (Terminal [REV] Function)<br />
E01 to E07, E98 and E99 assign commands (listed below) to general-purpose, programming, digital input<br />
terminals, [X1] to [X7], [FWD], and [REV].<br />
These function codes can also switch the logic system between normal and negative to define how the inverter<br />
logic interprets the ON or OFF state of each terminal. The factory default setting is normal logic system "Active<br />
ON." So, descriptions that follow are given in normal logic system. They are, in principle, arranged in the numerical<br />
order of assigned data. However, highly relevant signals are collectively described where one of them first<br />
appears. Refer to the function codes in the "Related function codes" column, if any.<br />
The <strong>EQ7</strong> runs under "V/f control," "dynamic torque control," "vector control without speed sensor," or "vector<br />
control with speed sensor." Some terminal commands assigned apply exclusively to the specific drive control,<br />
which is indicated by letters Y (Applicable) and N (Not applicable) in the "Drive control" column in the table given<br />
below. (Refer to page 4-2.)<br />
• Ensure safety before modifying the function code settings.<br />
Run commands (e.g., "Run forward" FWD), stop commands (e.g., "Coast to a stop" BX), and frequency<br />
change commands can be assigned to digital input terminals. Depending upon the assignment states of<br />
those terminals, modifying the function code setting may cause a sudden motor start or an abrupt change in<br />
speed.<br />
• When the inverter is controlled with the digital input signals, switching run or frequency command sources<br />
with the related terminal commands (e.g., SS1, SS2, SS4, SS8, Hz2/Hz1, Hz/PID, IVS, and LE) may cause a<br />
sudden motor start or an abrupt change in speed.<br />
An accident or physical injury may result.<br />
Function code data<br />
Active ON Active OFF<br />
Terminal commands assigned<br />
4-71<br />
Symbol<br />
V/f<br />
Drive control<br />
w/o<br />
PG<br />
w/<br />
PG<br />
Torque<br />
control<br />
Related<br />
function codes<br />
0 1000<br />
SS1 Y Y Y N C05 to C19<br />
1 1001 SS2 Y Y Y N<br />
Select multi-frequency (0 to 15 steps)<br />
2 1002 SS4 Y Y Y N<br />
3 1003 SS8 Y Y Y N<br />
4 1004 Select ACC/DEC time (2 steps) RT1 Y Y Y N<br />
F07, F08,<br />
E10 to E15<br />
5 1005 Select ACC/DEC time (4 steps) RT2 Y Y Y N<br />
6 1006 Enable 3-wire operation HLD Y Y Y Y F02<br />
7 1007 Coast to a stop BX Y Y Y Y <br />
8 1008 Reset alarm RST Y Y Y Y <br />
1009 9 Enable external alarm trip THR Y Y Y Y <br />
10 1010 Ready for jogging JOG Y Y Y N<br />
C20, H54, H55,<br />
d09 to d13<br />
11 1011 Select frequency command 2/1 Hz2/Hz1 Y Y Y N F01, C30<br />
12 1012 Select motor 2 M2 Y Y Y Y A42<br />
13 Enable DC braking DCBRK Y Y Y N F20 to F22<br />
14 1014 Select torque limiter level 2/1 TL2/TL1 Y Y Y Y<br />
F40, F41, E16,<br />
E17<br />
15 Switch to commercial power (50 Hz) SW50 Y N N N <br />
16 Switch to commercial power (60 Hz) SW60 Y N N N <br />
17 1017 UP (Increase output frequency) UP Y Y Y N<br />
Frequency<br />
command:<br />
F01, C30<br />
PID command:<br />
J02<br />
18 1018 DOWN (Decrease output frequency) DOWN Y Y Y N<br />
19 1019 Enable data change with keypad WE-KP Y Y Y Y F00<br />
20 1020 Cancel PID control Hz/PID Y Y Y N<br />
J01 to J19,<br />
J56 to J62<br />
21 1021 Switch normal/inverse operation IVS Y Y Y N C53, J01
Function code data<br />
Active ON Active OFF<br />
Terminal commands assigned<br />
Symbol<br />
V/f<br />
Drive control<br />
w/o<br />
PG<br />
w/<br />
PG<br />
Torque<br />
control<br />
Related<br />
function codes<br />
22 1022 Interlock IL Y Y Y Y F14<br />
23 1023 Cancel torque control Hz/TRQ N N N Y H18<br />
24 1024<br />
Enable communications link via<br />
RS-485 or fieldbus (option)<br />
LE Y Y Y Y H30, y98<br />
25 1025 Universal DI U-DI Y Y Y Y <br />
26 1026<br />
Enable auto search for idling motor<br />
speed at starting<br />
STM Y Y N Y H09, d67<br />
30 1030 Force to stop STOP Y Y Y Y F07, H56<br />
32 1032 Pre-excitation EXITE N Y Y N H84, H85<br />
33 1033<br />
Reset PID integral and differential<br />
J01 to J19,<br />
PID-RST Y Y Y N<br />
components<br />
J56 to J62<br />
34 1034 Hold PID integral component PID-HLD Y Y Y N<br />
35 1035 Select local (keypad) operation LOC Y Y Y Y<br />
(See Section<br />
4.2.2.)<br />
39 Protect motor from dew condensation DWP Y Y Y Y J21<br />
40 <br />
Enable integrated sequence to switch<br />
ISW50<br />
to commercial power (50 Hz)<br />
Y N N N J22<br />
41 <br />
Enable integrated sequence to switch<br />
ISW60<br />
to commercial power (60 Hz)<br />
Y N N N<br />
47 1047 Servo-lock command LOCK N N Y N J97 to J99<br />
48 <br />
Pulse train input<br />
F01, C30,<br />
PIN Y Y Y Y<br />
(available only on terminal [X7])<br />
d62, d63<br />
49 1049<br />
Pulse train sign<br />
(available on terminals except [X7])<br />
SIGN Y Y Y Y<br />
59 1049 Enable battery operation BATRY Y Y Y Y<br />
70 1070<br />
Cancel constant peripheral speed<br />
control<br />
Hz/LSC Y Y Y N d41<br />
71 1071<br />
Hold the constant peripheral speed<br />
control frequency in the memory<br />
LSC-HLD Y Y Y N<br />
72 1072<br />
Count the run time of commercial<br />
power-driven motor 1<br />
CRUN-M1 Y N N Y H44, H94<br />
73 1073<br />
Count the run time of commercial<br />
power-driven motor 2<br />
CRUN-M2 Y N N Y<br />
76 1076 Select droop control DROOP Y Y Y N H28<br />
77 1077 Cancel PG alarm PG-CCL N N Y Y <br />
98 <br />
Run forward<br />
(Exclusively assigned to [FWD] and FWD Y Y Y Y F02<br />
[REV] terminals by E98 and E99)<br />
99 <br />
Run reverse<br />
(Exclusively assigned to [FWD] and REV Y Y Y Y<br />
[REV] terminals by E98 and E99)<br />
100 No function assigned NONE Y Y Y Y U81 to U85<br />
Some negative logic (Active OFF) commands cannot be assigned to the functions marked with "" in the<br />
"Active OFF" column.<br />
The "Enable external alarm trip" (data = 1009) and "Force to stop" (data = 1030) are fail-safe terminal<br />
commands. In the case of "Enable external alarm trip," when data = 1009, "Active ON" (alarm is triggered<br />
when ON); when data = 9, "Active OFF" (alarm is triggered when OFF).<br />
4-72
Terminal function assignment and data setting<br />
• Multi-frequency (0 to 15 steps) --SS1, SS2, SS4, SS8 (Function code data = 0 to 3)<br />
The combination of the ON/OFF states of digital input signals SS1, SS2, SS4 and SS8 selects one of 16 different<br />
frequency commands defined beforehand by 15 function codes C05 to C19 (Multi-frequency 0 to 15). With this,<br />
the inverter can drive the motor at 16 different preset frequencies. Refer to C05 through C19.<br />
• Acceleration / deceleration time --RT1, RT2 (Function code data = 4 and 5)<br />
Selects acceleration / deceleration times using terminal functions, see page 4-38.<br />
• Enable 3-wire operation –HLD (Function code data = 6)<br />
Turning this terminal command ON self-holds the forward FWD or reverse REV run command, to enable 3-wire<br />
inverter operation. Refer to F02.<br />
• Coast to a stop -- BX (Function code data = 7)<br />
Turning this terminal command ON immediately shuts down the inverter output so that the motor coasts to a stop<br />
without issuing any alarms.<br />
• Reset alarm -- RST (Function code data = 8)<br />
Turning this terminal command ON clears the ALM state--alarm output (for any fault). Turning it OFF erases the<br />
alarm display and clears the alarm hold state.<br />
When activating the RST command ON, keep it ON for 10 ms or more. This command should be kept OFF for the<br />
normal inverter operation.<br />
• Enable external alarm trip -- THR (Function code data = 9)<br />
Turning this terminal command OFF immediately shuts down the inverter output (so that the motor coasts to a<br />
stop), displays the alarm 0h2, and outputs the alarm relay (for any fault) ALM. The THR command is self-held, and<br />
is reset when an alarm reset takes place.<br />
Use this alarm trip command from external equipment when immediately shutting down the inverter<br />
output in the event of an abnormal situation in peripheral equipment.<br />
• Ready for jogging –JOG (Function code data = 10)<br />
This terminal command is used to jog or inch the motor for positioning a work piece. Turning this command ON<br />
makes the inverter ready for jogging. Refer to C20.<br />
• Select frequency command 2/1 -- Hz2/Hz1 (Function code data = 11)<br />
Turning this terminal command ON and OFF switches the frequency command source between frequency<br />
command 1 (F01) and frequency command 2 (C30). Refer to F01.<br />
• Select motor 2 -- M2 (Function code data = 12)<br />
The combination of digital input terminal commands M2, M3 and M4 switches to any of the 1st to 4th motors.<br />
When the motor is switched, the function code group with which the inverter drives the motor is also switched to<br />
the one corresponding to the motor. Refer to A42.<br />
4-73
• Enable DC braking -- DCBRK (Function code data = 13)<br />
This terminal command gives the inverter a DC braking command through the inverter’s digital input.<br />
(Requirements for DC braking must be satisfied.) Refer to F20 through F22.<br />
• Select torque limiter level 2/1 -- TL2/TL1 (Function code data = 14)<br />
This terminal command switches between torque limiter 1 (F40 and F41) and torque limiter 2 (E16 and E17).<br />
Refer to F40 and F41.<br />
• Switch to commercial power for 50 Hz or 60 Hz -- SW50 and SW60 (Function code data = 15 and 16)<br />
When an external sequence switches the motor drive power from the commercial line to the inverter, inputting the<br />
terminal command SW50 or SW60 at the specified timing enables the inverter to start running the motor with the<br />
current commercial power frequency, regardless of settings of the reference/output frequency in the inverter. A<br />
running motor driven by commercial power is carried on into inverter operation. This command smoothly switches<br />
the motor drive power source, when the motor is being driven by commercial power, from the commercial power to<br />
the inverter power.<br />
For details, refer to the following table, the operation schemes, and an example of external circuit and its operation<br />
time scheme on the following pages.<br />
Assignment The inverter: Description<br />
SW50<br />
Starts at 50 Hz.<br />
Do not concurrently assign both SW50 and SW60.<br />
SW60<br />
Starts at 60 Hz.<br />
Operation Schemes<br />
• When the motor speed remains almost the same during coast-to-stop:<br />
4-74
• When the motor speed decreases significantly during coast-to-stop (with the current limiter activated):<br />
• Secure more than 0.1 second after turning ON the "Switch to commercial power" signal before turning<br />
ON a run command.<br />
• Secure more than 0.2 second of an overlapping period with both the "Switch to commercial power"<br />
signal and run command being ON.<br />
• If an alarm has been issued or BX has been ON when the motor drive source is switched from the<br />
commercial power to the inverter, the inverter will not be started at the commercial power frequency<br />
and will remain OFF. After the alarm has been reset or BX turned OFF, operation at the frequency of<br />
the commercial power will not be continued, and the inverter will be started at the ordinary starting<br />
frequency.<br />
To switch the motor drive source from the commercial line to the inverter, be sure to turn BX OFF<br />
before the "Switch to commercial power" signal is turned OFF.<br />
• When switching the motor drive source from the inverter to commercial power, adjust the inverter's<br />
reference frequency at or slightly higher than that of the commercial power frequency beforehand,<br />
taking into consideration the motor speed down during the coast-to-stop period produced by switching.<br />
• Note that when the motor drive source is switched from the inverter to the commercial power, a high<br />
inrush current will be generated, because the phases of the commercial power usually do not match the<br />
motor speed at the switching. Make sure that the power supply and all the peripheral equipment are<br />
capable of withstanding this inrush current.<br />
• If "Restart after momentary power failure" (F14 = 3, 4, or 5), is activated keep BX ON during<br />
commercial power driven operation to prevent the inverter from restarting after a momentary power<br />
failure.<br />
4-75
Example of Sequence Circuit<br />
Note 1) Emergency switch<br />
<strong>Manual</strong> switch provided for the event that the motor drive source cannot be switched normally to the<br />
commercial power due to a serious problem of the inverter<br />
Note 2) When any alarm has occurred inside the inverter, the motor drive source will automatically be switched to<br />
the commercial power.<br />
4-76
Example of Operation Time Scheme<br />
Alternatively, set the integrated sequence by which some of the actions above are automatically<br />
performed by the inverter itself. For details, refer to the description of ISW50 and ISW60.<br />
• UP Increase output frequency) and DOWN (Decrease output frequency) commands -- UP and DOWN<br />
(Function code data = 17 and 18)<br />
• Frequency setting<br />
Turning the terminal command UP or DOWN ON causes the output frequency to increase or decrease,<br />
respectively, within the range from 0 Hz to the maximum frequency. Refer to F01 (data = 7).<br />
• PID command<br />
Turning the terminal command UP or DOWN ON causes the PID command value to increase or decrease,<br />
respectively, within the range from 0 to 100%. Refer to J02 (data = 3).<br />
• Enable data change with keypad PID control -- WE-KP (Function code data = 19)<br />
Turning the terminal command WE-KP OFF protects function code data from accidentally getting changed by<br />
pressing the keys on the keypad. Only when this terminal command is ON, you can change function code data<br />
from the keypad. Refer to F00.<br />
4-77
• Cancel PID control -- Hz/PID (Function code data = 20)<br />
Turning this terminal command ON disables the PID control.<br />
If the PID control is disabled with this command, the inverter runs the motor with the reference frequency manually<br />
set by any of the multi-frequency, keypad, analog input, etc.<br />
Terminal command Hz/PID<br />
OFF<br />
ON<br />
Function<br />
Enable PID control<br />
Disable PID control/Enable manual frequency settings<br />
( Refer to the descriptions of J01 through J19 and J56 through J62.)<br />
• Switch normal/inverse operation -- IVS (Function code data = 21)<br />
This terminal command switches the output frequency control between normal (proportional to the input value)<br />
and inverse in analog frequency setting or under PID process control. To select the inverse operation, turn the IVS<br />
ON.<br />
The normal/inverse switching operation is useful for air-handling that require switching between cooling<br />
and heating. In cooling, the speed of the fan motor (output frequency of the inverter) is increased to lower<br />
the temperature. In heating, it is reduced to lower the temperature. This switching is realized by this IVS<br />
terminal command.<br />
• When the inverter is driven by an external analog frequency command sources (terminals [12], [C1] and<br />
[V2]):<br />
Switching normal/inverse operation can apply only to the analog frequency command sources (terminals [12], [C1]<br />
and [V2]) in frequency command 1 (F01) and does not affect frequency command 2 (C30) or UP/DOWN control.<br />
As listed below, the combination of the "Selection of normal/inverse operation for frequency command 1" (C53)<br />
and the IVS terminal command determines the final operation.<br />
Combination of C53 and IVS<br />
Data for C53 IVS Final operation<br />
0: Normal operation<br />
OFF<br />
Normal<br />
ON<br />
Inverse<br />
1: Inverse operation<br />
OFF<br />
Inverse<br />
ON<br />
Normal<br />
• When the process control is performed by the PID processor integrated in the inverter:<br />
The terminal command Hz/PID ("Cancel PID control") can switch the PID control between enabled (process is to<br />
be controlled by the PID processor) and disabled (process is to be controlled by the manual frequency setting). In<br />
either case, the combination of the "PID control" (J01) or "Selection of normal/inverse operation for frequency<br />
command 1" (C53) and the terminal command IVS determines the final operation as listed below.<br />
When the PID control is enabled:<br />
The normal/inverse operation selection for the PID processor output (reference frequency) is as follows.<br />
PID control (Mode selection) (J01) IVS Final operation<br />
1: Enable (normal operation)<br />
OFF<br />
Normal<br />
ON<br />
Inverse<br />
2: Enable (inverse operation)<br />
OFF<br />
Inverse<br />
ON<br />
Normal<br />
4-78
When the PID control is disabled:<br />
The normal/inverse operation selection for the manual reference frequency is as follows.<br />
Selection of normal/inverse operation for<br />
frequency command 1 (C53)<br />
IVS<br />
Final operation<br />
0: Normal operation – Normal<br />
1: Inverse operation – Inverse<br />
When the process control is performed by the PID control facility integrated in the inverter, the IVS is used<br />
to switch the PID processor output (reference frequency) between normal and inverse, and has no effect<br />
on any normal/inverse operation selection of the manual frequency setting.<br />
Refer to the descriptions of J01 through J19 and J56 through J62.<br />
• Interlock -- IL (Function code data = 22)<br />
In a configuration where a magnetic contactor (MC) is installed in the power output (secondary) circuit of the<br />
inverter, the momentary power failure detection feature provided inside the inverter may not be able to accurately<br />
detect a momentary power failure by itself. Using a digital signal input with the interlock command IL assures the<br />
accurate detection. Refer to F14.<br />
Terminal command IL<br />
OFF<br />
ON<br />
Meaning<br />
No momentary power failure has occurred.<br />
A momentary power failure has occurred.<br />
(Restart after a momentary power failure enabled)<br />
• Cancel torque control -- Hz/TRQ (Function code data = 23)<br />
When torque control is enabled (H18 = 2 or 3), assigning the terminal command Hz/TRQ ("Cancel torque control")<br />
to any of the general-purpose digital input terminals (data = 23) enables switching between speed control and<br />
torque control.<br />
Cancel torque control signal Hz/TRQ Operation<br />
ON<br />
OFF<br />
Cancel torque control (Enable speed control)<br />
Enable torque control<br />
• Enable communications link via RS-485 or fieldbus (option) -- LE (Function code data = 24)<br />
Turning this terminal command ON gives priorities to frequency commands or run commands received via the<br />
RS-485 communications link (H30) or the fieldbus option (y98). No LE assignment is functionally equivalent to the<br />
LE being ON. Refer to H30 (Communications link function) and y98 (Bus link function).<br />
• Universal DI -- U-DI (Function code data = 25)<br />
Using U-DI enables the inverter to monitor digital signals sent from the peripheral equipment via an RS-485<br />
communications link or a fieldbus option by feeding those signals to the digital input terminals. Signals assigned to<br />
the universal DI are simply monitored and do not operate the inverter.<br />
For an access to universal DI via the RS-485 or fieldbus communications link, refer to their respective<br />
<strong>Instruction</strong> <strong>Manual</strong>s.<br />
• Enable auto search for idling motor speed at starting -- STM (Function code data = 26)<br />
This digital terminal command determines, at the start of operation, whether or not to search for idling motor speed<br />
and follow it. Refer to H09 (Starting mode).<br />
4-79
• Force to stop -- STOP (Function code data = 30)<br />
Turning this terminal command OFF causes the motor to decelerate to a stop in accordance with the H56 data<br />
(Deceleration time for forced stop). After the motor stops, the inverter enters the alarm state with the alarm er6<br />
displayed. ( Refer to the description of F07.)<br />
• Pre-excitation -- EXITE (Function code data = 32)<br />
Turning this terminal command ON activates the pre-exciting feature. Even if this pre-excitation command is not<br />
assigned, specifying H85 (Pre-excitation: Time) to other than "0.00" enables the inverter to automatically start<br />
pre-exciting of the motor when it is turned ON. (This applies exclusively to the inverters under vector control with<br />
speed sensor.) Refer to H84 and H85.<br />
• Reset PID integral and differential components -- PID-RST (Function code data = 33)<br />
Turning this terminal command ON resets the integral and differential components of the PID processor. ( Refer<br />
to the descriptions of J01 through J19 and J56 through J62.)<br />
• Hold PID integral component -- PID-HLD (Function code data = 34)<br />
Turning this terminal command ON holds the integral components of the PID processor. ( Refer to the<br />
descriptions of J01 through J19 and J56 through J62.)<br />
• Select local (keypad) operation -- LOC (Function code data = 35)<br />
This terminal command switches the sources of run and frequency commands between remote and local.<br />
For details of switching between remote and local modes, refer to Chapter 7, Section 7.3.6 "Switching between<br />
remote and local modes."<br />
• Protect motor from dew condensation -- DWP (Function code data = 39)<br />
Turning this terminal command ON supplies a DC current to the motor in a stopped state in order to generate heat,<br />
preventing dew condensation. Refer to J21.<br />
• Enable integrated sequence to switch to commercial power (50 Hz) and (60 Hz) -- ISW50 and ISW60<br />
(Function code data = 40 and 41)<br />
With the terminal command ISW50 or ISW60 assigned, the inverter controls the magnetic contactor that switches<br />
the motor drive source between the commercial power and the inverter output according to the integrated<br />
sequence.<br />
This control is effective when not only ISW50 or ISW60* has been assigned to the input terminal but also the<br />
SW88 and SW52-2 signals have been assigned to the output terminals. (It is not essential to assign the SW52-1<br />
signal.)<br />
* The ISW50 or ISW60 should be selected depending upon the frequency of the commercial power; the former for<br />
50 Hz and the latter for 60 Hz.<br />
For details of these commands, refer to the circuit diagrams and timing schemes given below.<br />
Terminal command assigned<br />
ISW50<br />
Enable integrated sequence to switch to commercial power<br />
(50 Hz)<br />
ISW60<br />
Enable integrated sequence to switch to commercial power<br />
(60 Hz)<br />
Operation<br />
(Switching from commercial power to<br />
inverter)<br />
Start at 50 Hz.<br />
Start at 60 Hz.<br />
Do not assign both ISW50 and ISW60 at the same time. Doing so cannot guarantee the result.<br />
4-80
Circuit Diagram and Configuration<br />
Main Circuit<br />
Configuration of Control Circuit<br />
Summary of Operation<br />
ISW50 or ISW60<br />
Input<br />
OFF<br />
(Commercial power)<br />
ON<br />
(Inverter)<br />
Run command<br />
ON<br />
OFF<br />
ON<br />
OFF<br />
Output<br />
(Status signal and magnetic contactor)<br />
SW52-1 SW52-2 SW88<br />
52-1 52-2<br />
88<br />
OFF OFF<br />
ON<br />
OFF<br />
ON ON OFF<br />
Inverter<br />
operation<br />
OFF<br />
ON<br />
OFF<br />
Timing Scheme<br />
Switching from inverter operation to commercial-power operation ISW50/ISW60: ON OFF<br />
(1) The inverter output is shut OFF immediately (Power gate IGBT OFF)<br />
(2) The inverter primary circuit SW52-1 and the inverter secondary side SW52-2 are turned OFF immediately.<br />
(3) If a run command is present after an elapse of t1 (0.2 sec + time specified by H13), the commercial power<br />
circuit SW88 is turned ON.<br />
4-81
Switching from commercial-power operation to inverter operation ISW50/ISW60: OFF ON<br />
(1) The inverter primary circuit SW52-1 is turned ON immediately.<br />
(2) The commercial power circuit SW88 is turned OFF immediately.<br />
(3) After an elapse of t2 (0.2 sec + time required for the main circuit to get ready) from when SW52-1 is turned ON,<br />
the inverter secondary circuit SW52-2 is turned ON.<br />
(4) After an elapse of t3 (0.2 sec + time specified by H13) from when SW52-2 is turned ON, the inverter<br />
synchronizes once the motor that has been freed from the commercial power to the commercial power<br />
frequency. Then the motor returns to the operation driven by the inverter.<br />
t1: 0.2 sec + Time specified by H13 (Restart mode after momentary power failure)<br />
t2: 0.2 sec + Time required for the main circuit to get ready<br />
t3: 0.2 sec + Time specified by H13 (Restart mode after momentary power failure)<br />
Selection of Commercial Power Switching Sequence<br />
J22 specifies whether or not to automatically switch to commercial-power operation when an inverter alarm<br />
occurs.<br />
Data for J22<br />
Sequence (upon occurrence of an alarm)<br />
0 Keep inverter-operation (Stop due to alarm.)<br />
1 Automatically switch to commercial-power operation<br />
• The sequence operates normally also even when SW52-1 is not used and the main power of the<br />
inverter is supplied at all times.<br />
• Using SW52-1 requires connecting the input terminals [R0] and [T0] for an auxiliary control power.<br />
Without the connection, turning SW52-1 OFF loses also the control power.<br />
• The sequence operates normally even if an alarm occurs in the inverter except when the inverter itself<br />
is broken. Therefore, for a critical facility, be sure to install an emergency switching circuit outside the<br />
inverter.<br />
• Turning ON both the magnetic contactor MC (88) at the commercial-power side and the MC (52-2) at<br />
the inverter output side at the same time supplies main power mistakenly from the output (secondary)<br />
side of the inverter, which may damage the inverter. To prevent it, be sure to set up an interlocking logic<br />
outside the inverter.<br />
4-82
Examples of Sequence Circuits<br />
1) Standard sequence<br />
2) Sequence with an emergency switching function<br />
4-83
3) Sequence with an emergency switching function --Part 2 (Automatic switching by the alarm output issued by<br />
the inverter)<br />
• Servo-lock command -- LOCK (Function code data = 47)<br />
Turning this terminal command ON enables a servo-lock command; turning it OFF disables a servo-lock<br />
command. Refer to J97 through J99.<br />
• Pulse train input -- PIN (Function code data = 48)<br />
• Pulse train sign -- SIGN (Function code data = 49)<br />
Assigning the command PIN to digital input terminal [X7] enables the frequency command by the pulse train input.<br />
Assigning the command SIGN to one of the digital input terminals except [X7] enables the pulse train sign input to<br />
specify the polarity of frequency command. Refer to F01.<br />
4-84
• Enable battery operation -- BATRY (Function code data = 59)<br />
Turning this terminal command ON cancels the undervoltage protection so that the inverter runs the motor with<br />
battery power under an undervoltage condition.<br />
When BATRY is assigned to any digital input terminal, the inverter trips after recovery from power failure just as<br />
F14 = 1 regardless of F14 setting. When BATRY is ON, the main power down detection is disabled regardless of<br />
H72 setting.<br />
Prerequisites for battery operation<br />
(1) The terminal command BATRY (data = 59) must be assigned to any digital input terminal.<br />
(2) A DC link bus voltage must be supplied from the battery to the main circuit (L1/R-L3/T or L2/S-L3/T) as shown<br />
in Figures A and B given below.<br />
(3) A regulated voltage (sine-wave or DC voltage) must be supplied to the auxiliary power supply (R0-T0).<br />
(4) For 200 V class series / 230V class series 37 kW / 60 HP and above and 400 V class series / 460V 75 kW /<br />
125 HP and above, a regulated voltage (sine-wave) must be supplied to the auxiliary fan power supply (R1-T1) as<br />
shown in Figure B. The fan power supply connector must be configured for battery operation as shown in Figure C.<br />
(5) The BATRY-assigned terminal (data = 59) must be turned ON at the same moment as closing of MC2.<br />
73X<br />
Power<br />
Supply<br />
MC1<br />
Converter<br />
+<br />
Edc<br />
M<br />
R,S,T<br />
N(-)<br />
Battery<br />
UPS<br />
etc.<br />
MC2<br />
BATRY<br />
R0,T0 Control circuit<br />
Inverter<br />
Figure A: Connection Diagram<br />
200 V Class: 30 kW (230V 50HP) and below<br />
400 V Class: 55 kW, (460V 100HP) and Below<br />
73X<br />
Power<br />
Supply<br />
MC1<br />
Converter<br />
+<br />
Edc<br />
M<br />
R,S,T<br />
N(-)<br />
Battery<br />
UPS<br />
etc.<br />
MC2<br />
BATRY<br />
R0,T0<br />
R1,T1<br />
Control circuit<br />
Fan power supply<br />
Inverter<br />
Figure B: Connection Diagram<br />
200 V Class: 37 kW (230V 60HP) and above<br />
400 V Class: 75 kW, (460V 125HP) and above<br />
4-85
Setting<br />
CN R (Red)<br />
CN W (White)<br />
CN W (White)<br />
CN R (Red)<br />
Usage<br />
When not using R1 or T1<br />
(Factory default)<br />
When using R1 and T1 (BATRY operation)<br />
Figure C: Fan Power Supply Switching Connector<br />
About battery operation (when BATRY is ON)<br />
(1) The undervoltage protective function (lu ) is deactivated.<br />
(2) The inverter can run the motor even under an undervoltage condition.<br />
(3) The RDY ("Inverter ready to run") output signal is forcedly turned OFF.<br />
(4) The bypass circuit of the charging resistor comes to be closed (73X ON) after a delay of time T1 from when the<br />
BATRY is turned ON. Further, after a delay of time T2 (a maximum of 0.1 second), the battery operation starts. For<br />
the specifications of T1, see the table below.<br />
Main power<br />
MC1<br />
BATRY<br />
MC2<br />
73X<br />
Battery power supply<br />
ON<br />
ON<br />
ON<br />
ON<br />
ON<br />
ON<br />
ON<br />
LU<br />
RDY<br />
ON<br />
DC link bus voltage Edc<br />
ON<br />
T1<br />
T2<br />
Battery operationenabled<br />
zone<br />
Undervoltage level<br />
Detected speed<br />
Reference Frequency<br />
S-curve acce./dece. disabled<br />
0<br />
Run command<br />
Battery Operation Timing Diagram<br />
T1 from BATRY ON to 73X ON<br />
Power condition<br />
30 kW / 50 HP<br />
or below<br />
37 kW / 60 HP<br />
or above<br />
After the control power supply goes OFF, the<br />
100 ms 500 ms<br />
battery power and control power are turned ON.<br />
The control power remains ON or after a<br />
momentary power failure happens.<br />
205 ms<br />
ON<br />
(5) The S-curve acceleration/deceleration is disabled.<br />
(6) The battery operation speed can be calculated by the following formula.<br />
Battery voltage -5[ V ]<br />
Reference speed(pre- ramp)during battery operation <br />
×Rated speed× k<br />
2 ×Rated voltage<br />
Where,<br />
Battery voltage: 24 VDC or higher for 200 V class series / 230 V class series for USA<br />
48 VDC or higher for 400 V class series / 460 V class series for USA.<br />
Rated speed : F04<br />
Rated voltage : F05 (<strong>Motor</strong> rated voltage (V))<br />
Safety coefficient (Less than 1, about 0.8<br />
.<br />
4-86
Precautions<br />
(1) The battery power supply must be connected before or at the same moment as turning ON of BATRY.<br />
(2) As shown in the timing diagram above, battery operation is possible within the battery operation-enabled zone.<br />
There is a delay of "T1 + T2" after the BATRY, MC2, and battery power supply are turned ON.<br />
(3) The BATRY must not be turned ON when the voltage level is higher than the specified undervoltage level (that is,<br />
before the lu appears after a power failure). Turning the BATRY ON causes the bypass circuit (73X) of the charging<br />
resistor to stick to ON (closed).<br />
(4) During battery operation, driving with a heavy load must be avoided and the motor must run with no load or braking<br />
load condition. Low battery voltage cannot generate sufficient torque, causing the motor to stall.<br />
(5) The battery operation must be performed at a low speed. Be careful with the battery capacity.<br />
When a high voltage (e.g., 300 VDC for 200 V class series / 230 V class series for USA of inverters or 600 VDC for<br />
400 V ones / 460 V ones for USA) is applied, not battery operation but normal operation must be performed.<br />
(6) In normal operation, the BATRY must be OFF. Turning the main power supply ON with the BATRY being ON could<br />
damage the rectifier diode because the 73X is ON.<br />
• Count the run time of commercial power-drive motors 1 to 2 -- CRUN-M1, CRUN-M2 (Function code data =<br />
72, 73) These four terminal commands enable the inverter to count the cumulative run time of motors 1, 2 even<br />
when they are driven by commercial power (not by the inverter). When the CRUN-M1, CRUN-M2 is ON, the inverter<br />
counts the run time that the motor 1, 2 is driven by commercial power.<br />
• Select droop control – DROOP (Function code data = 76)<br />
This terminal command DROOP toggles droop control on and off. Refer to H28.<br />
Droop<br />
ON<br />
OFF<br />
Droop control<br />
Enable<br />
Disable<br />
• Cancel PG alarm-- PG-CCL (Function code data = 77)<br />
When this terminal command is ON, the PG signal loss alarm is ignored. Use this terminal command when<br />
switching PG wires for switching motors, for example, to prevent it from being detected as PG wire break.<br />
• Run forward -- FWD (Function code data = 98)<br />
Turning this terminal command ON runs the motor in the forward direction; turning it OFF decelerates it to stop.<br />
This terminal command can be assigned to the same setting as E01 thru E07 only by parameter E98.<br />
• Run reverse -- REV (Function code data = 99)<br />
Turning this terminal command ON runs the motor in the reverse direction; turning it OFF decelerates it to stop.<br />
This terminal command can be assigned to the same setting as E01 thru E07 only by parameter E99.<br />
E10 to E15 Acceleration Time 2 to 4, Deceleration Time 2 to 4 (Refer to F07.) see page 4-37<br />
E16, E17 Torque Limiter 2-1, 2-2 (Refer to F40.) see page 4-58<br />
4-87
E20 to E23<br />
E24, E27<br />
Terminal [Y1] to [Y4] Function<br />
Terminal [Y5A/C] and [30A/B/C] Function (Relay output)<br />
E20 through E24 and E27 assign output signals (listed on the next page) to general-purpose, programmable<br />
output terminals [Y1], [Y2], [Y3], [Y4], [Y5A/C] and [30A/B/C].<br />
These function codes can also switch the logic system between normal and negative to define how the inverter<br />
interprets the ON or OFF state of each terminal. The factory default setting is normal logic system "Active ON."<br />
Terminals [Y1], [Y2], [Y3] and [Y4] are transistor outputs and terminals [Y5A/C] and [30A/B/C] are relay contact<br />
outputs. In normal logic, if an alarm occurs, the relay will be energized so that [30A] and [30C] will be closed, and<br />
[30B] and [30C] opened. In negative logic, the relay will be de-energized so that [30A] and [30C] will be opened,<br />
and [30B] and [30C] closed. This may be useful for the implementation of failsafe power systems.<br />
• When a negative logic is employed, all output signals are active (e.g. an alarm would be recognized)<br />
while the inverter is powered OFF. To avoid causing system malfunctions by this, interlock these signals<br />
to keep them ON using an external power supply. Furthermore, the validity of these output signals is<br />
not guaranteed for approximately 1.5 seconds (for 40 HP or below) or 3 seconds (for 50 HP or above)<br />
after power-ON, so introduce such a mechanism that masks them during the transient period.<br />
• Terminals [Y5A/C] and [30A/B/C] use mechanical contacts that cannot stand frequent ON/OFF<br />
switching. Where frequent ON/OFF switching is anticipated (for example, limiting a current by using<br />
signals subjected to inverter output limit control such as switching to commercial power line or<br />
direct-on-line starting), use transistor outputs [Y1], [Y2], [Y3] and [Y4] instead.<br />
The service life of a relay is approximately 200,000 times if it is switched ON and OFF at one-second<br />
intervals.<br />
The table below lists functions that can be assigned to terminals [Y1], [Y2], [Y3], [Y4], [Y5A/C], and [30A/B/C]. The<br />
descriptions are, in principle, arranged in the numerical order of assigned data. However, highly relevant signals<br />
are collectively described where one of them first appears. Refer to the function codes or signals in the "Related<br />
function codes/signals (data)" column, if any.<br />
The <strong>EQ7</strong> runs under "V/f control," "dynamic torque control," "vector control without speed sensor," or "vector<br />
control with speed sensor." Some output signals assigned apply exclusively to the specific drive control, which is<br />
indicated by letters Y (Applicable) and N (Not applicable) in the "Drive control" column of the table given below.<br />
(Refer to page 4-2.)<br />
Explanations of each function are given in normal logic system "Active ON."<br />
Function code data<br />
Active ON Active OFF<br />
Functions assigned<br />
Symbol<br />
V/f<br />
Drive Control<br />
w/o<br />
PG<br />
w/<br />
PG<br />
Torque<br />
control<br />
Related<br />
function<br />
codes<br />
0 1000 Inverter running RUN Y Y Y Y <br />
1 1001 Frequency (speed) arrival signal FAR Y Y Y N E30<br />
2 1002 Frequency (speed) detected FDT Y Y Y Y E31, E32<br />
3 1003<br />
Undervoltage detected (Inverter<br />
stopped)<br />
4-88<br />
LU Y Y Y Y <br />
4 1004 Torque polarity detected B/D Y Y Y Y <br />
5 1005 Inverter output limiting IOL Y Y Y Y <br />
6 1006<br />
Auto-restarting after momentary<br />
power failure<br />
IPF Y Y Y Y F14<br />
7 1007 <strong>Motor</strong> overload early warning OL Y Y Y Y<br />
E34, F10,<br />
F12<br />
8 1008 Keypad operation enabled KP Y Y Y Y <br />
10 1010 Inverter ready to run RDY Y Y Y Y <br />
11 <br />
12 <br />
13 <br />
15 1015<br />
Switch motor drive source between<br />
commercial power and inverter<br />
output (For MC on commercial<br />
line)<br />
Switch motor drive source between<br />
commercial power and inverter<br />
output (For secondary side)<br />
Switch motor drive source between<br />
commercial power and inverter<br />
output (For primary side)<br />
Select AX terminal function (For<br />
MC on primary side)<br />
SW88 Y N N N<br />
SW52-2 Y N N N<br />
SW52-1 Y N N N<br />
E01 to E07<br />
ISW50<br />
(40)<br />
ISW60<br />
(41)<br />
J22<br />
AX Y Y Y Y
Function code data<br />
Active ON Active OFF<br />
Functions assigned<br />
4-89<br />
Symbol<br />
V/f<br />
Drive Control<br />
w/o<br />
PG<br />
w/<br />
PG<br />
Torque<br />
control<br />
Related<br />
function<br />
codes<br />
22 1022 Inverter output limiting with delay IOL2 Y Y Y Y IOL (5)<br />
25 1025 Cooling fan in operation FAN Y Y Y Y H06<br />
26 1026 Auto-resetting TRY Y Y Y Y H04, H05<br />
27 1027 Universal DO U-DO Y Y Y Y <br />
28 1028 Heat sink overheat early warning OH Y Y Y Y <br />
29 1029 Synchronization completed SY N N Y N<br />
30 1030 Lifetime alarm LIFE Y Y Y Y<br />
(See the PG<br />
Interface<br />
Card<br />
instruction<br />
manual.)<br />
(See<br />
Section 7.3.<br />
of UM)<br />
31 1031 Frequency (speed) detected 2 FDT2 Y Y Y Y E32, E36<br />
33 1033 Reference loss detected REF OFF Y Y Y Y E65<br />
35 1035 Inverter output on RUN2 Y Y Y Y RUN (0)<br />
36 1036 Overload prevention control OLP Y Y Y N H70<br />
37 1037 Current detected ID Y Y Y Y<br />
38 1038 Current detected 2 ID2 Y Y Y Y<br />
39 1039 Current detected 3 ID3 Y Y Y Y<br />
41 1041 Low current detected IDL Y Y Y Y<br />
E34, E35,<br />
E37, E38,<br />
E55, E56<br />
42 1042 PID alarm PID-ALM Y Y Y N J11 to J13<br />
43 1043 Under PID control PID-CTL Y Y Y N J01<br />
44 1044 <strong>Motor</strong> stopped due to slow flowrate<br />
under PID control<br />
PID-STP Y Y Y N J08, J09<br />
45 1045 Low output torque detected U-TL Y Y Y Y E78 to E81<br />
46 1046 Torque detected 1 TD1 Y Y Y Y<br />
47 1047 Torque detected 2 TD2 Y Y Y Y<br />
48 1048 <strong>Motor</strong> 1 selected SWM1 Y Y Y Y<br />
49 1049 <strong>Motor</strong> 2 selected SWM2 Y Y Y Y<br />
52 1052 Running forward FRUN Y Y Y Y <br />
53 1053 Running reverse RRUN Y Y Y Y <br />
54 1054 In remote operation RMT Y Y Y Y<br />
56 1056<br />
<strong>Motor</strong> overheat detected by<br />
thermistor<br />
A42, b42,<br />
r42<br />
(See Section<br />
4.2.2. UM)<br />
THM Y Y Y Y H26, H27<br />
57 1057 Brake signal BRKS Y Y Y N J68 to J72<br />
58 1058 Frequency (speed) detected 3 FDT3 Y Y Y Y E32, E54<br />
59 1059 Terminal [C1] wire break C1OFF Y Y Y Y <br />
70 1070 Speed valid DNZS N Y Y Y F25, F38<br />
71 1071 Speed agreement DSAG N Y Y N d21, d22<br />
72 1072 Frequency (speed) arrival signal 3 FAR3 Y Y Y N E30<br />
76 1076 PG error detected PG-ERR N Y Y N d21 to d23<br />
82 1082 Positioning completion signal PSET N N Y N J97 to J99<br />
84 1084 Maintenance timer MNT Y Y Y Y<br />
H44, H78,<br />
H79<br />
98 1098 Light alarm L-ALM Y Y Y Y H81, H82<br />
99 1099 Alarm output (for any alarm) ALM Y Y Y Y <br />
101 1101 Enable circuit failure detected DECF Y Y Y Y <br />
102 1102 Enable input OFF EN OFF Y Y Y Y <br />
105 1105 Braking transistor broken DBAL Y Y Y Y H98<br />
Any negative logic (Active OFF) command cannot be assigned to the functions marked with "" in the<br />
"Active OFF" column.
• Inverter running -- RUN (Function code data = 0)<br />
Inverter output on -- RUN2 (Function code data = 35)<br />
These output signals tell the external equipment that the inverter is running at a starting frequency or higher.<br />
If assigned in negative logic (Active OFF), these signals can be used to tell the "Inverter being stopped" state.<br />
Output signal Basic function Remarks<br />
RUN<br />
RUN2<br />
These signals come ON when the inverter is<br />
running.<br />
Under V/f control:<br />
These signals come ON if the inverter output<br />
frequency exceeds the starting frequency, and go<br />
OFF if it drops below the stop frequency. The RUN<br />
signal can also be used as a "Speed valid" signal<br />
DNZS.<br />
Goes OFF even during DC braking<br />
or dew condensation prevention.<br />
Comes ON even during DC<br />
braking, pre-exciting, zero speed<br />
control, or dew condensation<br />
prevention.<br />
Under vector control, both RUN and RUN2 come ON when zero speed control or servo-lock function is enabled.<br />
• Undervoltage detected (Inverter stopped) -- LU (Function code data = 3)<br />
This output signal comes ON when the DC link bus voltage of the inverter drops below the specified undervoltage<br />
level, and it goes OFF when the voltage exceeds the level.<br />
This signal is ON also when the undervoltage protective function is activated so that the motor is in an abnormal<br />
stop state (e.g., tripped).<br />
When this signal is ON, a run command is disabled if given.<br />
• Torque polarity detected -- B/D (Function code data = 4)<br />
The inverter issues the driving or braking polarity signal to this digital output judging from the internally calculated<br />
torque or torque command. This signal goes OFF when the detected torque is a driving one, and it goes ON when<br />
it is a braking one.<br />
• Inverter output limiting -- IOL (Function code data = 5)<br />
Inverter output limiting with delay -- IOL2 (Function code data = 22)<br />
The output signal IOL comes ON when the inverter is limiting the output frequency by activating any of the<br />
following actions (minimum width of the output signal: 100 ms). The output signal IOL2 comes ON when any of the<br />
following output limiting operation continues for 20 ms or more.<br />
• Torque limiting (F40, F41, E16 and E17, Maximum internal value)<br />
• Current limiting by software (F43 and F44)<br />
• Instantaneous overcurrent limiting by hardware (H12 = 1)<br />
• Automatic deceleration (Anti-regenerative control) (H69)<br />
When the IOL signal is ON, it may mean that the output frequency may have deviated from the frequency<br />
specified by the frequency command because of this limiting function.<br />
• Keypad operation enabled -- KP (Function code data = 8)<br />
This output signal comes ON when the keypad is specified as a run command source.<br />
• Inverter ready to run -- RDY (Function code data = 10)<br />
This output signal comes ON when the inverter becomes ready to run by completing hardware preparation (such<br />
as initial charging of DC link bus capacitors and initialization of the control circuit) and no protective functions are<br />
activated.<br />
• Select AX terminal function -- AX (Function code data = 15)<br />
In response to a run command FWD, this output signal controls the magnetic contactor on the commercial-power<br />
supply side. It comes ON when the inverter receives a run command and it goes OFF after the motor decelerates<br />
to stop with a stop command received.<br />
This signal immediately goes OFF upon receipt of a coast-to-stop command or when an alarm occurs.<br />
4-90
• Universal DO -- U-DO (Function code data = 27)<br />
Assigning this output signal to an inverter's output terminal and connecting the terminal to a digital input terminal of<br />
peripheral equipment via the RS-485 communications link or the fieldbus, allows the inverter to send commands<br />
to the peripheral equipment.<br />
The universal DO can also be used as an output signal independent of the inverter operation.<br />
For the procedure for access to Universal DO via the RS-485 communications link or fieldbus, refer to the<br />
respective instruction manual.<br />
• Heat sink overheat early warning -- OH (Function code data = 28)<br />
This output signal is used to issue a heat sink overheat early warning that allows for corrective action before an<br />
overheat trip 0h1 actually happens.<br />
This signal comes ON when the temperature of the heat sink exceeds the "overheat trip temperature minus 5°C<br />
(41°F)," and it goes OFF when it drops down to the "overheat trip temperature minus 8°C (46°F)."<br />
This signal comes ON also when the internal air circulation DC fan (75 HP or above for 230 V series or 125 HP or<br />
above for 460 V series) has locked.<br />
• Synchronization completed -- SY (Function code data = 29)<br />
This output signal comes ON when the control target comes inside the synchronization completion detection angle<br />
in synchronous running.<br />
For details about synchronous operation, refer to the PG Interface Card instruction manual.<br />
• Lifetime alarm -- LIFE (Function code data = 30)<br />
This output signal comes ON when it is judged that the service life of any one of capacitors (DC link bus capacitors<br />
and electrolytic capacitors on the printed circuit boards) and cooling fan has expired.<br />
This signal should be used as a guide for replacement of the capacitors and cooling fan. If this signal comes ON,<br />
use the specified maintenance procedure to check the service life of these parts and determine whether the parts<br />
should be replaced or not. (Refer to Chapter 7 of the user manual, Section 7.3 "List of Periodic Replacement<br />
Parts.")<br />
This signal comes ON also when the internal air circulation DC fan (75 HP or above for 230 V series or 125 HP or<br />
above for 460 V series) has locked.<br />
• Under PID control -- PID-CTL (Function code data = 43)<br />
This output signal comes ON when PID control is enabled ("Cancel PID control" (Hz/PID) = OFF) and a run<br />
command is ON. (Refer to the description of J01.)<br />
When PID control is enabled, the inverter may stop due to the slow flowrate stopping function or other<br />
reasons, with the PID-CTL signal being ON. As long as the PID-CTL signal is ON, PID control is effective,<br />
so the inverter may abruptly resume its operation, depending on the feedback value in PID control.<br />
When PID control is enabled, even if the inverter stops its output during operation because of sensor signals or<br />
other reasons, operation will resume automatically. Design machinery so that safety is ensured in consideration<br />
of these events.<br />
Otherwise, accidents could occur.<br />
4-91
• Running forward -- FRUN (Function code data = 52)<br />
Running reverse -- RRUN (Function code data = 53)<br />
Output signal Assigned data Running forward Running reverse Inverter stopped<br />
FRUN 52 ON OFF OFF<br />
RRUN 53 OFF ON OFF<br />
• In remote operation -- RMT (Function code data = 54)<br />
This output signal comes ON when the inverter switches from local to remote mode.<br />
For details of switching between remote and local modes, refer to user <strong>Manual</strong> Chapter 4, Section 4.2.2<br />
"Remote and local modes."<br />
• Terminal [C1] wire break -- C1OFF (Function code data = 59)<br />
This output signal comes ON when the inverter detects that the input current to terminal [C1] drops below 2 mA<br />
interpreting it as the terminal [C1] wire broken.<br />
• Speed valid -- DNZS (Function code data = 70)<br />
This output signal comes ON when the reference or detected speed exceeds the stop frequency specified by<br />
function code F25. It goes OFF when the speed is below the stop frequency for 100 ms or longer.<br />
Under vector control with speed sensor, F38 switches the decision criterion between the reference and detected<br />
speed. Under vector control without speed sensor, the reference speed is used as a decision criterion. ( Refer<br />
to the descriptions of F25 and F38.)<br />
• Alarm output (for any alarm) -- ALM (Function code data = 99)<br />
This output signal comes ON if any of the protective functions is activated and the inverter enters Alarm mode.<br />
• Enable circuit failure detected -- DECF (Function code data = 101)<br />
This output signal comes ON when the inverter detects a failure of the Enable circuit(*1).<br />
Configure a feedback circuit of the Enable input function as needed to feed back the transistor output of the<br />
DECF-assigned inverter to the reset input of the upper safety relay unit for turning the Enable command off and<br />
shutdown of the inverter output.<br />
4-92
• Enable input OFF -- EN OFF (Function code data = 102)<br />
This output signal comes ON when Enable inputs on [EN1] and [EN2] terminals are OFF (opened). See the table<br />
below.<br />
*1: These signals do not assure detection of all of single failures. (Compliant with EN ISO13849-1 PL=d Cat. 3)<br />
Main power input<br />
L1/R, L2/S, L3/T<br />
Enable input<br />
Logic Table for DECF and EN OFF Signals<br />
Transistor output<br />
or<br />
Alarm relay output<br />
(for any error) *2<br />
Output<br />
EN1-PLC EN2-PLC DECF EN OFF<br />
OFF x x OFF OFF Shut down (Safe Torque Off (STO) *3)<br />
OFF OFF OFF ON Shut down (Safe Torque Off (STO) *3)<br />
ON<br />
ON ON OFF OFF Wait for a run command<br />
ON OFF ON *4 OFF Shut down (Safe Torque Off (STO) *3)<br />
OFF ON ON *4 OFF Shut down (Safe Torque Off (STO) *3)<br />
x: Independent of this state, the output is determined.<br />
*2 To use these functions, it is necessary to assign DECF/EN OFF to digital output terminals (function codes E20<br />
to E24 and E27, data = 101/102 or 1101/1102 (negative logic)).<br />
*3 Output shutdown (Safe Torque Off) prescribed in IEC61800-5-2.<br />
*4 If either one of these terminals are kept OFF for 50ms or more, the inverter interprets it as a discrepancy,<br />
causing an alarm ecf. This alarm state can be cleared only by turning the inverter power off and on clears this<br />
alarm.<br />
• Braking transistor broken -- DBAL (Function code data = 105)<br />
If the inverter detects a breakdown of the braking transistor, it issues the braking transistor alarm ( ) and also<br />
the output signal DBAL. Detection of braking transistor broken can be cancelled by H98. (40 HP or below)<br />
( Refer to the description of H98.)<br />
Breakdown of the braking transistor could lead to the secondary breakdown of the braking resistor and<br />
inverter’s internal units. Use this output signal DBAL to detect abnormal operation of the built-in braking<br />
transistor and to cut off power to the magnetic contactor in inverter primary circuits, for preventing spread<br />
of the damage.<br />
E30<br />
Frequency Arrival (Hysteresis width)<br />
E30 specifies the detection level (hysteresis width) for the "Frequency (speed) arrival signal" FAR and the<br />
"Frequency (speed) arrival signal 3" FAR3.<br />
Output signal<br />
Frequency<br />
(speed) arrival<br />
signal<br />
FAR<br />
Frequency<br />
(speed) arrival<br />
signal 3<br />
FAR3<br />
Data assigned to<br />
output terminal<br />
- Data setting range: 0.0 to 10.0 (Hz)<br />
Operating condition 1 Operating condition 2<br />
1 Both signals come ON when<br />
the difference between the<br />
output frequency<br />
(estimated/detected speed)<br />
and the reference frequency<br />
(reference speed) comes<br />
within the frequency arrival<br />
72<br />
hysteresis width specified by<br />
E30.<br />
FAR always goes OFF when the run<br />
command is OFF or the reference<br />
speed is "0."<br />
When the run command is OFF, the<br />
inverter regards the reference speed<br />
as "0," so FAR3 comes ON as long<br />
as the output frequency<br />
(estimated/detected speed) is within<br />
the range of "0 ± the frequency arrival<br />
hysteresis width specified by E30."<br />
4-93
The operation timings of each signal are shown below.<br />
E31, E32 Frequency Detection (Level and Hysteresis width) E36, E54 (Frequency Detection 2 and 3 (Level))<br />
When the output frequency (estimated/detected speed) exceeds the frequency detection level specified by E31,<br />
the "Frequency (speed) detected signal" comes ON; when it drops below the "Frequency detection level minus<br />
Hysteresis width specified by E32," it goes OFF.<br />
The following three settings are available.<br />
Output signal<br />
Frequency (speed)<br />
detected signal FDT<br />
Frequency (speed)<br />
detected signal 2<br />
FDT2<br />
Frequency (speed)<br />
detected signal 3<br />
FDT3<br />
Data assigned<br />
to output<br />
terminal<br />
Operation level<br />
Range: 0.0 to 500.0<br />
Hz<br />
2 E31<br />
31 E36<br />
58 E54<br />
Hysteresis width<br />
Range: 0.0 to 500.0<br />
Hz<br />
E32<br />
4-94
E34, E35 Overload Early Warning/Current Detection (Level and Timer)<br />
E37, F38 (Current Detection 2/Low Current Detection (Level and Timer))<br />
E55, E56 (Current Detection 3 (Level and Timer))<br />
These function codes define the detection level and time for the "<strong>Motor</strong> overload early warning" OL, "Current<br />
detected" ID, "Current detected 2" ID2, "Current detected 3" ID3, and "Low current detected" IDL output signals.<br />
Output<br />
signal<br />
Data assigned<br />
to output<br />
terminal<br />
Operation level<br />
Range<br />
Timer<br />
Range: 0.01 to<br />
600.00 s<br />
<strong>Motor</strong><br />
characteristics<br />
Range<br />
Thermal time<br />
constant<br />
Range: 0.5 to 75.0<br />
min<br />
OL 7 E34 - F10 F12<br />
ID 37 E34 E35<br />
ID2 38 E37 E38<br />
ID3 39 E55 E56<br />
- -<br />
IDL 41 E37 E38<br />
- Data setting range<br />
Operation level: 0.00 (Disable), 1 to 200% of inverter rated current<br />
<strong>Motor</strong> characteristics 1: Enable (For a general-purpose motor with shaft-driven cooling fan)<br />
2: Enable (For an inverter-driven motor, non-ventilated motor, or motor with<br />
separately powered cooling fan)<br />
• <strong>Motor</strong> overload early warning signal -- OL<br />
The OL signal is used to detect a symptom of an overload condition (alarm code 0l1 ) of the motor so that the user<br />
can take an appropriate action before the alarm actually happens.<br />
The OL signal turns ON when the inverter output current exceeds the level specified by E34. In typical cases, set<br />
E34 data to 80 to 90% against F11 data (Electronic thermal overload protection for motor 1, Overload detection<br />
level). Specify also the thermal characteristics of the motor with F10 (Select motor characteristics) and F12<br />
(Thermal time constant).<br />
• Current detected, Current detected 2 and Current detected 3 -- ID, ID2 and ID3<br />
When the inverter output current exceeds the level specified by E34, E37 or E55 for the period specified by E35,<br />
E38 or E56, the ID, ID2 or ID3 signal turns ON, respectively. When the output current drops below 90% of the<br />
rated operation level, the ID, ID2 or ID3 turns OFF. (The minimum ON-duration is 100 ms.)<br />
• Low current detected -- IDL<br />
This signal turns ON when the output current drops below the level specified by E37 (Low current detection, Level)<br />
for the period specified by E38 (Timer). When the output current exceeds the "Low current detection level plus 5%<br />
of the inverter rated current," it goes OFF. (The minimum ON-duration is 100 ms.)<br />
4-95
E36 Frequency Detection 2 (Refer to E31.) see page 4-94<br />
E37, E38 Current Detection 2/Low Current Detection (Level and Timer) (Refer to E34.) see page4-95<br />
E40, E41 PID Display Coefficient A, B<br />
These function codes specify PID display coefficients A and B to convert a PID command (process command or<br />
dancer position command) and its feedback into mnemonic physical quantities to display.<br />
- Data setting range: -999 to 0.00 to 9990 for PID display coefficients A and B<br />
• Display coefficients for PID process command and its feedback (J01 = 1 or 2)<br />
E40 specifies coefficient A that determines the display value at 100% of the PID process command or its feedback,<br />
and E41 specifies coefficient B that determines the display value at 0%.<br />
The display value is determined as follows:<br />
Display value = (PID process command or its feedback (%))/100 (Display coefficient A - B) + B<br />
Example<br />
Maintaining the pressure around 16 kPa (sensor voltage 3.13 V) while the pressure sensor can detect 0 to 30 kPa<br />
over the output voltage range of 1 to 5 V:<br />
Select terminal [12] as a feedback terminal and set the gain to 200% so that 5 V corresponds to 100%.<br />
The following E40 and E41 settings allow you to monitor or specify the values of the PID process command and its<br />
feedback on the keypad as pressure.<br />
PID display coefficient A (E40) = 30.0, that determines the display value at 100% of PID process command or<br />
its feedback<br />
PID display coefficient B (E41) = -7.5, that determines the display value at 0% of PID process command or its<br />
feedback<br />
To control the pressure at 16 kPa on the keypad, set the value to 16.0.<br />
4-96
• Display coefficients for PID dancer position command and its feedback (J01 = 3)<br />
Under PID dancer control, the PID command and its feedback operate within the range 100%, so specify the<br />
value at +100% of the PID dancer position command or its feedback as coefficient A with E40, and the value at<br />
-100% as coefficient B with E41.<br />
If the sensor output is unipolar, the PID dancer control operates within the range from 0 to +100%, so virtually<br />
specify the value at -100% as coefficient B.<br />
That is, suppose "b" = "Display value at 0%," then:<br />
Display coefficient B = 2b - A<br />
For details about the PID control, refer to the description of J01 and later.<br />
For the display method of the PID command and its feedback, refer to the description of E43.<br />
• Display coefficient for analog input monitor<br />
By inputting analog signals from various sensors such as temperature sensors in air conditioners to the inverter,<br />
you can monitor the state of peripheral devices via the communications link. By using an appropriate display<br />
coefficient, you can also have various values converted into physical values such as temperature and pressure<br />
before they are displayed.<br />
To set up the analog input monitor, use function codes E61 through E63. Use E43 to choose the item to be<br />
displayed.<br />
E42<br />
LED Display Filter<br />
E42 specifies a filter time constant to be applied for displaying the monitored running status except the speed<br />
monitor (E43 = 0) on the LED monitor on the keypad. If the display fluctuates and is hard to read due to load<br />
fluctuation or other causes, increase this filter time constant.<br />
- Data setting range: 0.0 to 5.0 (s)<br />
4-97
E43 LED Monitor (Item selection) E48 (LED Monitor (Speed monitor item))<br />
E43 specifies the running status item to be monitored and displayed on the LED monitor.<br />
Specifying the speed monitor with E43 provides a choice of speed-monitoring formats selectable with E48 (LED<br />
Monitor).<br />
Monitor item<br />
Display sample<br />
on the LED<br />
monitor<br />
Unit<br />
Meaning of displayed value<br />
Function<br />
code data<br />
for E43<br />
Speed monitor Function code E48 specifies what to be displayed on the LED monitor. 0<br />
Output frequency 1<br />
(before slip<br />
compensation)<br />
Output frequency 2<br />
(after slip<br />
compensation)<br />
Reference<br />
frequency<br />
Hz Frequency actually being output (E48 = 0)<br />
Hz Frequency actually being output (E48 = 1)<br />
Hz Reference frequency being specified (E48 = 2)<br />
<strong>Motor</strong> speed r/min Output frequency (Hz) x<br />
Load shaft<br />
speed<br />
120<br />
P01<br />
(E48 = 3)<br />
r/min Output frequency (Hz) E50 (E48 = 4)<br />
Line speed m/min Output frequency (Hz) E50 (E48 = 5)<br />
Display speed (%) %<br />
Output frequency<br />
Maximum frequency<br />
x 100<br />
(E48 = 7)<br />
Output current A Current output from the inverter in RMS 3<br />
Output voltage V Voltage output from the inverter in RMS 4<br />
Calculated torque %<br />
<strong>Motor</strong> output torque in %<br />
(Calculated value)<br />
Input power kW Input power to the inverter 9<br />
PID command<br />
PID feedback<br />
amount<br />
PID output %<br />
Load factor %<br />
-<br />
-<br />
PID command/feedback amount<br />
transformed to that of virtual physical value<br />
of the object to be controlled (e.g.<br />
temperature)<br />
Refer to function codes E40 and E41 for<br />
details.<br />
10<br />
12<br />
PID output in % as the maximum frequency<br />
being at 100%<br />
Load factor of the motor in % as the rated<br />
output being at 100%<br />
<strong>Motor</strong> output kW <strong>Motor</strong> output in kW 16<br />
Analog input<br />
Torque current %<br />
Magnetic flux<br />
command<br />
-<br />
%<br />
An analog input to the inverter in a format<br />
suitable for a desired scale.<br />
Refer to function codes E40 and E41 for<br />
details.<br />
Torque current command value or<br />
calculated torque current<br />
Magnetic flux command value<br />
(Available only under vector control)<br />
8<br />
14<br />
15<br />
17<br />
23<br />
24<br />
Input watt-hour<br />
kWh<br />
Input watt-hour (kWh)<br />
100<br />
25<br />
4-98
E44<br />
LED Monitor (Display when stopped)<br />
E44 specifies whether the specified value (data = 0) or the output value (data = 1) to be displayed on the LED<br />
monitor of the keypad when the inverter is stopped. The monitored item depends on the E48 (LED monitor, Speed<br />
monitor item) setting as shown below.<br />
Data for<br />
E48<br />
0<br />
1<br />
Monitored item<br />
Output frequency 1<br />
(before slip compensation)<br />
Output frequency 2<br />
(after slip compensation)<br />
What to be displayed when the inverter stopped<br />
E44 = 0 (Specified value)<br />
Reference frequency<br />
Reference frequency<br />
E44 = 1 (Output value)<br />
Output frequency 1<br />
(before slip compensation)<br />
Output frequency 2<br />
(after slip compensation)<br />
2 Reference frequency Reference frequency Reference frequency<br />
3 <strong>Motor</strong> speed Reference motor speed <strong>Motor</strong> speed<br />
4 Load shaft speed Reference load shaft speed Load shaft speed<br />
5 Line speed Reference line speed Line speed<br />
7 Display speed (%) Reference display speed Display Speed<br />
E45<br />
LCD Monitor (Item selection)<br />
E45 specifies the LCD monitor display mode to be applied when the inverter is in Running mode.<br />
Data for E45<br />
Function<br />
0 Running status, rotational direction and operation guide<br />
1 Bar charts for output frequency, current and calculated torque<br />
Example of display for E45 = 0 (during running)<br />
Example of display for E45 = 1 (during running)<br />
Full-scale values on bar charts<br />
Item displayed<br />
Full scale<br />
Output frequency<br />
Maximum frequency<br />
Output current Inverter rated current 200%<br />
Calculated torque <strong>Motor</strong> rated torque 200%<br />
4-99
E46<br />
LCD Monitor (Language selection)<br />
E46 specifies the language to display on the keypad (TP-G1W-J1) as follows:<br />
Data for E46 Language<br />
0 Japanese<br />
1 English<br />
2 German<br />
3 French<br />
4 Spanish<br />
5 Italian<br />
E47<br />
LCD Monitor (Contrast control)<br />
E47 adjusts the contrast of the LCD monitor on the keypad as follows:<br />
Data for E47 0, 1, 2, 3, 4, 5, 6, 7, 8, 9, 10<br />
Contrast Low High<br />
E48 LED Monitor (Speed monitor item) (Refer to E43.) see page 4-98<br />
E50<br />
Coefficient for Speed Indication<br />
E50 specifies the coefficient that is used when the load shaft speed or line speed is displayed on the LED monitor.<br />
(Refer to the description of E43.)<br />
Load shaft speed (r/min) = (E50: Coefficient for speed indication) (Output frequency Hz)<br />
Line speed (m/min) = (E50: Coefficient for speed indication) (Output frequency Hz)<br />
- Data setting range: 0.01 to 200.00<br />
E51<br />
Display Coefficient for Input Watt-hour Data<br />
E51 specifies a display coefficient (multiplication factor) for displaying the input watt-hour data (5_10 ) in a part of<br />
maintenance information on the keypad.<br />
Input watt-hour data = Display coefficient (E51 data) Input watt-hour (kWh)<br />
- Data setting range: 0.000 (cancel/reset); 0.001 to 9999<br />
Setting E51 data to 0.000 clears the input watt-hour and its data to "0." After clearing, be sure to restore<br />
E51 data to the previous value; otherwise, input watt-hour data will not be accumulated.<br />
4-100
E54 Frequency Detection 3 (Level) (Refer to E31.) see page 4-94<br />
E55, E56 Current Detection 3 (Level, Timer) (Refer to E34.) see page 4-95<br />
4-101
E61 to E63 Terminal [12] Extended Function<br />
Terminal [C1] Extended Function<br />
Terminal [V2] Extended Function<br />
As listed below, under torque control, analog inputs through terminals [12], [C1], and [V2] specify the motor speed<br />
limit values. To limit the motor speed to the maximum frequency (F02, A01), apply a full-scale analog input<br />
(maximum input).<br />
It is recommended that this speed limit function be used together with d35 (Overspeed detection level).<br />
Data for E61,<br />
E62, or E63<br />
Input assigned to<br />
[12], [C1] and [V2]:<br />
Description<br />
0 None <br />
1<br />
2<br />
Auxiliary frequency<br />
command 1<br />
Auxiliary frequency<br />
command 2<br />
3 PID command 1<br />
5 PID feedback amount<br />
6 Ratio setting<br />
7 Analog torque limit value A<br />
8 Analog torque limit value B<br />
10 Torque command<br />
11 Torque current command<br />
Auxiliary frequency input to be added to the reference<br />
frequency given by frequency command 1 (F01). This is not<br />
added to any other reference frequencies given by frequency<br />
command 2 and multi-frequency commands, etc.<br />
Auxiliary frequency input to be added to all reference<br />
frequencies given by frequency command 1, frequency<br />
command 2, multi-frequency commands, etc.<br />
Command sources such as temperature and pressure under<br />
PID control. It is also necessary to configure function code<br />
J02.<br />
Feedback amounts such as temperature and pressure under<br />
PID control.<br />
This is used to multiply the final frequency command value by<br />
this value, for use in the constant line speed control by<br />
calculating the winder diameter or in ratio operation with<br />
multiple inverters.<br />
This is used when analog inputs are used as torque limiters.<br />
( Refer to F40 (Torque Limiter 1-1).)<br />
This is used when analog inputs are used as torque limiters.<br />
( Refer to F40 (Torque Limiter 1-1).)<br />
Analog inputs to be used as torque commands under torque<br />
control.<br />
( Refer to H18 (Torque Control).)<br />
Analog inputs to be used as torque current commands under<br />
torque control.<br />
( Refer to H18 (Torque Control).)<br />
17 Speed Limit FWD Speed Limit in Forward Direction<br />
18 Speed Limit REV Speed Limit in Reverse Direction<br />
20<br />
Analog signal input<br />
monitor<br />
By inputting analog signals from various sensors such as the<br />
temperature sensors in air conditioners to the inverter, you can<br />
monitor the state of external devices via the communications<br />
link. By using an appropriate display coefficient, you can also<br />
have various values to be converted into physical values such<br />
as temperature and pressure before they are displayed.<br />
If these terminals have been set up to have the same data, the operation priority is given in the following<br />
order: E61 > E62 > E63<br />
Function codes C31 to C45 (Analog input adjustment) apply to these analog inputs.<br />
4-102
E64<br />
Saving of Digital Reference Frequency<br />
E64 specifies how to save the reference frequency specified in digital formats by the / keys on the keypad<br />
as shown below.<br />
Data for E64<br />
0<br />
1<br />
Function<br />
Automatic saving when the main power is turned OFF<br />
The reference frequency will be automatically saved when the main power is turned OFF.<br />
At the next power-on, the reference frequency at the time of the previous power-off applies.<br />
Saving by pressing key<br />
Pressing the key saves the reference frequency. If the control power is turned OFF<br />
without pressing the key, the data will be lost. At the next power-ON, the inverter uses<br />
the reference frequency saved when the key was pressed last.<br />
E65<br />
Reference Loss Detection (Continuous running frequency)<br />
When the analog frequency command (setting through terminal [12], [C1], or [V2]) has dropped below 10% of the<br />
reference frequency within 400 ms, the inverter presumes that the analog frequency command wire has been<br />
broken and continues its operation at the frequency determined by the ratio specified by E65 to the reference<br />
frequency. Refer to E20 through E24 and E27 (data = 33).<br />
When the frequency command level (in voltage or current) returns to a level higher than that specified by E65, the<br />
inverter presumes that the broken wire has been fixed and continues to run following the frequency command.<br />
In the diagram above, f1 is the level of the analog frequency command sampled at any given time. The sampling is<br />
repeated at regular intervals to continually monitor the wiring connection of the analog frequency command.<br />
- Data setting range: 0 (Decelerate to stop), 20 to 120%, 999 (Disable)<br />
Avoid an abrupt voltage or current change for the analog frequency command. An abrupt change may be<br />
interpreted as a wire break.<br />
Setting E65 data at "999" (Disable) allows the REF OFF signal ("Reference loss detected") to be issued,<br />
but does not allow the reference frequency to change (the inverter runs at the analog frequency<br />
command as specified).<br />
When E65 = "0" or "999," the reference frequency level at which the broken wire is recognized as fixed is<br />
"f1 0.2."<br />
When E65 = "100" (%) or higher, the reference frequency level at which the wire is recognized as fixed is<br />
"f1 1."<br />
The reference loss detection is not affected by the setting of analog input adjustment (filter time<br />
constants: C33, C38, and C43)<br />
4-103
E78, E79<br />
E80, E81<br />
Torque Detection 1 (Level and Timer)<br />
Torque Detection 2/Low Torque Detection (Level and Timer)<br />
E78 specifies the operation level and E79 specifies the timer, for the output signal TD1. E80 specifies the<br />
operation level and E81 specifies the timer, for the output signal TD2 or U-TL.<br />
Output signal Assigned data<br />
Operation level<br />
Timer<br />
Range: 0 to 300% Range: 0.01 to 600.00 s<br />
TD1 46 E78 E79<br />
TD2 47 E80 E81<br />
U-TL 45 E80 E81<br />
• Torque detected 1 -- TD1, Torque detected 2 -- TD2<br />
The output signal TD1 or TD2 comes ON when the torque value calculated by the inverter or torque command<br />
exceeds the level specified by E78 or E80 (Torque detection (Level)) for the period specified by E79 or E81<br />
(Torque detection (Timer)), respectively. The signal turns OFF when the calculated torque drops below "the level<br />
specified by E78 or E80 minus 5% of the motor rated torque." The minimum ON-duration is 100 ms.<br />
• Low output torque detected--U-TL<br />
This output signal comes ON when the torque value calculated by the inverter or torque command drops below<br />
the level specified by E80 (Low torque detection (Level)) for the period specified by E81 (Low torque detection<br />
(Timer)). The signal turns OFF when the calculated torque exceeds the "level specified by E80 plus 5% of the<br />
motor rated torque." The minimum ON-duration is 100 ms.<br />
In the inverter’s low frequency operation, as a substantial error in torque calculation occurs, no low torque can be<br />
detected within the operation range at less than 20% of the base frequency (F04). (In this case, the result of<br />
recognition before entering this operation range is retained.)<br />
The U-TL signal goes off when the inverter is stopped.<br />
Since the motor parameters are used in the calculation of torque, it is recommended that auto-tuning be applied<br />
by function code P04 to achieve higher accuracy.<br />
E98, E99 Terminal [FWD] Function<br />
Terminal [REV] Function<br />
(Refer to E01 to E07.)<br />
4-104
4.2.3 C codes (Control functions)<br />
C01 to C03<br />
C04<br />
Jump Frequency 1, 2 and 3<br />
Jump Frequency (Hysteresis width)<br />
These function codes enable the inverter to jump over three different points on the output frequency in order to<br />
skip resonance caused by the motor speed and natural frequency of the driven machinery (load).<br />
- While increasing the reference frequency, the moment the reference frequency reaches the bottom of the jump<br />
frequency band, the inverter keeps the output at that bottom frequency. When the reference frequency exceeds<br />
the upper limit of the jump frequency band, the internal reference frequency takes on the value of the reference<br />
frequency. When decreasing the reference frequency, the situation will be reversed.<br />
- When more than two jump frequency bands overlap, the inverter actually takes the lowest frequency within the<br />
overlapped bands as the bottom frequency and the highest as the upper limit. Refer to the figure on the lower<br />
right.<br />
• Jump frequencies 1, 2 and 3 (C01, C02 and C03) Data setting range: 0.0 to 500.0 (Hz)<br />
Specify the center of the jump frequency band. (Setting to 0.0 results in no jump frequency band.)<br />
• Jump frequency hysteresis width (C04) Data setting range: 0.0 to 30.0 (Hz)<br />
Specify the jump frequency hysteresis width. (Setting to 0.0 results in no jump frequency band.)<br />
C05 to C19 Multi-frequency 1 to 15<br />
• These function codes specify 15 frequencies required for driving the motor at frequencies 1 to 15.<br />
Turning terminal commands SS1, SS2, SS4 and SS8 ON/OFF selectively switches the reference frequency of the<br />
inverter in 15 steps. To use these features, assign SS1, SS2, SS4 and SS8 ("Select multi-frequency") to the digital<br />
input terminals with C05 to C19 (data = 0, 1, 2, and 3).<br />
4-105
• Multi-frequency 1 to 15 (C05 through C19) Data setting range: 0.00 to 500.00 (Hz)<br />
The combination of SS1, SS2, SS4 and SS8 and the selected frequencies are as follows.<br />
SS8 SS4 SS2 SS1 Selected frequency command<br />
OFF OFF OFF OFF Other than multi-frequency *<br />
OFF OFF OFF ON C05 (multi-frequency 1)<br />
OFF OFF ON OFF C06 (multi-frequency 2)<br />
OFF OFF ON ON C07 (multi-frequency 3)<br />
OFF ON OFF OFF C08 (multi-frequency 4)<br />
OFF ON OFF ON C09 (multi-frequency 5)<br />
OFF ON ON OFF C10 (multi-frequency 6)<br />
OFF ON ON ON C11 (multi-frequency 7)<br />
ON OFF OFF OFF C12 (multi-frequency 8)<br />
ON OFF OFF ON C13 (multi-frequency 9)<br />
ON OFF ON OFF C14 (multi-frequency 10)<br />
ON OFF ON ON C15 (multi-frequency 11)<br />
ON ON OFF OFF C16 (multi-frequency 12)<br />
ON ON OFF ON C17 (multi-frequency 13)<br />
ON ON ON OFF C18 (multi-frequency 14)<br />
ON ON ON ON C19 (multi-frequency 15)<br />
* "Other than multi-frequency" includes frequency command 1 (F01), frequency command 2 (C30) and other<br />
command sources except multi-frequency commands.<br />
Note: SS1, SS2, SS4 and SS8 are assigned to input terminals by parameters E01 through E07.<br />
• When enabling PID control (J01 = 1, 2, or 3)<br />
Under the PID control, a multi-frequency command can be specified as a preset value (3 different frequencies). It<br />
can also be used for a manual speed command even with the PID control being canceled (Hz/PID = ON) or for a<br />
primary reference frequency under the PID dancer control.<br />
• PID command<br />
SS8 SS4 SS1, SS2 Command<br />
OFF OFF – Command specified by J02<br />
OFF ON – Multi-frequency by C08<br />
ON OFF – Multi-frequency by C12<br />
ON ON – Multi-frequency by C16<br />
C08, C12, and C16 can be specified in increments of 1 Hz. The following gives the conversion formula between<br />
the PID command value and the data to be specified.<br />
Data to be specified = PID command (%) Maximum frequency (F03) 100<br />
PID command (%) =<br />
• <strong>Manual</strong> speed command<br />
Data to be specified (C08, C12, C16)<br />
Maximum frequency (F03)<br />
100<br />
SS8, SS4 SS2 SS1 Selected frequency command<br />
– OFF OFF Other than multi-frequency<br />
– OFF ON C05 (Multi-frequency 1)<br />
– ON OFF C06 (Multi-frequency 2)<br />
– ON ON C07 (Multi-frequency 3)<br />
4-106
C20 Jogging Frequency H54, H55 (Acceleration/Deceleration Time, Jogging)<br />
d09 to d13 (Speed Control (Jogging))<br />
To jog or inch the motor for positioning a workpiece, specify the jogging conditions using the jogging-related<br />
function codes (C20, H54, H55, and d09 through d13) beforehand, make the inverter ready for jogging, and then<br />
enter a run command.<br />
• Making the inverter ready for jogging<br />
Turning ON the "Ready for jogging" terminal command JOG (Function code data = 10) readies the inverter for<br />
jogging.<br />
Pressing the " + keys" simultaneously in Running mode also readies the inverter for jogging (when the run<br />
command source is "Keypad" (F02 = 0, 2 or 3)). Pressing these keys toggles between "ready for jogging" and<br />
"normal operation."<br />
Switching between the normal operation state and ready-to-jog state is possible only when the inverter is<br />
stopped.<br />
• Starting jogging<br />
Holding down the or key or turning the input terminal command FWD or REV ON jogs the motor.<br />
In jogging with the or key, the inverter jogs only when the key is held down. Releasing the key decelerates<br />
the motor to a stop.<br />
To start jogging operation by simultaneously entering the JOG terminal command and a run command<br />
(e.g., FWD), the input delay time between the two commands should be within 100 ms. If a run command<br />
FWD is entered first, the inverter does not jog the motor but runs it ordinarily until the next input of the<br />
JOG.<br />
The jogging conditions should be specified beforehand using the following function codes.<br />
Function code Data setting range Description<br />
C20<br />
Jogging Frequency<br />
Reference frequency for jogging<br />
0.00 to 500.00 Hz<br />
operation<br />
H54 Acceleration Time (Jogging) 0.00 to 6000 s Acceleration time for jogging operation<br />
H55 Deceleration Time (Jogging) 0.00 to 6000 s Deceleration time for jogging operation<br />
d09<br />
Speed Control (Jogging)<br />
(Speed command filter)<br />
0.000 to 5.000 s<br />
Speed Control (Jogging)<br />
d10<br />
0.000 to 0.100 s<br />
(Speed detection filter)<br />
Modification items related to speed<br />
control for jogging operation under<br />
Speed Control (Jogging)<br />
d11<br />
0.1 to 200.0 times vector control without/with speed sensor<br />
P (Gain)<br />
For adjustments, refer to the descriptions<br />
Speed Control (Jogging)<br />
d12<br />
0.001 to 9.999 s of d01 to d06.<br />
I (Integral time)<br />
d13<br />
Speed Control (Jogging)<br />
(Output filter)<br />
0.000 to 0.100 s<br />
C30 Frequency Command 2 (Refer to F01.)<br />
C31 to C35<br />
C36 to C39<br />
C41 to C45<br />
Analog Input Adjustment for [12] (Offset, Gain, Filter time constant, Gain base point, Polarity)<br />
Analog Input Adjustment for [C1] (Offset, Gain, Filter time constant, Gain base point)<br />
Analog Input Adjustment for [V2] (Offset, Gain, Filter time constant, Gain base point, Polarity)<br />
Setting up a reference frequency using analog input<br />
(For details about the frequency command, refer to F01 (Frequency Command 1).)<br />
Adjust the gain, polarity, filter time constant, and offset which are applied to analog inputs (voltage inputs to<br />
terminals [12] and [V2], and current input to terminal [C1])<br />
Adjustable items for analog inputs<br />
Input<br />
terminal<br />
Input range<br />
Gain<br />
Gain<br />
Base point<br />
4-107<br />
Polarity<br />
Filter time<br />
constant<br />
Offset<br />
[12] 0 to +10 V, -10 to +10 V C32 C34 C35 C33 C31<br />
[C1] 4 to 20 mA C37 C39 C38 C36<br />
[V2] 0 to +10 V, -10 to +10 V C42 C44 C45 C43 C41
• Offset (C31, C36, C41) Data setting range: -5.0 to +5.0 (%)<br />
C31, C36 or C41 configures an offset for an analog voltage/current input. The offset also applies to signals sent<br />
from the external equipment.<br />
• Filter time constant (C33, C38, C43) Data setting range: 0.00 to 5.00 (s)<br />
C33, C38 or C43 configures a filter time constant for an analog voltage/current input. The larger the time constant,<br />
the slower the response. Specify the proper filter time constant taking into account the response speed of the<br />
machine (load). If the input voltage fluctuates due to line noise, increase the time constant.<br />
• Polarity (C35, C45)<br />
C35 and C45 configure the input range for analog input voltage.<br />
Data for C35 and C45<br />
Specifications for terminal inputs<br />
0 -10 to +10 V<br />
1 0 to +10 V (A minus component of the input will be regarded as 0 VDC.)<br />
• Gain<br />
To input bipolar analog voltage (0 to ±10 VDC) to terminals [12] and [V2], set C35 and C45 data to "0."<br />
Setting C35 and C45 data to "1" enables the voltage range from 0 to +10 VDC and interprets the negative<br />
polarity input from 0 to -10 VDC as 0 V.<br />
C40<br />
Terminal [C1] Range Selection<br />
C40 specifies the range of the input current signal on terminal [C1] as listed below.<br />
Data for C40<br />
Range of Input Current<br />
Signal<br />
on Terminal [C1]<br />
0 4 to 20 mA<br />
1 0 to 20 mA<br />
C50 Bias (Frequency command 1) (Bias base point) (Refer to F01.)<br />
C51, C52 Bias (PID command 1) (Bias value and Bias base point)<br />
These function codes (and the gain-related function codes) specify the gain and bias of the analog PID command<br />
1, enabling it to define arbitrary relationship between the analog input and PID commands.<br />
The actual setting is the same as that of F18. For details, refer to F18 given in the description of F01.<br />
Gain-related function codes C32, C34, C37, C39, C42, and C44 are shared by frequency commands.<br />
• Bias value (C51) Data setting range: -100.00 to 100.00 (%)<br />
• Bias base point (C52) Data setting range: 0.00 to 100.00 (%)<br />
C53 Selection of Normal/Inverse Operation (Frequency command 1) (Refer to E01 to E07.)<br />
4-108
4.2.4 P codes (<strong>Motor</strong> 1 Parameters)<br />
The <strong>EQ7</strong> drives the motor under V/f control, dynamic torque control, vector control without speed sensor, or vector<br />
control with speed sensor, which can be selected with function codes.<br />
To use the integrated automatic control functions such as auto torque boost, torque calculation monitoring,<br />
auto-energy saving operation, torque limiter, automatic deceleration (anti-regenerative control), auto search for<br />
idling motor speed, slip compensation, torque vector control, droop control, and overload stop, it is necessary to<br />
build a motor model in the inverter by specifying proper motor parameters including the motor capacity and rated<br />
current.<br />
The <strong>EQ7</strong> provides built-in motor parameters for HP matched motors. To use these motors, it is sufficient to specify<br />
motor parameters for P99 (<strong>Motor</strong> 1 Selection). If the cabling between the inverter and the motor is long (generally,<br />
66 ft (20 m) or longer) or a reactor is inserted between the motor and the inverter, however, the apparent motor<br />
parameters will change, so auto-tuning or other adjustments are necessary. For the auto-tuning procedure, refer<br />
to Chapter 3 "RUNNING THE MOTOR."<br />
When using a motor made by other manufacturers or a non-standard motor, obtain the datasheet of the motor and<br />
specify the motor parameters manually or perform auto-tuning.<br />
To specify the motor parameters correctly, select the motor type with P99 (<strong>Motor</strong> 1 Selection), specify the motor<br />
rated capacity with P02, and then initialize the motor parameters with H03. This procedure also applies when the<br />
inverter is switched to the MD/HD mode and a motor with one or two ranks lower capacity is used. When switching<br />
the motor between the 1st to 4th motors, specify the corresponding function codes. (Refer to the description of<br />
A42.)<br />
The motor parameters to be specified in P13 through P56 (such as iron loss factors and magnetic saturation<br />
factors) are usually not shown on the motor nameplate or in the test report.<br />
If auto-tuning (P04 = 2 or 3) is not performed, it is not necessary to change the motor parameters from the ones for<br />
a standard motor.<br />
P01<br />
<strong>Motor</strong> 1 (No. of poles)<br />
P01 specifies the number of poles of the motor. Enter the value given on the nameplate of the motor. This setting<br />
is used to monitor the motor speed (see E43) and control the speed. The following expression is used for the<br />
conversion.<br />
<strong>Motor</strong> speed (r/min) =<br />
120<br />
No. of poles<br />
Frequency (Hz)<br />
- Data setting range: 2 to 22 (poles)<br />
P02<br />
<strong>Motor</strong> 1 (Rated capacity)<br />
P02 specifies the rated capacity of the motor. Enter the rated value given on the nameplate of the motor.<br />
Data for P02 Unit Function<br />
HP When P99 (<strong>Motor</strong> 1 Selection) = 1<br />
0.01 to 1000<br />
kW When P99 (<strong>Motor</strong> 1 Selection) = 0, 2, 3 or 4<br />
When accessing function code P02 with the keypad, take into account that the P02 data automatically updates the<br />
data of function codes P03, P06 through P23, P53 through P56, and H46.<br />
P03<br />
<strong>Motor</strong> 1 (Rated current)<br />
P03 specifies the rated current of the motor. Enter the rated value given on the nameplate of the motor.<br />
- Data setting range: 0.00 to 2000 (A)<br />
4-109
P04<br />
<strong>Motor</strong> 1 (Auto-tuning)<br />
The inverter automatically detects the motor parameters and saves them in its internal memory. Basically, it is not<br />
necessary to perform tuning when using a HP rating motor with a standard connection with the inverter.<br />
There are three types of auto-tuning as listed below. Select appropriate one considering the limitations in your<br />
equipment and control mode.<br />
Data for P04 Auto-tuning Operation <strong>Motor</strong> parameters to be tuned<br />
0 Disable N/A N/A<br />
1<br />
2<br />
3<br />
Tune while the<br />
motor stops<br />
Tune while the<br />
motor is rotating<br />
under V/f control<br />
Tune while the<br />
motor is rotating<br />
under vector<br />
control<br />
The inverter performs<br />
tuning while the motor is<br />
stopped.<br />
After tuning while the motor<br />
is stopped, the inverter<br />
performs tuning again, with<br />
the motor running at 50% of<br />
the base frequency.<br />
After tuning while the motor<br />
is stopped, the inverter<br />
performs tuning, with the<br />
motor running at 50% of the<br />
base frequency twice.<br />
Primary resistance (%R1) (P07)<br />
Leakage reactance (%X) (P08)<br />
Rated slip frequency (P12)<br />
%X correction factors 1 and 2 (P53 and<br />
P54)<br />
No-load current (P06)<br />
Primary resistance (%R1) (P07)<br />
Leakage reactance (%X) (P08)<br />
Rated slip frequency (P12)<br />
Magnetic saturation factors 1 to 5 (P16 to<br />
P20)<br />
Magnetic saturation extension factors "a" to<br />
"c" (P21 through P23)<br />
%X correction factors 1 and 2 (P53 and<br />
P54)<br />
No-load current (P06)<br />
Primary resistance (%R1) (P07)<br />
Leakage reactance (%X) (P08)<br />
Rated slip frequency (P12)<br />
Magnetic saturation factors 1 to 5 (P16 to<br />
P20)<br />
Magnetic saturation extension factors "a" to<br />
"c" (P21 to P23)<br />
%X correction factors 1 and 2 (P53 and<br />
P54)<br />
For details of auto-tuning, refer to Chapter 5, "Check <strong>Motor</strong> Rotation and Direction".<br />
In any of the following cases, perform auto-tuning since the motor parameters are different from those of<br />
standard motors so that the best performance cannot be obtained under some controls.<br />
• The motor to be driven is a non-standard motor.<br />
• Cabling between the motor and the inverter is long. (Generally, 66 ft (20 m) or longer)<br />
• A reactor is inserted between the motor and the inverter.<br />
• Functions that are affected by motor parameters in running capability<br />
Function<br />
Auto torque boost<br />
Output torque monitor<br />
Load factor monitor<br />
Auto energy saving operation<br />
Torque limiter<br />
Anti-regenerative control (Automatic deceleration)<br />
Auto search<br />
Slip compensation<br />
Dynamic torque control<br />
Droop control<br />
Torque detection<br />
Vector control without/with speed sensor<br />
Brake Signal (Brake-OFF torque)<br />
Related function codes (representative)<br />
F37<br />
F31, F35<br />
F31, F35<br />
F37<br />
F40, F41<br />
H69<br />
H09<br />
F42<br />
F42<br />
H28<br />
E78 to E81<br />
F42<br />
J95<br />
4-110
P05, A19 <strong>Motor</strong> 1 / 2 (Online tuning)<br />
Long run under "Dynamic torque control" or "Slip compensation control" causes motor temperature change,<br />
varying the motor parameters. This changes the motor speed compensation amount, resulting in motor speed<br />
deviation from the initial rotating speed.<br />
Enabling online tuning identifies motor parameters covering the motor temperature change to decrease the motor<br />
speed fluctuation.<br />
To perform online tuning enabled with P05/A19, set P04 (Auto-tuning) to "2."<br />
Note: Online tuning can be performed only when F42 = 1 (Dynamic torque control) or when F42 = 2<br />
(V/f control with slip compensation active) and F37 = 2 or 5 (Auto torque boost).<br />
A46, d04<br />
d12<br />
Speed Control 2, Speed Control 1,<br />
Speed Control (Jogging) (Integral time)<br />
These function codes are used to configure the Automatic Speed Regulator (ASR) by selecting the PI controller or<br />
P controller.<br />
Setting the function code data to "999" selects the P controller.<br />
P06 to P08 <strong>Motor</strong> 1 (No-load current, %R1 and %X)<br />
P06 through P08 specify no-load current, %R1 and %X, respectively. Obtain the appropriate values from the test<br />
report of the motor or by calling the manufacturer of the motor.<br />
Performing auto-tuning automatically sets these parameters.<br />
• No-load current (P06)<br />
Enter the value obtained from the motor manufacturer.<br />
• %R1 (P07)<br />
Enter the value calculated by the following expression.<br />
R1 Cable R1<br />
%R1 <br />
×100 (%)<br />
V / ( 3 × I )<br />
where,<br />
R1: Primary resistance of the motor ()<br />
Cable R1: Resistance of the output cable ()<br />
V: Rated voltage of the motor (V)<br />
I: Rated current of the motor (A)<br />
• %X (P08)<br />
Enter the value calculated by the following expression.<br />
X1 X2 × XM / (X2 XM) Cable X<br />
%X <br />
×100 (%)<br />
V / ( 3 × I )<br />
where,<br />
X1: Primary leakage reactance of the motor ()<br />
X2: Secondary leakage reactance of the motor (converted to primary) ()<br />
XM: Exciting reactance of the motor ()<br />
Cable X: Reactance of the output cable ()<br />
V: Rated voltage of the motor (V)<br />
I: Rated current of the motor (A)<br />
For reactance, use the value at the base frequency (F04).<br />
4-111
P09 to P11 <strong>Motor</strong> 1 (Slip compensation gain for driving, Slip compensation response time, and<br />
Slip compensation gain for braking)<br />
P09 and P11 determine the slip compensation amount in % for driving and braking individually and adjust the slip<br />
amount from internal calculation. Specification of 100% fully compensates for the rated slip of the motor.<br />
Excessive compensation (P09, P11 100%) may cause hunting (undesirable oscillation of the system), so<br />
carefully check the operation on the actual machine.<br />
P10 determines the response time for slip compensation. Basically, there is no need to modify the default setting.<br />
If you need to modify it, consult your <strong>TECO</strong>-<strong>Westinghouse</strong> <strong>Motor</strong> <strong>Company</strong> representatives.<br />
P09<br />
P11<br />
P10<br />
Function codes<br />
Slip compensation gain for<br />
driving<br />
Slip compensation gain for<br />
braking<br />
Slip compensation response<br />
time<br />
Operation (Slip compensation)<br />
Adjust the slip compensation amount for driving.<br />
Slip compensation amount for driving =<br />
Rated slip x Slip compensation gain for driving<br />
Adjust the slip compensation amount for braking.<br />
Slip compensation amount for braking =<br />
Rated slip x Slip compensation gain for braking<br />
Specify the slip compensation response time. Basically,<br />
there is no need to modify the default setting.<br />
For details about the slip compensation control, refer to the description of F42.<br />
P12<br />
<strong>Motor</strong> 1 (Rated slip frequency)<br />
P12 specifies rated slip frequency. Obtain the appropriate values from the test report of the motor or by calling the<br />
manufacturer of the motor. Performing auto-tuning automatically sets these parameters.<br />
• Rated slip frequency: Convert the value obtained from the motor manufacturer to Hz using the following<br />
expression and enter the converted value. (Note: The motor rating given on the nameplate<br />
sometimes shows a larger value.)<br />
(Synchronous speed - Rated<br />
Rated slip frequency (Hz) =<br />
speed)<br />
Base frequency<br />
Synchronous speed<br />
For details about the slip compensation control, refer to the description of F42.<br />
P13 to P15 <strong>Motor</strong> 1 (Iron loss factors 1 to 3)<br />
P13 to P15 compensates the iron loss caused inside the motor under vector control with speed sensor, in order to<br />
improve the torque control accuracy.<br />
The combination of P99 (<strong>Motor</strong> 1 selection) and P02 (<strong>Motor</strong> 1 rated capacity) data determines the standard value.<br />
Basically, there is no need to modify the setting.<br />
P16 to P20<br />
P21 to P23<br />
<strong>Motor</strong> 1 (Magnetic saturation factors 1 to 5)<br />
<strong>Motor</strong> 1 (Magnetic saturation extension factors "a" to "c")<br />
These function codes specify the characteristics of the exciting current to generate magnetic flux inside the motor<br />
and the characteristics of the magnetic flux generated.<br />
The combination of P99 (<strong>Motor</strong> 1 selection) and P02 (<strong>Motor</strong> 1 rated capacity) data determines the standard value.<br />
Performing auto-tuning while the motor is rotating (P04 = 2 or 3) specifies these factors automatically.<br />
4-112
P53, P54 <strong>Motor</strong> 1 (%X correction factors 1 and 2)<br />
P53 and P54 specify the factors to correct fluctuations of leakage reactance (%X).<br />
Basically, there is no need to modify the setting.<br />
P55<br />
<strong>Motor</strong> 1 (Torque current under vector control)<br />
P55 specifies the rated torque current under vector control without/with speed sensor.<br />
The combination of P99 (<strong>Motor</strong> 1 selection) and P02 (<strong>Motor</strong> 1 rated capacity) data determines the standard value.<br />
Basically, there is no need to modify the setting.<br />
P56<br />
<strong>Motor</strong> 1 (Induced voltage factor under vector control)<br />
P56 specifies the induced voltage factor under vector control without/with speed sensor.<br />
The combination of P99 (<strong>Motor</strong> 1 Selection) and P02 (<strong>Motor</strong> 1, Rated capacity) data determines the standard<br />
value. Basically, there is no need to modify the setting.<br />
P99<br />
<strong>Motor</strong> 1 Selection<br />
P99 specifies the motor type to be used.<br />
Data for P99<br />
0 <strong>Motor</strong> characteristics 0 (Reserved)<br />
<strong>Motor</strong> type<br />
1 <strong>Motor</strong> characteristics 1 (HP rating motors)<br />
2 <strong>Motor</strong> characteristics 2 (Reserved )<br />
3 <strong>Motor</strong> characteristics 3 (Reserved)<br />
4 <strong>Motor</strong> characteristics 4 (kW rating motors)<br />
To select the motor drive control or to run the inverter with the integrated automatic control functions such as auto<br />
torque boost and torque calculation monitoring, it is necessary to specify the motor parameters correctly. First<br />
select the motor type to be used with P99, specify the motor rated capacity with P02, and then initialize the motor<br />
parameters with H03. This process automatically configures the related motor parameters (P01, P03, P06 through<br />
P23, P53 through P56, and H46).<br />
The data of F09 (Torque Boost 1), H13 (Restart Mode after Momentary Power Failure (Restart time)), and F11<br />
(Electronic Thermal Overload Protection for <strong>Motor</strong> 1, Overload detection level) depends on the motor capacity, but<br />
the process stated above does not change them. Specify and adjust the data during a test run if needed.<br />
Refer to the user manual for function code descriptions not covered in this section.<br />
4-113
Chapter 5 Check <strong>Motor</strong> Rotation and Direction<br />
This test is to be performed solely from the <strong>EQ7</strong> drive keypad. Apply power to the <strong>EQ7</strong> drive after all the electrical<br />
connections have been made and protective covers have been re-attached. At this point, DO NOT RUN THE<br />
MOTOR, the keypad should display as shown below in Fig. 5.1 and the speed reference 0.00 should be blinking.<br />
Important: <strong>Motor</strong> rotation and direction only applies to standard AC motors with a base frequency of 60Hz.<br />
Fig 5.1: Keypad (Stopped)<br />
Fig 5.2: Keypad (Running)<br />
Next use the and keys to set a speed reference of 10.00 Hz, then press the key, see Fig 5.2.<br />
The motor should now be operating at low speed running in forward (clockwise) direction.<br />
Next press<br />
key to stop the motor.<br />
If the motor rotation is incorrect, power down the <strong>EQ7</strong> drive.<br />
After the power has been turned OFF, wait at least ten minutes until the charge indicator extinguishes<br />
completely before touching any wiring, circuit boards or components.<br />
Using Safety precaution, and referring to Fig.2.23, exchange any two of the three output leads to the motor (U/T1,<br />
V/T2 and W/T3). After the wiring change, repeat this step and recheck motor direction.<br />
5-1
Chapter 6 Speed Reference Command Configuration<br />
The <strong>EQ7</strong> Drive offers users several choices to set the speed reference source. The most commonly used methods<br />
are described in the next sections.<br />
Frequency reference command is selected with parameter F01.<br />
F01 Frequency Command 1<br />
This function sets the frequency command source.<br />
Setting Range: 0 to 12<br />
To set parameter F01:<br />
- Press PRG key, next select QUICK SET or DATA SET with UP/DOWN and keys and press the<br />
FUNC/DATA key.<br />
- In the parameter list move cursor to F01 with UP/DOWN keys and press FUNC/DATA key to select.<br />
Data for F01<br />
0<br />
1<br />
2<br />
3<br />
5<br />
7<br />
8<br />
11<br />
12<br />
Enable / keys on the keypad.<br />
Function<br />
Enable the voltage input to terminal [12] (0 to 10 VDC, maximum frequency obtained at 10<br />
VDC).<br />
Enable the current input to terminal [C1] (0 to +20mA, +4 to +20 mA DC, maximum frequency<br />
obtained at +20 mA DC). (SW5 on the control PCB should be turned to the C1 side (factory<br />
default).<br />
Enable the sum of voltage (0 to 10 VDC) and current inputs (+4 to +20 mA DC) given to<br />
terminals [12] and [C1], respectively. See the two items listed above for the setting range and the<br />
value required for maximum frequencies. (SW5 on the control PCB should be turned to the C1<br />
side (factory default).)<br />
Note: If the sum exceeds the maximum frequency (F03), the maximum frequency will apply.<br />
Enable the voltage input to terminal [V2] (-10 to ±10 VDC, maximum frequency obtained at ±10<br />
VDC).<br />
Enable UP and DOWN commands assigned to the digital input terminals.<br />
The UP command (any of E01 to E07 = 17) and DOWN command (any of E01 to E07 = 18)<br />
should be assigned to any of digital input terminals [X1] to [X7].<br />
For details, refer to the descriptions of E01 through E07.<br />
Enable / keys on the keypad (balanceless-bumpless switching available).<br />
Enable a digital input interface card (option).<br />
(For details, refer to the Digital Input Interface Card <strong>Instruction</strong> <strong>Manual</strong>.)<br />
Enable the "Pulse train input" PIN command assigned to digital input terminal [X7]<br />
(E07 = 48), or a PG interface card (option).<br />
6.1 Reference from Keypad (Default Setting, F01 = 0)<br />
Speed reference from digital operator (Keypad) is the default setting. Use the and keys to change the speed<br />
reference.<br />
6-1
6.2 Reference from External Analog Signal (0 - 10V / 0 – 20mA / 4 - 20mA)<br />
Analog Reference: 0 – 10 V (Setting F01 = 1)<br />
Common/0V, T11 Analog Input T12<br />
Control Terminals /<br />
User Terminals<br />
G<br />
Connect shield to<br />
ground terminal<br />
- +<br />
0 – 10 V<br />
Analog Reference: Potentiometer / Speed Pot (Setting F01 = 1):<br />
Common/0V, T11<br />
G<br />
+10VDC, T13<br />
Analog Input T12<br />
Control Terminals /<br />
User Terminals<br />
Connect shield to<br />
ground terminal<br />
Potentiometer<br />
1 ~ 5K Ohm<br />
6-2
Analog Reference: 0 – 20mA / 4 – 20mA (Setting F01 = 2)<br />
Common/0V, T11 Analog Input C1<br />
Control Terminals /<br />
User Terminals<br />
G<br />
Connect shield to<br />
ground terminal<br />
- +<br />
0 – 20mA / 4 – 20mA<br />
Note: When using a 0 – 20mA signal set parameter C40 to 1.<br />
6-3
6.3 Reference from Serial Communication RS485 Port 2 (H30 = 6 or 8)<br />
Control Terminals /<br />
User Terminals<br />
RS485 PLC / Computer Connection<br />
+<br />
-<br />
RS485 Port 2<br />
DX+<br />
DX-<br />
SD<br />
Cable<br />
Shield<br />
To set the speed reference for the <strong>EQ7</strong> drive via serial communication parameter H30 has be set to either a “4” for<br />
frequency command via serial communication only or to “8” for Run Command and Frequency Reference<br />
(Frequency Command).<br />
Default Communication Setting is: Address “1”, 9600 Bits/sec, 1 Start Bit, 1 Stop Bit, and No Parity<br />
H30<br />
Communications Link Function<br />
This function sets the communication link function to select run/stop and frequency reference control.<br />
Setting range: 0 to 8<br />
To set parameter H30:<br />
- Press PRG key, next select QUICK SET or DATA SET with UP/DOWN and keys and press the<br />
FUNC/DATA key.<br />
- In the parameter list move cursor to H30 with UP/DOWN keys and press FUNC/DATA key to select.<br />
The serial communication link function uses RS485 Modbus RTU protocol and allows for:<br />
1) Monitoring (data monitoring, function data check).<br />
2) Frequency setting.<br />
3) Operation command (FWD, REV, and other commands for digital input).<br />
4) Write function data.<br />
6-4
H30<br />
Communications Link Function<br />
Set value Frequency command Run command (Run/Stop)<br />
0 F01 / C30 F02<br />
1 Enabled / RS485 (Port 1) F02<br />
2 F01 / C30 Enabled / RS485 (Port 1)<br />
3 Enabled / RS485 (Port 1) Enabled / RS485 (Port 1)<br />
4 Enabled / RS485 (Port 2) F02<br />
5 Enabled / RS485 (Port 2) Enabled / RS485 (Port 1)<br />
6 F01 / C30 Enabled / RS485 (Port 2)<br />
7 Enabled / RS485 (Port 1) Enabled / RS485 (Port 2)<br />
8 Enabled / RS485 (Port 2) Enabled / RS485 (Port 2)<br />
Frequency Reference Command Register<br />
<strong>EQ7</strong> Drive Frequency Reference Register: 1797 (Decimal) - Bit 0 – Bit 15: 0.00 ~ 120.00 Hz<br />
Examples:<br />
Frequency Reference Command: 10.00 Hz (<strong>EQ7</strong> Drive Address: 01)<br />
Command String (hexadecimal): 01 06 07 05 03 E8 98 01<br />
To set the frequency reference to 10.00, a value of ‘1000’ (03E8h) has to be send to the <strong>EQ7</strong> Drive<br />
Frequency Reference Command: 30.00 Hz (<strong>EQ7</strong> Drive Address: 01)<br />
Command String (hexadecimal): 01 06 07 05 0B B8 9F FD<br />
To set the frequency reference to 30.00, a value of ‘3000’ (0BB8h) has to be send to the <strong>EQ7</strong> Drive<br />
Frequency Reference Command: 60.00 Hz (<strong>EQ7</strong> Drive Address: 01)<br />
Command String (hexadecimal): 01 06 07 05 17 70 96 AB<br />
To set the frequency reference to 60.00, a value of ‘6000’ (1770h) has to be send to the <strong>EQ7</strong> Drive<br />
Note: The last 2 bytes of the command strings consist of a CRC16 checksum, please refer to the Refer to the <strong>EQ7</strong><br />
Communications <strong>Manual</strong> for additional information.<br />
6-5
Chapter 7 Operation Method Configuration (Run / Stop)<br />
The <strong>EQ7</strong> Drive offers users several choices to run and stop the drive from different sources. The most commonly<br />
used methods are described in the next sections.<br />
F02<br />
Operation Method<br />
This function sets the operation method (Run/Stop) source.<br />
Setting Range: 0 – 3<br />
To set parameter F02:<br />
- Press PRG key, next select QUICK SET or DATA SET with UP/DOWN and keys and press the<br />
FUNC/DATA key.<br />
- In the parameter list move cursor to F02 with UP/DOWN keys and press FUNC/DATA key to select.<br />
Data for<br />
F02<br />
0 Keypad<br />
1<br />
2<br />
3<br />
Run Command<br />
Terminal command FWD or<br />
REV<br />
Keypad<br />
(Forward rotation)<br />
Keypad<br />
(Reverse rotation)<br />
Description<br />
Enables the , , and keys to run the motor in the<br />
forward and reverse directions, and stop the motor.<br />
Enables input terminal commands FWD and REV to run<br />
the motor in the forward and reverse directions, and stop<br />
the motor.<br />
Enables the and keys to run the motor in the forward<br />
direction and stop it. Running the motor in the reverse<br />
direction is not possible.<br />
Enables the and keys to run the motor in the reverse<br />
direction and stop it. Running the motor in the forward<br />
direction is not possible.<br />
7.1 Run/Stop from Keypad (Default Setting, F02 = 0)<br />
Run from digital operator (Keypad) is the default setting.<br />
Use the key to run the drive in forward direction and the key to run the <strong>EQ7</strong> drive in reverse direction. (Note: to<br />
disable reverse direction set parameter H08 to 1)<br />
Press<br />
key to stop the <strong>EQ7</strong> drive. (Note: Stop method can be set with parameter H07, default is ramp to stop).<br />
7-1
7.2 Run/Stop from External Switch / Contact or Pushbutton (F02 = 1)<br />
Use an external contact or switch to Run and Stop the <strong>EQ7</strong> drive.<br />
Permanent Switch / Contact<br />
Control Terminals /<br />
User Terminals<br />
Common/CM<br />
Forward Command/FWD<br />
START / STOP SWITCH (Maintained)<br />
G<br />
Connect shield to<br />
ground terminal<br />
7-2
Momentary Contacts (Push Buttons)<br />
Use push button / momentary switch to Run and Stop the <strong>EQ7</strong> drive.<br />
F02 Operation Method = 1<br />
E07 Terminal [X7] Function = 6<br />
Control Terminals /<br />
User Terminals<br />
G<br />
Connect shield to<br />
ground terminal<br />
Common/CM<br />
START<br />
PUSH BUTTON<br />
(Momentary)<br />
Forward<br />
Command/FWD<br />
STOP<br />
PUSH BUTTON<br />
(Momentary)<br />
X7<br />
Programmed to<br />
Hold Function<br />
Note: Stop method can be set with parameter H07, default is ramp to stop.<br />
7-3
7.3 Run/Stop from Serial Communication RS485 Port 2 (H30 = 6 or 8)<br />
Control Terminals /<br />
User Terminals<br />
RS485 PLC / Computer Connection<br />
+<br />
-<br />
RS485 Port 2<br />
DX+<br />
DX-<br />
SD<br />
Cable<br />
Shield<br />
To Run/Stop (Operation Command) the <strong>EQ7</strong> drive via serial communication parameter H30 has be set to either a “6”<br />
for Run/Stop via serial communication only or to “8” for Run/Stop (Operation Command) and Frequency Reference<br />
(Frequency Command).<br />
Default Communication Setting is: Address “1”, 9600 Bits/sec, 1 Start Bit, 1 Stop Bit, and No Parity<br />
H30<br />
Communications Link Function<br />
This function sets the communication link function to select run/stop and frequency reference control.<br />
Setting range: 0 to 8<br />
To set parameter H30:<br />
- Press PRG key, next select QUICK SET or DATA SET with UP/DOWN and keys and press the<br />
FUNC/DATA key.<br />
- In the parameter list move cursor to H30 with UP/DOWN keys and press FUNC/DATA key to select.<br />
The serial communication link function uses RS485 Modbus RTU protocol and allows for:<br />
1) Monitoring (data monitoring, function data check).<br />
2) Frequency setting.<br />
3) Operation command (FWD, REV, and other commands for digital input).<br />
4) Write function data.<br />
7-4
H30<br />
Communications Link Function<br />
Set value Frequency command Run command (Run/Stop)<br />
Command Register<br />
0 F01 / C30 F02<br />
1 Enabled / RS485 (Port 1) F02<br />
2 F01 / C30 Enabled / RS485 (Port 1)<br />
3 Enabled / RS485 (Port 1) Enabled / RS485 (Port 1)<br />
4 Enabled / RS485 (Port 2) F02<br />
5 Enabled / RS485 (Port 2) Enabled / RS485 (Port 1)<br />
6 F01 / C30 Enabled / RS485 (Port 2)<br />
7 Enabled / RS485 (Port 1) Enabled / RS485 (Port 2)<br />
8 Enabled / RS485 (Port 2) Enabled / RS485 (Port 2)<br />
<strong>EQ7</strong> Drive Command Register: 1798 (Decimal)<br />
Bit 0: Run Forward<br />
Bit 1: Run Reverse<br />
Bit 2 ~ Bit 15: Refer to the <strong>EQ7</strong> Drive AC Drive <strong>Instruction</strong> <strong>Manual</strong><br />
Examples:<br />
Run Forward Command (<strong>EQ7</strong> Drive Address: 01)<br />
Command String (hexadecimal): 01 06 07 06 00 01 A9 7F<br />
Run Reverse Command (<strong>EQ7</strong> Drive Address: 01)<br />
Command String (hexadecimal): 01 06 07 06 00 02 E9 7E<br />
Stop Command (<strong>EQ7</strong> Drive Address: 01)<br />
Command String (hexadecimal): 01 06 07 06 00 00 68 BF<br />
Note: The last 2 bytes of the command strings consist of a CRC16 checksum, please refer to the Refer to the <strong>EQ7</strong><br />
Communications <strong>Manual</strong> for additional information.<br />
7-5
Chapter 8 <strong>Motor</strong> and Application Specific Settings<br />
It is essential that before running the motor, the motor nameplate data matches the motor data in the <strong>EQ7</strong> drive.<br />
8.1 Set <strong>Motor</strong> Name Plate Data (P02, P03, F11)<br />
P02<br />
<strong>Motor</strong> 1 (Capacity)<br />
The nominal motor rated capacity is set at the factory. Please verify that the motor name plate data matches the<br />
motor rated capacity shown in parameter P02. The setting should only be changed when driving a motor with a<br />
different capacity.<br />
Range: 0.01 to 1000 HP<br />
To set parameter P02:<br />
- Press PRG key, next select QUICK SET or DATA SET with UP/DOWN and keys and press the<br />
FUNC/DATA key.<br />
- In the parameter list move cursor to P02 with UP/DOWN keys and press FUNC/DATA key to select.<br />
Note: For kW rating motor set P99 to 4.<br />
Default values vary based on the <strong>EQ7</strong> drive model.<br />
The motor rated current is set at the factory based on the <strong>EQ7</strong> drive model. Enter the motor rated current from the<br />
motor nameplate if it does not match the value shown in parameter P3.<br />
P03<br />
<strong>Motor</strong> 1 (Rated Current)<br />
This function sets the rated current value of motor 1.<br />
Setting range: 0.00 to 2,000A<br />
To set parameter P03:<br />
- Press PRG key, next select QUICK SET or DATA SET with UP/DOWN and keys and press the<br />
FUNC/DATA key.<br />
- In the parameter list move cursor to P03 with UP/DOWN keys and press FUNC/DATA key to select.<br />
F11<br />
Overload Detection Level<br />
This function sets the operation current level for the electronic thermal O/L. Verify that the motor FLA on the motor<br />
nameplate matches the overload level shown in parameter F11<br />
Setting range: 1 to 135% of the rated current of the inverter.<br />
To set parameter F11:<br />
- Press PRG key, next select QUICK SET or DATA SET with UP/DOWN and keys and press the<br />
FUNC/DATA key.<br />
- In the parameter list move cursor to F11 with UP/DOWN keys and press FUNC/DATA key to select.<br />
8-1
8.2 Acceleration and Deceleration Time (F07 / F08)<br />
Acceleration and Deceleration times directly control the system dynamic response. In general, the longer the<br />
acceleration and deceleration time, the slower the system response, and the shorter time, the faster the response. An<br />
excessive amount of time can result in sluggish system performance while too short of a time may result in system<br />
instability.<br />
The default values suggested normally result in good system performance for the majority of general purpose<br />
applications. If the values need to be adjusted, caution should be exercised, and the changes should be in small<br />
increments to avoid system instability.<br />
F07 Acceleration Time 1<br />
F08 Deceleration Time 1<br />
These parameters set the acceleration and deceleration times of the output frequency from 0 to maximum frequency<br />
and from maximum frequency to 0.<br />
Setting range: 0.01 to 3600 Sec.<br />
To set parameter F07/F08:<br />
- Press PRG key, next select QUICK SET or DATA SET with UP/DOWN and keys and press the<br />
FUNC/DATA key.<br />
- In the parameter list move cursor to F07/F08 with UP/DOWN keys and press FUNC/DATA key to select.<br />
Acceleration and deceleration times are represented by the three most significant (high order) digits. Set acceleration<br />
and deceleration times with respect to maximum frequency. The relationship between the set frequency value and<br />
acceleration/deceleration times is as follows:<br />
Output frequency<br />
Maximum frequency<br />
Set frequency<br />
Output frequency<br />
Maximum frequency<br />
Set frequency<br />
Time<br />
Time<br />
Acceleration time<br />
Deceleration time<br />
Acceleration time<br />
Deceleration time<br />
Set Frequency = Maximum Frequency<br />
Set Frequency < Maximum Frequency<br />
Note: If the set acceleration and deceleration times are set too low, the torque limiting function or stall prevention<br />
function can become activated if the load torque and or inertia are relatively high. This will prolong the acceleration<br />
and or deceleration times and not allow the set times to be followed. In this case the acceleration and or the<br />
deceleration times should be adjusted.<br />
8-2
8.3 Torque Boost (F09, Default 0.1)<br />
IMPORTANT: PARAMETER IS REQUIRED TO BE CHANGED FOR CONSTANT TORQUE APPLICATIONS.<br />
This parameter sets the relationship between output frequency and output voltage. Constant torque applications have<br />
the same torque requirements at low speed as well as at high speed.<br />
See parameter F37 to select Load Selection / Auto Torque Boost.<br />
Initial Setup<br />
For variable Torque / Low Duty applications set parameter F09 to an initial value of 1.0.<br />
For Constant Torque / Medium Duty applications set parameter F09 to an initial value of 2.0.<br />
F09<br />
Torque Boost<br />
This parameter sets the torque boost for motor 1.<br />
Setting range: 0.0 to 20.0<br />
To set parameter F09:<br />
- Press PRG key, next select QUICK SET or DATA SET with UP/DOWN and keys and press the<br />
FUNC/DATA key.<br />
- In the parameter list move cursor to F09 with UP/DOWN keys and press FUNC/DATA key to select.<br />
Setting range<br />
0.0<br />
Characteristics selected<br />
Automatic torque boost characteristic where the torque boost value of a constant torque load (a linear<br />
change) is automatically adjusted.<br />
The motor tuning (P04 / A13) should be set to "2" for this function to be valid.<br />
0.1 to 0.9 Square law reduction torque for fan and pump loads.<br />
1.0 to 1.9<br />
Proportional torque for middle duty loads between square law reduction torque and constant torque<br />
(linear change).<br />
2.0 to 20.0 Constant torque (linear change).<br />
Warning: A larger than required torque boost value creates over-excitation at low speeds, continued<br />
operation may cause the motor to overheat. Check the characteristics of the motor for additional<br />
information.<br />
8-3
8.4 Load Selection / Auto Torque Boost / Auto Energy Saving Operation (F27, Default 1)<br />
This parameter sets the load type and auto torque boost setting, including auto energy savings.<br />
F37 Load Selection / Auto Torque Boost / Auto Energy Saving Operation 1<br />
F37 specifies V/f pattern, torque boost type, and auto energy saving operation in accordance with the characteristics<br />
of the load.<br />
Specify the torque boost level with F09 in order to assure sufficient starting torque.<br />
To set parameter F37:<br />
- Press PRG key, next select QUICK SET or DATA SET with UP/DOWN and keys and press the<br />
FUNC/DATA key.<br />
- In the parameter list move cursor to F37 with UP/DOWN keys and press FUNC/DATA key to select.<br />
Data for<br />
F37<br />
0<br />
V/f pattern<br />
Variable torque<br />
V/f pattern<br />
Torque boost<br />
Torque boost<br />
specified by F09<br />
1<br />
2<br />
Linear<br />
V/f pattern Auto torque boost<br />
3<br />
Variable torque<br />
V/f pattern<br />
Torque boost<br />
specified by F09<br />
4<br />
5<br />
Linear<br />
V/f pattern Auto torque boost<br />
Auto energy<br />
saving<br />
Disable<br />
Enable<br />
Applicable load<br />
Variable torque load<br />
(General-purpose fans and pumps)<br />
Constant torque load<br />
Constant torque load<br />
(To be selected if a motor may be<br />
over-excited at no load.)<br />
Variable torque load<br />
(General-purpose fans and pumps)<br />
Constant torque load<br />
Constant torque load<br />
(To be selected if a motor may be<br />
over-excited at no load.)<br />
If a required "load torque + acceleration toque" is more than 50% of the constant torque, it is<br />
recommended to select the linear V/f pattern (factory default).<br />
• Under the vector control with speed sensor, F37 is used to specify whether the auto energy saving<br />
operation is enabled or disabled. (V/f pattern and torque boost are disabled.)<br />
Data for F37<br />
Operation<br />
0 to 2 Auto energy saving operation OFF<br />
3 to 5 Auto energy saving operation ON<br />
• Under the vector control without speed sensor, both F37 and F09 are disabled. The auto energy saving<br />
operation is also disabled.<br />
• V/f characteristics<br />
The <strong>EQ7</strong> series of inverters offers a variety of V/f patterns and torque boosts, which include V/f patterns suitable for<br />
variable torque load such as general fans and pumps and for constant torque load (including special pumps requiring<br />
high starting torque). Two types of torque boosts are available: manual and automatic.<br />
(F09)<br />
(F09)<br />
Variable torque V/f pattern (F37 = 0) Linear V/f pattern (F37 = 1)<br />
8-4
When the variable torque V/f pattern is selected (F37 = 0 or 3), the output voltage may be low at a low<br />
frequency zone, resulting in insufficient output torque, depending on the characteristics of the motor and<br />
load. In such a case, it is recommended to increase the output voltage at the low frequency zone using the<br />
non-linear V/f pattern.<br />
Recommended value:<br />
H50 = 1/10 of the base frequency<br />
H51 = 1/10 of the voltage at base frequency<br />
• Torque boost: Data setting range: 0.0 to 20.0 (%) (100%/Rated voltage at base frequency)<br />
• Auto torque boost<br />
If the auto torque boost is selected, the inverter automatically optimizes the output voltage to fit the motor with its<br />
load. Under light load, the inverter decreases the output voltage to prevent the motor from over-excitation. Under<br />
heavy load, it increases the output voltage to increase the output torque of the motor.<br />
• Since this function relies also on the characteristics of the motor, set the base frequency 1 (F04), the<br />
rated voltage at base frequency 1 (F05), and other pertinent motor parameters (P01 through P03 and<br />
P06 through P99) in line with the motor capacity and characteristics, or else perform auto-tuning (P04).<br />
• When a special motor is driven or the load does not have sufficient rigidity, the maximum torque might<br />
decrease or the motor operation might become unstable. In such cases, do not use auto torque boost<br />
but choose manual torque boost per F09 (F37 = 0 or 1).<br />
• Auto energy saving operation (H67)<br />
If the auto energy saving operation is enabled, the inverter automatically controls the supply voltage to the motor<br />
to minimize the total power loss of motor and inverter. (Note that this feature may not be effective depending<br />
upon the motor or load characteristics. Check the advantage of energy saving before you actually apply this<br />
feature to your machinery.)<br />
You can select whether applying this feature to constant speed operation only or applying to constant speed<br />
operation and accelerating/decelerating operation.<br />
Data for H67<br />
Auto energy saving operation<br />
0 Enable only during running at constant speed<br />
Enable during running at constant speed or accelerating/decelerating<br />
1<br />
(Note: For accelerating/decelerating, enable only when the load is light.)<br />
If auto energy saving operation is enabled, the response to a motor speed change from constant speed operation<br />
may be slow. Do not use this feature for such machinery that requires quick acceleration/deceleration.<br />
• Use auto energy saving only where the base frequency is 60 Hz or lower. If the base frequency is set at<br />
60 Hz or higher, you may get a little or no energy saving advantage. The auto energy saving operation is<br />
designed for use with the frequency lower than the base frequency. If the frequency becomes higher<br />
than the base frequency, the auto energy saving operation will be invalid.<br />
• Since this function relies also on the characteristics of the motor, set the base frequency 1 (F04), the<br />
rated voltage at base frequency 1 (F05), and other pertinent motor parameters (P01 through P03 and<br />
P06 through P99) in line with the motor capacity and characteristics, or else perform auto-tuning (P04).<br />
• Under the vector control without speed sensor, the auto energy saving operation is disabled.<br />
8-5
8.5 Reset <strong>EQ7</strong> back to Factory Default<br />
Parameter H03<br />
Data Initialization<br />
H03 initializes the current function code data to the factory defaults or initializes the motor parameters.<br />
To change the H03 data, it is necessary to press the + keys or + keys (simultaneous keying).<br />
Data for H03<br />
Function<br />
0 Disable initialization (Settings manually made by the user will be retained.)<br />
1 Initialize all function code data to the factory defaults<br />
Initialize motor 1 parameters in accordance with P02 (Rated capacity) and P99 (<strong>Motor</strong> 1<br />
2<br />
selection)<br />
Initialize motor 2 parameters in accordance with A16 (Rated capacity) and A39 (<strong>Motor</strong> 2<br />
3<br />
selection)<br />
• To initialize the motor parameters, set the related function codes as follows.<br />
Function code<br />
Step Item Action<br />
1st motor<br />
2nd motor<br />
<strong>Motor</strong> Selects the motor<br />
(1)<br />
selection type<br />
P99<br />
A39<br />
<strong>Motor</strong> Sets the motor<br />
(2) (rated capacity (HP) P02 A16<br />
capacity)<br />
Data Initialize motor<br />
(3)<br />
initialization parameters H03 = 2 H03 = 3<br />
Function code data<br />
to be initialized<br />
If "Data = 0, 1, 3, or<br />
4" in Step (1)<br />
If "Data = 2" in Step<br />
(1), function codes<br />
listed at the right are<br />
also initialized<br />
P01, P03, P06 to P23,<br />
P53 to P56,H46<br />
A15, A17, A20 to A37,<br />
A53 to A56<br />
F04, F05 A02, A03<br />
• Upon completion of the initialization, the H03 data reverts to "0" (factory default).<br />
• If P02 or A16 data is set to a value other than the nominal applied motor rating, data initialization with H03<br />
internally converts the specified value forcibly to the standard nominal applied motor rating. (Refer to Table B in<br />
Section 4.1 "Function Code Tables.")<br />
• <strong>Motor</strong> parameters to be initialized are for motors listed below under V/f control. When the base frequency,<br />
rated voltage, and the number of poles are different from those of the listed motors, or when non-standard<br />
motors are used, change the rated current data to that printed on the motor nameplate.<br />
<strong>Motor</strong> selection<br />
V/f control data<br />
Data = 1 TWMC HP rating motors 4 poles 230 V/60 Hz, 460 V/60 Hz<br />
Data = 2 Consult Factory 4 poles ―/50 Hz, ―/50 Hz<br />
Data = 0 or 4 Consult Factory 4 poles 200 V/50 Hz, 400 V/50 Hz<br />
Data = 3 Consult Factory 4 poles 200 V/50 Hz, 400 V/50 Hz<br />
When accessing function code P02 with the keypad, take into account that P02 data automatically<br />
updates data of function codes P03, P06 through P23, P53 through P56, and H46. Also, when accessing<br />
function code A16, data of related function codes for each are automatically updated.<br />
8-6
Chapter 9 Using PID Control for Constant Flow / Pressure Applications<br />
9.1 What is PID Control?<br />
The PID function in the <strong>EQ7</strong> drive can be used to maintain a constant process variable such as pressure, flow,<br />
temperature by regulating the output frequency (motor speed). A feedback device (transducer) signal is used to<br />
compare the actual process variable to a specified setpoint. The difference between the set-point and feedback<br />
signal is called the error signal.<br />
The PID control tries to minimize this error to maintain a constant process variable by regulating the output frequency<br />
(motor speed).<br />
PID Control<br />
Cancellation<br />
(E01 – E07 = 20)<br />
F01 Frequency<br />
Command 1<br />
PID Command<br />
Selected by<br />
J02 (0 Default)<br />
0: Keypad (Default)<br />
*<br />
Terminals:<br />
1: 12- 0-10VDC<br />
1: V2 – 0-10VDC<br />
1: C1 – 0-20mA<br />
3: Up/Down<br />
4: Communication<br />
+<br />
-<br />
Proportional Gain<br />
(0.000 - 30.000)<br />
J03<br />
Integral Time<br />
(0.1 - 3600.0 Sec.)<br />
J04<br />
Derivative Time<br />
(0.00 - 600.00 Sec.)<br />
J05<br />
+<br />
+<br />
+<br />
PID OFF<br />
Normal<br />
Operation<br />
Inverse<br />
Operation<br />
Dancer<br />
Control<br />
J01 PID Control<br />
OFF<br />
ON<br />
*Terminal<br />
12<br />
Feedback Filter<br />
(0.0 - 900.0 Sec.)<br />
PID Control Block Diagram<br />
0<br />
1<br />
2<br />
3<br />
J06<br />
Normal<br />
Operation<br />
Frequency<br />
Command<br />
Terminal 12<br />
E61 = 5<br />
Drive<br />
Section<br />
PID Feedback Signal<br />
Terminal C1<br />
E62 = 5<br />
Terminal V2<br />
E63 = 5<br />
Feedback<br />
Transducer<br />
E61, E62 or E63 = 5<br />
Feedback Signal Select<br />
* The setpoint and feedback sources<br />
cannot be the same terminals.<br />
Control<br />
Target<br />
*<br />
The amplitude of the error can be adjusted with the Proportional Gain parameter J03 and is directly related to the<br />
output of the PID controller, so the larger gain the larger the output correction.<br />
Example 1: Example 2:<br />
Gain = 1.0 Gain = 2.0<br />
Set-Point = 80% Set-Point = 80%<br />
Feedback = 78% Feedback = 78%<br />
Error = Set-point - Feedback = 2% Error = Set-point - Feedback = 2%<br />
Control Error = Gain x Error = 2% Control Error = Gain x Error = 4%<br />
Please note that an excessive gain can make the system unstable and oscillation may occur.<br />
The response time of the system can be adjusted with the Integral Gain set by parameter J04. Increasing the Integral<br />
Time will make the system less responsive and decreasing the Integral Gain Time will increase response but may<br />
result in instability of the total system.<br />
Slowing the system down too much may be unsatisfactory for the process. The end result is that these two<br />
parameters in conjunction with the acceleration (F07) and deceleration (F08) times (see chapter 8.2) are adjusted to<br />
achieve optimum performance for a particular application.<br />
For typical fan and pump applications a Proportional Gain (J03) of 2.0 and an Integral Time (J04) of 5.0 sec is<br />
recommended.<br />
9-1
J01<br />
PID control (Mode Select)<br />
PID control can be enabled by setting parameter J01 to ‘1’<br />
Setting Range: 0 - 3<br />
1) No operation; PID Operation disabled<br />
2) Forward operation:<br />
PID operation enabled, motor speeds increases when feedback signal is smaller than set-point (most fan and<br />
pump applications)<br />
3) Reverse operation:<br />
PID operation enabled, motor slows down when feedback signal is smaller than set-point (e.g. level control<br />
applications)<br />
To set parameter J01:<br />
- Press PRG key, next select QUICK SET or DATA SET with UP/DOWN and keys and press the<br />
FUNC/DATA key.<br />
- In the parameter list move cursor to J01 with UP/DOWN keys and press FUNC/DATA key to select.<br />
9.2 Connect Transducer Feedback Signal (E61, E62, E63)<br />
Depending on the type of feedback transducer used, the <strong>EQ7</strong> drive can be setup for either 0-10V or a 4-20mA<br />
feedback transducer.<br />
Feedback Signal 4 – 20mA (Default E62 = 5)<br />
Analog Input C1<br />
Transducer Output:<br />
Black: 4 – 20mA<br />
G<br />
+10Vdc Power, T13<br />
Transducer Power:<br />
Brown or Red: +<br />
Control Terminals /<br />
User Terminals<br />
Connect shield to<br />
ground terminal<br />
Output<br />
2-Wire, 4 – 20mA Transducer<br />
+<br />
9-2
Feedback Signal 0 – 10V (E61 = 5)<br />
G<br />
Analog Input, T12<br />
Transducer Output:<br />
Black or White: 0 – 10V<br />
Common/0V, T11<br />
Transducer Common:<br />
Blue or Black: Common<br />
+10Vdc Power, T13<br />
Transducer Power:<br />
Brown or Red: +<br />
Control Terminals /<br />
User Terminals<br />
Connect shield to<br />
ground terminal<br />
-<br />
Output<br />
+<br />
3-Wire, 0 – 10V Transducer<br />
Program Feedback Signal Selection (E61, E62, E63)<br />
Use the extended terminal functions to select the analog terminal to use for the feedback transducer. To do this,<br />
determine the transducer specifications and then select the proper input terminal and electrical specifications from the<br />
table.<br />
E61<br />
Terminal 12 Extended Function<br />
E62<br />
E63<br />
Terminal C1 Extended Function<br />
Terminal V2 Extended Function<br />
Feedback Signal<br />
Parameter Settings<br />
Terminal 12 (0 – 10V) E61 = 5<br />
Terminal C1 (4 – 20mA) E62 = 5<br />
Terminal V2 (-10 – 10V) E63 = 5<br />
To set parameter E61, E62 and E63:<br />
- Press PRG key, next select QUICK SET or DATA SET with UP/DOWN and keys and press the<br />
FUNC/DATA key.<br />
- In the parameter list move cursor to E61, E62 or E63 with UP/DOWN keys and press FUNC/DATA key to select.<br />
9-3
9.3 Setpoint Scaling / Transducer Feedback Scaling (E40, E41)<br />
Use parameter E40 and E41 to scale the <strong>EQ7</strong> set-point to the transducer connected. Parameter E40 has to be<br />
programmed to the maximum range of the transducer and E41 to the minimum range of the transducer.<br />
To set parameter E40, E41<br />
- Press PRG key, next select QUICK SET or DATA SET with UP/DOWN and keys and press the<br />
FUNC/DATA key.<br />
- In the parameter list move cursor to E40, E41 with UP/DOWN keys and press FUNC/DATA key to select.<br />
Example 1: Example 2:<br />
Transducer range: 0 – 150 PSI<br />
Transducer range: 0 – 80 PSI<br />
E40 = 150.00 E40 = 80.00<br />
E41 = 0.00 (default)<br />
E41 = 0.00 (default)<br />
Use the and key to set the PID setpoint value<br />
(E.g. 80.00 PSI)<br />
Refer to the chapter 6 of the <strong>Instruction</strong> <strong>Manual</strong> for the preferred command (Run/Stop) method selection.<br />
9-4
Chapter 10 Troubleshooting<br />
10.1 Protective Functions<br />
The <strong>EQ7</strong> series of inverters has various protective functions as listed below to prevent the system from going down and<br />
reduce system downtime. The protective functions marked with an asterisk (*) in the table are disabled by default.<br />
Enable them according to your needs.<br />
The protective functions include, for example, the "alarm" detection function which, upon detection of an abnormal state,<br />
displays the alarm code on the LED monitor and causes the inverter to trip, the "light alarm" detection function which<br />
displays the alarm code but lets the inverter continue the current operation, and other warning signal output functions.<br />
If any problem arises, understand the protective functions listed below and follow the procedures given in Sections 10.2<br />
and onwards for troubleshooting.<br />
Protective function<br />
"Alarm" detection<br />
"Light alarm" detection*<br />
Stall prevention<br />
Overload prevention<br />
control*<br />
Automatic deceleration*<br />
(Anti-regenerative<br />
control)<br />
Deceleration<br />
characteristics*<br />
(Excessive<br />
regenerative energy<br />
proof braking capability)<br />
Reference loss<br />
detection*<br />
Automatic lowering of<br />
carrier frequency<br />
Dew condensation<br />
prevention*<br />
<strong>Motor</strong> overload early<br />
warning*<br />
Auto-reset*<br />
Forced stop*<br />
Surge protection<br />
Description<br />
This function detects an abnormal state, displays the corresponding alarm<br />
code, and causes the inverter to trip. The "alarm" codes are check-marked in<br />
the "Alarm" object column in Table 10.1. For details of each alarm code, see<br />
the corresponding item in the troubleshooting.<br />
The inverter retains the last four alarm codes and their factors together with<br />
their running information applied when the alarm occurred, so it can display<br />
them.<br />
This function detects an abnormal state categorized as a "light alarm," displays<br />
and lets the inverter continue the current operation without tripping.<br />
It is possible to define which abnormal states should be categorized as a "light<br />
alarm" using function codes H81 and H82. The "light alarm" codes are<br />
check-marked in the "Light alarm" object column in Table 10.1.<br />
For how to check and release light alarms, see Section 10.5 "If the "Light<br />
Alarm" Indication ( ) Appears on the LED Monitor."<br />
When the output current exceeds the current limiter level (F44) during<br />
acceleration/ deceleration or constant speed running, this function decreases<br />
the output frequency to avoid an overcurrent trip.<br />
Before the inverter trips due to a heat sink overheat ( ) or inverter overload<br />
(0lu ), this function decreases the output frequency to reduce the load.<br />
If regenerative energy returned exceeds the inverter's braking capability, this<br />
function automatically increases the deceleration time or controls the output<br />
frequency to avoid an overvoltage trip.<br />
During deceleration, this function increases the motor energy loss and<br />
decreases the regenerative energy returned to avoid an overvoltage trip (0u ).<br />
This function detects a reference frequency loss (due to a broken wire, etc.),<br />
continues the inverter operation at the specified frequency, and issues the<br />
"Command loss detected" signal REF OFF.<br />
Before the inverter trips due to an abnormal surrounding temperature or output<br />
current, this function automatically lowers the carrier frequency to avoid a trip.<br />
Even when the inverter is in stopped state, this function feeds DC current<br />
across the motor at certain intervals to raise the motor temperature for<br />
preventing dew condensation.<br />
When the inverter output current has exceeded the specified level, this<br />
function issues the "<strong>Motor</strong> overload early warning" signal OL before the<br />
thermal overload protection function causes the inverter to trip for motor<br />
protection. This function exclusively applies to the 1st motor.<br />
When the inverter has stopped because of a trip, this function allows the<br />
inverter to automatically reset and restart itself. (The number of retries and the<br />
latency between stop and reset can be specified.)<br />
Upon receipt of the "Force to stop" terminal command STOP, this function<br />
interrupts the run and other commands currently applied in order to forcedly<br />
decelerate the inverter to a stop.<br />
This function protects the inverter from a surge voltage invaded between main<br />
circuit power lines and the ground.<br />
10-1<br />
Related<br />
function code<br />
H98<br />
H81<br />
H82<br />
F44<br />
H70<br />
H69<br />
H71<br />
E65<br />
H98<br />
J21<br />
E34<br />
E35<br />
H04<br />
H05<br />
H56<br />
--
Code<br />
Table 10.1 Abnormal States Detectable ("Alarm" and "Light Alarm" Objects)<br />
Name<br />
"Alarm"<br />
objects<br />
"Light alarm"<br />
objects<br />
Remarks<br />
Ref.<br />
page<br />
Instantaneous overcurrent -- 10-12<br />
Ground fault -- 50 HP or above 10-12<br />
Overvoltage -- 10-12<br />
Undervoltage -- 10-13<br />
Input phase loss -- 10-14<br />
Output phase loss -- 10-14<br />
Heat sink overheat 10-14<br />
External alarm 10-15<br />
Inverter internal overheat 10-15<br />
<strong>Motor</strong> protection (PTC/NTC thermistor) -- 10-16<br />
Braking resistor overheat 40 HP or below 10-16<br />
Fuse blown --<br />
Charger circuit fault --<br />
125 HP or above for<br />
230 V series<br />
150 HP or above for<br />
460 V series<br />
60 HP or above for<br />
230 V series<br />
125 HP or above for<br />
460 V series<br />
10-17<br />
10-17<br />
to Overload of motor 1 through 2 10-17<br />
Inverter overload -- 10-18<br />
Overspeed -- 10-18<br />
PG wire break -- 10-19<br />
Memory error -- 10-19<br />
Keypad communications error -- 10-19<br />
CPU error -- 10-20<br />
Option communications error 10-20<br />
Option error 10-20<br />
Operation protection -- 10-20<br />
Tuning error -- 10-21<br />
RS-485 communications error (COM port 1)<br />
RS-485 communications error (COM port 2)<br />
10-21<br />
Data saving error during undervoltage -- 10-22<br />
Hardware error --<br />
Speed mismatch or excessive speed<br />
deviation<br />
60 HP or above for<br />
230 V series<br />
75 HP or above for<br />
460 V series<br />
10-22<br />
10-22<br />
NTC wire break error -- 10-23<br />
Mock alarm -- 10-23<br />
PID feedback wire break 10-24<br />
Braking transistor broken -- 10-24<br />
Positioning control<br />
error<br />
(Servo-lock) -- 10-24<br />
(Synchronous control) 10-24<br />
Enable circuit failure -- 10-24<br />
10-2
Table 10.1 Abnormal States Detectable ("Alarm" and "Light Alarm" Objects) (Continued)<br />
Code<br />
Name<br />
"Alarm"<br />
objects<br />
"Light alarm"<br />
objects<br />
Remarks<br />
Ref. page<br />
Light alarm -- -- --<br />
DC fan locked -- <br />
75 HP or above for<br />
230 V series<br />
125 HP or above for<br />
460 V series<br />
<strong>Motor</strong> overload early warning -- --<br />
Heat sink overheat early warning -- --<br />
Lifetime alarm -- --<br />
Reference command loss detected -- --<br />
PID alarm -- --<br />
Low torque output -- --<br />
PTC thermistor activated -- --<br />
Inverter life (<strong>Motor</strong> cumulative run time) -- --<br />
Inverter life (Number of startups) -- --<br />
--<br />
10-3
10.2 Before Proceeding with Troubleshooting<br />
If any of the protective functions has been activated, first remove the cause. Then, after checking that the all run<br />
commands are set to OFF, release the alarm. If the alarm is released while any run commands are set to ON, the<br />
inverter may supply the power to the motor, running the motor.<br />
Injury may occur.<br />
- Even if the inverter has interrupted power to the motor, if the voltage is applied to the main circuit input terminals<br />
L1/R, L2/S and L3/T, voltage may be output to inverter output terminals U, V, and W.<br />
- Turn OFF the power and wait at least five minutes for inverters of 40 HP or below, or at least ten minutes<br />
for inverters of 50 HP or above. Make sure that the LED monitor and charging lamp are turned OFF. Further,<br />
make sure, using a multimeter or a similar instrument, that the DC link bus voltage between the terminals P (+) and<br />
N (-) has dropped to the safe level (+25 VDC or below).<br />
Electric shock may occur.<br />
Follow the procedure below to solve problems.<br />
(1) First, check that the inverter is correctly wired, referring to Chapter 2, Section 2.3.4 "Wiring of main circuit terminals<br />
and grounding terminals."<br />
(2) Check whether an alarm code or the "light alarm" indication ( ) is displayed on the LED monitor.<br />
• If neither an alarm code nor "light alarm" indication ( ) appears on the LED monitor<br />
Abnormal motor operation Go to Section 10.3.1.<br />
[1] The motor does not rotate.<br />
[2] The motor rotates, but the speed does not increase.<br />
[3] The motor runs in the opposite direction to the command.<br />
[4] Speed fluctuation or current oscillation (e.g., hunting) occurs during<br />
running at constant speed.<br />
[5] Grating sound is heard from the motor or the motor sound fluctuates.<br />
[6] The motor does not accelerate or decelerate within the specified<br />
time.<br />
[7] The motor does not restart even after the power recovers from a<br />
momentary power failure.<br />
[8] The motor abnormally heats up.<br />
[9] The motor does not run as expected.<br />
Problems with inverter settings Go to Section 10.3.2.<br />
[1] Nothing appears on the LED monitor.<br />
[2] The desired menu is not displayed.<br />
[3] Data of function codes cannot be changed.<br />
• If an alarm code appears on the LED monitor Go to Section 10.4.<br />
• If the "light alarm" indication ( ) appears on the LED monitor Go to Section 10.5.<br />
• If an abnormal pattern appears on the LED monitor Go to Section 10.6.<br />
while neither an alarm code nor "light alarm" indication ( ) is displayed<br />
• For problems that could be caused by running the inverter on single-phase power Go to Section 10.7.<br />
If any problems persist after the above recovery procedure, contact your <strong>TECO</strong>-<strong>Westinghouse</strong> <strong>Motor</strong> <strong>Company</strong><br />
representative.<br />
10-4
10.3 If Neither an Alarm Code Nor "Light Alarm" Indication ( ) Appears on the LED Monitor<br />
This section describes the troubleshooting procedure based on function codes dedicated to motor 1 which are marked<br />
with an asterisk (*). For motors 2, replace those asterisked function codes with respective motor dedicated ones (refer to<br />
Chapter 4 of the user manual, Section 5.2.6, and Table 5.5).<br />
For the function codes dedicated to motors 2, see Chapter 4 "FUNCTION CODES."<br />
10.3.1 Abnormal motor operation<br />
[ 1 ] The motor does not rotate.<br />
Possible Causes<br />
(1) No power supplied to the<br />
inverter.<br />
(2) No run forward/reverse<br />
command was inputted, or<br />
both the commands were<br />
inputted simultaneously<br />
(external signal operation).<br />
What to Check and Suggested Measures<br />
Check the input voltage and interphase voltage unbalance.<br />
Turn ON a molded case circuit breaker (MCCB), a residual-currentoperated<br />
protective device (RCD)/earth leakage circuit breaker (ELCB) (with<br />
overcurrent protection) or a magnetic contactor (MC).<br />
Check for voltage drop, phase loss, poor connections, or poor contacts, and<br />
fix them if necessary.<br />
If only the auxiliary control power input is supplied, also supply the main<br />
power to the inverter.<br />
Check the input status of the forward/reverse command with Menu #4 "I/O<br />
Checking" using the keypad.<br />
Input a run command.<br />
Set either the forward or reverse run command off if both commands are<br />
being entered.<br />
Correct the run command source. (Set F02 data to "1.")<br />
Correct the assignment of commands FWD and REV with function codes<br />
E98 and E99.<br />
Connect the external circuit wires to control circuit terminals [FWD] and<br />
[REV] correctly.<br />
Make sure that the sink/source slide switch (SW1) on the control printed<br />
circuit board (control PCB) is properly configured.<br />
(3) No Enable input Check the input status of terminal [EN] with Menu #4 "I/O Checking" using the<br />
keypad.<br />
Correct the external circuit wiring to control circuit terminal [EN].<br />
(4) The inverter could not<br />
accept any run commands<br />
from the keypad since it was<br />
in Programming mode.<br />
(5) A run command with higher<br />
priority than the one<br />
attempted was active, and<br />
the run command was<br />
stopped.<br />
(6) No analog frequency<br />
command input.<br />
(7) The reference frequency<br />
was below the starting or<br />
stop frequency.<br />
Check which operation mode the inverter is in, using the keypad.<br />
Shift the operation mode to Running mode and enter a run command.<br />
Referring to the block diagram of the frequency command block (given in <strong>EQ7</strong><br />
User's <strong>Manual</strong>, Chapter 6), check the higher priority run command with Menu #2<br />
"Data Checking" and Menu #4 "I/O Checking" using the keypad.<br />
Correct any incorrect function code data settings (in H30, y98, etc.) or cancel<br />
the higher priority run command.<br />
Check whether the analog frequency command (reference frequency) is<br />
correctly inputted, using Menu #4 "I/O Checking" on the keypad.<br />
Connect the external circuit wires to terminals [13], [12], [11], [C1], and [V2]<br />
correctly.<br />
When terminal [C1] is used, check the slider position of terminal [C1] property<br />
switch (SW5) and the setting of the thermistor mode selection (H26).<br />
Check that a reference frequency has been entered correctly, using Menu #4 "I/O<br />
Checking" on the keypad.<br />
Set the reference frequency at the same or higher than that of the starting and<br />
stop frequencies (F23* and F25).<br />
Reconsider the starting and stop frequencies (F23* and F25), and if<br />
necessary, change them to the lower values.<br />
Inspect the external frequency command potentiometers, signal converters,<br />
switches, and relay contacts. Replace any ones that are faulty.<br />
Connect the external circuit wires to terminals [13], [12], [11], [C1], and [V2]<br />
correctly.<br />
10-5
Possible Causes<br />
(8) A frequency command with<br />
higher priority than the one<br />
attempted was active.<br />
(9) The upper and lower<br />
frequencies for the frequency<br />
limiters were set incorrectly.<br />
(10) The coast-to-stop command<br />
was effective.<br />
(11) Broken wires, incorrect<br />
connection or poor contact with<br />
the motor.<br />
What to Check and Suggested Measures<br />
Check the higher priority run command with Menu #2 "Data Checking" and<br />
Menu #4 "I/O Checking" using the keypad, referring to the block diagram of<br />
the frequency command block (refer to the <strong>EQ7</strong> User's <strong>Manual</strong>, Chapter 6).<br />
Correct any incorrect function code data (e.g. cancel the higher priority run<br />
command).<br />
Check the data of function codes F15 (Frequency limiter (High)) and F16<br />
(Frequency limiter (Low)).<br />
Change the settings of F15 and F16 to the correct ones.<br />
Check the data of function codes E01 through E07, E98, and E99 and the<br />
input signal status, using Menu #4 "I/O Checking" on the keypad.<br />
Release the coast-to-stop command setting.<br />
Check the wiring (Measure the output current).<br />
Repair the wires to the motor, or replace them.<br />
(12) Overload Measure the output current.<br />
Reduce the load (In winter, the load tends to increase.)<br />
(13) Torque generated by the motor<br />
was insufficient.<br />
(14) Wrong connection or poor<br />
contact of DC reactor (DCR)<br />
[ 2 ] The motor rotates, but the speed does not increase.<br />
Check whether any mechanical brake is activated.<br />
Release the mechanical brake, if any.<br />
Check that the motor starts running if the value of torque boost (F09*) is<br />
increased.<br />
Increase the value of torque boost (F09*) and try to run the motor.<br />
Check the data of function codes F04*, F05*, H50, H51, H52, H53, H65, and<br />
H66.<br />
Change the V/f pattern to match the motor's characteristics.<br />
Check that the motor switching signal (selecting motor 1, 2, 3 or 4) is correct<br />
and the data of function codes matches each motor.<br />
Correct the motor switching signal.<br />
Modify the function code data to match the connected motor.<br />
Check whether the reference frequency is below the slip-compensated<br />
frequency of the motor.<br />
Change the reference frequency so that it becomes higher than the<br />
slip-compensated frequency of the motor.<br />
Check the wiring.<br />
Inverters of 100 HP or above require a DCR to be connected. Without a DCR,<br />
these inverters cannot run.<br />
Connect the DCR correctly. Repair or replace DCR wires.<br />
Possible Causes<br />
(1) The maximum frequency<br />
currently specified was too low.<br />
(2) The data of frequency limiter<br />
(High) currently specified was<br />
too low.<br />
(3) The reference frequency<br />
currently specified was too low.<br />
(4) A frequency command (e.g.,<br />
multi-frequency or via<br />
communications) with higher<br />
priority than the one attempted<br />
was active and its reference<br />
frequency was too low.<br />
What to Check and Suggested Measures<br />
Check the data of function code F03* (Maximum frequency).<br />
Correct the F03* data.<br />
Check the data of function code F15 (Frequency limiter (High)).<br />
Correct the F15 data.<br />
Check that the reference frequency has been entered correctly, using Menu #4<br />
"I/O Checking" on the keypad.<br />
Increase the reference frequency.<br />
Inspect the external frequency command potentiometers, signal converters,<br />
switches, and relay contacts. Replace any ones that are faulty.<br />
Connect the external circuit wires to terminals [13], [12], [11], [C1], and [V2]<br />
correctly.<br />
Check the data of the relevant function codes and what frequency commands<br />
are being received, through Menu #1 "Data Setting," Menu #2 "Data Checking"<br />
and Menu #4 "I/O Checking," on the keypad by referring to the block diagram of<br />
the frequency command (refer to the <strong>EQ7</strong> User's <strong>Manual</strong>, Chapter 6).<br />
Correct any incorrect data of function codes (e.g. cancel the higher priority<br />
frequency command).<br />
10-6
Possible Causes<br />
(5) The acceleration time was too<br />
long or too short.<br />
What to Check and Suggested Measures<br />
(6) Overload. Measure the output current.<br />
Reduce the load.<br />
(7) Function code settings do not<br />
agree with the motor<br />
characteristics.<br />
(8) The output frequency does not<br />
increase due to the current<br />
limiter operation.<br />
(9) The output frequency does not<br />
increase due to the torque limiter<br />
operation.<br />
(10) Bias and gain incorrectly<br />
specified.<br />
Check the data of function codes F07, E10, E12, and E14 (Acceleration time).<br />
Change the acceleration time to match the load.<br />
Check whether any mechanical brake is activated.<br />
Release the mechanical brake.<br />
If auto-torque boost or auto-energy saving operation is specified, check<br />
whether the data of P02*, P03*, P06*, P07*, and P08* agree with the<br />
parameters of the motor.<br />
Perform auto-tuning of the inverter for the motor to be used.<br />
Make sure that F43 (Current limiter (Mode selection)) is set to "2" and check<br />
the data of F44 (Current limiter (Level)).<br />
Correct the F44 data. Or, if the current limiter operation is not needed, set<br />
F43 to "0" (disabled).<br />
Decrease the value of torque boost (F09*), then run the motor again and<br />
check if the speed increases.<br />
Adjust the value of the torque boost (F09*).<br />
Check the data of function codes F04*, F05*, H50, H51, H52, H53, H65, and<br />
H66 to ensure that the V/f pattern setting is right.<br />
Match the V/f pattern setting with the motor ratings.<br />
Check whether data of torque limiter related function codes (F40, F41, E16<br />
and E17) is correctly configured and the "Select torque limiter level" terminal<br />
command TL2/TL1 is correct.<br />
Correct data of F40, F41, E16 and E17 or reset them to the factory<br />
defaults (disable).<br />
Set the TL2/TL1 correctly.<br />
Check the data of function codes F18, C50, C32, C34, C37, C39, C42, and<br />
C44.<br />
Readjust the bias and gain to appropriate values.<br />
[ 3 ] The motor runs in the opposite direction to the command.<br />
Possible Causes<br />
What to Check and Suggested Measures<br />
(1) Wiring to the motor is incorrect. Check the wiring to the motor.<br />
Connect terminals U, V, and W of the inverter to the U, V, and W terminals<br />
of the motor, respectively.<br />
(2) Incorrect connection and<br />
settings for run commands and<br />
rotation direction commands<br />
FWD and REV.<br />
(3) The rotation direction<br />
specification of the motor is<br />
opposite to that of the inverter.<br />
Check the data of function codes E98 and E99 and the connection to<br />
terminals [FWD] and [REV].<br />
Correct the data of the function codes and the connection.<br />
The rotation direction of IEC-compliant motors is opposite to that of<br />
incompliant motors.<br />
Switch the FWD/REV signal setting.<br />
[ 4 ] Speed fluctuation or current oscillation (e.g., hunting) occurs during running at constant speed.<br />
Possible Causes<br />
(1) The frequency command<br />
fluctuates.<br />
What to Check and Suggested Measures<br />
Check the signals for the frequency command with Menu #4 "I/O Checking"<br />
using the keypad.<br />
Increase the filter constants (C33, C38, and C43) for the frequency<br />
command.<br />
10-7
Possible Causes<br />
(2) An external potentiometer is<br />
used for frequency setting.<br />
Possible Causes<br />
(3) Frequency switching or<br />
multi-frequency command was<br />
enabled.<br />
(4) The wiring length between the<br />
inverter and the motor is too<br />
long.<br />
(5) The machinery is hunting due<br />
to vibration caused by low<br />
rigidity of the load. Or the<br />
current is irregularly oscillating<br />
due to special motor<br />
parameters.<br />
What to Check and Suggested Measures<br />
Check that there is no noise in the control signal wires from external sources.<br />
Isolate the control signal wires from the main circuit wires as far as<br />
possible.<br />
Use shielded or twisted wires for control signals.<br />
Check whether the external frequency command potentiometer is<br />
malfunctioning due to noise from the inverter.<br />
Connect a capacitor to the output terminal of the potentiometer or set a<br />
ferrite core on the signal wire. (Refer to Chapter 2.)<br />
What to Check and Suggested Measures<br />
Check whether the relay signal for switching the frequency command is<br />
chattering.<br />
If the relay contact is defective, replace the relay.<br />
Check whether auto-torque boost, auto-energy saving operation, or dynamic<br />
torque vector control is enabled.<br />
Perform auto-tuning of the inverter for every motor to be used.<br />
Disable the automatic control systems by setting F37* to "1" (Constant<br />
torque load) and F42* to "0" (V/f control with slip compensation active),<br />
then check that the motor vibration stops.<br />
Make the output wires as short as possible.<br />
Once disable all the automatic control systems such as auto torque boost,<br />
auto energy saving operation, overload prevention control, current limiter,<br />
torque limiter, automatic deceleration (anti-regenerative control), auto search<br />
for idling motor speed, slip compensation, dynamic torque vector control,<br />
droop control, overload stop function, speed control, tuning, notch filter,<br />
observer, and then check that the motor vibration comes to a stop.<br />
Disable the functions causing the vibration.<br />
Readjust the output current fluctuation damping gain (H80*).<br />
Readjust the speed control systems. (d01* through d06*)<br />
Check that the motor vibration is suppressed if you decrease the level of F26<br />
(<strong>Motor</strong> sound (Carrier frequency)) or set F27 (<strong>Motor</strong> sound (Tone)) to "0."<br />
Decrease the carrier frequency (F26) or set the tone to "0" (F27 = 0).<br />
[ 5 ] Grating sound is heard from the motor or the motor sound fluctuates.<br />
Possible Causes<br />
(1) The specified carrier frequency<br />
is too low.<br />
(2) The surrounding temperature<br />
of the inverter was too high<br />
(when automatic lowering of<br />
the carrier frequency was<br />
enabled by H98).<br />
What to Check and Suggested Measures<br />
Check the data of function codes F26 (<strong>Motor</strong> sound (Carrier frequency)) and<br />
F27 (<strong>Motor</strong> sound (Tone)).<br />
Increase the carrier frequency (F26).<br />
Change the setting of F27 to appropriate value.<br />
Measure the temperature inside the panel where the inverter is mounted.<br />
If it is over 40C (104F), lower it by improving the ventilation.<br />
Lower the temperature of the inverter by reducing the load. (For fans or<br />
pumps, decrease the frequency limiter value (F15).)<br />
Note: If you disable H98, an 0h1, 0h3, or 0lu alarm may occur.<br />
(3) Resonance with the load. Check the machinery mounting accuracy or check whether there is resonance<br />
with the mounting base.<br />
Disconnect the motor from the machinery and run it alone, then find where<br />
the resonance comes from. Upon locating the cause, improve the<br />
characteristics of the source of the resonance.<br />
Adjust the settings of C01 (Jump frequency 1) to C04 (Jump frequency<br />
(Hysteresis width)) so as to avoid continuous running in the frequency<br />
range causing resonance.<br />
Enable the speed control (notch filter) (d07*, d08*) and the observer (d18<br />
to d20) to suppress vibration. (Depending on the characteristics of the<br />
load, this may take no effect.)<br />
10-8
[ 6 ] The motor does not accelerate or decelerate within the specified time.<br />
Possible Causes<br />
(1) The inverter runs the motor<br />
with S-curve or curvilinear<br />
pattern.<br />
(2) The current limiting operation<br />
prevented the output frequency<br />
from increasing (during<br />
acceleration).<br />
(3) The automatic deceleration<br />
(Anti-regenerative control) is<br />
enabled during deceleration.<br />
What to Check and Suggested Measures<br />
Check the data of function code H07 (Acceleration/deceleration pattern).<br />
Select the linear pattern (H07 = 0).<br />
Shorten the acceleration/deceleration time (F07, F08, E10 through E15).<br />
Make sure that F43 (Current limiter (Mode selection)) is set to "2: Enable<br />
during acceleration and at constant speed," then check that the setting of F44<br />
(Current limiter (Level)) is reasonable.<br />
Readjust the setting of F44 to appropriate value, or disable the function of<br />
current limiter with F43.<br />
Increase the acceleration/deceleration time (F07, F08, E10 through E15).<br />
Check the data of function code H69 (Automatic deceleration (Mode<br />
selection)).<br />
Increase the deceleration time (F08, E11, E13, and E15).<br />
(4) Overload. Measure the output current.<br />
Reduce the load (For fans or pumps, decrease the frequency limiter value<br />
(F15).) (In winter, the load tends to increase.)<br />
(5) Torque generated by the motor<br />
was insufficient.<br />
(6) An external potentiometer is<br />
used for frequency setting.<br />
(7) The output frequency is limited<br />
by the torque limiter.<br />
(8) The specified acceleration or<br />
deceleration time was<br />
incorrect.<br />
Check that the motor starts running if the value of the torque boost (F09*) is<br />
increased.<br />
Increase the value of the torque boost (F09*).<br />
Check that there is no noise in the control signal wires from external sources.<br />
Isolate the control signal wires from the main circuit wires as far as<br />
possible.<br />
Use shielded or twisted wires for control signals.<br />
Connect a capacitor to the output terminal of the external frequency<br />
command potentiometer or set a ferrite core on the signal wire. (Refer to<br />
Chapter 2.)<br />
Check whether data of torque limiter related function codes (F40, F41, E16<br />
and E17) is correctly configured and the TL2/TL1 terminal command ("Select<br />
torque limiter level 2/1") is correct.<br />
Correct the data of F40, F41, E16 and E17 or reset them to the factory<br />
defaults.<br />
Set the TL2/TL1 correctly.<br />
Increase the acceleration/deceleration time (F07, F08, E10 through E15).<br />
Check the terminal commands RT1 and RT2 for acceleration/deceleration<br />
times.<br />
Correct the RT1 and RT2 settings.<br />
[ 7 ] The motor does not restart even after the power recovers from a momentary power failure.<br />
Possible Causes<br />
(1) The data of function code F14<br />
is either "0," "1," or "2."<br />
(2) The run command remains<br />
OFF even after the power has<br />
been restored.<br />
What to Check and Suggested Measures<br />
Check if an undervoltage trip (lu) occurs.<br />
Change the data of function code F14 (Restart mode after momentary<br />
power failure (Mode selection)) to "3," "4," or "5."<br />
Check the input signal with Menu #4 "I/O Checking" using the keypad.<br />
Check the power recovery sequence with an external circuit. If necessary,<br />
consider the use of a relay that can keep the run command ON.<br />
In 3-wire operation, the power to the control printed circuit board (control PCB)<br />
has been shut down once because of a long momentary power failure time, or<br />
the "Enable 3-wire operation" signal HOLD has been turned OFF once.<br />
Change the design or the setting so that a run command can be issued<br />
again within 2 seconds after the power has been restored.<br />
10-9
[ 8 ] The motor abnormally heats up.<br />
Possible Causes<br />
(1) Excessive torque boost<br />
specified.<br />
(2) Continuous running in<br />
extremely slow speed.<br />
What to Check and Suggested Measures<br />
Check whether decreasing the torque boost (F09*) decreases the output<br />
current but does not stall the motor.<br />
If no stall occurs, decrease the torque boost (F09*).<br />
Check the running speed of the inverter.<br />
Change the speed setting or replace the motor with a motor exclusively<br />
designed for inverters.<br />
(3) Overload. Measure the inverter output current.<br />
Reduce the load (For fans or pumps, decrease the frequency limiter value<br />
(F15).) (In winter, the load tends to increase.)<br />
[ 9 ] The motor does not run as expected.<br />
Possible Causes<br />
(1) Incorrect setting of function<br />
code data.<br />
What to Check and Suggested Measures<br />
Check that function codes are correctly configured and no unnecessary<br />
configuration has been done.<br />
Configure all the function codes correctly.<br />
Make a note of function code data currently configured and then initialize all<br />
function code data using H03.<br />
After the above process, reconfigure function codes one by one, checking<br />
the running status of the motor.<br />
(2) Running on single-phase power Refer to Section 10.7 "If the Inverter is Running on Single-Phase Power,"<br />
[ 3 ].<br />
10-10
10.3.2 Problems with inverter settings<br />
[ 1 ] Nothing appears on the LED monitor.<br />
Possible Causes<br />
(1) No power (neither main<br />
power nor auxiliary control<br />
power) supplied to the<br />
inverter.<br />
(2) The power for the control<br />
PCB did not reach a<br />
sufficiently high level.<br />
(3) The keypad was not<br />
properly connected to the<br />
inverter.<br />
What to Check and Suggested Measures<br />
Check the input voltage and interphase voltage unbalance.<br />
Turn ON a molded case circuit breaker (MCCB), a residual-currentoperated<br />
protective device (RCD)/earth leakage circuit breaker (ELCB) (with<br />
overcurrent protection) or a magnetic contactor (MC).<br />
Check for voltage drop, phase loss, poor connections, or poor contacts and<br />
fix them if necessary.<br />
Check if the jumper bar has been removed between terminals P1 and P(+) or if<br />
there is a poor contact between the jumper bar and those terminals.<br />
Mount a jumper bar or a DC reactor between terminals P1 and<br />
P(+). For poor contact, tighten up the screws.<br />
Check whether the keypad is properly connected to the inverter.<br />
Remove the keypad, put it back, and see whether the problem recurs.<br />
Replace the keypad with another one and check whether the problem recurs.<br />
When running the inverter remotely, ensure that the extension cable is securely<br />
connected both to the keypad and to the inverter.<br />
Disconnect the cable, reconnect it, and see whether the problem recurs.<br />
Replace the keypad with another one and check whether the problem per<br />
recurs.<br />
[ 2 ] Data of function codes cannot be changed.<br />
Possible Causes<br />
(1) An attempt was made to<br />
change function code data<br />
that cannot be changed<br />
when the inverter is running.<br />
(2) The data of the function<br />
codes is protected.<br />
(3) The WE-KP terminal<br />
command ("Enable data<br />
change with keypad") is not<br />
entered, though it has been<br />
assigned to a digital input<br />
terminal.<br />
(4) The key was not<br />
pressed.<br />
(5) The data of function codes<br />
F02, E01 through E07, E98,<br />
and E99 cannot be<br />
changed.<br />
(6) The target function code(s)<br />
does not appear.<br />
What to Check and Suggested Measures<br />
Check if the inverter is running with Menu #3 "Drive Monitoring" using the keypad<br />
and then confirm whether the data of the function codes can be changed when<br />
the motor is running by referring to the function code tables.<br />
Stop the motor then change the data of the function codes.<br />
Check the data of function code F00 (Data Protection).<br />
Change the F00 data from "Enable data protection" (1 or 3) to "Disable data<br />
protection" (0 or 2).<br />
Check the data of function codes E01 through E07, E98 and E99 and the input<br />
signal status with Menu #4 "I/O Checking" using the keypad.<br />
Input a WE-KP command through a digital input terminal.<br />
Check whether you have pressed the key after changing the function code<br />
data.<br />
Press the key after changing the function code data.<br />
Check that saue is displayed on the LED monitor.<br />
Either one of the FWD and REV terminal commands is turned ON.<br />
Turn OFF both FWD and REV.<br />
When "0. QUICK SET" is selected, only the particular function code(s) appears.<br />
Select "10. USER SET" and add the target function code(s) to the set of<br />
function codes registered for Quick Setup. After that, select the target<br />
function code(s) and change its data. For details, refer to Chapter 3, Table 3.5<br />
"Menus Available in Programming Mode."<br />
10-11
10.4 If an Alarm Code Appears on the LED Monitor<br />
[ 1 ] Instantaneous overcurrent<br />
Problem The inverter momentary output current exceeded the overcurrent level.<br />
Overcurrent occurred during acceleration.<br />
Overcurrent occurred during deceleration.<br />
Overcurrent occurred during running at a constant speed.<br />
Possible Causes<br />
(1) The inverter output lines were<br />
short-circuited.<br />
(2) Ground faults have occurred at<br />
the inverter output lines.<br />
What to Check and Suggested Measures<br />
Disconnect the wiring from the inverter output terminals ([U], [V] and [W]) and<br />
measure the interphase resistance of the motor wiring. Check if the resistance<br />
is too low.<br />
Remove the short-circuited part (including replacement of the wires, relay<br />
terminals and motor).<br />
Disconnect the wiring from the output terminals ([U], [V] and [W]) and perform<br />
a Megger test.<br />
Remove the grounded parts (including replacement of the wires, relay<br />
terminals and motor).<br />
(3) Overload. Measure the motor current with a measuring device to trace the current trend.<br />
Then, use this data to judge if the trend is over the calculated load value for<br />
your system design.<br />
If the load is too heavy, reduce it or increase the inverter capacity.<br />
(4) Excessive torque boost<br />
specified.<br />
(when F37* = 0, 1, 3, or 4)<br />
(5) The acceleration/ deceleration<br />
time was too short.<br />
Trace the current trend and check if there are any sudden changes in the<br />
current.<br />
If there are any sudden changes, make the load fluctuation smaller or<br />
increase the inverter capacity.<br />
Enable instantaneous overcurrent limiting (H12 = 1).<br />
Check whether decreasing the torque boost (F09*) decreases the output<br />
current but does not stall the motor.<br />
If no stall occurs, decrease the torque boost (F09*).<br />
Check that the motor generates enough torque required during<br />
acceleration/deceleration. That torque is calculated from the moment of<br />
inertia for the load and the acceleration/deceleration time.<br />
Increase the acceleration/deceleration time (F07, F08, E10 through E15,<br />
and H56).<br />
Enable the current limiter (F43) and torque limiter (F40, F41, E16, and<br />
E17).<br />
Increase the inverter capacity.<br />
(6) Malfunction caused by noise. Check if noise control measures are appropriate (e.g., correct grounding and<br />
routing of control and main circuit wires).<br />
Implement noise control measures. For details, refer to the <strong>EQ7</strong> User's<br />
<strong>Manual</strong>, "Appendix A."<br />
Enable the Auto-reset (H04).<br />
Connect a surge absorber to magnetic contactor's coils or other solenoids<br />
(if any) causing noise.<br />
[ 2 ] Ground fault<br />
Problem A ground fault path exists from the output terminal of the inverter.<br />
Possible Causes<br />
(1) Inverter output terminal(s)<br />
grounded (ground fault).<br />
What to Check and Suggested Measures<br />
Disconnect the wiring from the output terminals ([U], [V], and [W]) and perform a<br />
Megger test.<br />
Remove the grounded parts (including replacement of the wires, relay<br />
terminals and motor).<br />
10-12
[ 3 ] Overvoltage<br />
Problem The DC link bus voltage was over the detection level of overvoltage.<br />
Overvoltage occurred during acceleration.<br />
Overvoltage occurred during deceleration.<br />
Overvoltage occurred during running at constant speed.<br />
Possible Causes<br />
(1) The power supply voltage<br />
exceeded the inverter's<br />
specification range.<br />
Possible Causes<br />
(2) A surge current entered the<br />
input power supply.<br />
(3) The deceleration time was<br />
too short for the moment of<br />
inertia for load.<br />
(4) The acceleration time was<br />
too short.<br />
What to Check and Suggested Measures<br />
Measure the input voltage.<br />
Decrease the voltage to within the specified range.<br />
What to Check and Suggested Measures<br />
In the same power line, if a phase-advancing capacitor is turned ON/OFF or a<br />
thyristor converter is activated, a surge (momentary large increase in the voltage<br />
or current) may be caused in the input power.<br />
Install a DC reactor.<br />
Recalculate the deceleration torque based on the moment of inertia for the load<br />
and the deceleration time.<br />
Increase the deceleration time (F08, E11, E13, E15, and H56).<br />
Enable the automatic deceleration (anti-regenerative control) (H69), or<br />
deceleration characteristics (H71).<br />
Enable torque limiter (F40, F41, E16, E17, and H73).<br />
Set the rated voltage (at base frequency) (F05*) to "0" to improve the braking<br />
capability.<br />
Consider the use of a braking resistor.<br />
Check if the overvoltage alarm occurs after rapid acceleration.<br />
Increase the acceleration time (F07, E10, E12, and E14).<br />
Select the S-curve pattern (H07).<br />
Consider the use of a braking resistor.<br />
(5) Braking load was too heavy. Compare the braking torque of the load with that of the inverter.<br />
Set the rated voltage (at base frequency) (F05*) to "0" to improve the braking<br />
capability.<br />
Consider the use of a braking resistor.<br />
(6) Malfunction caused by<br />
noise.<br />
[ 4 ] Undervoltage<br />
Check if the DC link bus voltage was below the protective level when the<br />
overvoltage alarm occurred.<br />
Implement noise control measures. For details, refer to the <strong>EQ7</strong> User's<br />
<strong>Manual</strong>, "Appendix A."<br />
Enable the auto-reset (H04).<br />
Connect a surge absorber to magnetic contactor's coils or other solenoids (if<br />
any) causing noise.<br />
Problem DC link bus voltage has dropped below the undervoltage detection level.<br />
Possible Causes<br />
(1) A momentary power failure<br />
occurred.<br />
(2) The power to the inverter<br />
was switched back to ON<br />
too soon (when F14 = 1).<br />
(3) The power supply voltage<br />
did not reach the inverter's<br />
specification range.<br />
(4) Peripheral equipment for the<br />
power circuit malfunctioned,<br />
or the connection was<br />
incorrect.<br />
What to Check and Suggested Measures<br />
Release the alarm.<br />
If you want to restart running the motor without treating this condition as an<br />
alarm, set F14 to "3," "4," or "5," depending on the load type.<br />
Check if the power to the inverter was switched back to ON while the control<br />
power was still alive. (Check whether the LEDs on the keypad light.)<br />
Turn the power ON again after all LEDs on the keypad go off.<br />
Measure the input voltage.<br />
Increase the voltage to within the specified range.<br />
Measure the input voltage to find which peripheral equipment malfunctioned or<br />
which connection is incorrect.<br />
Replace any faulty peripheral equipment, or correct any incorrect<br />
connections.<br />
10-13
(5) Any other loads connected<br />
to the same power supply<br />
has required a large starting<br />
current, causing a<br />
temporary voltage drop.<br />
(6) Inverter's inrush current<br />
caused the power voltage<br />
drop because the power<br />
supply transformer capacity<br />
was insufficient.<br />
Measure the input voltage and check the voltage fluctuation.<br />
Reconsider the power supply system configuration.<br />
Check if the alarm occurs when a molded case circuit breaker (MCCB),<br />
residual-current-operated protective device (RCD)/earth leakage circuit breaker<br />
(ELCB) (with overcurrent protection) or magnetic contactor (MC) is turned ON.<br />
Reconsider the capacity of the power supply transformer.<br />
[ 5 ] Input phase loss<br />
Problem Input phase loss occurred, or interphase voltage unbalance rate was large.<br />
Possible Causes<br />
(1) Breaks in wiring to the main<br />
power input terminals.<br />
(2) The screws on the main<br />
power input terminals are<br />
loosely tightened.<br />
(3) Interphase voltage<br />
unbalance between three<br />
phases was too large.<br />
(4) Overload cyclically<br />
occurred.<br />
(5) Single-phase voltage was<br />
input to the three-phase<br />
input inverter.<br />
(6) Running on single-phase<br />
power<br />
What to Check and Suggested Measures<br />
Measure the input voltage.<br />
Repair or replace the main circuit power input wires or input devices (MCCB,<br />
MC, etc.).<br />
Check if the screws on the main power input terminals have become loose.<br />
Tighten the terminal screws to the recommended torque.<br />
Measure the input voltage.<br />
Connect an AC reactor (ACR) to lower the voltage unbalance between input<br />
phases.<br />
Increase the inverter capacity.<br />
Measure the ripple wave of the DC link bus voltage.<br />
If the ripple is large, increase the inverter capacity.<br />
Check the inverter settings and service condition.<br />
Correct them for single-phase use, referring to Chapter 1, Section 1.3.4<br />
"Precautions for use on single-phase input.<br />
Refer to Section 10.7 "If the Inverter is Running on Single-Phase Power,"<br />
[ 5 ].<br />
The input phase loss protection can be disabled with the function code H98 (Protection/Maintenance Function).<br />
[ 6 ] Output phase loss<br />
Problem Output phase loss occurred.<br />
Possible Causes<br />
(1) Inverter output wires are<br />
broken.<br />
(2) The motor winding is<br />
broken.<br />
(3) The terminal screws for<br />
inverter output were not tight<br />
enough.<br />
(4) A single-phase motor has<br />
been connected.<br />
What to Check and Suggested Measures<br />
Measure the output current.<br />
Replace the output wires.<br />
Measure the output current.<br />
Replace the motor.<br />
Check if any screws on the inverter output terminals have become loose.<br />
Tighten the terminal screws to the recommended torque.<br />
Single-phase motors cannot be used. Note that the <strong>EQ7</strong> only drives<br />
three-phase induction motors.<br />
10-14
[ 7 ] Heat sink overheat<br />
Problem Temperature around heat sink has risen abnormally.<br />
Possible Causes<br />
(1) Temperature around the<br />
inverter exceeded the<br />
inverter's specification<br />
range.<br />
What to Check and Suggested Measures<br />
Measure the temperature around the inverter.<br />
Lower the temperature around the inverter (e.g., ventilate the panel where the<br />
inverter is mounted).<br />
(2) Ventilation path is blocked. Check if there is sufficient clearance around the inverter.<br />
Change the mounting place to ensure the clearance.<br />
(3) Cooling fan's airflow volume<br />
decreased due to the<br />
service life expired or failure.<br />
Check if the heat sink is not clogged.<br />
Clean the heat sink.<br />
Check the cumulative run time of the cooling fan. Refer to Chapter 3, Section<br />
3.4.6 "Reading maintenance information – Menu #5 "Maintenance Information"."<br />
Replace the cooling fan.<br />
Visually check whether the cooling fan rotates normally.<br />
Replace the cooling fan.<br />
Inverters of 60 HP or above for three-phase 230 V series and those of 125 HP or<br />
above for three-phase 460 V series are equipped with not only a cooling fan for<br />
heat sink but also an internal air circulation fan. Check the following.<br />
Check the connection of the fan power switching connectors "CN R" and<br />
"CN W."<br />
Correct the connection. (Refer to " Switching connectors" in Chapter 2,<br />
Section 2.3.4 "Wiring of main circuit terminals and grounding terminals".<br />
(4) Overload. Measure the output current.<br />
Reduce the load (e.g. Use the heat sink overheat early warning (E01 through<br />
E07) or the overload early warning (E34) and reduce the load before the<br />
overload protection is activated.).<br />
Decrease the motor sound (carrier frequency) (F26).<br />
Enable the overload prevention control (H70).<br />
(5) Running on single-phase<br />
power<br />
[ 8 ] External alarm<br />
Refer to Section 10.7 "If the Inverter is Running on Single-Phase Power, [ 1 ]<br />
and [ 6 ].<br />
Problem External alarm was inputted (THR).<br />
(when the "Enable external alarm trip" THR has been assigned to any of digital input terminals)<br />
Possible Causes<br />
(1) An alarm function of external<br />
equipment was activated.<br />
(2) Wrong connection or poor<br />
contact in external alarm<br />
signal wiring.<br />
(3) Incorrect setting of function<br />
code data.<br />
[ 9 ] Inverter internal overheat<br />
What to Check and Suggested Measures<br />
Check the operation of external equipment.<br />
Remove the cause of the alarm that occurred.<br />
Check if the external alarm signal wiring is correctly connected to the terminal to<br />
which the "Enable external alarm trip" terminal command THR has been<br />
assigned (Any of E01 through E07, E98, and E99 should be set to "9.").<br />
Connect the external alarm signal wire correctly.<br />
Check whether the "Enable external alarm trip" terminal command THR has<br />
been assigned to an unavailable terminal (with E01 through E07, E98, or E99).<br />
Correct the assignment.<br />
Check whether the normal/negative logic of the external signal matches that of<br />
the THR command specified by any of E01 through E07, E98, and E99.<br />
Ensure the matching of the normal/negative logic.<br />
Problem Temperature inside the inverter has exceeded the allowable limit.<br />
Possible Causes<br />
(1) The surrounding<br />
temperature exceeded the<br />
inverter's specification limit.<br />
(2) Running on single-phase<br />
power<br />
What to Check and Suggested Measures<br />
Measure the surrounding temperature.<br />
Lower the temperature around the inverter (e.g., ventilate the panel where<br />
the inverter is mounted).<br />
Refer to Section 10.7 "If the Inverter is Running on Single-Phase Power," [ 6 ].<br />
10-15
[ 10 ] <strong>Motor</strong> protection (PTC/NTC thermistor)<br />
Problem Temperature of the motor has risen abnormally.<br />
Possible Causes<br />
(1) The temperature around the<br />
motor exceeded the motor's<br />
specification range.<br />
(2) Cooling system for the motor<br />
defective.<br />
What to Check and Suggested Measures<br />
Measure the temperature around the motor.<br />
Lower the temperature.<br />
Check if the cooling system of the motor is operating normally.<br />
Repair or replace the cooling system of the motor.<br />
(3) Overload. Measure the output current.<br />
Reduce the load (e.g. Use the heat sink overheat early warning (E01 through<br />
E07) or the overload early warning (E34) and reduce the load before the<br />
overload protection is activated.). (In winter, the load tends to increase.)<br />
Lower the temperature around the motor.<br />
Increase the motor sound (Carrier frequency) (F26).<br />
(4) The activation level (H27) of<br />
the PTC thermistor for motor<br />
overheat protection was set<br />
inadequately.<br />
(5) Settings for the PTC/NTC<br />
thermistor are improper.<br />
(6) Excessive torque boost<br />
specified. (F09*)<br />
(7) The V/f pattern did not<br />
match the motor.<br />
(8) Incorrect setting of function<br />
code data.<br />
Check the PTC thermistor specifications and recalculate the detection voltage.<br />
Modify the data of function code H27.<br />
Check the setting of the thermistor mode selection (H26) and the slider position<br />
of terminal [C1] property switch SW5.<br />
Change the H26 data in accordance with the thermistor used and set the<br />
SW5 to the PTC/NTC position.<br />
Check whether decreasing the torque boost (F09*) does not stall the motor.<br />
If no stall occurs, decrease the F09* data.<br />
Check if the base frequency (F04*) and the rated voltage at base frequency<br />
(F05*) match the values on the motor's nameplate.<br />
Match the function code data with the values on the motor's nameplate.<br />
Although no PTC/NTC thermistor is used, the thermistor mode is enabled (H26).<br />
Set the H26 data to "0" (Disable).<br />
[ 11 ] Braking resistor overheated<br />
Problem The electronic thermal protection for the braking resistor has been activated.<br />
Possible Causes<br />
What to Check and Suggested Measures<br />
(1) Braking load is too heavy. Reconsider the relationship between the braking load estimated and the real<br />
load.<br />
Lower the real braking load.<br />
Review the selection of the braking resistor and increase the braking<br />
capability (Modification of related function code data (F50, F51, and F52) is<br />
also required.)<br />
(2) Specified deceleration time<br />
is too short.<br />
(3) Incorrect setting of function<br />
code data F50, F51, and<br />
F52.<br />
Recalculate the deceleration torque and time needed for the load currently<br />
applied, based on a moment of inertia for the load and the deceleration time.<br />
Increase the deceleration time (F08, E11, E13, E15, and H56).<br />
Review the selection of the braking resistor and increase the braking<br />
capability. (Modification of related function code data (F50, F51, and F52) is<br />
also required.)<br />
Recheck the specifications of the braking resistor.<br />
Review data of function codes F50, F51, and F52, then modify them.<br />
Note: The inverter issues an overheat alarm of the braking resistor by monitoring the magnitude of the braking load, not<br />
by measuring its surface temperature.<br />
When the braking resistor is frequently used so as to exceed the settings made by function codes F50, F51, and F52,<br />
therefore, the inverter issues an overheat alarm even if the surface temperature of the braking resistor does not rise. To<br />
squeeze out full performance of the braking resistor, configure function codes F50, F51, and F52 while actually<br />
measuring the surface temperature of the braking resistor.<br />
10-16
[ 12 ] Fuse blown<br />
Problem The fuse inside the inverter blew.<br />
Possible Causes<br />
(1) The fuse blew due to<br />
short-circuiting inside the<br />
inverter.<br />
[ 13 ] Charger circuit fault<br />
What to Check and Suggested Measures<br />
Check whether there has been any excess surge or noise coming from outside.<br />
Take measures against surges and noise.<br />
Have the inverter repaired.<br />
Problem The magnetic contactor for short-circuiting the charging resistor failed to work.<br />
Possible Causes<br />
(1) The control power was not<br />
supplied to the magnetic<br />
contactor intended for<br />
short-circuiting the charging<br />
resistor.<br />
(2) Running on single-phase<br />
power<br />
[ 14 ] Overload of motor 1, 2<br />
What to Check and Suggested Measures<br />
Problem Electronic thermal protection for motor 1, 2 activated.<br />
<strong>Motor</strong> 1 overload<br />
<strong>Motor</strong> 2 overload<br />
Possible Causes<br />
(1) The electronic thermal<br />
characteristics do not match<br />
the motor overload<br />
characteristics.<br />
(2) Activation level for the<br />
electronic thermal protection<br />
was inadequate.<br />
(3) The specified acceleration/<br />
deceleration time was too<br />
short.<br />
Check that, in normal connection of the main circuit (not a connection via the DC<br />
link bus), the connector (CN R) on the power printed circuit board (power PCB) is<br />
not inserted to NC .<br />
Insert the connector (CN R) to FAN .<br />
Check whether you quickly turned the circuit breaker ON and OFF to confirm<br />
safety after cabling/wiring.<br />
Wait until the DC link bus voltage has dropped to a sufficiently low level and<br />
then release the current alarm. After that, turn ON the power again. (Do not<br />
turn the circuit breaker ON and OFF quickly.)<br />
(Turning ON the circuit breaker supplies power to the control circuit to the<br />
operation level (lighting the LEDs on the keypad) in a short period.<br />
Immediately turning it OFF even retains the control circuit power for a time,<br />
while it shuts down the power to the magnetic contactor intended for<br />
short-circuiting the charging resistor since the contactor is directly powered<br />
from the main power.<br />
Under such conditions, the control circuit can issue a turn-on command to the<br />
magnetic contactor, but the contactor not powered can produce nothing. This<br />
state is regarded as abnormal, causing an alarm.)<br />
Refer to Section 10.7 "If the Inverter is Running on Single-Phase Power,"<br />
[ 4 ].<br />
What to Check and Suggested Measures<br />
Check the motor characteristics.<br />
Reconsider the data of function codes (P99*, F10* and F12*).<br />
Use an external thermal relay.<br />
Check the continuous allowable current of the motor.<br />
Reconsider and change the data of function code F11*.<br />
Recalculate the acceleration/deceleration torque and time needed for the load,<br />
based on the moment of inertia for the load and the acceleration/deceleration<br />
time.<br />
Increase the acceleration/ deceleration time (F07, F08, E10 through E15,<br />
and H56).<br />
(4) Overload. Measure the output current.<br />
Reduce the load (e.g. Use the overload early warning (E34) and reduce the<br />
load before the overload protection is activated.). (In winter, the load tends to<br />
increase.)<br />
(5) Excessive torque boost<br />
specified (F09*)<br />
Check whether decreasing the torque boost (F09*) does not stall the motor.<br />
If no stall occurs, decrease the F09* data.<br />
10-17
[ 15 ] Inverter overload<br />
Problem Temperature inside inverter has risen abnormally.<br />
Possible Causes<br />
(1) Temperature around the<br />
inverter exceeded the<br />
inverter's specification<br />
range.<br />
(2) Excessive torque boost<br />
specified (F09*)<br />
(3) The specified acceleration/<br />
deceleration time was too<br />
short.<br />
What to Check and Suggested Measures<br />
Measure the temperature around the inverter.<br />
Lower the temperature (e.g., ventilate the panel where the inverter is<br />
mounted).<br />
Check whether decreasing the torque boost (F09*) does not stall the motor.<br />
If no stall occurs, decrease the F09* data.<br />
Recalculate the acceleration/deceleration torque and time needed for the load,<br />
based on the moment of inertia for the load and the acceleration/deceleration<br />
time.<br />
Increase the acceleration/deceleration time (F07, F08, E10 through E15, and<br />
H56).<br />
(4) Overload. Measure the output current.<br />
Reduce the load (e.g., Use the overload early warning (E34) and reduce the<br />
load before the overload protection is activated.). (In winter, the load tends to<br />
increase.).<br />
Decrease the motor sound (Carrier frequency) (F26).<br />
Enable overload prevention control (H70).<br />
(5) Ventilation paths are<br />
blocked.<br />
(6) Cooling fan's airflow volume<br />
decreased due to the<br />
service life expired or failure.<br />
(7) The wires to the motor are<br />
too long, causing a large<br />
leakage current from them.<br />
(8) Running on single-phase<br />
power<br />
[ 16 ] Overspeed<br />
Check if there is sufficient clearance around the inverter.<br />
Change the mounting place to ensure the clearance.<br />
Check if the heat sink is not clogged.<br />
Clean the heat sink.<br />
Check the cumulative run time of the cooling fan. Refer to Chapter 3, Section<br />
3.4.6 "Reading maintenance information – Menu #5 "Maintenance Information"."<br />
Replace the cooling fan.<br />
Visually check that the cooling fan rotates normally.<br />
Replace the cooling fan.<br />
Measure the leakage current.<br />
Insert an output circuit filter (OFL).<br />
Refer to Section 10.7 "If the Inverter is Running on Single-Phase Power," [ 1 ]<br />
and [ 6 ].<br />
Problem The motor rotates in an excessive speed (<strong>Motor</strong> speed (F03 data) (d32 data, d33 data) 1.2)<br />
Possible Causes<br />
(1) Incorrect setting of function<br />
code data.<br />
(2) Insufficient gain of the speed<br />
controller.<br />
(3) Noises superimposed on the<br />
PG wire.<br />
What to Check and Suggested Measures<br />
Check the motor parameter "Number of poles" (P01*).<br />
Specify the P01* data in accordance with the motor to be used.<br />
Check the maximum frequency setting (F03*).<br />
Specify the F03* data in accordance with the output frequency.<br />
Check the setting of speed limit function (d32 and d33).<br />
Disable the speed limit function (d32 and d33).<br />
Check whether the actual speed overshoots the commanded one in higher<br />
speed operation.<br />
Increase the speed controller gain (d03*.)<br />
(Depending on the situations, reconsider the setting of the filter constant or<br />
the integral time.)<br />
Check whether appropriate noise control measures have been implemented<br />
(e.g., correct grounding and routing of signal wires and main circuit wires).<br />
Implement noise control measures. For details, refer to the <strong>EQ7</strong> User's<br />
<strong>Manual</strong>, "Appendix A."<br />
10-18
[ 17 ] PG wire break<br />
Problem The pulse generator (PG) wire has been broken somewhere in the circuit.<br />
Possible Causes<br />
(1) The wire between the pulse<br />
generator (PG) and the<br />
option card has been<br />
broken.<br />
(2) PG related circuit affected<br />
by strong electrical noise.<br />
What to Check and Suggested Measures<br />
Check whether the pulse generator (PG) is correctly connected to the option card<br />
or any wire is broken.<br />
Check whether the PG is connected correctly. Or, tighten up the related<br />
terminal screws.<br />
Check whether any joint or connecting part bites the wire sheath.<br />
Replace the wire.<br />
Check if appropriate noise control measures have been implemented (e.g.,<br />
correct grounding and routing of signal wires, communication cables, and main<br />
circuit wires).<br />
Implement noise control measures.<br />
Separate the signal wires from the main power wires as far as possible.<br />
[ 18 ] Memory error<br />
Problem Error occurred in writing the data to the memory in the inverter.<br />
Possible Causes<br />
(1) When writing data<br />
(especially initializing or<br />
copying data), the inverter<br />
was shut down so that the<br />
voltage to the control PCB<br />
has dropped.<br />
(2) Inverter affected by strong<br />
electrical noise when writing<br />
data (especially initializing<br />
or copying data).<br />
What to Check and Suggested Measures<br />
Initialize the function code data with H03 (= 1). After initialization, check if<br />
pressing the key releases the alarm.<br />
Revert the initialized function code data to their previous settings, then restart<br />
the operation.<br />
Check if appropriate noise control measures have been implemented (e.g.,<br />
correct grounding and routing of control and main circuit wires). Also, perform the<br />
same check as described in (1) above.<br />
Implement noise control measures. Revert the initialized function code data<br />
to their previous settings, then restart the operation.<br />
(3) The control PCB failed. Initialize the function code data by setting H03 to "1," then reset the alarm by<br />
pressing the key and check that the alarm goes on.<br />
The control PCB (on which the CPU is mounted) is defective. Contact your<br />
<strong>TECO</strong>-<strong>Westinghouse</strong> <strong>Motor</strong> <strong>Company</strong> representative.<br />
[ 19 ] Keypad communications error<br />
Problem A communications error occurred between the multi-function keypad and the inverter.<br />
Possible Causes<br />
(1) Broken communications<br />
cable or poor contact.<br />
(2) Connecting many control<br />
wires hinders the front cover<br />
from being mounted, lifting<br />
the keypad.<br />
(3) Inverter affected by strong<br />
electrical noise.<br />
What to Check and Suggested Measures<br />
Check continuity of the cable, contacts and connections.<br />
Re-insert the connector firmly.<br />
Replace the cable.<br />
Check the mounting condition of the front cover.<br />
Use wires of the recommended size AWG 19 or 18 (0.65 to 0.82 mm 2 ) for<br />
wiring.<br />
Change the wiring layout inside the unit so that the front cover can be<br />
mounted firmly.<br />
Check if appropriate noise control measures have been implemented (e.g.,<br />
correct grounding and routing of communication cables and main circuit wires).<br />
Implement noise control measures.<br />
For details, refer to the <strong>EQ7</strong> User's <strong>Manual</strong>, "Appendix A."<br />
(4) A keypad failure occurred. Replace the keypad with another one and check whether a keypad<br />
communications error ( ) occurs.<br />
Replace the keypad.<br />
10-19
[ 20 ] CPU error<br />
Problem A CPU error (e.g. erratic CPU operation) occurred.<br />
Possible Causes<br />
(1) Inverter affected by strong<br />
electrical noise.<br />
What to Check and Suggested Measures<br />
Check if appropriate noise control measures have been implemented (e.g.<br />
correct grounding and routing of signal wires, communications cables, and main<br />
circuit wires).<br />
Implement noise control measures.<br />
[ 21 ] Option communications error<br />
Problem A communications error occurred between the option card and the inverter.<br />
Possible Causes<br />
(1) There was a problem with<br />
the connection between the<br />
option card and the inverter.<br />
What to Check and Suggested Measures<br />
Check whether the connector on the option card is properly engaged with that of<br />
the inverter.<br />
Reload the option card into the inverter.<br />
(2) Strong electrical noise. Check whether appropriate noise control measures have been implemented<br />
(e.g. correct grounding and routing of signal wires, communications cables, and<br />
main circuit wires).<br />
Implement noise control measures.<br />
[ 22 ] Option error<br />
An error detected by the option card. Refer to the instruction manual of the option card for details.<br />
[ 23 ] Operation protection<br />
Problem An incorrect operation was attempted.<br />
Possible Causes<br />
(1) The key was pressed<br />
when H96 = 1 or 3.<br />
(2) The start check function was<br />
activated when H96 = 2 or 3.<br />
(3) The forced stop digital input<br />
STOP was turned OFF.<br />
What to Check and Suggested Measures<br />
Check that the key was pressed when a run command had been entered<br />
from the input terminal or through the communications port.<br />
If this was not intended, check the setting of H96.<br />
Check that any of the following operations has been performed with a run<br />
command being entered.<br />
- Turning the power ON<br />
- Releasing the alarm<br />
- Switching the enable communications link LE operation<br />
Review the running sequence to avoid input of a Run command when this<br />
error occurs.<br />
If this was not intended, check the setting of H96.<br />
(Turn the run command OFF before releasing the alarm.)<br />
Check that turning the STOP OFF decelerated the inverter to stop.<br />
If this was not intended, check the settings of E01 through E07 for terminals<br />
[X1] through [X7].<br />
10-20
[ 24 ] Tuning error<br />
Problem Auto-tuning failed.<br />
Possible Causes<br />
(1) A phase was missing (There<br />
was a phase loss) in the<br />
connection between the<br />
inverter and the motor.<br />
(2) V/f or the rated current of the<br />
motor was not properly set.<br />
(3) The wiring length between<br />
the inverter and the motor<br />
was too long.<br />
(4) The rated capacity of the<br />
motor was significantly<br />
different from that of the<br />
inverter.<br />
(5) The motor was a special<br />
type such as a high-speed<br />
motor.<br />
(6) A tuning operation involving<br />
motor rotation (P04* = 2 or<br />
3) was attempted while the<br />
brake was applied to the<br />
motor.<br />
What to Check and Suggested Measures<br />
Properly connect the motor to the inverter.<br />
Check whether the data of function codes (F04*, F05*, H50 through H53, H65,<br />
H66, P02*, and P03*) matches the motor specifications.<br />
Check whether the wiring length between the inverter and the motor exceeds 164<br />
ft (50 m).<br />
(Small capacity inverters are greatly affected by the wiring length.)<br />
Review, and if necessary, change the layout of the inverter and the motor to<br />
shorten the connection wire. Alternatively, minimize the wiring length without<br />
changing the layout.<br />
Disable both auto-tuning and auto-torque boost (set data of F37* to "1").<br />
Check whether the rated capacity of the motor is three or more ranks lower, or<br />
two or more ranks higher than that of the inverter.<br />
Replace the inverter with one with an appropriate capacity.<br />
<strong>Manual</strong>ly specify the values for the motor parameters P06*, P07*, and P08*.<br />
Disable both auto-tuning and auto-torque boost (set data of F37* to "1").<br />
Disable both auto-tuning and auto-torque boost (set data of F37* to "1").<br />
Specify the tuning that does not involve the motor rotation (P04* = 1).<br />
Release the brake before tuning that involves the motor rotation (P04* = 2 or<br />
3).<br />
For details of tuning errors, refer to Chapter 4 of the user manual, Section 4.1.7 "Function code basic settings and<br />
tuning < 2 >, • Tuning errors."<br />
[ 25 ] RS-485 communications error (COM port 1)<br />
RS-485 communications error (COM port 2)<br />
Problem A communications error occurred during RS-485 communications.<br />
Possible Causes<br />
(1) Communications conditions<br />
of the inverter do not match<br />
that of the host equipment.<br />
(2) Even though no-response<br />
error detection time (y08,<br />
y18) has been set,<br />
communications is not<br />
performed within the<br />
specified cycle.<br />
(3) The host equipment did not<br />
operate due to defective<br />
software, settings, or<br />
defective hardware.<br />
(4) The RS-485 converter did<br />
not operate due to incorrect<br />
connections and settings, or<br />
defective hardware.<br />
(5) Broken communications<br />
cable or poor contact.<br />
What to Check and Suggested Measures<br />
Compare the settings of the y codes (y01 to y10, y11 to y20) with those of the<br />
host equipment.<br />
Correct any settings that differ.<br />
Check the host equipment.<br />
Change the settings of host equipment software or disable the no-response<br />
error detection (y08, y18 = 0).<br />
Check the host equipment (e.g., PLCs and computers).<br />
Remove the cause of the equipment error.<br />
Check the RS-485 converter (e.g., check for poor contact).<br />
Change the various RS-485 converter settings, reconnect the wires, or<br />
replace hardware with recommended devices as appropriate.<br />
Check the continuity of the cables, contacts and connections.<br />
Replace the cable.<br />
10-21
Possible Causes<br />
(6) Inverter affected by strong<br />
electrical noise.<br />
(7) Terminating resistor not<br />
properly configured.<br />
What to Check and Suggested Measures<br />
Check if appropriate noise control measures have been implemented (e.g.,<br />
correct grounding and routing of communications cables and main circuit wires).<br />
Implement noise control measures.<br />
Implement noise reduction measures on the host side.<br />
Replace the RS-485 converter with a recommended insulated one.<br />
Check that the inverter serves as a terminating device in the network.<br />
Configure the terminating resistor switch(es) (SW2/SW3) for RS-485<br />
communication correctly. (That is, turn the switch(es) to ON.)<br />
[ 26 ] Data saving error during undervoltage<br />
Problem The inverter failed to save data such as the frequency commands and PID commands (which are specified<br />
through the keypad), or the output frequencies modified by the UP/DOWN terminal commands when the<br />
power was turned OFF.<br />
Possible Causes<br />
(1) During data saving<br />
performed when the power<br />
was turned OFF, the voltage<br />
fed to the control PCB<br />
dropped in an abnormally<br />
short period due to the rapid<br />
discharge of the DC link bus.<br />
(2) Inverter operation affected<br />
by strong electrical noise<br />
when the power was turned<br />
OFF.<br />
What to Check and Suggested Measures<br />
Check how long it takes for the DC link bus voltage to drop to the preset voltage<br />
when the power is turned OFF.<br />
Remove whatever is causing the rapid discharge of the DC link bus voltage.<br />
After pressing the key and releasing the alarm, return the data of the<br />
relevant function codes (such as the frequency commands and PID<br />
commands (specified through the keypad) or the output frequencies modified<br />
by the UP/DOWN terminal commands) back to the original values and then<br />
restart the operation.<br />
Check if appropriate noise control measures have been implemented (e.g.,<br />
correct grounding and routing of control and main circuit wires).<br />
Implement noise control measures. After pressing the key and releasing<br />
the alarm, return the data of the relevant function codes (such as the<br />
frequency commands and PID commands (specified through the keypad) or<br />
the output frequencies modified by the UP/DOWN terminal commands) back<br />
to the original values and then restart the operation.<br />
(3) The control circuit failed. Check if erf occurs each time the power is turned ON.<br />
The control PCB (on which the CPU is mounted) is defective. Contact your<br />
<strong>TECO</strong>-<strong>Westinghouse</strong> <strong>Motor</strong> <strong>Company</strong> representative.<br />
[ 27 ] Hardware error<br />
Problem The LSI on the power printed circuit board malfunctions.<br />
Possible Causes<br />
(1) The inverter capacity setting<br />
on the control printed circuit<br />
board is wrong.<br />
(2) Data stored in the power<br />
printed circuit board memory<br />
is corrupted.<br />
(3) The control printed circuit<br />
board is misconnected to<br />
the power printed circuit<br />
board.<br />
What to Check and Suggested Measures<br />
It is necessary to set the inverter capacity correctly.<br />
Contact your <strong>TECO</strong>-<strong>Westinghouse</strong> <strong>Motor</strong> <strong>Company</strong> representative.<br />
It is necessary to replace the power printed circuit board.<br />
Contact your <strong>TECO</strong>-<strong>Westinghouse</strong> <strong>Motor</strong> <strong>Company</strong> representative.<br />
It is necessary to replace the power or control printed circuit board.<br />
Contact your <strong>TECO</strong>-<strong>Westinghouse</strong> <strong>Motor</strong> <strong>Company</strong> representative.<br />
10-22
[ 28 ] Speed mismatch or excessive speed deviation<br />
Problem An excessive deviation appears between the speed command and the detected speed.<br />
Possible Causes<br />
(1) Incorrect setting of function<br />
code data.<br />
What to Check and Suggested Measures<br />
Check the following function code data; P01* (<strong>Motor</strong> (No. of poles)), d15<br />
(Feedback encoder pulse count/rev), and d16 and d17 (Feedback pulse<br />
correction factor 1 and 2).<br />
Specify data of function codes P01*, d15, d16, and d17 in accordance with<br />
the motor and PG.<br />
(2) Overload. Measure the inverter output current.<br />
Reduce the load.<br />
(3) The motor speed does not<br />
rise due to the current limiter<br />
operation.<br />
(4) Function code settings do<br />
not match the motor<br />
characteristics.<br />
(5) Wrong wiring between the<br />
pulse generator (PG) and<br />
the inverter.<br />
(6) Wiring to the motor is<br />
incorrect.<br />
(7) The motor speed does not<br />
rise due to the torque limiter<br />
operation.<br />
Check whether any mechanical brake is working.<br />
Release the mechanical brake.<br />
Check the data of function code F44 (Current limiter (Level)).<br />
Change the F44 data correctly. Or, set the F43 data to "0" (Disable) if the<br />
current limiter operation is not needed.<br />
Check the data of function codes F04*, F05*, and P01* through P12* to ensure<br />
that the V/f pattern setting is right.<br />
Match the V/f pattern setting with the motor ratings.<br />
Change the function code data in accordance with the motor parameters.<br />
Check whether the data of P01*, P02*, P03*, P06*, P07*, P08*, P09*, P10* and<br />
P12* match the parameters of the motor.<br />
Perform auto-tuning of the inverter, using the function code P04*.<br />
Check the wiring between the PG and the inverter.<br />
Correct the wiring.<br />
Check that the relationships between the PG feedback signal and the run<br />
command are as follows:<br />
For the FWD command: the B phase pulse is in the High level at rising edge of<br />
the A phase pulse<br />
For the REV command: the B phase pulse is in the Low level at rising edge of<br />
the A phase pulse<br />
If the relationship is wrong, interchange the A and B phase wires.<br />
Check the wiring to the motor.<br />
Connect the inverter output terminals U, V, and W to the motor input terminals<br />
U, V, and W, respectively.<br />
Check the data of F40 (Torque limiter 1-1).<br />
Correct the F40 data. Or, set the F40 data to "999" (Disable) if the torque<br />
limiter operation is not needed.<br />
[ 29 ] NTC wire break error<br />
Problem A wire break is found in the NTC thermistor detection circuit.<br />
Possible Causes<br />
(1) The NTC thermistor cable is<br />
broken.<br />
(2) The temperature around the<br />
motor is extremely low<br />
(lower than -30C (-22F)).<br />
(3) The NTC thermistor is<br />
broken.<br />
What to Check and Suggested Measures<br />
Check whether the motor cable is broken.<br />
Replace the motor cable.<br />
Measure the temperature around the motor.<br />
Reconsider the use environment of the motor.<br />
Measure the resistance of the NTC thermistor.<br />
Replace the motor.<br />
[ 30 ] Mock alarm<br />
Problem The LED displays the alarm err.<br />
Possible Causes<br />
(1) The + keys were held<br />
down for more than 5<br />
seconds.<br />
What to Check and Suggested Measures<br />
To escape from this alarm state, press the<br />
key.<br />
10-23
[ 31 ] PID feedback wire break<br />
Problem The PID feedback wire is broken.<br />
Possible Causes<br />
(1) The PID feedback signal<br />
wire is broken.<br />
(2) PID feedback related circuit<br />
affected by strong electrical<br />
noise.<br />
What to Check and Suggested Measures<br />
Check whether the PID feedback signal wires are connected correctly.<br />
Check whether the PID feedback signal wires are connected correctly. Or,<br />
tighten up the related terminal screws.<br />
Check whether any contact part bites the wire sheath.<br />
Check if appropriate noise control measures have been implemented (e.g.,<br />
correct grounding and routing of signal wires, communication cables, and main<br />
circuit wires).<br />
Implement noise control measures.<br />
Separate the signal wires from the main power wires as far as possible.<br />
[ 32 ] Braking transistor error<br />
Problem A braking transistor error is detected.<br />
Possible Causes<br />
(1) The braking transistor is<br />
broken.<br />
What to Check and Suggested Measures<br />
Check whether resistance of the braking resistor is correct or there is a<br />
misconnection of the resistor.<br />
Consult your <strong>TECO</strong>-<strong>Westinghouse</strong> <strong>Motor</strong> <strong>Company</strong> representative for repair.<br />
[ 33 ] Positioning control error (Servo-lock)<br />
Problem An excessive positioning deviation has occurred when the servo-lock function was activated.<br />
Possible Causes<br />
(1) Insufficient gain in<br />
positioning control system.<br />
(2) Incorrect control completion<br />
width.<br />
What to Check and Suggested Measures<br />
Readjust the settings of J97 (Servo-lock (Gain)) and d03 (Speed control 1 P<br />
(Gain)).<br />
Check whether the setting of J99 (Servo-lock (Completion width)) is correct.<br />
Correct the setting of J99.<br />
[ 34 ] Positioning control error (Synchronous control)<br />
Problem An excessive positioning deviation has occurred when the synchronous control function was activated.<br />
For details, refer to the instruction manual of the PG interface card.<br />
Possible Causes<br />
(1) Insufficient gain in<br />
positioning control system.<br />
(2) Incorrect control completion<br />
width.<br />
What to Check and Suggested Measures<br />
Readjust the settings of d72 (Synchronous Control Parameters (APR P gain))<br />
and d03 (Speed control 1 P (Gain)).<br />
Check whether the setting of d78 (Synchronous Control Parameters<br />
(Over-deviation detection width)) is correct.<br />
Correct the setting of d78.<br />
[ 35 ] Enable circuit failure<br />
Problem The circuit that detects the status of the enable circuit is broken.<br />
Possible Causes<br />
(1) Circuit related to the Enable<br />
circuit affected by strong<br />
electrical noise.<br />
What to Check and Suggested Measures<br />
Check if appropriate noise control measures have been implemented (e.g.,<br />
correct grounding and routing of signal wires, communication cables, and main<br />
circuit wires).<br />
Implement noise control measures.<br />
Separate the signal wires from the main power wires as far as possible.<br />
The "Reset alarm" terminal command RST cannot reset this alarm ecf. If even a power-off reset cannot restore<br />
the inverter state, the inverter needs to be repaired.<br />
10-24
[ 36 ] Enable circuit failure<br />
Problem The circuit that detects the status of the enable circuit is broken.<br />
Possible Causes<br />
(1) Contact failure of the<br />
interface printed circuit<br />
board (PCB).<br />
(2) Enable circuit logic error<br />
What to Check and Suggested Measures<br />
Check that the interface PCB is firmly mounted in place. (Turning the inverter<br />
power off and on clears this alarm.)<br />
Check that the two output levels of the safety switch or other safety device are<br />
not discrepant. (EN1/EN2 = High/High or Low/Low)<br />
(Turning the inverter power off and on clears this alarm.)<br />
10.5 If the “Light Alarm” Indication ( ) Appears on the LED Monitor<br />
If the inverter detects a minor abnormal state "light alarm," it can continue the current operation without tripping while<br />
displaying the "light alarm" indication on the LED monitor. In addition to the indication , the inverter displays<br />
the "L-ALARM" (blinking) on the LCD monitor and outputs the "light alarm" signal L-ALM to a digital output terminal to<br />
alert the peripheral equipment to the occurrence of a light alarm. (To use the L-ALM, it is necessary to assign the signal<br />
to any of the digital output terminals by setting any of function codes E20 through E24 and E27 to "98.")<br />
Function codes H81 and H82 specify which alarms should be categorized as "light alarm." The available "light alarm"<br />
codes are check-marked in the "Light alarm" object column in Table 10.1.<br />
To display the "light alarm" and escape from the light alarm state, follow the instructions below.<br />
• Displaying the light alarm<br />
1) Press the key to enter Programming mode.<br />
2) Shift to Menu #5 "5: MAINTENANC," scroll to Page 11, and check the "LALM1" (Light alarm (Latest)). The light alarm<br />
is displayed in alarm codes. For details about those codes, see Table 10.1 "Abnormal States Detectable ("Alarm"<br />
and "Light Alarm" Objects)."<br />
• Switching the LED monitor from the light alarm to normal display<br />
If it is necessary to return the LED monitor to the normal display state (showing the running status such as reference<br />
frequency) before the light alarm is removed (e.g., when it takes a long time to remove the light alarm), follow the steps<br />
below.<br />
1) Press the key to return the LED monitor to the light alarm indication ( ).<br />
2) With being displayed, press the key. The LED monitor returns to the normal display state, but the<br />
"L-ALARM" on the LCD monitor continues blinking.<br />
• Releasing the light alarm<br />
1) First remove the "LALM1" (Light alarm (Latest)) under Menu #5, in accordance with the troubleshooting procedure.<br />
The reference page for the troubleshooting corresponding to each light alarm is shown in "Ref. page" column in<br />
Table 10.1.<br />
2) To return the LED monitor from the display to the normal display state (showing the running status such as<br />
reference frequency), press the key in Running mode.<br />
If the light alarm(s) has been successfully removed in step 1) above, the "L-ALARM" blinking on the LCD monitor<br />
disappears and the digital output L-ALM also goes OFF. (If any light alarm persists, e.g., detecting a DC fan lock, the<br />
"L-ALARM" continues blinking and the L-ALM remains ON.)<br />
10-25
10.6 If an Abnormal Pattern Appears on the LED Monitor except Alarm Codes and "Light Alarm"<br />
Indication ( )<br />
[ 1 ] – – – – (center bar) appears<br />
Problem A center bar (– – – –) appeared on the LED monitor.<br />
Possible Causes<br />
(1) When PID control had been<br />
disabled (J01 = 0), you<br />
changed E43 (LED Monitor<br />
(Item selection)) to 10 or 12.<br />
With the PID being enabled<br />
(J01 = 1, 2, or 3), you<br />
disabled PID control (J01 =<br />
0) when the LED monitor<br />
had been set to display the<br />
PID command or PID<br />
feedback amount by<br />
pressing the key.<br />
(2) The keypad was poorly<br />
connected.<br />
What to Check and Suggested Measures<br />
Make sure that when you wish to view other monitor items, E43 is not set to "10:<br />
PID command" or "12: PID feedback amount."<br />
Set E43 to a value other than "10" or "12."<br />
Make sure that when you wish to view a PID command or a PID feedback<br />
amount, J01 (PID control) is not set to "0: Disable."<br />
Set J01 to "1: Enable (Process control normal operation)," "2: Enable<br />
(Process control inverse operation)," or "3: Enable (Dancer control)."<br />
Prior to proceed, check that pressing the key does not change the display on<br />
the LED monitor.<br />
Check continuity of the extension cable for the keypad used in remote operation.<br />
Replace the cable.<br />
[ 2 ] _ _ _ _ (under bar) appears<br />
Problem Although you pressed the / key or entered a run forward command FWD or a run reverse command<br />
REV, the motor did not start and an under bar ( _ _ _ _ ) appeared on the LED monitor.<br />
Possible Causes<br />
(1) The voltage of the DC link<br />
bus was low.<br />
(2) The main power is not ON,<br />
while the auxiliary input<br />
power to the control circuit is<br />
supplied.<br />
(3) Although power is supplied<br />
not via the commercial<br />
power line but via the DC<br />
link bus, the main power<br />
down detection is enabled<br />
(H72 = 1).<br />
(4) Inverter running on<br />
single-phase power<br />
What to Check and Suggested Measures<br />
Select 5_01 under Menu #5 "Maintenance Information" in Programming mode on<br />
the keypad, then check the DC link bus voltage which should be 200 VDC or<br />
below for three-phase 230 V series, and 400 VDC or below for three-phase 460<br />
V series.<br />
Connect the inverter to a power supply that meets its input specifications.<br />
Check whether the main power is turned ON.<br />
Turn the main power ON.<br />
Check the connection to the main power and check if the H72 data is set to "1"<br />
(factory default).<br />
Correct the H72 data.<br />
Refer to Section 10.7 "If the Inverter is Running on Single-Phase Power,” [ 2 ].<br />
[ 3 ] appears<br />
Problem Parentheses (<br />
Possible Causes<br />
(1) The display data overflows<br />
the LED monitor.<br />
) appeared on the LED monitor during speed monitoring on the keypad.<br />
What to Check and Suggested Measures<br />
Check whether the output frequency multiplied by the display coefficient (E50) is<br />
1,000,000 or more.<br />
Correct the E50 data.<br />
10-26
10.7 If the Inverter is Running on Single-Phase Power<br />
[ 1 ] The AC fan(s) does not work. (230 V series with 60 HP or above or 460 V series with 125 HP or above)<br />
Possible Causes<br />
The power supply is connected to<br />
the main circuit power input<br />
terminal L2.<br />
Suggested Measures<br />
Connect the power supply to L1 and L3.<br />
[ 2 ] _ _ _ _ (under bar) appears<br />
Possible Causes<br />
The power supply is connected<br />
to the main circuit power input<br />
terminal L2 and the main power<br />
down detection is activated.<br />
Suggested Measures<br />
Connect the power supply to L1 and L3.<br />
[ 3 ] The motor does not run as expected.<br />
Possible Causes<br />
Large voltage ripple inside the<br />
inverter due to single-phase<br />
power<br />
Suggested Measures<br />
When the inverter runs on single-phase power, the voltage ripple becomes larger<br />
than that on three-phase power so that an operation error span becomes wider,<br />
causing lower performance than expected.<br />
To improve the accuracy in operation, use the inverter on three-phase power.<br />
[ 4 ] Charger circuit fault (230 V series with 60 HP or above or 460 V series with 125 HP or above)<br />
Possible Causes<br />
The power supply is connected<br />
to the main circuit power input<br />
terminal L2.<br />
Suggested Measures<br />
Connect the power supply to L1 and L3.<br />
[ 5 ] Input phase loss<br />
Possible Causes<br />
The input phase loss protection<br />
is activated.<br />
Suggested Measures<br />
Disable the input phase loss protection by switching Bit 1 of H98 to "0." When<br />
switching from the factory default of H98, modify the H98 data from 82 to 81 in<br />
decimal.<br />
[ 6 ] Heat sink overheat, Inverter internal overheat, or Inverter overload<br />
Possible Causes<br />
The inverter was running with<br />
load exceeding the single-phase<br />
rating.<br />
Suggested Measures<br />
To run the inverter on single-phase power, it is necessary to derate the output to<br />
the lower level than that on three-phase power.<br />
Review the load conditions to run the inverter within the single-phase rating, or<br />
increase the inverter capacity.<br />
10-27
Chapter 11 Specifications<br />
11.1 Drive Ratings<br />
11.1.1 230 V series<br />
CT mode designed for constant torque load applications<br />
Item<br />
Specifications<br />
Model <strong>EQ7</strong>-2XXX-C 0P5 001 002 003 005 007 010 015 020 025 030 040 050 060 075 100 125 150<br />
*1<br />
Nominal applied motor for three<br />
phase input [HP]<br />
1/2 1 2 3 5 7.5 7.5 10 15 20 25 30 40 50 60 75 100 125<br />
*1<br />
Nominal applied motor for single<br />
phase input [HP]<br />
1/4 1/2 1 1.5 3 3 3 5 7.5 10 10 15 20 25 30 30 40 40<br />
Output ratings<br />
Three<br />
phase<br />
input<br />
Single<br />
phase<br />
input<br />
Rated capacity *2<br />
[kVA]<br />
1.2 2.0 3.2 4.4 7.2 11 11 15 20 25 30 36 47 58 72 86 113 138<br />
Rated current [A] 3 5 8 11 18 27 27 37 49 63 76 90 119 146 180 215 283 346<br />
Rated capacity *2<br />
[kVA]<br />
0.8 1.3 1.9 2.6 4.4 6.8 6.8 9.2 10 13 15 18 24 30 37 38 44 52<br />
Rated current [A] 1.9 3.1 4.7 6.3 11 17 17 23 26 33 38 45 61 75 93 95 109 131<br />
Rated voltage *3 [V] Three-phase, 200 to 240 V (with AVR function) Three-phase 200 to 230 V (with AVR function)<br />
Overload capability<br />
Voltage, frequency<br />
Three-phase, 200 to 240 V, 50/60 Hz<br />
150% -1 min, 200% -3.0 s<br />
Three-phase, 200 to 220 V, 50 Hz<br />
Three-phase, 200 to 230 V, 60 Hz<br />
Input ratings<br />
Braking<br />
Three<br />
phase<br />
input<br />
Single<br />
phase<br />
input<br />
Voltage, frequency<br />
variations<br />
Voltage: +10 to -15% (Interphase voltage unbalance: 2% or less), *4 Frequency: +5 to -5%<br />
Input current with<br />
DCR 1.5 3 5.5 7.7 13 18.5 18.5 25.1 37.6 50.2 62.7 75.3 100 120 145 178 246 291<br />
Input current without<br />
DCR 2.8 4.7 8.5 11.9 20 28.4 28.4 38.6 54.8 72.4 87.7 101 136 167 203 -<br />
Required capacity<br />
with DCR *5 [kVA] 0.6 1.2 2.2 3.1 5.2 7.4 7.4 10 15 20 25 30 40 48 58 71 98 116<br />
Voltage, frequency<br />
Single-phase , 200 to 240 V, 50/60Hz<br />
Single-phase, 200 to 220 V, 50 Hz<br />
Single-phase, 200 to 230 V, 60 Hz<br />
Voltage, frequency<br />
variations Voltage: +10 to -10% , Frequency: +5 to -5%<br />
Input current with<br />
DCR 2.0 3.5 6.6 9.5 17.2 25.1 25.1 33.1 41.8 56.1 67.7 79 114 143 172 181 218 252<br />
Input current without<br />
DCR 3.1 5.3 9.5 13.2 22.2 31.5 31.5 42.7 60.7 80.1 97 112 151 185 225 228 -<br />
Required capacity<br />
with DCR *5 [kVA]<br />
0.5 0.9 1.6 2.2 4.0 5.8 5.8 7.7 9.7 13 16 18 26 33 40 42 50 58<br />
Torque *6 [%] 150% 100% 20% 10 to 15%<br />
Braking transistor Built-in - -<br />
Built-in braking resister Built-in -<br />
Braking time [s] 5 s -<br />
%ED 5 3 5 3 2 3 3 2 -<br />
DC reactor (DCR) Option As standard *7<br />
Keypad<br />
Applicable safety standards<br />
Multi-function keypad<br />
UL508C, C22.2No.14, EN61800-5-1:2007,EN61800-5-2:2007 SIL2, EN ISO13849-1:2008 PL=d Cat.3,EN954-1:1996 Cat.3<br />
Enclosure (IEC60529) IP20, UL open type , NEMA1(Option) IP00, UL open type , NEMA1(Option)<br />
Cooling method Natural cooling Fan cooling<br />
Weight/Mass [lbs(kg)]<br />
3.8<br />
(1.7)<br />
4.4<br />
(2.0)<br />
6.2<br />
(2.8)<br />
6.6<br />
(3.0)<br />
6.6<br />
(3.0)<br />
14.3<br />
(6.5)<br />
14.3<br />
(6.5)<br />
14.3<br />
(6.5)<br />
12.8<br />
(5.8)<br />
20.9<br />
(9.5)<br />
20.9<br />
(9.5)<br />
22<br />
(10)<br />
55.1<br />
(25)<br />
70.6<br />
(32)<br />
92.6<br />
(42)<br />
94.8<br />
(43)<br />
137<br />
(62)<br />
231<br />
(105)<br />
(*1) 4-pole standard motor<br />
(*2) Rated capacity is calculated by assuming the output rated voltage as 230 V for 230 V series and 460 V for 460 V series.<br />
(*3) Output voltage cannot exceed the power supply voltage. At single-phase input use, the output voltage may be lower than three-phase input.<br />
(*4) Voltage unbalance [%] = (Max. voltage [V] - Min. voltage [V])/Three-phase average voltage [V]×67(See IEC61800-3.) If this value is 2 to 3%, use an optional AC reactor (ACR).<br />
(*5) Required when a DC reactor (DCR) is used.<br />
(*6) Without external braking resistor condition. Average braking torque for the motor running alone. (It varies with the efficiency of the motor.)<br />
(*7) For Inverters of 100HP or above , the DC reactor is provided as separate standard component. Be sure to connect it to those inverters.<br />
11-1
VT mode designed for variable torque load applications<br />
Item<br />
Specifications<br />
Model <strong>EQ7</strong>-2XXX-C 0P5 001 002 003 005 007 010 015 020 025 030 040 050 060 075 100 125 150<br />
*1<br />
Nominal applied motor for three<br />
phase input [HP]<br />
1/2 1 2 3 5 7.5 10 15 20 25 30 40 50 60 75 100 125 150<br />
*1<br />
Nominal applied motor for single<br />
phase input [HP]<br />
1/4 1/2 1 1.5 3 3 5 7.5 10 10 15 20 25 30 30 30 40 50<br />
Output ratings<br />
Three<br />
phase<br />
input<br />
Single<br />
phase<br />
input<br />
Rated capacity *2<br />
[kVA]<br />
1.2 2.0 3.2 4.4 7.2 11 13 18 24 30 35 46 58 72 86 113 138 165<br />
31.8 46.2 59.4 74.8 88 115<br />
Rated current *4 [A] 3 5 8 11 18 27 (29) (42) (55) (68) (80) (107) 146 180 215 283 346 415<br />
Rated capacity *2<br />
[kVA]<br />
0.8 1.3 1.9 2.6 4.4 6.8 9.2 12 13 16 18 23 30 37 38 41 52 59<br />
Rated current [A] 1.9 3.1 4.7 6.3 11 17 23 30 32 39 44 58 74 93 95 102 131 149<br />
Input ratings<br />
Braking<br />
Rated voltage *3 [V] Three-phase, 200 to 240 V (with AVR function) Three-phase 200 to 230 V (with AVR function)<br />
Overload capability 150% -1 min, 200% -3.0 s 120% -1 min<br />
Three<br />
phase<br />
input<br />
Single<br />
phase<br />
input<br />
Voltage, frequency<br />
Three-phase, 200 to 240 V, 50/60 Hz<br />
Three-phase, 200 to 220 V, 50 Hz<br />
Three-phase, 200 to 230 V, 60 Hz<br />
Voltage, frequency<br />
variations Voltage: +10 to -15% (Interphase voltage unbalance: 2% or less), *5 Frequency: +5 to -5%<br />
Input current with<br />
DCR 1.5 3 5.5 7.7 13 18.5 25.1 37.6 50.2 62.7 75.3 100 120 145 178 246 291 358<br />
Input current without<br />
DCR 2.8 4.7 8.5 11.9 20 28.4 38.6 54.8 72.4 87.7 101 136 167 203 244 -<br />
Required capacity<br />
with DCR *6 [kVA] 0.6 1.2 2.2 3.1 5.2 7.4 10.0 15.0 20.0 25.0 30.0 40.0 48.0 58.0 71.0 98.0 116 143<br />
Voltage, frequency<br />
Single-phase, 200 to 240 V, 50/60 Hz<br />
Single-phase, 200 to 220 V, 50 Hz<br />
Single-phase, 200 to 230 V, 60 Hz<br />
Voltage, frequency<br />
variations Voltage: +10 to -10% , Frequency: +5 to -5%<br />
Input current with<br />
DCR 2.0 3.5 6.6 9.5 17.2 25.1 34.0 47.0 55.1 67.9 78.1 107 140 173 179 202 258 293<br />
Input current without<br />
DCR 3.1 5.3 9.5 13.2 22.2 31.5 42.7 60.7 80.1 97 112 151 185 225 233 -<br />
Required capacity<br />
with DCR *6 [kVA] 0.5 0.9 1.6 2.2 4.0 5.8 7.9 11 13 16 18 25 32 40 41 47 59 67<br />
Torque *7 [%] 150% 100% 70% 15% 7 to 12%<br />
Braking transistor Built-in - -<br />
Built-in braking resister Built-in -<br />
Braking time [s] 5 s 3.7 s 3.7 s 3.4 s -<br />
%ED 5 3 5 3 2 2.2 2.2 1.4 -<br />
DC reactor (DCR) Option As standard *8<br />
Keypad<br />
Applicable safety standards<br />
Multi-function keypad as standard<br />
UL508C, C22.2No.14, EN61800-5-1:2007,EN61800-5-2:2007 SIL2,<br />
EN ISO13849-1:2008 PL=d Cat.3,EN954-1:1996 Cat.3<br />
Enclosure (IEC60529) IP20, UL open type , NEMA1(Option) IP00, UL open type , NEMA1(Option)<br />
Cooling method Natural cooling Fan cooling<br />
Weight/Mass [lbs(kg)]<br />
3.8<br />
(1.7)<br />
4.4<br />
(2.0)<br />
6.2<br />
(2.8)<br />
6.6<br />
(3.0)<br />
6.6<br />
(3.0)<br />
14.3<br />
(6.5)<br />
14.3<br />
(6.5)<br />
14.3<br />
(6.5)<br />
12.8<br />
(5.8)<br />
20.9<br />
(9.5)<br />
20.9<br />
(9.5)<br />
22<br />
(10)<br />
55.1<br />
(25)<br />
70.6<br />
(32)<br />
92.6<br />
(42)<br />
94.8<br />
(43)<br />
137<br />
(62)<br />
231<br />
(105)<br />
(*1) 4-pole standard motor<br />
(*2) Rated capacity is calculated by assuming the output rated voltage as 230 V for 230 V series and 460 V for 460 V series.<br />
(*3) Output voltage cannot exceed the power supply voltage. At single-phase input use, the output voltage may be lower than three-phase input.<br />
(*4) To use the inverter with the carrier frequency of 3 kHz or more at the surrounding temperature of 40°C(104°F) or higher, manage the load so that the current<br />
comes to be within the rated ones enclosed in parentheses ( ) in continuous running.<br />
(*5) Voltage unbalance [%] = (Max. voltage [V] - Min. voltage [V])/Three-phase average voltage [V] ×67(See IEC61800-3.) If this value is 2 to 3%, use an optional AC reactor (ACR).<br />
(*6) Required when a DC reactor (DCR) is used.<br />
(*7) Without external braking resistor condition. Average braking torque for the motor running alone. (It varies with the efficiency of the motor.)<br />
(*8) For inverters of 100HP or above, the DC reactor is provided as separate standard component. Be sure to connect it to those inverters.<br />
11-2
11.1.2 460 V series<br />
CT mode designed for constant torque load applications<br />
Item<br />
Specifications<br />
Model <strong>EQ7</strong>-4XXX-C 0P5 001 002 003 005 007 010 015 020 025 030 040 050 060 075 100 - -<br />
*1<br />
Nominal applied motor for three<br />
phase input [HP]<br />
*1<br />
Nominal applied motor for single<br />
phase input [HP]<br />
1/2 1 2 3 5 7.5 7.5 10 15 20 25 30 40 50 60 75 - -<br />
1/4 1/2 1 1.5 3 3 3 5 7.5 10 10 15 20 25 30 30 - -<br />
Output ratings<br />
Three<br />
phase<br />
input<br />
Single<br />
phase<br />
input<br />
Rated capacity *2<br />
[kVA]<br />
1.2 2.0 3.2 4.4 7.2 11 11 15 20 25 31 36 48 60 73 89 - -<br />
Rated current [A] 1.5 2.5 4 5.5 9 13.5 13.5 18.5 24.5 32 39 45 60 75 91 112 - -<br />
Rated capacity *2<br />
[kVA]<br />
0.8 1.2 2.0 2.4 4.5 6.4 6.4 9.6 10 14 16 18 24 30 36 44 - -<br />
Rated current [A] 0.9 1.5 2.4 3.0 5.6 8.0 8.0 12 13 17 20 23 30 38 45 55 - -<br />
Rated voltage *3 [V]<br />
Overload capability<br />
Three-phase, 380 to 480 V (with AVR function)<br />
150% -1 min, 200% -3.0 s<br />
Input ratings<br />
Three<br />
phase<br />
input<br />
Single<br />
phase<br />
input<br />
Voltage, frequency<br />
Three-phase, 380 to 480 V, 50/60 Hz<br />
Voltage, frequency<br />
variations Voltage: +10 to -15% (Interphase voltage unbalance: 2% or less), *4 Frequency: +5 to -5%<br />
Input current with<br />
DCR 0.7 1.5 2.6 4 6.6 9.2 9.2 12.4 18.8 25 31 36 50 60 72 89 - -<br />
Input current without<br />
DCR 1.4 2.6 5.1 7.1 11.3 15 15 20.1 28.6 38 45.4 52.6 67.7 82 99.1 - - -<br />
Required capacity<br />
with DCR *5 [kVA] 0.6 1.2 2.1 3.2 5.3 7.4 7.4 9.9 15.0 20.0 25.0 29.0 40.0 48.0 58.0 71.0 - -<br />
Voltage, frequency<br />
Single-phase, 380 to 480 V, 50/60 Hz<br />
Voltage, frequency<br />
variations<br />
Voltage: +10 to -10% , Frequency: +5 to -5%<br />
Input current with<br />
DCR 1.0 1.8 3.5 4.7 8.5 11.7 11.7 16.8 21.5 29 34.5 41.6 57.1 69.7 84.5 106 - -<br />
Input current without<br />
DCR 1.7 3.1 5.9 8.2 13.0 17.3 17.3 23.2 33 43.8 52.3 60.6 77.9 94.3 114 140 - -<br />
Required capacity<br />
with DCR *5 [kVA] 0.5 0.9 1.7 2.2 4.0 5.4 5.4 7.8 9.9 13 16 19 26 32 39 49 - -<br />
Torque *6 [%] 150% 100% 20% 10 to 15% - -<br />
Braking<br />
Braking transistor Built-in - - -<br />
Built-in braking resister Built-in - - -<br />
Braking time [s] 5 s - - -<br />
%ED 5 3 5 3 2 3 3 2 - - -<br />
DC reactor (DCR) Option As standard *7<br />
Keypad<br />
Applicable safety standards<br />
Multi-function keypad as standard<br />
UL508C, C22.2No.14, EN61800-5-1:2007,EN61800-5-2:2007 SIL2,<br />
EN ISO13849-1:2008 PL=d Cat.3,EN954-1:1996 Cat.3<br />
Enclosure (IEC60529) IP20, UL open type , NEMA1(Option) IP00 UL open type , NEMA1(Option)<br />
Cooling method Natural cooling Fan cooling<br />
Weight/Mass [lbs(kg)]<br />
3.8<br />
(1.7)<br />
4.4<br />
(2.0)<br />
5.7<br />
(2.6)<br />
6.0<br />
(2.7)<br />
6.6<br />
(3.0)<br />
14.3<br />
(6.5)<br />
14.3<br />
(6.5)<br />
14.3<br />
(6.5)<br />
12.8<br />
(5.8)<br />
20.9<br />
(9.5)<br />
20.9<br />
(9.5)<br />
22<br />
(10)<br />
55.1<br />
(25)<br />
57.3<br />
(26)<br />
68.3<br />
(31)<br />
72.8<br />
(33) - -<br />
(*1) 4-pole standard motor<br />
(*2) Rated capacity is calculated by assuming the output rated voltage as 230 V for 230 V series and 460 V for 460 V series.<br />
(*3) Output voltage cannot exceed the power supply voltage. At single-phase input use, the output voltage may be lower than three-phase input.<br />
(*4) Voltage unbalance [%] = (Max. voltage [V] - Min. voltage [V])/Three-phase average voltage [V] ×67(See IEC61800-3.) If this value is 2 to 3%, use an optional AC reactor (ACR).<br />
(*5) Required when a DC reactor (DCR) is used.<br />
(*6) Without external braking resistor condition. Average braking torque for the motor running alone. (It varies with the efficiency of the motor.)<br />
(*7) For inverters of 100HP or above, the DC reactor is provided as separate standard component. Be sure to connect it to those inverters.<br />
11-3
CT mode designed for constant torque load applications<br />
Item<br />
Specifications<br />
Model <strong>EQ7</strong>-4XXX-C 125 150 200 250 300 350 450 500 600 700 800 900 1000 - -<br />
*1<br />
Nominal applied motor for three<br />
phase input [HP]<br />
100 125 150 200 250 300 350 400 450 500 600 800 900 - -<br />
*1<br />
Nominal applied motor for single<br />
phase input [HP]<br />
40 50 60 60 75 100 100 125 150 150 200 250 300 - -<br />
Output ratings<br />
Three<br />
phase<br />
input<br />
Single<br />
phase<br />
input<br />
Rated capacity *2<br />
[kVA]<br />
120 140 167 202 242 300 330 414 466 518 590 765 932 - -<br />
Rated current [A] 150 176 210 253 304 377 415 520 585 650 740 960 1170 - -<br />
Rated capacity *2<br />
[kVA]<br />
48 57 68 82 97 118 133 162 184 206 236 305 373 - -<br />
Rated current [A] 61 72 86 103 122 149 167 204 231 259 297 384 469 - -<br />
Rated voltage *3 [V]<br />
Three-phase, 380 to 480 V (with AVR function)<br />
Input ratings<br />
Braking<br />
Overload capability<br />
Three<br />
phase<br />
input<br />
Single<br />
phase<br />
input<br />
Voltage, frequency<br />
150%-1 min, 200% -3.0 s<br />
Three-phase, 380 to 440 V, 50 Hz<br />
Three-phase, 380 to 480 V, 60 Hz<br />
Voltage, frequency<br />
variations Voltage: +10 to -15% (Interphase voltage unbalance: 2% or less) *4 , Frequency: +5 to -5%<br />
Input current with<br />
DCR 120 143 176 207 250 311 340 436 487 547 614 767 970 - -<br />
Required capacity<br />
with DCR *5 [kVA] 96 114 140 165 199 248 271 347 388 436 489 611 773 - -<br />
Voltage, frequency<br />
Single-phase, 380 to 440 V, 50 Hz<br />
Single-phase, 380 to 480 V, 60 Hz<br />
Voltage, frequency<br />
variations Voltage: +10 to -10% , Frequency: +5 to -5%<br />
Input current with<br />
DCR 113 137 164 192 234 286 319 395 446 512 575 707 892 - -<br />
Required capacity<br />
with DCR *5 [kVA] 53 63 76 89 108 132 147 182 206 236 265 325 410 - -<br />
Torque *6 [%] 10 to 15 %<br />
Braking transistor - -<br />
DC reactor (DCR) As standard *7<br />
Keypad<br />
Applicable safety standards<br />
Enclosure (IEC60529)<br />
Cooling method<br />
Weight/Mass [lbs(kg)]<br />
93<br />
(42)<br />
137<br />
(62)<br />
141<br />
(64)<br />
Multi-function keypad as standard<br />
UL508C, C22.2No.14, EN61800-5-1:2007,EN61800-5-2:2007 SIL2,<br />
EN ISO13849-1:2008 PL=d Cat.3,EN954-1:1996 Cat.3<br />
207<br />
(94)<br />
216<br />
(98)<br />
IP00, UL open type , NEMA1(Option)<br />
284<br />
(129)<br />
309<br />
(140)<br />
Fan cooling<br />
540<br />
(245)<br />
540<br />
(245)<br />
805<br />
(365)<br />
805<br />
(365)<br />
1170<br />
(530)<br />
1170<br />
(530) - -<br />
(*1) 4-pole standard motor<br />
(*2) Rated capacity is calculated by assuming the output rated voltage as 230 V for 230 V series and 460 V for 460 V series.<br />
(*3) Output voltage cannot exceed the power supply voltage. At single-phase input use, the output voltage may be lower than three-phase input.<br />
(*4) Voltage unbalance [%] = (Max. voltage [V] - Min. voltage [V])/Three-phase average voltage [V]×67(See IEC61800-3.)If this value is 2 to 3%, use an optional AC reactor (ACR).<br />
(*5) Required when a DC reactor (DCR) is used.<br />
(*6) Without external braking resistor condition. Average braking torque for the motor running alone. (It varies with the efficiency of the motor.)<br />
(*7) For inverters of 100HP or above, the DC reactor is provided as separate standard component. Be sure to connect it to those inverters.<br />
11-4
VT mode designed for variable torque load applications<br />
Item<br />
Specifications<br />
Model <strong>EQ7</strong>-4XXX-C 0P5 001 002 003 005 007 010 015 020 025 030 040 050 060 075 100 - -<br />
*1<br />
Nominal applied motor for three<br />
phase input [HP]<br />
*1<br />
Nominal applied motor for single<br />
phase input [HP]<br />
1/2 1 2 3 5 7.5 10 15 20 25 30 40 50 60 75 100 - -<br />
1/4 1/2 1 1.5 3 3 5 7.5 10 10 15 20 25 30 30 40 - -<br />
Output ratings<br />
Three<br />
phase<br />
input<br />
Single<br />
phase<br />
input<br />
Rated capacity *2<br />
[kVA]<br />
1.2 2.0 3.2 4.4 7.2 11 13.1 18.3 24 29 36 48 60 73 89 120 - -<br />
Rated current [A] 1.5 2.5 4 5.5 9 13.5 16.5 23 30.5 37 45 60 75 91 112 150 - -<br />
Rated capacity *2<br />
[kVA]<br />
0.8 1.2 2.0 2.4 4.5 6.4 8.8 12 14 16 18 23 30 37 43 47 - -<br />
Rated current [A] 0.9 1.5 2.4 3.0 5.6 8.0 11 15 17 20 23 29 37 46 54 59 - -<br />
Rated voltage *3 [V]<br />
Three-phase, 380 to 480 V (with AVR function)<br />
Overload capability 150% -1 min, 200% -3.0 s 120% -1 min<br />
Input ratings<br />
Three<br />
phase<br />
input<br />
Single<br />
phase<br />
input<br />
Voltage, frequency<br />
Three-phase, 380 to 480 V, 50/60 Hz<br />
Voltage, frequency<br />
variations Voltage: +10 to -15% (Interphase voltage unbalance: 2% or less) *4 , Frequency: +5 to -5%<br />
Input current with<br />
DCR 0.7 1.5 2.6 4 6.6 9.2 12.5 18.8 25.1 31.3 36.3 50.2 60.2 72.7 89.1 120 - -<br />
Input current without<br />
DCR 1.4 2.6 5.1 7.1 11.3 15 20.1 28.6 38 45.4 52.6 67.7 82 99.1 121 - - -<br />
Required capacity<br />
with DCR *5 [kVA] 0.6 1.2 2.2 3.1 5.2 7.4 10 15 20 25 29 40 48 58 71 96 - -<br />
Voltage, frequency<br />
Single-phase, 380 to 480 V, 50/60 Hz<br />
Voltage, frequency<br />
variations Voltage: +10 to -10% , Frequency: +5 to -5%<br />
Input current with<br />
DCR 1.0 1.8 3.5 4.7 8.5 11.7 15.7 24 28.6 34.6 40 53.4 69.1 84.3 99.7 110 - -<br />
Input current without<br />
DCR 1.7 3.1 5.9 8.2 13.0 17.3 23.2 33 43.8 52.3 60.6 77.9 94.3 114 134 - - -<br />
Required capacity<br />
with DCR *5 [kVA] 0.5 0.9 1.7 2.2 4.0 5.4 7.3 11 13 16 18 25 32 39 46 51 - -<br />
Torque *6 [%] 150% 100% 70% 15% 7 to 12% - -<br />
Braking<br />
Braking transistor Built-in - - -<br />
Built-in braking resister<br />
Built-in<br />
Braking time [s] 5 s 3.7s 3.7s 3.4s<br />
%ED 5 3 5 3 2 2.2 2.2 1.4<br />
DC reactor (DCR) Option As standard *7<br />
Keypad<br />
Applicable safety standards<br />
Multi-function keypad as standard<br />
UL508C, C22.2No.14, EN61800-5-1:2007,EN61800-5-2:2007 SIL2,<br />
EN ISO13849-1:2008 PL=d Cat.3,EN954-1:1996 Cat.3<br />
Enclosure (IEC60529) IP20, UL open type , NEMA1(Option) IP00 UL open type , NEMA1(Option)<br />
Cooling method Natural cooling Fan cooling<br />
Weight/Mass [lbs(kg)]<br />
3.8<br />
(1.7)<br />
4.4<br />
(2.0)<br />
5.7<br />
(2.6)<br />
6.0<br />
(2.7)<br />
6.6<br />
(3.0)<br />
14.3<br />
(6.5)<br />
14.3<br />
(6.5)<br />
14.3<br />
(6.5)<br />
12.8<br />
(5.8)<br />
20.9<br />
(9.5)<br />
20.9<br />
(9.5)<br />
22<br />
(10)<br />
55.1<br />
(25)<br />
57.3<br />
(26)<br />
68.3<br />
(31)<br />
72.8<br />
(33) - -<br />
(*1) 4-pole standard motor<br />
(*2) Rated capacity is calculated by assuming the output rated voltage as 230 V for 230 V series and 460 V for 460 V series.<br />
(*3) Output voltage cannot exceed the power supply voltage.<br />
(*4) Voltage unbalance [%] = (Max. voltage [V] - Min. voltage [V])/Three-phase average voltage [V] ×67(See IEC61800-3.) If this value is 2 to 3%, use an optional AC reactor (ACR).<br />
(*5) Required when a DC reactor (DCR) is used.<br />
(*6) Without external braking resistor condition. Average braking torque obtained by use of a motor. (Varies with the efficiency of the motor.)<br />
(*7) For inverters of 100HP or above, the DC reactor is provided as separate standard component. Be sure to connect it to those inverters.<br />
11-5
VT mode designed for variable torque load applications<br />
Item<br />
Specifications<br />
Model <strong>EQ7</strong>-4XXX-C 125 150 200 250 300 350 450 500 600 700 800 900 1000 - -<br />
*1<br />
Nominal applied motor for three<br />
phase input [HP]<br />
*1<br />
Nominal applied motor for single<br />
phase input [HP]<br />
125 150 200 250 300 350 450 500 600 700 800 900 1000 - -<br />
50 50 60 75 100 100 125 150 200 200 250 300 400 - -<br />
Output ratings<br />
Three<br />
phase<br />
input<br />
Single<br />
phase<br />
input<br />
Rated capacity *2<br />
[kVA]<br />
140 167 202 242 300 331 414 518 590 669 765 932 1092 - -<br />
Rated current [A] 176 210 253 304 377 415 520 650 740 840 960 1170 1370 - -<br />
Rated capacity *2<br />
[kVA]<br />
55 65 78 96 116 128 160 198 229 259 305 368 461 - -<br />
Rated current [A] 70 82 99 121 146 161 202 250 288 326 384 462 579 - -<br />
Rated voltage *3 [V]<br />
Three-phase, 380 to 480 V (with AVR function)<br />
Input ratings<br />
Brakin<br />
Overload capability<br />
Three<br />
phase<br />
input<br />
Single<br />
phase<br />
input<br />
Voltage, frequency<br />
120% -1 min<br />
Three-phase, 380 to 440 V, 50 Hz<br />
Three-phase, 380 to 480 V, 60 Hz<br />
Voltage, frequency<br />
variations Voltage: +10 to -15% (Interphase voltage unbalance: 2% or less) *4 , Frequency: +5 to -5%<br />
Input current with<br />
DCR 143 175 207 249 311 340 435 547 613 686 766 970 1093 - -<br />
Required capacity<br />
with DCR *5 [kVA] 114 140 165 199 248 271 347 436 489 547 611 773 871 - -<br />
Voltage, frequency<br />
Single-phase, 380 to 440 V, 50 Hz<br />
Single-phase, 380 to 480 V, 60 Hz<br />
Voltage, frequency<br />
variations Voltage: +10 to -10% , Frequency: +5 to -5%<br />
Input current with<br />
DCR<br />
132 158 188 226 283 309 392 492 558 633 717 878 1060 - -<br />
Required capacity<br />
with DCR *5 [kVA]<br />
61 73 87 105 130 143 181 227 257 291 330 404 488 - -<br />
Torque *6 [%] 7 to 12%<br />
Braking transistor - -<br />
DC reactor (DCR) As standard *7<br />
Keypad<br />
Applicable safety standards<br />
Enclosure (IEC60529)<br />
Cooling method<br />
Weight/Mass [lbs(kg)]<br />
93<br />
(42)<br />
137<br />
(62)<br />
141<br />
(64)<br />
Multi-function keypad as standard<br />
UL508C, C22.2No.14, EN61800-5-1:2007,EN61800-5-2:2007 SIL2,<br />
EN ISO13849-1:2008 PL=d Cat.3,EN954-1:1996 Cat.3<br />
207<br />
(94)<br />
216<br />
(98)<br />
IP00, UL open type , NEMA1(Option)<br />
284<br />
(129)<br />
309<br />
(140)<br />
Fan cooling<br />
540<br />
(245)<br />
540<br />
(245)<br />
805<br />
(365)<br />
805<br />
(365)<br />
1170<br />
(530)<br />
1170<br />
(530) - -<br />
(*1) 4-pole standard motor<br />
(*2) Rated capacity is calculated by assuming the output rated voltage as 230 V for 230 V series and 460 V for 460 V series.<br />
(*3) Output voltage cannot exceed the power supply voltage.<br />
(*4) Voltage unbalance [%] = (Max. voltage [V] - Min. voltage [V])/Three-phase average voltage [V]×67(See IEC61800-3.) If this value is 2 to 3%, use an optional AC reactor (ACR).<br />
(*5) Required when a DC reactor (DCR) is used.<br />
(*6) Without external braking resistor condition. Average braking torque obtained by use of a motor. (Varies with the efficiency of the motor.)<br />
(*7) For inverters of 100HP or above , the DC reactor is provided as separate standard component. Be sure to connect it to those inverters.<br />
11-6
11.2 Common Specifications<br />
Item Specifications Remarks<br />
Output<br />
Functional safety<br />
Control<br />
Setting range<br />
Maximum frequency<br />
Base frequency<br />
• 25 to 500 Hz CT-Vector, V/f control *1,*2)<br />
• 25 to 200 Hz (CT-Vector, Vector control w/PG*7)<br />
• 25 to 120 Hz (CT-Vector, sensorless vector control *6, Variable Torque and Constant Torque , various controls,*1 to 7)<br />
25 to 500 Hz variable setting (Variable Torque (Model <strong>EQ7</strong>-x0P5-C or above) and Constant Torque mode : 120Hz)<br />
Starting frequency 0.1 to 60.0 Hz variable setting (sensorless vector control*6/ vector control w/PG, 0.0 Hz for *7)<br />
Carrier frequency<br />
Output frequency Accuracy<br />
(Stability)<br />
Setting resolution<br />
Speed control range<br />
Speed control accuracy<br />
Stop function Response time SIL<br />
PFH Category<br />
Performance level<br />
Control method<br />
Voltage/freq. characteristic<br />
Torque boost<br />
• 0.75 to 16 kHz variable setting (CT-Vector: <strong>EQ7</strong>-x0P5-C to <strong>EQ7</strong>-x100-C, Variable Torque:<strong>EQ7</strong>-x0P5-C to <strong>EQ7</strong>-x040-C<br />
• 0.75 to 10 kHz variable setting CT-Vector : <strong>EQ7</strong>-x125-C to <strong>EQ7</strong>-x800-C, Variable Torque: <strong>EQ7</strong>-x050-C to <strong>EQ7</strong>-x100-C<br />
• 0.75 to 6 kHz variable setting CT-Vector: <strong>EQ7</strong>-x900-C to <strong>EQ7</strong>-x1000-C Variable Torque: <strong>EQ7</strong>-x125-C to <strong>EQ7</strong>-x900-C)<br />
• 0.75 to 4 kHz variable setting Variable Torque: <strong>EQ7</strong>-x1000-C<br />
• 0.75 to 2kHz variable setting Constant Torque: <strong>EQ7</strong>-x150-C to <strong>EQ7</strong>-x800-C<br />
NOTE: Frequency drops automatically to protect the inverter depending on environmental temperature and output current.<br />
(This auto drop function can be cancelled.)<br />
• Analog setting: ±0.2% of max. frequency (at 25 ±10 °C)*1<br />
• Digital setting: ±0.01% of max. frequency (at -10 to +50 °C)<br />
• Analog setting: Analog setting: 1/3000 of max. frequency (1/1500 with V2 input)<br />
• Keypad setting: 0.01Hz (99.99Hz or less), 0.1Hz (100.0 to 500Hz)<br />
• Link setting: 1/20000 of max. frequency or 0.01 Hz (fixed)<br />
• Min. speed: Base speed 1:1500 (4P 1r/min to 1500r/min) *7<br />
• Min. speed: Base speed 1:200 (4P 7.5r/min to 1500r/min) *6<br />
• Min. speed: Base speed 1:4 *7<br />
• Min. speed: Base speed 1:2 *6<br />
• Analog setting: ±0.2% of max. frequency (at 25±10 ) *7<br />
• Digital setting: ±0.01% of max. frequency (at -10 to +50 )<br />
• Analog setting: ±0.5% or below of base speed (at 25±10 ) *6<br />
• Digital setting: ±0.5% or below of base speed (at -10 to +50 )<br />
• Safe torque off<br />
• 50ms or less<br />
• SIL 2<br />
• 1.7×10^-9<br />
(STO: acc.EN61800-5-2:2007)<br />
(delay time to "Safe torque off" from turning off either terminal [EN1] or [EN2]<br />
(Safety integrity level)<br />
(Probability of a dangerous random hardware failure per hour)<br />
• 3 (EN ISO 13849-1:2008)<br />
• d (EN ISO 13849-1:2008)<br />
• V/f control *1<br />
• Dynamic torque control *2<br />
• Vector control without speed sensor *6<br />
• Vector control with speed sensor (with an optional PG interface card mounted) *7<br />
230 V<br />
serie<br />
s<br />
460 V<br />
serie<br />
s<br />
Base frequency and max. output frequency can be set to 80 to 240V in common.<br />
The AVR control ON/OFF can be selected. *1<br />
Non-linear V/f setting (3 points) Free voltage (0 to 240V) and frequency (0 to 500Hz) can be set. *1<br />
Base frequency and max. output frequency can be set to 160 to 500V in common.<br />
The AVR control ON/OFF can be selected. *1<br />
Non-linear V/f setting (3 points) Free voltage (0 to 500V) and frequency (0 to 500Hz) can be set. *1<br />
• Auto torque boost (for constant torque load) *1 to *2<br />
• <strong>Manual</strong> torque boost: Desired torque boost (0.0 to 20.0%) can be set. *1<br />
• Select application load with function code F37. (Variable torque load or constant torque load) *1<br />
Starting torque<br />
Constant Torque mode)<br />
• <strong>EQ7</strong>-x040-C or below: 200% or higher, <strong>EQ7</strong>-x050-C or above: 180% or higher/set frequency: 0.3Hz *6<br />
• <strong>EQ7</strong>-x040-C or below: 200% or higher, <strong>EQ7</strong>-x050-C or above: 180% or higher/set frequency: 0.3Hz :Base frequency<br />
50Hz, slip compensation and auto torque boost operation *1 to*2<br />
Keypad<br />
• Multi-function keypad: Start and stop with FWD, REV, and STOP keys<br />
Start/stop operation<br />
External signals (digital inputs): Forward (Reverse) rotation, stop command (capable of 3-wire operation), coast-to-stop command,<br />
external alarm, alarm reset, etc.<br />
Link operation: Operation through RS-485 or field bus (option) communications.<br />
Switching operation command: Remote/Local switching, link switching<br />
11-7
l<br />
Item Specifications Remarks<br />
Enable input(Safe Torque Off (STO))<br />
• Turning off the circuit between terminals [EN1] and [PLC] or terminals [EN2] and [PLC] stops the inverter's output transistor.<br />
(Safe Torque Off: STO)<br />
• Keypad : Can be set with UP and DOWN keys<br />
• External Volume: Can be Set with external potentiometer (1 to 5kΩ 1/2W)<br />
• Analog input:<br />
0 to ±10 VDC (±5 VDC)/0 to ±100% (Terminals [12] and [V2])<br />
0 to +10 VDC (+5 VDC)/0 to +100% (Terminals [12] and [V2])<br />
+4 to +20 mA DC/0 to 100% (Terminal [C1])<br />
0 to +20 mA DC/0 to 100% (Terminal [C1])<br />
• UP/DOWN operation: Frequency can be increased or decreased while the digital input signal is ON.<br />
• Multi-frequency : Selectable from 16 steps (step 0 to 15)<br />
• Digital signal : 16bit parallel (binary, BCD)<br />
• Link operation : Frequency can be set through RS-485 (Standard setting)<br />
"DC +1 to +5V"<br />
can be<br />
adjusted with<br />
bias and<br />
analog input<br />
gain<br />
Frequency setting<br />
• Switching frequency setting: Frequency setting can be switched (2 settings) with external signal (digital input).<br />
Remote/local switching, link switching<br />
• Auxiliary frequency setting: Terminal [12], [C1], or [V2] input can be selected respectively as an additional input.<br />
• Operation at a specified ratio: The ratio can be set by analog input signal.<br />
• Inverse operation:<br />
: The setting "0 to +10V DC/0 to 100 " can be switched to "+10 to 0V DC/0 to 100%" by external command.<br />
: The setting "4 to +20mA DC/0 to 100 " can be switched to "+2<br />
: The setting "4 to +20mA DC/0 to 100 " or "0 to +20mA DC/0 to 100 (Terminal [C1])" can be<br />
switched to "+20 to 4mA DC/0 to 100 "or "+20 to 0mA DC/0 to 100 (Terminal [C1])"<br />
• Pulse train input : Pulse input = X7 terminal, rotational direction = general terminal<br />
Complementary output: Max. 100kHz, Open collector output: Max. 30kHz<br />
•<br />
Pulse<br />
Setting<br />
train<br />
range:<br />
input<br />
From<br />
: PG<br />
0.00<br />
interface<br />
to 6000<br />
option<br />
s<br />
CW/CCW pulse, pulse + rotational direction<br />
Complementary output: Max. 100kHz, Open collector output: Max. 25kHz<br />
• Switch: The four types of accel./decel. time can be set or selected individually (switchable during operation).<br />
Contro<br />
Acceleration/deceleration time<br />
• Acceleration/deceleration pattern:<br />
Linear accel./decel., S-shape accel./decel. (weak, free, (strong)), curvilinear accel./decel. (accel./decel. max.<br />
capacity of constant output)<br />
• Deceleration mode (coast-to-stop): Coast-to-stop at the operation command OFF.<br />
• Forcible stop decel.time: Deceleration stop by the forcible stop (STOP)<br />
Frequency limiter (Upper limit and<br />
lower limit frequencies)<br />
• Both upper and lower limit frequencies can be variably set in hertz.<br />
• It is possible to choose the operation done when the set frequency drops below the lower limit from between continuous<br />
operation at lower limit frequency and operation stop.<br />
Bias frequency • Bias of set reference frequency and PID command can be independently set (setting range: 0 to ±100%).<br />
• Gain: Setting in the range from 0 to 200%<br />
Analog input<br />
• Off-set: Setting in the range from -5.0 to +5.0%<br />
• Filter: Setting in the range from 0.00s to 5.00s<br />
Jump frequency<br />
• Actuation points (3 points) and their common jump widths (0 to 30.0Hz) can be set.<br />
Jogging operation<br />
• Operation with FWD, or REV key multifunction keypad , or digital contact input ,FWD, or REV<br />
(Exclusive accel/decel time setting, exclusive frequency setting)<br />
Auto-restart after<br />
momentary power failure<br />
Current limit by hardware<br />
• Trip at power failure: The inverter trips immediately after power failure.<br />
• Trip at power recovery: Coast-to-stop at power failure and trip at power recovery<br />
• Deceleration stop: Deceleration stop at power failure, and trip after stoppage<br />
• Continuous operation: Operation is continued using the load inertia energy.<br />
• Start at the frequency selected before momentary stop: Coast-to-stop at power failure and start after power recovery at the<br />
frequency selected before momentary stop. *1 to *3<br />
• Start at starting frequency: Coast-to-stop at power failure and start at the starting frequency after power recovery. *1 to *2<br />
• Limiting the current by hardware to prevent overcurrent trip due to sharp load change or momentary power failure which<br />
cannot be controlled by software current limit (This function can be cancelled.)<br />
Operation by commercial power<br />
supply<br />
• With commercial power selection command, the inverter outputs 50/60Hz (SW50, SW60 . *1 to *2<br />
• The inverter has the commercial power supply selection sequence.<br />
Slip compensation • Compensates for decrease in speed according to the load. *1 to *2<br />
Droop control<br />
• Decrease the speed according to the load torque.<br />
Torque limiter<br />
Current control<br />
(software current limit)<br />
• Switchable between 1st or 2nd torque limit values<br />
• Torque limit, torque current limit, and power limit are set for each quadrant. *6, *7<br />
• Analog torque limit input<br />
• Automatically reduces the frequency so that the output current becomes lower than the preset operation level. *1 to *2<br />
11-8
Item Specifications Remarks<br />
PID control<br />
• PID adjuster for process control and that for dancer control<br />
• Switchable between forward and reverse operations<br />
• Low liquid level stop function (pressurized operation possible before low liquid level stop)<br />
• PID command: Keypad, analog input (from terminals [12], C1, V2), RS-485 communications<br />
• PID feedback value: Analog input (from terminals [12], C1, V2)<br />
• Alarm output (absolute value alarm, deviation alarm)<br />
• PID output limiter<br />
• Integration reset/ho<br />
Auto search for idling motor speed<br />
• Estimates the speed of the motor running under no load and starts the motor without stopping it. (<strong>Motor</strong> electric constant needs<br />
tuning: Offline tuning) *1 to * 2 and *6<br />
Automatic deceleration<br />
• If the DC link bus voltage or calculated torque exceeds the automatic deceleration level during deceleration, the<br />
inverter automatically prolongs the deceleration time to avoid overvoltage trip.<br />
(It is possible to select forcible deceleration actuated wh<br />
• If the calculated torque exceeds automatic deceleration level during constant speed operation, the inverter avoids overvoltage<br />
trip by increasing the frequency.<br />
Deceleration characteristic<br />
(improving braking ability)<br />
Automatic energy saving operation<br />
Overload prevention control<br />
• The motor loss is increased during decel. to reduce the regenerative energy in the inverter to avoid overvoltage trip. *1<br />
• The output voltage is controlled to minimize the total sum of the motor loss and inverter loss at a constant speed.<br />
• If the ambient temperature or IGBT joint temperature increases due to overload, the inverter lowers the output<br />
frequency to avoid overload.<br />
Off-line tuning<br />
• Rotary type and non-rotary type are available for tuning the motor constant.<br />
Control<br />
On-line tuning<br />
Cooling fan ON/OFF control<br />
• Performs tuning while the motor is rotating in order to cover the motor speed fluctuation caused by the temperature rise of<br />
motor.<br />
• Detects inverter internal temperature of the inverter and stops the cooling fan when the temperature is low.<br />
• The fan control signal can be output to an external device.<br />
the<br />
Setting 2nd motor<br />
• Switchable among the two motors<br />
• Code data for four kinds of specific functions can be switched (even during operation).<br />
It is possible to set the base frequency, rated current, torque boost, and electronic thermal slip compensation as the data for 1st to<br />
2nd motors.<br />
Universal DI<br />
• The status of external digital signal connected with the universal digital input terminal is transferred to the host controller.<br />
Universal DO<br />
Universal AO<br />
Speed control • Notch filter for vibration control, *7<br />
• Digital command signal from the host controller is output to the universal digital output terminal.<br />
• The analog command signal from the host controller is output to the analog output terminal.<br />
Synchronous operation • Synchronous control drives two or more shafts of a conveyer while keeping their positions in synchronization. *7<br />
Preliminary excitation<br />
• Excitation is carried out to create the motor flux before starting the motor. *6 and*7<br />
Zero speed control • The motor speed is held to zero by forcibly zeroing the speed command. *7<br />
Servo lock • Stops the inverter and holds the motor in stop position. *7<br />
Torque control *6, *7<br />
• Analog torque command input<br />
• Speed limit function is provided to prevent the motor from becoming out of control.<br />
Rotation direction control<br />
• Preventing reverse rotation<br />
• Preventing forward rotation<br />
Preventing condensation in motor<br />
• When the inverter is stopped, current is automatically supplied to the motor to keep the motor warm and avoid condensation.<br />
Battery Operation<br />
• The battery operation enables the undervoltage inverter to run the elevator with a battery for moving the cage to the nearest floor.<br />
Run/stop<br />
Speed monitor<br />
(set frequency, output frequency, motor speed, load shaft speed, line speed, and speed indication with percent) Output current [A],<br />
output voltage [V], calculated torque, input power [HP], PID reference value, PID feedback value, PID output<br />
Inverter life warning<br />
• Life judgment of the main circuit capacitor, electrolytic capacitor on printed circuit board, and cooling fan<br />
• Life warning information can be output to an external device.<br />
• Ambient temperature: 40˚C, Load rate: inverter rated current 100% (LD type: 80%)<br />
Display<br />
Cumulative running hours<br />
• Displays the inverter cumulative running hours, integrated power, cumulative motor running hours, and the number of operation<br />
start times (of each motor).<br />
• Outputs the warning when the maintenance time or the number of start times has exceeded the preset<br />
Trip mode<br />
Light-alarm<br />
Running or trip mode<br />
• Displays the cause of trip.<br />
• Shows the light-alarm display [L-AL].<br />
• Trip history: Saves and displays the cause of the last four trips (with a code).<br />
• Also saves and displays the detailed data recorded on occurrence of the last four trips.<br />
11-9
Item Specifications Remarks<br />
Overcurrent protection<br />
Short-circuit protection<br />
Ground fault protection<br />
• The inverter is stopped for protection against overcurrent.<br />
• The inverter is stopped for protection against overcurrent caused by a short circuit in the output circuit.<br />
• The inverter is stopped for protection against overcurrent caused by a grounding fault in the output circuit.<br />
(<strong>EQ7</strong>-x040-C or below).<br />
• Detecting zero-phase current of output current, the inverter is stopped for protection against overcurrent caused by a<br />
grounding fault in the output circuit. (<strong>EQ7</strong>-x050-C or above)<br />
Overvoltage protection<br />
Undervoltage protection<br />
Input phase loss protection<br />
Output phase loss detection<br />
Overheat protection<br />
Overload protection<br />
External alarm input<br />
Fuse breaking<br />
Charging circuit abnormality<br />
Brake transistor abnormality<br />
Over-speed protection *6 to *7<br />
PG breakwire *7<br />
• An excessive voltage (230V series: 400V DC, 460V series: 800V DC) in the DC link circuit is detected and the inverter is<br />
stopped.If an excessive voltage is applied by mistake, the protection can not be guaranteed.<br />
• The voltage drop (230V series: 200V DC, 460V series: 400V DC) in the DC link circuit is detected to stop the inverter.<br />
• The input phase loss is detected to shut off the inverter output. This function protects the inverter.<br />
• When the load to be connected is small or DC REACTOR is connected a phase loss is not detected.<br />
Detects breaks in inverter output wiring at the start of running and during running, stopping the inverter output.<br />
• Stop the inverter output detecting excess cooling fan temperature in case of a cooling fan fault or overload.<br />
• Stop the inverter output detecting a fault of inner agitating fan. (<strong>EQ7</strong>-2075-C, <strong>EQ7</strong>-4125-C or above)<br />
• Stop the inverter output detecting inner temperature of the inverter unit for a cooling fan fault or overload.<br />
• Protect the braking resistor from over heat by setting the braking resistor electronic thermal function.<br />
• Stop the inverter output detecting a cooling unit temperature of the inverter cooling fan and a switching element temperature<br />
calculated with the output current.<br />
• With the digital input signal (THR) opened, the inverter is stopped with an alarm.<br />
• Stop the inverter output detecting the fuse breaking of the main circuit in the inverter. (<strong>EQ7</strong>-2125-C, <strong>EQ7</strong>-4150-C or<br />
above)<br />
• Stop the inverter output detecting the charge circuit abnormality in the inverter. (<strong>EQ7</strong>-2060-C, <strong>EQ7</strong>-4125-C or above)<br />
• Stop the inverter detecting the brake transistor abnormality. (DB transistor built-in type only)<br />
• Stop the inverter when the detected speed exceeds (max. output frequency) × (d32 data or d33 data) × 120% in the case of d35<br />
= 999 *6~*7<br />
• Stop the inverter when the detected speed exceeds (max. output frequency)×(d35 data) in the case of d35≠999 *6<br />
• Stop the inverter when the detected speed exceeds 120Hz × 120% *6<br />
• Stop the inverter when the detected speed exceeds 200Hz × 120% *7<br />
• Stop the inverter detecting the PG breaking.<br />
Protective<br />
function<br />
<strong>Motor</strong> protection<br />
Electronic thermal<br />
PTC thermistor<br />
NTC thermistor<br />
NTC thermistor broken<br />
Overload early warning<br />
Memory error<br />
• The inverter is stopped with an electronic thermal function set to protect the motor. Protects the general-purpose motor inverter<br />
over all frequency range.(The running level and thermal time constant (0.5 to 75.0 min) can be set.)<br />
• A PTC thermistor input stops the inverter to protect the motor. Connect a PTC thermistor between terminal V2 and 11 and set the<br />
switch on control print board and the function code.<br />
• The NTC thermistor detects a motor temperature. Connect a NTC thermistor between terminal V2 and 11 and set the switch on<br />
control print board and the function code.<br />
• Stop the inverter output detecting the built-in motor NTC breaking.<br />
• Warning signal (OL) is output at the predetermined level before stopping the inverter with electronic thermal function.<br />
• Data is checked upon power-on and data writing to detect any fault in the memory and to stop the inverter if any.<br />
Keypad communications error<br />
detection<br />
CPU error<br />
Option communications error<br />
Option error<br />
• The keypad is used to detect a communication fault between the keypad and inverter main body during operation and to stop the<br />
inverter.<br />
• Stop the invert detecting a CPU error or LSI error caused by noise.<br />
• When each option is used, a fault of communication with the inverter main body is detected to stop the inverter.<br />
• When each option is used, the option detects a fault to stop the inverter.<br />
Operation error<br />
• STOP key priority Pressing the STOP key on the keypad or entering the digital input signal will forcibly decelerate and stop the<br />
motor even if the operation command through signal input or communication is selected. Er6 will be displayed after the stop.<br />
• Start check: If the running command is being ordered when switching the running command method from power-on, alarm reset,<br />
or the linked operation, the operation starts suddenly. This function bans running and displays Er6.<br />
Tuning error<br />
RS-485 communications error<br />
(port1)<br />
Speed deviation excess *6 to *7<br />
• Stop the inverter output when tuning failure, interruption, or any fault as a result of tuning is detected during tuning for motor<br />
constant.<br />
• When the connection port of the keypad connected via RS485 communication port to detect a communication error, The inverter<br />
is stopped and displays an error.<br />
• Stop the inverter output when the speed deviation excesses the specified value (difference between speed command and<br />
feedback).<br />
Data save error upon undervoltage<br />
• When the undervoltage protection function works, an alarm is displayed if the data is not properly saved.<br />
Positioning Control Error • Stop the inverter output when an excessive positioning deviation has occurred. *7<br />
RS-485 communications error<br />
(port2)<br />
Hardware error<br />
• Stop the inverter output detecting the communication error between the inverter main unit and a mate when the RS-485<br />
connection port of the touch panel is used to configure the network.<br />
• Stop the inverter output detecting the communication error between the inverter main unit and a mate when the RS-485<br />
connection port of the touch panel is used to configure the network..<br />
Simulation error<br />
• Simulated alarm is output by the keypad operation.<br />
EN Circuit Error • The circuit to detect EN terminal status is broken (Single fault) *8<br />
11-10
Item Specifications Remarks<br />
PID feedback breaking detection<br />
• Stop the inverter output detecting a breaking when the input current is allocated to the PID control feedback. (Select valid/invalid.)<br />
Alarm relay output (for any fault)<br />
Alarm relay output<br />
(for any fault)<br />
• The inverter outputs a relay contact signal when the inverter issues an alarm and stops the inverter output.<br />
• The alarm stop state is reset by pressing the PRG/RESET key or by the digital input signal RST.<br />
• The relay signal is output when the inverter stops upon an alarm.<br />
• PRG/RESET key is used to reset the alarm stop state.<br />
Below items can be registered as minor errors<br />
Protective function<br />
Light-alarm (warning)<br />
Alarm detection:<br />
Overheating of the heatsink (OH1), External alarm (OH2), Inverter overheat (OH3), Overheating of braking resistor (dbH), <strong>Motor</strong><br />
overload (OL1 to OL4), Optional communication error (Er4), Option error (Er5), RS-485(port1) communication error (Er8),<br />
Inconsistent speed (excessive speed deviation) (ErE), Positioning Control Error(Ero), RS-485 (port2) communication error (ErP),<br />
Warning output:<br />
DC fan lock detected, Overload early warning (for motor), heatsink overheat early warning, Life early warning (DC link bus capacitor,<br />
electrolytic capacitor on printed circuit board, cooling fan), Reference command loss detected, PID warning output, Low torque<br />
detected, Thermistor detection (PTC), Machine life (cumulative motor run time error), Machine life (number of startups error),<br />
Stall prevention<br />
Retry function<br />
Surge protection<br />
Command loss detected<br />
• Operates when the inverter output goes beyond the instantaneous overcurrent limiting level, and avoids tripping, during<br />
acceleration and constant speed operation.<br />
• When the motor is tripped and stopped, this function automatically resets the tripping state and restarts operation.<br />
• The inverter is protected against surge voltage intruding between the main circuit power line and ground.<br />
• A loss (breaking, etc.) of the frequency command is detected to output an alarm and the operation is continued at the preset<br />
frequency (set at a ratio to the frequency before detection).<br />
Momentary power failure protection<br />
• A protective function (inverter stoppage) is activated upon a momentary power failure for 15msec or longer.<br />
•If restart upon momentary power failure is selected, the inverter restarts upon recovery of the voltage within the set time.<br />
Installation location<br />
Ambient temperature<br />
• Shall be free from corrosive gases, flammable gases, oil mist, dusts, direct sunlight. (Pollution degree 2 (IEC60664-1)). Indoor use<br />
only.<br />
• Open type: -10 to +50℃ (14 to 122°F)<br />
(-10 to +40℃(14 to 104°F) when installed side-by-side without clearance (30HP or below))<br />
• NEMA1/NEMA12/NEMA4: -10 to +40℃(14 to 104°F)<br />
Environment<br />
Ambient humidity<br />
Altitude<br />
Atmospheric pressure<br />
Vibration<br />
• 5 to 95% RH (without condensation)<br />
• Lower than 3300ft (1,000m)<br />
• 86 to 106kPa<br />
• <strong>EQ7</strong>-2100-C, <strong>EQ7</strong>-4125-C or below<br />
• <strong>EQ7</strong>-2125-C, <strong>EQ7</strong>-4150-C or above<br />
• 3 mm: 2 to less than 9 Hz, 3 mm: 2 to less than 9 Hz<br />
• 9.8 m/s2: 9 to less than 20 Hz, 2 m/s2: 9 to less than 55 Hz<br />
• 2 m/s2: 20 to less than 55 Hz, 1 m/s2 : 55<br />
Storage temperature<br />
Storage humidity<br />
• -25 to +65°C (-13 to 149°F)<br />
• 5 to 95% RH (without condensation)<br />
*1 Effective function in V/f control<br />
*2 Effective function in dynamic torque vector control<br />
*6 Effective function in vector control without speed sensor<br />
*7 Effective function in vector control with speed sensor (PG option is necessary.)<br />
*8 This specification does not guarantee that all single fault cases are surely detected (EN954-1/EN ISO 13849-1, Cat.3)<br />
11-11
11.3 External Dimensions<br />
11.3.1 Standard models<br />
Inverter type<br />
<strong>EQ7</strong>-2XXX-C<br />
<strong>EQ7</strong>-4XXX-C<br />
Dimensions<br />
inch (mm)<br />
40 HP or below<br />
230 V 460 V W W1 W2 H H1 H2 D D1 D2 D3 ØA<br />
0P5 0P5 4.33<br />
(110)<br />
001 001<br />
002 002<br />
003 003<br />
005 005<br />
007 007<br />
010 010<br />
015 015<br />
020 020<br />
025 025<br />
030 030<br />
040 040<br />
050<br />
060 075<br />
- 100<br />
75<br />
100<br />
5.91<br />
(150)<br />
8.66<br />
(220)<br />
9.84<br />
(250)<br />
050 12.6<br />
060 (320)<br />
125<br />
125 -<br />
150 -<br />
- 150<br />
- 200<br />
- 250<br />
- 300<br />
- 350<br />
- 450<br />
- 500<br />
- 600<br />
- 700 34.65<br />
- 800 (880)<br />
3.78<br />
(96)<br />
5.35<br />
(136)<br />
7.72<br />
(196)<br />
8.9<br />
(226)<br />
9.45<br />
(240)<br />
13.98 10.83<br />
(355) (275)<br />
20.87 16.93<br />
(530) (430)<br />
24.8 11.42<br />
(630) (290)<br />
20.87 16.93<br />
(530) (430)<br />
26.77 11.42<br />
(680) (290)<br />
10.24<br />
(260)<br />
- 900 39.37 11.81<br />
- 1000 (1000) (300)<br />
0.24<br />
(6)<br />
0.39<br />
(10)<br />
0.59<br />
(15)<br />
10.24<br />
(260)<br />
9.69<br />
(246)<br />
9.37<br />
(238)<br />
15.75 14.88<br />
(400) (378)<br />
21.65 20.87<br />
(550) (530)<br />
24.21 23.43<br />
(615) (595)<br />
26.57 25.79<br />
(675) (655)<br />
29.13<br />
(740) 28.35<br />
29.53<br />
(720)<br />
(750)<br />
34.65 33.46<br />
(880) (850)<br />
29.13 27.95<br />
(740) (710)<br />
39.37<br />
(1000)<br />
38.19<br />
(970)<br />
55.12 53.94<br />
(1400) (1370)<br />
61.02 59.84<br />
(1550) (1520)<br />
0.28<br />
(7)<br />
0.43<br />
(11)<br />
0.47<br />
(12)<br />
0.61<br />
(15.5)<br />
5.2<br />
(132)<br />
5.71<br />
(145)<br />
7.68<br />
(195)<br />
10.04<br />
(255)<br />
10.63<br />
(270)<br />
11.22<br />
(285)<br />
14.17<br />
(360)<br />
12.4<br />
(315)<br />
14.17<br />
(360)<br />
4.45<br />
(113)<br />
4.13<br />
(105)<br />
4.53<br />
(115)<br />
5.71<br />
(145)<br />
7.09<br />
(180)<br />
5.31<br />
(135)<br />
7.09<br />
(180)<br />
17.32 10.24<br />
(440) (260)<br />
0.75<br />
(19)<br />
1.26<br />
(32)<br />
3.54<br />
(90)<br />
5.51<br />
(140)<br />
6.1<br />
(155)<br />
5.51<br />
(140)<br />
7.09<br />
(180)<br />
19.69 12.33 7.35<br />
(500) (313.2)(186.8)<br />
0.12<br />
(3)<br />
0.39<br />
(10)<br />
0.16<br />
(4)<br />
0.25<br />
(6.4)<br />
0.24<br />
(6)<br />
0.39<br />
(10)<br />
0.59<br />
(15)<br />
50 HP or above<br />
11-12
11.3.2 Panel cutting of standard model (50 HP or above)<br />
Inverter type<br />
<strong>EQ7</strong>-2_ _ _ <strong>EQ7</strong>-4_ _ _<br />
Refer to:<br />
Dimensions<br />
inch (mm)<br />
230V 460V W3 W4 W5 H3 H4 H5 B<br />
050 050<br />
- 060<br />
060 -<br />
-<br />
075<br />
100<br />
Figure A<br />
12.28<br />
(312)<br />
13.66<br />
(347)<br />
11.34<br />
(288)<br />
12.72<br />
(323)<br />
9.45<br />
(240)<br />
10.83<br />
(275)<br />
20.87<br />
(530)<br />
23.43<br />
(595)<br />
25.79<br />
(655)<br />
075<br />
- 10.83<br />
100<br />
(275) 28.35<br />
- 125<br />
(720)<br />
125<br />
-<br />
150 Figure B<br />
-<br />
150<br />
200<br />
250<br />
300<br />
Figure A<br />
20.08<br />
(510)<br />
25.98<br />
(660)<br />
20.08<br />
(510)<br />
350<br />
25.98<br />
450<br />
(660)<br />
Figure B<br />
500 26.14<br />
600<br />
(664)<br />
700<br />
34.02<br />
800<br />
(864)<br />
Figure C<br />
900 38.58<br />
1000<br />
(980)<br />
16.93<br />
(430)<br />
11.42<br />
(290)<br />
16.93<br />
(430)<br />
11.42<br />
(290)<br />
10.24<br />
(260)<br />
11.81<br />
(300)<br />
16.93<br />
(430)<br />
-<br />
16.93<br />
(430)<br />
-<br />
33.46<br />
(850)<br />
27.95<br />
(710)<br />
38.19<br />
(970)<br />
53.94<br />
(1370)<br />
59.84<br />
(1520)<br />
20.16<br />
(512)<br />
22.72<br />
(577)<br />
25.08<br />
(637)<br />
27.64<br />
(702)<br />
27.36<br />
(695)<br />
32.48<br />
(825)<br />
26.97<br />
(685)<br />
37.2<br />
(945)<br />
53.07<br />
(1348)<br />
58.66<br />
(1490)<br />
0.35<br />
(9)<br />
0.49<br />
(12.5)<br />
0.43<br />
(11)<br />
0.57<br />
(14.5)<br />
M8<br />
M12<br />
Figure A Figure B Figure C<br />
11-13
11.3.3 DC reactor (DCR)<br />
Power<br />
supply<br />
voltage<br />
230 V<br />
Inverter<br />
type<br />
<strong>EQ7</strong>-2_ _ _<br />
<strong>EQ7</strong>-4_ _ _<br />
P50<br />
Option/<br />
Standard<br />
Reactor<br />
DCR2-0.4<br />
001 DCR2-0.75<br />
002 DCR2-1.5<br />
003 DCR2-2.2<br />
005 DCR2-3.7<br />
007 DCR2-5.5<br />
010 DCR2-7.5<br />
015 Option DCR2-11<br />
020 DCR2-15<br />
025 DCR2-18.5<br />
030 DCR2-22A<br />
Refer<br />
to:<br />
Fig.A<br />
Dimensions inch (mm)<br />
W W1 D D1 D2 D3 H<br />
2.6<br />
(66)<br />
3.39<br />
(86)<br />
4.37<br />
(111)<br />
5.75<br />
(146)<br />
040 DCR2-30B Fig.B 5.98±0.12<br />
(152±3)<br />
050 DCR2-37C<br />
060 DCR2-45C<br />
075 DCR2-55C<br />
100<br />
DCR2-75C<br />
125 DCR2-90C<br />
Standard<br />
150 DCR2-110C<br />
Fig.C<br />
8.27±0.39<br />
(210±10)<br />
10.040.3<br />
9<br />
(25510)<br />
11.810.3<br />
9<br />
(30010)<br />
2.2<br />
(56)<br />
2.8<br />
(71)<br />
3.74<br />
(95)<br />
4.88<br />
(124)<br />
3.54±0.04<br />
(90±1)<br />
7.28<br />
(185)<br />
8.86<br />
(225)<br />
10.43<br />
(265)<br />
3.54<br />
(90)<br />
3.94<br />
(100)<br />
4.72<br />
(120)<br />
2.83<br />
(72)<br />
3.15<br />
(80)<br />
3.78<br />
(96)<br />
6.14±0.124.570.08<br />
(156±3) (1162)<br />
3.98±0.08<br />
(101±2)<br />
4.170.08<br />
(1062)<br />
3.78±0.08<br />
(96±2)<br />
4.170.08<br />
(1062)<br />
4.570.08<br />
(1162)<br />
4.570.16<br />
(1164)<br />
3.19<br />
(81)<br />
3.39<br />
(86)<br />
2.99<br />
(76)<br />
3.39<br />
(86)<br />
3.78<br />
(96)<br />
3.54<br />
(90)<br />
0.59<br />
(15)<br />
0.79<br />
(20)<br />
-<br />
3.7<br />
(94)<br />
0.39<br />
(10) 4.33<br />
(110)<br />
0.79<br />
(20)<br />
0.91<br />
(23)<br />
0.94<br />
(24)<br />
0.59<br />
(15)<br />
0.98<br />
(25)<br />
4.53<br />
(115)<br />
4.92<br />
(125)<br />
5.31<br />
(135)<br />
5.51<br />
(140)<br />
5.71<br />
(145)<br />
6.1<br />
(155)<br />
7.28<br />
(185)<br />
Note: 100 HP or above type comes with a DC reactor (DCR) suitable for the LD-mode use.<br />
3.07±0.2<br />
(78±5)<br />
5.12<br />
(130)<br />
5.39<br />
(137)<br />
7.09<br />
(180)<br />
5.12<br />
(130)<br />
1.99±0.04<br />
(50.5±1) 4.92<br />
2.090.04 (125)<br />
(531)<br />
1.890.04<br />
(48±1)<br />
5.71<br />
(145)<br />
2.090.04<br />
(531) 5.71<br />
(145)<br />
2.280.04<br />
(581)<br />
6.3<br />
(160)<br />
Mounting<br />
hole<br />
0.2×0.31<br />
(5.2×8)<br />
0.24×0.3<br />
5<br />
(6×9)<br />
0.28×0.4<br />
3<br />
(7×11)<br />
0.31<br />
(8)<br />
M6<br />
M8<br />
Terminal<br />
hole<br />
M4<br />
M5<br />
M6<br />
M8<br />
M10<br />
M12<br />
Mass<br />
lb (kg)<br />
0.04<br />
(1)<br />
0.06<br />
(1.4)<br />
0.06<br />
(1.6)<br />
0.07<br />
(1.8)<br />
0.1<br />
(2.6)<br />
0.14<br />
(3.6)<br />
0.15<br />
(3.8)<br />
0.17<br />
(4.3)<br />
0.23<br />
(5.9)<br />
0.29<br />
(7.4)<br />
0.3<br />
(7.5)<br />
0.47<br />
(12)<br />
0.29<br />
(7.4)<br />
0.33<br />
(8.4)<br />
0.4<br />
(10.2)<br />
25<br />
(11.4)<br />
31<br />
(14)<br />
37<br />
(17)<br />
11-14
Power<br />
supply<br />
voltage<br />
Inverter type<br />
<strong>EQ7</strong>-2_ _ _<br />
<strong>EQ7</strong>-4_ _ _<br />
F50<br />
Option/<br />
Standard<br />
Reactor<br />
DCR4-0.4<br />
001 DCR4-0.75<br />
002 DCR4-1.5<br />
003 DCR4-2.2<br />
005 DCR4-3.7<br />
007 DCR4-5.5<br />
010 DCR4-7.5<br />
015 Option DCR4-11<br />
020 DCR4-15<br />
025 DCR4-18.5<br />
030 DCR4-22A<br />
Refer<br />
to:<br />
Figure<br />
A<br />
Dimensions inch (mm)<br />
W W1 D D1 D2 D3 H<br />
2.6<br />
(66)<br />
3.39<br />
(86)<br />
4.37<br />
(111)<br />
5.75<br />
(146)<br />
2.2<br />
(56)<br />
2.8<br />
(71)<br />
3.74<br />
(95)<br />
4.88<br />
(124)<br />
3.54<br />
(90)<br />
3.94<br />
(100)<br />
4.72<br />
(120)<br />
2.83<br />
(72)<br />
3.15<br />
(80)<br />
3.78<br />
(96)<br />
0.59<br />
(15)<br />
0.79<br />
(20)<br />
0.59<br />
(15)<br />
0.79<br />
(20)<br />
0.94<br />
(24)<br />
0.59<br />
(15)<br />
0.98<br />
(25)<br />
-<br />
3.7<br />
(94)<br />
Mass<br />
Mounting Terminal<br />
lb (kg)<br />
hole hole<br />
0.2×0.31<br />
(5.2×8)<br />
4.33 0.24×0.35<br />
(110) (6×9)<br />
5.12<br />
(130)<br />
6.61<br />
(168)<br />
6.73<br />
(171)<br />
0.28×0.43<br />
(7×11)<br />
M4<br />
M5<br />
M6<br />
0.04<br />
(1)<br />
0.06<br />
(1.4)<br />
0.06<br />
(1.6)<br />
0.08<br />
(2)<br />
0.1<br />
(2.6)<br />
0.17<br />
(4.2)<br />
0.17<br />
(4.3)<br />
0.23<br />
(5.9)<br />
0.28<br />
(7.2)<br />
460 V<br />
040 DCR4-30B<br />
050 DCR4-37C<br />
060 DCR4-45C<br />
075 DCR4-55C<br />
100<br />
DCR4-75C<br />
125 DCR4-90C<br />
150 DCR4-110C<br />
200 DCR4-132C<br />
250 DCR4-160C<br />
300 DCR4-200C<br />
350 DCR4-220C<br />
Standard<br />
450 DCR4-280C<br />
500 DCR4-355C<br />
600 DCR4-400C<br />
700 DCR4-450C<br />
800 DCR4-500C<br />
Figure<br />
B<br />
Figure<br />
C<br />
Figure<br />
D<br />
900 DCR4-630C Figure<br />
E<br />
1000 DCR4-710C<br />
5.98±0.12<br />
(152±3)<br />
8.27±0.39<br />
(210±10)<br />
10.040.39<br />
(25510)<br />
11.810.39<br />
(30010)<br />
13.780.39<br />
(35010)<br />
13.780.39<br />
(35010)<br />
15.750.39<br />
(40010)<br />
3.54±0.04 6.18±0.12 4.53±0.08<br />
(90±1) (157±3) (115±2)<br />
7.28<br />
(185)<br />
8.86<br />
(225)<br />
10.43<br />
(265)<br />
12.2<br />
(310)<br />
12.2<br />
(310)<br />
13.58<br />
(345)<br />
17.520.39<br />
(44510) 15.16<br />
17.320.39 (385)<br />
(44010)<br />
17.520.39<br />
(44510)<br />
11.220.39<br />
(28510)<br />
13.390.39<br />
(34010)<br />
15.35<br />
(390)<br />
5.71<br />
(145)<br />
6.3<br />
(160)<br />
3.98±0.08<br />
(101±2)<br />
4.170.08<br />
(1062)<br />
3.78±0.08<br />
(96±2)<br />
4.170.08<br />
(1062)<br />
4.570.08<br />
(1162)<br />
4.960.16<br />
(1264)<br />
5.160.16<br />
(1314)<br />
5.550.16<br />
(1414)<br />
5.750.16<br />
(1464)<br />
6.340.16<br />
(1614)<br />
6.140.16<br />
(1564)<br />
5.710.16<br />
(1454)<br />
5.910.16<br />
(1504<br />
6.50.16<br />
(1654)<br />
7.990.16<br />
(2034)<br />
11.610.1<br />
6 (2954)<br />
3.19<br />
(81)<br />
4.33<br />
(110)<br />
4.13<br />
(105)<br />
3.39<br />
(86) 4.72<br />
2.99 (120)<br />
(76)<br />
3.39<br />
(86)<br />
3.78<br />
(96)<br />
3.54<br />
(90)<br />
4.92<br />
(125)<br />
3.07±0.2<br />
(78±5)<br />
5.12<br />
(130)<br />
1.99±0.04<br />
(50.5±1) 4.92<br />
2.090.04 (125)<br />
(531)<br />
1.890.04<br />
(48±1)<br />
5.71<br />
(145)<br />
2.090.04<br />
(531) 5.71<br />
(145)<br />
5.51<br />
(140) 2.280.04<br />
(581)<br />
6.89<br />
(175)<br />
3.94<br />
(100) 7.09<br />
4.06 (180)<br />
(103)<br />
4.45<br />
(113)<br />
4.65<br />
(118)<br />
5.24<br />
(133)<br />
5.04<br />
(128)<br />
4.61<br />
(117)<br />
4.8<br />
(122)<br />
5.39<br />
(137)<br />
6.69<br />
(170)<br />
10.04<br />
(255)<br />
7.28<br />
(185)<br />
7.87<br />
(200)<br />
8.27<br />
(210)<br />
7.87<br />
(200)<br />
8.39<br />
(213)<br />
8.46<br />
(215)<br />
8.66<br />
(220)<br />
7.68<br />
(195)<br />
8.86<br />
(225)<br />
2.480.08<br />
(632)<br />
2.580.08<br />
(65.52)<br />
2.780.08<br />
(70.52)<br />
2.870.08<br />
(732)<br />
3.170.08<br />
(80.52)<br />
3.070.04<br />
(781)<br />
2.850.04<br />
(72.51)<br />
2.950.08<br />
(752)<br />
3.250.08<br />
(82.52)<br />
6.1<br />
(155)<br />
6.3<br />
(160)<br />
7.48<br />
(190)<br />
7.48<br />
(190)<br />
8.86<br />
(225)<br />
9.65<br />
(245)<br />
4.090.08<br />
(1042) 18.9<br />
4.210.08 (480)<br />
(1072)<br />
0.31<br />
(8)<br />
M6<br />
M8<br />
M10<br />
M10<br />
M12<br />
M8<br />
M10<br />
M12<br />
M16<br />
Ø15<br />
0.51<br />
(13)<br />
0.29<br />
(7.4)<br />
0.33<br />
(8.4)<br />
0.41<br />
(10.3)<br />
27<br />
(12.4)<br />
32<br />
(14.7)<br />
41<br />
(18.4)<br />
49<br />
(22)<br />
56<br />
(25.5)<br />
65<br />
(29.5)<br />
72<br />
(32.5)<br />
79<br />
(36)<br />
104<br />
(47)<br />
115<br />
(52)<br />
132<br />
(60)<br />
154<br />
(70)<br />
165<br />
(75)<br />
209<br />
(95)<br />
Note: 100 HP or above type comes with a DC reactor (DCR) suitable for the LD-mode use.<br />
11-15
Figure A<br />
Figure B<br />
Figure C<br />
Figure D<br />
4 x<br />
Mounting<br />
hole<br />
2 x<br />
Terminal<br />
hole<br />
4 x<br />
Mounting<br />
hole<br />
2 x 4 x<br />
Terminal<br />
hole<br />
Figure E<br />
4 x<br />
Mounting hole<br />
DCR4-630C: 2 x 2 x Terminal hole<br />
DCR4-710C: 2 x 4 x Terminal hole<br />
11-16
11.3.4 Standard models with NEMA1 kit (option)<br />
Inverter type<br />
<strong>EQ7</strong>2_ _ _ /<br />
<strong>EQ7</strong>4_ _ _<br />
Dimensions<br />
inch (mm)<br />
230 V 460 V W H D<br />
0P5<br />
0P5<br />
001 001<br />
002 002<br />
003 003<br />
005 005<br />
4.45<br />
(113)<br />
5.87<br />
(149)<br />
12.2<br />
(310)<br />
5.26<br />
(133.5)<br />
5.76<br />
(146.3)<br />
5.76<br />
(146.2)<br />
40 HP or below<br />
007 007<br />
010 010<br />
015 015<br />
8.66<br />
(220)<br />
13.24<br />
(336.2)<br />
020 020<br />
025 025<br />
030 030<br />
040 ―<br />
- 040<br />
050 050<br />
060 -<br />
- 060<br />
075 -<br />
- 075<br />
100 -<br />
- 100<br />
125 -<br />
- 125<br />
150 -<br />
9.84<br />
(250)<br />
12.73<br />
(323.4)<br />
14.11<br />
(358.4)<br />
12.73<br />
(323.4)<br />
14.11<br />
(358.4)<br />
21<br />
(533.4)<br />
14.11<br />
(358.4)<br />
26.91<br />
(683.4)<br />
19.27<br />
(490)<br />
22.05<br />
(560)<br />
19.27<br />
(490)<br />
26.97<br />
(685)<br />
29.92<br />
(760)<br />
26.97<br />
(685)<br />
34.84<br />
(885)<br />
29.92<br />
(760)<br />
34.84<br />
(885)<br />
32.28<br />
(820)<br />
37.8<br />
(960)<br />
34.84<br />
(885)<br />
46.46<br />
(1180)<br />
7.68<br />
(195)<br />
10.04<br />
(255)<br />
10.63<br />
(270)<br />
10.04<br />
(255)<br />
10.63<br />
(270)<br />
11.22<br />
(285)<br />
10.63<br />
(270)<br />
14.17<br />
(360)<br />
- 150<br />
35.43 12.4<br />
- 200 21 (900) (315)<br />
- 250 (533.4) 49.61<br />
- 300<br />
(1260) 14.17<br />
- 350 26.91 51.18 (360)<br />
- 450 (683.4) (1300)<br />
- 500 26.94<br />
- 600 (684.2)<br />
- 700 34.81<br />
- 800 (884.2)<br />
- 900 39.54<br />
- 1000 (1004.2)<br />
63.78<br />
(1620) 17.39<br />
64.17 (441.6)<br />
(1630)<br />
64.57<br />
(1640)<br />
19.75<br />
(501.6)<br />
50 HP or above<br />
Note: Standard models with NEMA1 kit cannot employ external cooling.<br />
11-17
11.3.5 Keypad (TP-G1W-J1)<br />
Drill four screw holes and cut a square hole in a panel as specified below.<br />
Location of Screw Holes in Panel (viewed from back)<br />
Dimensions of Panel Cutting<br />
11-18