
Create successful ePaper yourself
Turn your PDF publications into a flip-book with our unique Google optimized e-Paper software.
DRILL TEMPLATE 92 W<br />
1. Compatibility<br />
Presently the drill template 92 W can be used for:<br />
HEAD<br />
FREEFLEX PRO 18 (X)<br />
FREEFLEX PRO 16<br />
FREEFLEX PRO 14<br />
FREEFLEX PRO 12<br />
FREEFLEX PRO 11<br />
FREEFLEX PLUS 11<br />
MOJO 18 (X)<br />
MOJO 15<br />
MOJO 12<br />
MOJO 11<br />
TYROLIA<br />
FREEFLEX PRO 18 (X)<br />
FREEFLEX PRO 17<br />
FREEFLEX PRO 15<br />
FREEFLEX PRO 11<br />
PEAK 18 (X)<br />
PEAK 15<br />
All HEAD/TYROLIA adult bindings can be used with skis<br />
140 cm and longer. The junior bindings are delivered with<br />
screws for skis shorter than 140 cm. If they are mounted<br />
on skis longer than 140 cm or on HEAD/TYROLIA plates,<br />
replace them with longer screws (see screw chart in this<br />
manual-page 30).<br />
Drill template 92 W can be used for ski widths from 59 mm<br />
to 108 mm. For other skis use the template adapter set<br />
(art. no. 162 569). With this adapter set, skis from 45 to<br />
132 mm can be mounted.<br />
NOTE: HEAD/TYROLIA offers different types of brakes.<br />
Refer to the brake overview on 56-59 for brake and<br />
binding compatibility.<br />
The Description of the brakes always includes a number<br />
like 72, 78, 90, 97, 115, and so on …. This number<br />
stands for the maximum ski width in the brake area<br />
and not in the ski center!!!<br />
2. ADJUSTING THE DRILL<br />
TEMPLATE<br />
There are two different mounting procedures for template<br />
92 W. One for FREEFLEX PRO and one for CARVE and<br />
TWO PIECE bindings.<br />
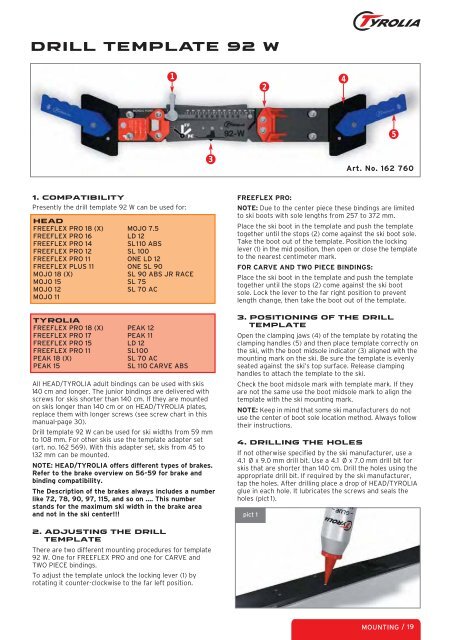
To adjust the template unlock the locking lever (1) by<br />
rotating it counter-clockwise to the far left position.<br />
1<br />
MOJO 7.5<br />
LD 12<br />
SL110 ABS<br />
SL 100<br />
ONE LD 12<br />
ONE SL 90<br />
SL 90 ABS JR RACE<br />
SL 75<br />
SL 70 AC<br />
PEAK 12<br />
PEAK 11<br />
LD 12<br />
SL100<br />
SL 70 AC<br />
SL 110 CARVE ABS<br />
3<br />
2<br />
FREEFLEX PRO:<br />
NOTE: Due to the center piece these bindings are limited<br />
to ski boots with sole lengths from 257 to 372 mm.<br />
Place the ski boot in the template and push the template<br />
together until the stops (2) come against the ski boot sole.<br />
Take the boot out of the template. Position the locking<br />
lever (1) in the mid position, then open or close the template<br />
to the nearest centimeter mark.<br />
FOR CARVE AND TWO PIECE BINDINGS:<br />
Place the ski boot in the template and push the template<br />
together until the stops (2) come against the ski boot<br />
sole. Lock the lever to the far right position to prevent<br />
length change, then take the boot out of the template.<br />
3. POSITIONING OF THE DRILL<br />
TEMPLATE<br />
Open the clamping jaws (4) of the template by rotating the<br />
clamping handles (5) and then place template correctly on<br />
the ski, with the boot midsole indicator (3) aligned with the<br />
mounting mark on the ski. Be sure the template is evenly<br />
seated against the ski’s top surface. Release clamping<br />
handles to attach the template to the ski.<br />
Check the boot midsole mark with template mark. If they<br />
are not the same use the boot midsole mark to align the<br />
template with the ski mounting mark.<br />
NOTE: Keep in mind that some ski manufacturers do not<br />
use the center of boot sole location method. Always follow<br />
their instructions.<br />
4. DRILLING THE HOLES<br />
If not otherwise specified by the ski manufacturer, use a<br />
4.1 Ø x 9.0 mm drill bit. Use a 4.1 Ø x 7.0 mm drill bit for<br />
skis that are shorter than 140 cm. Drill the holes using the<br />
appropriate drill bit. If required by the ski manufacturer,<br />
tap the holes. After drilling place a drop of HEAD/TYROLIA<br />
glue in each hole. It lubricates the screws and seals the<br />
holes (pict 1).<br />
pict 1<br />
4<br />
5<br />
Art. No. 162 760<br />
MOUNTING / 19