
You also want an ePaper? Increase the reach of your titles
YUMPU automatically turns print PDFs into web optimized ePapers that Google loves.
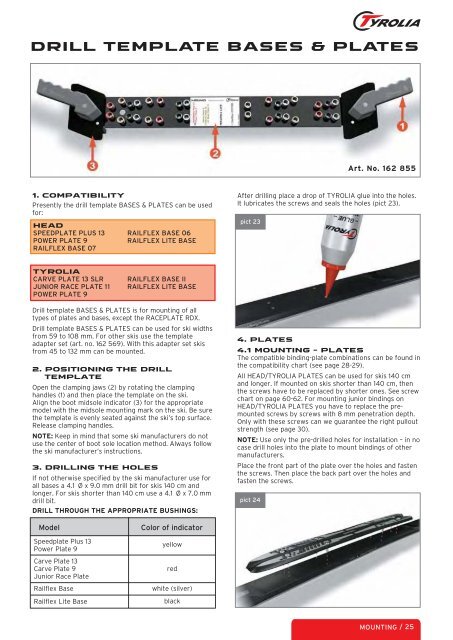
DRILL TEMPLATE BASES & PLATES<br />
1. Compatibility<br />
Presently the drill template BASES & PLATES can be used<br />
for:<br />
HEAD<br />
SPEEDPLATE PLUS 13<br />
POWER PLATE 9<br />
RAILFLEX BASE 07<br />
TYROLIA<br />
CARVE PLATE 13 SLR<br />
JUNIOR RACE PLATE 11<br />
POWER PLATE 9<br />
RAILFLEX BASE 06<br />
RAILFLEX LITE BASE<br />
RAILFLEX BASE II<br />
RAILFLEX LITE BASE<br />
Drill template BASES & PLATES is for mounting of all<br />
types of plates and bases, except the RACEPLATE RDX.<br />
Drill template BASES & PLATES can be used for ski widths<br />
from 59 to 108 mm. For other skis use the template<br />
adapter set (art. no. 162 569). With this adapter set skis<br />
from 45 to 132 mm can be mounted.<br />
2. POSITIONING THE DRILL<br />
TEMPLATE<br />
Open the clamping jaws (2) by rotating the clamping<br />
handles (1) and then place the template on the ski.<br />
Align the boot midsole indicator (3) for the appropriate<br />
model with the midsole mounting mark on the ski. Be sure<br />
the template is evenly seated against the ski’s top surface.<br />
Release clamping handles.<br />
NOTE: Keep in mind that some ski manufacturers do not<br />
use the center of boot sole location method. Always follow<br />
the ski manufacturer’s instructions.<br />
3. DRILLING THE HOLES<br />
If not otherwise specified by the ski manufacturer use for<br />
all bases a 4.1 Ø x 9.0 mm drill bit for skis 140 cm and<br />
longer. For skis shorter than 140 cm use a 4.1 Ø x 7.0 mm<br />
drill bit.<br />
DRILL THROUGH THE APPROPRIATE BUSHINGS:<br />
Model Color of indicator<br />
Speedplate Plus 13<br />
Power Plate 9<br />
Carve Plate 13<br />
Carve Plate 9<br />
Junior Race Plate<br />
Railflex Base<br />
Railflex Lite Base<br />
yellow<br />
red<br />
white (silver)<br />
black<br />
Art. No. 162 855<br />
After drilling place a drop of TYROLIA glue into the holes.<br />
It lubricates the screws and seals the holes (pict 23).<br />
pict 23<br />
4. PLATES<br />
4.1 MOUNTING - PLATES<br />
The compatible binding-plate combinations can be found in<br />
the compatibility chart (see page 28-29).<br />
All HEAD/TYROLIA PLATES can be used for skis 140 cm<br />
and longer. If mounted on skis shorter than 140 cm, then<br />
the screws have to be replaced by shorter ones. See screw<br />
chart on page 60-62. For mounting junior bindings on<br />
HEAD/TYROLIA PLATES you have to replace the premounted<br />
screws by screws with 8 mm penetration depth.<br />
Only with these screws can we guarantee the right pullout<br />
strength (see page 30).<br />
NOTE: Use only the pre-drilled holes for installation – in no<br />
case drill holes into the plate to mount bindings of other<br />
manufacturers.<br />
Place the front part of the plate over the holes and fasten<br />
the screws. Then place the back part over the holes and<br />
fasten the screws.<br />
pict 24<br />
MOUNTING / 25