
You also want an ePaper? Increase the reach of your titles
YUMPU automatically turns print PDFs into web optimized ePapers that Google loves.
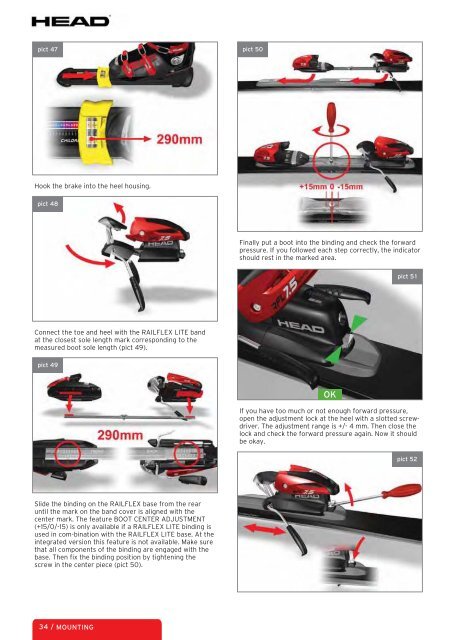
pict 47<br />
Hook the brake into the heel housing.<br />
pict 48<br />
Connect the toe and heel with the RAILFLEX LITE band<br />
at the closest sole length mark corresponding to the<br />
measured boot sole length (pict 49).<br />
pict 49<br />
Slide the binding on the RAILFLEX base from the rear<br />
until the mark on the band cover is aligned with the<br />
center mark. The feature BOOT CENTER ADJUSTMENT<br />
(+15/0/-15) is only available if a RAILFLEX LITE binding is<br />
used in com-bination with the RAILFLEX LITE base. At the<br />
integrated version this feature is not available. Make sure<br />
that all components of the binding are engaged with the<br />
base. Then fix the binding position by tightening the<br />
screw in the center piece (pict 50).<br />
34 / MOUNTING<br />
pict 50<br />
Finally put a boot into the binding and check the forward<br />
pressure. If you followed each step correctly, the indicator<br />
should rest in the marked area.<br />
OK<br />
pict 5 1<br />
If you have too much or not enough forward pressure,<br />
open the adjustment lock at the heel with a slotted screwdriver.<br />
The adjustment range is +/- 4 mm. Then close the<br />
lock and check the forward pressure again. Now it should<br />
be okay.<br />
pict 52