FHV/ FHVT HVS/ HVST - Walter Roller GmbH & Co.
FHV/ FHVT HVS/ HVST - Walter Roller GmbH & Co.
FHV/ FHVT HVS/ HVST - Walter Roller GmbH & Co.

You also want an ePaper? Increase the reach of your titles
YUMPU automatically turns print PDFs into web optimized ePapers that Google loves.
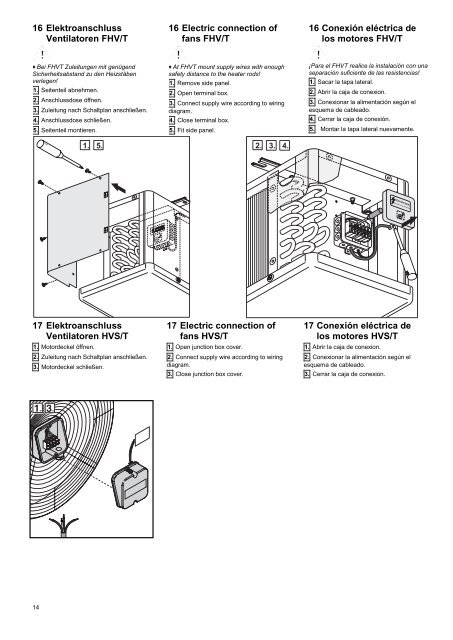
16 Elektroanschluss<br />
Ventilatoren <strong>FHV</strong>/T<br />
Bei <strong>FHV</strong>T Zuleitungen mit genügend<br />
Sicherheitsabstand zu den Heizstäben<br />
verlegen!<br />
1. Seitenteil abnehmen.<br />
2. Anschlussdose öffnen.<br />
3. Zuleitung nach Schaltplan anschließen.<br />
4. Anschlussdose schließen.<br />
5. Seitenteil montieren.<br />
17 Elektroanschluss<br />
Ventilatoren <strong>HVS</strong>/T<br />
1. Motordeckel öffnen.<br />
2. Zuleitung nach Schaltplan anschließen.<br />
3. Motordeckel schließen.<br />
14<br />
16 Electric connection of<br />
fans <strong>FHV</strong>/T<br />
At <strong>FHV</strong>T mount supply wires with enough<br />
safety distance to the heater rods!<br />
1. Remove side panel.<br />
2. Open terminal box.<br />
3. <strong>Co</strong>nnect supply wire according to wiring<br />
diagram.<br />
4. Close terminal box.<br />
5. Fit side panel.<br />
17 Electric connection of<br />
fans <strong>HVS</strong>/T<br />
1. Open junction box cover.<br />
2. <strong>Co</strong>nnect supply wire according to wiring<br />
diagram.<br />
3. Close junction box cover.<br />
16 <strong>Co</strong>nexión eléctrica de<br />
los motores <strong>FHV</strong>/T<br />
¡Para el <strong>FHV</strong>T realice la instalación con una<br />
separación suficiente de las resistencias!<br />
1. Sacar la tapa lateral.<br />
2. Abrir la caja de conexion.<br />
3. <strong>Co</strong>nexionar la alimentación según el<br />
esquema de cableado.<br />
4. Cerrar la caja de conexión.<br />
5. Montar la tapa lateral nuevamente.<br />
17 <strong>Co</strong>nexión eléctrica de<br />
los motores <strong>HVS</strong>/T<br />
1. Abrir la caja de conexion.<br />
2. <strong>Co</strong>nexionar la alimentación según el<br />
esquema de cableado.<br />
3. Cerrar la caja de conexion.