Mechanical & electrical Installation SCS200 - Nothnagel
Mechanical & electrical Installation SCS200 - Nothnagel
Mechanical & electrical Installation SCS200 - Nothnagel

Erfolgreiche ePaper selbst erstellen
Machen Sie aus Ihren PDF Publikationen ein blätterbares Flipbook mit unserer einzigartigen Google optimierten e-Paper Software.
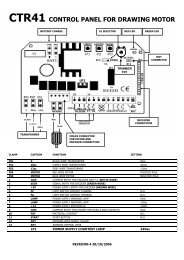
INITIAL OPERATION<br />
BASIC SETTING<br />
Proceed step by step. If you are not sure, start again at the beginning. Take sufficient time to make these settings.<br />
1. Are all components required for operation connected? Motors, photocells, safety contact strip, stop switch.<br />
2. Make sure that nobody is present in the range of the gates.<br />
3. Close the gate/s and attach motor/s. Secure motors with the “R” clip and turn the release lever towards the gate pillar. The<br />
motor/s are now locked.<br />
NOTE: If attaching the motor/s is not possible, check if spindle travel is sufficient. If not, check tensioning distance. Fittings may<br />
have to be aligned again.<br />
Now connect the mains supply (230V) to the control board.<br />
BASIC SETTING:<br />
1. Press buttons P1, P2 and P3 simultaneously for approx. 2-3 seconds until yellow LED flashes.<br />
2. Monitor the gate. Press and hold P1 for 1-2 seconds. The wing with motor 1 opens. If motor 1 closes, it is wired incorrectly and<br />
the red and blue wires of the motor cable must be inverted. (Caution: Disconnect Power!)<br />
Repeat steps 1 and 2. Leave gate/s in partially open position.<br />
NOTE: General operation – if you release the button, the gate will immediately stop. By pressing the button again the gate will<br />
move in the opposite direction until you release the button, and so on.<br />
3. Press and hold P2 for 1-2 seconds. The wing with motor 2 must open. (Do not open gate completely, only short distances.)<br />
If motor 2 closes, it is wired incorrectly and the red and blue wires of the motor cable must be inverted.<br />
(Caution: Disconnect Power!)<br />
Repeat steps 1 and 2. Leave gate/s in partially open position.<br />
NOTE: The control board is active for this manual setting mode for approx. 20 seconds. If necessary, start again by pressing P1,<br />
P2 and P3 simultaneously.<br />
Now check the following:<br />
1. During opening the front housing must not touch the gate. Stop opening several times and check. If housing touches the gate<br />
dimensions A/B must be checked and if necessary, underlay the gate pillar with flat washers in order to enlarge clearance.<br />
2. Both wings must open completely. Do not open the wings too far! If there are no stops, choose and mark a position for<br />
maximum opening.<br />
3. Both wings must close completely. (Ideally the trolley stops approx. 1 cm before the end of the spindle.) If not, correct<br />
tensioning distance(s).<br />
Wait until learn-LED goes out (20 seconds after a button was pressed).<br />
PROGRAMMING TRAVEL DISTANCES “SIMPLE I”<br />
NOTE: only with stops in OPEN and CLOSE position<br />
1. Wings must be closed<br />
2. Press P1 until wing / motor 1 starts opening (learn-LED flashes)<br />
Automatic programming starts (slow travel)<br />
Wing 1 moves to the stop in OPEN position<br />
Wing 2 moves to the stop in OPEN position<br />
Then wing 2 moves to the stop in CLOSE position.<br />
Then wing 1 moves to the stop in CLOSE position.<br />
When the learn-LED goes out the programming has finished.<br />
PROGRAMMING TRAVEL DISTANCES “SIMPLE II”<br />
NOTE: If there are no stops at the OPEN position, the wing should be stopped at opening angle of 90 degrees.<br />
1. Both wings must be closed.<br />
2. Press P1 until wing / motor 1 starts opening<br />
3. Press P1 hard when wing / motor 1 reaches OPEN position. Wing 2 starts.<br />
4. Press P1 hard when wing / motor 2 reaches OPEN position. After that wing 2 closes automatically. The wing 1<br />
closes automatically.<br />
5. The motors “learn” the CLOSE position automatically.<br />
If required, individual CLOSE positions can be programmed as well. Press P1 hard at the desired CLOSE position for<br />
each wing. When the learn-LED goes out the programming has finished.<br />
en-12