Installation, Operaton and Maintenance Manual (IOM)
Installation, Operaton and Maintenance Manual (IOM)
Installation, Operaton and Maintenance Manual (IOM)

You also want an ePaper? Increase the reach of your titles
YUMPU automatically turns print PDFs into web optimized ePapers that Google loves.
VST <strong>Installation</strong> Procedure for<br />
Phase II Coaxial EVR Balance<br />
Fuel Hoses<br />
Part Number Series: VSTA-EVR <strong>and</strong> VDV-EVR<br />
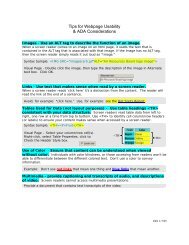
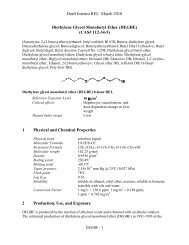
Figure 1.<br />
EVR Balance Hanging Hardware Assembly<br />
Balance<br />
Whip Hose<br />
Safety Breakaway<br />
Primary Hose<br />
Torque wrench with<br />
1-7/8” (48mm) openended<br />
attachment<br />
2-1/4” (57mm) openended<br />
wrench<br />
GENERAL INFORMATION<br />
If hanging hardware components are involved in a drive-off or incur<br />
other customer abuse, each individual component must be functionally<br />
tested prior to customer dispensing activities.<br />
INSTALLATION PREPARATION<br />
This procedure must be followed to insure leak-proof installation<br />
<strong>and</strong> operation of these hose products.<br />
1. Turn off <strong>and</strong> tag the power to the dispenser. Dispenser must be<br />
de-energized prior to service to avoid personal injury.<br />
2. Barricade work area to block vehicle access to the dispenser.<br />
3. Close the dispenser shear valve prior to removing hanging<br />
hardware (hoses, safety breakaways, <strong>and</strong> nozzles).<br />
4. Drain liquid product from the hanging hardware set into an<br />
approved container prior to replacing any hanging hardware<br />
components.<br />
5. Remove hanging hardware from the dispenser prior to<br />
making replacement component assembly connections. VST<br />
recommends connecting the whip hose to the dispenser as the<br />
last connection during the hanging hardware assembly.<br />
INSTALLATION ANd FuNcTION TESTS<br />
Vapor Systems Technologies, Inc.<br />
650 Pleasant Valley Drive<br />
Springboro, Ohio 45066 (USA)<br />
Toll Free: 1-888-878-4673<br />
Phone: 937-704-9333<br />
Fax: 937-704-9443<br />
www.vsthose.com<br />
1. Initial inspection:<br />
a. Carefully unpack hose from shipping carton.<br />
b. Inspect All O-Rings on each end of the hose to determine<br />
that they are present <strong>and</strong> undamaged.<br />
c. Inspect hose exterior for any damage.<br />
d. Inspect coupling threads for any damage.<br />
2. lightly lubricate All O-Rings on mating connections with<br />
petroleum jelly or other suitable lubricant. DO NOT USE pipe<br />
dope or thread sealant.<br />
3. Insert the hose coupling into the mating connection <strong>and</strong> h<strong>and</strong>tighten.<br />
NOTE Flow direction arrows on whip <strong>and</strong> primary hoses,<br />
where applicable, are indicated on hose coupling cuffs.<br />
4. Tighten all the hose-joint connections to 50 foot-pounds of<br />
torque. DO NOT OVER TIGHTEN. Use a torque wrench with<br />
an open-end attachment to fit the hose couplings <strong>and</strong> an<br />
open-end wrench to properly tighten coupling connections.<br />
DO NOT USE channel-locks or pliers to tighten hose joints.<br />
Proper ft./lb. torque may not be achieved with these tools.<br />
5. Purge air from the system by pumping one-tenth (1/10) to twotenths<br />
(2/10) of a gallon of fuel into an approved container.<br />
Inspect each hose-joint connection for liquid leaks <strong>and</strong> make<br />
proper adjustments if necessary.<br />
VST <strong>IOM</strong> / VR-204-A / Section 12 <strong>Installation</strong>: Phase II Coaxial EVR Balance Fuel Hoses 12-1